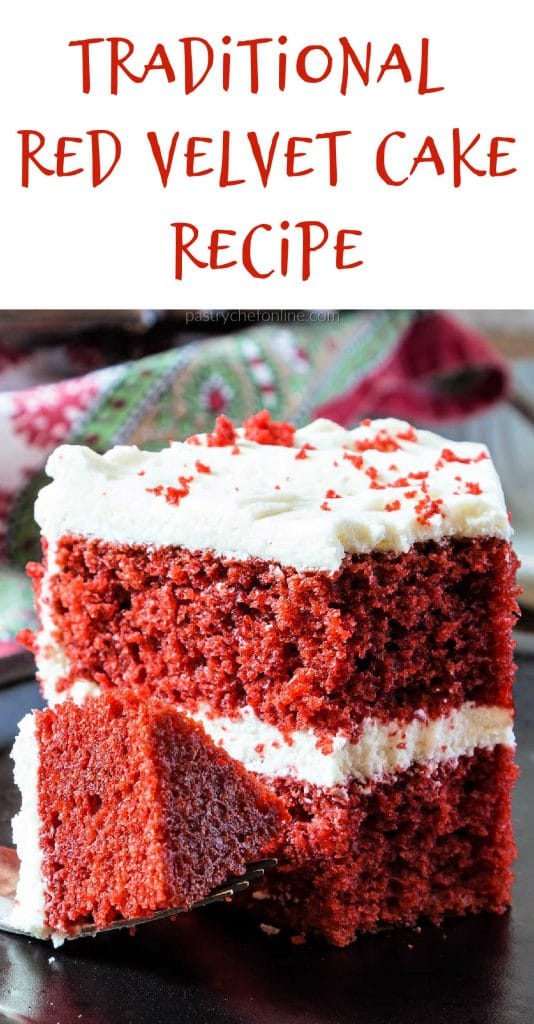
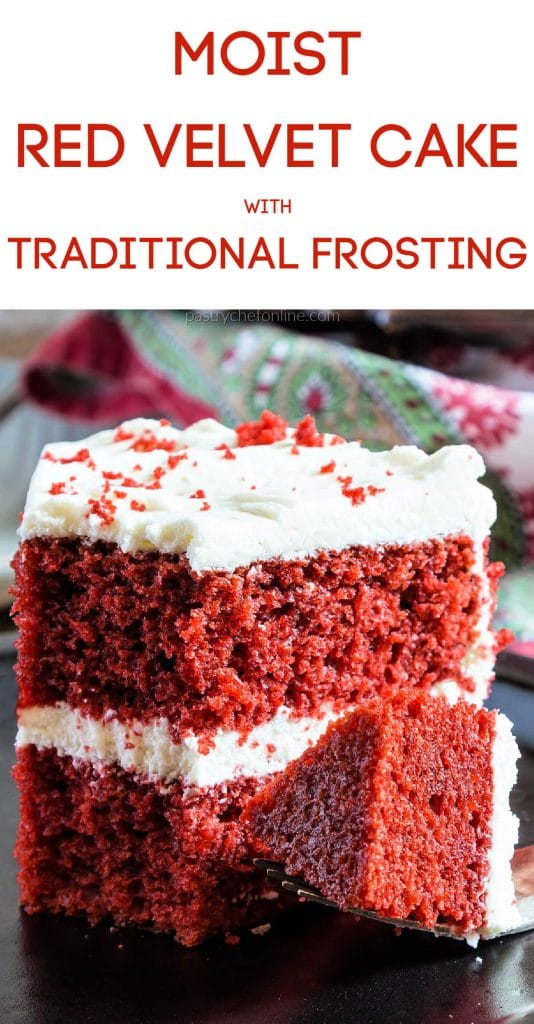

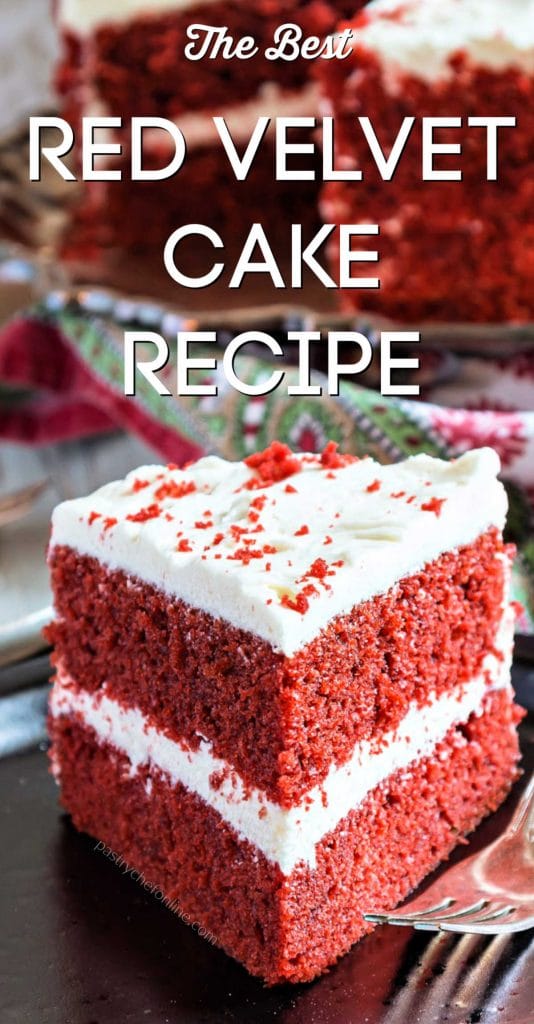
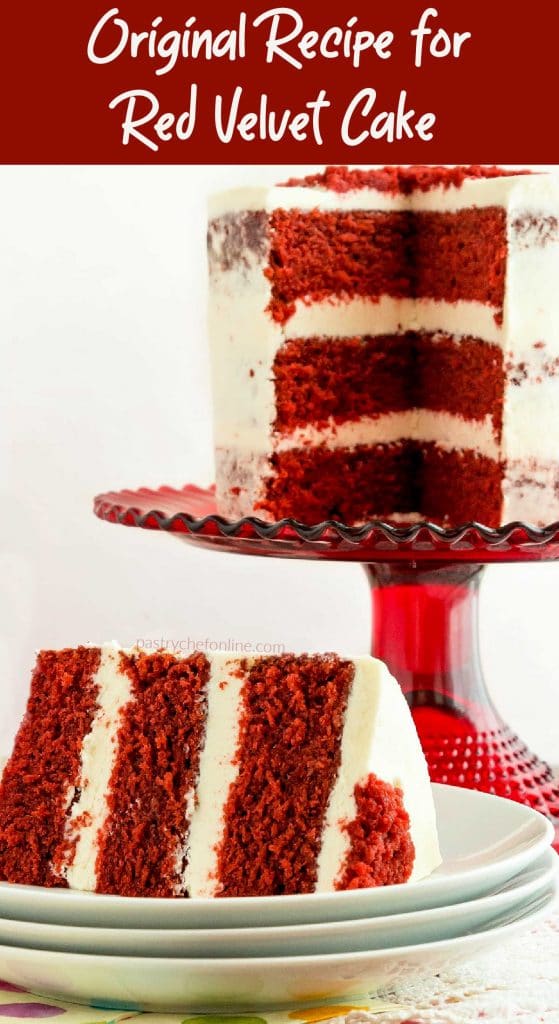
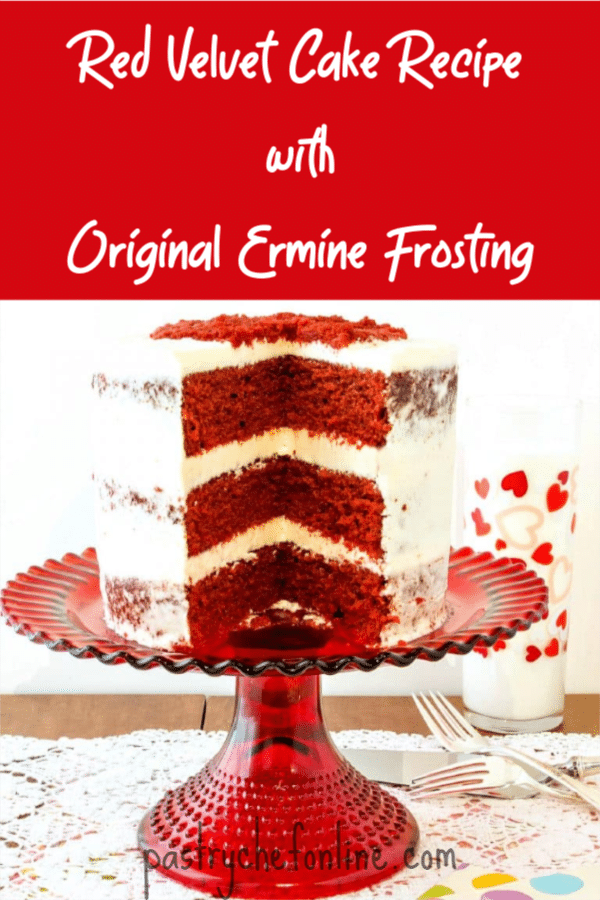
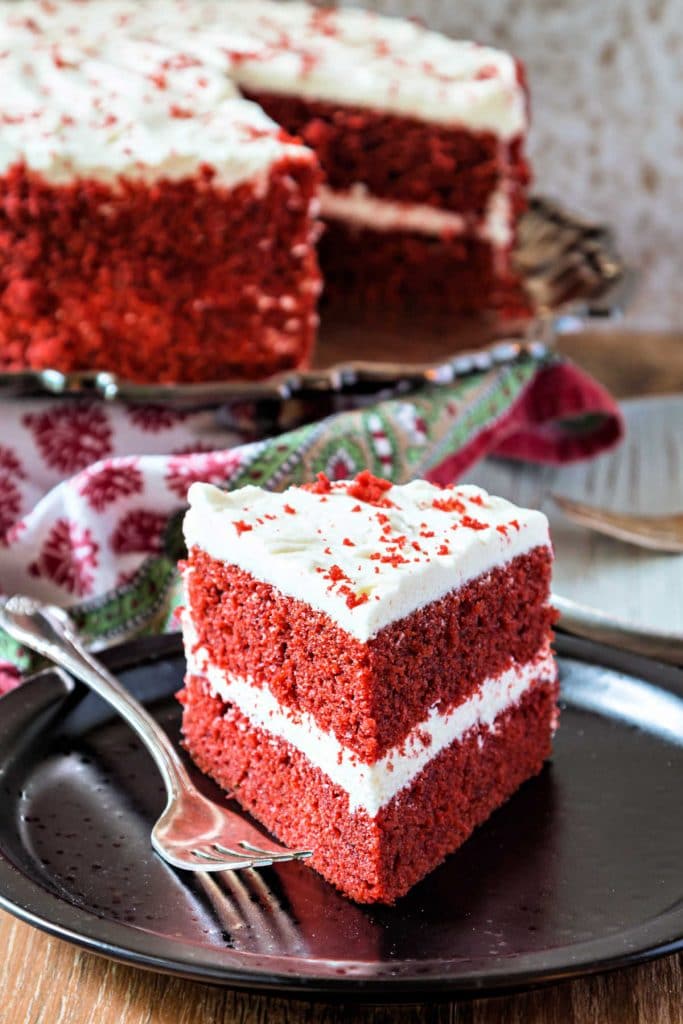
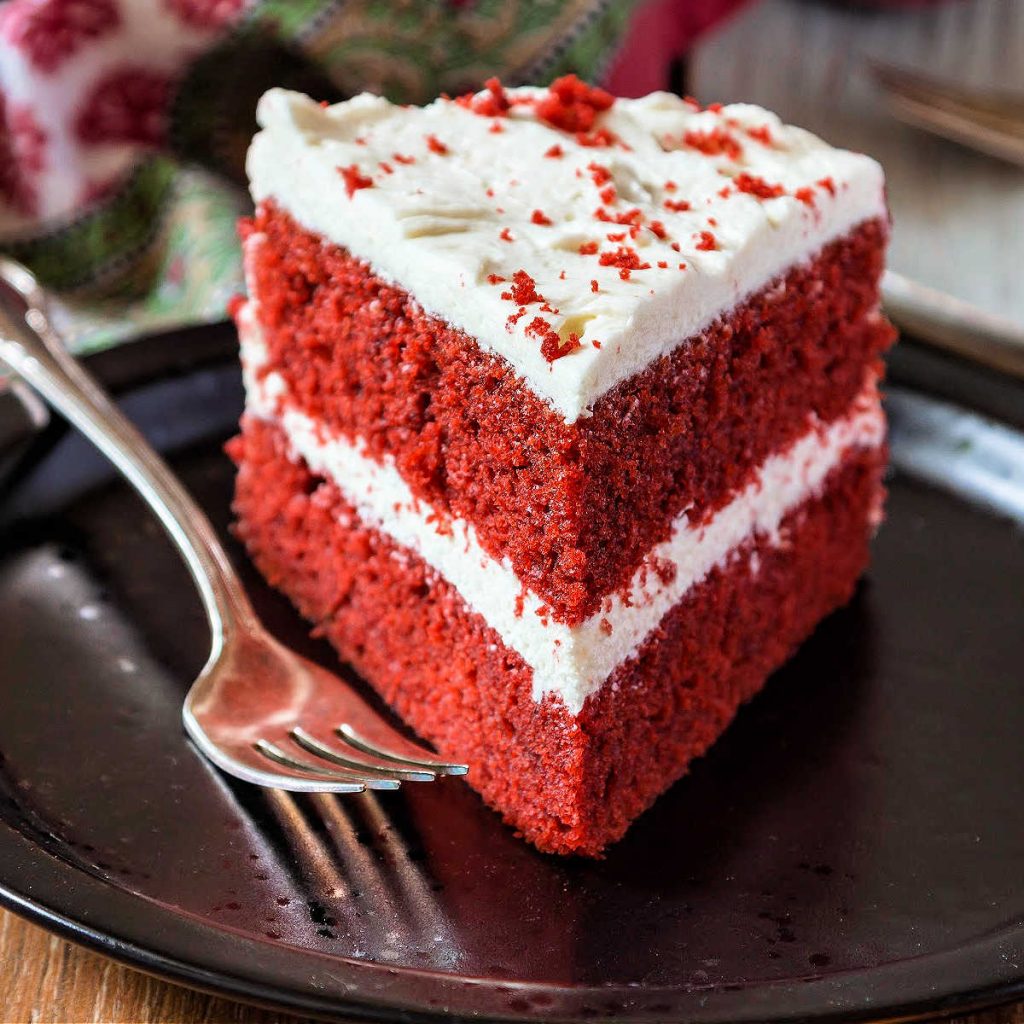
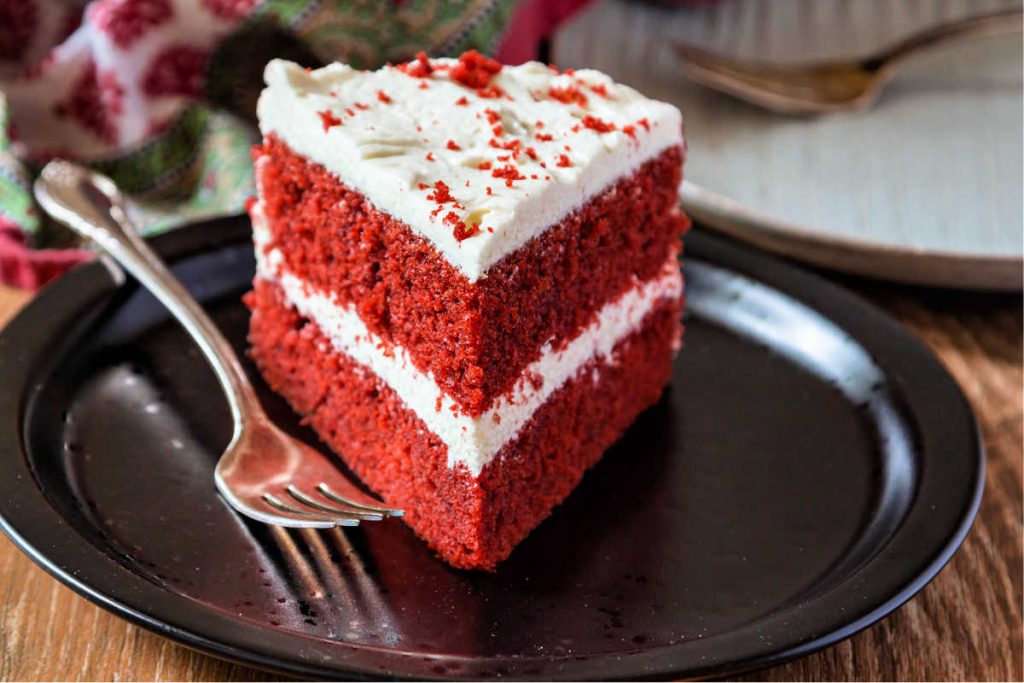
Y’all, this red velvet cake recipe is pretty spectacular, if I do say so myself. Follow the directions and you will end up with a moist, lightly chocolate, and deeply red cake.
Many sources say ermine frosting is the original frosting for red velvet, so that is what I have used here. If you’d like more in-depth information on it, you can read my post on ermine frosting. Otherwise, I have included the recipe here as well.
For ease of browsing, you can find all my cake recipes in one place.
Pastry Chef Online Participates in Affiliate Programs. If you make a purchase through one of my links, I may earn a small commission. For more information click to read my disclosure policy
Red Velvet Cake, At a Glance
✅Skill Level: Beginner
✅Skills: Old-Fashioned Leavening with vinegar and baking soda, baking
✅Type: Layer Cake
✅Number of Ingredients: 11
✅Prep Time: 20 minutes
✅Cook Time: 45 minutes
✅Yield: 8-10 slices
Related Reading: The (Arguably) Original Red Velvet Frosting
Jump Straight to the Recipe
This recipe is just amazing. Cake and frosting. I make filled cupcakes with this recipe all the time and people just go wild for it. The frosting is always a huge hit, but the cake is so fluffy and tender, it’s a perfect pairing. Thank you for this true gift of a recipe!
Reader and Red Velvet Lover JJ
Where Did Red Velvet Cake Come From?
There are two schools of thought about the origins of this festive cake.
- Some people say that the original red color was caused as a reaction between the acidic cocoa powder and buttermilk with the baking soda. So in that case, red velvet is a type of chocolate cake.
- The other school of thought is that a food coloring manufacturer, Betty Adams of Adams Extracts, developed a cake recipe using red food coloring as an integral ingredient. This recipe contained cake flour and buttermilk for tenderness and just a hint of cocoa powder to keep the red color vibrant. You can find that red velvet cake, labeled as “original,” on the Adams Extract site.
The recipe is described as being frosted with either “classic white icing,” or cream cheese frosting.
Classic white icing=ermine frosting. Huzzah!
So if you really want to make a traditional version, make sure to use Adams Extracts red food coloring in your recipe!
And of course, it is totally fine to use your favorite red food coloring.
PRO TIP: Make sure you are using liquid food coloring rather than gel coloring. You need the liquid form to make sure the cake contains enough liquid.
Is This Cake Just Chocolate Cake with Food Coloring?
The short answer to this question is no. There is not enough chocolate (in the form of cocoa) to make this a truly chocolate cake.
If you were to leave the red food coloring out, the cake would most likely be a pale beige color at best.
What Makes This Recipe Work
Traditional red velvet cake, at least as it evolved in the mid-20th century, gets its red hue from food coloring rather than from a reaction between cocoa powder and vinegar.
The recipe does contain a bit of cocoa–just enough that you can taste it without it reading as a real chocolate cake.
Buttermilk not only provides some of the acid to react with the baking soda, but it also makes for a very tender cake.
For the tightest, most velvety crumb, use cake flour. Know that you can use either cake flour or all-purpose though.
PRO TIP: Use cake flour for the finest texture and most velvety crumb.
Using brown sugar deepens the flavor of the cake. You can use light or dark brown sugar here.
For an excellent discussion of this cake (and excellent all-around recipes for desserts) check out Stella Parks’s wonderful BraveTart: Iconic American Desserts.
How to Make Your Cake
Please scroll down for the whole recipe which includes amounts. This section is for your convenience to make sure you have all the ingredients you need. If you don’t need the help, you can always jump straight to the recipe.
Ingredients
As with most cake recipes, you most likely have all the ingredients you will need already. Here’s a checklist for you:
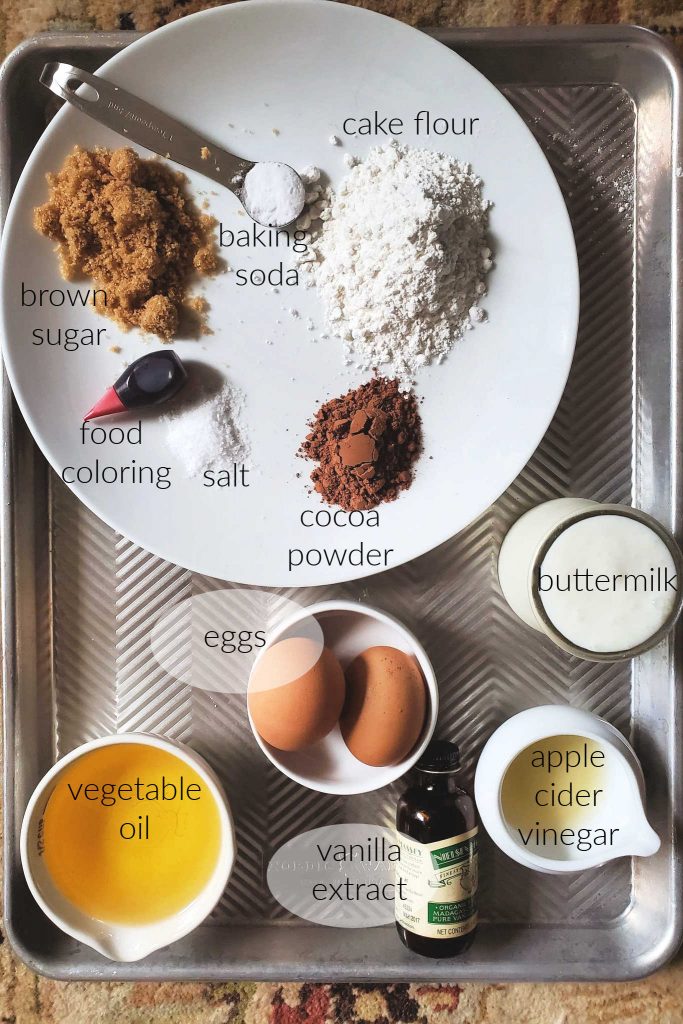
- cake flour or all purpose flour: you can use either. I have made this cake both ways, and you will get excellent results either way
- American cocoa powder (not Dutch process): provides a light chocolate flavor without overpowering the delicate flavor
- baking soda: together with the vinegar, it provides the lift. Do not substitute with baking powder, which already contains an acid
- buttermilk: I use full-fat, but non-fat or low-fat will work also. You can substitute with soured milk (1 Tablespoon lemon juice in 1 cup milk), but buttermilk lasts for a ridiculously long time in the fridge, so I always keep some on hand
- red food coloring: use liquid and not gel coloring. If you do use gel, add a tablespoon of water to make sure there’s enough liquid in your cake
- vanilla: extract or paste will work here
- brown sugar: I like using brown sugar because it adds a bit more flavor than granulated sugar, but you can also use granulated
- eggs: provide structure, protein, and emulsifiers
- vegetable oil: use a neutral vegetable oil that doesn’t have much flavor on its own
- salt: I use kosher salt in this recipe. If you have table salt or fine salt, reduce the amount by about 1/3.
- vinegar: provides the acid that creates the lift in reaction with the baking soda. You can use apple cider vinegar or plain white vinegar. I’ve used both, and since you only need a small amount, you cannot taste it in the finished cake.
Mixing Method
Old-school red velvet cake is made using a modified creaming method.
Since the fat in the cake is liquid, you cannot expect to get really good aeration from beating the oil and sugar together as you would butter and sugar.
Would you like to save this post?
All the leavening comes from the reaction of the vinegar and buttermilk and baking soda, which is why the vinegar is added last.
Once you mix in the vinegar, get the cake into the oven pronto so you don’t lose all the bubbles that the chemical reaction creates.
Here’s how to mix up your cake:
- Put the flour, baking soda, and cocoa powder in your sifter.
- Sift into a large bowl and give it a whisk to combine it evenly.
- Mix buttermilk, red food coloring, and oil
- Mix together oil, sugar, and salt with a hand mixer or
stand mixer - Add eggs, one at a time, and beat until opaque and thick
- Alternate adding dry ingredients and wet ingredients
- Mix in vinegar last, pan up your batter, and get it into the oven ASAP
In the collage above:
- Evenly divide the batter between prepared pans.
- Bake for 30-35 minutes.
- What the finished cake looks like. Note it should be just barely drawing away from the sides of the pan
- The cooled layers with the domes sliced off. I recommend using a serrated knife for this step. You can also use cake strips or bake 25F cooler than the recipe recommends. Either of these methods will allow the cakes to rise more evenly, reducing or eliminating the need to slice off cake domes.
I’ve made several different red velvet cakes before and this will be my go to from now on! It’s delicious! Definitely a keeper
Pinner Caitlyn
Cake Baking Tips & Tricks for Success
I have baked hundreds of cakes, both at home and the restaurant. Here are some tips I have picked up along the way to make baking about as fool-proof as possible.
- Heat your oven for a good 30 minutes before you start making your batter. It takes much less time for the air in the oven to reach baking temperature than it does for the oven box itself to heat up, so give it plenty of time, well after the oven tells you it’s ready.
- Bake with parchment circles in the bottoms of your pans and spray the sides well with pan spray. This almost completely eliminates sticking. You can buy cut-to-size parchment circles or cut your own from rectangular sheets
- Put your pans on a half-sheet pan to go into the oven. A standard half-sheet will hold 3 6″ pans or 2 8-9″ pans. Placing them on a sheet pan keeps your oven clean in case there is an accidental spill and also makes it much easier to rotate pans and remove them from the oven
- Allow cakes to cool in pans for 10-15 minutes before turning them out on cooling racks. Make sure you flip them so they cool right side up. If you let them cool upside down and they are domed (like most baking soda-leavened cakes are), they can crack and may fall apart
My Favorite Baking Pans for Red Velvet (and Other) Cakes
When baking cakes, whether you are making a 3-layer 6″ cake or a 2-layer 8″-9″ cake, you can’t go wrong with Fat Daddio pans.
They are lightweight, have straight, 2″ sides, are light in color to help keep your cakes from over-baking, and they last and last.
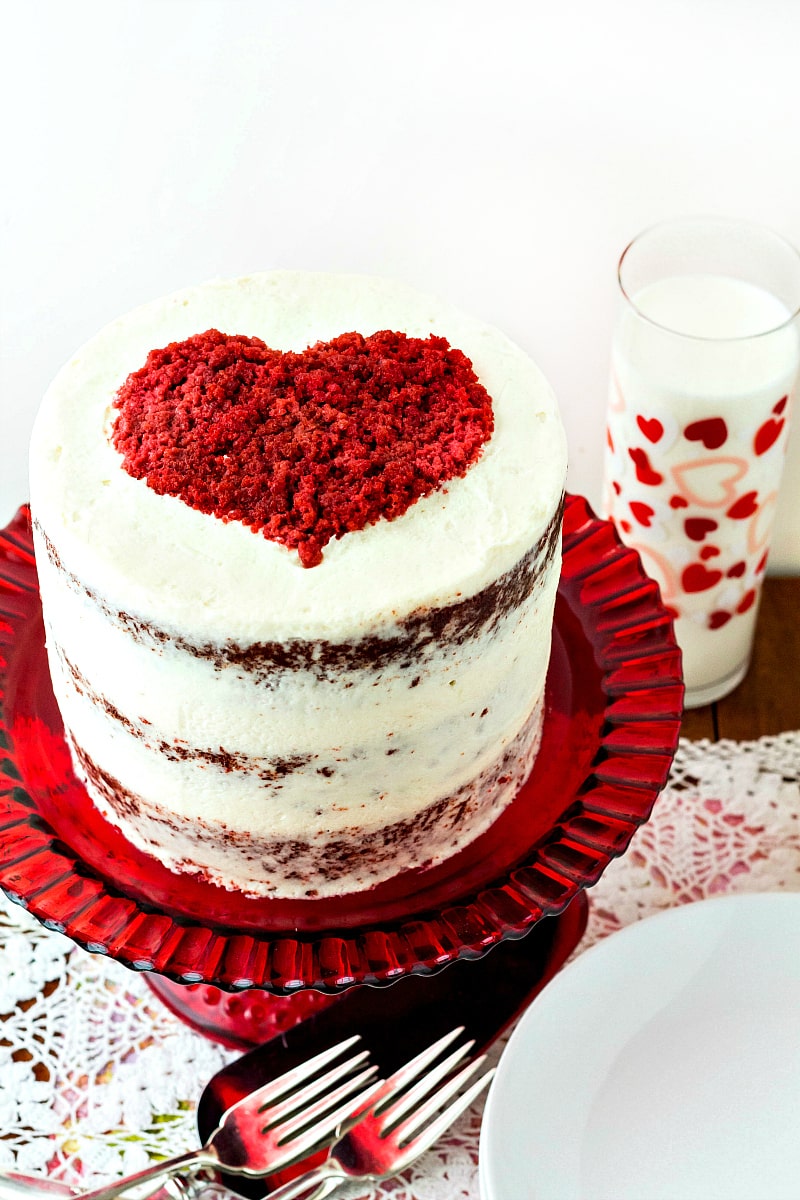
Decorating This Cake
An old-fashioned cake calls for old-fashioned decorations.
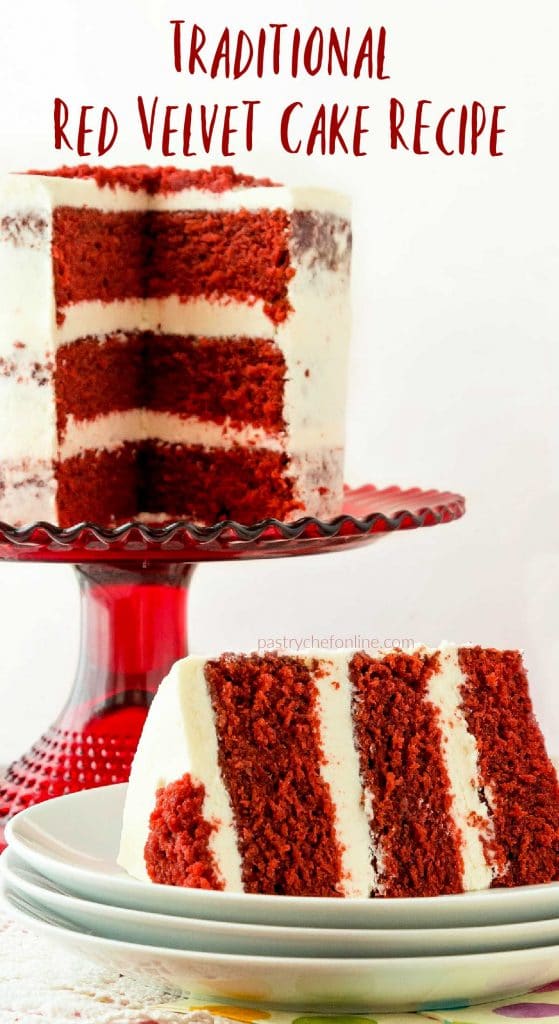
Since this cake has a beautiful, deep red crumb, crumble the cake domes and use them for decoration.
As you can see in the photos, for the 6″, 3-layer “naked cake,” I used the crumbs and a stencil to create a heart on top of the cake.
For the 8″ cake that is fully frosted, I used the crumbs to completely coat the sides and then just gave the top a light dusting of crumbs.
Red Velvet Cake Q & A
Absolutely. Just substitute your preferred liquid food coloring. You’ll need 1/2 ounce or 1 Tablespoon or either blue or green liquid food coloring.
Whether you frost with ermine frosting or cream cheese frosting, store the cake, covered, in the fridge for up to 5 days. Cut slices and, for best texture, allow them to come to room temperature before serving.
Yes. Freeze the entire cake–frosting and all–on a sheet pan until the at least the frosting is completely frozen. Then you can wrap it well in both plastic wrap and foil. It will keep for up to 3 months. Thaw in the fridge. You can also freeze individual slices in the same way, or freeze the unfrosted layers in freezer bags with as much of the air pressed out as you can. Allow them to thaw and come to room temperature before frosting.
More Delicious Cake Recipes
If you love this recipe, here are some other cakes on my site you might enjoy as well.
- Rocky Road Cake–a delicious vintage-style chocolate sheet cake reimagined with rocky road frosting. Because sometimes more is more!
- Butterscotch Sheet Cake–an easy sheet cake that doesn’t require eggs or milk topped with a rich butterscotch cream cheese frosting
- Eclair Cake–this cake is made with pate de choux as the base, homemade vanilla pudding as the filling and then gets topped with whipped cream and chocolate ganache. Think of it as a “slab eclair!”
- For red velvet flavor and color plus cheesecake, you also need to check out these red velvet cheesecake brownies
Questions?
If you have any questions about this post or recipe, I am happy to help.
Simply leave a comment here and I will get back to you soon. I also invite you to ask questions in my Facebook group, Fearless Kitchen Fun.
If your question is more pressing, please feel free to email me. I should be back in touch ASAP, as long as I’m not asleep.
A Note About Measurements
My recipes are almost all written by weight, including liquids, unless otherwise specified.
For accuracy and consistency of results, I encourage you to buy–and use–a kitchen scale.
I promise that baking and cleanup will be so much quicker and easier.
This is the scale that I recommend for home use. I have owned and used one for years.
Love This? Please Rate and Review!
It helps me and other readers so much if you take a moment to rate and review this recipe.
Your star rating and comments help others decide whether the recipe is worth making, and your feedback helps me continue improving recipes here at Pastry Chef Online.
Other lovely ways to share include pinning or posting on your favorite social media platform.
Thank you so much for taking the time!


Red Velvet Cake Recipe
Video
Equipment
Ingredients
For the Cake (for 3 6″ layers)
- 11.5 oz all purpose or cake flour (2 1/2 cups)
- 2 Tablespoons non-alkalized cocoa powder (such as Nestle or Hershey’s)
- 1 teaspoon baking soda
- 8 oz 1 cup buttermilk
- ½ oz red food coloring (liquid, not gel or paste)
- 1 teaspoon vanilla
- 10.5 oz 1 1/2 cups light brown sugar
- 10.5 oz neutral vegetable oil (1 1/2 cups)
- 1 teaspoon kosher salt
- 2 large eggs
- 1 teaspoon vinegar
For the Ermine Frosting
- 8 oz 1 cup whole milk
- 7 oz 1 cup granulated sugar
- 4 Tablespoons plus 2 teaspoons all purpose flour
- ¼ teaspoon kosher salt
- 10 oz 2 1/2 sticks unsalted butter at cool room temperature
- 1 teaspoon vanilla extract
- a couple of shakes of chocolate bitters (optional but lovely)
Instructions
For the Cake
- Set a rack in the center of your oven and preheat to 350F.
- Spray 3 6" cake pans with pan spray. Line the bottoms with parchment circles, and place them on a baking tray. Set aside.
- Sift together the flour, cocoa powder and baking soda. Set aside.
- Stir the buttermilk, food coloring, and vanilla together. Set aside.
- With a hand mixer or in the bowl of your stand mixer, cream together the sugar, oil, and salt. Add the eggs, 1 at a time, and beat until emulsified. The mixture will thicken and be opaque.
- Alternate adding the dry ingredients in three additions with the wet ingredients (buttermilk/food coloring/vanilla), mixing just until combined and scraping the bowl as necessary.
- Mix in the vinegar.
- Divide evenly among the three prepared pans and bake for 40-45 minutes, rotating the pan after about 25 minutes, until well-risen and slightly domed and the cakes spring back when pressed lightly on the tops.
- Run a thin spatula around the inside of each pan. Allow the cakes to cool in the pans for 10 minutes, then turn them out onto cake racks to cool completely.
For the Ermine Frosting
- In a medium saucepan, combine the milk, sugar, flour, and salt. Bring to a boil over medium heat, whisking constantly.
- Allow to boil for 15-30 seconds and then pour through a fine mesh strainer into a bowl. Cool to room temperature.
- Stir in the vanilla and optional bitters into the milk-sugar mixture once it has cooled.
- Cut the butter into 1-2 Tablespoon pieces. If the butter seems too firm, flatten each piece to allow them to soften faster.
- Using the whip attachment, whip the butter into the cooled base a piece at a time, waiting until one piece is completely incorporated before adding the next. Once all the butter is added, whip on high speed for a few minutes (5-7 or so) until the frosting is smooth and fluffy. If it's still not coming together in a glorious fluffy mass, refrigerate the bowl for a few minutes and then whip again.
To Assemble the Cake
- Slice the domes off the cakes and crumble into crumbs.
- Smear a dab of icing in the center of your cake plate, and place one layer on top.
- Spread evenly with about 1/2 cup frosting.
- Place another layer on top, spread another 1/2 cup of frosting on that layer and top with the final layer, bottom side up. Make sure the cake is level and the layers are stacked evenly, and then refrigerate for 30 minutes or so. This will keep your layers from sliding while you frost the rest.
- Spread a thin layer of frosting around the sides so you can see the cake through the frosting. Spread a thicker layer of frosting on the top of the cake.
- Use the cake crumbs to decorate however you'd like, either pressing them around the sides or using them in a stencil to make a design on top like I did.
Did You Make Any Changes?
Notes
FREEZING INSTRUCTIONS
If you need to freeze the cake, I would suggest freezing the layers before frosting. Ermine is really best when made and then spread on your cake immediately. Since it is a bit temperamental, I wouldn't recommend freezing the frosted cake since the texture of the frosting might suffer. Wrap each completely cooled cake layer in a double layer of plastic wrap and then foil. If you make 6" cakes like I did, you can put the double wrapped layer in a gallon sized freezer bag instead. The cake should be fine for 6-8 weeks frozen. STORING Red velvet cake will be fine at room temperature for 2-3 days. If you want to, you may refrigerate the cake. The nice thing about red velvet is, because it doesn't contain butter, it will stay soft in the fridge. Still, I'd allow slices to come to room temperature for a good 20 minutes or so before serving so that the butter in the ermine frosting has a chance to soften.Nutrition
Would you like to save this post?

Hi, y’all! I hope you’ve enjoyed this post and hopefully also learned a thing or two.
If you like my style, I invite you to sign up for my occasional newsletter, The Inbox Pastry Chef.
Expect updates on new and tasty recipes as well as a bit of behind-the-scenes action. I hope to see you there!

And there it is, gang. A beautiful, tender red cake with perfect white frosting. For my money, it doesn’t get more old school or more Southern than that.
Thanks so much for spending some time with me today.
Take care, y’all.


Join in Today!
I made your red velvet cake for a friend’s 21st birthday this weekend. It was a big hit with everyone! So moist and delicious — and I never thought I was a red velvet fan. Will definitely make it again – thank you!
Yay! I’m so happy it was a hit and very glad it changed your mind about red velvet!
are you able to substitute the oil in this recipe for butter? or another non-oil ingredient?
If you want to sub out the oil, I suggest using ghee, which is 100% fat like oil. Whole butter is only 80-82% butter fat. Enjoy the cake!
This recipe is amazing! Made wonderful cakes & cupcakes!
Just curious if there would be any way to alter the recipe to create a vanilla cake? I have tried dozens of recipes to try and find the perfect soft and moist vanilla cake and cupcakes. But I have found most recipes call for butter, and it just doesn’t turn out right, they end up denser and more greasy tasting.
If I could find a way to turn this recipe into vanilla it would be incredible also.
So glad they turned out so well! Try subbing extra liquid for the food coloring, leaving out the cocoa powder, and adding a touch more vanilla. See how it turns out, both in texture and flavor.
Could I make this recipe in a 9×13 pan?
And could I also use the recipe to make Bento size cakes (4inch)
Hey, Sarah. Yes, you can make it in a 9×13. I’ve also made both standard and mini cupcakes with this batter, so I see no reason it wouldn’t work as a 4″ cake. Enjoy!
Thank you! I just made this cake and frosting and have but in the fridge and can’t wait to try!
When making cupcakes, would you recommend the ermine frosting? Or would you recommend a buttercream or a cream cheese frosting?
Personally, I’d stick with the ermine. It is pipeable if you want swirls. And I still contend that American buttercream is too sweet and cream cheese frosting is too heavy for the delicate flavor of red velvet. But they are your cupcakes, and I know you’ll enjoy them no matter how you frost them, Sarah! 🙂
Hey Jennifer –
Have you ever covered this cake and icing with fondant? Will it hold up?
Thanks!
Hi, Paula. Not this specific cake, but fondant-over-frosting generally holds up very well. I don’t think you will have any problems with it at all.
I’d be interested in trying your red velvet cake recipe. I’m a Waffle Maker and Pre-mix distributor.
Hope you enjoy the cake!
This cake recipe is one of the best I have made in quite awhile! I am absolutely in love with it! The cake is super moist and the frosting complicates the cake perfectly. It’s a nice change from the super sweet American buttercream. I tried the cake first but I also made this recipe into cupcakes and it made about 25 cupcakes. I’m not exactly sure about the time but I think I ended up baking them for about 18-20 minutes. Thanks again for the recipe!
I’m so glad you like it! And thanks for the info on how many cupcakes the recipe makes. I’ll add that to the post to help others!
I love Red Velvet Cate.
Have you made this into cupcakes? Do you know how many it would make?
Thanks!
Hi, Jill! Yes, I’ve used this recipe to make mini cupcakes at the restaurant I worked in, so they bake up beautifully. I really don’t know how many it would make. Have 2 12-cavity pans lined and ready and then if it makes under 24, add a little water to the empty cavities before baking. If there is leftover batter, bake in a coffee mug and keep it for yourself. I wish I could be more precise for you, but I can tell you the recipe makes lovely cupcakes. Enjoy!
Hi! I just made this cake and while the flavor is great my cake is brown and not red like your picture at all 🙁 what could be the issue there?
Hi, Diana. I’m glad you like the cake. I’m honestly not sure why it’s not red. Every time I have made it, the batter is a deep red and it bakes up red, even though the very outside is browned from the oven. Once you cut into it, it’s red. Did you use the correct amount of food coloring? Or maybe you used more cocoa powder which dulled the color? I cannot say for sure since there are so many variables. I’m happy to help you troubleshoot if you can provide me with more information. I’m very glad you like the flavor, of course, but half the appeal of red velvet is the color.
Wow, this cake looks amazing. I can’t wait to make this.
It’s a good one. I hope you enjoy it!
Your recipe is a joy to read and I’ll be trying it out especially with the holidays coming up. The actual origin of the cake reaches quite far back (see article below) then appears to have become part of a commercial marketing campaign in the 1940s. I believe the version I’ve made before was James Beard’s own. I love it 😉
https://www.nytimes.com/2014/05/14/dining/red-velvet-cake-from-gimmick-to-american-classic.html
Thank you, Mike! It really is a celebratory cake. And so much history, much of it murky. But kudos to the Adams folks for making a coloring an integral part of the recipe. Evil genius, right?!
Hooray, I’m so glad everyone loved it!
This cake looks so dreamy! I am sure everyone is going to love how easy you list out the steps!
WOW! I always learn so much from your posts and recipes. What an incredible looking cake! I positively love cream cheese frosting but I’m totally intrigued with this ermine frosting. Can’t wait to taste it!
Aw, thank you, Laura. 🙂 It seems a bit weird, but I promise it is chocolate cake’s (and red velvet cake’s) best friend! Enjoy!
Wow, you are amazing! Your detailed instruction reads like a romantic novel and really gets my gastric juices running. I feel your creative, warm love for the art of gastronomy. Thanks a bunch. Not a purist—could I bake this in 9 inch pans—-don’t have room to store more baking pans that will just be used occasionally.
Oh, wow, Donna, thank you so much! Yes, you can absolutely bake this in 2 8″ or 9″ pans with no problem. You’ll just have to check it because bake time will be a bit different. I always go for an internal temp of between 195F-200F for doneness. Enjoy!
Hi Jenni! I can’t wait to try the ermine frosting! I’ve searched high and low for the “original” original recipe for red velvet cake that gets its red color from the chemical reaction, to no avail. Does a recipe even exist? I won’t eat red food color, and I don’t want to use beets. I’d be very grateful if you could find one!
Hey, Robynne! If I’m not mistaken Stella Parks has one that doesn’t contain food coloring. I totally understand your not wanting to eat it–my use of it is pretty much limited to this cake and to a drop or two in frosting on occasion. Stella’s is a deep–not brilliant–red and uses both red wine and American cocoa powder (non-alkalized) to achieve the color. I 100% trust her and her recipes. Here it is as shared by The Splendid Table, but if you don’t have her cookbook, pick up a copy of Bravetart: Iconic American Desserts. One of my favorites! https://www.splendidtable.org/recipes/red-wine-velvet-cake And do use the ermine as opposed to cream cheese frosting. Cream cheese frosting will overpower the flavor of the cake! 🙂
My Mother’s family has been making a version of this cake for three generations and I’m positive that our descendants will continue the tradition. When I was a child none of my friends had ever had a red velvet cake and once they tried it they were hooked. I was disappointed when the local bakeries started making a version that uses cream cheese frosting which is an abomination in my opinion. I have my Grandmother’s handwritten copy; the edges of the paper are worn, it’s smudged with red food coloring and frosting and is one of my most treasured possessions. There are some differences in the ingredients and method, but it’s very similar. Side note, we called this a Waldorf-Astoria cake.
Hi, Kate! Thank you so much for stopping in and for commenting. I like cream cheese frosting, but I think it overpowers the delicate flavor of red velvet. Ermine is my go to now, and it’s actually one of my favorites for any chocolate cake, period. I find it so interesting your family calls this Waldorf-Astoria cake since I think of it as a Southern invention. I’m going to have to do some more reading about the association with that hotel. Thanks again for commenting. Get that hand-written recipe framed–what a treasure!
This recipe is just amazing. Cake and frosting. I make filled cupcakes with this recipe all the time and people just go wild for it. The frosting is always a huge hit, but the cake is so fluffy and tender, it’s a perfect pairing. Thank you for this true gift of a recipe!
Wow, JJ, I am thrilled that you like it! I bet they are gorgeous as cupcakes too! Thank you so much for stopping in and for letting me know. 🙂
That frosting so so good, light, airy and yummy. follow your ingredients and use James D Taylor technique ( from comments) as l beginner to make that frosting. Thank you for recipe, next will try your red velvet recipe too and will let you know
So glad you enjoyed the frosting! What kind of cake did you put it one. It’s one of my favorites for chocolate cake!
A similar recipe to this has been passed down from my husband’s family! Instead of the whole milk for the frosting, his Granny used buttermilk. It gives it a tangy flavor similar to a cream cheese frosting. I was curious to see if anybody else used the cooked milk technique 🙂 It’s also funny that you say Adam’s red food coloring because that is always how I made her recipe when I lived down South, I can’t find it up here in MI though!
Wow, I have always heard not to boil buttermilk because it will curdle. I can imagine the tang would be lovely in ermine, though. Maybe I should experiment with using whole buttermilk. Thank you for telling me! (Sorry you can’t find Adams anymore for the authenticity factor, but I think it’s totally fine to use any other liquid red color instead)
HOLY COW IS THAT FROSTING AMAZING!!! I admit, I didn’t make the whole cake, I was simply looking for a great frosting. Well, I found it. THANK YOU so much for the great instructions and the really wonderful frosting.
I am so glad you enjoyed it, and I really appreciate your letting me know! It is one of my favorite frostings for chocolate cake. What kind of cake did you frost with it?
Red Velvet is a tradition in our family and we always did a white ermine icing but our icing is cornstarch and water simmered until thick then cool to room temperature, then powdered sugar creamed together with the room temperature butter and vanilla extract. then mix both mixtures together. I may have to try your icing recipe to see the difference. It is nice to see people out there who love the ermine icing like my family does. it drives me crazy when people think red velvet should have cream cheese icing!
Yeah, I vote to save the cream cheese frosting for carrot cake, for sure, Janine! Your version of ermine looks even more old-school than this one–that cornstarch/water is so neutral, the main flavor would be butter. I’d love it if you would send the recipe. Would like to give it a try!
I’ve tried red velvet cakes before but never made one. I’m a pretty good baker but this cake failed to rise much. There was a strange after taste as well. The frosting as expected is too buttery for my tastes. Liked the lower sweetness but that didn’t overcome the greasy residue in my mouth.
How would this work with 9″ cake pans? In my head it makes sense to just do two layers but I’m curious if it’ll mess with the baking time?
It should work just fine, Megan. The baking time will probably be similar because even though there are only 2 layers, it’s the same volume of batter just spread out in 2 larger pans. Keep an eye on them and pull them once they test “done.” Enjoy!
Such a great recipe,I tried it and the taste was super delicious,the frosting incredibly yummy ,what to say,its the first time i try this frosting recipe ,never knew it before.But I have a question,the cake had lots of huge air bubbles, what causes this issue,too many big holes? What I did wrong?
And lots of thanks for your website ,very informative and cant stop jumping from one article to another..too much love./
Hello, Nour! I’m so pleased you found me and that you love the cake. That ermine frosting is the best, right?! As to the air bubbles in your cake, it could be from over-mixing. Did you make the cake with a stand mixer, a hand mixer, or by hand? And did you use cake flour or all purpose. If you give me some specifics, I am more than happy to help you troubleshoot. 🙂
I used stand mixer ,and all purpose flour!! could this be the problem?thanks for your quick reply.
I am a total sucker for all things romantic. I love this cake and I am going to try to figure out how to make it gluten free for my family this Valentine’s day :-).
Aw, how wonderful, Sandi! I don’t think it should be too hard to make gf. Even with the flour in the icing, you can sub cornstarch with no problem. 1 caveat: boil cornstarch-thickened pudding for a full 2 minutes, stirring all the while, or it will thin out again once it cools and you refrigerate it.
Hello Jennifer, I just found your site doing research. I was raised on Red Velvet Cake. It was the “go – to” cake for every birthday and holiday in our house. I read Kathleen Klas’ comment and have just one difference. The frosting was never called “Ermine” frosting in our house. It was always called “Million Dollar” frosting. I read your recipe and it is exactly the same. I was born in the 50’s and have been cooking and baking for over 50 years. This recipe is not for beginners, if done improperly, you will taste the flour, and lumps will be prevalent. We cream the butter, sugar and vanilla with a whisk attachment and set aside. Next, we whisk together a small amount of milk and flour until there are no lumps, a paste, then we add milk, flour, milk, flour, milk, until it is all incorporated, having whisked the whole time. THEN, we put it on the heat, slowly bringing it to a boil, while whisking constantly. We would then remove from the heat, let cool and then whip together with the creamed butter sugar mixture. No sieving, no lumps, no flour taste. We would make the frosting the night before the cake, and keep it in the fridge. Just take it out before you start the cake and it will come to room temperature before the cake is ready to frost. Give this method a try and let me know. God Bless.
Great information, Reverend. Thanks for stopping in. I love that you call it “million dollar frosting.” I used to call it “angel tears” frosting before I found it was called ermine, because it’s so good it would make angels cry!
I have never tried your method before. I do prefer adding the sugar to the cooked portion since it’s sure to completely dissolve that way, but I can see how your technique would make for a very smooth, delicious frosting as well. 🙂
Dang, girl! You’ve outdone yourself! That is one gorgeous cake!
Thanks, friend! It’s hard to beat the red-white combo for eye appeal, and I really *really* love the ermine frosting!
I love your site! I learn something new every time I visit. And your wit is too much fun!!!
This cake is just gorgeous. And Ermine frosting sounds the perfect companion. Will be making this for the next birthday on the calendar!
I’d be thrilled for you to make this cake as part of a birthday celebration, Leigh! ❤️❤️❤️
My mother made this icing when I was growing up, and I am now 71. I never knew it was called ermine icing. We just liked it and always asked for this frosting when she baked cake. Always so light and fluffy…..And you had to beat it forever or so it seemed. I now make this icing and have given the recipe to my daughter. I have used other extracts to flavor it and so far have had no luck making it chocolate.
Kathleen, hi! I only learned about ermine frosting a few years ago–so smooth and amazing! I have made a chocolate version, but it was not the smoothest. Back to the drawing board, I guess! So glad you’re passing the recipe down–it’s such a good one. It really needs to make a serious comeback!
I just tried this recipe and the cake hadn’t even cooked for 20 min and it was completely burnt! What could be the reason??
It could be that your oven is not calibrated correctly. Do you have an oven thermometer? You may have to compensate by lowering the temperature if your oven runs high. And with a new recipe, it’s always best to err on the side of caution and start checking it well before the specified baking time. Also, the baking time is based on using 3 6″ pans. If your pans were larger, the batter would’ve been thinner in the pan and would have baked much more quickly. Hope this helps.
The second batch seems to have come off better. Waiting for it to cool. Still have to figure out what the problem was. Thanks for the help 🙂
I’m glad round 2 seems successful. Keep me posted!
Hi Jenni,
This recipe looks perfect for a pre-shower dinner for an almost bride whose favorite cake is red velvet. BUT, I need to make or non-dairy. Do you recommend soy or almond milk, or can I use vegan sour cream for the cake? Will the frosting work with vegan margarine?
Hi, Doris! You can use whatever non-dairy milk you prefer. You could even use coffee. It would then be red velvet mocha, but it’s an option. I’ve never used vegan sour cream, so I don’t know how it works in baked goods, but I would give it a try for sure. I’ve made ermine frosting with vegan “butter,” and it has worked out fine. If you can get the sticks, it’s firmer than the tubs. Otherwise the frosting will be a little soft. If the weather is cool where you are, it should work out just fine. Let me know how it goes and best wishes to the happy couple!
Hi Jenni. I JUST found you! What a delight to read your blog. I love your wit. I have a question.
I can taste food dyes (and a lot of other chemicals) in commercial made products. I usually don’t eat them for this reason. I’m very sad about this as Oreos and Chips Ahoy used to be my favorite store bought cookies… no more 🙁 I’ve been wanting to have Red Velvet cake without the red in it.
My question: how would you make this recipe WITHOUT the food dye? Would you just increase the buttermilk? I know it will look like tan colored dryer lent but it should still taste good, right? Of course I would be making this just for me (and people who don’t want food dyes or don’t care how it looks). Thanks!
Hi, Erin! I’m so glad you found me, and thank you for your lovely comment!
Being able to taste the dye is definitely a double edged sword. On one hand, your favorite store-bought cookies make you sad, but on the other, food dye isn’t really food anyway.
If I were you, I’d add an ounce of either buttermilk as you mentioned, water or even coffee. Because why not? If you are interested in trying a deep brown-red, naturally colored red velvet cake, find Stella Parks’s recipe from her new gorgeous baking book, BraveTart. It may be online, but it’s definitely in the book. As well, she has developed lots of copycat recipes for childhood favorites such as Oreo, Nutter Butters, Twinkies, and more.
I know there are tons of copycat recipes out there, including mine for Little Debbie Oatmeal Cream Pies (and I reference her recipe for the same in the post) but Stella is a phenomenal pastry chef and her recipes are spot on.
Enjoy the pale brown velvet cake (lol) and get to know Stella!
We are frosting people… this frosting is true to traditional red velvet, and I had to make another half batch to finish covering the cake. Thanks for the recipe!
I’m so glad you enjoyed it! Try it on Devil’s Food sometime. Heaven!
Do you recommend doubling for 3 8inch pans? I like a pretty tall cake.
I wouldn’t double it because I think that it will overfliw. At 6″ in diameter, the proportions are lovely. To get the same look at 8″,youd probably have to make another layer. Scaling cake recipes up can be dicey because the leavening doesn’t scale in the same way the rest of the ingredients do. I think I would make the recipe as written in 8″ pans and either torte each layer in half for a total of 6 layers (you’ll make up some height in frosting), or go ahead and do another round of the recipe, baking 1 8″ round and finishing up with some cupcakes.
Thank you I think I will go with the extra layer and using the remainder for cupcakes. I can’t wait to try it out…It looks beautiful,
Please share a picture when you make it–I’d love to see!
Your cake looks beautiful ! I love that cake stand too ! Can you tell me where you got it ?
Thanks, Lisa! I got it at Home Goods–it’s the perfect size for a 6″ cake. Sorry, but I don’t remember the brand.
P.S. That cake looks AMAZING.
And thanks!! Ermine loves red velvet, and vice versa. Cream cheese frosting, while delicious, is too overbearing for the delicate flavor of red velvet. So Sayeth Me. =)
I ADORE European buttercreams. I love the sweet stuff, but the less-sweet and very buttery European versions have my heart. (I’d like to kiss the German who decided to combine pastry cream and butter. COME ON!!)
The very first time I had a European buttercream (French), I made it. I had no idea what I was doing but fortunately nothing bad happened. And I have been smitten ever since!