


I love delicious, creamy shells and cheese, so I created a recipe for the site to go along with my other mac and cheese recipes like my baked mac and cheese and my goat cheese mac and cheese.
The sauce features plenty of cheese as well as sour cream and cream cheese to create a creamy and flavorful base for all the tender shell pasta.
For ease of browsing, you can find all my pasta dishes in one place. Now let’s get on with the shells and cheese!
Pastry Chef Online Participates in Affiliate Programs. If you make a purchase through one of my links, I may earn a small commission. For more information click to read my disclosure policy

As a promise to my family to make mac and cheese, I decided to try Jenni’s Creamy Baked Shells and Cheese. I could not have made a better choice! The results were perfect; a sultry, creamy sauce that enveloped the shells. The crunchy topping was a perfect complement!
Reader Carol
Recipe, At a Glance
✅Skill Level: Beginner
✅Skills: Making a Roux, cooking pasta, Making a Cheese Sauce (Mornay) , Baking
✅Type: Mac and Cheese
✅Number of Ingredients: 18 (roux, sauce, and topping)
✅Prep Time: 30 minutes
✅Cook Time: 30 minutes
✅Yield: 12 servings
Jump Straight to the Recipe
What Makes a Perfect Shells and Cheese Recipe?
One of the hallmarks of a great, creamy mac and cheese is plenty of cheesy sauce for the pasta. In fact, the sauce should seem like too much sauce, because the pasta will absorb some of the liquid as it bakes.
And reheating is another big test. Are the reheated shells and cheese dry? If so, there wasn’t enough cheese sauce.
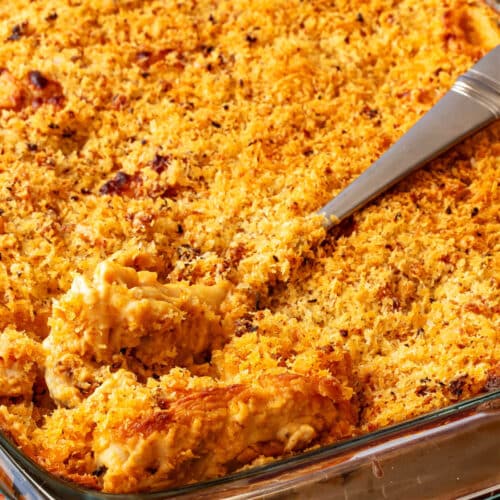
One of the first things you’ll note about this recipe is that there is an almost alarming amount of sauce to go with the shells. In the oven, the sauce thickens and concentrates as some liquid evaporates and some is absorbed by the pasta and even a little by the panko topping.
By the time you pull your creation out of the oven, you’ll have a beautifully golden brown, crispy-panko-topped shells and cheese that is the perfect texture with exactly the right amount of creamy sauce. And the sauce warms back up to its lovely creamy consistency even when reheated.
Why Use Shells?

Shells are basically little edible pockets designed to hold things. And what better thing to hold than delightfully creamy, well-seasoned, slightly tangy cheese sauce?
Exactly.
As a matter of fact, shells are so good at holding onto sauce, you want to make sure you blow on each bite really well before digging in. Otherwise an incendiary pocket of, cheese sauce might burn your mouth, which is no fun.
What is fun is letting it cool off enough so that you get a bite that contains a bunch of textures at once: crispy from the panko topping, a little chewy from the pasta itself, and creamy from the cheese sauce.
You’re welcome to use a different pasta shape, of course, but shells are very homey, do their job of holding onto sauce exceedingly well, and remind me of my mom and her macaroni casserole supreme.
Making Shells and Cheese: Ingredients and Procedure
If you are comfortable making a roux and a mornay sauce and already have the ingredients you need, you can skip down to the recipe. Otherwise, read on for the ingredient list, potential substitutions, and the procedure, including hows and whys as well as helpful tips.
Ingredients

For the Roux
Roux is the base of the sauce, giving it body and thickening it. The starch in the flour helps to keep the sauce from getting grainy, especially when reheated, so this is Insurance Policy #1 for a creamy sauce
- butter: Carries flavor and helps to toast the spices. It also coats the flour granules to moderate thickening power. You could also substitute oil or bacon fat
- flour: Thickens the sauce when cooked into a roux with the butter and spices and helps to stabilize the cheese sauce so it doesn’t break or get grainy
- smoked paprika: the predominant seasoning in this recipe. You could use hot smoked paprika if you like things a bit on the spicy side. Even consider using ground chipotle for a deeply smoky heat. If you don’t like heat, use sweet smoked paprika or just plain paprika
- ground mustard: Provides a bit of sharpness and mild heat and is also a very traditional ingredient in a British-style cheese sauce like Welsh rarebit, for example
- garlic herb seasoning: Use your favorite seasoning blend here. If you don’t want to introduce herbal notes, just add some granulated garlic (maybe 1-1 1/2 teaspoons) and a bit of onion powder and call it a day. Personally, I like Kinder’s garlic and herb seasoning, so that’s what I use
- salt: With a bechamel in general and one with so many spices, specifically, the salt is necessary to bring the spices into focus and to keep the flavors from seeming “muddy”
- pepper: I almost always use at least some black pepper in almost all my savory cooking. You can use it or leave it out depending on your preference
For the Cheese Sauce
Before adding the cheese, you’ll have a spiced bechamel sauce. After adding the cheese, you’ll have a spiced Mornay sauce. Adding the cream cheese and sour cream are not traditional for a Mornay, but they do add creaminess and volume to the sauce without adding a lot of extra liquid.
- evaporated milk: The first liquid added to the roux, evaporated milk is a bit sweeter than whole milk (but do NOT confuse it with sweetened condensed milk) and has a slightly cooked flavor. It provides our second insurance policy: starting with a minimum of liquid. The thicker and more luxurious your base, the less chance of curdling/separation when you add the cheese. Evaporated milk is a great place to start because all mac and cheese, whether you think so or not, should have a touch of sweetness. Evaporated milk is a way to get that sweetness without adding sugar
- half and half: Adds more volume to the sauce as well as some richness. Yes, there’s cheese in it, but still, you might as well go for it without going full-on heavy cream
- whole milk: Adds a bit more volume and liquid, which is generally not a great thing for cheese sauce. At the same time, you’ll reduce the sauce on the stove before adding the cheese, and we do need the volume to ensure lots of creamy goodness per bite
- extra sharp cheddar cheese: This is my favorite cheese for mac and cheese. It doesn’t melt quite as smoothly as a medium cheddar, but that’s what all our insurance policies are for, and the sharp flavor is the way to go as a foil for all the creaminess. If you’d like, feel free to substitute any good melting cheese here
- Monterey jack cheese: Jack cheese doesn’t add a ton of flavor, but it does add volume and melts into a very smooth, delicious goo that is creamy and not stringy. And we want the maximum amount of cheesy goo per bite. Sub Colby jack or a mild-to-medium cheddar.
- cream cheese: Adds subtle tang and super creamy goodness
- sour cream: Gives us more tang and volume. It’s a great addition to shells and cheese. Substitute Greek yogurt, if desired
- medium shells: don’t forget the pasta! You’ll need a full pound
For the Panko Topping
Would you like to save this post?
You can choose to leave off the panko topping and serve the shells and cheese straight from the pot as a stovetop version. I like the contrast of a crispy layer on top of a creamy one. If you are into textural contrast, make the topping. You can use anything crispy, really, from crushed cheese crackers to potato chips, but panko makes a nice, neutral base for the topping and is inherently crispy.
- panko: By nature, panko is light, airy, and crisp, so it makes the perfect main ingredient for a contrasting texture to the creamy shells and cheese sauce. Other options include crackers, cheese crackers, potato chips, etc
- Parmesan cheese: Adds a sharp, nutty element to the topping. You could also go with Gruyere for a more mellow nuttiness or use more extra sharp cheddar to carry that theme through the whole dish
- melted butter: To carry flavor and assist in browning. If starting with crushed potato chips, you’ll need less butter since the chips are already on the oily side
- garlic herb seasoning: Again, to carry the flavors from the cheese sauce into the topping. You can substitute with a bit of garlic powder or any of your favorite seasonings. Smoked paprika might be another nice addition
- salt: Just a small pinch, because panko is very bland
Procedure
Here’s how to make the shells and cheese:
- Make the spiced roux: Melt the butter, then add the flour and all the spices. This will not be a runny roux. It’s very thick and chunky. Cook, stirring, until the roux is sizzling, about 2 minutes
- Make the bechamel: Slowly pour in the evaporated milk, whisking well. Then whisk in the half and half and milk. Make sure your milks are all at room temperature (evaporated) or chilled (half and half and whole milk). Adding cold liquids to a hot roux help to keep the roux from getting clumpy
- Turn it into a cheese sauce (Mornay): Once you have your bechamel sauce, melt in shredded cheese, a big handful at a time, moving the pot on and off a low burner to allow the cheese to incorporate slowly. Only heat at this point when the cheese seems to have stopped melting. Once all the shredded cheese is mixed in, thoroughly whisk in the cream cheese followed by the sour cream
- Add the pasta: Add the pasta straight from the boiling water, along with any starchy water clinging to it. I scoop mine out and into the cheese sauce using a spider. Once I figured this out, no more carrying heavy vats of boiling water and pasta over to the sink and colander! Once you get the pasta into the sauce, turn the heat up to high and bring everything to a boil, stirring constantly. The roux, the evaporated milk, the pasta water, and to a certain extent, the cream cheese all work together to keep the sauce silky smooth, even at a boil. Boil for 2-3 minutes, until the sauce thickens up again after being thinned by the starchy water
- Top with panko and bake: Pour your cheesy shells into a 9″ x 13″ baking dish and spread it out evenly. Top with the panko and bake at 375F for 30 minutes until bubbling all around the edges and golden brown on top. Finish under the broiler for 1-2 minutes if you want to make sure the panko layer is super crisp
Insurance Against Grainy or Clumpy Cheese Sauce
If you just want to follow the recipe, you can jump straight to it. Otherwise, read the following Sciencey bits to learn the different methods employed in this recipe to keep the sauce super creamy and magical, even when reheated.

To recap and point out, we’ve utilized several ways to keep the cheese sauce creamy and beautiful, even when at a full boil:
- Starting with a roux: The cooked butter/flour mixture that is a roux introduces starch at the very beginning of cooking. The starch impedes the coagulation of proteins, helping to keep the cheese from getting clumpy. If you are gluten-free, use cornstarch to make your roux
- Using evaporated milk as part of the dairy: Evaporated milk is slowly cooked to reduce water content by about 60%, so using it to start the bechamel allows you to thin the roux out a bit without introducing too much water
- Reducing the bechamel: It’s a balancing act to add enough liquid to a cheese sauce to increase the volume and keep it from being too stodgy without using so many watery ingredients that your cheese gets grainy. Keeping the bechamel at a low boil for a few minutes helps to reduce the liquid in the sauce, making it less likely that your cheese will get grainy. Balance, achieved!
- Adding the cheese slowly: Once you have a lovely, thick bechamel sauce, you want to keep it as stable as you can by introducing the cheese slowly, allowing it to slowly melt into the base as you whisk. Moderating the heat here is key, along with adding the cheese gradually, in about 6-8 additions rather than dumping it all in at once. It’s rather similar to adding one egg at a time to a cake batter rather than dumping all the eggs in at once and ending up with a thin batter
- Using cream cheese in the cheese sauce: Cream cheese is a miracle of American food technology. It’s one of the few cheeses that stays creamy even in a boiling sauce. Adding cream cheese is sort of a no-brainer, especially if you’re trying to achieve a creamy texture. It’s in the name: cream cheese
- Harnessing the power of starchy water: Adding starchy water to the cheese sauce adds another layer of protection against curdling. We finally bring the sauce to a boil when introducing the pasta and starchy water, and the pasta starch in conjunction with the starch from our roux–remember our roux?–allows us to bring our now-high volume sauce back to a boil without anything bad happening.
- Reducing the shells and cheese before baking: This last piece of the puzzle is why we want to use pasta water in the first place. Just stirring in well-drained pasta into a cheese sauce isn’t enough. You need to bring your mixture back to a boil and further reduce the sauce so it’s roughly the same texture and consistency as it was before adding the water. It’s the same way I finish making my penne in vodka sauce: add pasta and pasta water and then boil to reduce it to a thick sauce that clings to every noodle
- Baking: Baking the shells and cheese, either with or without panko topping, not only browns the top, but it also further concentrates the sauce as even more liquid evaporates from it in the heat of the oven. What you end up with is an intense sauce filling the shells and coating them with cheesy, creamy perfection
Jenni Says: If you can bring yourself to do it, boil your shells in a smaller amount of water than you normally would. This ensures you get the maximum amount of starch in the water that clings to your shells when you scoop them into the sauce. Another insurance policy!
Avoid Acidic Ingredients
Another factor to consider when making a creamy, stable cheese sauce is to avoid adding acids, even a little bit. While a tiny amount of hot sauce (vinegar) or mustard (vinegar again!) might not make a difference, if you are a little too exuberant adding it, the acid could absolutely mess with the texture of your sauce.
That’s why I call for dry mustard instead of “squeeze mustard.” If you want a spicier mac and cheese, use pepper flake, a shake of cayenne, or another ground spicy spice. And if you simply need to use some Frank’s because you put that 5h!t on everything, add it at the table!
Reheating Tip
Jenni Says: To make sure your shells and cheese remain every bit as creamy (if a bit more concentrated) upon reheating, reheat in the microwave in fairly thin slices on medium power. Slicing the servings helps it reheat evenly while heating more slowly gives you more insurance that your sauce won’t break.
Questions?
If you have any questions about this post or recipe, I am happy to help.
Simply leave a comment here and I will get back to you soon. I also invite you to ask questions in my Facebook group, Fearless Kitchen Fun.
If your question is more pressing, please feel free to email me. I should be back in touch ASAP, as long as I’m not asleep.
A Note About Measurements
My recipes are almost all written by weight, including liquids, unless otherwise specified.
For accuracy and consistency of results, I encourage you to buy–and use–a kitchen scale.
I promise that baking and cleanup will be so much quicker and easier.
This is the scale that I recommend for home use. I have owned and used one for years.
[O]h my gosh! [T]his Shells & Cheese (aka mac & cheese) is delicious!
Reader Jo-Anne
Love These Shells and Cheese? Please Rate and Review. Thanks!
It helps me and other readers so much if you take a moment to rate and review this recipe.
Your star rating and comments help others decide whether the recipe is worth making, and your feedback helps me continue improving recipes here at Pastry Chef Online.
Other lovely ways to share include pinning or posting on your favorite social media platform.
Thank you so much for taking the time!

Creamy Baked Shells and Cheese Recipe
Video
Ingredients
For the Roux
- 2 oz butter 4 Tablespoons
- 4 Tablespoons flour
- 1 ½ Tablespoons sweet smoked paprika 4 1/2 teaspoons
- 1 Tablespoon ground mustard
- 2 teaspoons garlic and herb seasoning I use Kinder's
- 1 ½ teaspoons kosher salt I use Morton's. If using a different salt, weigh out 7.5 grams
- ½ teaspoon black pepper
For the Cheese Sauce
- 12 oz evaporated milk 1 can
- 12 oz half and half 1 1/2 cups
- 8 oz whole milk 1 cup
- 16 oz extra sharp cheddar cheese 1 pound, shredded at home with a box grater or food processor
- 8 oz Monterey jack cheese 1/2 pound, shredded at home with a box grater or food processor
- 8 oz full fat sour cream about a cup
- 4 oz cream cheese 1/2 block
To Finish
- 1 pound medium shells or your favorite short pasta shape
For the Panko topping
- 4 ½ oz panko 1 1/2 cups
- 3 Tablespoons butter melted
- 1 oz Parmesan cheese finely grated. Sub Gruyere or more cheddar
- 1 teaspoon garlic and herb seasoning I use Kinder's
- pinch kosher salt
Instructions
Mise en Place to Make Your Life Easier
- Measure the flour and all the spices into a small bowl or plate. Shred the cheddar cheese and Monterey jack cheese by hand or using the grating disc on your food processor. Pour half and half and whole milk into a liquid measure or pitcher for easy pouring.
For the Roux
- In a wide saute pan or Dutch oven, melt the butter until just beginning to bubble.
- Add the flour and spices and whisk and cook for about 2 minutes or until the mixture is sizzling. NOTE: The roux will be very thick and chunky at this point. Worry not. Just cook over medium-to-medium-high heat until the spices are a little toasted and the roux is sizzling.
For the Cheese Sauce
- Slowly pour in the evaporated milk, about 1/3 at a time, whisking it in until the sauce is very thick with no more "chunks" of roux remaining.
- Pour in the half and half and milk and bring to a boil. Reduce the heat and keep at a very low boil/high simmer for about 5-7 minutes, or until slightly reduced. What you've made up to this point is a seasoned bechamel sauce.
- Bring a 4-5 quart saucepan of water to a boil. Season it fairly liberally with salt, and then add the pasta. Cook for 1 minute fewer than called for on the package. I'm telling you to do this now rather than at some other point, because you want to put the cooked, hot pasta immediately into the cheese sauce rather than draining and rinsing it.
- Preheat your oven to 375F and put a half sheet pan or a large sheet of foil on the middle rack to catch any drips.
- While the water is heating and the pasta is cooking, take the bechamel off the heat. If you are using an electric stove, turn that burner down to low. Add a big fistful of shredded cheese (about a cup or so) and whisk it in until it is completely melted. If it seems like it's not melting anymore, put it back on the burner for a few seconds, whisking the whole time. The key to adding the cheese is to do it sssslllloooowwwwwlllly so it melts evenly. This is called Insurance. Starting with evaporated milk and then reducing the sauce for a few minutes after adding the other dairy is our first level of insurance for a creamy sauce that doesn't break or get grainy. Our second level is adding the cheese slowly and not letting it boil again until we want it to.
- Continue adding the shredded cheese, a fistful at a time (about 6-7 additions) until it's all smooth and amazing, taking the pan off and putting it on the burner as necessary to keep the cheese melting. The only little "bumps" you should see are from the garlic and herb seasoning with little bits of garlic and whatnot.
- Once the cheese is completely melted, add the cream cheese, whisking it in over low heat until it melts completely. Then whisk in the sour cream all at once.
- As soon as the pasta is done, use a spider/strainer to scoop it out into the cheese sauce along with any starchy water held in the shells. The starch in the water is our third level of insurance for smooth and creamy sauce. It is also what allows us to bring everything to a boil again.
- Turn the sauce and pasta mixture back up to high heat and bring it back to a boil, stirring constantly with a spatula. Once it comes to a boil, turn the heat to medium to keep it at a boil and cook for 2 minutes. What we're doing here is reducing the sauce down to the same consistency it was before adding the starchy water while leaving the starch in the sauce to keep it creamy. It's like magic!
For the Panko Topping
- Evenly stir together the panko, finely shredded cheese, garlic herb seasoning, and salt in a small bowl.
- Drizzle the melted butter over the panko and stir or use a clean hand to mix it well so all the panko is evenly moistened with the butter.
To Top and Bake
- Carefully pour the shells and cheese mixture into a 9" x 13" baking dish and spread out evenly.
- Top with a thick layer, even of panko.
- Bake for 30 minutes, turning the pan after 15-20 minutes so it cooks evenly. If you'd like the panko a little more browned, finish up under the broiler for 1-2 minutes after baking. Cheese sauce will be bubbling all around the edges and maybe up through the center in a couple of places.
- Let cool for 15-20 minutes before serving. Cool any leftover pasta and refrigerate, tightly covered, for up to 5 days. Reheat in the microwave and then finish under the broiler to keep the panko topping as crispy as possible.
Did You Make Any Changes?
Notes
Half Batch
This amount should fit nicely in an 8″ square baking pan. For the Roux- 1 oz butter
- 1 oz flour
- 2 1/4 teaspoons smoked paprika
- 1 1/2 teaspoons ground mustard
- 1 teaspoon garlic and herb seasoning
- 3/4 teaspoon Morton’s kosher salt
- 1/4 teaspoon black pepper
- 6 oz evaporated milk (half a can)
- 3/4 cup half and half
- 1/2 cup whole milk
- 8 oz extra sharp cheddar cheese
- 4 oz Monterey jack cheese
- 4 oz sour cream
- 2 oz cream cheese
- 2.25 oz panko
- 1 1/2 Tablespoons butter, melted
- 1/2 oz finely grated Parmesan (or Gruyere or cheddar)
- 1/2 teaspoon garlic herb seasoning
- small pinch of kosher salt
Storing
Cool and then tightly cover and refrigerate leftovers for up to 5 days. If you need to make and then freeze it, make the sauce and pasta but don’t bake or top it with panko. Wrap it well in plastic wrap and foil and freeze for up to 2 months. Thaw for at least 24 hours in the fridge and then top with the panko topping and bake.Reheating
To keep your leftover shells and cheese sauce as creamy as possible, slice servings into 3-4 thin slices and lay them down in a single layer in a microwave-safe plate or bowl. Leaving dense mac and cheese in a big block is a recipe for a broken sauce, because it will take a very long time at high power for the center to heat up, leaving the outsides over-heated and no longer creamy and delightful. Reheat on medium power in 90-second increments until heated through. Remember, melting the cheese into the sauce slowly is the way to go, so reheating slowly stands to reason. If you want to make sure the panko is crispy, put the serving/s under the broiler, panko topping up, for 1-2 minutes or until crisped. In that case, you’ll want to transfer servings to a metal baking sheet to go under the broiler.Nutrition
Would you like to save this post?

Hi, y’all! I hope you’ve enjoyed this post and hopefully also learned a thing or two.
If you like my style, I invite you to sign up for my occasional newsletter, The Inbox Pastry Chef.
Expect updates on new and tasty recipes as well as a bit of behind-the-scenes action. I hope to see you there!

And there you have it, friends. Super creamy and luscious shells and cheese with a delightfully crisp baked panko topping. I think you’re gonna love it!
Thanks for spending some time with me today.
Take care, y’all.


Join in Today!
it is safe to say macaroni and cheese is my son-in-law’s favorite food. it is also safe to say he is very picky about his mac and cheese. I know, this is baked shells and cheese. My son-in-law still gave it five stars. Extremely good
Oh, man, I’m so glad everyone enjoyed it and that it passed the son-in-law test, Deb! Yay!
oh my gosh! this Shells & Cheese (aka mac & cheese) is delicious! Read through the recipe before you start and you won’t be disappointed at how easily this recipe comes together. Getting everything ready before you start, is the key to having it turn out just as Jenni describes. The recipe makes a generous 13×9 (or 2 8×8 pans, plus a little to have a bowl for yourself). I used seasoned breadcrumbs, because that’s what I had, and since it called for garlic & herbs, the seasoned worked out just fine. I read the instructions and managed not to follow them, but was able to overcome my mistake. I cooked the pasta while I was grating the cheese. I cooked it for 5 minutes, removed it from the water. When the recipe said to boil and cook the pasta, I brought the pasta water back to a boil and cooked it for 3-4 minutes to be al-dente and proceeded with the recipe.
The best investment I made this year was a spider sieve, to be able to pull out the pasta and not drain all that good starched water down the drain. Adding it back into the pasta is magic. You should do it. Enjoy this recipe! Every shell is filled with the tasty cheese sauce.
I am so glad you loved it, Jo-Anne, and I hope your friend did, too! Once I realized I didn’t have to lug a heavy vat of boiling pasta over to the sink, I was liberated! lol
As a promise to my family t make mac and cheese, I decided to try Jenni’s Creamy Baked Shells and Cheese. I could not have made a better choice! Jenni’s instructions were spot on; any doubts I had about a particular step were addressed already so I carried on with confidence. The results were perfect; a sultry, creamy sauce that enveloped the shells. The crunchy topping was a perfect complement! I used 8 oz of Habanero cheddar cheese which added a zingy touch! I highly recommend making this dish. A more perfect comfort food I cannot imagine exists!!
Ooh, Carol, I’m so glad y’all liked it, and thank you so much for taking the time to rate and review! Hooray for sultry cheese sauce with a kick! xoxo
This recipe is a masterclass in creating the perfect creamy baked shells and cheese! The step-by-step explanations and “insurance policies” for avoiding grainy or clumpy sauce are incredibly thoughtful. I love the detailed focus on balancing flavors and textures—from the sharpness of the extra sharp cheddar to the creamy tang of sour cream and cream cheese, all topped with a crispy panko layer. The inclusion of tips for reheating and avoiding acidic ingredients is a fantastic touch. Definitely a recipe worth trying for anyone who loves the ultimate comfort food!
I so appreciate the thoughtful review. I hope many folks find the post helpful and enjoy the results!