


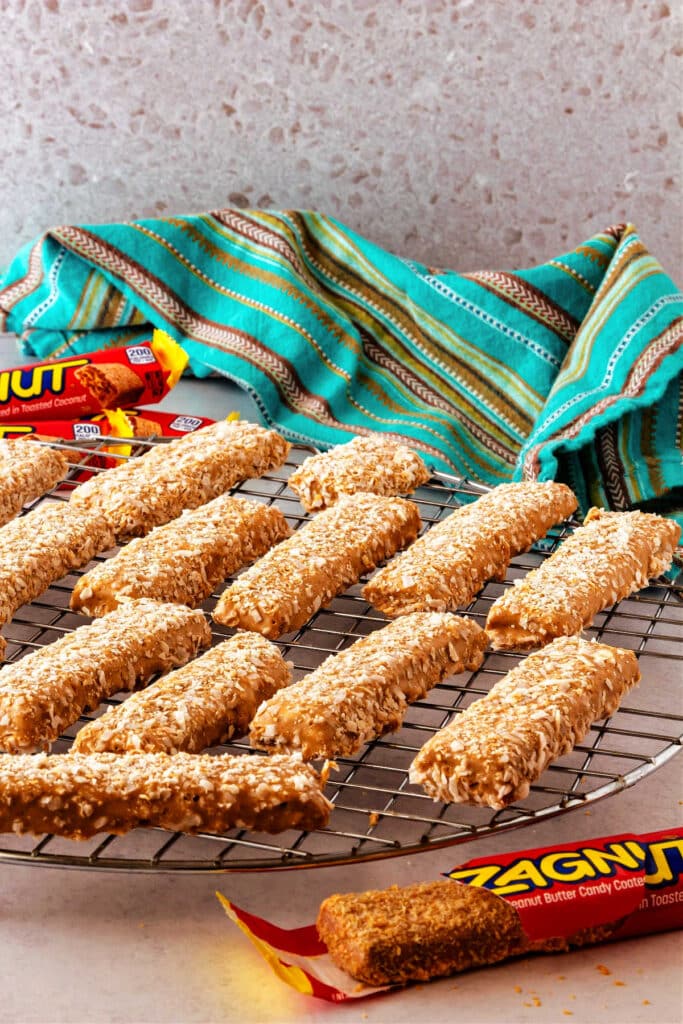
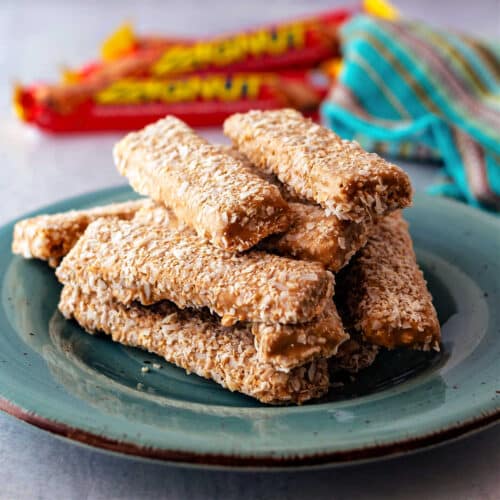
If you have a nostalgic love for a Zagnut, my homemade Zagnut recipe will thrill you!
Crispy and flaky and chock full of peanut butter and coconut flavor, these are a doable project on a dry day.
You may also want to take a look at my homemade Butterfinger recipe. For ease of browsing, you can find all my candy recipes in one place. And now, let’s make some Zagnuts!
Homemade Zagnut Bars, At a Glance
✅Skill Level: Advanced
✅Skills: Cooking Sugar Syrup, Laminating Hot Candy, Cutting Candy, Dipping in Peanut Butter Coating, Rolling in Coconut
✅Type: Candy Bars
✅Number of Ingredients: 12
✅Prep Time: 30 minutes
✅Cook Time: 15 minutes
✅Curing Time: 4 hours
✅Yield: 16 candy bars
Jump Straight to the Recipe
Pastry Chef Online Participates in Affiliate Programs. If you make a purchase through one of my links, I may earn a small commission. For more information click to read my disclosure policy
Why Make Homemade Zagnuts?
This candy bar wasn’t even on my radar until a reader, Aiden, emailed and asked if I could develop a recipe for one.
I’d never even had a Zagnut before, and since I’d tasted one, I bought some via Amazon. Honestly, I was underwhelmed by the overly sweet and a bit artificial taste and color, but the sweet peanut butter and coconut combination was solid, so off I went.
This Zagnut recipe is the result! I actually asked Aiden to test the recipe for me, and he did. Here’s what a security guard at his college had to say about his:
Those bars are 10 out of 10! Holy crap those are good!!!
Security Guard at Aiden’s college
I mean, there can be no higher praise.
And now, some thoughts from one of my recipe testers:
Notes from My Testers

Huge thanks to tester Jo-Anne for testing my Zagnut recipe and instructions!
Full disclosure, she ended up with great bars the first time and peanut butter sand the second.
Sometimes the unexpected just…happens…when making candy. Please be sure to carefully read all my caveats and Preventing Disaster sections before starting the recipe. and kudos to Jo-Anne for making these without benefit of a video, because I hadn’t made it, yet!
Now, onto Jo-Anne’s notes:
Jo-Anne’s Notes
Instructions and Timing:
I would have used a 1 qt saucepan instead of a 2 qt. For me, trying to get a temperature when there’s only a half inch of syrup in the pan is difficult. I use a Thermapen instant read thermometer. Other than that, everything was good. Mise en place is difficult with small quantities. I made sure I read what got combined, so I wasn’t making more work for me on the cleanup end. The way you listed the ingredients was helpful. I used a stainless-steel bowl for the peanut butter/coconut mixture. No cold glass to cool the mixture quickly. It took 30 minutes from start to cutting them.
Flavor, Texture, and General:
I can’t thank you enough for including me to try this amazing recipe! I’m thrilled with the result. They taste delicious. I will have to scout out the commercial candy the next time I’m at a pharmacy to compare, but like anything homemade, I’m sure they are far superior to those on the market.
The folding process was a bit tricky, but I managed to follow it. I was so worried about it cooling so fast that I wouldn’t be able to get all those folds in. Using a waterbed heating element and a silicone rolling mat helped me work with the hot candy for a longer time.
I’m happy to report that the bars came out incredibly flaky and delicious! Other than my mix-up reading the directions, your directions were excellent and very helpful. I have plenty of ingredients to make another batch and I will use the second silpat this time, in order to give them a fair shake as a candy that will remain in my recipe box. I truly appreciate all the effort you put into perfecting this recipe.
Here are a couple of things to keep in mind before you get started:
Caveats
Do not make this candy (or any candy) on a humid or rainy day.
Make sure your instant read or candy thermometer is accurate.
Know that sometimes the centers will end up crumbly even if you follow the first two years.
Making candy is finicky, especially if you don’t make candy every day. Too many variables to control in a home kitchen.
If your centers do get crumbly, they are still delicious, and you can use them as an ice cream mix-in or topping or as a textured element in frosting for filling a cake.
Equipment
While it’s always a good idea to gather your equipment and ingredients before starting baking or cooking, when making candy, it’s vital. The higher the temperature you take your candy, the faster the temperature will rise, and things will happen quickly. Be prepared!
Here’s a list of everything you’ll need to make these candy bars.
Some of these items are readily available and some you may already have. I will provide affiliate links to any pieces of equipment that are a bit harder to find.
- Kitchen Scale: For weighing your ingredients. The highest weight you’ll need is 6 oz. The lowest is 0.5 oz. This is the scale that I used for years and recommend to home bakers.
- Small saucepan: About 1 1/2 quarts. The amount of syrup you’ll be cooking is fairly small. It will bubble up a bit because of the fats in the mixture, but a 1 1/2 quart pan is sufficient for the amount.
- Silicone Spatulas: for stirring the candy and spreading it out on a silicone mat
- Small offset icing spatula: For spreading the sweetened peanut butter mixture over the hot candy for lamination
- 1 half-sheet pan: To put your silicone mat on for pouring out the candy. If you have a flat-top stove, a half sheet pan isn’t strictly necessary, but they are very useful and very versatile
- 2 ½-sheet-sized Silpat or similar silicone baking mat: You’ll use one to pour your candy and laminate it. You’ll use the other to put on top of the laminated candy to roll out. If you watch my video, you’ll notice there’s some candy stuck to my rolling pin. Using a Silpat on top eliminates that mess.
- Rolling Pin: A straight or French rolling pin–either will work.
- Instant Read or Candy Thermometer: For checking the temperature of your candy as it cooks. I prefer an instant read, but if you like the clip-on type of candy thermometer, use that. Just be sure it is accurate, because temperature is really important when making candy.
- Cutting board: For trimming, scoring, and cutting the candy centers
- Pizza cutter or chef knife: I find it easier to deeply score the candy with a pizza cutter and then go back and use a chef knife to cut the bars apart
- 10″ skillet (although the size isn’t that important): For toasting coconut
- Dinner plate or shallow dish: for cooling toasted coconut. I leave the coconut on the plate and put the dipped centers directly onto the plate of coconut.
- Shallow dish: For dipping the centers into the peanut butter coating
- Two forks: For fishing the centers out of the peanut butter coating and allowing excess to drip off. Use two to make it easier to hold them and minimize the possibility of breakage as you’re dipping
- Cooling rack: To let the finished candy bars set up. You could also place them on a sheet of parchment or waxed paper
- Silicone brush: Since the candy is very flaky, be sure to brush off loose bits and flakes before dipping the centers
Zagnut Ingredients and Substitutions
As with all my copycat recipes (see my Little Debbie oatmeal cream pie recipe), I started with the ingredient list on the box of Zagnuts.
I eliminated anything that was not pretty readily accessible, and then went from there.
Here’s what you’ll need:
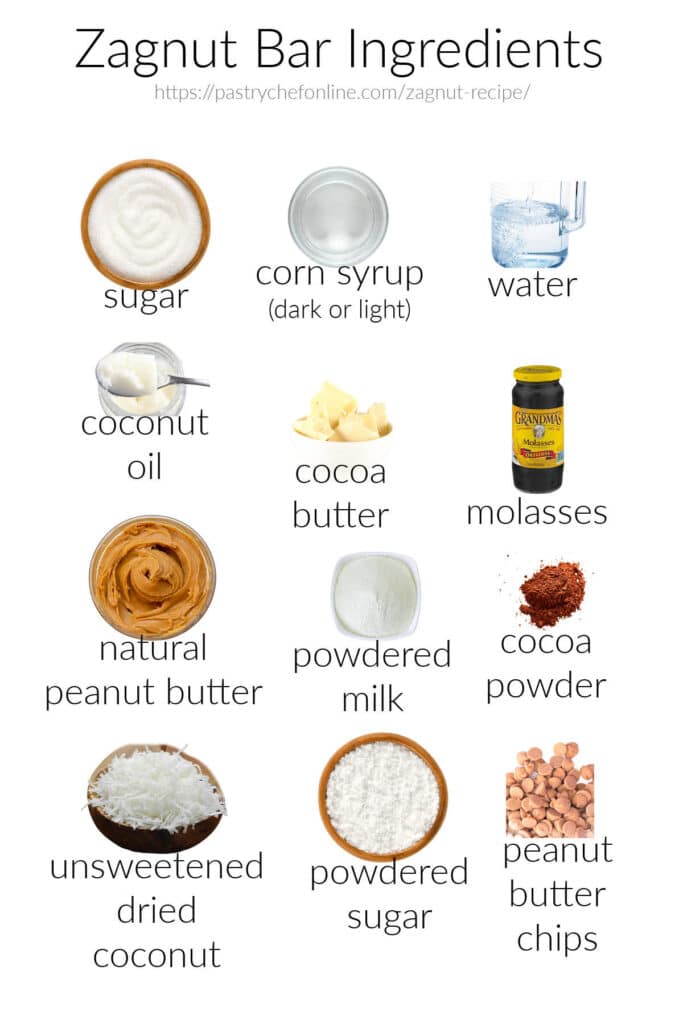
- Sugar: Provides the sweetness and crispy texture to the centers. I would not try using any brown sugar. Cooking molasses that long makes the flavor too prominent.
- Corn syrup: To prevent crystallization to keep your candy from turning into a pile of sand. You may substitute glucose syrup or any invert sugar such as honey. Do NOT substitute with golden syrup. It is only partially invert
- Water: To help dissolve the sugar into a syrup before heating to the desired temperature
- Coconut oil: Fat to control the texture of the candy center, keeping it from being too hard like a lollipop
- Cocoa Butter: Ditto for coconut oil. If you cannot find cocoa butter, you may use all coconut oil. Aidan did, and his turned out just fine!
- Molasses: Adds marginally to the color of the candy center as well as providing a tiny bit of bitterness to balance the sweetness. You could leave it out and just use an extra 2 teaspoons of corn syrup
- Natural peanut butter: Used both in the hard candy center and the lamination “cream.” I have not tested this recipe with smooth peanut butter containing palm oil. I expect it would work, but to be on the safe side, pick up a jar of smooth natural peanut butter. I use Smucker’s.
- Powdered milk: Adds a bit of milk solids to the centers. Not strictly necessary, but it is in the ingredient list on the box, so I like to stick as closely as possible to that.
- Cocoa powder: Ditto the powdered milk
- Unsweetened dried coconut: A little bit is used in the candy centers. The bulk is used as a finish to dip the bars into before letting the coating set.
- Powdered sugar: Mixed with some peanut butter for laminating the candy.
- Peanut butter chips: Melted together with a little coconut oil, peanut butter chips provide the ideal flavor and texture for dipping the candy centers. I considered trying to make my own coating with peanut butter, powdered sugar and coconut oil, but then I decided not to try and reinvent the entire wheel.
Instructions
In a nutshell, here’s what you’ll do. I urge you to watch the video that goes with this recipe so you can see all the steps, especially the laminating in real time.
- Gather all your equipment and ingredients and handle your mise en place so everything you need is where you need it when you need it.
- Cook sugar syrup.
- Mix with peanut butter/coconut mixture.
- Spread on a silicone mat.
- Layer on peanut butter/powdered sugar mixture and spread it thinly.
- Laminate the candy and then trim and score to final size.
- Let the candy cure for 4 hours at room temperature.
- Dip cured centers in peanut butter coating.
- Roll in lightly toasted coconut and let them firm up.
Preventing Disaster When Making Cooked Sugar Syrup Candies
By far, the trickiest parts of this recipe are cooking the sugar syrup, mixing in the peanut butter, and laminating it.
- You could undershoot or overshoot the target temperature and end up with a sticky mess or a burnt mess.
- The candy could crystallize when mixing in the peanut butter/coconut mixture.
- You candy could harden to much to layer and laminate.
Here are the fixes that will minimize the possibility of horror:
- Use an accurate thermometer. I much prefer an instant read thermometer to a clip-on candy thermometer, but use what you’re comfortable with, as long as it is accurate.
- Heat the peanut butter/coconut mixture in the microwave before adding the cooked sugar syrup. Heating the peanut butter ensures there is not such a drastic temperature differential between the syrup and the peanut butter. This will make it much easier to incorporate the two.
- Work quickly and make sure everything is where you need it to be before starting. You’ll fold and roll the candy twice. By the second roll, the candy will be pretty firm. If it starts getting too firm before you get to that stage, put the slab of candy in, Silpat and all, into the microwave for about 10-15 seconds to keep it pliable.
Since these are the trickiest steps, here are some collages of laminating to help you visualize how to do the steps.
Would you like to save this post?
Again, please watch the video for making the whole recipe, start to finish.
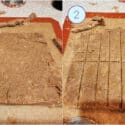
Why Laminate These Candy Bar Centers?
Look at this photograph. THIS is what lamination buys you:
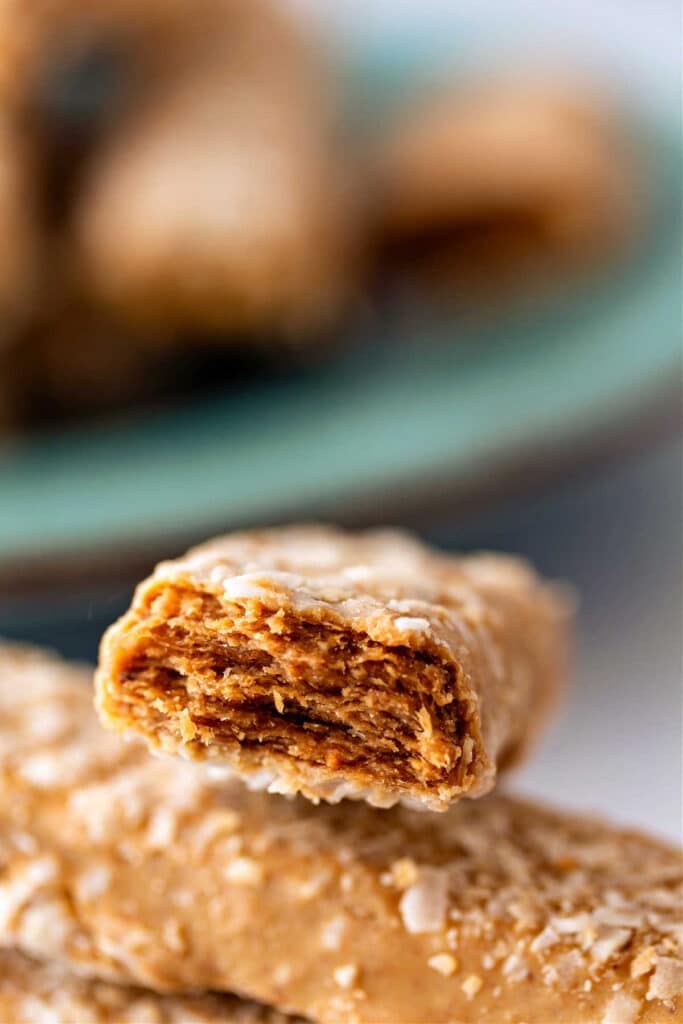
- Laminating lightens the texture
- Laminating with peanut butter/powdered sugar allows for ultra-thin layers of crispy and creamy
- Because of the lamination and thin layers, the bars are easy to bite into. No lamination would mean one very thick layer of hard candy, and that would be very hard to break, bite, or chew.
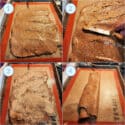
Getting Ready to Laminate

- The hot candy after being mixed with peanut butter/coconut roughly spread out on Silpat.
- Using an offset spatula to spread peanut butter/powdered sugar onto the candy.
- The peanut butter all spread over the peanut butter candy.
- Beginning of lamination: folding the candy into thirds.
Jenni Says: At this stage, the candy is still very hot. Use the edges of the Silpat/silicone mat to help you fold your candy.
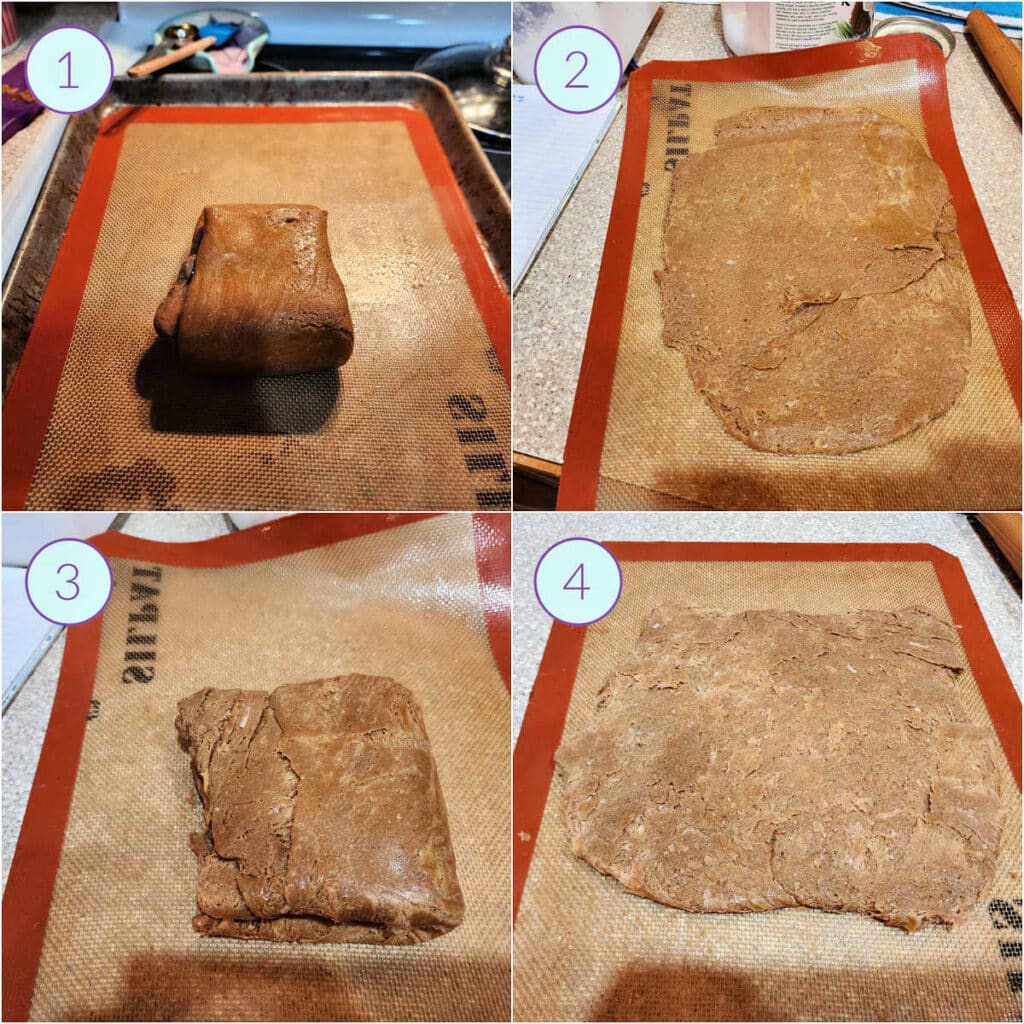
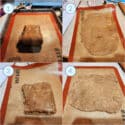
- After folding in thirds one way, fold the candy in thirds the other way to make a packet.
- Roll this out into a rectangle roughly 1/3-ish” inch thick.
- Fold this rectangle into thirds one way and then in half the other way.
- Roll out to a finished thickness of about 1/4-ish”. Try to shoot for about a 9″ square.

- Once you have your 9″ rectangle, use a pizza wheel to trim off the edges to make as true a square as you can.
- Deeply score the candy centers, and then come back with a chef knife to cut them apart.
Jenni Says: Before cutting your bars through, move the slab of candy from the silicone mat to a cutting board. Silicone mats are delicate, and you don’t want to end up slicing it into candy bar sizes.
For the complete list of ingredients, amounts, and instructions, please head straight to the recipe, which is printable. You can also sign up to have the recipe emailed straight to your inbox.
Zagnut Q & A
Originally made by Clark, Zagnut is now produced by Hershey’s. It consists of a crispy, flaky, layered peanut butter center which is then dipped in a peanut buttery coating and rolled in finely ground, toasted coconut. It’s similar to a Butterfinger minus the chocolate and plus coconut.
Kept tightly covered at room temperature, these copycat Zagnuts will be good for at least a couple of weeks. I can almost guaranteed they won’t last that long, though.
Probably. But you’d need to use a sheet pan-sized silicone mat and would have to work super hard to get all the lamination in before the candy gets too hard. My recommendation is to make two batches in succession rather than a double batch.
Questions?
If you have any questions about this post or recipe, I am happy to help.
Simply leave a comment here and I will get back to you soon. I also invite you to ask questions in my Facebook group, Fearless Kitchen Fun.
If your question is more pressing, please feel free to email me. I should be back in touch ASAP, as long as I’m not asleep.
A Note About Measurements
My recipes are almost all written by weight, including liquids, unless otherwise specified.
For accuracy and consistency of results, I encourage you to buy–and use–a kitchen scale.
I promise that baking and cleanup will be so much quicker and easier.
This is the scale that I recommend for home use. I have owned and used one for years.
Love This Zagnut Recipe? Please Rate and Review!
It helps me and other readers so much if you take a moment to rate and review this recipe.
Your star rating and comments help others decide whether the recipe is worth making, and your feedback helps me continue improving recipes here at Pastry Chef Online.
Other lovely ways to share include pinning or posting on your favorite social media platform.
Thank you so much for taking the time!

Homemade Zagnut Recipe
Video
Ingredients
For the Candy Centers
- 7 oz granulated sugar 198 grams
- 1 oz dark or light corn syrup OR glucose syrup 28 grams
- 0.5 oz cocoa butter 14 grams
- 0.5 oz 14 grams virgin coconut oil 14 grams
- 2-3 oz water just enough to help dissolve the sugar as it heats. This does not have to be a precise measurement
- 2 teaspoons molasses
- 6 oz natural peanut butter (the kind you have to stir) 170 grams
- 0.5 oz unsweetened desiccated coconut 14 grams
- 2 teaspoons dry milk powder OR malted milk powder
- 1 teaspoon cocoa powder
For Laminating the Candy
- 2 oz natural peanut butter (the kind you have to stir) 57 grams
- 0.5 oz 14 grams confectioners sugar
For the Peanut Butter Coating
- 10 oz peanut butter morsels 283 grams (1 bag in the US)
- 1 oz 28 grams virgin coconut oil 28 grams
For Rolling after Coating
- 3 oz desiccated coconut 85 grams
Instructions
Mise en place:
- In a medium saucepan, combine sugar, corn syrup/glucose syrup, cocoa butter, virgin coconut oil, and a little water.
- Crumble the ½ oz coconut so no large bits remain. I just used my hands for this, but you could even use a mortar, run a knife over it a few times, or pulse it once or twice in a food processor.
- In a large bowl, whisk together peanut butter, the coconut that you have crushed up really well, milk powder, and cocoa powder until well combined.
- Spread this mixture up the sides of the bowl a bit, because you'll be pouring the hot sugar syrup into the bowl, and the peanut butter will act as an insulator to keep the syrup from solidifying on the cool glass sides of the bowl.
- In a small bowl, stir together the natural peanut butter and the confectioners sugar. Set aside with a small offset spatula.
- Place one Silpat in a half sheet pan and set aside, convenient to the stove.
- Clear a large space on your counter to do the rolling. Get out your rolling pin and put it there along with an additional Silpat.
To Make the Candy Centers
- Before you start cooking your sugar syrup, heat the bowl of peanut butter/coconut/dry milk/cocoa powder in the microwave until hot, about 30-40 seconds. This will help to reduce the temperature differential between the two mixtures so that when you combine them, there is less of a chance that your mixture will crystallize. It will also extend your working time for lamination by a little.
- Over medium-high heat, stir the sugar water mixture to start dissolving the sugar.
- Once the sugar is “loose” and the mixture is very easy to stir, place a lid on your pan and bring the mixture to a boil. Allow it to boil for a minute to wash any errant sugar crystals off the sides of the pan.
- Remove the lid and, with a candy thermometer clipped to the side or with an instant read thermometer, cook the syrup until it reaches 290F/143.3C.
- Scrape the molasses into the pan and swirl it to distribute it evenly. The temperature will rise quickly now.
- When the syrup reaches 305F to 310F (151.7C to 154.4C), which will take only seconds, scrape it into the bowl of hot peanut butter/coconut/milk powder/cocoa powder.
- Use a silicone spatula to quickly but carefully stir the two mixtures together until it’s a uniform color and texture.
- Immediately scrape this mixture onto the Silpat-lined half-sheet pan. Spread it out with the back of your spatula so it's in a roughly 12" x 10" (30 cm x 25 cm) square. It does NOT have to be perfect.
To Laminate the Candy
- Using a small, offset icing spatula, apply little blobs of the peanut butter/confectioners sugar over the surface of the candy and spread quickly to get a thin, even layer. Again, this does not have to be perfect. Just get it into a thin layer as quickly and carefully as you can.
- Using the edges of your Silpat, fold the candy like you’re folding a letter, in thirds. First one side, and then the other. Then, use the other two sides of the Silpat to help you fold the candy in thirds again the other way. Now you should have a thick square of candy that is roughly 4-ish” (10 cm) on a side.
- Pick up the Silpat with the candy on it and put it on your cleared workspace. Cover it with another Silpat (preferred) or a piece of parchment. Roll it out until it you have a 10-ish” (25 cm) square.
- Remove the top Silpat and use the bottom Silpat to assist you in folding the candy in thirds one way and then in half the other way.
- Place the Silpat back on top of the candy and roll out to a finished size of about 8 ½”-9″ (21-23 cm). It will be hard to roll at this point, so you’ll have to press down pretty hard.
To Cut to Size
- The candy will be warm now, but not too hot to touch. Use a spatula or two to help you slide the candy to a plastic cutting board.
- Use a pizza wheel or chef’s knife to trim irregular edges so you are left with an 8″ (20 cm) square. Deeply score the candy in half both ways so you have 4 squares. Cut each square into fourths so you have two rows of 8 candy bars, each about 4″ x 1″.
- Now go back and, using a chef knife, cut the bars apart and let them cool completely. Cut them in two stages to make them less likely to break apart. Then sit out at room temperature for about 4 hours.
To Coat and Finish the Bars
- Place the 3 oz (85 grams) coconut in a dry skillet. Over medium heat, toast the coconut until just beginning to color. Keep it moving with silicone spatula. It’s ready when the coconut is hot, fragrant, and pale golden. Pour the coconut onto a plate to cool.
- Once cool, crumble the coconut into small pieces. As when preparing the coconut for the candy centers, you can also use a mortar and pestle, a knife, or a couple of pulses in the food processor. You don’t want dust–just little pieces. Spread it out on a plate or shallow tray.
- Place the peanut butter morsels and coconut oil in a microwave-safe, shallow dish. Melt in 30 second bursts, stirring well until the mixture is hot, liquidy-drippy, and well-combined.
- Since the centers are flaky, use a silicone brush to brush off any little flakes of loose candy on the centers.
- Place 1-2 candy bar centers into the melted peanut butter mixture, and then use 2 forks to flip each one once and then again. Place 2 forks under each center (this minimizes the chance that any bars will just randomly break) and let excess coating drip back into the dish. Reheat the peanut butter mixture as necessary if it starts to thicken up on you. I reheated mine once, but if you work faster than I do, you may not have to. If you work more slowly, you may have to reheat it twice.
- Place coated centers in the plate of coconut and then sprinkle additional coconut on the tops of the bars. Use the forks to move each coconutted bar onto a cooling rack.
- Once the peanut butter coating has solidified, about 45 minutes or so, pick each bar up and use your hands to brush off any random coconut that is sticking out or loose.
Did You Make Any Changes?
Notes
Fun Sizes
You are welcome to cut the candy into 1″ squares for minis or into 1″ x 2″ rectangles for fun sized. You will probably need almost double the coating ingredients since you’ll have more bars to dip, so keep that in mind. Use 2 10oz bags of morsels and 2 ounces of coconut oil.Double Batch
Rather than making a double batch, which will require larger silicone mats and for you to work faster, I recommend making two single batches in succession if you really need 32 candy bars.Storing
Keep at room temperature in a tight-sealing container for up to two weeks.Nutrition
Would you like to save this post?

Hi, y’all! I hope you’ve enjoyed this post and hopefully also learned a thing or two.
If you like my style, I invite you to sign up for my occasional newsletter, The Inbox Pastry Chef.
Expect updates on new and tasty recipes as well as a bit of behind-the-scenes action. I hope to see you there!

I hope you give these candy bars a try, friends. I didn’t like the ones I bought, and this Zagnut recipe is 100% better than store bought.
Thanks for spending some time with me today.
Take care, y’all.


Join in Today!
I just came across this recipe, so I haven’t made these yet. I just want to say that, after watching the video, I find this crazy impressive and hope I’m able to pull it off! thanks for coming up with this recipe and thank you for sharing it!
I hope these turn out well for you. I have been emailing with a woman whose mixture keeps turning to sand when she pours it into the peanut butter mixture. Make sure the peanut butter mixture is hot before adding the sugar syrup, but also know that, if you end up with sand, it will still be very tasty! If you have any questions before you tackle this recipe, don’t hesitate to ask, Toni!
I first tried a Zagnut bar from my local candy shop in 2024, and I loved the peanut butter and coconut combo, so naturally I wanted to make them myself. However, when I looked them up online, there weren’t any recipes telling me how to make them. After trying Jennifer Field’s Butterfinger bars, I knew she was the person to ask because Zagnuts are somewhat similar. She developed a recipe and asked me to test it; when I finished testing the Zagnuts I was left with amazing results on the first try! I gave some to family and friends, and everyone thought they were amazing. Some said they were even better than the ones you can buy in the store. If you like smooth peanut butter coating and toasted coconut over a light/crisp center, I would highly recommend that you give these a try!
Thanks so much for suggesting this recipe, Aiden! I’m thrilled you guys love it, and I hope you make them often, because, as the security guard said, Holy Crap they’re good! 🙂