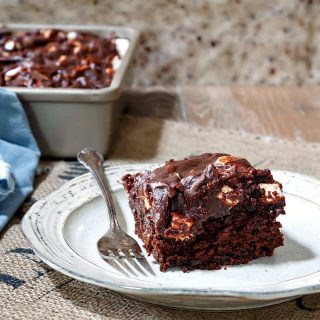
This incredibly moist and rich rocky road cake is adapted from Jill O’Connor’s wonderful cookbook, Cake, I Love You, and is based on her chocolate mayonnaise cake recipe. You’re going to love how easy it is to make this chocolate sheet cake recipe, friends!
If you’re not a fan of rocky road, you can leave out the marshmallows and nuts and enjoy this as an easy chocolate sheet cake “straight.” Either way, use the melted chocolate bar frosting Jill created, because it is fantastic.
If you love the flavor of a mayonnaise cake, you may also enjoy my chocolate mint cake which is also based on Jill’s recipe. For ease of browsing, check out all my cake recipes here. Thanks for being here. Let’s get to it!
Pastry Chef Online Participates in Affiliate Programs. If you make a purchase through one of my links, I may earn a small commission. For more information click to read my disclosure policy

Rocky Road Cake, At a Glance
✅Skill Level: Beginner
✅Skills: Mixing a Cake Batter, Making Frosting, Icing a Cake
✅Type: Sheet Cake
✅Number of Ingredients: 11 in the cake, 7 in the frosting
✅Prep Time (For the Cake): 20 minutes
✅Cook Time (For the Cake): 45 minutes
✅Yield: 9″ x 13″ sheet cake, approximately 24 slices
Jump Straight to the Recipe
You’ll Love This Cake If
Not all recipes are for everyone.
You’ll want to try this rocky road cake if you:
- love moist cake
- like your chocolate flavor to be pretty intense
- like a lot of different textures in one bite
- think you’ve had the best chocolate frosting before (if you haven’t made this one, you haven’t. Trust me)
- love the tang of sour cream (see “best chocolate frosting” above)
- understand that mayonnaise is mostly oil and your cake isn’t going to taste like a sandwich!
When you do make this recipe, it will help me and other readers if you:
✅Rate the recipes using the stars in the recipe card
✅Leave a review when prompted in the recipe card
✅Leave a comment on the post
Thank you! ❤️
Tasting Notes
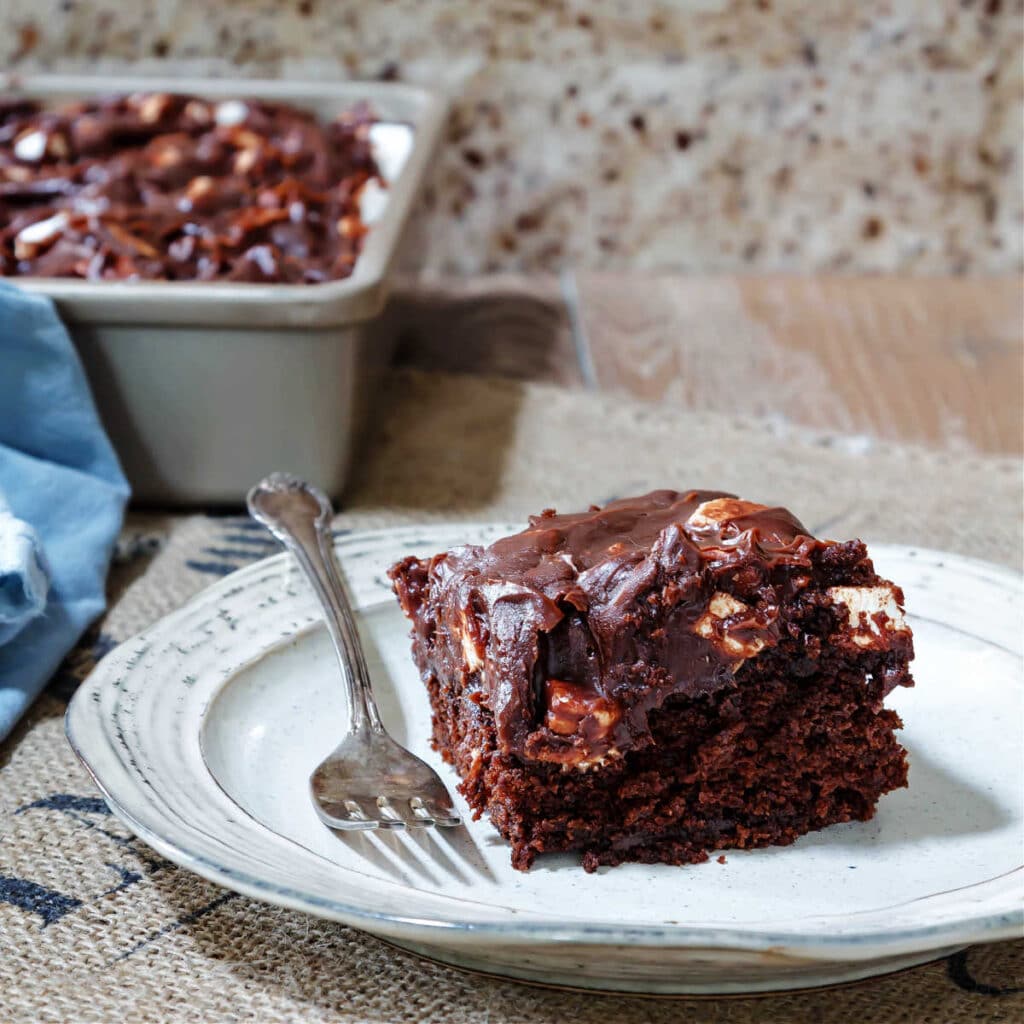
Texture: Moist, medium crumb. The frosting is smooth and dense with bites of airy/chewy marshmallow as well as the crunch of nuts.
Flavor: The cake is deeply chocolatey with background notes of coffee (you can control this by controlling how much instant coffee you use). The frosting is tangy from the sour cream, and that tempers the sweetness a bit, making it alarmingly easy to eat. The marshmallows and nuts add vanilla sweetness and some saltiness, depending on the bite you take.
Why Is There Mayonnaise In This Cake?
Much like old-fashioned pie recipes or “desperation pies,” mayonnaise cake was born of the desperation of the Depression Era in the United States.
Butter was hard to come by, so ingenious bakers subbed in mayonnaise, which is pretty much just oil with a little egg, some vinegar, and salt.
Even mayonnaise companies jumped on the mayo cake bandwagon and started printing the recipe right on the jar. Today, Hellman’s has a very fine chocolate mayonnaise recipe printed on their website.
PRO TIP: Check the salt level of the mayonnaise you are planning to use. If your mayonnaise is pretty salty, you may have to add minimal, if any, additional salt.
Let your palate be your guide, and know that this cake is incredibly moist, delicious, and easy to make.
How to Make This Cake
If you are not interested in the step-by-step instructions and tips, you can head straight to the recipe. You can always scroll back up if you need some clarification on anything.
Ingredients and Substitutions
For the Cake
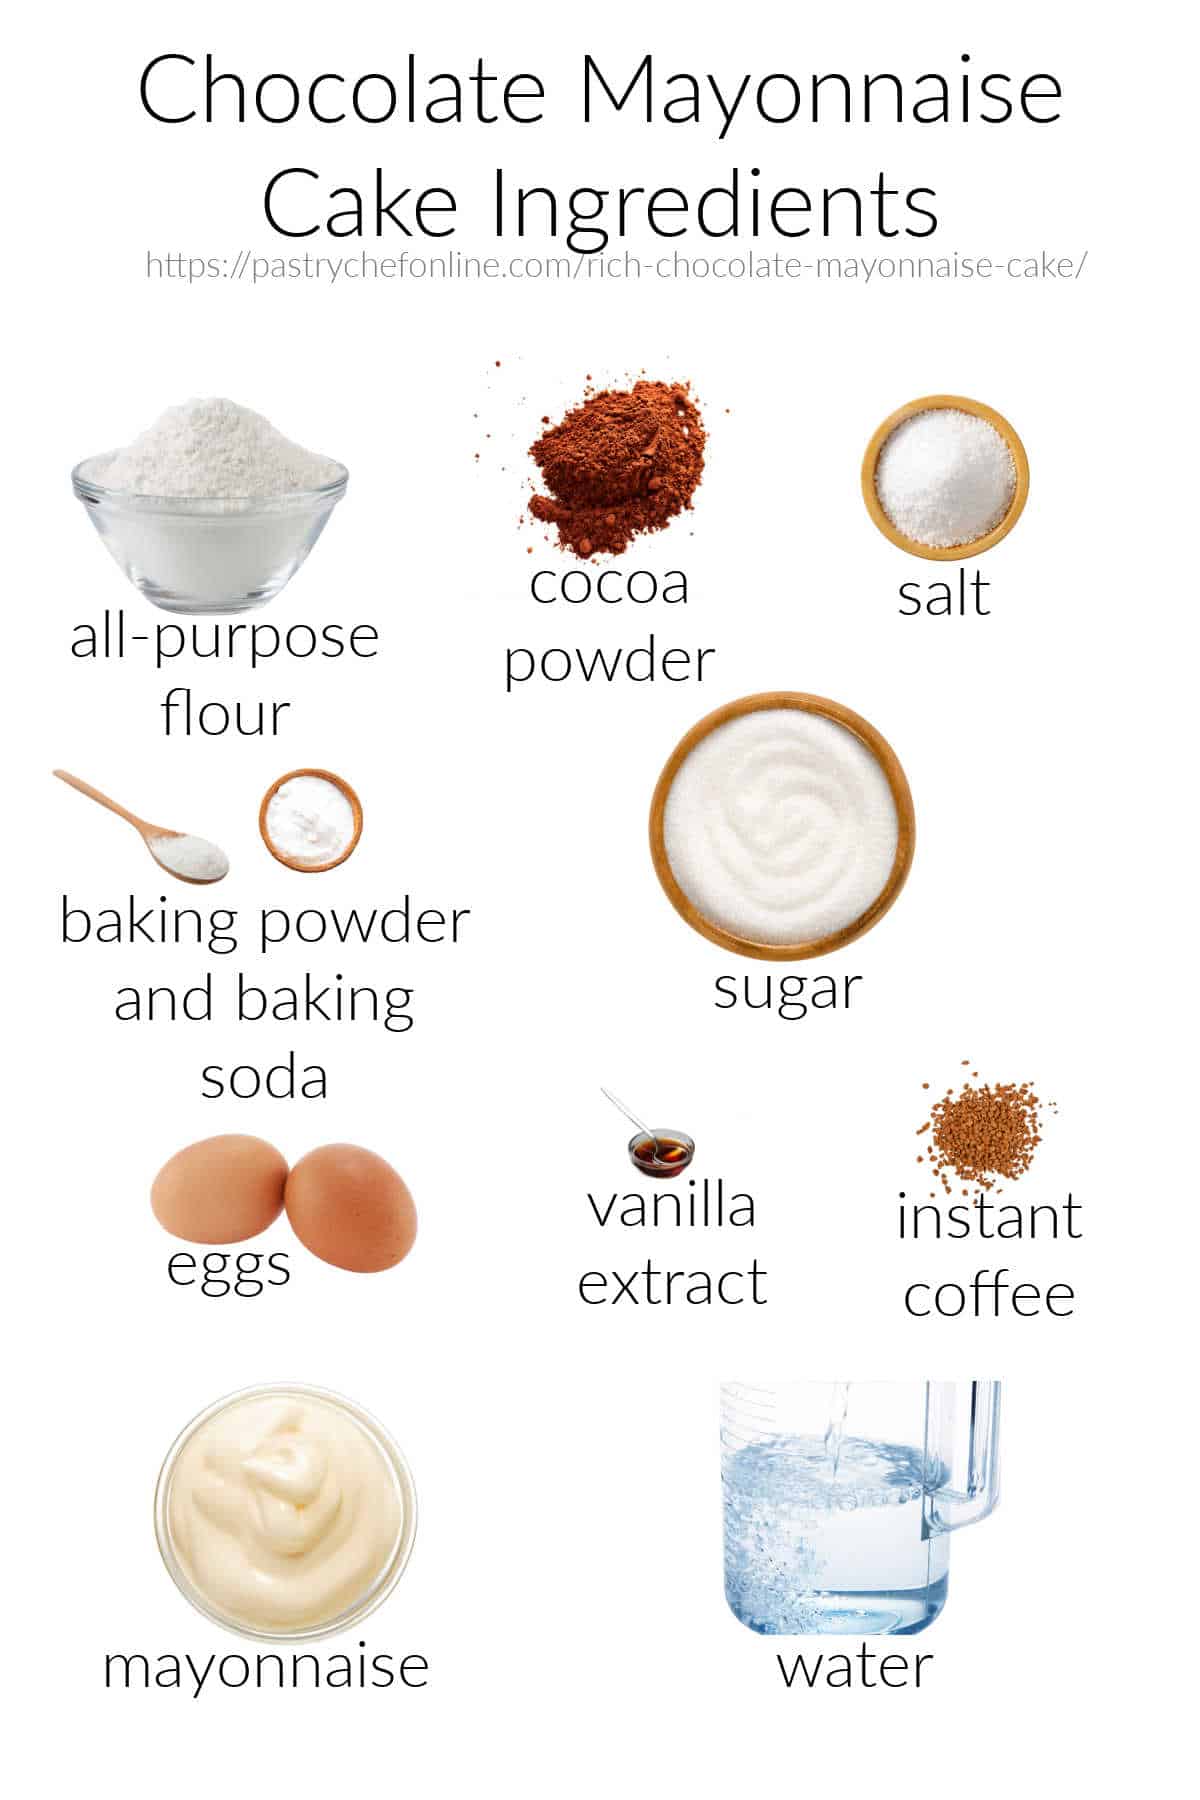
- All-purpose flour: Provides the structure and bulk of the cake. I wouldn’t bother trying to substitute with cake flour, because the cake is moist enough as it is and could fall apart with a lower-protein flour
- Cocoa powder: Regular American (non-alkalized) cocoa powder works fine. I used Hershey’s. If you have a favorite premium brand, by all means use that. If all you have is Dutch-process (alkalized), cut the amount of baking soda in half
- Salt: Brings all the flavors into focus and counteracts any bitterness from the cocoa powder and instant coffee
- Baking powder: Chemical leavening that provides rise
- Baking soda: Assists with rising and also neutralizes some of the acid in the cocoa and coffee
- Sugar: Lends sweetness and moisture and contributes to the tenderness of the cake
- Eggs: Large eggs.
- Vanilla extract: Rounds out the flavors
- Instant coffee: Underscores and deepens the chocolate flavor without overpowering it or reading and “mocha.”
- Mayonnaise: Provides the bulk of the fat in the recipe, contributing to tenderness and moisture
- Water: Boiling water. Mix the instant coffee with the water, or you can use hot coffee instead
For the Rocky Road Frosting
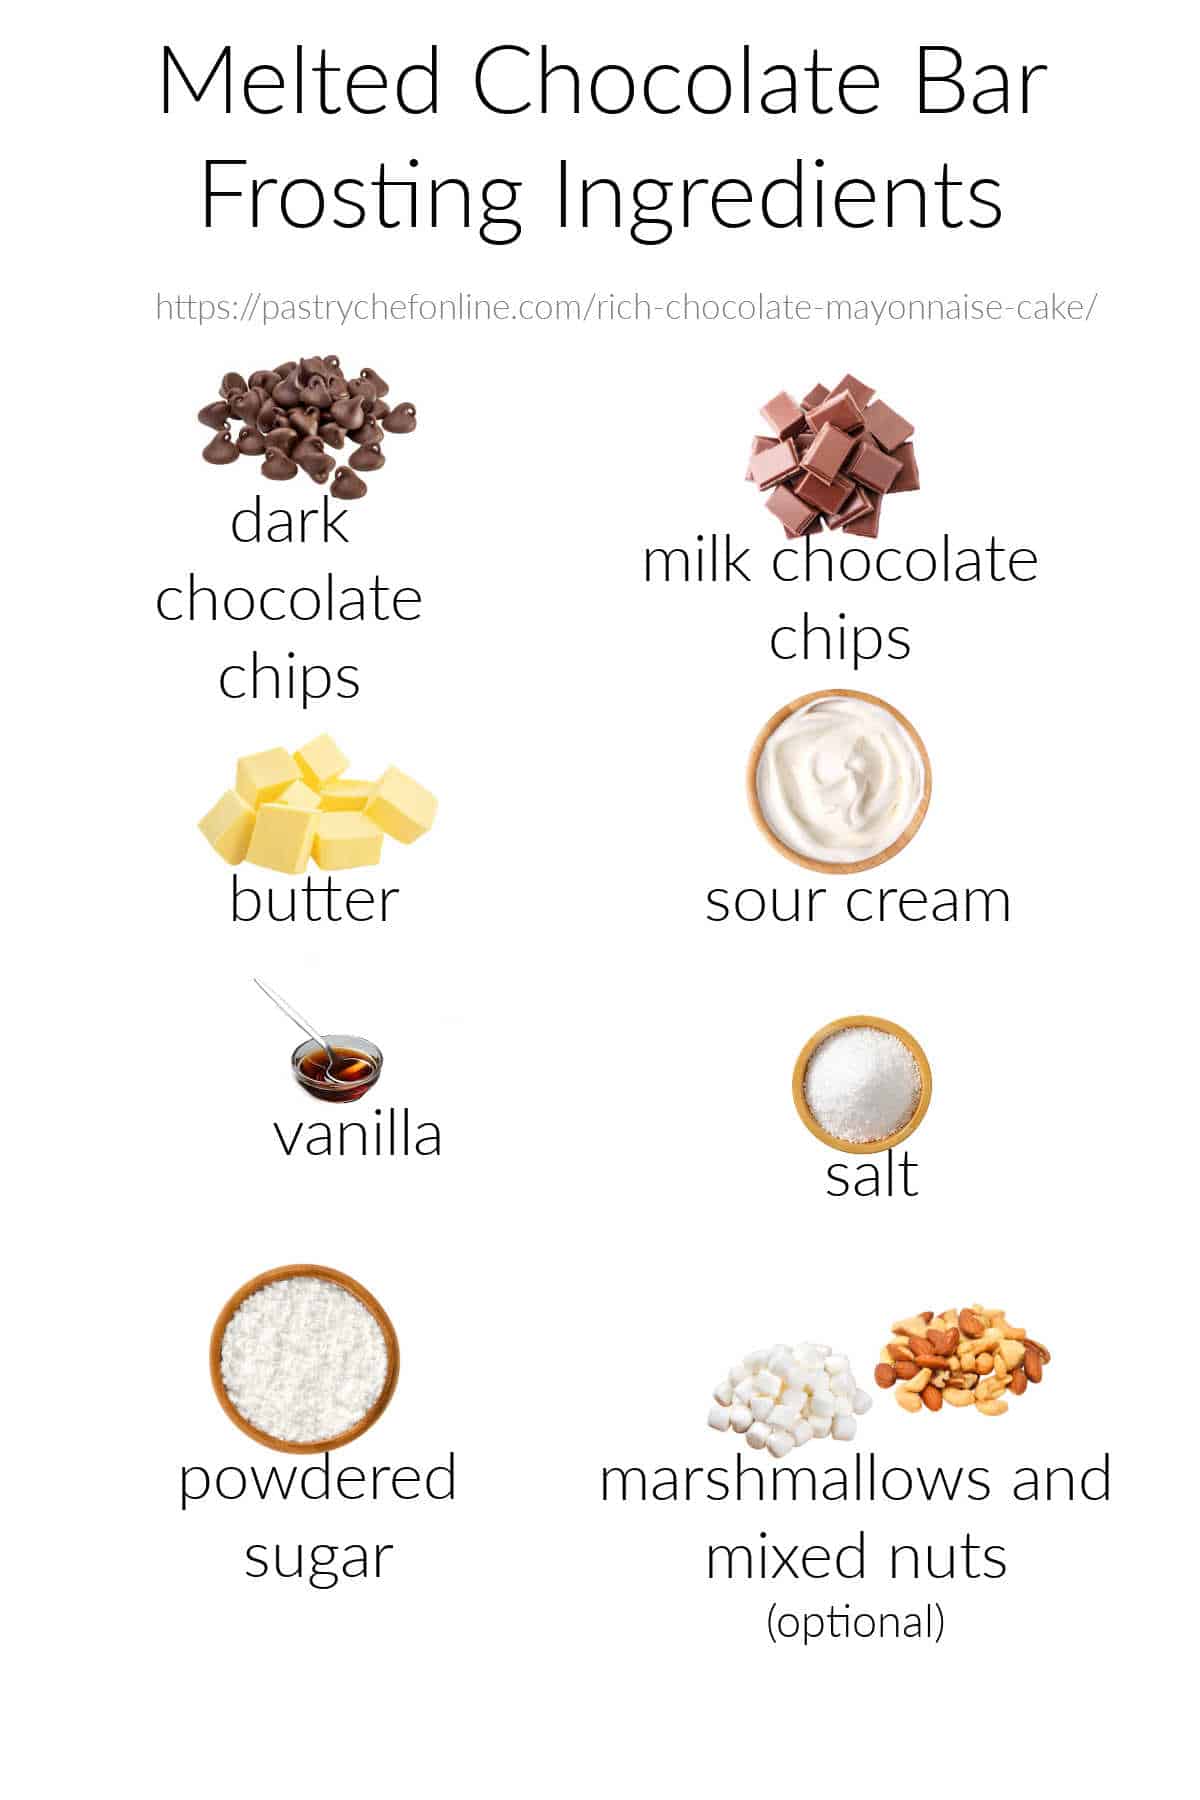
- Dark chocolate chips: Or use chopped chocolate bars
- Milk chocolate chips: Or chopped milk chocolate bars
- Butter: Provides fat and flavor and lends to the spreadability and thickness of the frosting
- Sour cream: Adds a simply irresistible tang and creamy dairy finish to the frosting. You could also substitute creme fraiche or Greek yogurt
- Vanilla: Rounds out the chocolate flavor
- Salt: Brings the flavors into focus and tempers the sweetness
- Powdered sugar: Adds a bit more sweetness and some of the mouthfeel of a standard American butter frosting. (This frosting is smoother, though. And better. I said it)
- Marshmallows: Homemade or storebought marshmallows. If using storebought, get minis, or cut up larger ones
- Mixed nuts: Your favorite nuts. The nuts used in original rocky road ice cream were walnuts.* Use what you like, either all of one kind such as almonds, or use a mix of almonds, pecans, cashews, etc.
*Reference for original nuts here
Procedure
For the Cake
The mixing method for this cake is sort of a hybrid between the egg foam method (what you’d use to make a genoise) and the dissolved sugar method, which I use in the chocolate stout cake recipe.
Here’s the procedure in a nutshell:
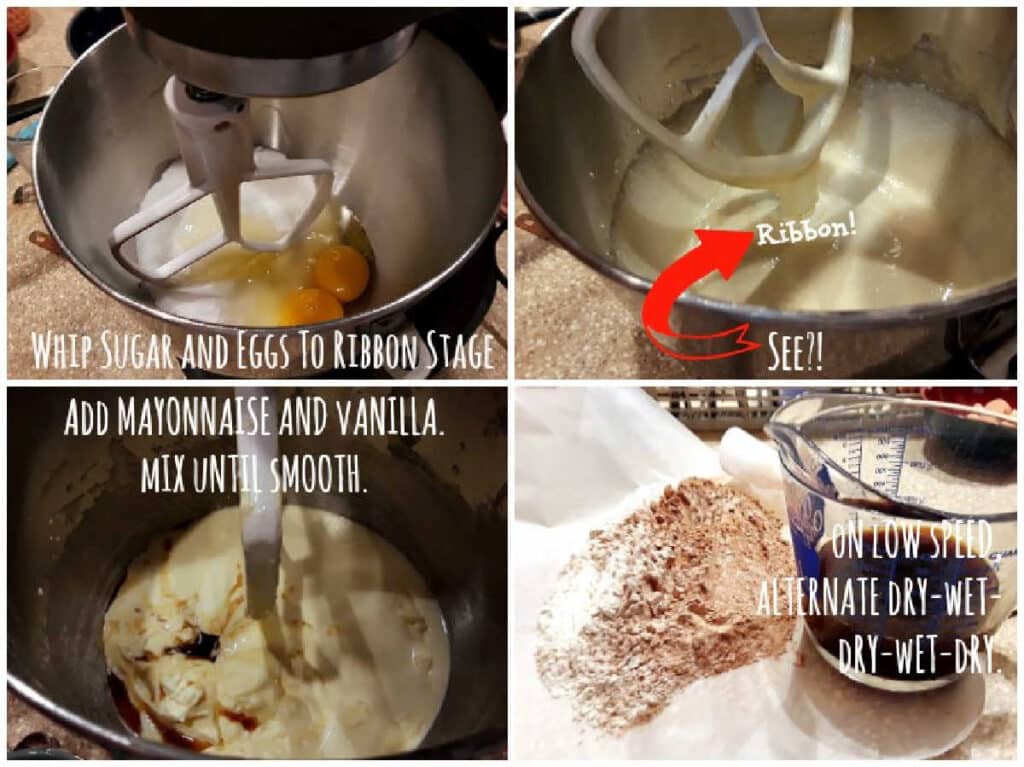
1-2. Beat the eggs and sugar together using the paddle attachment. Beat until the mixture is very pale and thick.
Would you like to save this post?
3. Blend in the mayonnaise and vanilla until smooth. Scrape the bowl as needed.
4. Sift flour, salt, leaveners, and cocoa powder together and alternate adding to the batter with the hot water/instant coffee mixture.
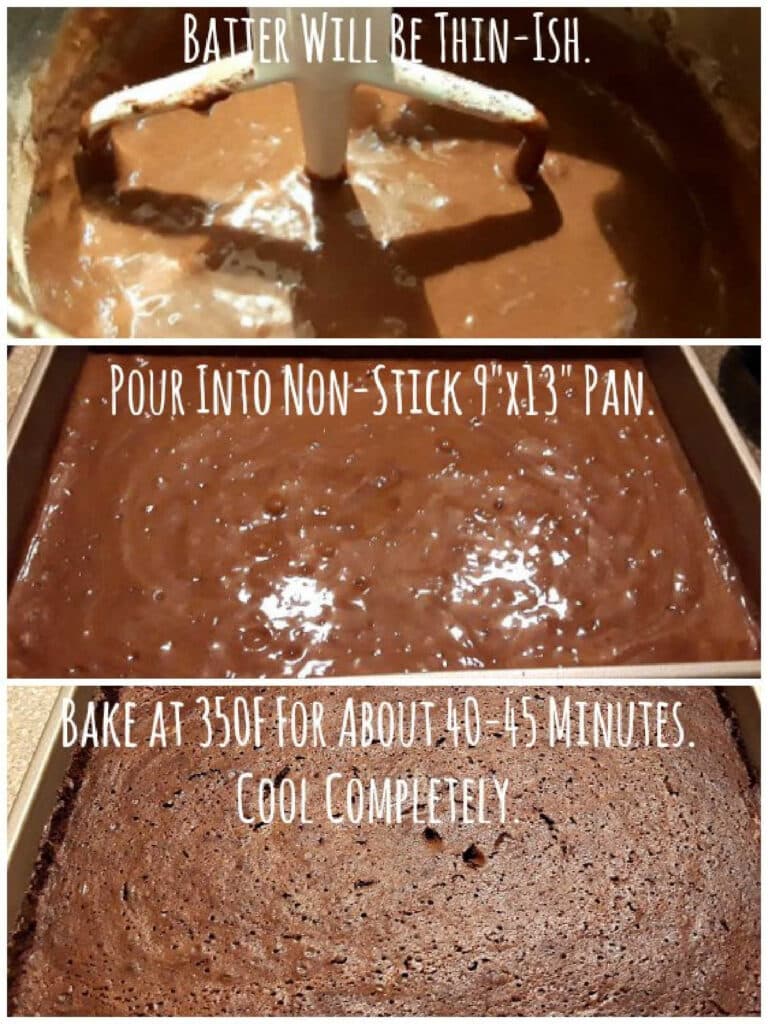
Scrape the batter into your prepared pan and bake until the cake bounces back when you press gently on top and the sides of the cake have just started to shrink away from the sides of the pan.
The cake will pull away further as it cools. Allow it to cool completely in the pan before frosting.
For the Frosting
The frosting is easy to make, and as a bonus, you don’t need a mixer at all.
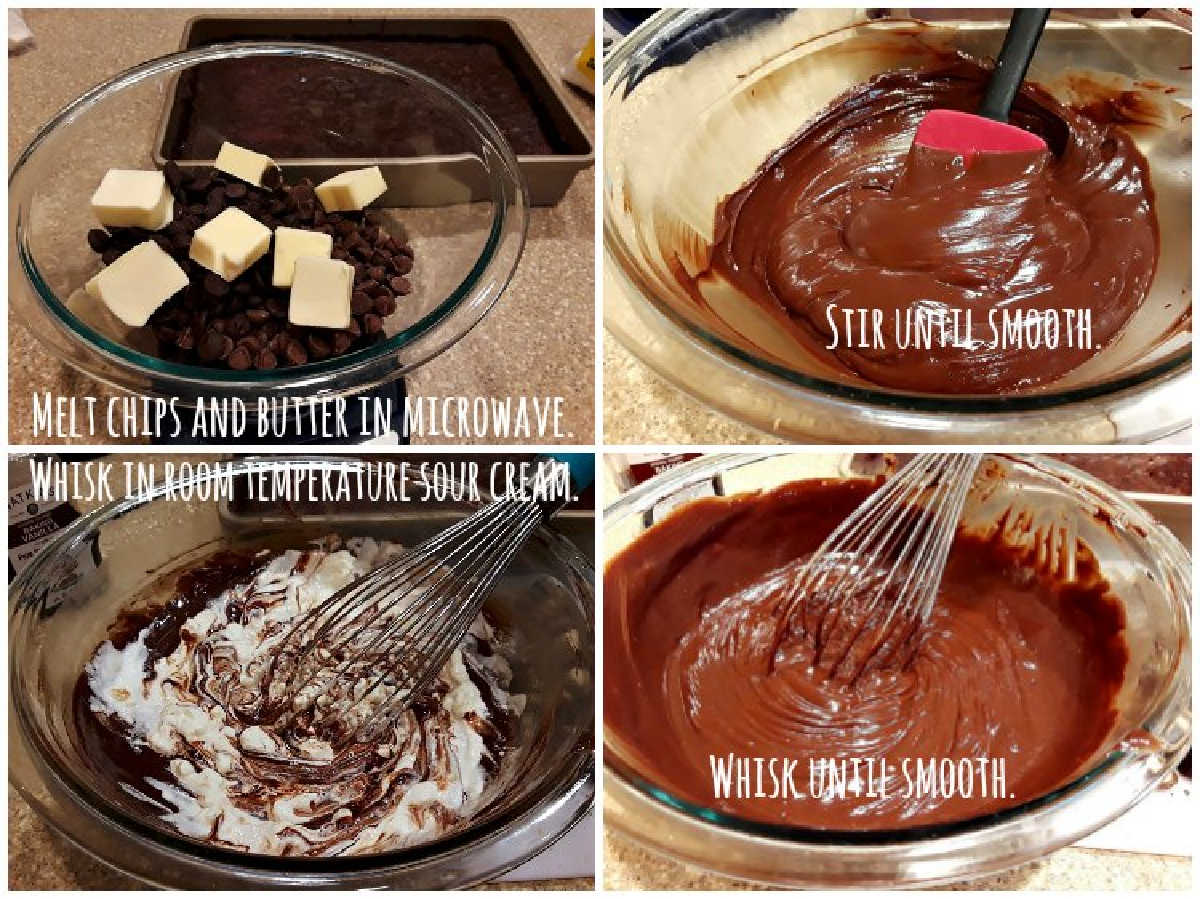
- Put the milk and dark chocolate chips, along with the stick of butter, in a microwave-safe bowl.
- Melt in bursts and then stir until completely smooth.
- Whisk in room-temperature sour cream.
- Keep whisking until the mixture is smooth.
Once you have the base made, all you have to do is thicken it up with some powdered sugar. If you want the frosting to be fluffy, use a
If you want it to be dense (I did!), just whisk it in by hand.
Then fold in about 2/3 of your marshmallows and mixed nuts.
Jenni Says: If you add all the marshmallows and nuts at one time, the frosting will be difficult to spread. Add them in two additions as outlined below.
Frosting the Cake
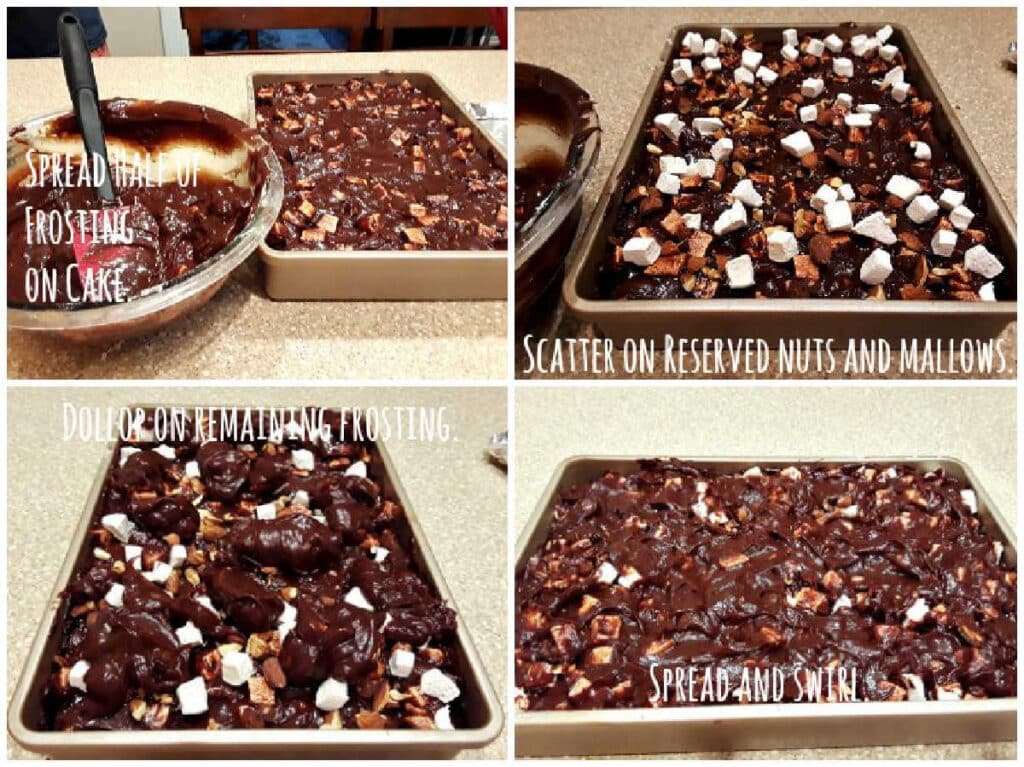
- Spread half the frosting on the cake.
- Scatter the reserved mini marshmallows and chopped nuts evenly over the cake.
- Add the rest of the frosting in “blobs” evenly spaced over the mallows and nuts.
- Spread/swirl. You want some mallows and nuts to still be showing.
NOTE: Store the cake in the refrigerator. It’ll help firm up the frosting a bit and make the cake easier to slice. Slice the cake while chilled, but let the slices sit out for about 30-45 minutes before serving so they come back to room temperature.
Useful Cake-Making Equipment
I do recommend using a stand mixer to make this cake. It has more power than a hand mixer and can really whip the eggs and sugar to the ribbon stage that is needed.
Bake the cake in a 9″ x 13″ cake pan. This is such a versatile size, and you’ll use it for everything from baking brownies to lasagna.
And if you’re feeling shoppy, you can find all my kitchen shopping recommendations in one place.
Frequently Asked Questions About This Cake
- I don’t have instant coffee or espresso powder, and I don’t want to order it. What can I use instead? No problem. Just use hot brewed coffee, and you’ll be fine.
- Can I substitute sour cream for the mayonnaise? No. Sour cream is mainly dairy, and mayonnaise is mainly oil. You will not get good results using sour cream–there is not enough fat in it to make the cake nice and moist.
- Can I make this into a layer cake? Yes! Jill’s original recipe gives directions for making this cake in round pans.
- Spray your 8 or 9″ cake pans and line the bottoms with parchment rounds
- Divide the batter evenly between the two pans, and bake for 20-25 minutes.
- Is the cake hard to slice with all those nuts in it? I would probably not make the rocky road frosting if making a layer cake. The cake is hard to slice cleanly when you hit a nut, so having nuts both in the filling between the layers, around the sides, and on the top is a recipe for a very messy slicing experience. If you still want to make the rocky road frosting, I’d slice the cake first and then just add the mallows and chopped nuts to the top of each slice.
More Cake Recipes to Enjoy

If you’re a cake fan, you may consider trying some of my other cake recipes.
- Butterscotch lovers, you will want to try my butterscotch sheet cake. The frosting on that one is inspired by Jill’s frosting, at least in the way it’s made. As deeply chocolatey as this frosting is, the frosting for the butterscotch cake is deeply butterscotchy and delicious.
- For the opposite of the rocky road cake, vanilla fans will swoon over this whipping cream pound cake. With a tight, velvety crumb that almost melts in your mouth, it is quite delicious!
- This Chocolate Espresso Pound Cake is fully mocha in flavor, so if that’s your thing, you will love it.
And don’t forget to take a look at Jill’s wonderful Cake, I Love You.
Questions?
If you have any questions about this post or recipe, I am happy to help.
Simply leave a comment here and I will get back to you soon. I also invite you to ask questions in my Facebook group, Fearless Kitchen Fun.
If your question is more pressing, please feel free to email me. I should be back in touch ASAP, as long as I’m not asleep.
A Note About Measurements
My recipes are almost all written by weight, including liquids, unless otherwise specified.
For accuracy and consistency of results, I encourage you to buy–and use–a kitchen scale.
I promise that baking and cleanup will be so much quicker and easier.
This is the scale that I recommend for home use. I have owned and used one for years.
Love This Rocky Road Sheet Cake? Please Rate and Review. It Really Helps!
It helps me and other readers so much if you take a moment to rate and review this recipe.
Your star rating and comments help others decide whether the recipe is worth making, and your feedback helps me continue improving recipes here at Pastry Chef Online.
Other lovely ways to share include pinning or posting on your favorite social media platform.
Thank you so much for taking the time!

Rocky Road Cake Recipe
Video
Equipment
Ingredients
For the Chocolate Sheet Cake
- 280 grams all-purpose flour (2 cups)
- 60 grams American cocoa powder (3/4 cup)
- 1 teaspoon baking powder
- ¾ teaspoon baking soda
- ¾ teaspoon kosher salt
- 400 grams granulated sugar (2 cups)
- 2 large eggs
- 240 grams full fat mayonnaise (1 cup)
- 2 teaspoons vanilla extract
- 2 teaspoons espresso powder
- 320 milliliters boiling water (1 1/3 cup)
For the Rocky Road Frosting
- 180 grams semisweet chocolate chips (1 cup)
- 180 grams milk chocolate chips (1 cup)
- 110 grams unsalted butter (1 stick)
- 240 grams sour cream (1 cup)
- 1 teaspoon vanilla extract
- ¼ teaspoon kosher salt
- 240 grams confectioners’ sugar (2 cups)
- 1 cup mini marshmallows (homemade or store bought)
- 1 cup toasted mixed nuts (coarsely chopped)
Instructions
For the Cake
- Position your oven rack in the center of the oven. Preheat to 350F. Spray a 9″x13″ rectangular cake pan with pan spray. Set aside.
- Sift together the flour, cocoa powder, baking powder, baking soda, and salt. Set aside.
- Stir the espresso powder into the boiling water.
- In the bowl of your stand mixer fitted with the paddle attachment, beat the sugar and eggs on medium high speed until they reach the ribbon stage, about 5 minutes.
- Add the mayonnaise and vanilla and beat until smooth, scraping the bowl as necessary.
- With the mixer on low speed, alternate adding the sifted dry ingredients in three additions with the coffee in two additions. Begin and end with the dry ingredients. Scrape bowl as necessary.
- Scrape the batter into the prepared pan and bake for 40-45 minutes or until the cake springs back when pressed in the center, the edges are just starting to shrink from the sides of the pan, and the internal temperature of the cake is between 190F and 200F.
- Remove to a rack to cool completely.
To Make the Rocky Road Frosting
- Measure out the sour cream and allow to warm up from refrigerator temperature to cool room temperature, about an hour.
- Put the semisweet chips, milk chocolate chips, and butter in a microwave safe bowl. Microwave on full power for 1 minute. Stir the chocolate and butter until completely smooth. If it’s not all melted evenly, heat in 15 second bursts, stirring in between, until completely smooth.
- Whisk in the sour cream until completely incorporated and smooth. Whisk in the salt and vanilla.
- Put the confectioners’ sugar in a fine mesh strainer and sift it onto the chocolate mixture. Whisk until smooth and shiny.
- Fold in about 2/3 of the chopped nuts and mini marshmallows.
To Frost and Finish the Cake
- With an offset spatula, evenly spread about half the frosting onto the cooled cake.
- Scatter the remaining toasted nuts and mini marshmallows evenly over the frosting.
- Dollop on the rest of the frosting. Then use your spatula to swirl and spread the frosting over the nuts and mallows, leaving some of them showing.
- Refrigerate the cake until serving time, at least 2 hours. Slice the cake and let slices come to room temperature before serving. Store leftover cake, covered, in the fridge for up to 3 days.
Did You Make Any Changes?
Notes
Storing:
Store the cake, covered at room temperature, for 3 days. You can also store it in the fridge. Just allow the cake slices to come to room temperature before serving. Freeze slices for longer storage.Freezing:
Freeze individual slices, or the whole cake if you'd like. Freeze slices until firm, and then wrap in plastic wrap and foil. To freeze the whole cake, it will be easiest to freeze it in the pan you baked it in. Wrap well with plastic wrap and foil. You can freeze it frosted or unfrosted. If you freeze it unfrosted, bring the cake back to room temperature before frosting.Nutrition
Would you like to save this post?

Hi, y’all! I hope you’ve enjoyed this post and hopefully also learned a thing or two.
If you like my style, I invite you to sign up for my occasional newsletter, The Inbox Pastry Chef.
Expect updates on new and tasty recipes as well as a bit of behind-the-scenes action. I hope to see you there!

And there you have it, a rich, moist, and crowd-pleasing rocky road cake. You’re going to love this cake. I promise.
Thanks for spending some time with me today. And I really do love hearing from you, so please leave a comment, rate the recipe, and/or ask a question. I’m happy to help.
Take care, y’all.


Join in Today!
I am so excited to make this for my hubby’s birthday! He just loves Rocky Road ice cream, so I think he will love this! Thanks!
Oh, awesome, Sara! I really hope he loves it! You are going to love the chocolate frosting, even without the nuts and marshmallows in it. It really is in my top 3 best chocolate frostings ever. Jill O’Connor is a master! Please give a shout if you have any questions. 🙂
I looks amazing. Thank you for sharing this recipe.
You’re welcome. Enjoy!
Sissy, this is a lovely post. Well done! The cake sounds delicious, as soon as I’m off this silly diet, I’m making it! 🙂
Aw, thank you, Sissy! I think you will love it. ❤️
If I want to make this a s’mores cake, can I replace the nuts with graham cracker chunks? Or do you think they would get too soggy in the frosting? If I make it for a crowd I try to avoid nuts because of allergies. Thanks! 🙂
First of all: an excellent idea! You can trade the nuts for Grahams, but you’re right to be concerned about their getting soggy after a few hours. Whir your grahams up in a food processor, and mix them with a pinch of salt, some sugar, and melted butter, break that up into crumbles, and then bake it on a sheetpan until crunchy. Cool completely. They should stay at least mostly crunchy for 2-3 days. I did this when I made an ice cream that I wanted Graham cracker crumbles in, and it worked great! Enjoy, and please send me a photo of your masterpiece!
I just want a whole pan of this to myself – that’s a serving right? Great instructions and love the frosting for it.
You can have as much as you want! And the frosting is just the best. Jill O’Connor is a cake genius!
OMG I cried a little…recipes like this make me wish I could eat gluten. You outdid yourself with this one!
I hope you can make it happen with a gf blend of some sort. It’s such a mosit, rich cake. While 8 can take credit for the marshmallows and nuts, Jill Oconnor gets full marks for this cake and especially for the frosting. It is seriously the best chocolate frosting I’ve ever had!
This is a great, moist chocolaty delight. A nice treat that is not heavy like some chocolate desserts can be. Definitely worth saving room for!
We definitely need to make this guy again. And again! xo
good grief, woman, I’m drooling all over my keyboard. This sounds absolutely decadent and I think I MUST find a reason to make it. Let’s see, tomorrow is Tuesday, that may be a good enough reason. I actually do have somewhat of a question. You say that you can use brewed coffee in place of the instant or espresso. How much brewed coffee would you use, and wouldn’t that mess up your liquid to solids ratio?
Use the same amount as the water: 1 1/3 cups. 🙂 Then just leave out the water and the espresso powder. And Tuesday seems like the perfect reason to make this!