

Overnight yeast pancakes are deeply flavorful, wonderfully fluffy, and ridiculously convenient. Whisk the batter together the night before, let the yeast work while you sleep, and wake up ready to make pancakes with almost zero morning effort.
If yeast makes you nervous, pancakes are a great place to start. No kneading, no shaping, no stressing. Just stir everything together and let time and fermentation work their magic.
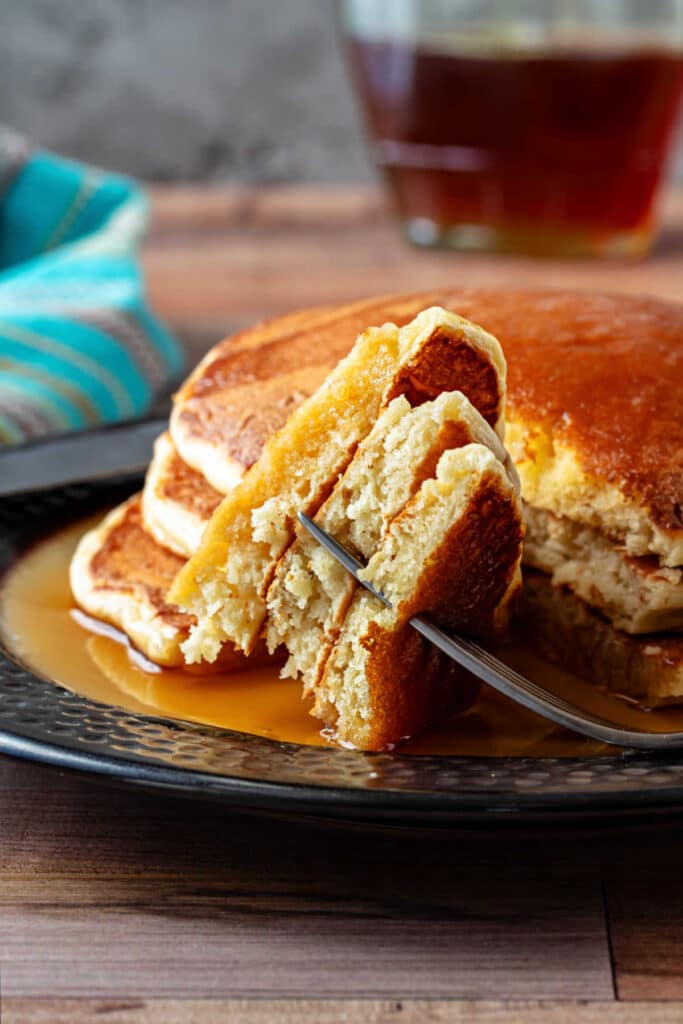
The overnight rest gives these pancakes a light tangy complexity and that old-school diner flavor that’s hard to resist, crisp buttery edges and all.
Pastry Chef Online Participates in Affiliate Programs. If you make a purchase through one of my links, I may earn a small commission. For more information click to read my disclosure policy
Great pancakes. Fluffiest I’ve ever made.
Overnight pancake convert Buddy
Overnight Pancakes, At a Glance
✅Skill Level: Beginner
✅Skills: Whisking, Flipping a Pancake
✅Type: Breakfast pastry/pancake
✅Number of Ingredients: 8
✅Prep Time: 10-15 minutes
✅Cook Time: about 3-4 minutes per pancake
✅Yield: 12 pancakes
Jump Straight to the Recipe
A Yeasted Pancake is a Beautiful Thing
Overnight yeast pancakes have deeper flavor, a lighter texture, and just a hint of tang that makes them taste a little like old-school diner pancakes in the best way.
They also fit real life beautifully. Instead of making batter first thing in the morning, you whisk everything together the night before and let time do the work while you sleep.
Here are a but a few reasons to love them:
- More flavor: While the batter rests, the yeast slowly develops flavor, giving the pancakes more depth and character than a standard quick batter.
- Light, airy texture: The yeast keeps producing bubbles as the batter rests, so the pancakes stay fluffy from the first pancake to the last. Huzzah!
- No morning rush: Unlike chemically leavened batters made with baking powder and baking soda, you’re not racing against the clock to preserve bubbles.
- Flexible timing: The batter can hang out in the fridge for up to 36 hours before cooking, making these ideal for weekends, holidays, or feeding guests.
- Cook now, save some for later: Make a few pancakes today, refrigerate the remaining batter, and cook the rest the next morning.
The flavor payoff is pretty fantastic. Almost a little sourdough tang without needing to maintain a starter.
Ingredients and Procedure
Make these pancakes with only 8 ingredients, most of which you probably already own.
If you want to get straight to it, you’re welcome to jump on down to the recipe.

- all-purpose flour: The bulk of the recipe, all-purpose flour is my choice for a good balance between tenderness and gluten-development. You can substitute whole-wheat flour for up to half of the all-purpose if you prefer
- granulated sugar: Sugar adds a touch of sweetness, assists in browning, and helps to tenderize the gluten. You can use brown sugar or a mixture of granulated and brown for a bit more depth of flavor
- kosher salt: Salt focuses all the flavor, allows the vanilla to “bloom” and have more dimension, and it also moderates yeast growth so your batter doesn’t go crazy and rise up over the top of your bowl
- instant yeast: SAF is my preferred yeast. They have 2 formulations, one for breads and one for sweet breads. Honestly, either will work for whatever you want to make. I think it’s really more of a marketing gimmick, but don’t tell them I said so. Yeast provides the rise and additional flavor. It’s a forgiving leavener in this context because it will keep multiplying and providing lift as long as it has carbs to eat. You can stir the batter down multiple times and it will still rise well once it’s in the pan
- whole milk: The majority of the liquid in the batter, whole milk brings some milk sugars and proteins for milky sweetness and browning. You can substitute any plant milk or use 2% if you prefer
- eggs: Provides some fat and emulsifiers (in the yolk) and additional liquid and proteins (in the whites) My “regular” pancakes for one recipe is a no-egg recipe, but the yeasted test batch without eggs just felt stodgy, so the egg also helps with lightening the batter
- neutral vegetable oil: Fat carries flavor and it also adds tenderness and weakens gluten for an overall tender and fluffy texture. You can try using melted and cooled butter or ghee in place of the oil, but in the fridge, it tends to end up in little pebbles of fat. The flavor will definitely be buttery, though, so it’s your choice entirely
- vanilla extract: Add a creamy, woody, floral roundness to the pancakes
Optional Ingredients/Variations
You can add all sorts of extracts, zests, fruit, etc to change up the flavor of your pancakes. Here are a few ideas:
To Add to the Batter:
- cinnamon or your favorite baking spice/s
- lemon or orange zest
- instant coffee or coffee extract
- other extracts such as almond (be judicious with it–it’s strong!), lemon, or orange
To Add to the Pancakes as They Cook:
As a rule, don’t mix any solids into your pancake batter, because it’s almost impossible to get an even distribution of whatever–blueberries, chocolate chips, etc–straight from the bowl.
The best way to add these “extras” is to scatter a handful evenly across the tops of your pancakes before you flip them.
- blueberries
- chopped strawberries or other fruits larger than blueberries
- sauteed apple (you need to precook harder fruits since they need longer to cook than 60 seconds, so sauté them with a little sugar, butter, and a pinch of salt until soft. See my apple turnovers for an example of a cooked fruit compote you could use in pancakes
- chocolate chips (I like to drizzle the tiniest bit of batter on top of each chip to insulate them when they’re flipped so the chips don’t burn.)

Procedure
There are 8 ingredients in these pancakes: 4 dry and 4 wet
Putting them together is seriously as easy as 1-2-3:
- Whisk the dry ingredients together in a large bowl
- Whisk the wet ingredients together in a pitcher or a medium bowl
- Whisk the wet ingredients into the dry ingredients for about the count of 10. A few lumps can remain.
Once the batter is made, the yeast will start doing its thing. If you keep your house pretty cool, you can let it hang out at room temperature overnight. If it’s a bit warmer in your kitchen, you can refrigerate it.
Either way, cover your bowl of batter with a lid or plastic wrap and just walk away.
The next day, when you’re ready to make your pancakes, preheat your griddle/cast iron pan over medium-low heat until it’s nice and hot.
I spray the pan with some avocado oil or Pam and then wipe it out. I generally only do this once every few pancakes. If you have a good nonstick coating, you should be able to do the same.
Jenni Says: You will be tempted to heat your pan on medium-high to high heat. Don’t do this. Your pancakes need a more consistent, lower heat to cook through without burning the outsides. Trust me.
How to Know When to Flip Your Pancakes

Pancakes can cause all sorts of consternation as they sit there, cooking on the first side. You only want to flip them once, so they have to be perfect. This can cause stress and worry.
But worry not. Stress not. Here’s what to look for:
With yeasted batter, even if you have just stirred it down, the heat of the pan will make the yeast super active, so bubbles will rise up through your pancakes. Toward the beginning of cooking, the bubbles will rise, pop, and fill in with batter.
Would you like to save this post?
Closer to time to flip them, some of the holes may not fill in all the way with batter.
Watch the pancakes pretty closely. You will be able to see when the pancakes are no longer wet on the sides and even just slightly on top around the edges. That’s when you’ll know it’s time to flip.
How to Flip Pancakes so They Don’t Break
Pancakes can sense fear. Use a good, not-too-flexible spatula, and in one motion, shove it under your pancake decisively. You want to get a good 2/3 to 3/4 of the way to the other side of the pancake so it doesn’t break when you try to flip it.
A short, quick, and decisive SHOVE will do that for you. Once you’ve got your spatula under your pancake, pick it up only about 3-4″–too far and it’ll splatter when it hits the pan again–and flip it completely over. Again, decisively.
And that’s it. The second side will be uglier than the first. It’s a pancake law. Worry not. It won’t brown as evenly as the first side because of all the bubbles that were forced to the surface while the first side was cooking.
Cook for about a minute or so, and then check the second side. If it looks anemically beige rather than golden brown, give it another 30-45 seconds and check again.
Tada!
Watch the video, which focuses on cooking and flipping the pancakes so you can make them whenever you want, stress- and worry-free.
How Much Oil to Use
One of my testers, Jo-Anne, added a bit of oil to her pan and then proceeded to cook pancakes. Hers looked very much like the second sides of the ones I cooked.
I believe the difference is that I add a little spritz of oil and then wipe most of it away so the pan is almost dry. Cooking pancakes this way will get you a first side (the side that’s the prettiest) that is almost uniformly golden brown. Like this:

Spraying in or brushing oil in the pan without wiping it out will yield pancakes that have a more lacy golden-brown color, more like you’d see on a crepe.
This is how tester Jo-Anne made them, and here is a photo of hers. Note the 2 in the back on the right are more uniform in color. Those are two she made without adding extra oil, so her pan was almost dry.

It is strictly an aesthetic choice whether you want uniform or lacy golden-brown pancakes.
Jenni Says: Oil your pan and then wipe it out for pancakes that are uniformly golden brown. For a more lacy, golden-brown appearance, don’t wipe the excess oil out of the pan. Either way, they’ll be delicious.
Yeast-Raised Pancake Q&A
Yeast, combined with a long rise, yields a pancake with more flavor than one chemically raised with baking powder. Since yeast will continue to produce bubbles for several days, you also don’t have to work so quickly to make your pancakes.
Store leftover pancakes, well-wrapped, in the fridge for up to 3 days. To reheat, you can heat them in the microwave, or if you like pancakes to a a bit crispy on the outsides, reheat them in a toaster or toaster oven. For longer storage, it’s best to freeze them. Let them cool completely and then put them in freezer bags with a square of parchment between each to keep them from sticking together. Reheat from frozen in the toaster or in the microwave. Or do a combo, heating them for 30 seconds or so in the microwave and then getting them lightly crisp in a toaster or toaster oven.
Notes from My Testers

I was so happy when some of my readers stepped up to test this recipe for me (and for you). Here are some of their testing notes:
I loved how easy it was to make them. You didn’t have to add additional ingredients in the morning, or wait for it to come to room temperature before cooking. You didn’t have to separate the eggs, and whip the whites. It’s just a super simple recipe that turned out excellent fluffy pancakes with minimal effort. I’ll definitely be making these again!
—Tester Vanessa
The recipe came together in minutes, weights and measurements were accurate. I refrigerated the batter overnight until the next afternoon. I stirred down the batter and nuked the butter and maple syrup while the pan was heating. The 1/3 cup per pancake measure is accurate. Timing depends on pan and heating element. The result is a nicely textured..not too light and not too dense not too sweet..pancake…The recipe is solid…and beautiful, tasty results. —Tester Carol
What a wonderful recipe! I loved how easily everything came together. The directions were clear and easy to follow. The pancakes cooked up light and tender. They’re perfect with just a bit of butter and nothing else. This was my first time trying yeasted pancakes and I have to say, they are delicious! I enjoyed the flavor much more than box-mix pancakes…I made six this time but I’m already looking forward to having a big batch ready next time my Grandkids come over! Thank you Jenni!” —Tester Sara
More Breakfast Goodness
If you are into a more decadent breakfast, try my chocolate pancakes, which are happy to serve as breakfast or dessert. Or give my yeast-raised chocolate chocolate chip pancakes a try.
Love pancakes and have a hankering for a lovely fall version? Try these caramel apple pancakes. Or skip the caramel and try these apple pancakes instead.
And if you’re a fan of the overnight batter maneuver, you must try my overnight malted waffle recipe.
And as far as syrups to pour over your pancakes, maple syrup or a mixture of maple syrup and honey are pretty standard. But don’t discount white chocolate sauce or a nice mixed berry sauce. You can even spread them with mixed berry jam.
You can also try some good old Southern buttermilk syrup. Good eatin’!
Questions?
If you have any questions about this post or recipe, I am happy to help.
Simply leave a comment here and I will get back to you soon. I also invite you to ask questions in my Facebook group, Fearless Kitchen Fun.
If your question is more pressing, please feel free to email me. I should be back in touch ASAP, as long as I’m not asleep.
A Note About Measurements
My recipes are almost all written by weight, including liquids, unless otherwise specified.
For accuracy and consistency of results, I encourage you to buy–and use–a kitchen scale.
I promise that baking and cleanup will be so much quicker and easier.
This is the scale that I recommend for home use. I have owned and used one for years.

Overnight Pancake Recipe
Video
Ingredients
- 16 oz all-purpose flour 454 grams or about 3 3/4 cups
- 4 Tablespoons sugar white, brown, or a mixture of the two
- 2 ½ teaspoons kosher salt if using other than Morton's, weigh out 12 grams
- 2 teaspoons instant yeast
- 20 oz whole milk 567 grams or 2 1/2 cups
- 2 large eggs
- 4 Tablespoons neutral vegetable oil
- 2 teaspoon vanilla extract
Instructions
- In a large bowl, whisk together the flour, sugar, salt, and yeast.
- In a medium bowl or pitcher, whisk the milk, egg, vegetable oil, and vanilla extract together until well combined.
- Pour the wet ingredients over the dry ingredients and whisk together until reasonably well-combined–about the count of ten. A few little lumps are just fine.
- Cover the bowl and refrigerate overnight.
- The next day, pull the batter out and let it sit in a warm place for about an hour or so before making your pancakes. You can use it immediately, because the yeast will wake up, but it's nice to give them a head start.
- Preheat your griddle or preferred pancake pan and cook about 3 oz at a time. Cook until very bubbly on top. The edges will appear dry, about 90 seconds-2 minutes. Flip and cook the second side for about 1-1 1/2 minutes or until lightly golden brown on the second side. NOTE: The second sides are always less attractive than the first. I always serve mine first side up!
- Keep pancakes in a warm oven (about 200F) until all are cooked, then dig in.
Did You Make Any Changes?
Notes
Small Batch Amounts
Makes about 6 pancakes- 8 oz all-purpose flour
- 2 Tablespoons sugar
- 1 1/4 teaspoon kosher salt (6 grams)
- 1 teaspoon instant yeast
- 10 oz whole milk
- 1 egg
- 2 Tablespoons neutral vegetable oil
- 1 teaspoon vanilla extract
Large Batch Amounts
Makes about 24 pancakes. NOTE you can cook some on one day and the rest the next day.- 32 oz all-purpose flour
- 3.5 oz sugar (8 Tablespoons or 1/2 cup)
- 5 teaspoons kosher salt (25 grams)
- 3 teaspoons instant yeast (I know it’s not double, but the yeast will continue to multiply. 3 teaspoons/1 Tablespoon is plenty of yeast, I promise)
- 40 oz whole milk (1134 grams or 5 cups)
- 4 large eggs
- 3.4 oz vegetable oil (96 grams or 1/2 cup)
- 4 teaspoons vanilla extract
Storing
Hold leftovers in the fridge for up to three days. Reheat in the microwave, toaster, or toaster oven. Or start them in the microwave to make sure the centers are warm and then crisp the outsides up a bit in the toaster or toaster oven.Nutrition
Would you like to save this post?
Love These Overnight Pancakes? Please Rate and Review. Thanks!
It helps me and other readers so much if you take a moment to rate and review this recipe.
Your star rating and comments help others decide whether the recipe is worth making, and your feedback helps me continue improving recipes here at Pastry Chef Online.
Other lovely ways to share include pinning or posting on your favorite social media platform.
Thank you so much for taking the time!


Hi, y’all! I hope you’ve enjoyed this post and hopefully also learned a thing or two.
If you like my style, I invite you to sign up for my occasional newsletter, The Inbox Pastry Chef.
Expect updates on new and tasty recipes as well as a bit of behind-the-scenes action. I hope to see you there!

And there you have it, friends. Yeasted, overnight pancakes that might well be the best pancakes ever!
I hope you enjoy them. Thanks for spending some time with me.
Take care, y’all.


Join in Today!
May I not leave the mix overnight? Can I pop it into somewhere for an hour and then start pan frying the pan cake?
Hey, Katie! Sure, you can make the batter and let it rise until nice and bubbly then stir it down and make pancakes on the same day. The batter does develop more flavor with an overnight rise, but they’ll still be delicious if made the same day. Enjoy!
Great pancakes. Fluffiest I’ve ever made. I used almond milk since we were out of regular. Worked great. Is it possible to substitute honey, molasses, or golden syrup for the sugar? Would any of the other ingredients need to be adjusted?
Hey, Buddy! I’m so glad they worked out, and it’s great to know that almond milk works well in them, too. I would stay away from honey just because it may keep the yeast from being as active as possible, and I think molasses might yield too strong a flavor. If you do try using molasses, be really restrained with it. I think of the three alternatives to sugar you mention, that golden syrup is definitely your best bet. You may want to increase the flour by just a smidge, but since they’re pancakes and aren’t meant to rise into a gorgeous loaf, I think the sub without any other adjustments should work well. Enjoy!
Thanks for the recipe Jennifer! I’m comfortable leaving this at room temp overnight so I simply reduced the yeast to just 1/4 tsp and it was just right! I also reduced the flour by 100g and added 60g oatmeal and 40g polenta to the wet ingredients and whisked them up with the blade attachment on my stick blender before folding in the dry.
Excellent Brad! I bet the subs of polenta and oatmeal gave them a lovely texture and flavor. I think I’ll give that a go next time I make them!
Really solid recipe! Thanks for the weights, wish more writers would do that. This will be my go to method for pancakes. I did add a little milk the next morning, because I like them a little thinner.
Hey, Keith! So glad you enjoyed the recipe and that you could tweak it to your preferred texture. I will never (rarely) go back to same-day pancakes. I’ve had the blog for maybe 6 years now, so there is some variation in formatting, but I have always tried to use weights as my primary measurement. So much more reliable and consistent. Take care!
I’ve made these twice in the past week, and they are wonderful! Nice, fluffy pancakes from the first one to the last one, and a lovely, complex flavor that I hadn’t even realized I was missing. I made it with whole milk the first time and almond milk the second time, because that’s what I had. They came out great both ways.
Delicious–my husband and I are now firm believers in overnight yeasted pancakes!
A word of caution to those trying to sneak in a little extra nutrition: be sure to adjust the hydration if you choose to use a whole grain flour. I used WW pastry flour and whole milk in the quantities listed in the recipe. My batter was a little too thick and spreading it out across the pan destroyed the delicate bubbles the yeast had spent all night creating.
But again: DELICIOUS! I’ll be making yeasted pancakes again, and they’ll definitely be made for company; maybe even with the appropriate flour next time. Thanks for the recipe!
So glad you loved them, Allison! And good point about using a “thirstier” flour. I will make a note to make sure others know as well. I appreciate the review!
Great recipe, easy to make, and the pancakes were fluffy and tasty. I tried the small batch recipe ( 230g flour, 280g milk, 30g sugar) , with soy milk.
They aren’t overly sweet, which is perfect if you decide to add toppings. Could use them as like blinis, with smoked salmon and salted whipped cream for example.
Currently I don’t have maple syrup (or salted butter caramel ) in my cupboards, so I’ll add some more sugar next time, but just before making them so the yeast doesn’t “eat up” all the sugar during the night.
Leila, I am so happy you enjoyed the pancakes. I really love the flavor that long slow rise imparts. I serve mine with a metric ton of maple syrup, so it’s best for me to keep them less sweet. lol Smart not to add the extra sugar until the next morning. Enjoy!
I have never made my own pancakes and always just buy them from the supermarket – I might actually be able to follow this recipe I think I need to – these look delicious. xxx
They really are easy to make, Ashley! I’m glad my recipe is giving you the confidence to try!
These were super quick and easy to mix up the night before and the fluffiness! Oh they were so much fluffier than traditional baking powder pancakes. One of the best things was that the last pancake was every bit as fluffy as the first. The recipe amount made just the right amount for breakfast for our family of 5.
I’m so happy y’all loved them, Jenny! The yeast is amazing at making bubbles, and continuing to make bubbles. Thank you, yeast!
This recipe came together in minutes. The weights and measures are accurate. I used half whole milk and half buttermilk and that worked well. I refrigerated overnight and stirred the batter down per instructions. The results are nice fluffy pancakes.
Thank you so much for testing the recipe for me, Carol! And I’m so glad you enjoyed them!
We had the pancakes this morning. I loved that I could start the night before and know what we’re going to eat for breakfast in the morning.
We used buttermilk and my husband said they tasted a little like sourdough, which he really liked.
I enjoy peanut butter on my pancakes so the true test was how they tasted with peanut butter. And they were soooo delicious.
Thank you for the recipe!!!
I thrilled y’all loved them, Melanie! Thank you for testing the recipe before it was live, too. I really appreciate your giving me feedback on them!
Thanks for sharing the recipe with me to be one of your testers. I decided to mix the batter around 1pm for savory dinner pancakes. I often will place a spoonful of tuna salad on a pancake and fold it over, much like a soft taco. Must be a childhood ‘thing’.
The recipe was very easy to follow and came together within a couple of minutes with minimal cleanup. I prefer to weigh my ingredients; I appreciated the weight measures. The batter looked yummy, from the get-go. I left it on the counter; came home 4 hours later and it was ready. I never know to leave the oil in the pan or not. I mostly use cast iron, so I know my pans are seasoned. For most of the pancakes, I added about a tsp of olive oil and spread it with a brush. I could manage 2 pancakes at a time in a low rimmed skillet. I forgot to oil it at one point and had 2 on the skillet. That’s when I noticed the evenness of the color as I flipped it. I prefer a little crunch around the edges, so, keeping up the oil was my preferred way of cooking. I also liked the lacy look. It certainly doesn’t deter from the taste!
OH! the taste…oh my gosh. Not an overpowering yeast flavor, but it was there. The boyfriend doesn’t like buttermilk, so I used half and half cut with water. The pancakes were fluffy, tender, and had just the right amount of sweet. I reheated 3 this morning for breakfast on the skillet. Being careful not to cook, but just heat them. Warming the plates and maple syrup kept the pancakes from cooling off quickly. I’ve put the remainder in the freezer, in a zip lock baggie, between parchment. These will be my go-to pancakes. Lemon Blueberry next time….
Tester, Jo-Anne
I am so happy you love them, and thanks for letting me use your photo and for all the detail in your review. Very much appreciated!
Delicious! So easy to make and taste much better than anything from a box!
Thank you so much for being one of my testers Sara! I’m glad you love the pancakes!