
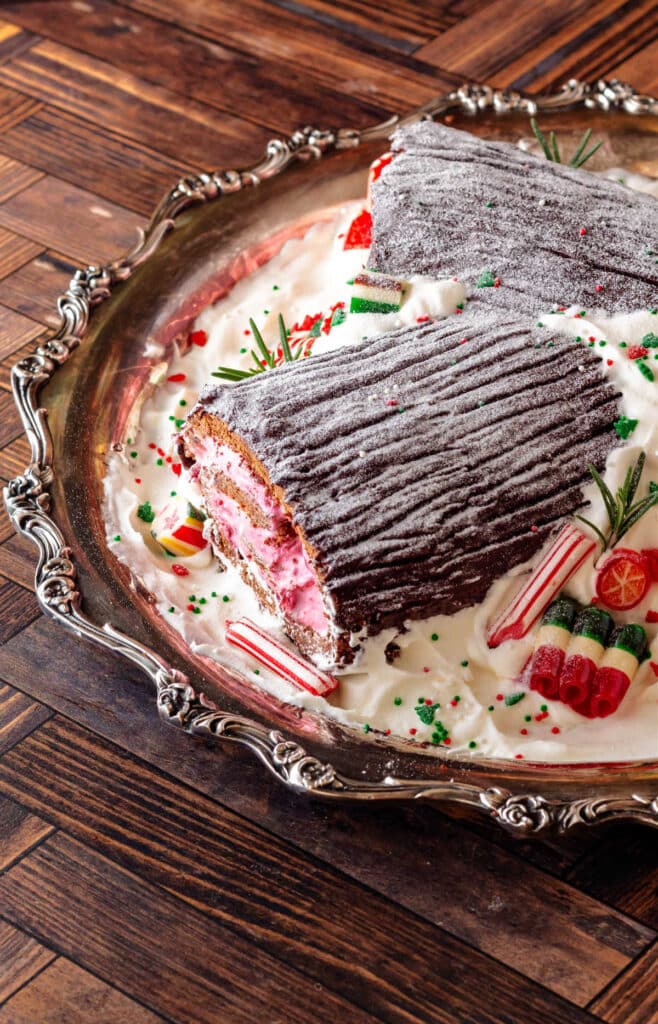
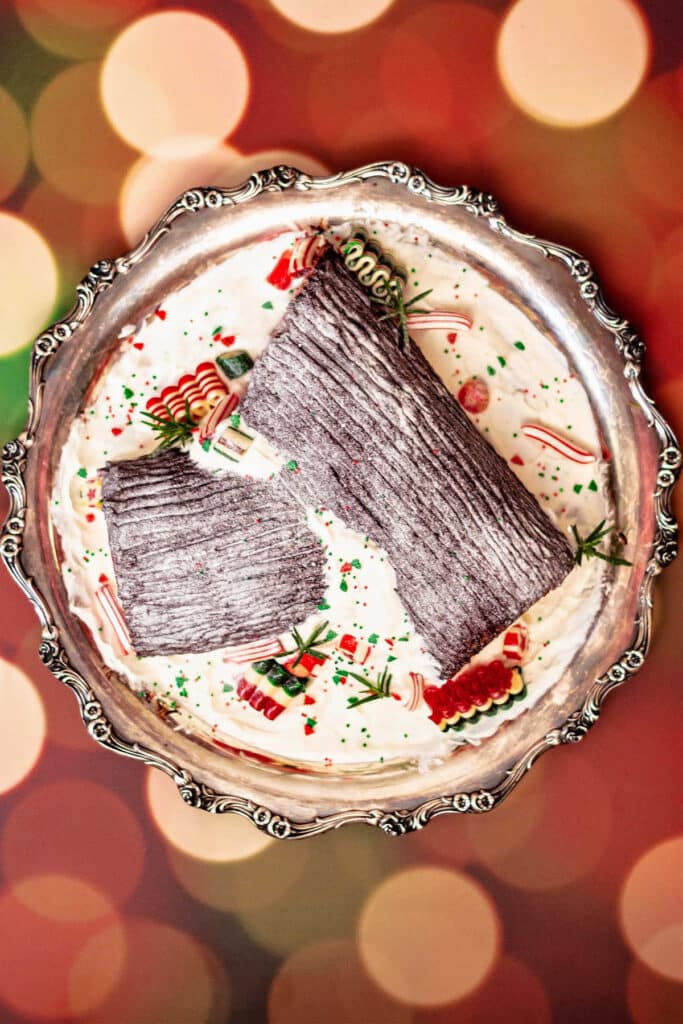
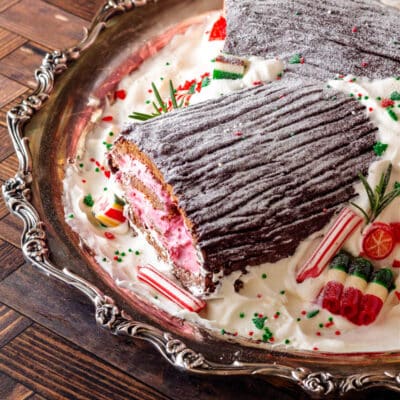
This chocolate yule log or buche de noel recipe is the perfect centerpiece for your Christmas table. It’s filled with cranberry-raspberry filling and coated with ganache that looks like tree bark.
After your meal, you will So enjoy eating it, and so will all your guests. As a bonus, it is also a gluten-free Christmas dessert! Another showstopper for Christmas is my vegan chocolate Christmas cake.
For ease of browsing, here are all my cake recipes in one place. Thanks for stopping by!
Pastry Chef Online Participates in Affiliate Programs. If you make a purchase through one of my links, I may earn a small commission. For more information click to read my disclosure policy
Chocolate Yule Log, at a Glance
✅Skill Level: Intermediate
✅Skills: Whipping whole eggs to a thick foam, folding, rolling a jelly roll, making ganache
✅Type: Jelly Roll Cake
✅Number of Ingredients: 6 in the cake batter, 6 in the filling, 2 in the ganache
✅Prep Time: 40 minutes
✅Cook Time: 15 minutes
✅Decorating Time: about 30 minutes
✅Yield: 12 servings
Jump Straight to the Recipe
A Brief History of the Yule Log
The Yule log originally comes from Nordic tradition and was an entire tree that was burned during the winter solstice.
And since some Scandinavians were Vikings who traveled far and wide to trade and to raid and eventually to settle down and farm, the Yule log tradition traveled with them.
The history of the actual yule log cake–or buche de Noel in French–is a bit murky, but since hearths where the Yule log was burned were also used for baking, some enterprising and fanciful baker decided to make a cake to mark the Solstice.
The French really elevated the form to the rolled sponge around cream fillings that we know today.
How to Make a Yule Log Cake
I am here today to tell you that you can make a chocolate yule log. A lovely, lighter-than-air chocolate buche de Noel is well within your reach.
Honestly, I have made the mistakes for you so you won’t have to make them yourself.
The traditional components of a Buche de Noel or Yule Log are:
- a sponge cake of some sort
- a creamy filling of some sort
- usually chocolate frosting or glaze to mimic bark
- traditional decorations such as meringue mushrooms, leaves and nuts made of marzipan or molded chocolate
The components of this particular chocolate yule log include:
1. a flourless chocolate sponge cake (gluten free, y’all!), given structure from the cocoa solids in the chocolate and the egg whites, and tenderness from both the yolks and the cocoa butter in the chocolate:
Here’s how to make the cake. I encourage you to read over the directions both here and in the recipe, especially if you’ve never made a light and airy spongecake without flour before.
If you’re raring to go, you can jump straight to the recipe.
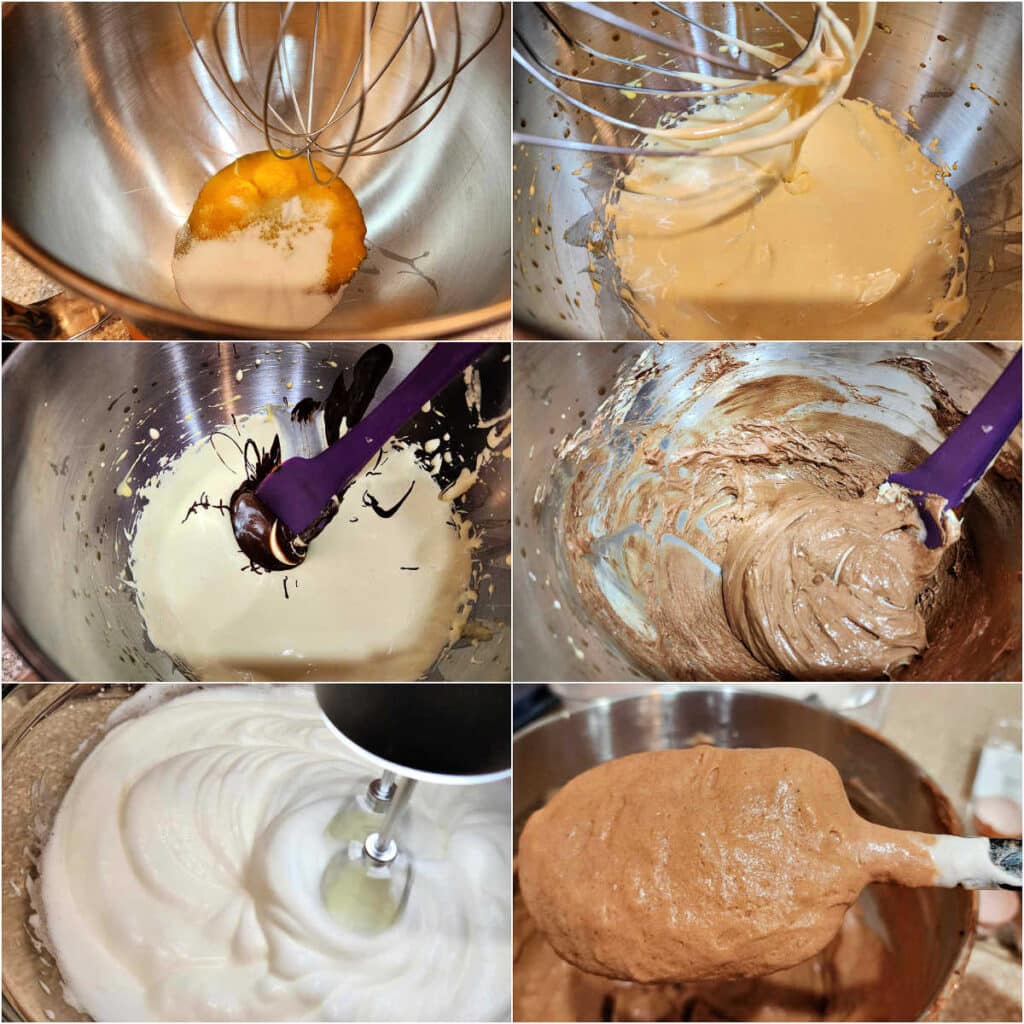
a)Place yolks, sugar, vanilla, and salt in your mixing bowl.
b)Whip until pale, very thick, and dense. You’re looking for about the texture of marshmallow creme.
c)Scrape the melted and cooled chocolate into the yolk mixture.
❗Be sure the chocolate has cooled to room temperature. If it’s still too warm, it will deflate your yolks.
d)Gently but thoroughly fold the chocolate into the yolks.
e)Whip the whites and the rest of the sugar to stiff peaks.
f)Fold a bit of the whites into the yolk mixture to lighten it, and then fold in the rest until there are no white streaks.
❗Be gentle, because you don’t want to deflate your billowy batter.
To Bake and Cool the Cake
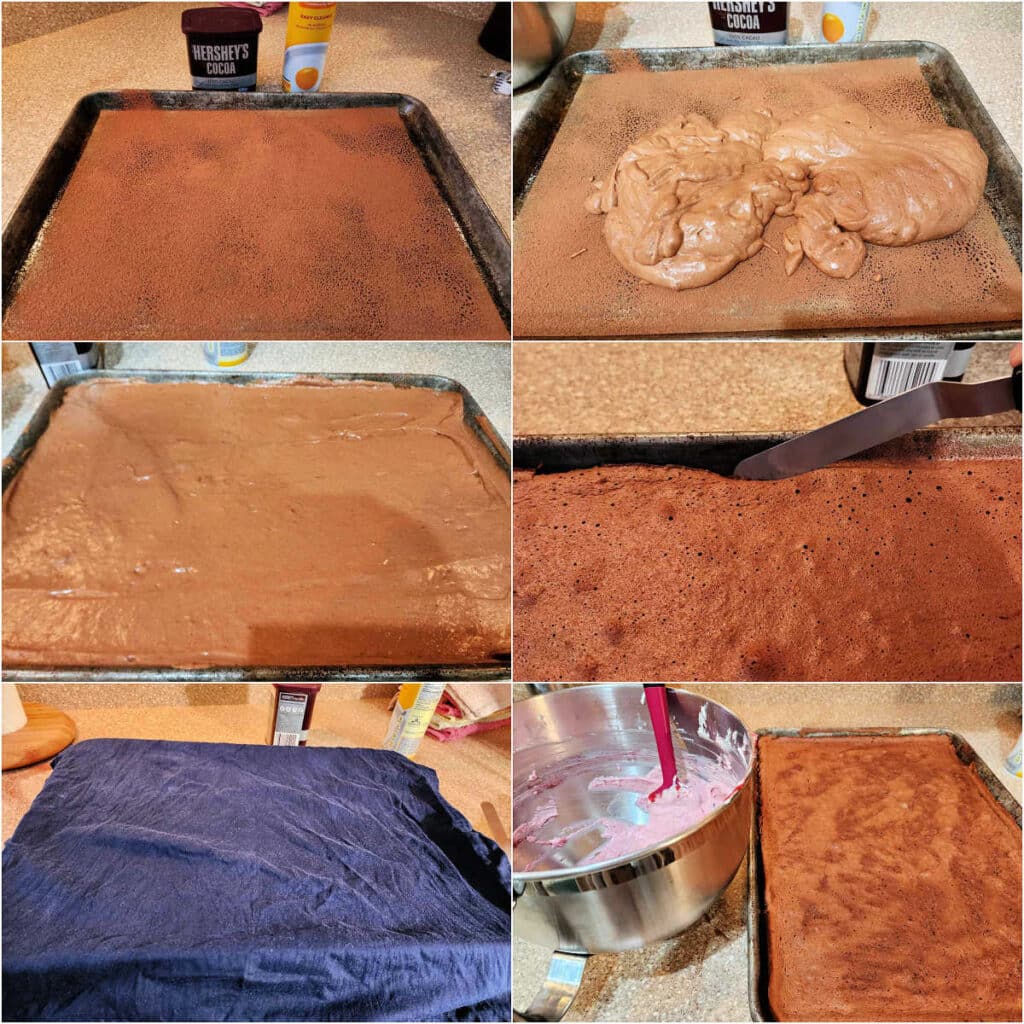
a)Spray a half-sheet pan with pan spray. Line it with a sheet of parchment, then spray the parchment. Then sift cocoa powder evenly all over the pan. This will help keep sticking to a minimum.
b)Scrape the batter into the pan.
c)Spread it out evenly from edge to edge.
d)After baking, which takes 15-17 minutes at 350F, run a small spatula around the inside of the pan to ensure the cake doesn’t stick and tear as it cools.
e)Cover the cake with a damp, lint-free towel as it cools. It should only take about 30-45 minutes for the cake to cool.
f)Get ready to fill the cake.
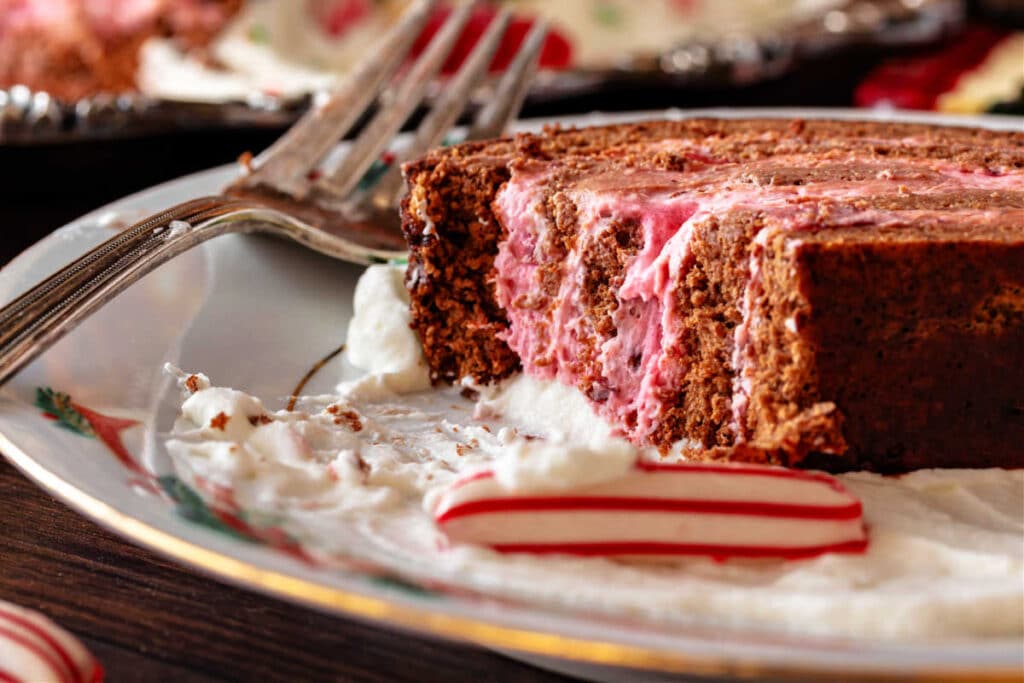
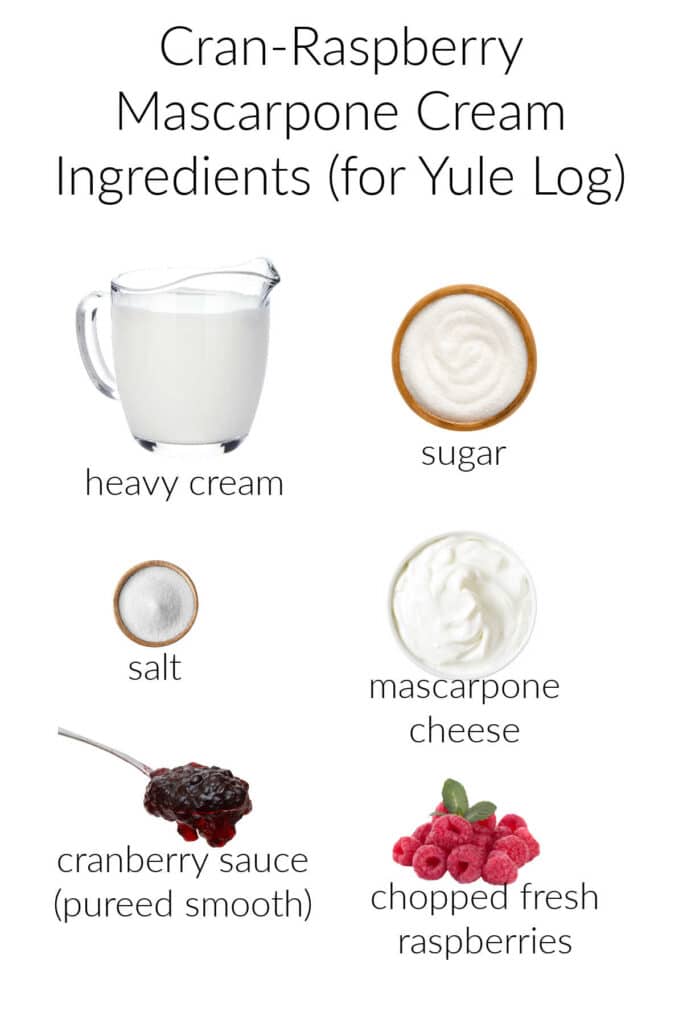
2. sweetened whipped cream and mascarpone cheese blended with cranberry sauce and chopped raspberries (or do what I did with my latest version: use my cran-raspberry jam recipe and add that to the whipped filling):
The filling is quite easy to make.
Whip cream and mascarpone (or cream cheese) together and then fold in cranberry sauce and chopped raspberries.
Save time by making my cranberry raspberry jam. That’s what I did for the new photos.
Would you like to save this post?
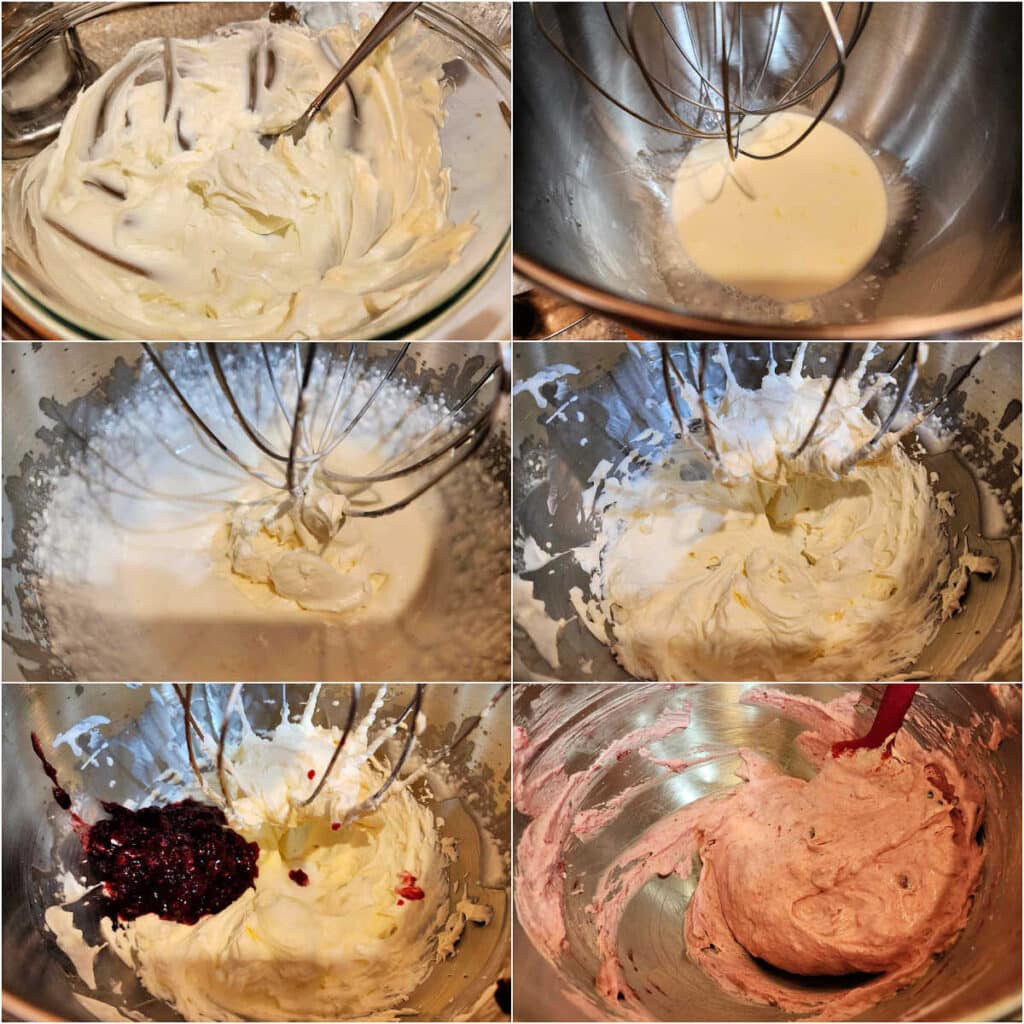
a)If using cream cheese (pictured), microwave it for a few seconds to soften it, then stir it so it is very smooth and spoonable. If using mascarpone, you can skip this step.
b)Place heavy cream, a little sugar, and salt into a mixing bowl fitted with the whisk attachment.
c)Whip to thicken the cream, then plop the mascarpone or softened cream cheese into the mixer.
d)Whip the two together. This will take very little time, and the mixture will thicken quickly. Pay attention!
e)Scrape the cranberry sauce or jam into the whipped cream mixture.
f)Gently but thoroughly fold the two together.
3. a simple two-ingredient ganache (just chocolate and cream)
Make the ganache by bringing the cream to just barely boiling, then pour it over chopped chocolate. Stir/whisk until the mixture is smooth and glossy.
Now it’s time to put this yule log together!
Assembling the Cake
First, you need to fill the chocolate cake with the filling. Reserve 3 Tablespoons of filling to use to glue the “branch” you haven’t cut yet onto the log.
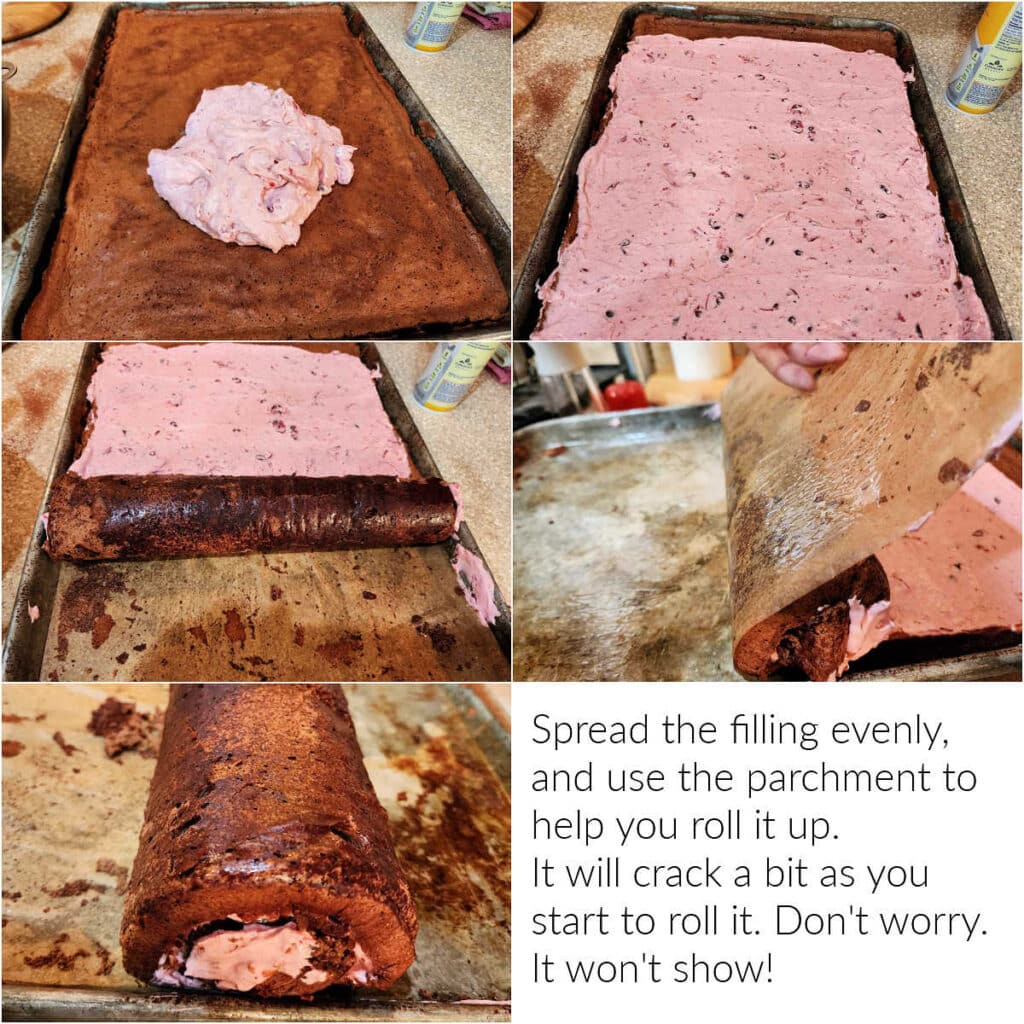
❗Beginning is the hardest part. Reach a spatula down under the short end of the cake closest to you to raise it up a little, and begin rolling. This part will most likely crack some. Once you expose the parchment, you can grab it to help you roll the cake up.
Once the cake is beautifully rolled up, it’s time to cut off one end to make a branch.
If you have a long presentation platter, you can just leave it as one log with no branches. It’s up to you.
Glue the cut piece onto the main log using the reserved filling.
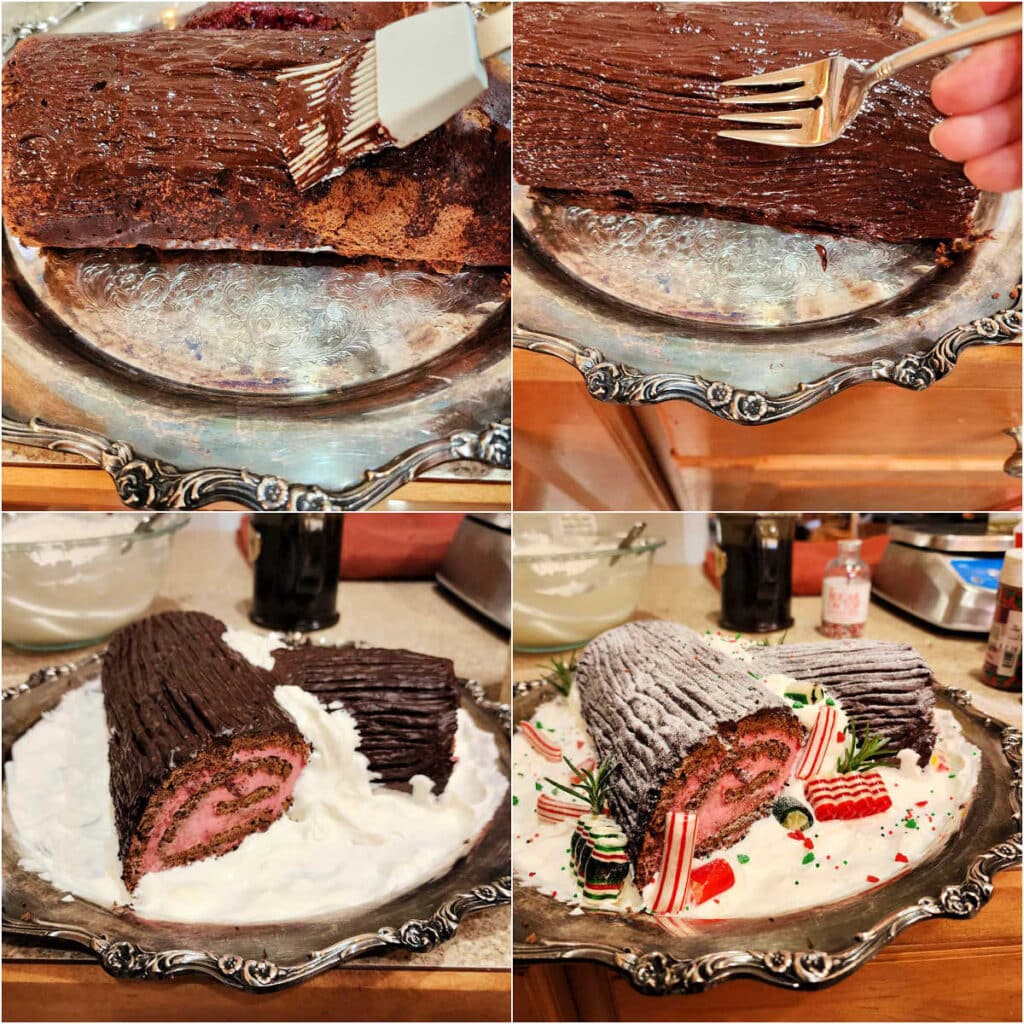
Now spread or paint on the ganache in a thin, even layer.
Then, run a fork along the ganache to make it look like bark, and then decorate as desired.
Give a chocolate yule log a shot this year–it makes a really great centerpiece for the meal, and once you’re finished eating, you can cut that bad boy up and eat him!
Take photos first though, because I want to see!
Reader Renditions
A reader on Pinterest made a beautiful version of this Christmas dessert, so I thought I would share with you so you can see someone else’s version.
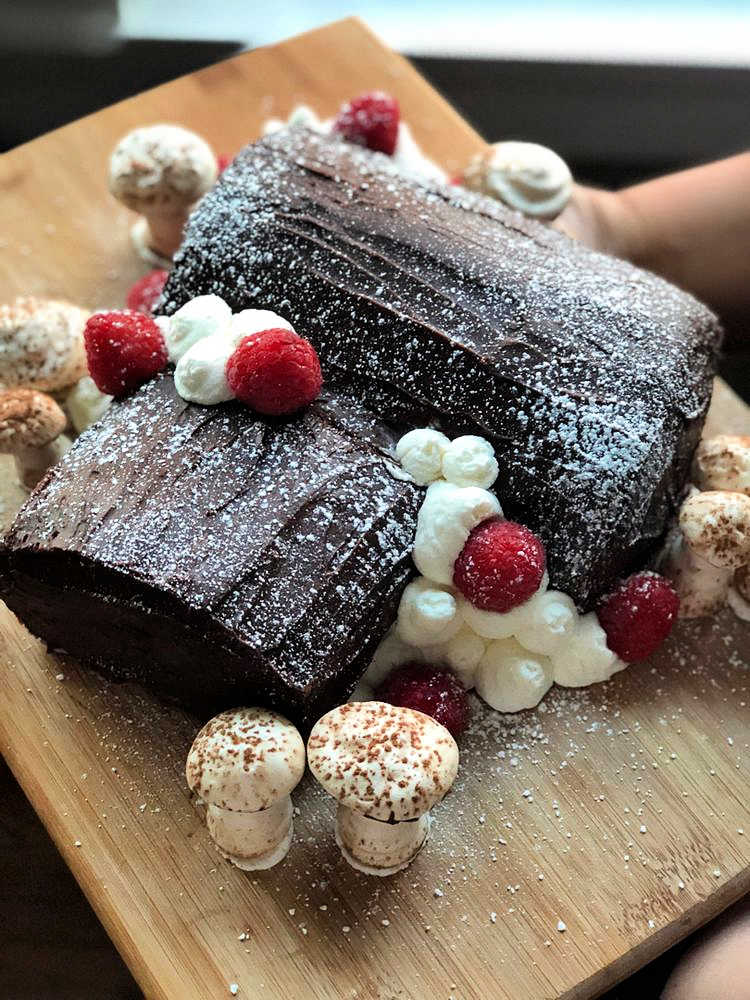
As you can see, Simone added some awesome little meringue mushrooms along with whipped cream and raspberries. She did such a great job, and I am so happy she decided to make this guy for her family!
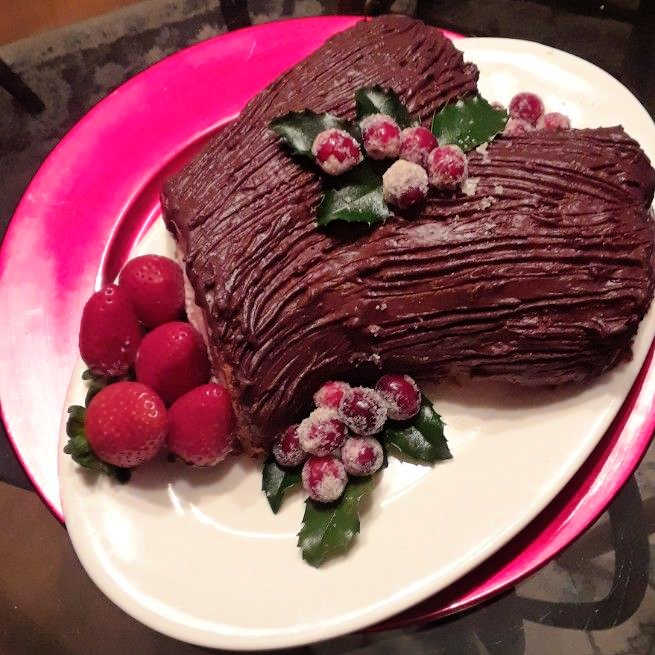
Another pinner made this gorgeous version and chose to decorate it with strawberries and sugared cranberries. Here’s what she said about it:
This was a huge hit with the family…yum.
Pinner Lady Oftheonering
Other Fantastic Festive Christmas Dessert Recipes
Still not ready to try your hand at a Yule Log? Or maybe you just want a bountiful dessert table? Either way, here are some other delicious Christmas dessert recipes for you to try.
- Chocolate Eclair Cake Thick, creamy vanilla pudding, whipped cream, and chocolate ganache all inside a big pate a choux shell. Fancy!
- Gingerbread Cookies–old school, delicious gingerbread cutouts
- Hot Chocolate Custard–while not a dessert, this rich, slightly thick, not-too-sweet drinking custard is super festive and delicious. Serve it in espresso cups
- Chocolate Peppermint Crinkle Cookies (These also happen to be gluten-free!)
- Alton Brown Fruit Cake (Yes!)
- Chestnut Chocolate Torte (This one is decorated with zigzags, but consider using a Christmas tree stencil instead!)
Questions?
If you have any questions about this post or recipe, I am happy to help.
Simply leave a comment here and I will get back to you soon. I also invite you to ask questions in my Facebook group, Fearless Kitchen Fun.
If your question is more pressing, please feel free to email me. I should be back in touch ASAP, as long as I’m not asleep.
A Note About Measurements
My recipes are almost all written by weight, including liquids, unless otherwise specified.
For accuracy and consistency of results, I encourage you to buy–and use–a kitchen scale.
I promise that baking and cleanup will be so much quicker and easier.
This is the scale that I recommend for home use. I have owned and used one for years.
Love This Buche de Noel? Please Rate and Review. Thank you!
It helps me and other readers so much if you take a moment to rate and review this recipe.
Your star rating and comments help others decide whether the recipe is worth making, and your feedback helps me continue improving recipes here at Pastry Chef Online.
Other lovely ways to share include pinning or posting on your favorite social media platform.
Thank you so much for taking the time!

Chocolate Yule Log Recipe
Ingredients
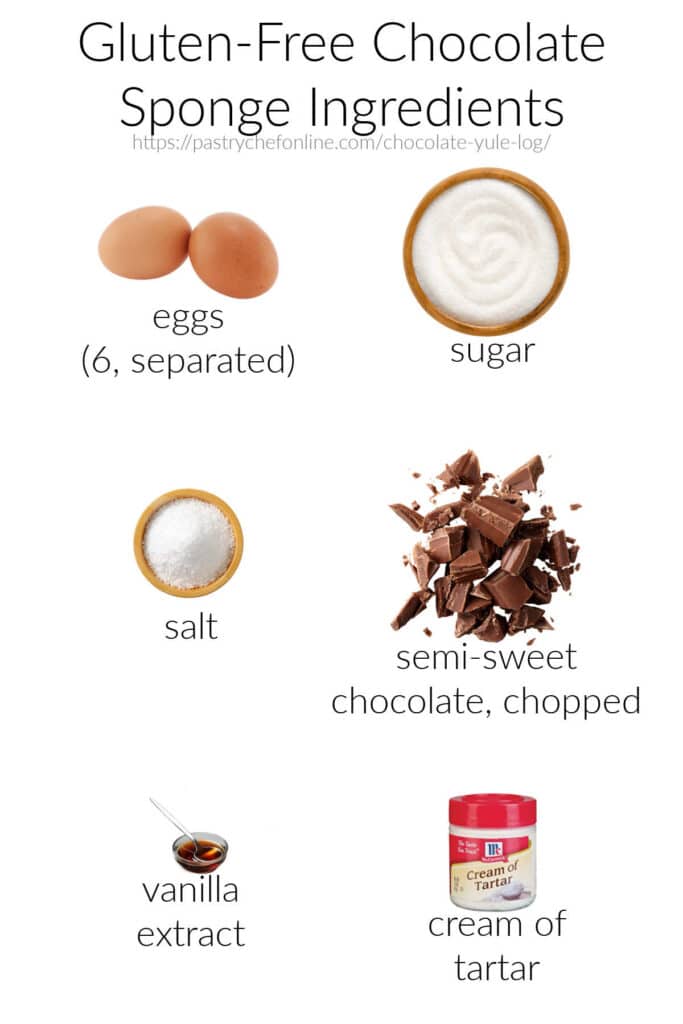
For the Chocolate Sponge
- 6 large eggs separated
- 4.2 ounces semisweet chocolate, chopped 120 grams
- 2.8 ounces granulated white sugar 80 grams, divided use
- 1 teaspoon pure vanilla extract
- ¾ teaspoon cream of tartar
- heavy pinch of salt
For the Cran-Raspberry Mascarpone Cream
- 6 oz heavy cream 170 grams or 3/4 cup
- 1 oz granulated sugar 28 grams or 2 Tablespoons
- pinch of salt
- 6 oz cold mascarpone cheese OR cream cheese 170 grams or 3/4 cup
- 6 oz pureed cranberry sauce 170 grams or about 3/4 cups (your favorite. I use my cran-raspberry jam)
- 2 oz chopped fresh raspberries 57 grams or about 1/2 cup, optional if using a jam that already has raspberries in it
For the Ganache
- 3 oz good quality semi-sweet or bittersweet chocolate 85 grams, finely chopped
- 3 oz heavy cream 85 grams
For the Garnish
- whipped cream
- raspberries
- sugared cranberries
Instructions
For the Chocolate Sponge
- Preheat oven to 350Fwith a rack in the center.
- Spray a half-sheet pan with pan spray.
- Line the pan with parchment paper and then spray the paper and liberally dust cocoa powder all over the parchment. This will help keep your cake from sticking.
- While the eggs are still cold, separate the eggs, placing the whites in one bowl and the yolks in the bowl of your stand mixer. Cover with plastic wrap and bring to room temperature before using.
- Meanwhile melt the chocolate on medium heat in a microwave oven, stirring after every 30-second burst. Let the chocolate cool to room temperature.
- In the bowl of your electric mixer (or with a hand mixer) place the egg yolks, heavy pinch of salt, and 1.8 ounces (50 grams) of the sugar until it is thick and billowy, about 7 minutes. Make sure it gets to the "ribbon stage" where the batter sits on the surface for a few seconds before sinking back in. Beat in the vanilla extract.
- Add the melted and cooled chocolate and fold to combine evenly. Set aside while you beat the egg whites.
- In a clean mixing bowl, with the whisk attachment or in a bowl with a hand mixer, beat the egg whites until foamy. Add the cream of tartar and beat at medium-high speed until soft peaks form. Beat in the rest of the sugar (1 oz or 30 grams) and take the whites to stiff peaks.
- Gently fold about 1/4 of the meringue into the egg yolk mixture using a rubber spatula or whisk to lighten the batter.
- Fold in the remaining whites just until incorporated. Fold gently so you don't deflate the batter. Spread the batter evenly into the prepared pan with an offset spatula. Bake until the cake is puffed, has lost its shine, and springs back when gently pressed, about 15 – 17 minutes. Remove from oven and place on wire rack to cool. Co
- Use a small, offset spatula to go around the edge of the cake to make sure it doesn't tear when cooling. Cover the cake with a slightly damp, lint-free towel so it doesn't dry out while cooling.
For the Cran-Raspberry Mascarpone Cream
- Whip the heavy cream along with sugar (to taste) and a pinch of salt until thickened.
- Whip in the mascarpone cheese. Just plop it in there. If you're using the whip attachment on your stand mixer, I promise it will all come together. If you're using a hand mixer, plop the beaters right on top of the blob of cheese to break it up and then mix away. See Notes if you're substituting cream cheese.
- Your cream and cheese mixture will whip up quickly at this point, so be careful not to overwhip. The cheese can turn grainy and gross, so just take it to medium peaks.
- Plop in the cranberry sauce and chopped raspberries and whip for 2-3 seconds to get it going, then fold in by hand so there are no streaks.
To Assemble the Roll
- Leave your cooled cake in the pan and remove the towel.
- Spread all but about 3 tablespoons of the filling evenly over the cake, from edge to edge. Leave about 1 1/2" plain at one short end, but cover the rest with an even coat. Reserve the remaining 3 Tablespoons to glue the "branch" onto your log.
- Using the parchment to help you, roll the cake up starting from the short end and rolling towards the end that you left plain. Carefully peel back the parchment as you roll. That initial roll may very well crack, but it's in the middle, so don't worry too much about it. Mine cracked about 1 1/2" in, but whatever. Keep rolling and peeling back the parchment until he's all rolled up. Move the roll to a cutting board, seam side down. Have your Presentation Platter ready too. Cover it with some strips of waxed paper so you don't make a mess on the platter. You'll carefully pull those pieces out before the final garnishing.
- Trim one end of your jelly roll at an angle. You can make this piece as large or as small as you want, but for aesthetics, I wouldn't make it any more than 1/3 of the length of the roll. Set that guy aside for a moment.
- Place the longer part of your roll on the serving platter. Slather the remaining filling mixture on the angled end of the piece you just cut off and then stick it to the roll wherever you want. The reserved mixture will act as glue, so press it together fairly well without squishing your cake.
- Cover loosely with plastic wrap and refrigerate.
For the Ganache
- Bring the cream just to a boil and then remove from the heat.
- Pour in the chopped chocolate all at once and stir until emulsified–rich, thick, dark and shiny.
- Refrigerate until it's the consistency of frosting. You don't want it to be runny.
To Make the "Bark"
- Once the ganache is at spreading consistency, remove the cake from the fridge.
- Using a small offset spatula (because it's easy to use, but use what you have), spread a thin coat of ganache all over the roll and down to the waxed paper. Try not to leave any of the roll naked. But if you have to, cover it with whipped cream later!
- Once the ganache is spread evenly. Drag the tines of a fork back and forth over it until it looks as barkish as you want.
- Refrigerate until the ganache is set. You'll be able to tell because it will no longer be shiny.
To Garnish
- Using a serrated knife, carefully trim off the very ends of your jelly roll so there's no sloppy filling sticking out.
- Carefully remove the strips of waxed paper from around the cake roll. You may have to hold the cake in place with a spatula while you pull. Just go slowly and get rid of all the waxed paper.
- Liberally dust the cake with powdered sugar. Some of it will dissolve as it sits, so use more than you think you need.
- Whip your cream to stiff peaks (I use cream, a touch of sugar, a pinch of salt and a little bit of vanilla). I think I whipped about 3/4 cup to garnish mine. Make as much or as little as you want.
- Apply your whipped cream artfully around your Yule Log.
- Press sugared cranberries and raspberries wherever you think they should go.
- Some edible (or at least non-toxic) greenery would be lovely as well.
- Before presenting, dust the entire thing–platter and all–with some more powdered sugar.
Did You Make Any Changes?
Notes
To Substitute Cream Cheese for the Mascarpone
Cream cheese is much firmer than mascarpone, so take your 6 oz cream cheese, cut it into chunks, and microwave it for about 20 seconds. Stir it really well with a spatula and smash out any lumps. You want the cream cheese to be smooth, at warm room temperature (about 76-77F) and spoonable. Once it has reached this texture, you can add it to the filling just as if it were mascarpone. Nutritional information based on 12 servings of cakeNutrition
Would you like to save this post?

Hi, y’all! I hope you’ve enjoyed this post and hopefully also learned a thing or two.
If you like my style, I invite you to sign up for my occasional newsletter, The Inbox Pastry Chef.
Expect updates on new and tasty recipes as well as a bit of behind-the-scenes action. I hope to see you there!

Thanks so much for spending some time with me today.
Whether you call this a buche de Noel or a Yule Log, I do hope you make it and enjoy it.
Take care, y’all.


Join in Today!
Second time to make – love it and easily done for me. But why two half sheets?
So glad you love the Yule log cake, Helen! Of course you only need 1 half-sheet for this recipe, but they are such versatile and useful pans, that’s how I buy them, and it’s my favorite brand. Your choice entirely whether to buy a set or just one. Merry Christmas!
Hi Jennifer,
Do you know if his can be frozen once fully assembled?
Hey, Kailee! The only ingredient I was concerned about was the mascarpone, but that apparently freezes well. So yes, freezing is definitely an option. I would hold off on doing the chocolate coating until after you thaw the cake because the chocolate could bloom or get damaged in the freezer. Otherwise, you should be good to go!
This looks completely doable! Excited to try it. Can I make any of this cake early? Like maybe get it rolled with icing and then put in fridge for a day or 2? What do you suggest for make ahead?
Yay, Jennifer! I’m glad you’re going to go for it!
Yes, you can make the cake, fill it, and then wrap it really tightly in plastic wrap to keep in the fridge for a day or two–before you cut off the end for the “stump” part. Then, all you’ll have to do is whip up your ganache (or use canned frosting, even, if you’re in a time crunch), spread it thin, and drag your fork through it for Instant Bark Texture. Decorate however you’d like, but whipped cream and fruit is fast and easy. If you have any rosemary lying around, you can add some of that for winter evergreen action.
Enjoy, and please let me know if you have any other questions about it. Have a wonderful Christmas!
Thank you for your detailed instructions. Even though this seems like a complicated recipe, you broke down the steps and made it easy to understand. I made this tonight for my family’s Christmas dessert and it was AMAZING! So delicious! Thank you again for a fabulous recipe!
I can’t tell you how thrilled I am that you guys made this a part of your Christmas celebration this year! I’m so happy you enjoyed it! ❤️
Jenni:
This looks so good!
I wanted to take my Christmas cake recipe and put it into my buche de Noel pan.
Do you have any suggestions for an icing?
I want it to look like a log, and festive.
I would go with ganache and a fork like I did. It’s just such an easy way to approximate the look of bark, Charlie. You could also use pretty much any type of chocolate frosting that will hold its shape, and you can then use a small offset spatula to swirl it or stick with a fork to make “bark lines” in it. A dusting of “non melting powdered sugar” would be a nice touch and bring out the texture in your frosting bark. Here’s an affiliate link so you can take a look at it: https://www.amazon.com/Sucre-Neige-Non-Melting-Powdered-OliveNation/dp/B00JRDF72M/ref=as_li_ss_tl?ie=UTF8&qid=1543340990&sr=8-1-spons&keywords=non+melting+powdered+sugar&psc=1&linkCode=ll1&tag=pcobakingequipment-20&linkId=13719839d9482ffe1929ee75dad456c2&language=en_US (Sorry for the long ugly link!) Meringue mushrooms are a classic decoration–you can pipe stems and caps separately, bake them in a super low oven until they dry out, then “glue” the tops onto the stems with some corn syrup, chocolate, or royal icing. You will have to use a sharp knife to cut a little hole in the under side of the caps to attach the stems. Here’s a tutorial link: https://natashaskitchen.com/meringue-mushrooms-recipe/ Hope that helps–happy Yule Logging!
Thanks Jenni :
I’m concerned though if the chocolate will go with a white Christmas cake.
Maybe a white chocolate with chocolate swirls that will look like birch bark?
I personally love a white cake with chocolate frosting, but you could just as easily do a white chocolate ganache or buttercream and then maybe dust with cocoa powder to bring out the “bark.” I like the chocolate curls idea too–either white or dark or maybe a mixture of the two. You’ll have to send a pic once you’ve made it. Would love to see!
Thanks so much for this recipe! Made it this weekend for our family’s “Fauxmas” (some of the family won’t be here for the real day, so we had an early celebration 🙂 )
It was just perfect! (mind you, mine didn’t look anything like your work of art, but it was so delicious! Will definitely be making this again.
I am thrilled you and your family enjoyed it! Thanks so much for letting me know! And hooray for early celebrations!
Beautifully done, Jenni! I’m going to try your recipe next year!!
Thanks, Liz! And I love your triple chocolate threat, too. No wrong way to make a buche! <3
Jenni, you are so right that the cake is the hardest part! I remember making my first buche with the Daring Bakers back in the day, and it was tough. Thank goodness for frosting to hide the goofs. You have obviously overcome your trials because this cake is gorgeous and so festive. Love it!
Thanks so much, Andrea! I had a good time making this guy, and I think the neighbors are enjoying eating it! And frosting is the best, isn’t it?! It’s like edible spackle! lol
oh lordy – those early mistakes, they shape us don’t they Jenni??? and yes, just smack those idiots who don’t give clear instructions!!! i LOVE the cranberry/raspberry filling combo – both of which pair so nicely with chocolate. it’s just stunning!!
I had nightmares about that stupid stump Debra! lol I’m so glad you like this guy; I’m really happy with it too. And your tiramisu one is just lovely. I need to make a white one sometime. Like a birch tree!