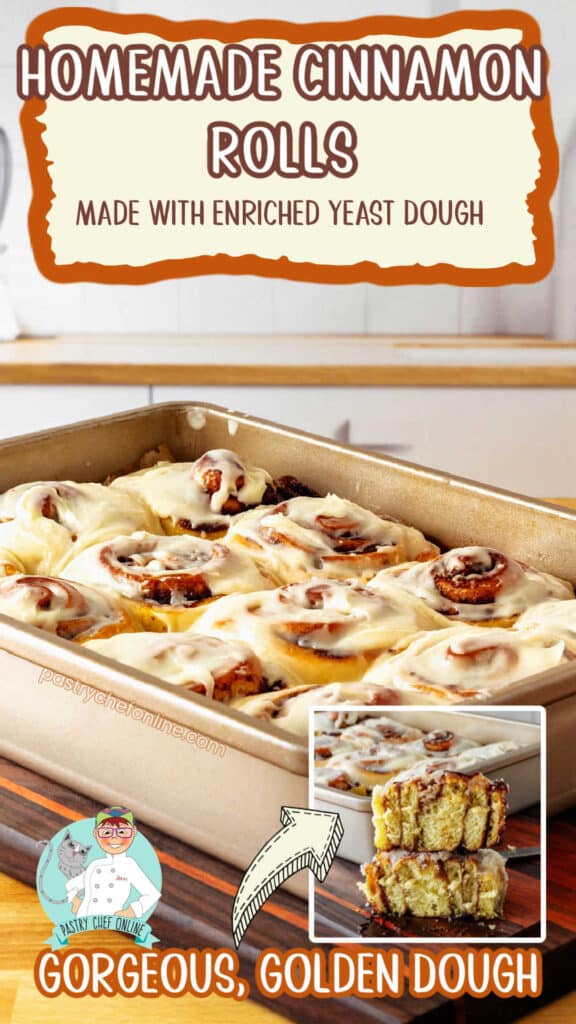
I am excited to bring you my recipe for homemade cinnamon rolls. Made with an easy-to-work-with sweet dough enriched with a lot of egg yolk, these bake up beautifully golden brown and delicious.
his recipe is my traditional cinnamon bun recipe. You may also like to take a look at my gooey potato dough cinnamon rolls as well.
Know that you can use the sweet dough recipe to make any sort of filled bun that you like, but do try these as cinnamon rolls, because there’s nothing better than a warm cinnamon bun! For ease of browsing, you can find all my sweet yeast dough recipes in one place. Let’s get into it.
Pastry Chef Online Participates in Affiliate Programs. If you make a purchase through one of my links, I may earn a small commission. For more information click to read my disclosure policy
Other sweet roll recipes you may enjoy: chocolate honey buns, peanut butter sweet rolls, and pumpkin spice cinnamon rolls.
Homemade Cinnamon Rolls, at a Glance
✔️Skill Level: Intermediate
✔️Skills: Kneading dough, shaping and cutting rolls, patience
✔️Type: Sweet Roll
✔️Number of Ingredients: Dough: 8, Filling: 6, Glaze: 6
✔️Prep Time: 1 hour, give or take
✔️Rise Time: 2 rises totaling about 4 hours
✔️Cook Time: 30-35 minutes
✔️Yield: 12 cinnamon buns
Jump Straight to the Recipe
This dough is wonderful to work with and the resulting bake is perfect. It’ll be my staple sweet bun dough from now on.
Reader Beth
Why You Should Make This Recipe
Yes, I know there are a billion recipes for cinnamon rolls on the Internet and in cookbooks, so why do I want you to give this recipe a try?
For starters, the dough. It’s enriched with 4 egg yolks, so it’s the most beautiful golden color. It’s a fairly firm dough, which makes it easy to work with.
It rolls out beautifully with pretty much zero spring-back.
And it bakes up beautifully mellow and tender.
The filling contains the expected cinnamon but also some pumpkin pie spice which adds an extra dimension to the filling. It’s subtle, but it makes the rolls so much more interesting with that hint of clove and allspice.
This is a great trick to use, regardless of whether you make my recipe. Add a secondary spice blend or even just a bit of additional spice to your cinnamon filling to give it more dimension.
I also really like this glaze with its combination of cream cheese and butter to add a little tang, body, and fat to carry the vanilla flavor.
I hope I have convinced you. If I have, I have a favor to ask:
When you do make this recipe, it will help me and other readers if you:
✅Rate the recipes using the stars in the recipe card
✅Leave a review when prompted in the recipe card (If it’s a positive review, and I hope it is, I’ll use it in the post as social proof)
✅Leave a comment on the post
Thank you so much!
If you’re an old hand at working with enriched yeast dough, by all means, jump straight to the recipe.
Otherwise, let’s go over ingredients, substitutions, and step by step instructions.
Ingredients You’ll Need (and Substitutions)
Here all all the ingredients needed to make these guys. Some ingredients are used in more than one component.
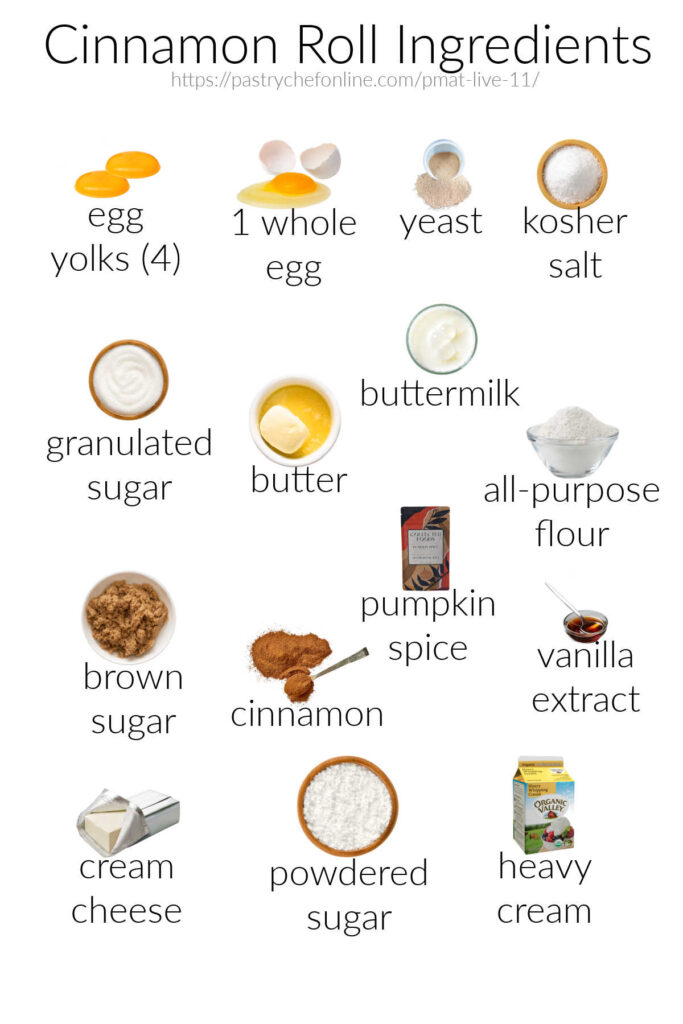
For the Dough
- whole egg: Adds some of the liquid to the recipe as well as protein in the form of egg white
- egg yolks: Adds a lot of emulsifiers, fat, and gorgeous yellow color to the dough. Egg yolk-rich dough tends to bake up nice and tender
- yeast: allows the dough to rise and expand. You can use either instant or active dry yeast
- kosher salt: Brings all the flavors into focus and moderates yeast growth
- granulated sugar: Adds some sweetness and some ready food for the yeast. Sugar also assists in browning and tenderizes the crumb
- unsalted butter: Provides more liquid and fat to carry flavor and tenderize the dough
- buttermilk: Adds a lovely tang to the dough. If you don’t have buttermilk, use plain yogurt thinned down to the consistency of buttermilk. I used Cabot 10% Greek yogurt, which is very thick, so I went with 50% yogurt and 50% water.
- all-purpose flour: Lends bulk and structure and the proteins responsible for gluten formation so the dough can rise nicely. I use a King Arthur, which is a higher-protein all-purpose flour. You may substitute bread flour, but you may need to increase the liquid by as much as an ounce or so
For the Cinnamon Filling
- unsalted butter: Carries all the flavor of the sugar and spices and allows the filling to be a spreadable consistency. I call for 6 ounces of butter, which is 1 1/2 sticks and is plenty for a generous layer of filling
- brown sugar: I use dark brown sugar, because I like the complexity the molasses in the sugar brings to the filling. You can also use light brown sugar or regular granulated sugar if you prefer
- cinnamon: 3 Tablespoons is enough to be decidedly cinnammony without being harsh
- pumpkin pie spice: This is technically optional, but I find that using a bit of a spice blend or another spice or two adds complexity without taking away from the cinnamony-ness of the filling. Other options are a teaspoon or two of ginger, 1/2 teaspoon of ground cloves or allspice, or even a teaspoon or two of cocoa powder to deepen the cinnamon flavor
- salt: Brings all those spice flavors into focus. Don’t skimp on the salt in the filling or it will taste very flat and muddy
- vanilla: Rounds out the spice flavor with warm, creamy, woody notes
For the Cream Cheese Glaze
- cream cheese: Adds a little tang as well as body to the glaze
- butter: Brings a little warmth as well as extra fat to carry the tang of the cream cheese as well as the vanilla
- powdered sugar: Also called icing sugar or 10x, powdered sugar provides bulk and sweetness to the glaze
- salt: Tempers the sweetness and snaps all the flavors into focus
- heavy cream: To thin the glaze to a nice, spreadable consistency. If you want to drizzle the glaze, add cream, a bit at a time, until it’s pourable but thick. You can use any milk in place of the heavy cream. Plant-based milk will work just fine as will half and half or whole milk
- vanilla: Rounds out the flavors of the glaze
Procedure
Here, we’ll take a brief look at the steps for making the dough, shaping it, filling it, and baking it.
Please look them over, and then you can jump to the recipe when you’re ready to get started.
For the Dough
Making the dough is straightforward.
Would you like to save this post?
It’s made using the straight dough process which is putting all the ingredients in the mixer bowl at the same time and letting her rip.

- Add all the ingredients except for the melted butter and flour and whisk them together to break up the yolks.
- Pour in the melted butter and then top with all the flour
- Mix on low speed with the dough hook and then knead on medium/medium-low speed until you have a…
- …smooth and stretchy dough.
NOTE: This is a pretty stiff dough that is not sticky when fully kneaded. It is a bit of a workout for your mixer, so take it in stages, kneading for a couple of minutes at a time and then letting your mixer rest in between. You can also knead by hand.
Total kneading time should be about 10 minutes.
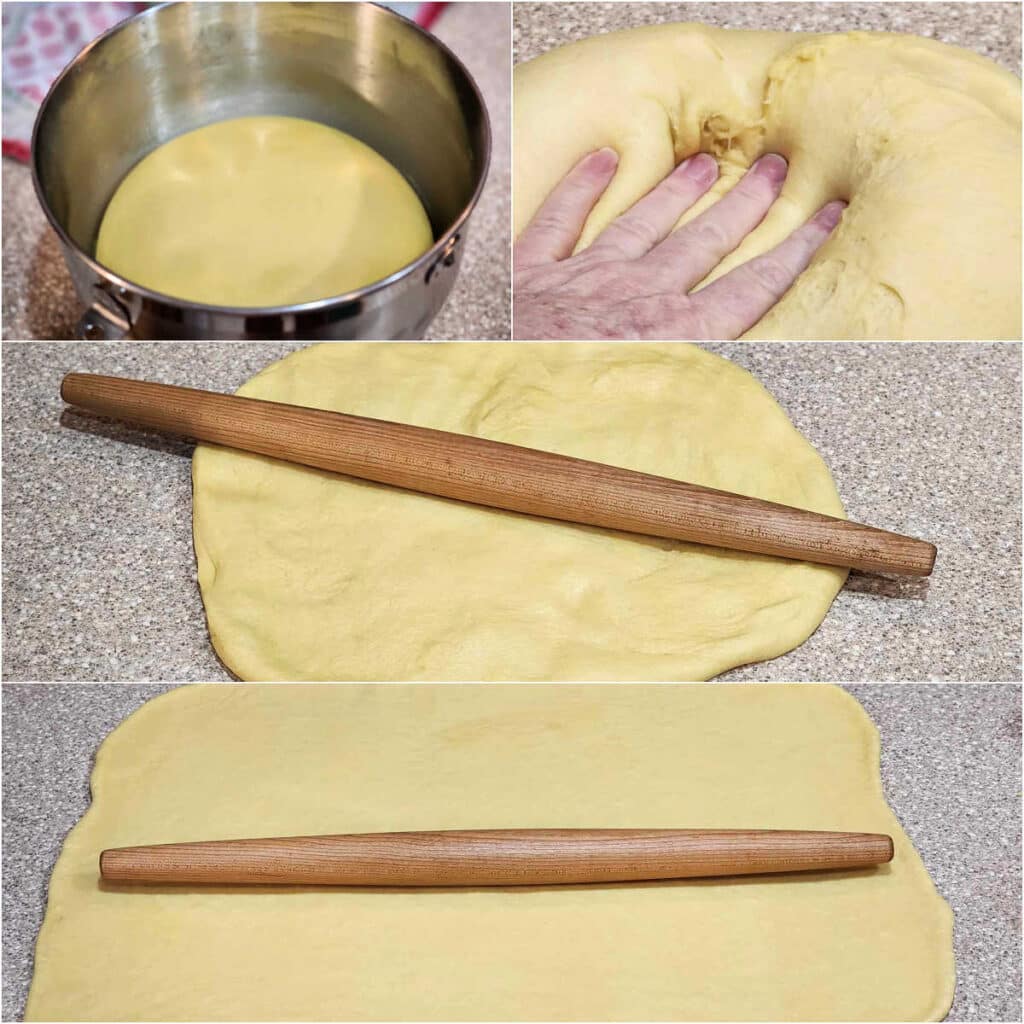
- Once the dough has risen in a cozy place, scrape it out onto a clean counter, and…
- …press out all the gases
- Pat the dough into a reasonably rectangular shape.
- Roll the dough until it is about 20″ wide by about 14-15″ deep. For reference, my rolling pin is 18″ long.
For the Filling
The filling is part of the magic of this recipe, and it’s very easy to make.
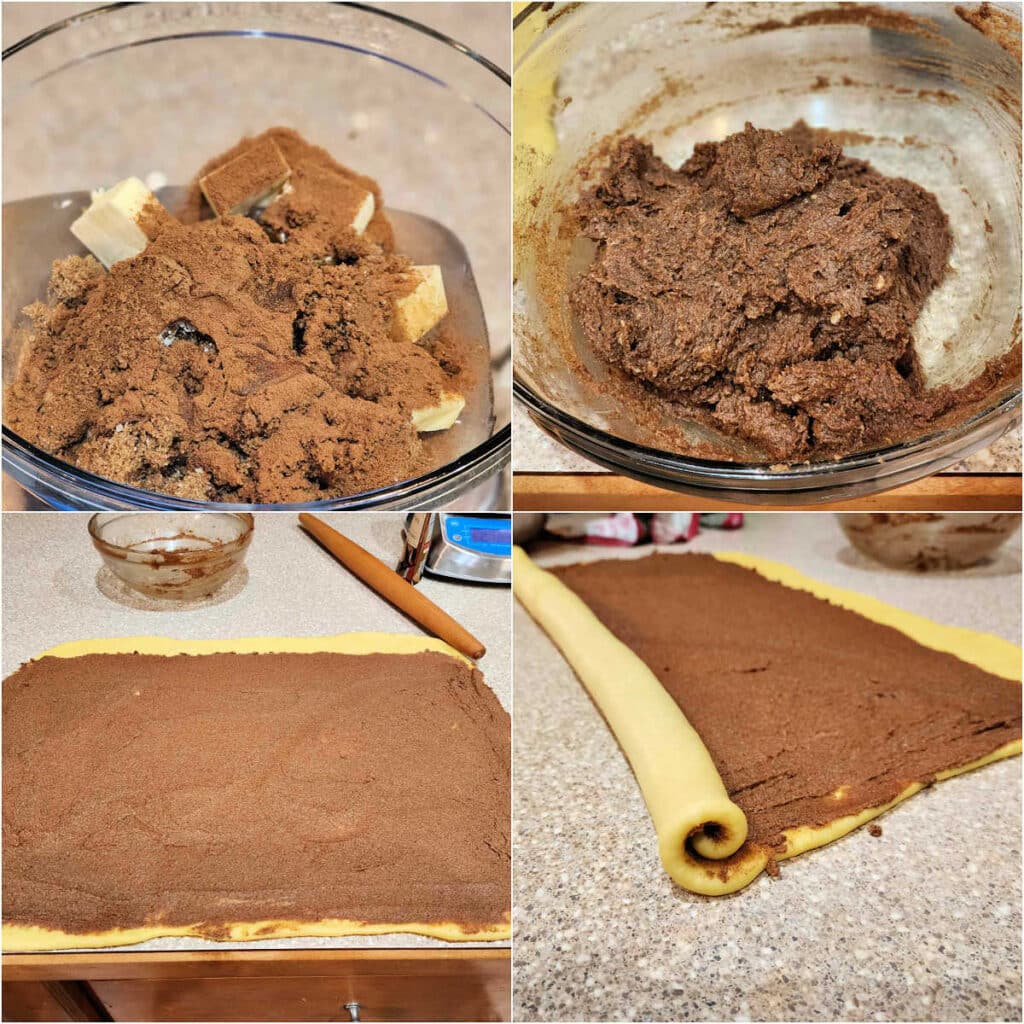
- Microwave the butter to soften it, and then add the rest of the ingredients.
- Use a spatula, a hand mixer, or a clean hand (my choice) to mix the filling together evenly into a paste.
- Spread it in an even layer from edge to edge on the dough, leaving about 1-1 1/2 inches clear on the far end.
- Roll the dough up into a cylinder, pinching the seam to minimize the chance of them “unrolling” a little bit during the second rise.
To Slice, Rise, and Bake

- Turn the cylinder of dough seam-side down, and use a piece of dental floss (my choice) or a sharp serrated knife to trim off the uneven ends.
- Then divide the remaining dough in half and each half in half so you have 4 more-or-less equal portions.
- Divide each piece into 3 equal slices for a total of 12 rolls.
- Place them in a 9″ x 13″ rectangular pan that you’ve either lined with parchment or sprayed lightly with pan spray.
Second Rise and Baking
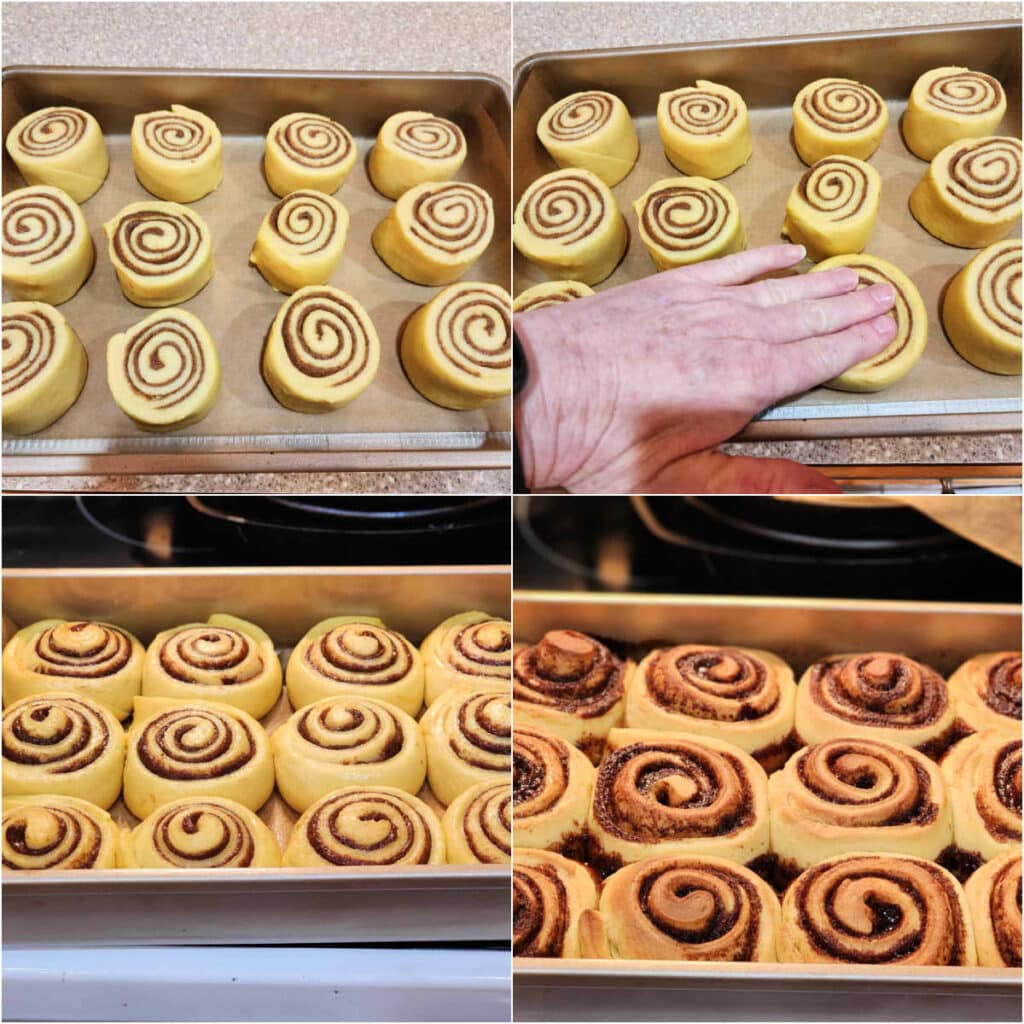
- Once your rolls are panned up…
- …press each one down slightly. This encourages them to spread out to fill the space and sort of compacts everything a little bit.
- Allow the rolls to rise in a warm place until the sides are touching.
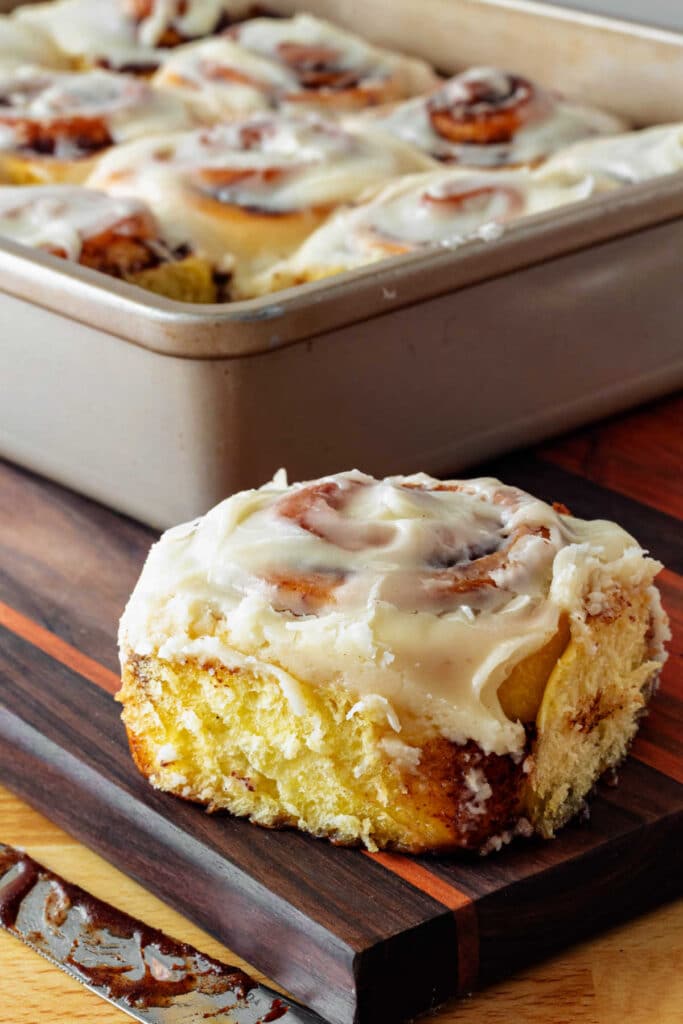
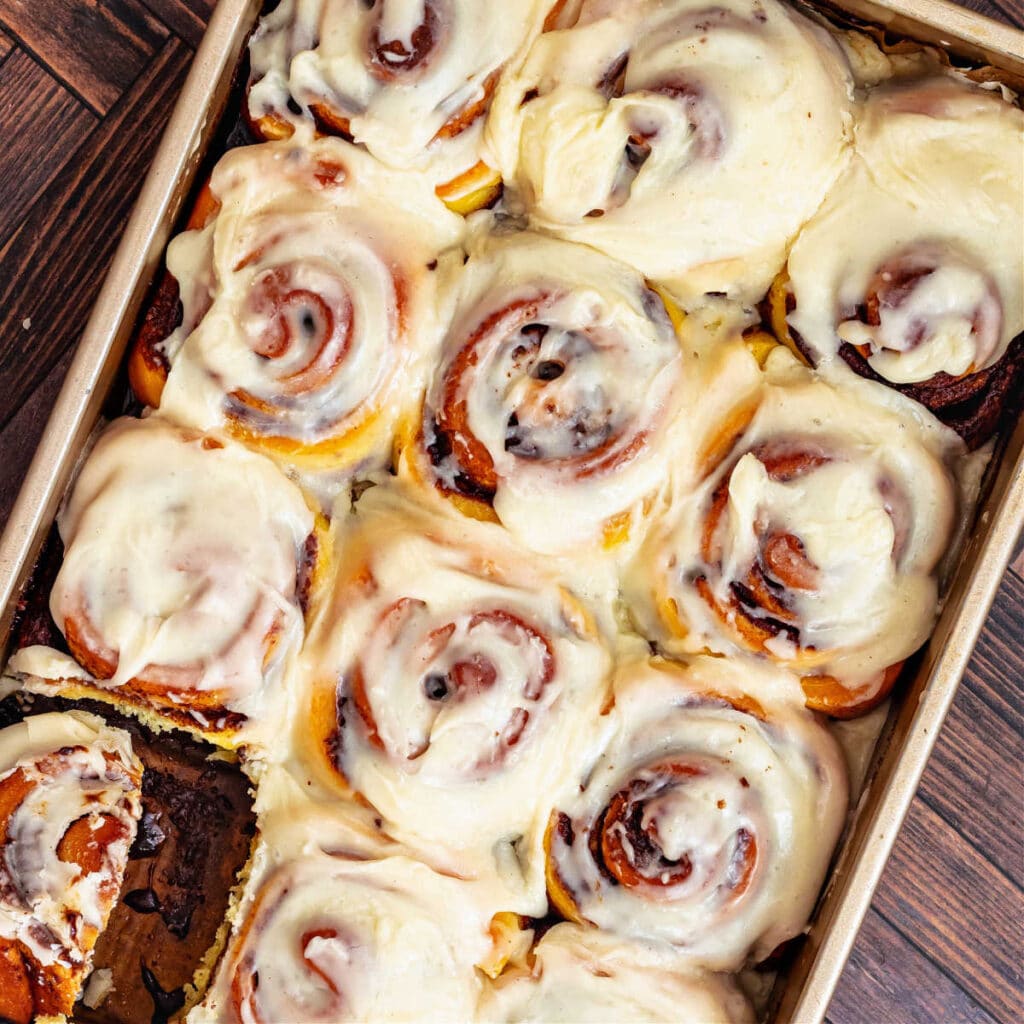
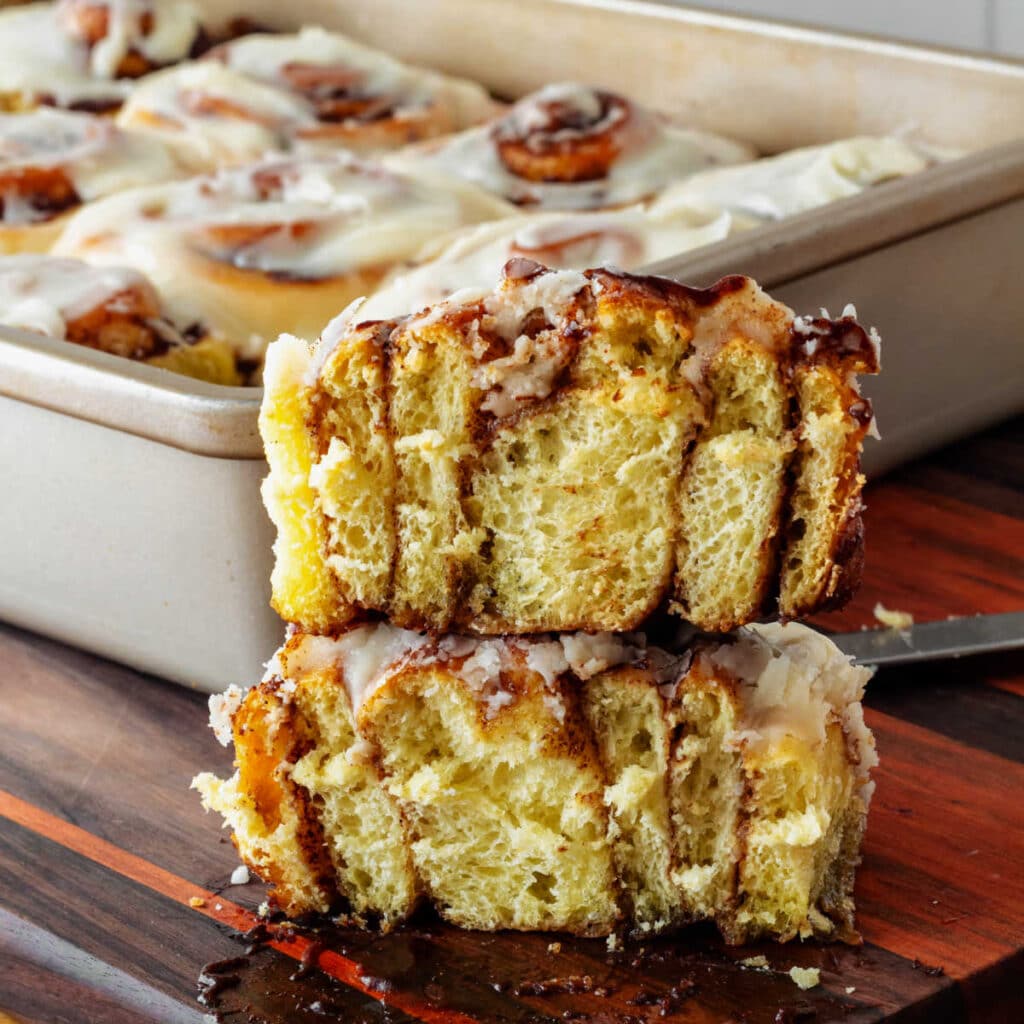
- Bake for about 30 minutes until golden brown, then glaze them right away so the glaze can melt down between the rolls.
TO MAKE OVERNIGHT CINNAMON ROLLS: After shaping and panning, spray the rolls lightly with pan spray, cover, and refrigerate overnight. Pull them out the next morning and let come to room temperature and rise in a cozy place until puffy. Then bake as directed.
If you are looking for a bit more calorie-conscious cinnamon raisin delight, please check out my cinnamon raisin bread. It is super good!
If, by some chance, you have leftover cinnamon rolls, use them up in this easy-to-make cinnamon roll casserole.
Cinnamon Roll Q & A
They are best the day they are made, but you can store them at room temperature for a day or two before reheating to serve.
Yes. If you want to freeze the whole tray, skip the glaze until after thawing and reheating. Otherwise, freeze and store in heavy-duty freezer bags, pressing out as much air as you can before sealing the bag/s. Thaw at room temperature and reheat to serve.
Sure. Add some orange zest to the dough, filling, and glaze for orange cinnamon rolls. Add finely chopped toasted nuts to the filling if you like. Or add some mini chocolate chips. Flavor the glaze with almond extract or some maple extract if you have some. There are lots of ways to make these rolls your own.
Questions?
If you have any questions about this post or recipe, I am happy to help.
Simply leave a comment here and I will get back to you soon. I also invite you to ask questions in my Facebook group, Fearless Kitchen Fun.
If your question is more pressing, please feel free to email me. I should be back in touch ASAP, as long as I’m not asleep.
A Note About Measurements
My recipes are almost all written by weight, including liquids, unless otherwise specified.
For accuracy and consistency of results, I encourage you to buy–and use–a kitchen scale.
I promise that baking and cleanup will be so much quicker and easier.
This is the scale that I recommend for home use. I have owned and used one for years.
Please Rate and/or Comment
It helps me and other readers so much if you take a moment to rate and review this recipe.
Your star rating and comments help others decide whether the recipe is worth making, and your feedback helps me continue improving recipes here at Pastry Chef Online.
Other lovely ways to share include pinning or posting on your favorite social media platform.
Thank you so much for taking the time!


Homemade Cinnamon Rolls
Video
Equipment
Ingredients
For the Dough
- 4 egg yolks at room temperature
- 1 whole egg at room temperature
- 1 ¼ teaspoon yeast instant or active dry
- 1 ½ teaspoons kosher salt I use Morton's
- 2 oz sugar 56 grams or about 1/4 cup
- 3 oz melted butter 85 grams, 6 Tablespoons, or 3/4 stick
- 9 oz buttermilk 255 grams or 1 cup and 2 Tablespoons at room temperature
- 20 oz all-purpose flour 567 grams or about 4 1/2 cups
For the Cinnamon Filling
- 6 oz unsalted butter 170 grams or 1 1/2 sticks
- 8 oz brown sugar 227 grams or about 1 cup, packed
- 3 Tablespoons ground cinnamon
- 2 teaspoons pumpkin pie spice optional but lovely
- ⅜ teaspoons kosher salt I use Morton's
- ½ teaspoon vanilla extract
For the Glaze
- 2 oz cream cheese 56 grams or 1/4 block
- 2 oz unsalted butter 56 grams, 4 Tablespoons, or 1/2 stick
- 10 oz powdered sugar 284 grams or 2 1/2 cups
- ½ teaspoon kosher salt
- ½ teaspoon vanilla
- 2 Tablespoons heavy cream This is a guesstimate. Add a little at a time until you achieve a spreadable consistency.
Instructions
To Make the Dough
- In the bowl of your stand mixer, Combine yolks, egg, yeast, sugar, melted butter, buttermilk, and salt. Whisk to combine.
- Add the flour all at once and with the dough hook, mix on low until all the flour is incorporated. Scrape the bowl as necessary.
- Knead on medium speed until the dough is smooth and elastic, approximately 10-15 minutes. This is a fairly firm dough, so watch your mixer. You don't want it to overheat. You can knead on a lower speed, and you may have to knead a couple of minutes at a time, allowing your mixer to cool down in between. You can also knead by hand. The dough will be smooth and not at all sticky when done.
- Gather the dough into a nice ball, place it back into the mixer bowl and spray lightly with pan spray. Cover the bowl with a lint-free towel, and allow it to rise in a cozy place until doubled in size, about 2-2 1/2 hours. I like to heat a mug of water for 3 minutes in the microwave, then move it to the side, put the covered bowl of dough next to it, then close the door. If your microwave has a surface light for the stove below, turn that on as well. It will help to keep the microwave warm.
To Make the Cinnamon Filling
- In a medium bowl, microwave the butter for about 30 seconds, or until very soft.
- Add the rest of the filling ingredients and mix well until completely combined. I generally use my clean hand to squeeze everything together until it forms a paste.
To Fill, Shape, and Bake
- Once the dough has doubled in size, scrape it out onto a clean countertop with plenty of room to work. This dough is firm enough that you won't need to flour or oil your surface.
- Press the gases out of the dough and keep pressing it out with your hands until you have a rough rectangle.
- Using a rolling pin, roll the dough until you have a large rectangle of dough about 20" wide by about 14-15" long.
- Using an offset spatula or your clean hands, spread the filling out onto the dough rectangle evenly, from edge to edge, leaving about 1-1 1/2" "clean" dough at the far end.
- Starting at the long side nearest you, roll the dough up fairly tightly until you get to the clean end. Pinch the seam together really well, and roll the cylinder of dough so it is seam-side-down.
- Using dental floss or a sharp serrated blade, slice off the uneven ends of the cylinder of dough. Put those together in a little ramekin. That's just for you to enjoy. Slice the rest of the dough into 12 rolls. I cut the dough in half, cut each half in half, and then cut each of those pieces into 3 rolls apiece.
- Line a 9" x 13" rectangular baker with parchment or spray lightly with some pan spray. Arrange the rolls 3 across by four down. Lightly spray the tops with pan spray, cover, and let rise until puffy and the sides of the rolls are touching, about 1-1 1/2 hours.
- During the last 30 minutes of rising, heat your oven to 350F/160C, and place a rack in the center of the oven.
- Bake until golden brown with an internal temperature of 195F, about 30-35 minutes. If the rolls are browning faster than you'd like, loosely tent with foil for the last few minutes of baking.
To Glaze
- As soon as the rolls come out of the oven, spread them with the cream cheese glaze. The glaze will melt and spread to nicely cover all the rolls. The glaze is not so thick that it disappears, though, so you'll only have to glaze once.
- Serve warm. Cool completely and store leftovers, well covered, at room temperature for a day or two. Reheat to serve. For longer storage, freeze room temperature rolls and thaw and heat as needed.
Did You Make Any Changes?
Notes
Overnight Instructions
Make the dough, do the first rise, and shape as directed. Once the rolls are in the pan, spray with pan spray, cover well, and refrigerate overnight. Remove the pan of rolls to a cozy place to rise and get puffy, about 2-3 hours, depending on how cozy your cozy place is. Once nicely risen and puffy, bake and ice as directed.Nutrition
Would you like to save this post?

Hi, y’all! I hope you’ve enjoyed this post and hopefully also learned a thing or two.
If you like my style, I invite you to sign up for my occasional newsletter, The Inbox Pastry Chef.
Expect updates on new and tasty recipes as well as a bit of behind-the-scenes action. I hope to see you there!

And there you have it: homemade cinnamon rolls made with a gorgeous, easy to work with, golden enriched sweet dough.
I hope you love them as much as we do around here. And thanks to our neighbors who take some of this deliciousness off our hands!
Thanks for being here. Take care, y’all.


Join in Today!
I made these during the bake-off, and my husband declared them the best he has ever had. I have been making cinnamon rolls for years, and these really ARE the best! My only modification was to pour 1/3 c heavy cream over them just before baking. Yum!!
I have seen that pour-cream-over thing, and I’ve never tried it. It does make sense that it would make them super soft and gooey, though. So thrilled you guys think they’re The Best! I appreciate the review and rating too. It helps so much!
Jenni, I made these during the bake-off but I was wondering..could I freeze the dough after rolling it up? I have a houseful of family coming and want to be prepared! Thanks!
Hey, Barbara! I’m so glad you love the cinnamon rolls! Yes, you can freeze the shaped rolls. I’d use maybe 1 1/2x the amount of yeast called for in the recipe to account for any that might not come back after freezing. Stick the whole pan in the fridge overnight to thaw and then rest them for maybe an hour or two on the counter or in a warm place before baking. Your family will be so happy!
This dough is wonderful to work with and the resulting bake is perfect. It’ll be my staple sweet bun dough from now on.
Oh, I’m so happy you love it, Beth!
These are spectacular! Easy dough to work with. I used cardamom and allspice with the cinnamon. And the icing! Perfect t to spread and didn’t disappear even frosting the rolls right out of the ovenk
I am so thrilled you love the dough, Carlin! And your spicing choice is fantastic!
When does the buttermilk go into the dough? Oh, and by the way, you have salt listed twice in the directions.
Thanks for catching those–sometimes I get ahead of myself! Buttermilk goes in with everything else. Enjoy!
So when I made cinnamon rolls about the same time, I used homemade apple butter for the schmear (btw, LOVE the sped-up spreading of the filling) and sprinkled on a ton of cinnamon-sugar. I also got to use the bread-rising function of my oven for the first time, which was very exciting. My house is cold, too.
cinnamon rolls are our (jeez, can that be grammatically correct?) Christmas morning tradition. This year we are trekking northward (northern GA) to spend the holiday with are daughter and I’m bringing the rolls, frozen, and hopefully a slow cold rise will work out
a tip that i saw once to keep all the filling inside instead of oozing out the bottom is to not pinch the roll tightly closed, so that when you cut your slice you take the roll flap and pull it across the bottom of the slice – it works out well
happy holiday
Thank you, thank you, THANK YOU so much for making this video! We have a Christmas morning tradition of cinnamon rolls after the presents have been opened. Unfortunately (please be kind to me, my friend), it was the store bought stuff. I am going to do this from now on! You’re the best!