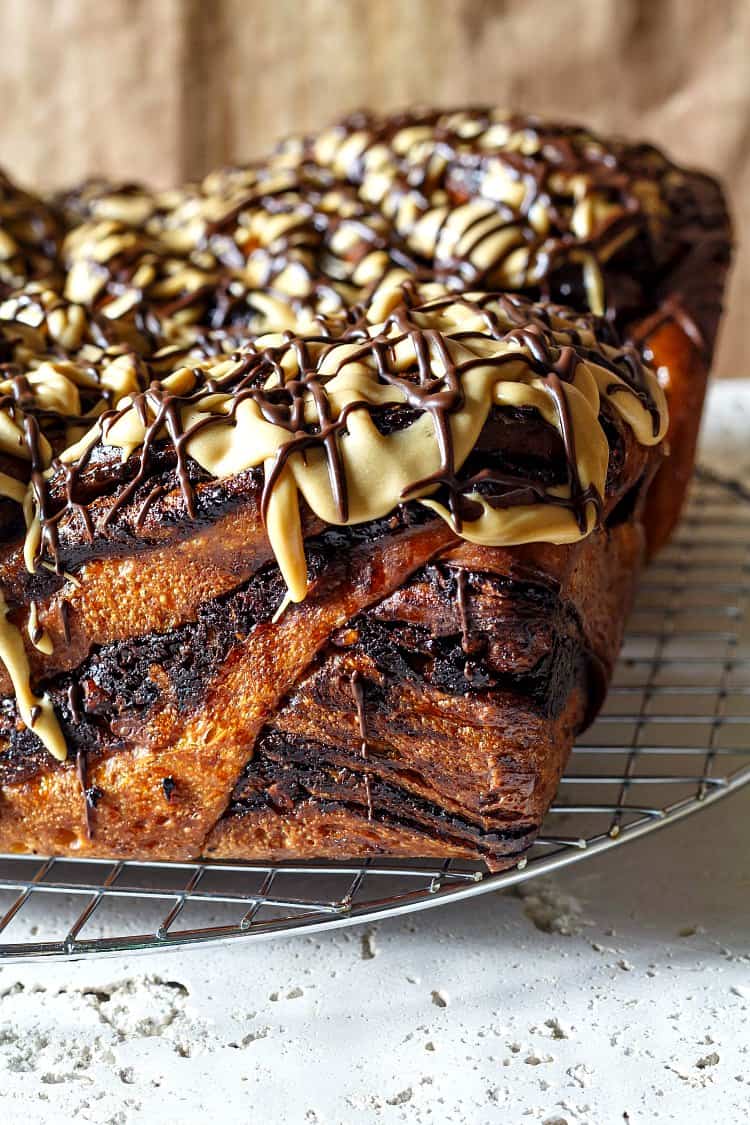
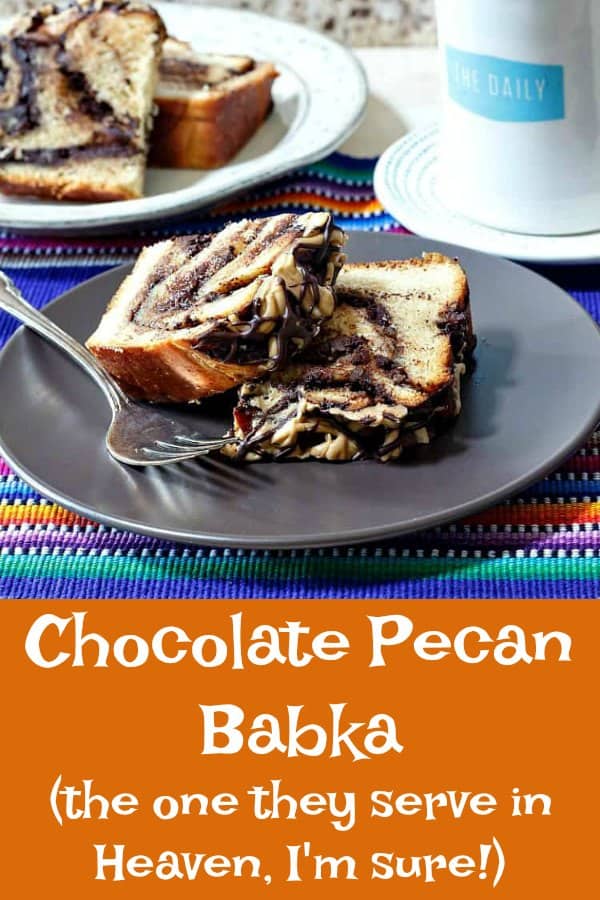
I pulled out all the stops in making this chocolate babka with pecans. Rich chocolate pecan filling, a brown sugar syrup, a coffee glaze and a chocolate one.
The twists in this chocolate pecan babka are spectacular to look at, so if you want to leave off the glaze to better appreciate the shaped swirls, you certainly can.
If they serve babka in heaven, this is the one!
You may also enjoy the pumpkin babka I made with no refined sugar. And consider serving either with a delicious mug of whipped coffee.
For ease of browsing, here are all of my sweet yeast breads.
See my best chocolate babka web story here.
This was really, really, really, good. I over cooked it because I forgot to lower the temperature after I tented with foil. I also experimented with the two loaves.
Ruth V. Marrero
I did one without the syrup and one with. Each one had 4 sections. Plain, coffee, coffee and chocolate and just chocolate glazed.
The consensus at my house was that the one with syrup and just the coffee syrup was the winner. It will definitely be served at my next brunch.
What Is Babka?
I think folks in New York have known about babka for a very long time.
It was probably that Seinfeld episode about it (and the black and white cookies) that brought babka into the mainstream.
Pastry Chef Online Participates in Affiliate Programs. If you make a purchase through one of my links, I may earn a small commission. For more information click to read my disclosure policy
And then Ottolenghi elevated the bread/coffee cake by giving it his signature twist, apparently a hallmark of what is called a krantz cake.
The word babka comes from a Slavic word meaning “grandmother.” This is most likely a nod to the grandmothers who used to make this sweet, enriched yeast bread.
These days, it seems like most folks who are making babka give them the signature Ottolenghi twist, calling them babkas instead of krantz cakes. But whether you call this a babka or a krantz cake, you are going to love it. I promise.
A Couple Of Notes About This Recipe
- This is a non-traditional dough in that I used buttermilk for the liquid and added some brown sugar and a touch of cinnamon to the dough.
Traditional babka recipes call for a mixture of milk and water, and maybe a bit of granulated sugar. - Even I will admit that I got a bit carried away with the sugar syrup and two glazes.
Still, since I used 72% chocolate, the loaf does not read as too sweet. You are welcome to leave off the glazes altogether, use one or the other, or leave off the sugar syrup in favor of just using a glaze or two. It really depends on how decadent you are feeling.
Procedure
There are a few steps to make this babka, but none are difficult. I’ll walk you through it.
Making the Dough
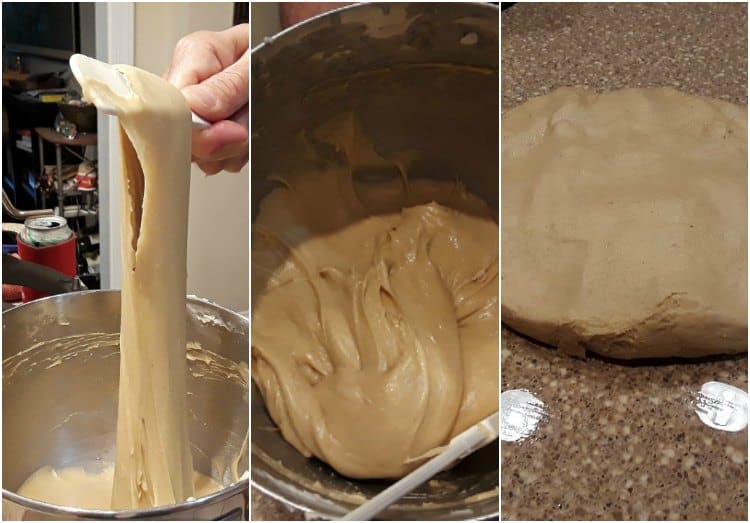
- Make sure the dough is smooth, shiny, and super stretchy. (See photo 1 above) This will take about 10 minutes of kneading after incorporating all the butter.
- Scrape the finished dough into a ball, spray the top with pan spray, cover and refrigerate overnight.
- Divide the dough in two and put one half in the fridge while working with the other.
- Work on an oiled surface and pat the dough into a rough rectangle before using a rolling pin to roll it out to a thickness of no more than 1/4″.
Filling the Dough
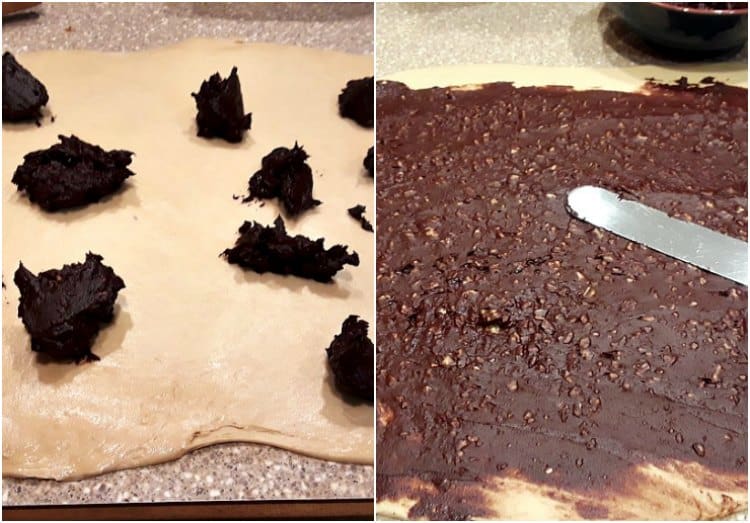
- Once you have the filling mixed up (See Recipe), dot it all over the rectangle of dough.
- Use an offset spatula to spread the filling out in a thin layer, leaving about 1″ of clear dough on the far side of the rectangle.
Shaping
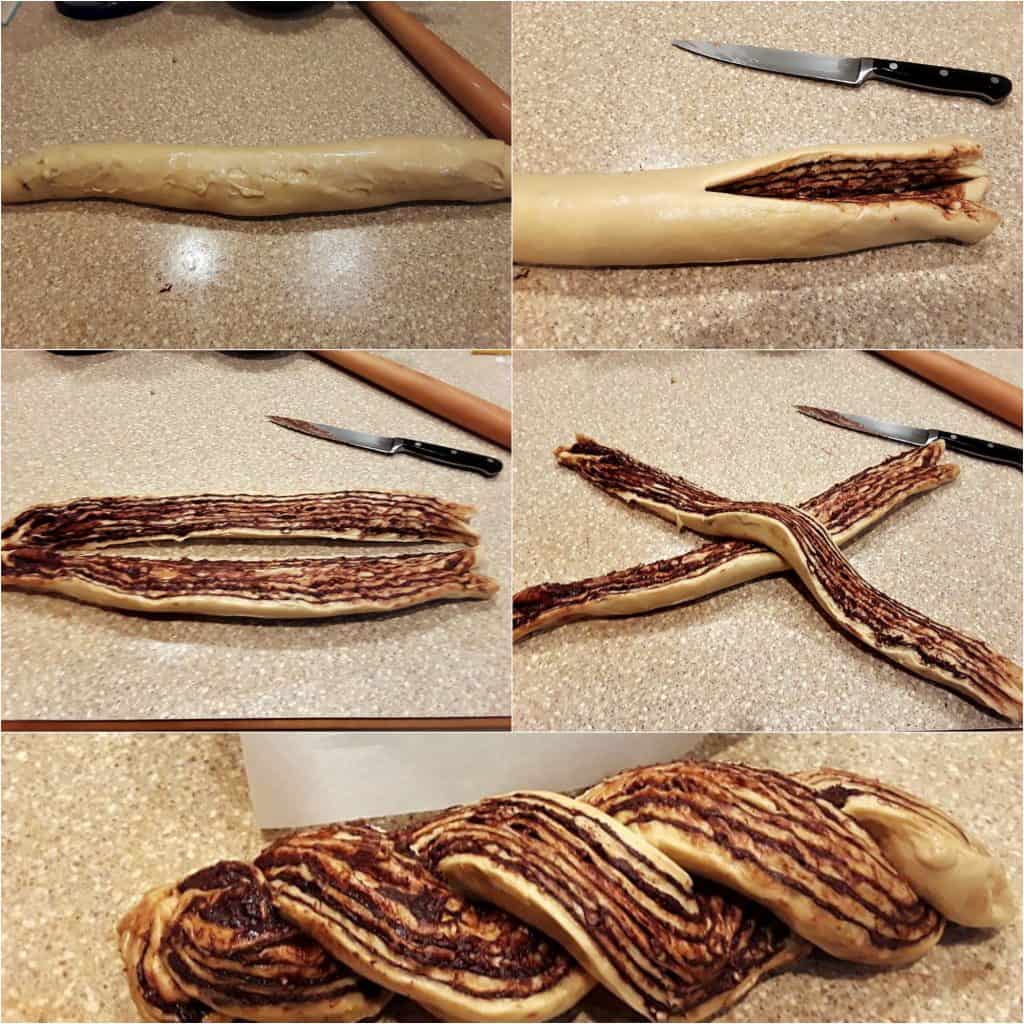
- Roll the dough up into a log. Work quickly while the dough is still chilled. If it gets too soft, nothing horrible will happen. You may just need to use a bench knife to help you roll. Pinch the seam together.
- Use a sharp knife to cut the roll of dough into two semicircular logs.
- Cross one log over the other, cut sides up.
- Make two twists on either side, pinching the ends together well.
Panning, Rising, and Baking
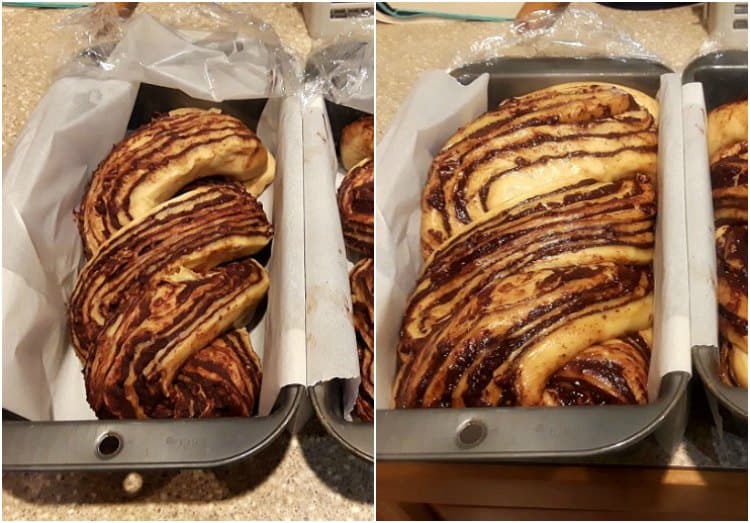
- With a hand on either end of the shaped loaf, push the coils together a bit to tighten up the shape and shorten the loaf.
- Place in a parchment-lined pan, tucking the pinched ends of the coil underneath.
- Cover and refrigerate overnight, or just continue with the rising. Either way, you want the dough to rise to fill the pan–not quite doubled in size. I refrigerated mine overnight and let it rise in an oven I preheated for 30 seconds and then turned off. The rise took about 2 hours.
Sugar Syrup and Glazing
Would you like to save this post?
- Boil together brown sugar and water. Off the heat, stir in the vanilla and let cool until just warm.
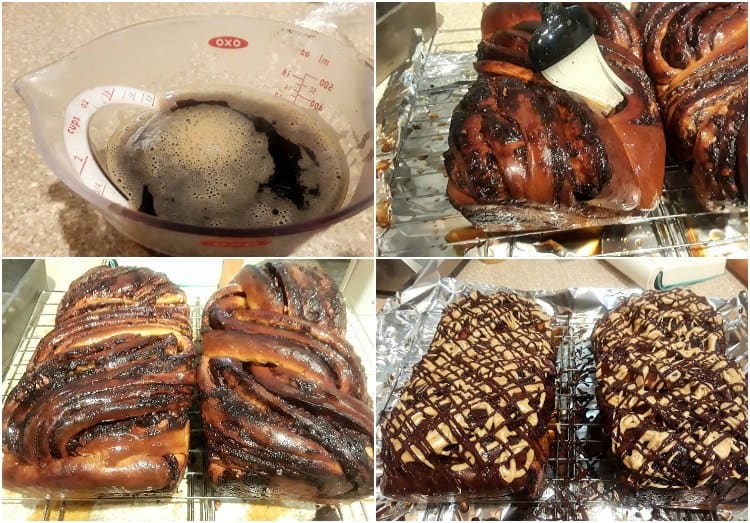
- Once you take the loaves out of the oven, brush them liberally with the syrup. You can use some of the syrup or all of it. I used it all.
- I used a spoon dipped into the coffee glaze to make circular drizzles of glaze all over the babkas. Then I put the melted chocolate and butter into a zip top bag with a tiny corner snipped off to make the chocolate criss-cross lines. Feel free to do your own thing with one glaze, both glazes, or leave them off entirely.
VARIATION: Instead of one (or both) glazes, sprinkle on a liberal amount of toasted chopped pecans after the sugar syrup to really reinforce the pecaniness in the chocolate filling.
Tips for Success
- Take your time. It takes about 5 minutes to mix the dough, 10 minutes to add the softened butter, and another 10 minutes to knead it after you add all the butter. You definitely need a sturdy, direct drive stand mixer for making this guy.
- When rolling out the dough, spray oil or pan spray on your counter rather than using flour. Flour will just make your loaf heavy. Pan spray will help you overcome the urge to use flour, and it will also keep the dough from sticking to your hands.
- When hot, the loaves are pretty delicate, so it’s a good idea to line your bread pans with parchment, leaving some hanging over each long side of the pan to help you pull it out. Once it’s out of the pan, peel off the paper and let the loaves cool on cooling racks.
- Start brushing the syrup onto the loaves after they’ve been out of the oven for at least 20 minutes so that the structure is set enough to be able to handle the extra liquid.
- Even though it is very hard to do, wait until the loaves are completely cool before slicing and digging in. If you try to slice them while they are hot or even very warm, they will squish and the filling will run out.
- Leftovers? Turn slices into French toast by dipping them into an egg-milk mixture and frying up on a griddle. You can also cut leftovers into chunks and turn them into bread pudding. You’re welcome.
PRO TIP: Work on an oiled surface rather than a floured one. This will keep the dough from sticking and avoid a dense loaf from adding too much flour.
Storage
Keep leftovers, well-wrapped, at room temperature for up to two days. For best flavor and texture, reheat (or toast slices) before serving.
Do not store your babka in the fridge. It’ll get stale really quickly as refrigerators tend to pull moisture out of baked goods.
Freezing
As with most yeast breads, chocolate babka freezes extremely well.
Wrap in a double layer of plastic and then in foil. Freeze for up to 3 months.
Defrost, still wrapped at room temperature. Reheat or toast to serve.
Questions?
Okay, let’s do this.
Let’s Bake

Interested in More Sweet Breads? Try These:
- Soft, Gooey Cinnamon Rolls with potato in the dough, these guys stay super soft. Wonderful for brunch or breakfast.
- Apple Butter Coffee Cake flavored with chai spice and filled with chai apple butter (or use your favorite apple butter), this yeasted coffee cake is covered with streusel and glaze. Truly a celebration coffee cake.
- Chocolate Cherry Krantz Cakes: another version of babka, chocolate and cherry are the perfect marriage in these beautiful spiraled loaves
A Note About Measurements
Don't let its small price and small size fool you. The Escali Primo is an accurate and easy-to-use food scale that I have used for years. It's easy to store, easy to use, has a tare function, and easily switches between grams and ounces/pounds for accurate measurements.
It will help me and other readers so much if you take a moment to rate and leave a review for this recipe.
You can use the stars to rate 1-5 (5 is best), and leave a review in the comments. It helps me make adjustments if any are needed, and comments help others decide whether the recipe is worth making.
Other ways to share include pinning, and/or sharing on your favorite social media platform.
Thank you so much for taking the time!

Chocolate Pecan Babka Recipe
Would you like to save this post?
Ingredients
For the Dough
- 4 large egg yolks
- 1 large egg
- 1 ½ teaspoons kosher salt I used Morton’s
- 2 oz brown sugar
- 1 teaspoon cinnamon optional
- 20 oz all purpose flour I used King Arthur
- 2 teaspoons active dry yeast
- 10 oz buttermilk
- 6 oz unsalted butter softened
For the Filling
- ¼ cup honey
- ½ cup butter melted
- 6 oz bittersweet chocolate chopped (about 6 oz)
- 1 teaspoon espresso powder
- 1 oz cocoa powder sifted
- heavy pinch kosher salt
- 1 cup toasted pecans very finely chopped
For the Brown Sugar Syrup
- 8 oz brown sugar
- 8 oz water
- 1 teaspoon vanilla extract
For the Coffee Glaze
- 5 teaspoons milk any kind
- 1 oz unsalted butter 2 Tablespoons
- pinch salt
- 1 ½ teaspoons espresso powder
- 6 oz confectioners sugar about 1 1/2 cups
For the Chocolate Glaze
- 3 oz bittersweet chocolate chopped (1/2 cup)
- 1 Tablespoon unsalted butter
Instructions
For the Dough
- In the bowl of your stand mixer, combine the yolks, egg, salt, brown sugar, and cinnamon. Dump all the flour on top followed by the yeast.
- Pour the buttermilk on top and mix on low with the dough hook for 5 minutes.
- With the mixer on low speed, add the softened butter, a bit at a time, until completely incorporated. This should take about 10 minutes, and the dough will be very soft.
- Turn the mixer up to medium high and knead for 10 minutes until the dough is very smooth, shiny, and extensible (stretchy), and clears the sides of the bowl. You will think it will never clear the sides, but it will. I promise.
- Scrape the soft dough into a ball in the bottom of the mixer bowl. Spray with pan spray, cover with plastic wrap, and refrigerate overnight.a
For the Filling
- In a microwave-safe bowl, melt the butter and honey together with the espresso powder and bittersweet chocolate. Start with 30 seconds and then stir well. If the chocolate is not completely melted, microwave again for 15 seconds at a time until smooth.
- Slowly whisk in the cocoa powder and salt until smooth and well-combined.
- Thoroughly stir in the finely chopped nuts. Mixture will be loose. Refrigerate for about 20 minutes, then stir. You want the mixture to be about the consistency of crunchy peanut butter to make it easy to spread.
To Shape and Bake
- Line 2 9″x5″ loaf pans with parchment, allowing the parchment to hang over the two long sides of the pans.
- Remove the dough from the fridge and divide in two, about 21 oz each. Leave half in the bowl and put back in the fridge.
- Spray a work surface lightly with pan spray.
- Plop the cold dough onto your work surface and press into a rectangle. Use a rolling pin to roll it out into a large rectangle, approximately 16″ x 12″, long side toward you.
- Spoon on half the filling in blobs and then use an offset spatula to spread the filling evenly over the dough, leaving 1″ of the far side of the rectangle clear of filling.
- Roll the dough up like a jelly roll, using a bench knife to help you if the dough wants to stick.
- Pinch the seam and place the roll, seam side down, on the counter.
- Using a sharp knife, cut the log in half, long way, and turn the halves so the cut sides are up.
- Place one half over the other, like a cross. Then make 2 twists on either side of the cross, keeping the cut sides up. Pinch ends together.
- Use your hands to press on either end of the twist to tighten it up just a bit.
- Carefully pick up your twist and place in a prepared pan, tucking each end of the twist under the loaf.
- Repeat with the other half of the dough and filling.
- Cover both pans with plastic wrap and refrigerate for at least 8 hours and up to 12.
- Remove from the fridge and, depending on how much time you have, allow the loaves to come to room temperature and then slowly rise until doubled. This could take several hours, depending on the temperature in your kitchen. I preheated the oven for 30 seconds and then turned it off. I let the dough rise in the barely heated oven until doubled, about 2 hours.
- Set a rack in the center of the oven and preheat to 375F.
- Bake the risen loaves for 15 minutes.
- Turn the heat down to 325F, loosely tent the loaves with foil, and bake until the internal temperature reaches 190-195F, about 20-25 additional minutes.`
- Take the loaves out of the oven and use the parchment to lift them from the pans. Peel the paper off and let cool on racks for about 20 minutes. Then brush the syrup evenly over each loaf. Once the loaves have cooled completely, glaze with one or both of the glazes. (Instructions follow for the syrup and glazes.)
To Make the Brown Sugar Simple Syrup
- In a small saucepan, bring the water and brown sugar to a boil. Off the heat, stir in the vanilla. Let cool until just warm.
For the Coffee Glaze
- Put the milk, butter, salt, and espresso powder in a microwave-safe bowl, and microwave until the butter melts. Whisk until smooth.
- Sift the confectioners sugar over the milk-butter mixture and whisk until smooth. If you’d like the glaze a bit thinner, add milk, 1/2 teaspoon at a time, until you like the consistency.
To Make the Chocolate Glaze
- In a microwave-safe bowl, melt the chocolate and butter. Whisk until smooth. You can either drizzle this glaze over the babkas or put in a zip top bag and then snip off a tiny corner to make lines like I did. If you have a piping bag, fit it with a #2 tip.
Did You Make Any Changes?
Notes
Nutrition

Hi, y’all! I hope you’ve enjoyed this post and hopefully also learned a thing or two.
If you like my style, I invite you to sign up for my occasional newsletter, The Inbox Pastry Chef.
Expect updates on new and tasty recipes as well as a bit of behind-the-scenes action. I hope to see you there!


Join in Today!


Hey Jenni! I hope you are doing well. This recipe looks great, and I was wondering how long it usually keeps on the counter or in the fridge. My experience with babkas (made from other recipes) is that they tend toughen up a day or two after baking and would like to avoid that if possible. Thanks, and take care!
Hey, Ellie! We’re doing okay over here, thanks for asking. Hope you are also! Unfortunately, babka does tend to stale rather quickly. It’s the nature of the dough. This one does benefit from lots of gooey filling, a syrup glaze, and the 2 glazes (if you decide to go The Full Monte!) So all that will help. Most traditionally made yeast bread is going to be best the day you make it–babka or not. You can either wait until it cools completely, slice the entire loaf, and then remove pieces to thaw/toast as you need them (which is what I do), or you can potentially make it with a Tangzhong dough, where you take a portion of the flour and a portion of the liquid from the recipe, cook them together until the starches in the flour gelatinize before continuing with the recipe. The starches will hold onto that liquid and keep staling at bay for a good 3-4 days. Oh, or, you could bake the recipe in 3-4 small pans, freezing some and keeping one out at a time to eat. Hope that helps!
Thanks for your always sagely and quick advice, Jenni!
Of course! That’s what I’m here for! Let me know what you decide to do. 🙂
Since I have decided to take this to “Misfit Thanksgiving “ I of course, must do a test run in the next week! I’ll keep Y’all posted!
Oh, awesome, Larry! Can’t wait for your review!
Looks to die for Jenni. One of my favorites. Can’t wait to try your version!
Thank you, Abbe! I really hope you enjoy it!
I think I just died and went to heaven! Love how you made it so much easier with the photos. Videos go by too fast for this old girl but I can stare at photos while I work. Thanks for such an amazing recipe!
Yay! I’m so glad, Gail! Please let me know how you like it! (Really hoping you’ll give it a try.) 🙂
Yum!
Glad you were able to share it with your coworkers, sweetie!