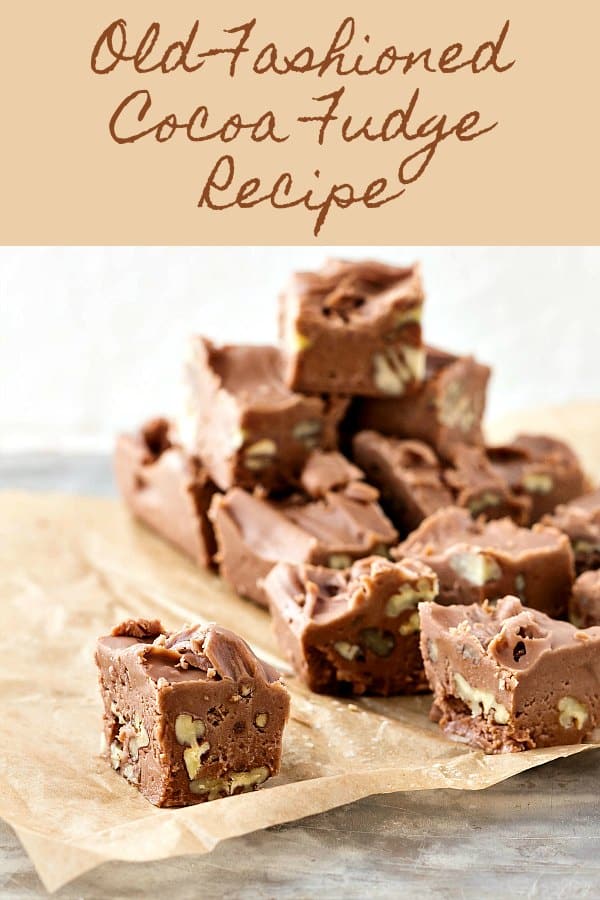
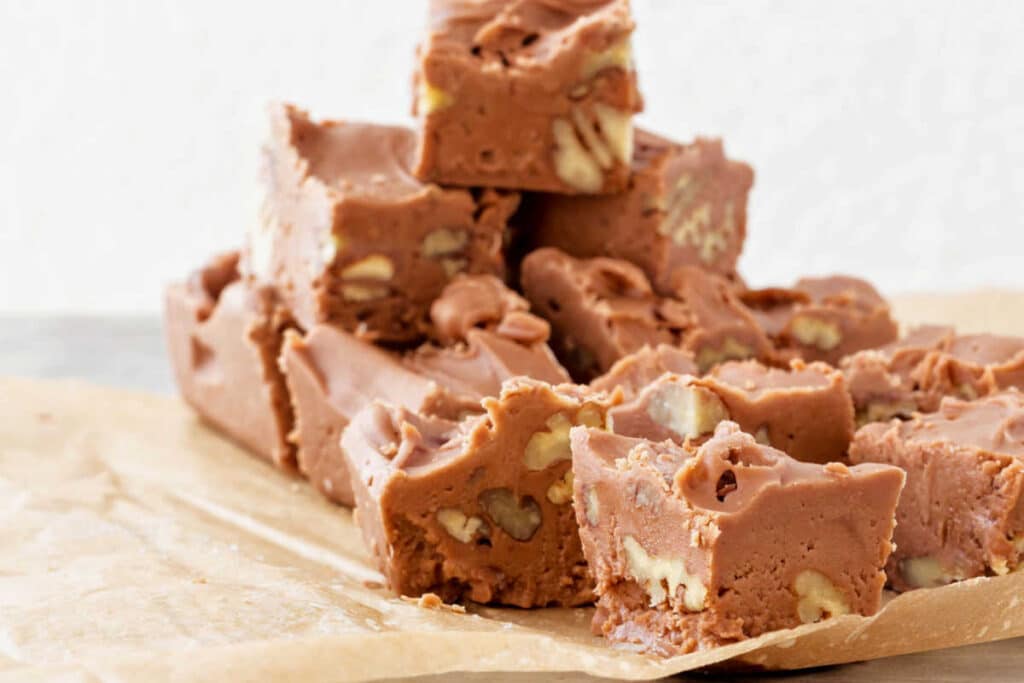
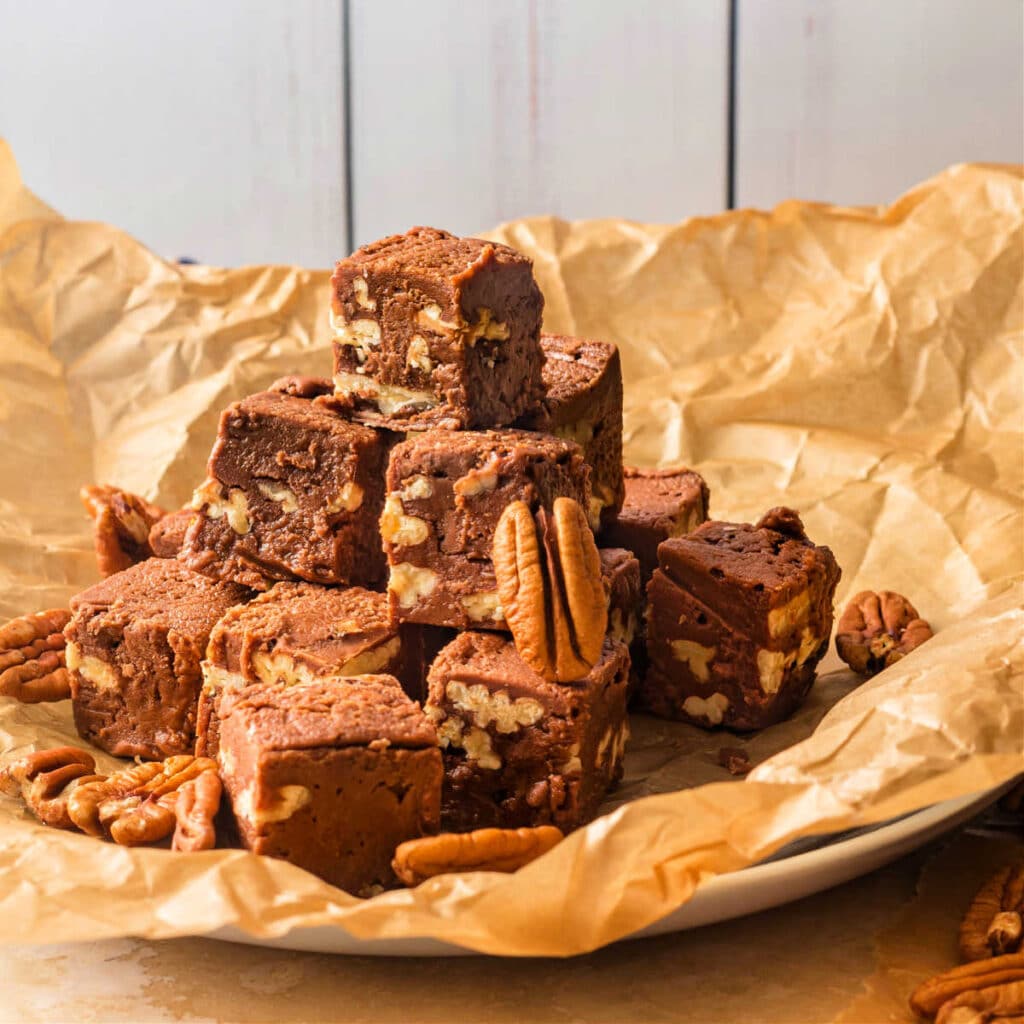
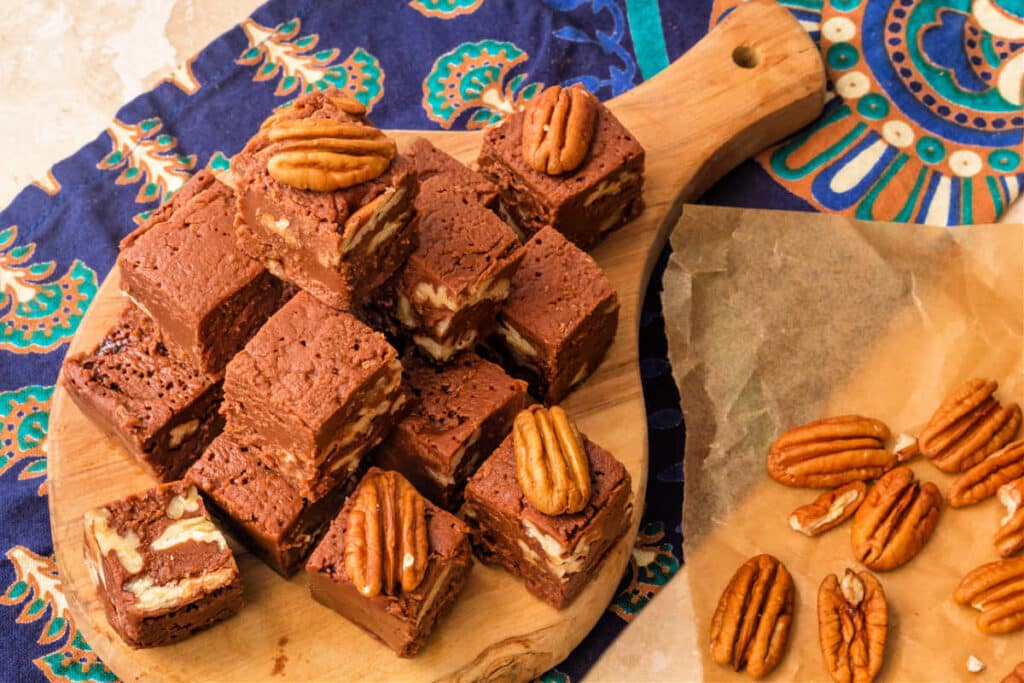
This old-fashioned fudge recipe uses cocoa powder and is super creamy. I was honored to give this recipe back to a family who only had the ingredient list from their grandma.
They’d tried and failed to make it a few times. I am so happy I could allow them to enjoy their family’s treasured fudge recipe again! I have updated the post with a larger batch that is also more intensely chocolatey. You can find that variation in the recipe notes.
You can learn more about the science of making fudge here or, for ease of browsing, find all my candy recipes here in one place. Enjoy!
Watch my old-fashioned cocoa fudge recipe web story here.
Old-Fashioned Fudge, at a Glance
✔️Skill Level: Intermediate
✔️Skills: Cooking sugar, using a candy thermometer
✔️Type: Candy
✔️Number of Ingredients: 8
✔️Prep Time: 5 minutes
✔️Cook Time: 15 minutes
✔️Yield: 40 pieces for 1x recipe, 80 pieces for 2x
Related Recipes: Peanut Butter Fudge, Penuche
Jump Straight to the Recipe
Bringing Back a Treasured Family Recipe
This is what happened to reader Carol:
Pastry Chef Online Participates in Affiliate Programs. If you make a purchase through one of my links, I may earn a small commission. For more information click to read my disclosure policy
Her grandmother used to make this old-fashioned fudge recipe every year, but she never taught the kids how she made it, and now that she’s gone, they were left fudge-less.
Carol did find the list of what she hoped were the ingredients for creamy cocoa fudge, but that was all she found. No rules. Just ingredients.
She sent me this message:
I ran across a list of ingredients for my Granny’s Fudge but no instructions. She is no longer with us, so I can’t ask her about it. I remember watching her when I was little, but she wouldn’t let me get too close for fear of me getting burned. She used to “tweak” it to make white fudge and peanut butter fudge.
Ingredients:
- 2 cups sugar
- 1 Tablespoon cocoa
- 1 Tablespoon Karo
- 1 Tablespoon butter
- 1 teaspoon vanilla
- 1 cup milk
- Chopped pecans
Thanks so much and belated Merry Christmas!
Carol
Fudge-Making Rules to Remember
- Making fudge is all about concentrating the sugar so that when it sets up again as crystals, it feels smooth and creamy in your mouth and not grainy.
- Cooking it to too high a temperature causes it to set up really hard.
- Cooking it to too low a temperature causes it to be too soft or even runny like sauce (which isn’t bad. It’s just not what we’re going for).
- You really need an instant-read thermometer or a good candy thermometer if you’re making fudge or any other kind of candy.
- Stirring is the key to making and controlling how the crystals set up. But if you stir too soon, or too late, you’ll end up with grainy fudge. Think of it the same way churning ice cream while it’s freezing ensures tiny ice crystals and smooth, creamy ice cream. This is the same principle.
How to Make Cocoa Fudge
Before we get down to the actual recipe, I want to make sure you a)have all the ingredients you need and b)know what to expect.
if you already know how to make fudge, you can skip the following sections and head straight to the recipe.
Here’s the rundown:
Ingredients
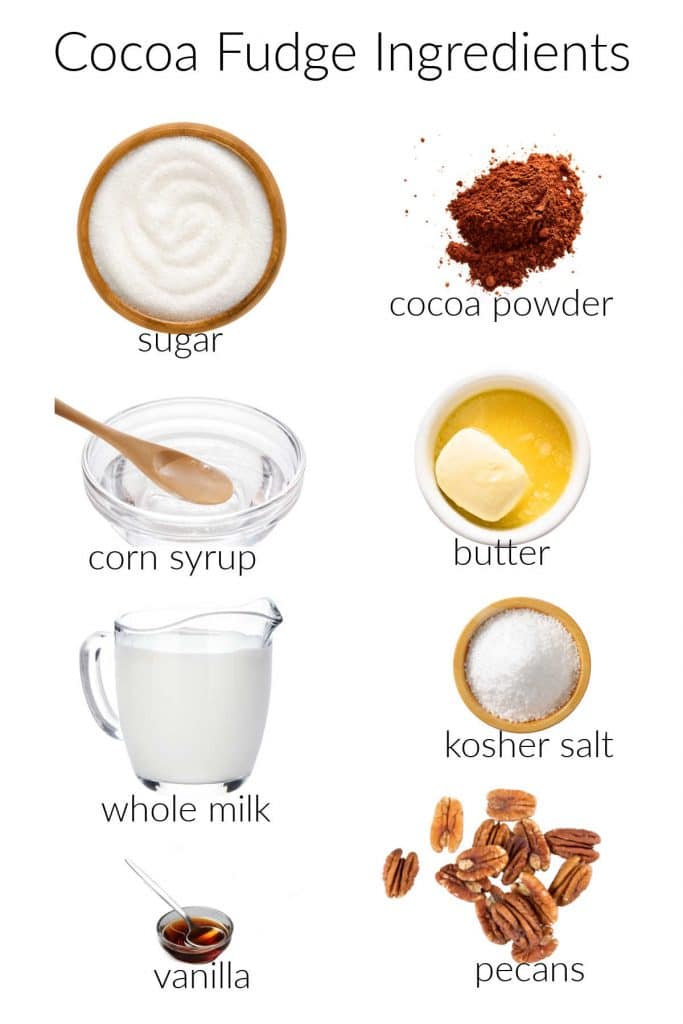
- sugar: provides the sweetness and the crystals needed to help the fudge set up into a creamy texture. For more depth of flavor, you can substitute with light brown sugar
- cocoa powder: you don’t need Dutch process for this. Plain old American cocoa powder will work just fine. Control how chocolatey your fudge is by using more or less cocoa powder
- corn syrup: helps to inhibit large crystals so you don’t end up with grainy fudge. You can substitute Lyle’s golden syrup here if you’d rather
- butter: adds fat for carrying flavor and also for mouthfeel
- milk: lends milk solids and liquid to moderate how quickly the sugar cooks. Also lends some complexity as the milk solids brown while cooking. I used whole milk. You can also use 2%. Do NOT substitute with evaporated milk, 1% or skim milk
- kosher salt: brings out the flavor in the fudge while counteracting any bitterness from the cocoa powder
- vanilla: chocolate’s best friend, the vanilla rounds out the flavors
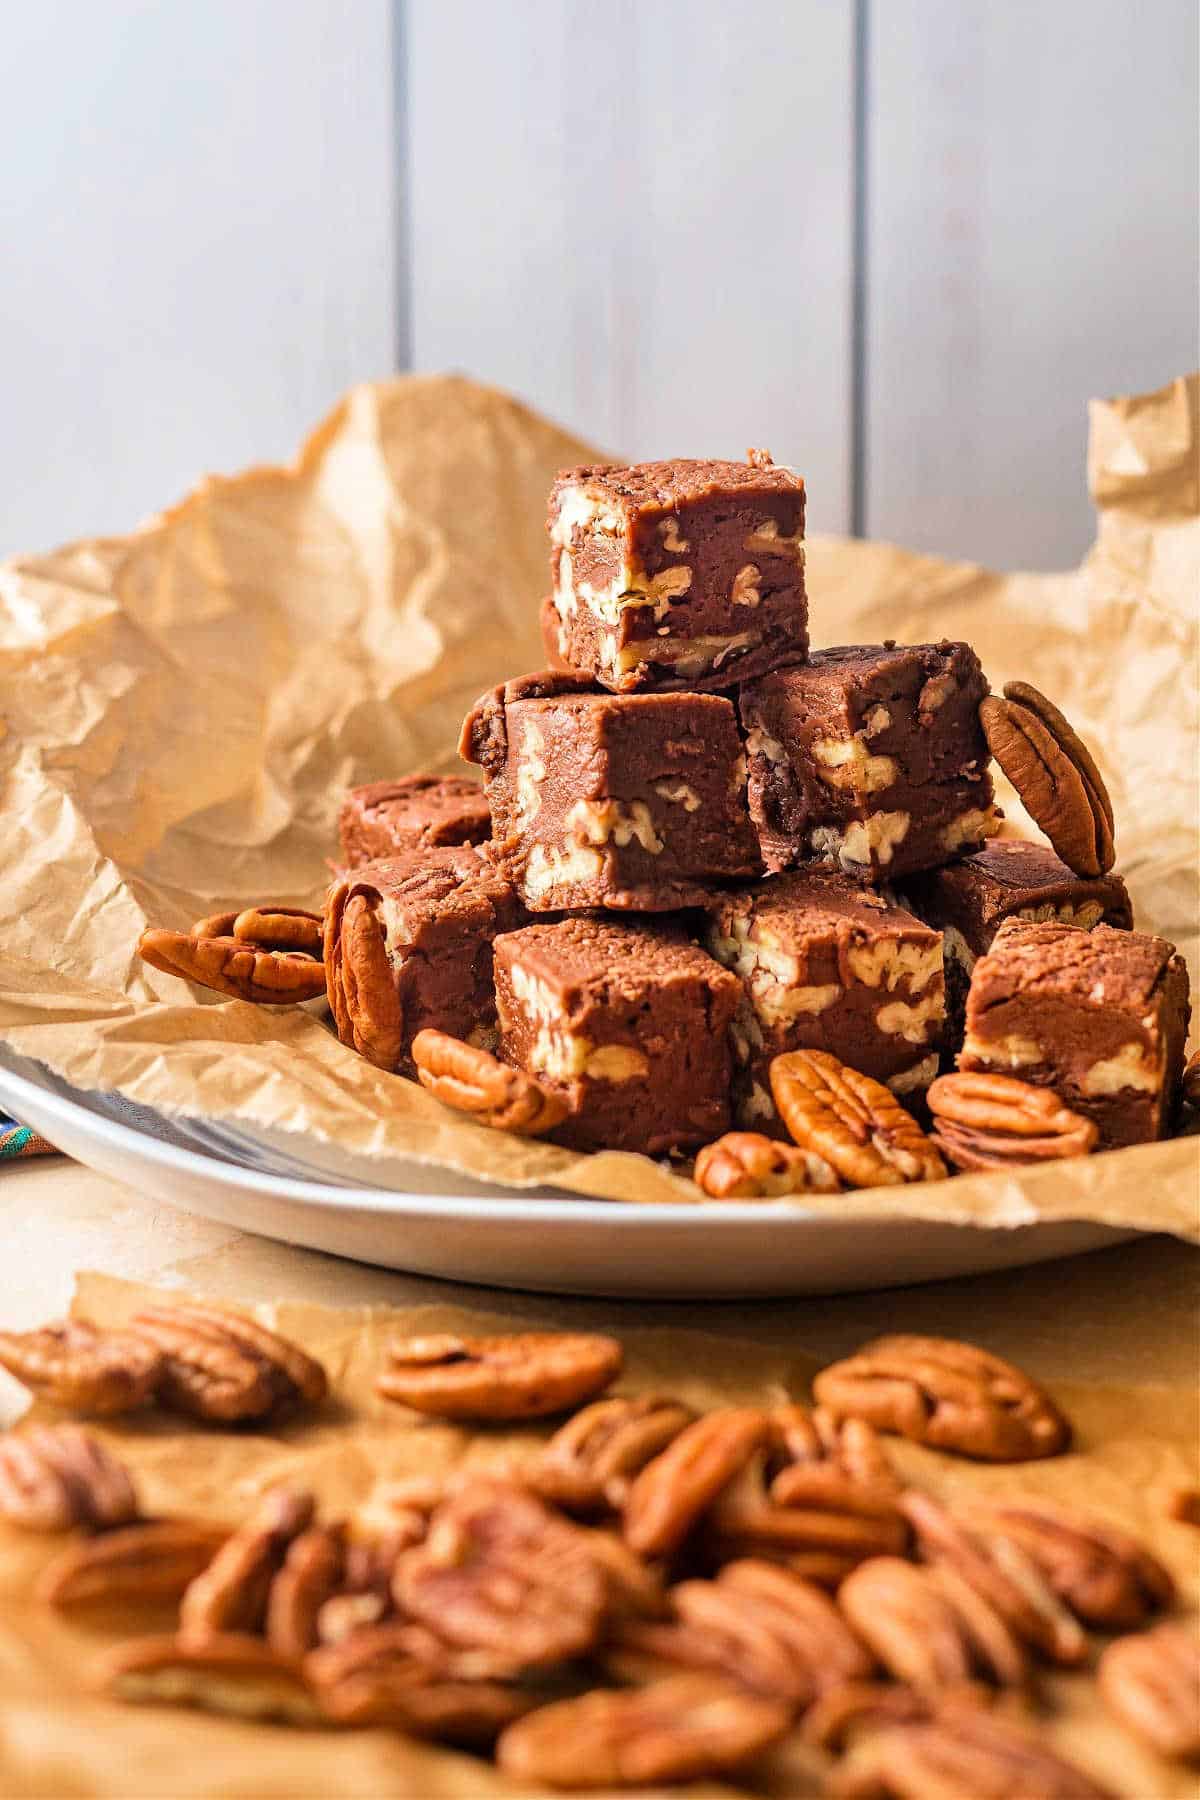
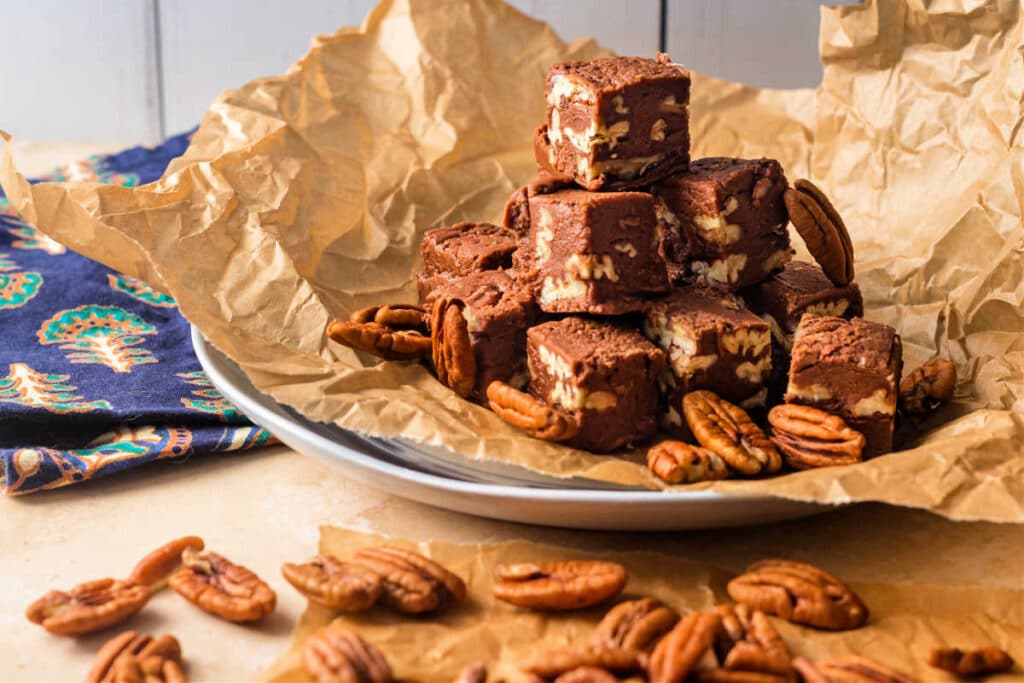
- pecans: toast your nuts before chopping for maximum nutty flavor and crisp texture. You can substitute your favorite nut here or leave them out entirely
Two Different Versions
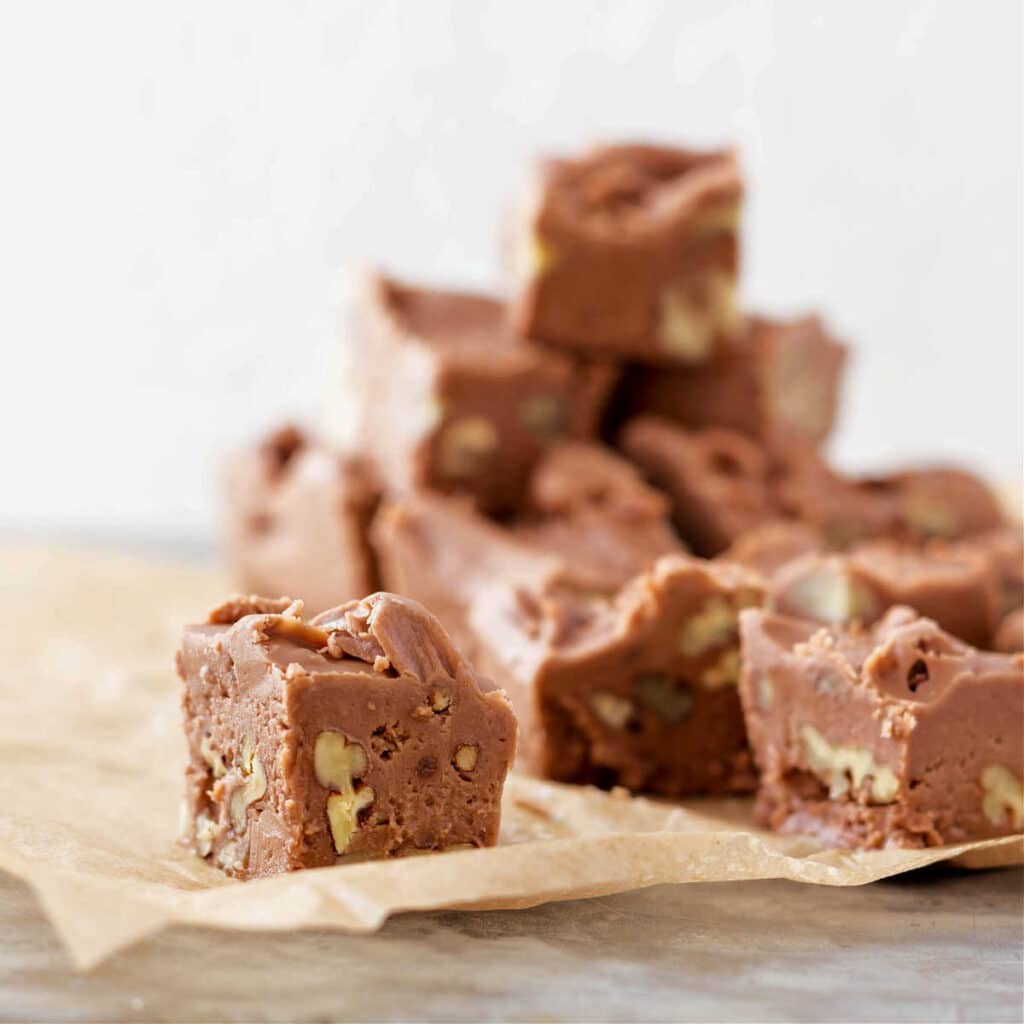
Note some of the photos of the fudge in this post are paler than others.
That’s because the paler ones only have a heaping tablespoon of cocoa powder in them.
I made them that way because that was how Carol’s grandma’s recipe was written.
I remade (and doubled) the recipe recently to add more chocolate, deepen the flavor, and add a touch more butter.
You will find that ingredient list in the NOTES section of the recipe card. The procedure for making both types is exactly the same.
Pro Tips
Take your time. Cooking over medium heat will let you get to where you need to go. It will happen more slowly so you have just a bit more margin for error.
Be precise with your temperatures: both how hot you cook your mixture and–especially for fudge–what temperature you cool it to before you start stirring.
How To: Step by Step
- Everyone in the pool except for butter and vanilla.
- Bring to a rolling boil. Check temperature frequently until it reaches 234F. Remove from heat.
- Add butter and vanilla, but don’t stir them in yet.
- When the fudge cools to 110F, begin stirring. Stir and stir.
- It will start to thicken up after about 5 minutes or so. Continue stirring until fudge starts to lose its gloss.
- Quickly stir in nuts (if using).
- Spread into prepared pan to set up.
Visual Cues
Sometimes just seeing photographs doesn’t fully convey what you’re looking for at different stages.
Here are a few short video clips that hopefully will help.
1. The candy will boil pretty vigorously, so make sure your pan is much larger than you think you need. Boiling dairy can get out of hand quickly!
2. Make sure you check the temperature frequently. You are shooting for 234F/112C. You can take it a little higher, but no more than 236F/113C.
3. When you begin stirring the fudge, it will be fairly thin and easy to stir. (Note that in between shooting these clips, I was stirring very quickly and vigorously to help the candy cool and also to beat a little air into it).
4. As the fudge cools, the candy will lighten in color a bit and become less shiny and much thicker. That’s when it’s time to add the nuts.
Once your fudge gets very thick and more matte than shiny, add your nuts (if using). Stir them in quickly, because the fudge will thicken up very quickly once the nuts are added.
This is because the nuts are at room temperature and will bring the temperature of your candy down quickly.
Jenni Says: Buy yourself a little extra time to stir in the nuts by keeping them warm in your toaster oven before adding them to the fudge. Just be careful not to burn them.
Scrape your candy into your prepared pan, and then smooth it out with an offset spatula. I spray mine with pan spray to make it easier to spread/press the fudge into the pan.
If it starts to stick, add some more spray.
Cover and let the fudge set up in the fridge for a couple of hours before removing from the pan and slicing on a cutting board.
Cocoa Options
You can use whatever cocoa powder you have, but the richer the powder, the richer your fudge.
Especially if you make the version with just 1 heaping tablespoon of cocoa, you want to use the most flavorful you can find.
I have two recommendations for you.
The first is the cocoa powder we used to buy at the restaurants I worked in.
It is rich and contains about 25% cocoa butter, which means it brings its own body and fat to the party.
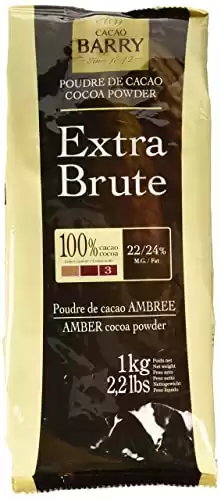
This is the cocoa powder we used to use at the restaurant. It is deeply delicious with a pretty high percentage of fat. That leads to richer flavor. I used to make the hot fudge sauce with this cocoa powder, so if you use a lot of cocoa powder and want to take some fancy, restaurant-quality cocoa powder for a spin, this Cocoa Barry is fantastic. Note this is FOUR POUNDS of cocoa powder!
My second pick is more widely available, and I can usually find it in the regular grocery store.
If I can find it, I will generally choose Ghirardelli over other brands like Hershey’s or Nestle.
It is richer, darker in color, and has a full-bodied chocolate aroma, much more so than the other two brands.
If you see Ghirardelli at the store, pick some up.
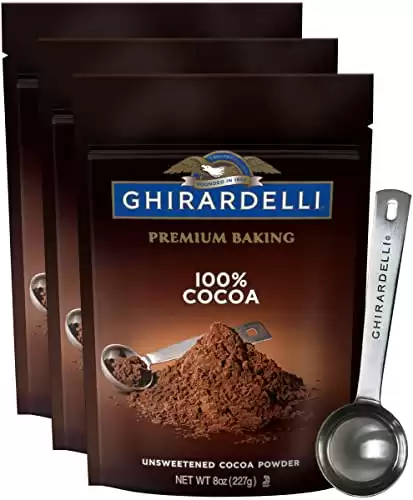
This is the cocoa powder I use to make hot fudge sauce (and other stuff) at home. It is rich and delicious and will give your hot fudge sauce and baked goods a lovely, deep chocolate flavor. It is less expensive than the premium brands, but it costs a bit more than the brands that are widely available at the grocery store. Definitely worth having in your pantry. NOTE: The price is for 1 1/2 pounds of cocoa powder.
Equipment You May Need
Here are some recommendations for making your candy-making life easier.
A heavy pot with sloped sides will make it easy to stir into the corners.
And, as I have mentioned previously, owning an instant-read thermometer is almost a must. I much prefer them to clip-on candy thermometers because they’re more responsive and much more versatile.
I use mine to check doneness in everything from cakes to candy to chicken and bread.
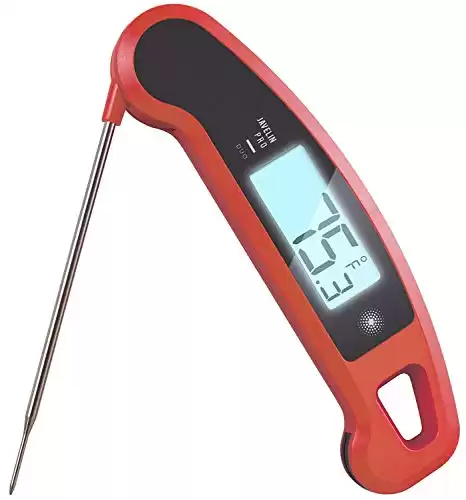
- Small probe won't make huge holes in your food
- Accurate and fast readings
- Results in either Fahrenheit or Celcius
- Display is backlit for easy readings
- Probe folds away for easy storage
Using a wooden spoon or high-heat silicone spatula is definitely the way to go because metal utensils will just transfer the heat up to your hand, and that would be bad.
A pizza cutter makes a surprisingly good candy cutter too, especially if you spray the wheel with a little bit of Pam or other pan spray.
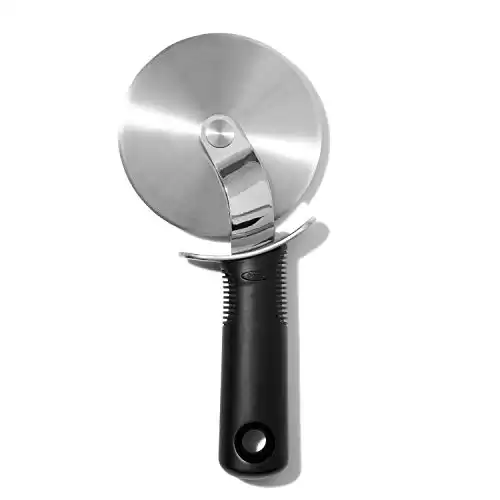
- Easy to hold
- Easy to wash
- Handles way more than pizza: cut brownies, candies, etc
The Most Important Thing You Need to Know About Making Fudge (and other candy)
If you do not want to read all this supporting information and you already know how to make fudge, you can jump straight to the recipe.
Just the thought of making fudge, or any candy, can scare folks. And what’s scarier than a fudge recipe?
A random list of old-fashioned creamy cocoa fudge ingredients with no instructions on how to make it. That’s what.
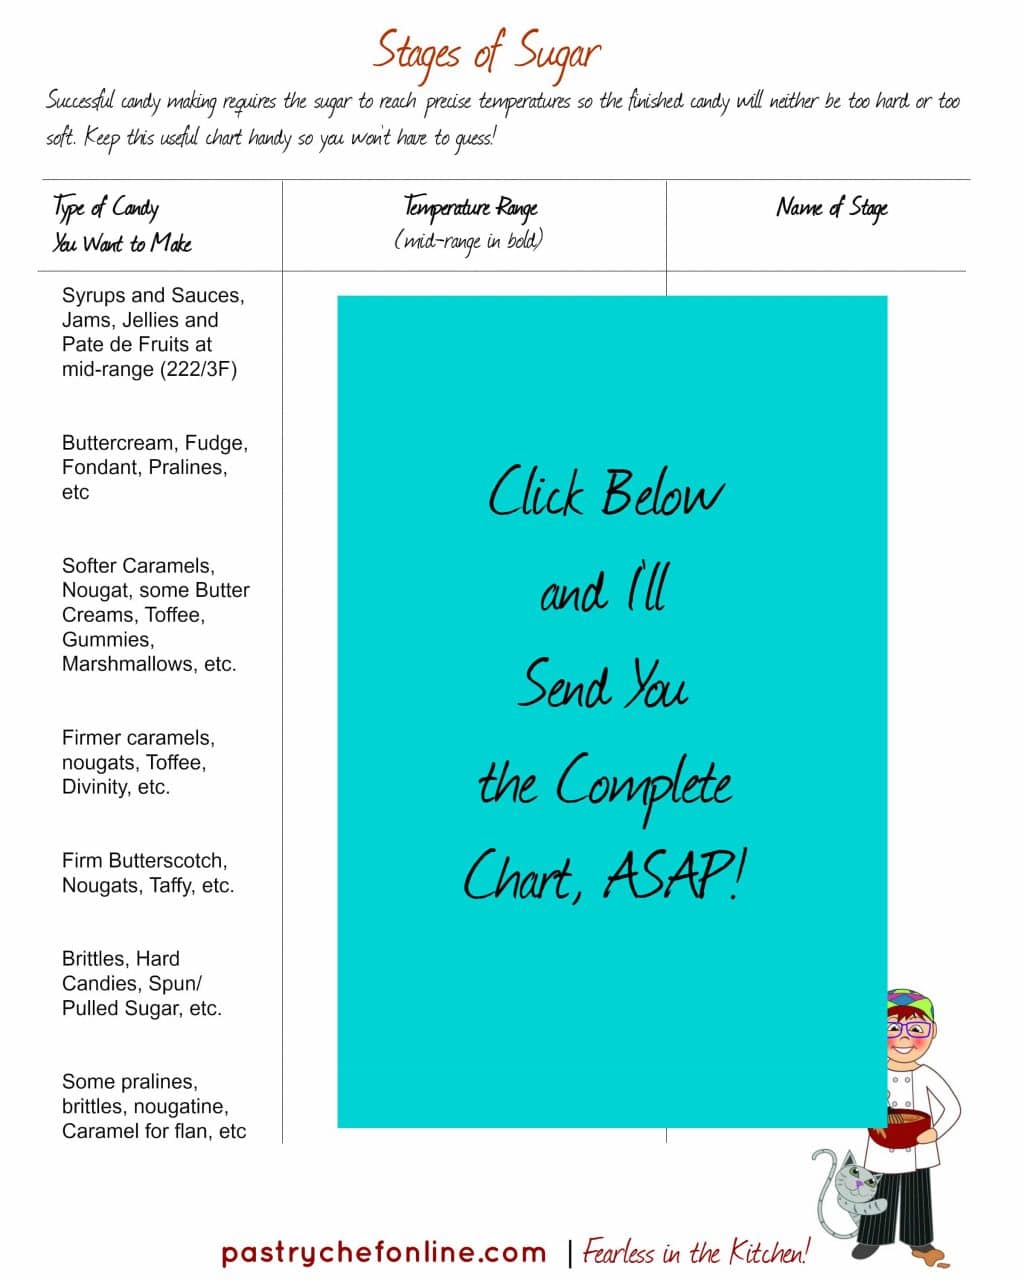
Successful candy-making requires that sugar be cooked to precise temperatures so the finished candy is the correct texture. What are you supposed to do if there aren’t any instructions?!
You had better know your candy-making techniques, and the most important thing to know about that is what sugar does–how it acts–when it is cooked to different temperatures.
Stages of Cooking Sugar
Have you heard of terms like “thread stage,” “hard ball stage,” or “soft crack stage?” These terms have to do with how sugar behaves once it reaches certain temperatures.
Back before we had access to precise thermometers, folks would test their sugar by plopping just a bit of the boiling sugar into a glass of ice water and then seeing what happened.
If the sugar made a blob that you could squish with your fingers, it was at the soft ball stage.
If you could squish it but it took a bit of effort, it was at firm ball stage.
If it ended up in shards that bent but then snapped, it was as soft crack stage.
Thank goodness we don’t need to use that method anymore. Because sugar is hot and the more times you take blobs of it and transfer them to a glass of ice water, the more of a chance you have of burning yourself. Nope, I’ll take an instant-read thermometer any day.
You still need to know what temperatures give you what results, so I made this handy stages of sugar chart for you.
Adjusting Temperature for High Altitude Candy Making
A reader recently commented saying that his candy tasted great but had the wrong texture. It was too hard. He did his own research and realized that it was because the temperature called for was too hot at his altitude (5000 ft above sea level).
This information will help a lot of you, so thank you so much, dear reader. And I know your next batch of candy will be Perfection!
Here’s the rule: reduce the temperature by 1 degree for every degree below sea level boiling temperature of 212F.
Make Adjustments for your Elevation Like This:
- Take the temperature of your boiling water.
- Subtract 1 degree from the target temperature for every degree below 212F your water boils.
If your water boils at 208F, then you will have to stop cooking your sugar at 230F (4 degrees below 234F since your water boils at 4F below 212F).
For reference, I found this Altitude Conversion Chart in a booklet titled “The Art of Candy Making” from the USU Extension/Utah County in Provo, Utah.
More Candy Recipes
- Chewy Butterscotch Candy is a traditional recipe based on one from 1848 from Doncaster, England. I make it chewy because with the original proportions, cooking it long enough for it to get crunchy would make it be too bitter (lots of molasses in this one). As a chewy candy, it is excellent.
- Butterscotch Hard Candy: these babies are like Werthers but so much better. Deep butterscotch flavor, a lovely crunch that melts into creamy goodness, and they won’t stick to your teeth!
- Crunchy Butterfinger Candy Bars I tested this recipe 9 times to get it just right. It really is crunchy whereas many copycat Butterfinger recipes are chewy.
- Bourbon Honeycomb Candy Light and airy with a hint of bourbon from bourbon-infused honey. Drizzle it with chocolate. You won’t be sorry!
- Old-Fashioned Angel Food Candy This is like honeycomb candy but completely dipped in chocolate and then sprinkled with flaky salt. So good!
- Maple Peanut Brittle Because this brittle is made with maple, you can have it for breakfast.
Questions?
If you have any questions about this post or recipe, I am happy to help.
Simply leave a comment here and I will get back to you soon. I also invite you to ask question in my Facebook group, Fearless Kitchen Fun.
If your question is more pressing, please feel free to email me. I should be back in touch ASAP, as long as I’m not asleep.
It will help me and other readers so much if you take a moment to rate and leave a review for this recipe.
You can use the stars to rate 1-5 (5 is best), and leave a review in the comments. It helps me make adjustments if any are needed, and comments help others decide whether the recipe is worth making.
Other ways to share include pinning, and/or sharing on your favorite social media platform.
Thank you so much for taking the time!


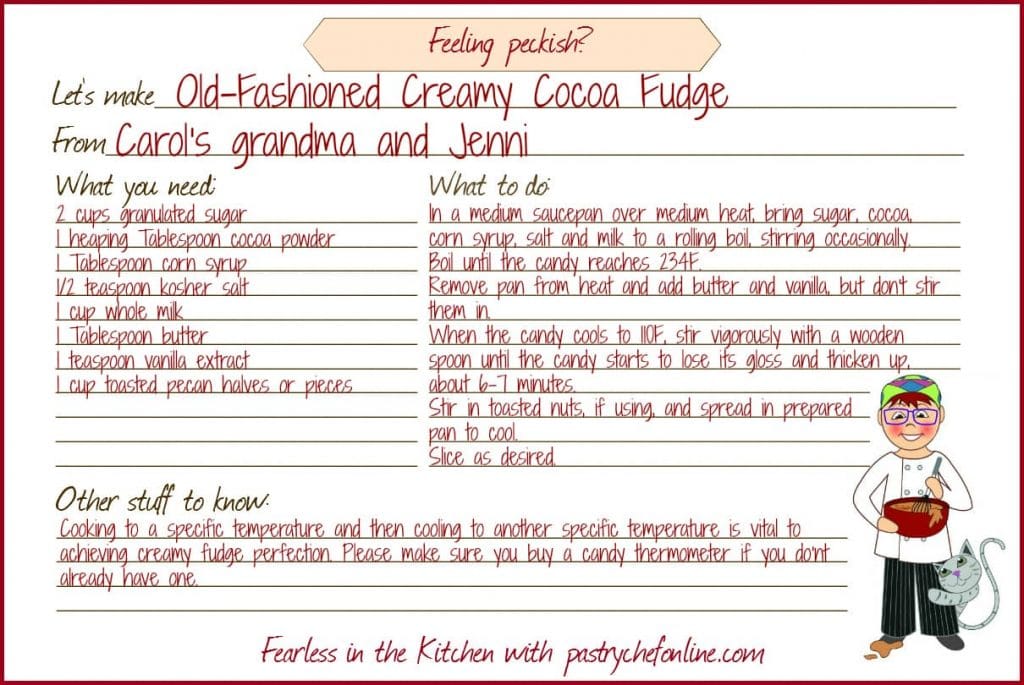
Old Fashioned Creamy Cocoa Fudge
Ingredients
- 2 cups sugar (14 oz)
- 1 heaping Tablespoon cocoa* (See Notes)
- 1 Tablespoon corn syrup (light or dark. Any liquid sugar will work here such as maple syrup, honey or molasses)
- ½ teaspoon salt (my addition. Rounds out the flavors and keeps the fudge from seeming too sweet)
- 1 cup whole milk (8 oz)
- 1 Tablespoon butter
- 1 teaspoon vanilla
- 1 cup toasted pecan halves or pieces (use whatever nut you prefer or leave them out altogether)
Instructions
To Make Fudge
- Line an 8″x8″ pan** (See Notes) with parchment or non-stick foil with a piece that is long enough to line the bottom and come up and over two opposite sides of the pan. (use these as “handles” to get the cooled fudge out of the pan). Spray with pan spray. You can also spray or butter the pan well, but using parchment or non-stick foil will make it easier to get the fudge out of the pan.
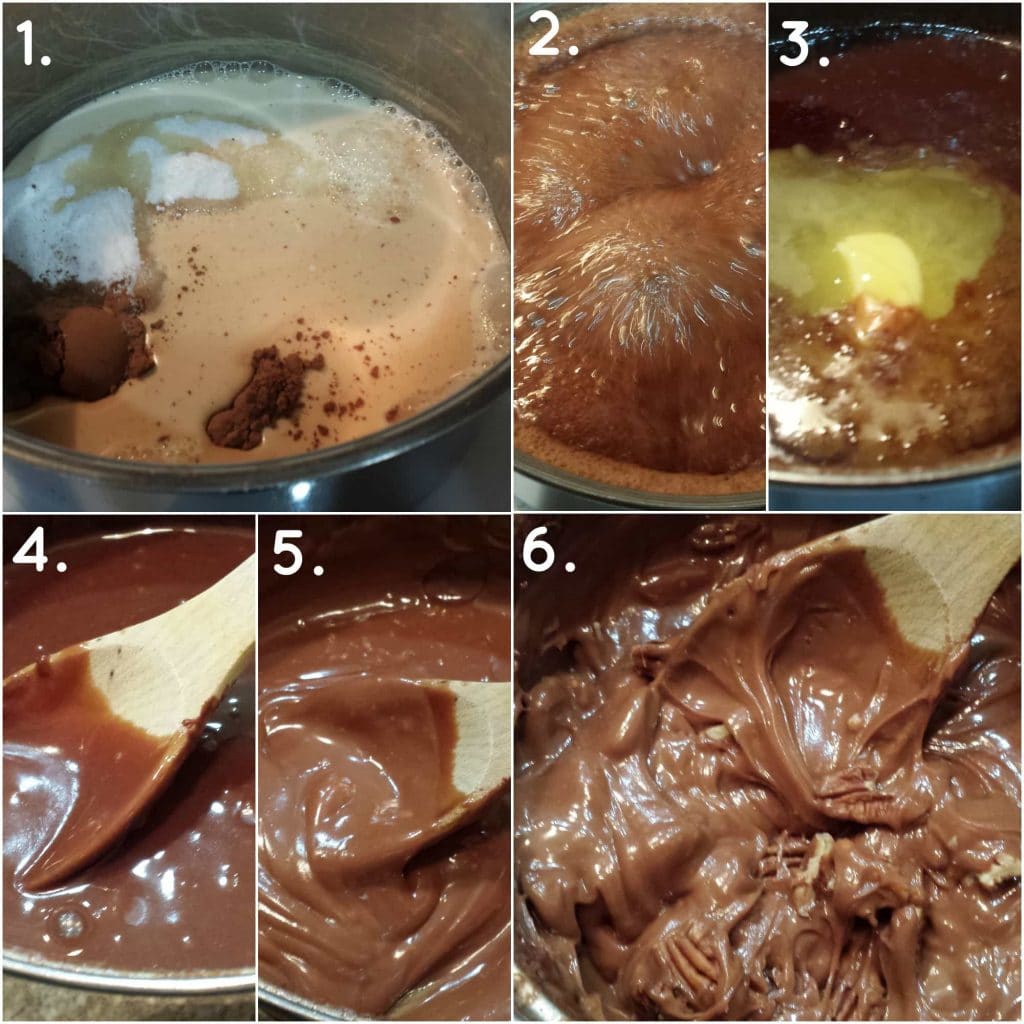
- Place the sugar, cocoa powder, corn syrup, salt and milk in a heavy-bottomed saucepan that is much larger than you think you need. 3 quart size will work just fine.
- Stir well, and cook over medium heat until the mixture comes to a boil. You can stir it and scrape the sides of the pan until it starts to boil.
- Allow the mixture to boil until it reaches 234F. This is just under the soft ball stage, but this is the correct temperature for making cocoa fudge. (If you’re making chocolate fudge, cook to 238F, which is the soft ball stage.)
- Move the pan off the burner and drop in the butter and the vanilla. Don’t stir them in (if you stir too soon, you’ll end up with grainy fudge).
- Let the mixture cool to 110F. The pan will feel warm but by no means hot. If you’re using a “leave-in” candy thermometer, there will be no question. If you don’t have one, occasionally check the temperature with your instant read thermometer (that’s what I do).
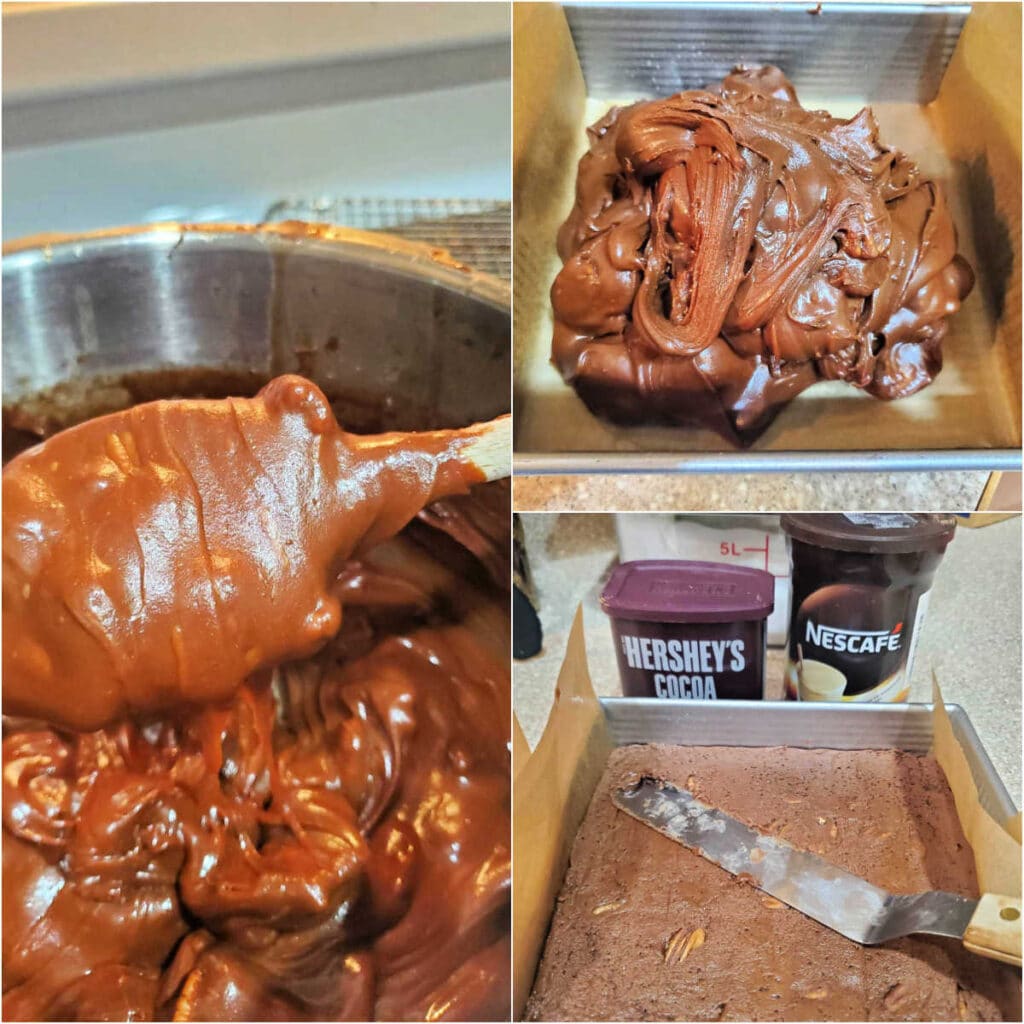
- Once the candy has cooled to the correct temperature, begin stirring vigorously with a wooden spoon. You can also scoop up a bunch of the warm candy and let it pour back into the pot. This will make you feel fancy, and it will help to bring the temperature of the candy down more quickly. Keep stirring and stirring until the candy is just starting to lose its gloss and thicken up.
- Dump in the pecans if using, and stir them in quickly.
- Scrape the now-quite-thick fudge into the pan and moosh it into the corners with a spatula. I sprinkled some flaky sea salt on top of mine. You can too if you want. Or not.
- Allow the candy to set up for at least an hour before slicing with a sharp knife.
- Store at room temperature in a tightly-sealed container for 3-4 days. But it will be gone before then.
Did You Make Any Changes?
Notes
MORE CHOCOLATEY VARIATION
Use the same procedure as the original recipe. Here is your ingredient list. This makes double the original recipe and fits beautifully in an 8" or 9" square pan.- 4 cups granulated sugar
- 1/2 cup cocoa powder
- 2 Tablespoons corn syrup
- 1 Tablespoon espresso powder or instant coffee
- 1 teaspoon kosher salt (I use Morton's)
- 2 cups whole milk
- 2 oz (4 Tablespoons or 1/2 stick) unsalted butter
- 1 Tablespoon vanilla extract
- 2 cups toasted pecans, whole or coarsely chopped
Nutrition
Here’s the downloadable recipe card, friends! If you’d like some blank printable recipe cards, I have 3 different holiday designs for you to choose from.

Hi, y’all! I hope you’ve enjoyed this post and hopefully also learned a thing or two.
If you like my style, I invite you to sign up for my occasional newsletter, The Inbox Pastry Chef.
Expect updates on new and tasty recipes as well as a bit of behind-the-scenes action. I hope to see you there!
Thank you for taking the time to read today. Enjoy the old fashioned fudge recipe!
Take care, and have a lovely day.
Watch my Christmas fudge recipe web story here.
Watch my traditional fudge recipe web story here.


Join in Today!
Hi. I love fudge and wanted to try and make it for the first time. I found your recipe and thought this shouldn’t be too hard. I tried to make some for Christmas but did not do something right. The flavor is amazing however it just turns to soup when I take it out the freezer. I can not even cut it up. Help what did I do wrong
Hi, Misty. I’m glad you love the flavor, and I understand the disappointment when candy doesn’t behave itself. My first though it that you didn’t cook it to the correct temperature. Is your candy/instant-read thermometer accurate? And if you made it on a humid day, that can affect the way it sets up. Let me know and hopefully I can help troubleshoot further. If it really is soupy lean into that, warm it, and serve it over ice cream.
What I made taste great but it’s not fudge,lol. Is it supposed to be the consistency of smooth peanut butter. I’ve tired 3 times now. Even cooked to a higher temp than recommended. Tested my thermometer in boiling water and brought a new one.
Could I be over mixing it once cooled? Or maybe not enough. I wait for the colour change.
If it’s setting up like peanut butter, it sounds like you may need to cook it to a higher temp. Say 3F higher. I wish I could pinpoint exactly your issue, but candy can be finicky. Humidity can also affect the final product. You could try waiting for it to cool down further before beating it. If you have a stand mixer, you can pour it into the bowl and beat with the paddle attachment when it’s around 105-110F. I hope this helps.
I learned very quickly about Humidity living in Southern Louisiana. I wanted to make Pralines with my Husband’s Momma0’s recipe an Authentic New Orleans one from her Dear friend who was Born and raised there. So I was so excited to try. Well it never set up, I asked my husband are how long does it take for them to set up? He said “Oh Honey you can’t make them on a real humid day.” We lived in his Childhood home taking care of his Daddy, we were 25 miles from the Gulf. So lesson learned. My husband ate those darn things with a Spoon. Lol
Yeah, the humidity issue is real and can wreak havoc. Your husband must *really* like pralines to eat them with a spoon! lol 🙂
This was a easy recipe. But it came out dry. I followed the temps exactly. When I waited till it cooled to 110, it was dry and hard to mold in the pan.
Hi, Sylvia. I’m sorry your fudge came out dry. A couple of questions for you to help me pinpoint the issue: what kind of thermometer did you use? And did you use a scale or cups? And did you make the original recipe or my modified recipe that appears in the Notes section? I’d love the opportunity to help troubleshoot.
Hi! Can you give more specifics about the stirring while it’s coming to temperature? This looks pretty much identical to my great grandmas recipe that I use. I’ve tried not stirring it- that burned obviously. And Ive tried stirring constantly- that must have been the time with a more dry/ crumbly texture. Maybe I keep it at too high of a temp? Anyway- it’s time to make fudge again this year and I keep making notes on my recipe each year hoping I’ll crack the code! Any insight to the best stirring technique would be appreciated!
Hey, Meg. I hope this one works for you and brings back the taste of great grandma’s fudge! I stirred in the pot until the mixture came to a boil, and then I stopped and just let it go over medium heat, checking the temp frequently, until it hit 234F. Then I pulled it off the heat and stirred continuously and pretty vigorously once it cooled to 110F. You can also do that fudge factory thing where you pull it up and let it fall back into the pot. Do that enough and it’ll help aerate it and cool it more quickly. Once it gets thick and is no longer shiny, stir in the toasted nuts quickly and get it into the pan. I hope that helps to clarify. Please let me know if you have more questions. Thanks, and Merry Christmas!
After15 minutes the fudge never got to temp…only to 225. How long should it take?
As the water cooks out, time can vary depending on humidity (best to make on a dry day to avoid graininess) and elevation. Make sure your thermometer is accurate and keep going. Once the water has all cooked off, temp should start rising a bit more quickly. But it could absolutely take a good while. I can’t be more specific than that because there are so many variables. I hope this helps though. Email if you have more questions. [email protected]