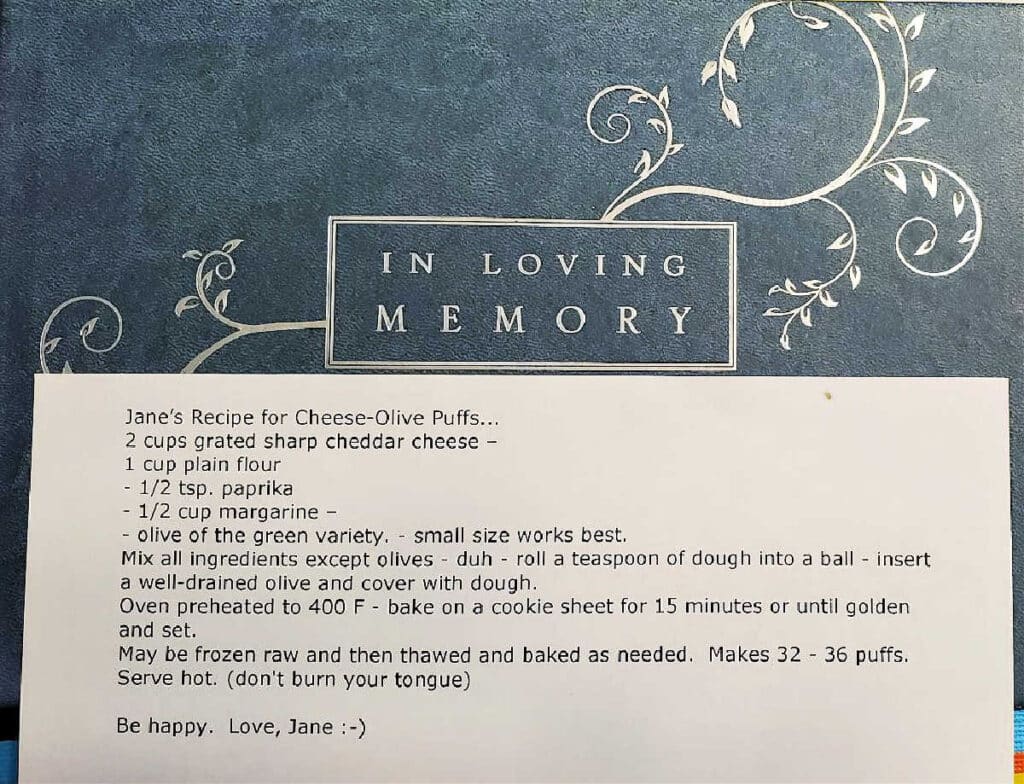
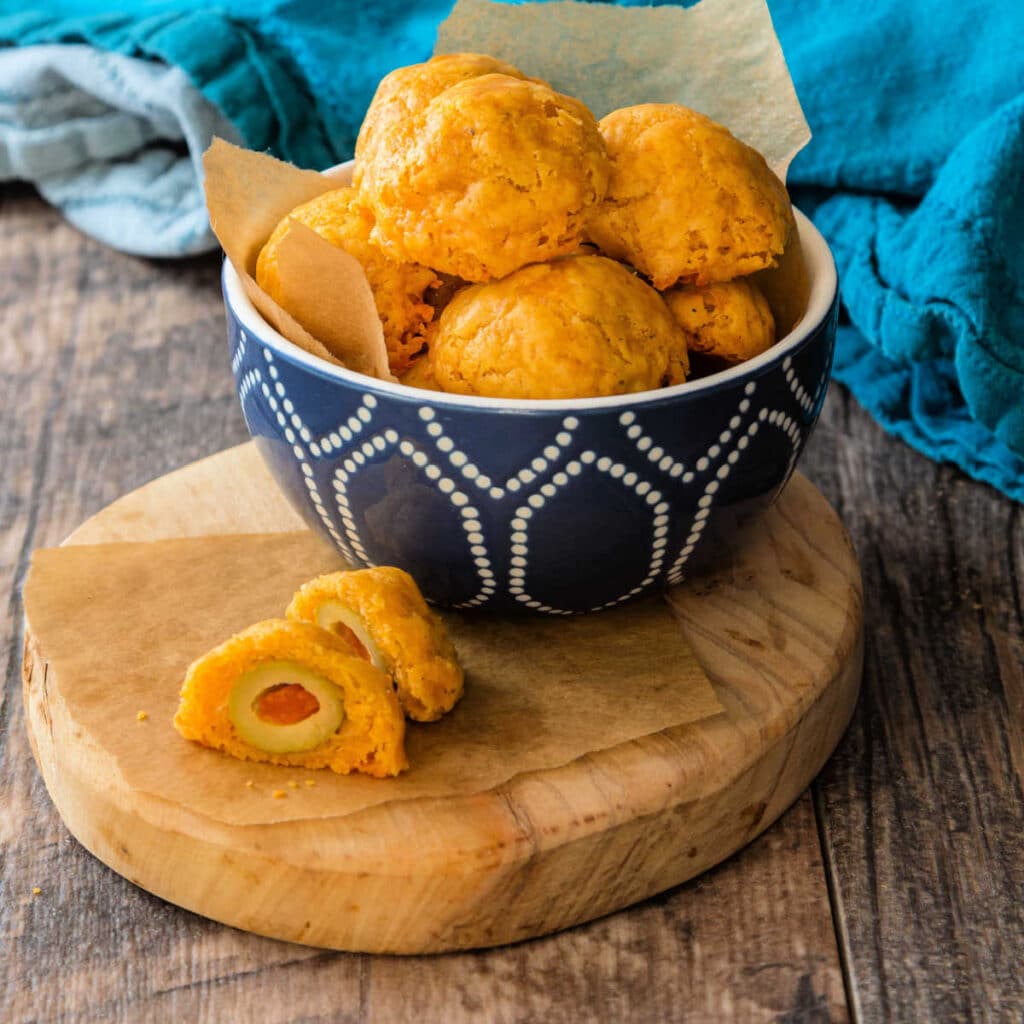
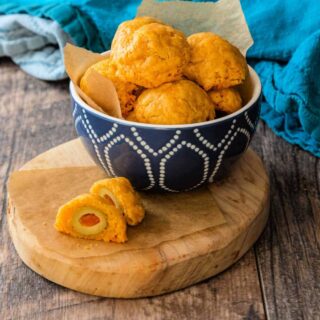
These quintessential 1970s appetizers are cheese olive puffs. Some people call them cheese olive balls, but in our neighborhood, puffs won the day. We grew up eating these guys, and my mom was known for making them and bringing them to almost every neighborhood party they attended, especially during the holidays.
I consider this a family recipe, and it is all the more special because my friend Jennifer shared this recipe at my mom’s funeral. I cannot imagine a more “Jane” funeral than for everyone to leave with a recipe to make.
If you love a good retro appetizer recipe, you will probably also flip for mom’s cream cheese and red sauce. And for ease of browsing, you can find all my appetizer recipes in one place. Thanks so much for being here!
Pastry Chef Online Participates in Affiliate Programs. If you make a purchase through one of my links, I may earn a small commission. For more information click to read my disclosure policy

At a Glance
✔️Skill Level: Beginner
✔️Skills: Grating cheese, mixing, wrapping dough around a filling
✔️Type: Individual Appetizer
✔️Number of Ingredients: 6
✔️Prep Time: 10 minutes
✔️Cook Time: 15 minutes
✔️Yield: 40 cheese puffs
Jump Straight to the Recipe
Why Make This Recipe
First and foremost, these little appetizers are delicious.
Salty/briny, crisp on the outside, with a little olive surprise in the middle of each one.
This recipe, or similar ones, has been around for probably about 60 years or so and was at the height of popularity in the 70s and 80s.
They are very easy to make, and one recipe makes 40 cheese puffs.
The recipe also readily doubles or even triples. And these freeze well, so you can have a stash in the freezer to bake at a moment’s notice.
In Memory of My Mom
As you may know, my mom passed away on October 16, 2022.
As part of our celebration of life at her funeral, I asked people to stand and share a story about my mom if they had one.
And boy did they ever. Person after person stood and shared a sweet, funny, or poignant story about my mom, and it was such a lovely time of remembrance.
My dear friend, who has known my mom since I first brought her to my home to visit from college, not only shared the story of how mom emailed her with the recipe for cheese olive puffs, she also found the email (from probably 20 years ago), printed it off, and offered it to everyone in attendance.
So people left mom’s funeral not only with great memories of her, but also with one of her recipes.
Thanks, Jennifer. So perfect.
How to Make Cheese Olive Puffs
As I said at the beginning, these are easy to make, and they have a pretty short list of ingredients.
If you want to get right to it, you can skip straight to the recipe.
Here’s what you’ll need:
Ingredients and Substitutions
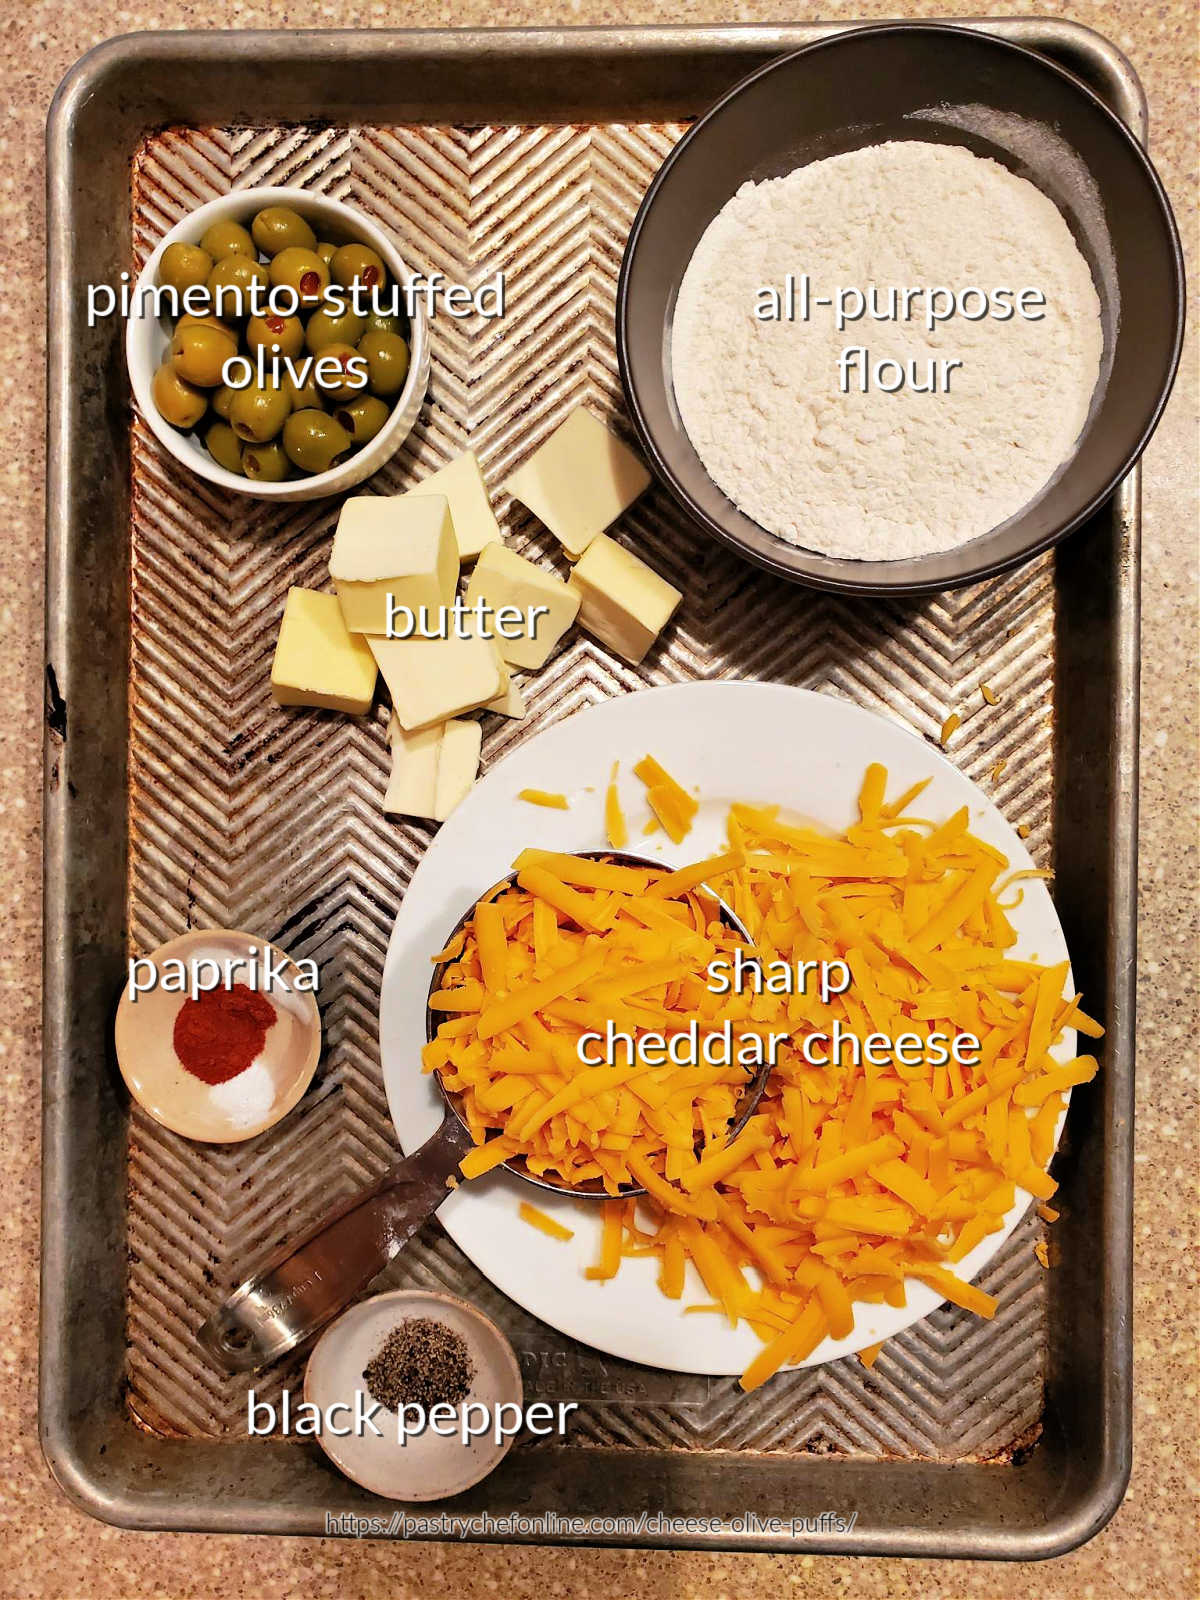
- butter: There is plenty of salt in both the cheese and the olives, so you can use unsalted butter. If all you have is salted butter, that’ll work just fine, though.
- cheddar cheese: I like to use extra sharp, but use your favorite
- flour: regular all-purpose flour gives these cheesy guys some structure and “crumb” as opposed to just unrelenting cheesiness
- paprika: I used smoked sweet paprika. Feel free to use plain paprika or spice things up with hot smoked paprika
- black pepper: Not called for in the original recipe, black pepper provides a bit of bite
- green olives: Mom calls for the small, green variety, so that’s what I used, too
Procedure
Cheese olive balls are very easy to make. They are a touch tedious to shape, but you can get your kids to help. Or you can just find your Zen place while doing it yourself.
Here’s what you’ll do:
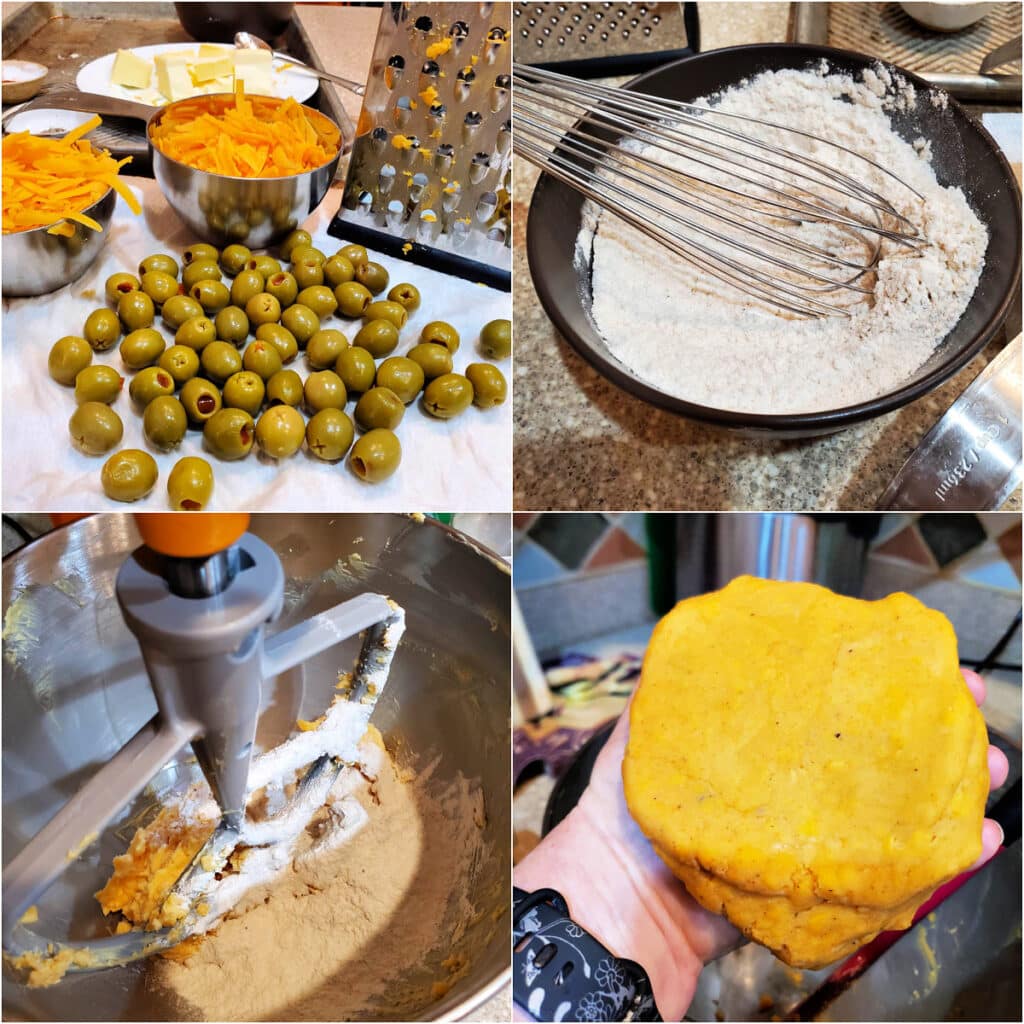
- Grate the cheese and drain the olives.
- Whisk paprika and pepper into the flour.
- Mix butter and cheese together until well combined and then add the flour mixture.
- Gather into a ball.
Would you like to save this post?
Once you have the dough, it’s a simple matter of shaping the puffs:
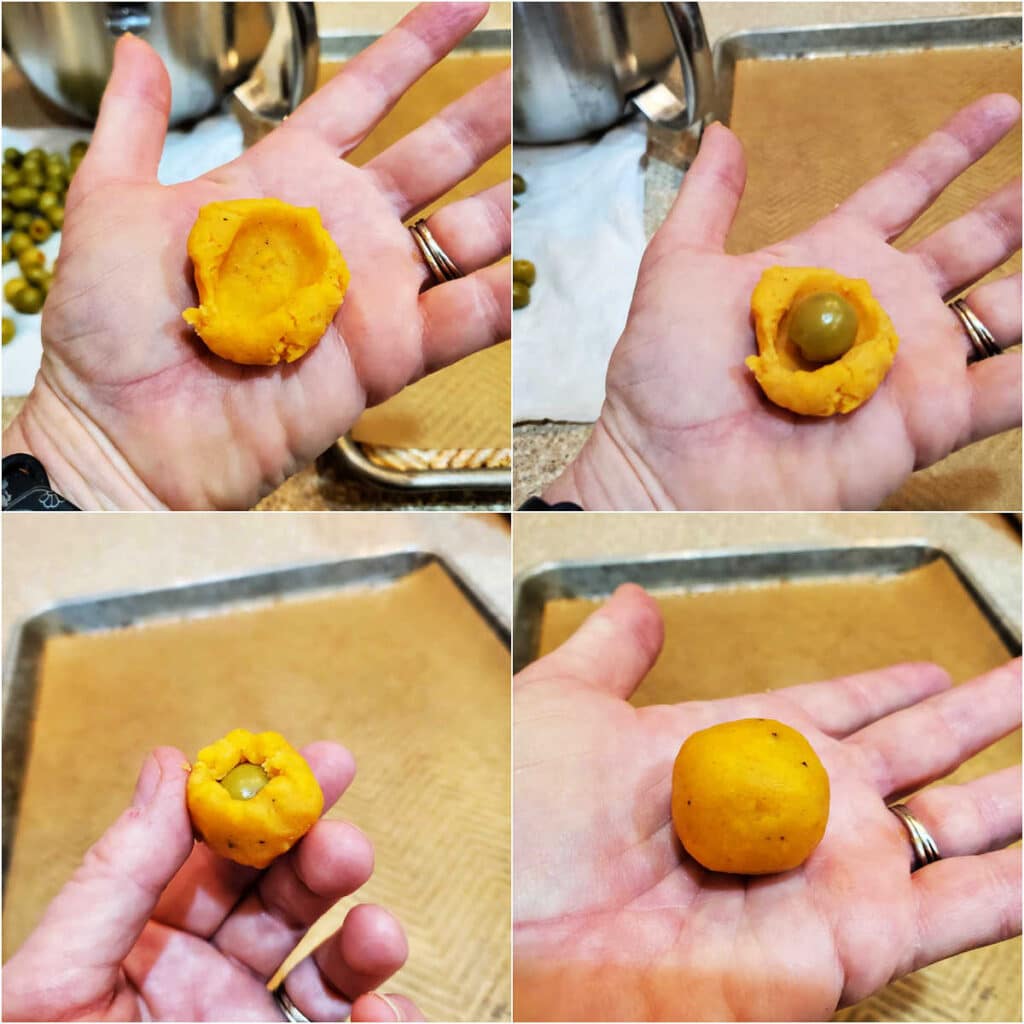
- Make an indentation with your thumb in your piece of dough.
- Stick an olive in there.
- Shape the dough up and around the olive, and then pinch it shut.
- Roll the dough into a neat ball.
- Repeat 39 times!
Equipment You May Need
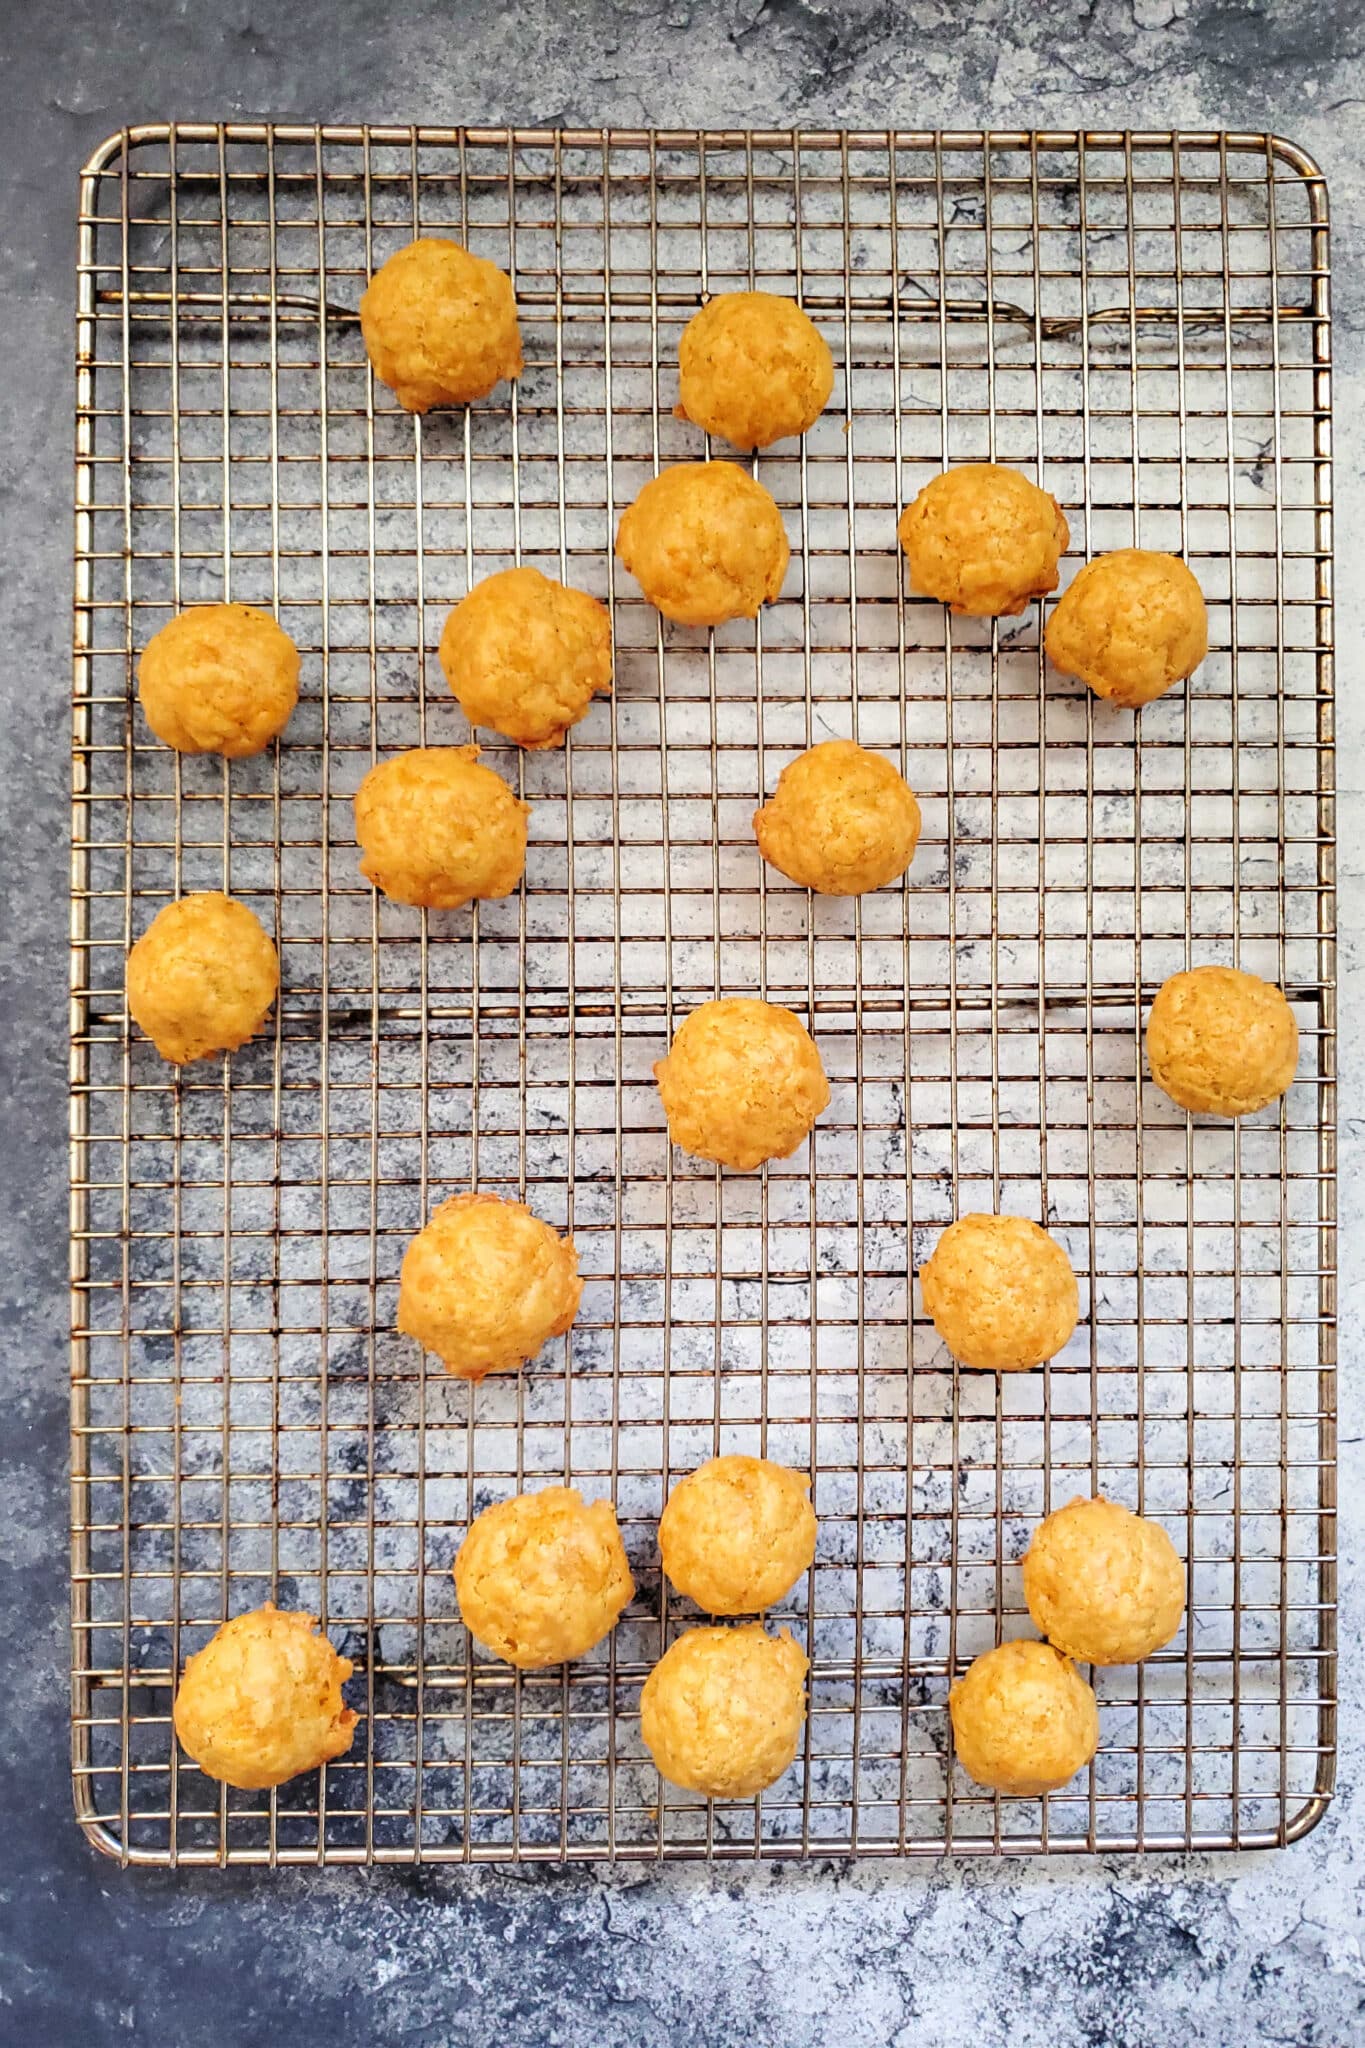
Aside from a couple of half-sheet pans, parchment paper, and a cooling rack, you don’t need a ton of specialized equipment.
If you don’t have a stand mixer or a hand mixer, you can always wait until the butter and cheese are very soft and then mix everything together with a wooden spoon.
If you don’t have a scale, you may also want to use a small portion scoop for the dough so your olive balls are all the same size.
If you do a lot of baking, don’t miss my list of essential tools for serious bakers.
Tips for Success
Do not use pre-shredded cheese in this recipe. You want the cheese to blend in with the rest of the ingredients, and the coating on pre-shredded will keep it from doing so.
For nice, round, cheese puffs without too much spread or a “hump” where the olive is, refrigerate the balls of dough while the oven preheats, around 20 minutes.
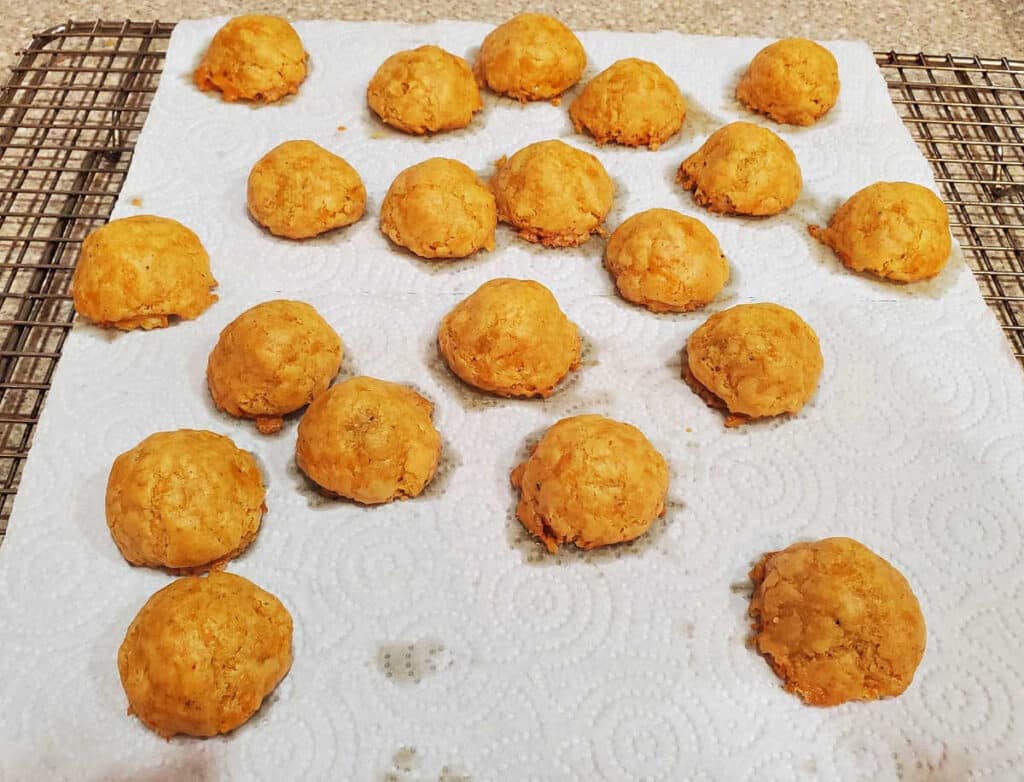
To minimize greasiness, remove the baked puffs to a paper towel for a minute before transferring to a cooling rack. The paper will absorb a little of the excess fat.
Cheese Puffs Q & A
Store, tightly covered, in the fridge for 4-5 days. Reheat for 5 minutes at 325F or for a few seconds in the microwave. Note, they will be less crisp if you microwave them.
Absolutely. Substitute your favorite cup for cup gluten-free flour blend for the all-purpose flour.
Yes. Place the olive-stuffed dough balls on a parchment-lined sheet pan. Freeze for two hours or until firm, and then transfer to a zip-top freezer bag, pressing out as much air as you can before sealing. These will keep just fine for up to 3 months. Bake from frozen in a 400F preheated oven. Let the puffs sit out while the oven preheats and then bake for 15-16 minutes, until set and golden brown.
More Retro Appetizers to Enjoy
Why not put on a whole retro-appetizer spread?
Go all-in with sausage-stuffed mushrooms (this version happens to be gluten-free). Don’t forget the classic that is the port wine cheese ball, and it’s not a party without some smoky bacon guacamole.
And, as far as I’m concerned, you haven’t gone all-in for all the retro goodness if you don’t make some poppy seed party ham biscuits.
Questions?
If you have any questions about this post or recipe, I am happy to help.
Simply leave a comment here and I will get back to you soon. I also invite you to ask questions in my Facebook group, Fearless Kitchen Fun.
If your question is more pressing, please feel free to email me. I should be back in touch ASAP, as long as I’m not asleep.
Love These Olive Puffs? Please Rate and Review. Thanks!
It helps me and other readers so much if you take a moment to rate and review this recipe.
Your star rating and comments help others decide whether the recipe is worth making, and your feedback helps me continue improving recipes here at Pastry Chef Online.
Other lovely ways to share include pinning or posting on your favorite social media platform.
Thank you so much for taking the time!

Cheese Olive Puffs Recipe
Ingredients
- 126 grams all-purpose flour 4.5 oz or about 1 cup
- ½ teaspoon smoked paprika or plain paprika
- ½ teaspoon freshly ground black pepper
- 112 grams salted or unsalted butter, softened 4 oz or 1 stick
- 196 grams extra sharp cheddar cheese 7 oz or about 2 cups
- 40 small, green, pimento-stuffed olives
Instructions
- Whisk together the flour, paprika, and pepper.
- Set aside.
- Using a box grater, shred the cheddar cheese. Set aside.
- Drain the olives on paper towels and blot well them until they are dry.
- In a large bowl using a hand mixer or in the bowl of your stand mixer fitted with the paddle attachment, beat the butter until creamy.
- Add the shredded cheese to the butter and beat until fairly well-combined.
- With the mixer off, dump in the flour mixture, and mix on low speed until you get a uniformly orange dough. This will take about 1-2 minutes. Scrape the bowl as necessary.
- If baking all the puffs at once, line 2 half-sheet pans with parchment paper. If making to freeze for later, you'll only need one lined baking sheet. (See Notes below)
- Pinch off a piece of dough that's about 2 teaspoons. If weighing, shoot for 9.8-10 grams or .35-.40 ounces.
- Holding the piece of dough in the palm of your hand, make an indention in the center with your finger.
- Place an olive in the indention and then wrap the dough around it, pinching it shut. Then roll the ball into a nice round and place on the baking sheet. Continue until you've used all the dough.
- Refrigerate the puffs while you preheat your oven to 400F. Place oven racks in the upper and lower thirds of the oven.
- When your oven is hot, bake the trays for 15 minutes, rotating the pans and swapping racks after about 10 minutes.
- Remove to paper towels to drain for a minute and then serve hot. You can also allow them to come to room temperature and reheat later to serve.
Did You Make Any Changes?
Notes
To Freeze
To Bake From Frozen
Storing
Store in the fridge, tightly covered, for 4-5 days. Reheat at 325F for 5 minutes. You can also heat in the microwave for a few seconds, but note they will be less crisp.Nutrition
Would you like to save this post?
I hope you love these cheese olive puffs. It really is a treasured recipe, and even more so now that mom is gone.
Thanks so much for spending some time with me today. Take care, y’all.

Hi, y’all! I hope you’ve enjoyed this post and hopefully also learned a thing or two.
If you like my style, I invite you to sign up for my occasional newsletter, The Inbox Pastry Chef.
Expect updates on new and tasty recipes as well as a bit of behind-the-scenes action. I hope to see you there!


Join in Today!
I also made these for a neighborhood Christmas party. I made them two days before and cooked some to try and froze the rest. I don’t like green olives so just did little balls and took them hot with a dip and I love them. Even cold they are yummy. So many options with spices and herbs that could be added!!!
I also tried the choux pastry kind. I liked them better hot. And they were waaaaay easier than I thought they would be even by hand.
Thanks again for a great site. And such a wonderful story about your mom and this recipe.
I don’t like the olives either! lol I never have. I always gave them to mom, my brother, or later, to Jeffrey. But having that recipe shared with folks who attended mom’s memorial was just so special and so very *mom.* 🙂
What type of dip did you make/use?
I can’t speak for Laurel, but I’ll offer my two cents. Since they’re basically just little baked cheese balls, I’d consider doing some sort of bacon dip. Even a bacon ranch would be good, I bet.