
Today, I’m bringing you my fine-tuned recipe for homemade Ritz crackers. They’re crispy, flaky, a little sweet, a little salty, and perfect for snacking.
Like most of my copycat recipes, I worked hard to make these taste as much like the real thing as possible. I tested and tested so you can confidently make and serve these little crackers, knowing that they taste as close to the iconic crackers in the red box as they can.
Would you like to save this post?
If you love saltine crackers, you may also enjoy my spent grain soda crackers. For ease of browsing, you can find all my appetizer recipes in one place. Now let’s get down to it!
Pastry Chef Online Participates in Affiliate Programs. If you make a purchase through one of my links, I may earn a small commission. For more information click to read my disclosure policy
You’ll Love These Crackers If…
Not all recipes are for all people, and that really goes for copycat recipes especially.
These crackers are for you if you like:
- Light and crispy crackers
- Crackers to take a back seat to whatever you put on them
- The nostaligic combination of anything on a Ritz cracker
- To make copycats you can barely tell apart from the originals
If these homemade Ritz sound like your cup of tea, you can jump straight to the recipe.
If you need some more convincing or just want to read all the tips and tricks and step-by-step photo directions, read on.
Either way, if you do decide to make these cracker, I have a favor to ask:
When you do make this recipe, it will help me and other readers if you:
✅Rate the recipes using the stars in the recipe card
✅Leave a review when prompted in the recipe card (If it’s a positive review, and I hope it is, I’ll use it in the post as social proof)
✅Leave a comment on the post
Thank you so much!
So Many Test Batches!
This section is here for people who are interested in my process of dialing in a copycat recipe.
If that’s not your thing and you just want to make the crackers, head straight to the recipe.
For the rest of you baking nerds, and I include myself in that group, here’s what I did.
First, I found several copycat Ritz recipes on the Internet just by doing a Google search.
I wrote all the ingredients and amounts down in a grid, ingredients down one side and the names of the sites across the top.
Then I compared all amounts to come up with a starting place.
From there, I added a bit more or a bit less of ingredients to try to get it dialed in and taking notes.
It was a frustrating process, because the more different ways I tested, the more differnt ways they didn’t taste like Ritz!
And then, I did what I should have done in the first place when trying to make a name brand copycat: I looked at the box.
That’s exactly what I did when I made the Little Debbie oatmeal cream pie copycats several years ago, and those worked out beautifully.
That helped me nail the proportions of fat, flour, sugar, and salt. The rest was just adjusting the leavening and the amount of leavening and water.
And since there is both sugar and corn syrup (on the box: high fructose corn syrup, which is much different than regular corn syrup), I split the difference down the middle.
How to Make Homemade Ritz
First, and this might be the most important piece of the puzzle:
Bake your crackers on an oven-safe, grid-type cooling rack.
It will allow them to cook evenly, reduce the chance of them burning or cooking unevenly, and let air circulate all around them so they puff into the light, crispy crackers you love.
Here are the ingredients you’ll need.
Ingredients and Substitutions
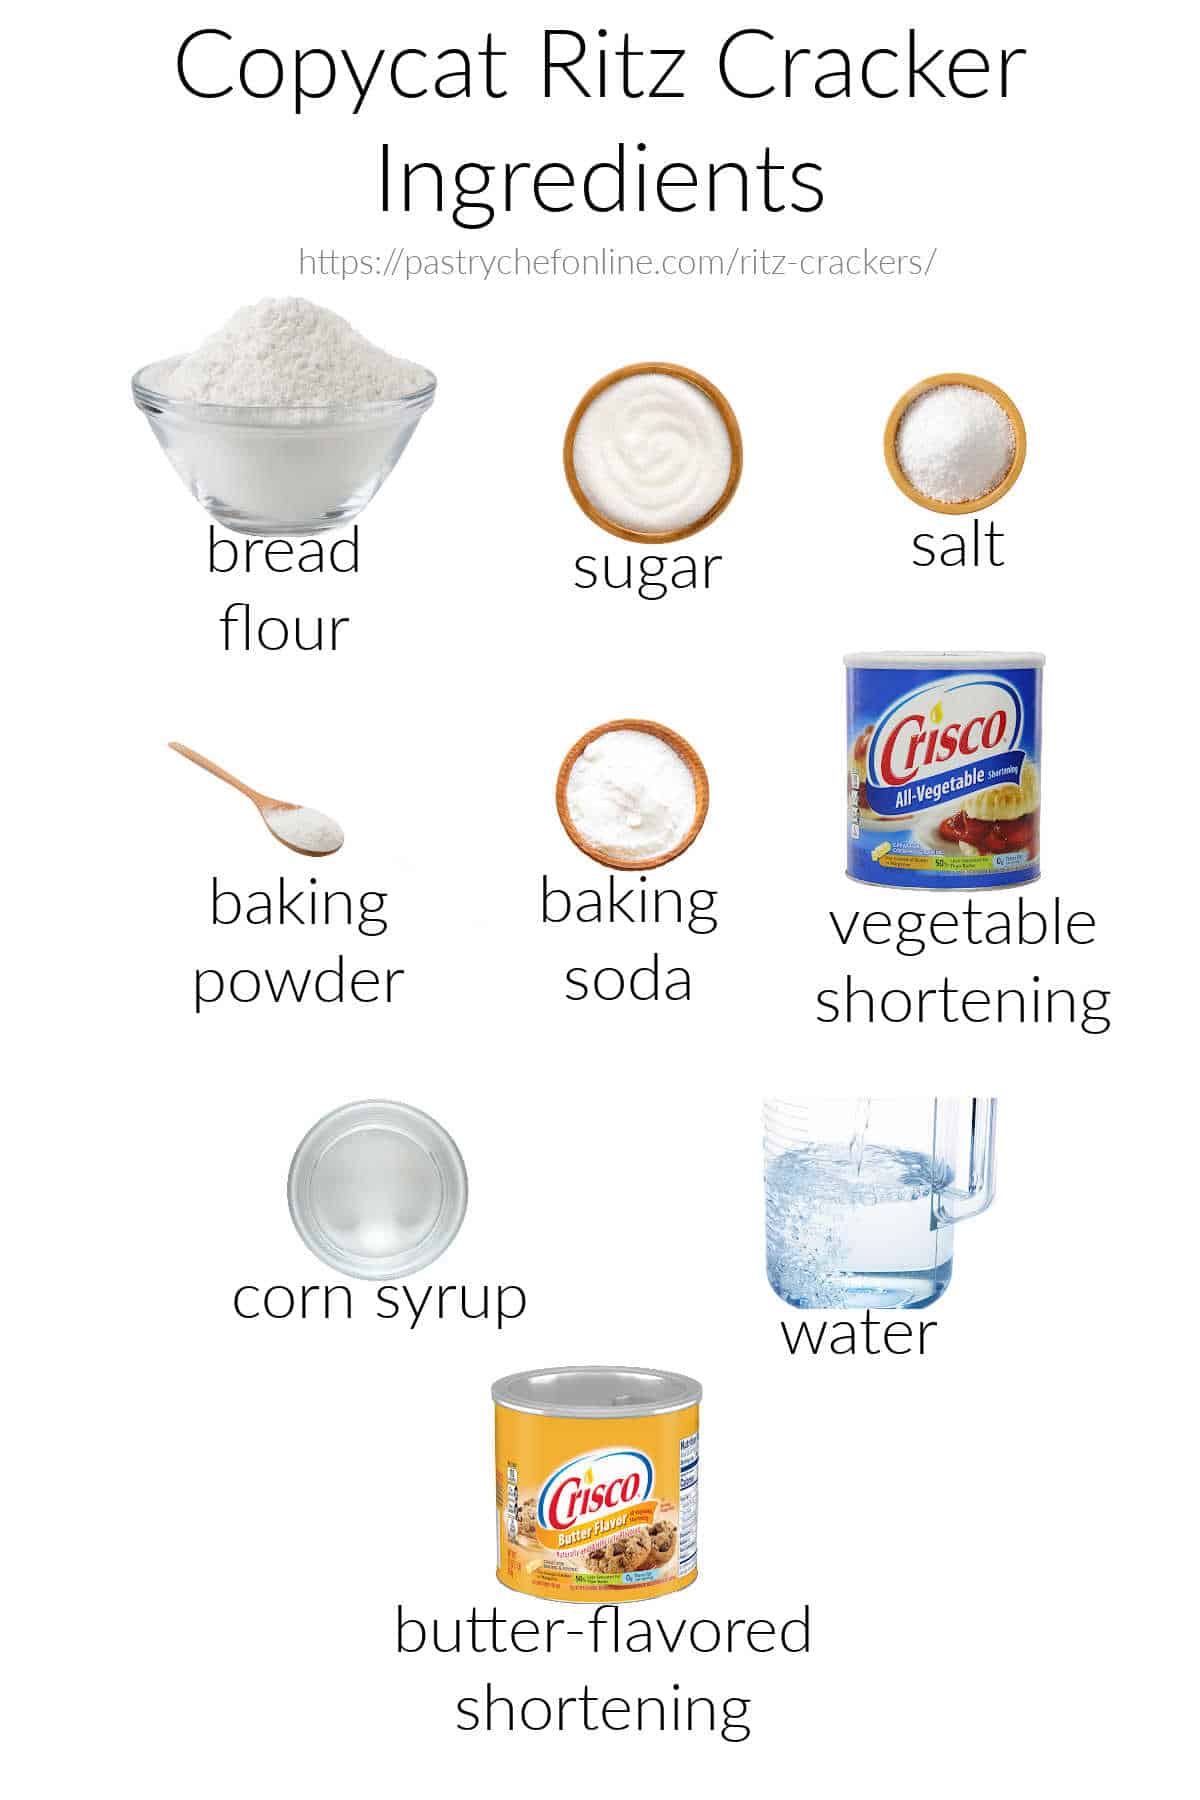
- bread flour: Provides the bulk of the recipe and protein to give the crackers structure. Bread flour works here since there is a lot of fat in the recipe. The higher protein allows for a sturdy as well as light and crispy cracker
- sugar: Provides a touch of sweetness as well as assisting in browning
- baking powder: The leavening that allows for flaky, crispy crackers
- salt: Snaps all the flavors into focus
- baking soda: Adds a little more *oomph* to the leavening for nice, light crackers. It also helps to make them more crispy
- vegetable shortening: The fat in the crackers. It provides tenderness by coating a good amount of the flour. I used Crisco (if you hate shortening, please substitute ghee rather than butter. Ghee, like shortening, is 100% fat).
- corn syrup: Provides just a little extra sweetness and helps the crackers stay fresher a bit longer
- water: This is a fairly wet dough so the leavening doesn’t have to work too hard to puff the crackers up
- butter flavored vegetable shortening: For brushing on the tops of the baked crackers. You can use butter, but in that case, I’d recommend using clarified butter or ghee since both are 100% fat while whole butter contains water that can make it harder to get the crackers nice and crispy
Procedure
You’ll make these crackers using the biscuit method, the same method you’d use to make pate brisee or angel biscuits, although you won’t need to do any rolls and folds to make homemade Ritz crackers.
I tried making the dough both ways: doing a few rolls and folds and just rolling it out once, and since they’re rolled so thin, there’s very little difference.
My vote is to save the time and energy and just give them one simple roll before cutting out the crackers.
In short:
- Whisk dry ingredients together.
- Cut in the fat with your fingertips.
- Stir in liquid until the dough just comes together.
- Wrap in plastic and refrigerate for 30 minutes.
- Roll out thin and cut crackers.
- Bake.
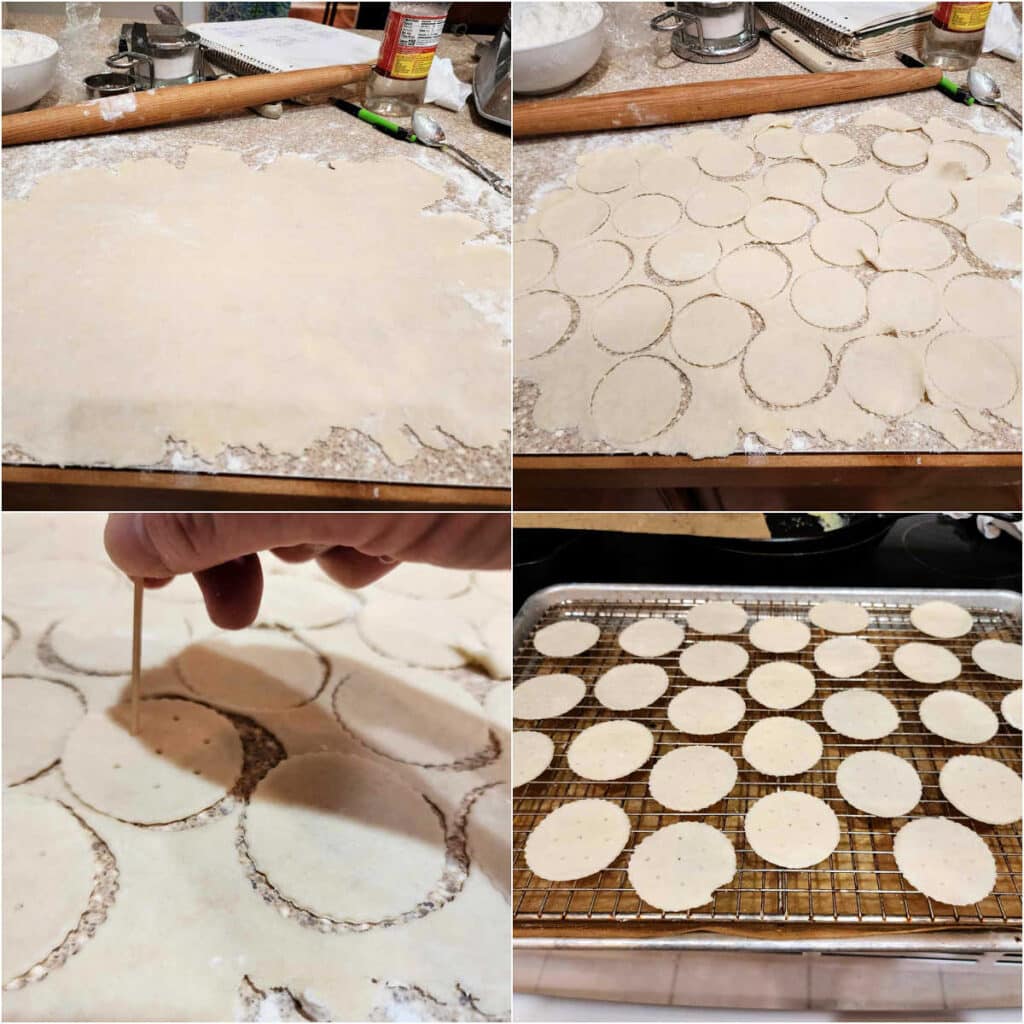
Here are some collages that show some of the steps so you know what you’re looking for.
The top left image below shows all the dry ingredients mixed together while the one top right shows the texture a bit more closely.
Note that while there are no large pieces of shortening, the mixture still is light and floury. Do not overwork the fat into the flour too completely or your crackers won’t puff as much and will taste a bit oily.
Make sure to stir the corn syrup and water together really well, and once you drizzle the mixture into the dry ingredients, scrape the pitcher to make sure you get all the corn syrup into the bowl.
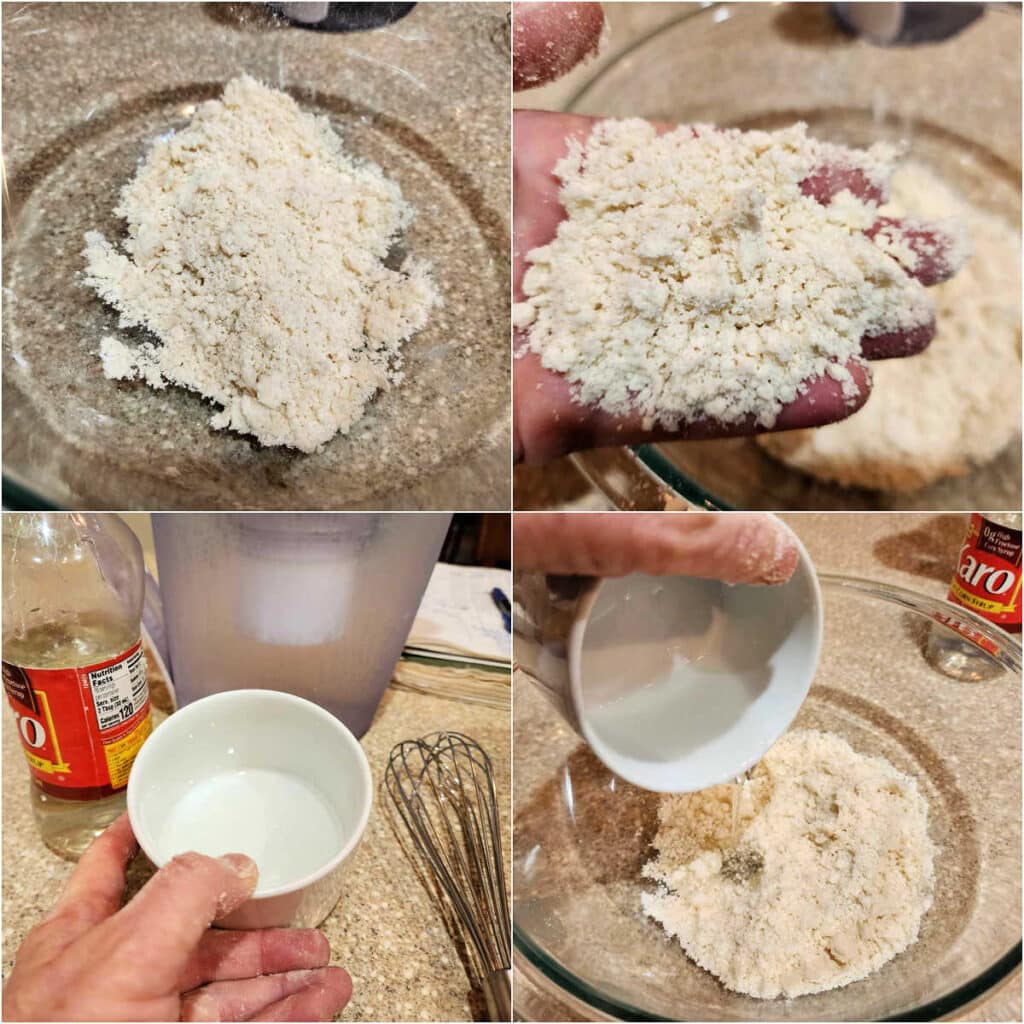
Jenni Says: Rub in just with your fingertips and do it pretty quickly, making sure the mixture is still light and floury when you’re done.
NOT PICTURED: Wrapping the finished dough and chilling the dough for about 30 minutes.
After the dough chills, cut it in half and work with half at a time, leaving the remaining half in the fridge.
Roll it out on a well-floured surface and flour the top of the dough pretty liberally as well. (Feel free to use all-purpose flour for dusting).
Use your bench knife to make sure the dough isn’t sticking. If it does start to stick, carefully lift the dough up and toss a bit more flour underneath.
The dough should be thin enough to start seeing the countertop through it but not so thin you could read through it. Shoot for somewhere between 1/16″-1/8″. But know you will probably not be able to get them as uniform as a “real” Ritz.
And that’s okay. Slight irregularities just let folks know they’re eating homemade Ritz crackers!
Cutting Out and Docking
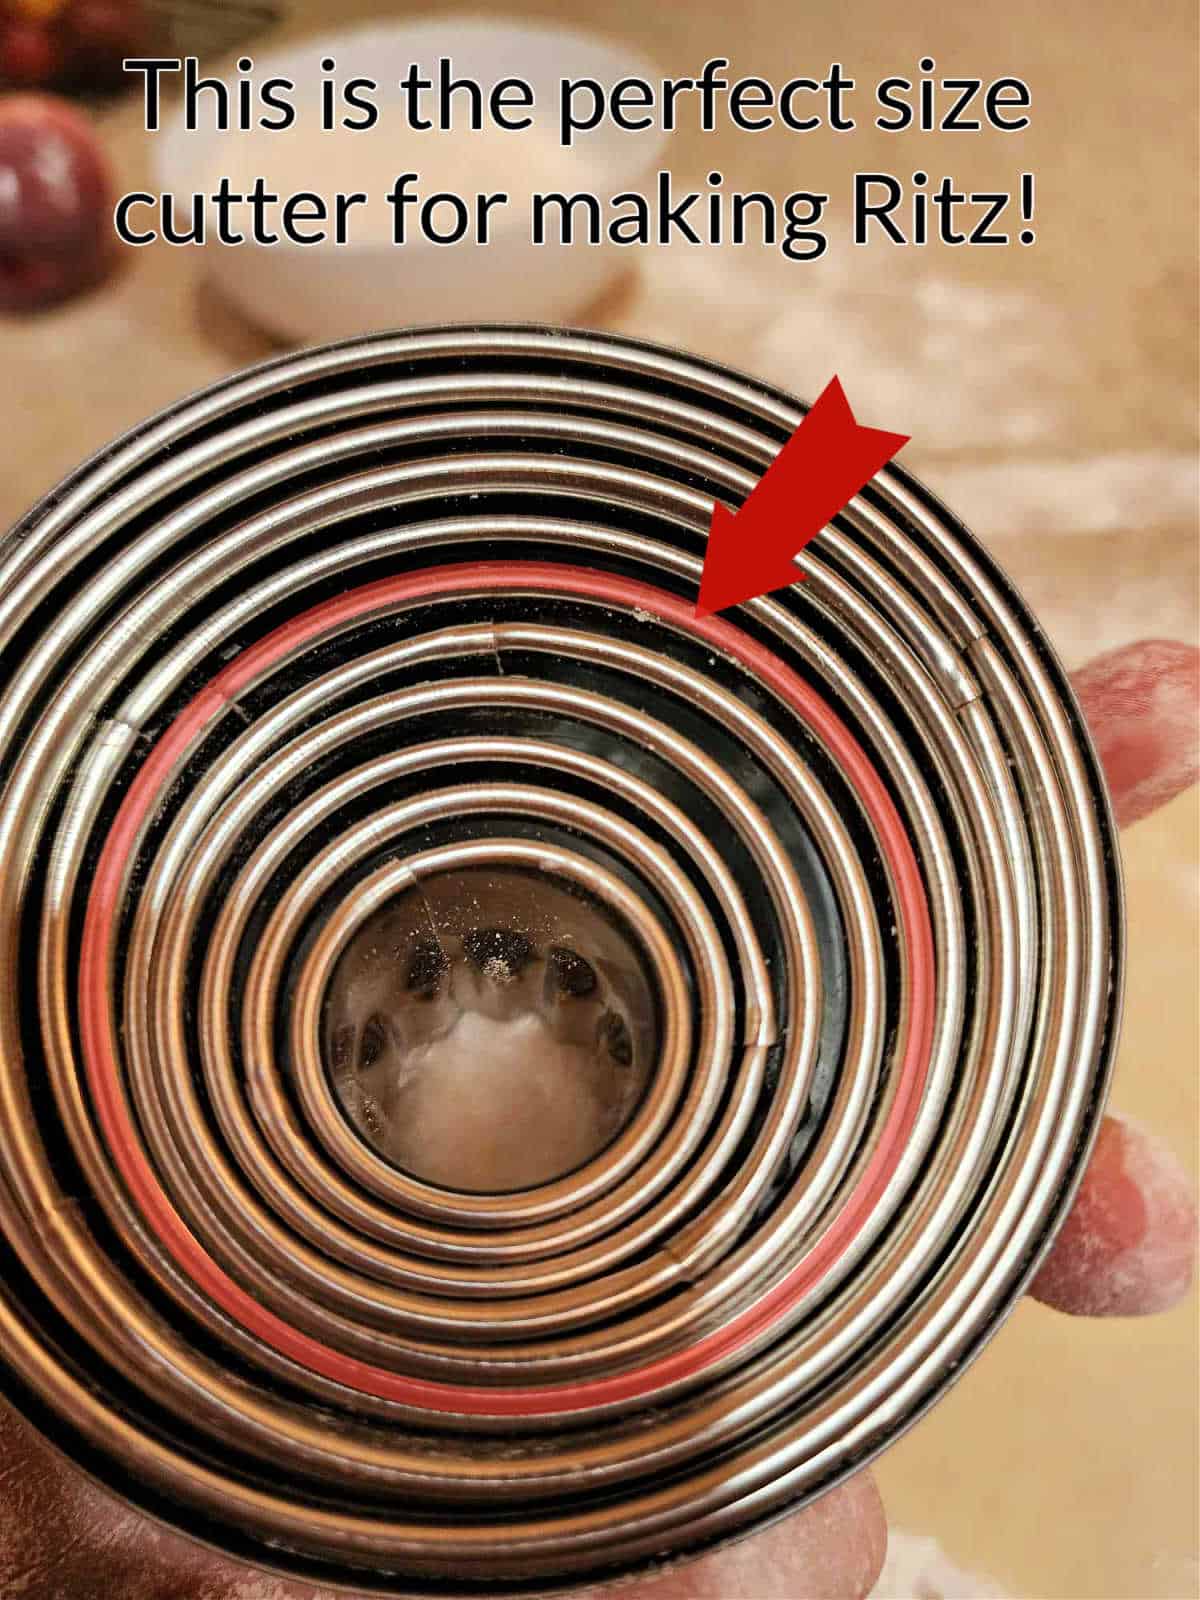
Use a fluted cutter from a set of graduated, nesting cutters about 1 1/4″ in diameter to cut the Ritz. They will shrink up a bit in the oven, and you will end up with crackers that are just about the same size as the boxed kind.
Snip off the top of a toothpick so you have a blunt and skinny stick to work with.
Poke 7 holes in each cracker: one in the center and a circle of 6 around the center one.
Or just poke some holes–it doesn’t really matter too much, but if you’re gonna make a copycat, it may as well taste AND look like the originals.
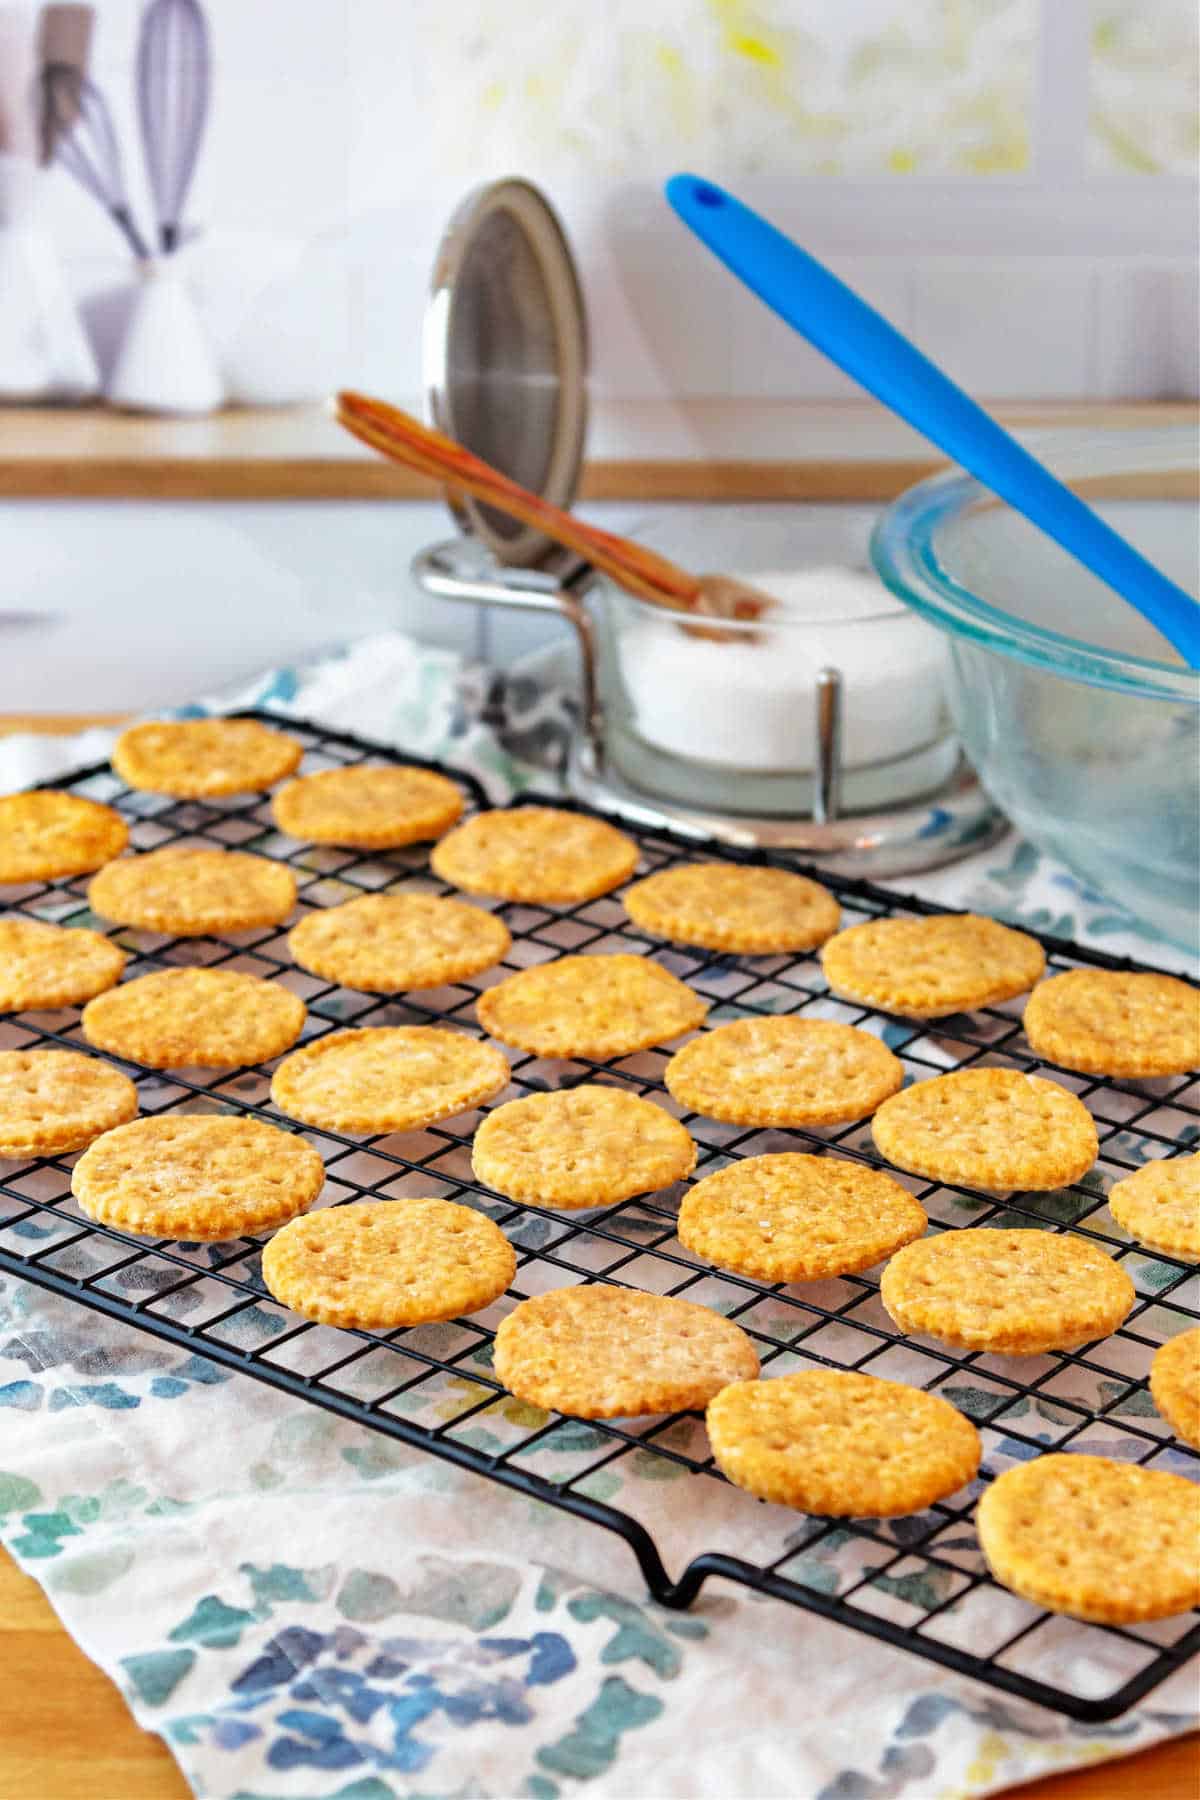
Remove the docked cracker dough to your grid-type cooling rack set over a sheet pan.
No need to give them a lot of room. These don’t spread.
Bake on the middle rack at 400F for about 8-9 minutes. I rotate the pan 180 degrees after 5 minutes and then check them at 3-4 minutes.
They will be a little puffed, a bit smaller than when they went in, and a mottled pale-and-golden-brown all over. Some spots may be a little deeper golden brown.
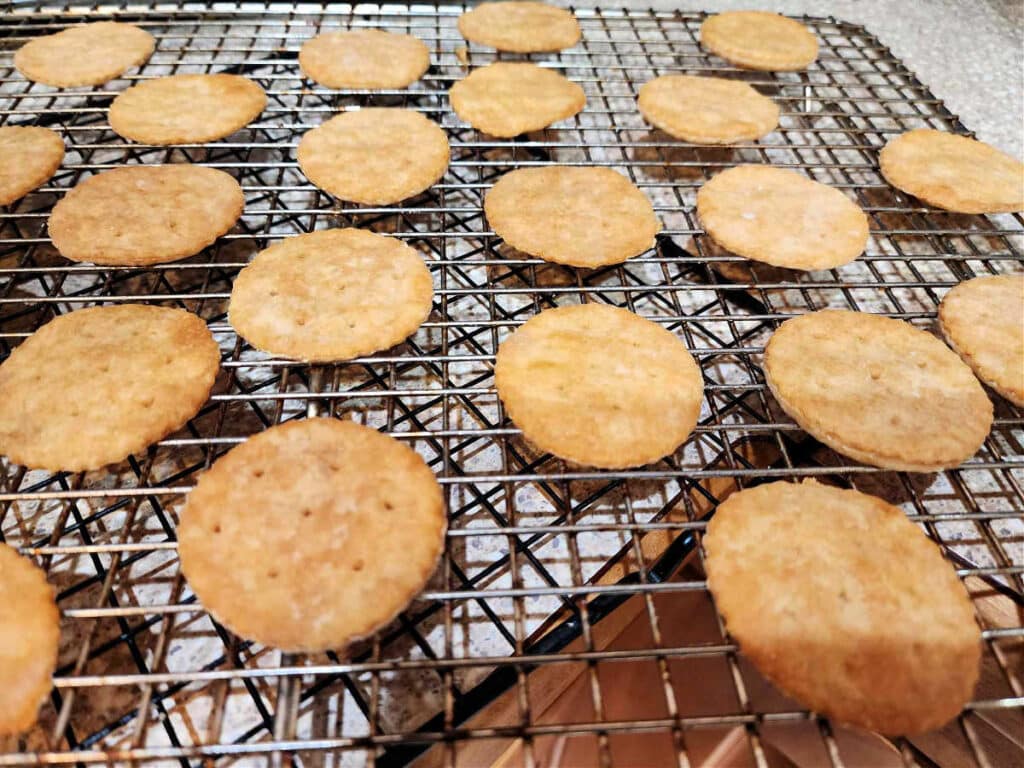
As soon as you remove the crackers from the oven, brush each one liberally with melted butter-flavored Crisco (or clarified butter or ghee), and then sprinkle a large pinch of salt over the entire tray–you really only need 2-3 grains of salt per cracker, so just give everything a light sprinkle from relatively high up so the salt disperses evenly.

NOTE that in the above photos, I baked on parchment directly on the sheet pan. You can see how unevenly the crackers brown. Trust me that baking on a rack will give you the very best results.
You can be done after sprinkling with salt, but to get the crispest crackers that are most similar to the boxed kind, turn off the oven, allow it to cool until it’s lower than 300F–275F is ideal–and put all the crackers back in to crisp for 20-30 minutes.
This last go-round in the oven won’t brown them anymore than they already are, but it will allow any moisture that may still be hanging out in the crackers to bake off and evaporate away.
Now, you can let them cool completely before storing in air-tight containers for about a week.
Equipment You May Need
The most important thing you’ll need to make these crackers is an oven-safe, grid-type cooling rack that fits in a jelly roll pan or a half-sheet pan.
You can find them sold as a set, but as long as your rack fits in your pan, you’ll be good to go.
The second-most important tool is a fluted cutter of the right size. I have this set of Ateco fluted cutters, and this is the one I used for the Ritz. They baked up into the perfect Ritz size.
Other equipment you’ll need:
- large bowl: for mixing the dry ingredients and the dough
- whisk: to whisk dry ingredients together. If you mix the corn syrup and water together in a bowl, you can use the whisk to mix them together really well, also
- rolling pin: to roll out your dough. I prefer a tapered French pin
- bench knife: One of the most useful tools in my kitchen, I use it for everything from portioning dough to transferring crackers, cleaning off my work surface, and helping to unstick any dough that might stick to the counter
- kitchen scale: especially with copycat recipes, you want to be as accurate with measurements as possible, so if you don’t have a kitchen scale, please get one
Tips and Tricks for Success
Here are some tips for cracker success:
- Cut in fat with a light touch.
- Bake at a high temperature. 400F works well for these crackers.
- Reroll scraps only once to make a second round.
- Bake crackers on a rack for even air circulation and to guard against excessive and/or uneven browning.
These two bear repeating in teal text boxes:
Bake crackers on a grid-type cooling rack on a half-sheet pan. This allows for even crisping and browning with much less chance of burning.
Even if you have enough dough leftover for a third roll, don’t do it. Second roll crackers will be almost as good as first roll crackers, but ones made by rerolling again will be tough and weird.
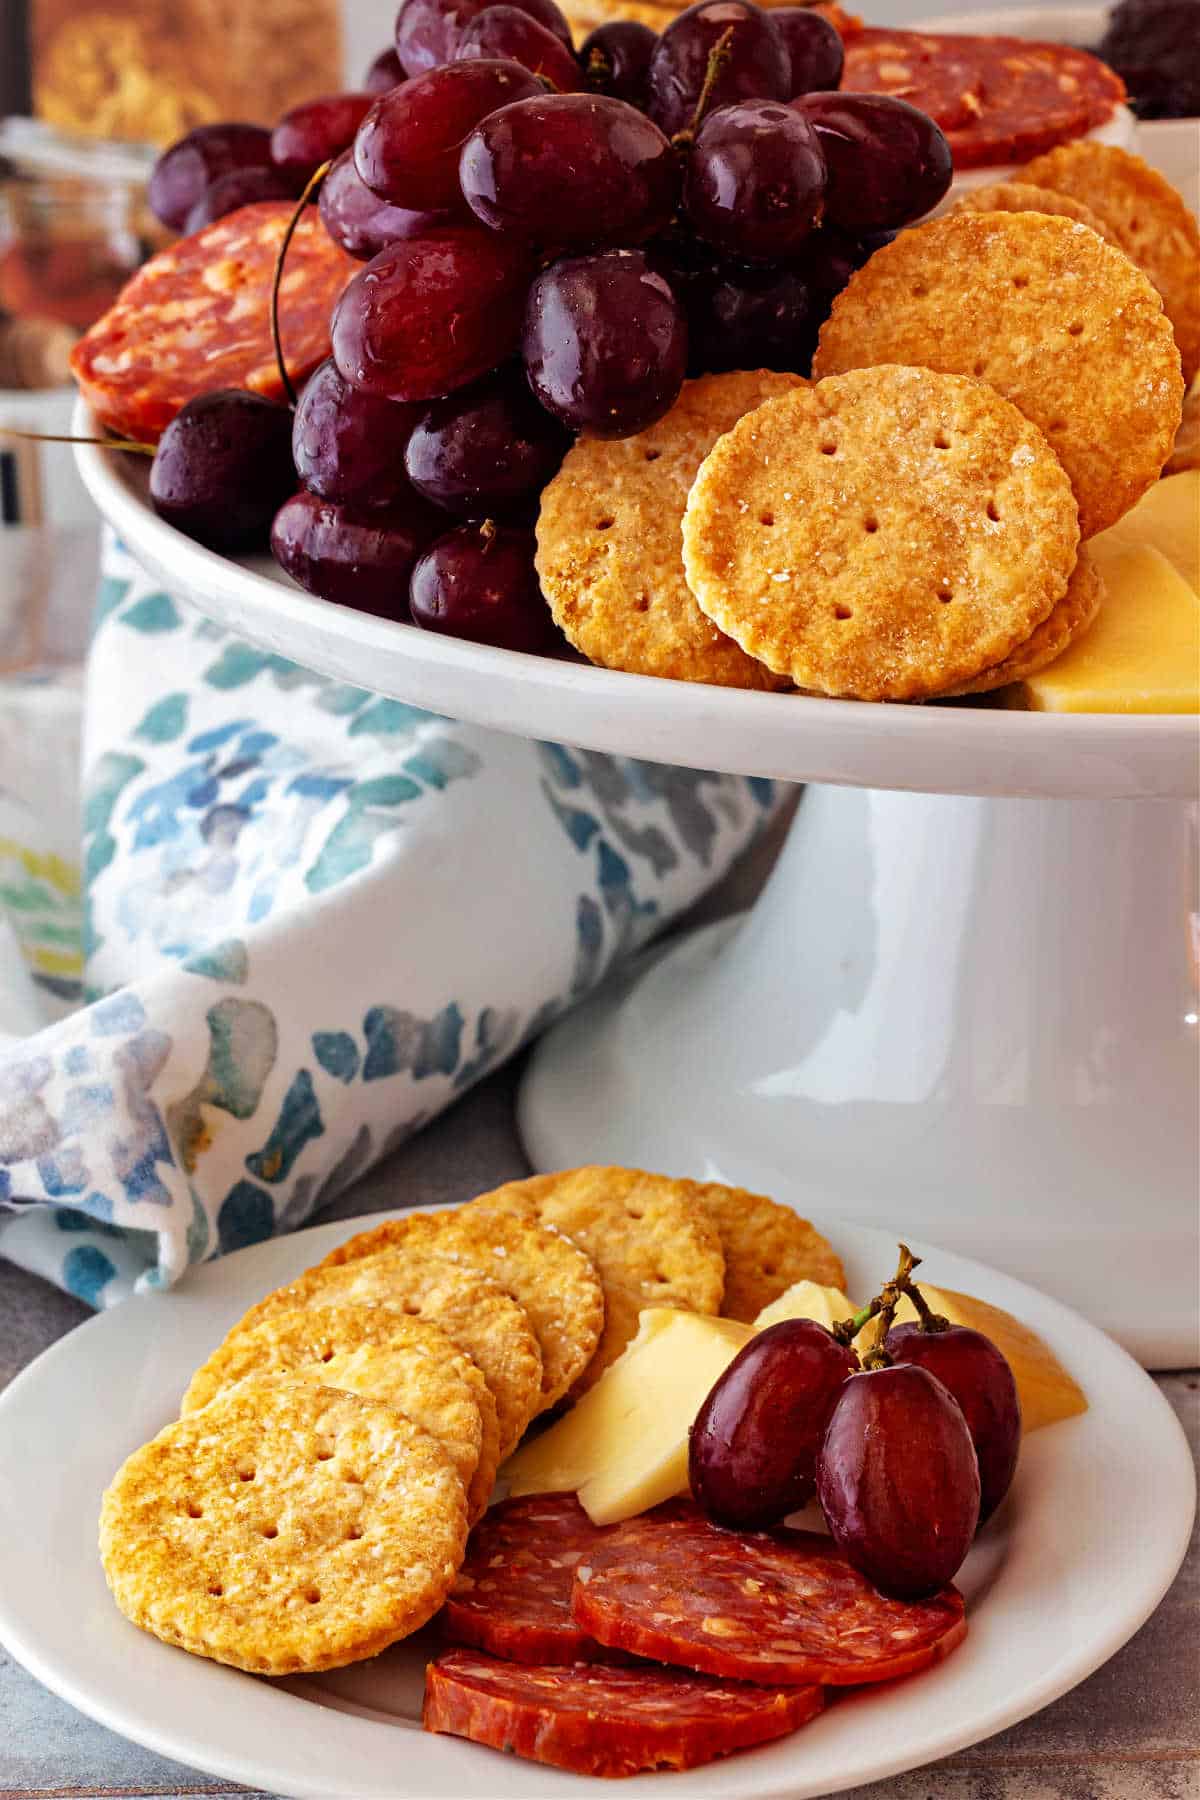
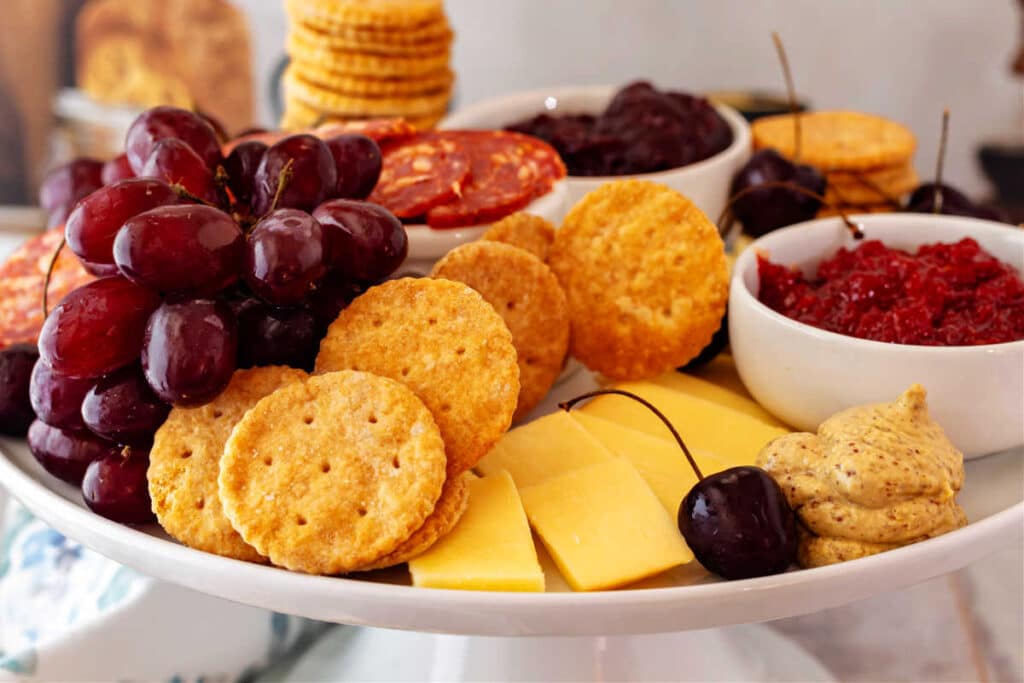
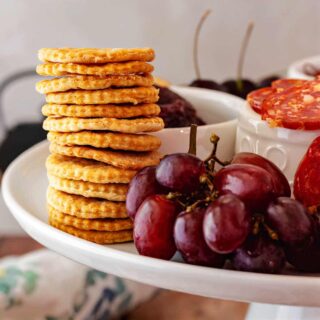
Serving Suggestions
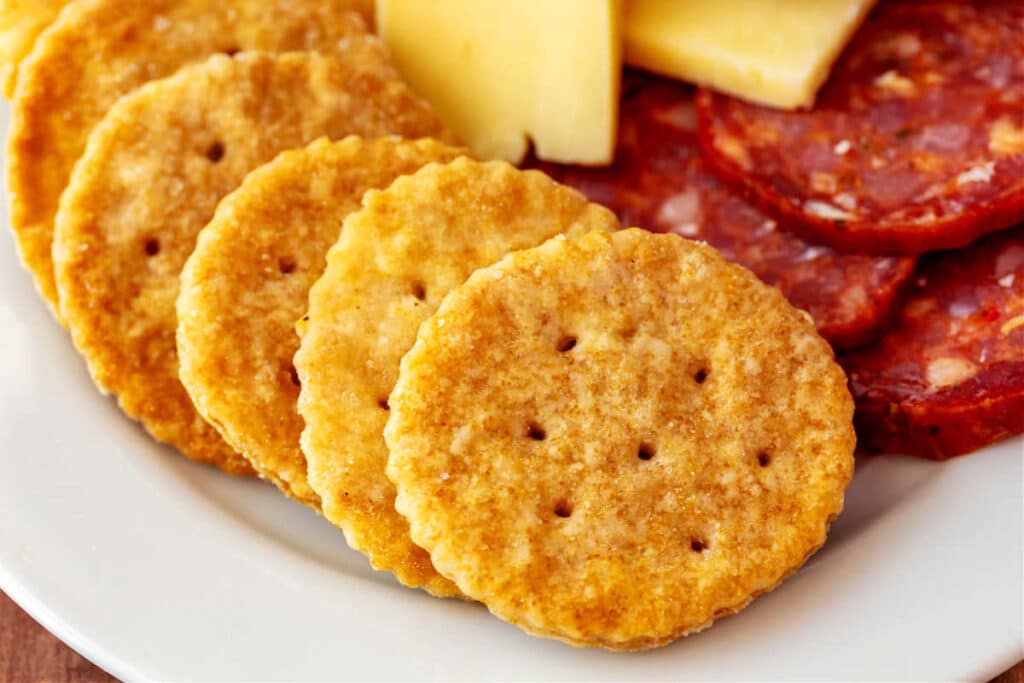
Lots of smackerels are great on a homemade Ritz cracker, because as the ads used to say, everything is better when it sits on a Ritz!
From eating them sandwiched together with peanut butter or open-faced with some peanut butter and a healthy smear of mixed berry jam or apricot preserves to using them as the base for my mom’s Red Sauce–the best sauce to pour over a block of cream cheese ever, you just really can’t go wrong.
Dip them in hummus, spicy queso, or chili cheese dip. Or spread port wine cheese on them. All are excellent plans.
Need a great beany dip? Try this garlic-parmesan white bean dip. Super flavorful and delicious.
As a part of a cheese board, pair them with savory jams such as fig chutney, onion jam, or bacon jam.
For a super easy appetizer or light supper, pair them with broiled goat cheese. You won’t be sorry!
And if you want to give these Ritz a spin as a recipe ingredient, try these Ritz Cracker Crab Cakes. They get excellent reviews!
Ritz Cracker Q & A
As written, yes, although the sugar and corn syrup can be questionably vegan. Of course, if you substitute ghee or clarified butter for the butter-flavored shortening, the crackers will no longer be vegan, but they will be vegetarian.
After the second bake, cool them completely and then store them in an airtight container. They should be good for about a week.
The best way to do this is to put them on a paper towel-lined plate and microwave them for 30 seconds or so. Allow them to cool to room temperature on a rack, and they’ll be good as new. Be careful not to leave them in the microwave too long or they will start to burn. One minute will be too long, so start checking them at 30 seconds. You should hear a gentle sizzle when you open the microwave, and they should be very warm but not scorching hot.
There’s really no reason to freeze the baked crackers, but you can freeze the dough for up to a couple of months. Allow it to thaw overnight in the fridge and then roll them, cut them, and bake as directed. You can also freeze the cut crackers before baking and then bake them directly from frozen on a rack on a cookie sheet.
Other Cracker and Snacky Recipes
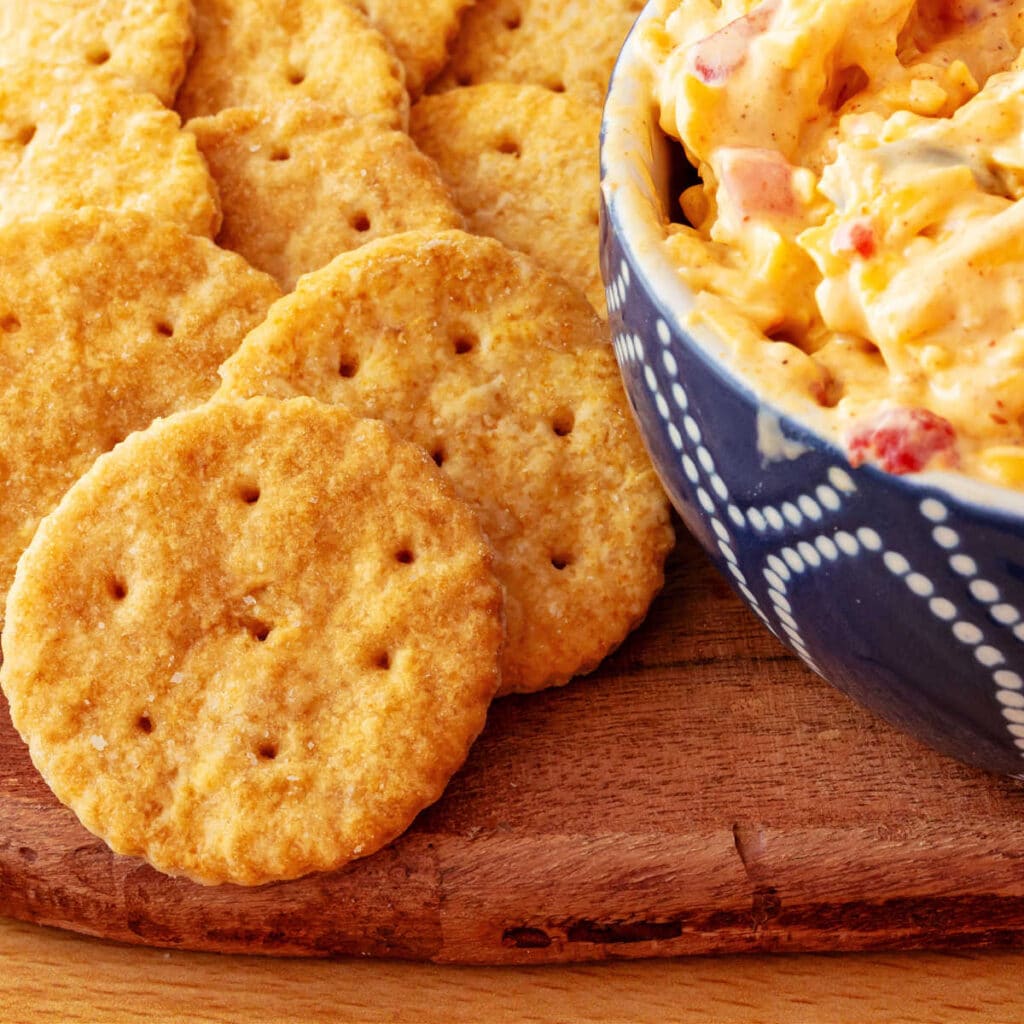
Please, please, please make some pimento cheese to enjoy on Ritz crackers. You will be so very happy you did.
I also have a pimento cheese spread that has some cream cheese in it so you can unmold it for fancy parties. Or for Halloween, as you’ll see if you follow the link!
If you enjoy rye, you may like my little rye crackers. Build baby Reubens on them with a little corned beef, a spoonful of sauerkraut, and a wee drizzle of Russian dressing.
If you love crispy, then you’ll love my puff pastry cheese straws. Very easy to snack upon.
Questions?
If you have any questions about this post or recipe, I am happy to help.
Simply leave a comment here and I will get back to you soon. I also invite you to ask questions in my Facebook group, Fearless Kitchen Fun.
If your question is more pressing, please feel free to email me. I should be back in touch ASAP, as long as I’m not asleep.
A Note About Measurements
Love This? Please Share It and Review It!
It helps me and other readers so much if you take a moment to rate and review this recipe.
Your star rating and comments help others decide whether the recipe is worth making, and your feedback helps me continue improving recipes here at Pastry Chef Online.
Other lovely ways to share include pinning or posting on your favorite social media platform.
Thank you so much for taking the time!

Homemade Ritz Crackers
Ingredients
- 7.6 oz bread flour 216 grams or about 1 3/4 cups
- 2 teaspoons baking powder
- 2 ½ teaspoons sugar
- 3.1 grams salt generous 3/4 teaspoon (I use Morton's kosher salt. Weighing it will give you the most accurate measuremnt)
- ¼ teaspoon baking soda
- 2 oz vegetable shortening 57 grams or a scant 1/4 cup (I used Crisco. For extra buttery flavor, use 1 oz each regular and butter-flavored Crisco)
- 3 oz cold water 85 grams or 6 Tablespoons
- 1 oz light corn syrup 28 grams or 2 scant Tablespoons
To Finish
- butter-flavored Crisco melted
- kosher salt for sprinkling
Instructions
- In a large bowl, whisk together the flour, baking powder, sugar, salt, and baking soda.
- In a small bowl or measuring cup, stir together the corn syrup and cold water to dissolve the syrup. Set aside.
- Add the vegetable shortening (plain or a mixture of plain and butter-flavored) to the bowl with the dry ingredients, and rub it in with your fingertips pretty thoroughly. You want to make sure there are no large pieces, but the mixture should still have a light and floury texture when you're finished. It shouldn't seem oily or curmbly.
- Evenly drizzle in the water/corn syrup mixture, making to scrape the bowl/pitcher to get any corn syrup that might be clinging to the sides or bottom.
- Stir together the liquid into the dry ingredients with the back of a wooden spoon or spatula to keep from overmixing.
- Once the mixture it thoroughly wet, give it a couple of kneads in the bowl to make sure all the flour is incorporated.
- Scrape the dough out onto a piece of plastic wrap, wrap it well, and refrigerate for 30-45 minutes.
- While the dough is chilling, heat your oven to 400F and set a rack in the center of the oven.
- Get a half-sheet pan and fit it with an oven-safe, grid-style coolling rack. Set aside.
- Once your dough has rested in the fridge, liberally flour a clean work surface, cut the dough in half, and work with 1/2 at a time and put the other half back in the fridge.
- Place half the dough onto the floured surface and flour the top.
- Roll the dough out as thinly and evenly as you can. You should just be able to see the counter through the dough, but it shouldn't be so thin you could read through it. Shoot for about 3mm or a little thinner than 1/8".
- Use a fluted round cutter to cut out crackers as close together as you can. Gather up the scraps, wrap in plastic, and refrigerate. You should be able to get about 30 crackers from the first pass.
- Snip the tip off a skewer or toothpick and make 7 holes in each cracker. One in the center, and 6 in a circle around the first hole.
- Remove the crackers to the grid on the baking sheet. You can place them very close together–they won't spread. Leave maybe 1/4" between the crackers.
- Bake for 5 minutes.
- Rotate the pan 180 degrees, and bake an additional 3-4 minutes, until crackers are puffed and golden-brown.
- As soon as the crackers come out of the oven, brush each one liberally with the metled butter-flavored Crisco and then sprinkle with just a touch of salt. Use less than you think you need. One reasonable-sized pinch of salt should be enough to very lightly salt the whole tray.
- Repeat steps 10-18 with the other half of the dough.
- Combine the scraps from both halves of the dough and press them together into a rough disc. Roll out to about 3 mm thick and cut as many more crackers as you can. Throw away any scraps as crackers made with them will be tough and weird.
- Bake off the rerolls as you did the other two trays.
- Turn off the oven and let it cool to no hotter than 275F.
- Place all the crackers back in the oven and let them sit in the hot-but-off oven for about 20-30 minutes to dry out and crisp up.
- Remove from the oven again and allow them to cool completely before storing in airtight containers for about a week.
- To recrisp any that seem to be getting soft, but them on a paper towel-lined plate in the microwave and microwave them on high for 30-40 seconds. Allow them to cool completely for maximum crispiness.
Did You Make Any Changes?
Notes
For More Buttery Flavor
Try using all-butter flavor Crisco as opposed to just using it to brush the tops after baking.To Use Real Butter
The flavor will not be the same at all, but if you want to use real butter, your best bet is to use clarified butter or ghee instead of whole butter. Since butter has water in it, it will make your crackers tougher, but both clarified butter and ghee are both 100% butterfat with no water.Variations
- Make cheese Ritz by adding 3-4 oz shredded sharp cheddar to the dough. Cut back on the Crisco by half.
- Add 2 teaspoons of your favorite herb blend to make herbed crackers
- Add 1/2 teaspoon each garlic powder and onion powder plus a little cayenne for savory, spicy crackers
Storing
After cooling completely, store in air-tight containers for up to a week. Recrisp on a paper towel-lined plate in the microwave for about 30 seconds and then let them cool completely again.Nutrition
Would you like to save this post?

Hi, y’all! I hope you’ve enjoyed this post and hopefully also learned a thing or two.
If you like my style, I invite you to sign up for my occasional newsletter, The Inbox Pastry Chef.
Expect updates on new and tasty recipes as well as a bit of behind-the-scenes action. I hope to see you there!

Thanks so much for spending some time with me today.
I hope you enjoy the homemade Ritz crackers. Downhome never felt so fancy!
Take care, and have a lovely day.


Join in Today!
This is the best cracker recipe I have found so far, others are too greasy or get tough. I had to make some changes out of necessity. Used Nutiva shortening 47 gms (that’s all I had) and rounded it out with10 gms Ghee. Baked on parchment-lined pans because I don’t have the grid. I did not knead the dough but instead used a dough scraper and cut the liquid into the dry mix until it was well distributed, and then before rolling out gave the dough a squeeze to pull it together. I think that helps keep glutin from forming so the reused parts don’t get so tough. I think using all Ghee would be even better and more flavorful, and plan to make this again.
I am so glad you enjoyed them, Joyce! And I am really glad you mentioned ghee. I have actually been thinking about testing these using ghee for part or even all of the fat. I think it would definitely give superior flavor without introducing extra liquid to toughen the crackers. I’ll need to make a 1/2 recipe to see for myself, but if it is really excellent, I’ll change the recipe to reflect the change. I appreciate the review and your explaining what you did differently, too!
So for those of us who would never use shortening for important dietary reasons, like PUFA fats are killers, can we sub butter? Butter is a healthy fat. No disparagement intended, I just like to keep my arteries clean. Or coconut oil maybe? Just not Crisco.
I would use ghee. The water in the butter will end up making the crackers get soft too quickly. Measure it out 1:1 for the Crisco and also use it to brush the tops when they come out of the oven. Honestly, next time I make them, I may try the ghee route too! Enjoy, Nancy!