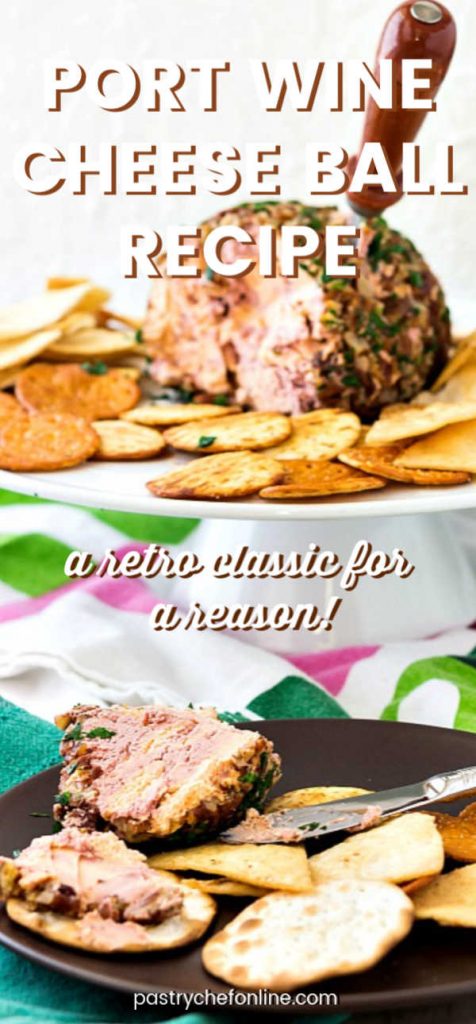
Today, friends, I am here to talk about one of my favorite cheese spreads, port wine cheese. Whether you pack it into a crock or roll it into a port wine cheese ball studded with spiced pecans and herbs, this retro appetizer classic is sharp and delicious!
I grew up eating port wine cheese, or rather sneaking it from the crock in the door of the fridge, and my copycat port wine cheese recipe is pretty much a dead ringer for my favorite childhood cheese spread. Serve them with my homemade Ritz crackers and you are in business!
For ease of browsing, here are all of my appetizer recipes in one place. Thanks for stopping by!
Pastry Chef Online Participates in Affiliate Programs. If you make a purchase through one of my links, I may earn a small commission. For more information click to read my disclosure policy
Port Wine Cheese Ball, At a Glance
✔️Skill Level: Beginner
✔️Skills: Reducing a liquid on the stove, using a food processor, cooking nuts on the stove top
✔️Type: Appetizer
✔️Number of Ingredients: 5 for the cheese ball and 4 for the pecans
✔️Prep Time: 20 minutes
✔️Cook Time: 18 minutes to reduce the port
✔️Yield: 1 cheeseball weighing about 1 pound
Jump Straight to the Recipe
I am so used to the artifical colors in store bought port wine cheese but don’t let looks fool you! This recipe is legit and I would prefer to make my own everytime. This tastes so much better then store bought and you know what’s going in it!
Reader Jade
What Is Port Wine Cheese?
Honestly, it is pretty much exactly what it sounds like.
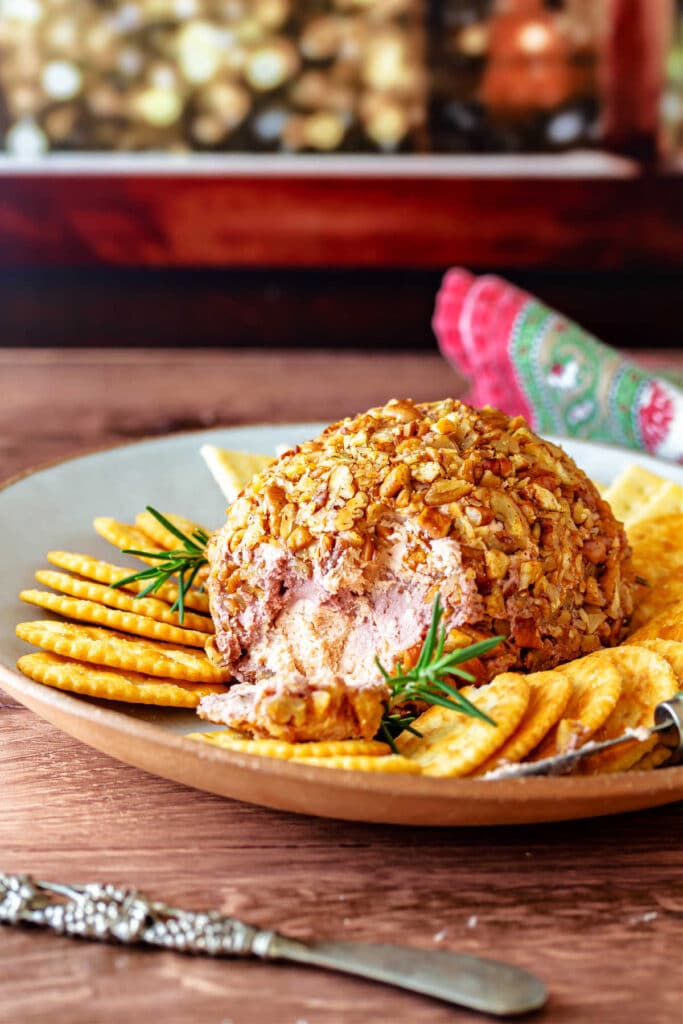
Port wine cheese is a cheese spread that gets mixed with a good amount of port, specifically ruby port, and then it’s shaped into a ball or log, or sometimes just packed into crocks.
The whole point of port wine cheese is that it is hard to stop eating, so you will definitely want to make some!
What Makes This Port Wine Cheese the Best?

Most of the other “copycat” recipes for port wine cheese I’ve seen online either direct you to blend straight port in with all the cheese, which I think lends a harsh edge from the alcohol, or they make a sort of “port Jell-o” made with port and gelatin and then layer that in with the cheese spread.
Since gelatin is an animal product, when you use it in an otherwise vegetarian recipe, you are automatically turning it into a non-vegetarian recipe.
And the gelatin isn’t necessary anyway, especially if you make a reduction. Which leads me to another reason this cheese spread is the best:
The truly magical ingredient in my port wine cheese is the port reduction.
Reducing the port by a factor of 8 yields a thick, intense, and sweet port wine reduction or syrup bursting with the pure essence of port without the excess alcohol that can lend a harsh quality to the spread or the excess liquid that could potentially cause the cheese ball to weep.
If this sounds like your kinda cheese ball, I have a favor to ask:
When you do make this recipe, it will help me and other readers if you:
✅Rate the recipes using the stars in the recipe card
✅Leave a review when prompted in the recipe card (If it’s a positive review, and I hope it is, I’ll use it in the post as social proof)
✅Leave a comment on the post
Thank you so much!
If you’re ready to get started, go ahead and jump straight to the recipe. Otherwise, read on to see how to make port wine cheese, step by step.
How to Make This Cheese Ball
First you’ll gather your ingredients.
Here’s what you’ll need. It’s a surprisingly short list:
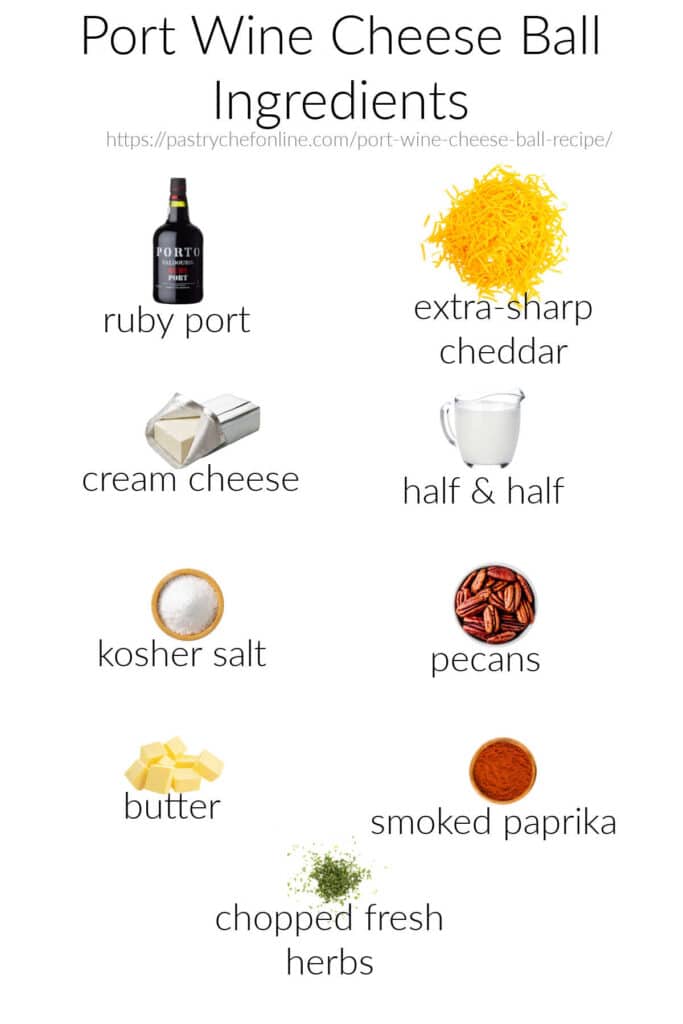
- ruby port: Don’t use tawny port. It doesn’t have the same sugar content and won’t be sweet and syrupy. Plus it won’t be the wrong color. You’ll reduce a whole bottle of port (750 ml bottle) down to about 3.5 oz
- extra sharp cheddar cheese: You need the zing of extra sharp cheese to shine through the sweet port reduction, so no medium cheddar here
- cream cheese: Lends spreadability and creaminess
- half and half: Thins the mixture enough that it stays spreadable even straight from the fridge
- kosher salt: Adds flavor and counteracts any possible bitterness. You’ll use some in the cheeseball and also in the pecans
- pecans: You could use another type of nut, but pecans are a southern classic. Leave them whole and then chop them after they cool. If you try to toast them after chopping, there’s a much higher risk that they’ll burn
- butter: For cooking the pecans
- smoked paprika: While technically optional, I do like the slight smoky edge of the smoked paprika. Use sweet paprika or even a bit of chili powder if you prefer, or leave it out entiely and just cook the pecans in butter and salt
- chopped fresh herbs: optional. Use your favorite herbs or just roll in the spiced pecans and call it a day
Procedure
Making the cheeseball is easy, although you need to use a food processor. If you have one, you’re good to go.
First, you’ll make your port wine reduction (Jump to That Section)
Once you have your reduction, gather the rest of your ingredients.
Make sure your cheese and cream cheese are at room temperature. It’s okay to have the half and half straight from the fridge, but it’ll be easiest to blend the cheeses when they’re a bit warmer and softer.
Process the cheese and cream cheese in pulses, and then let the machine run.
Combine port reduction with the half and half and salt, and then pour that through the feed tube in the processor.
Let the processor run until the cheese spread is completely smooth.
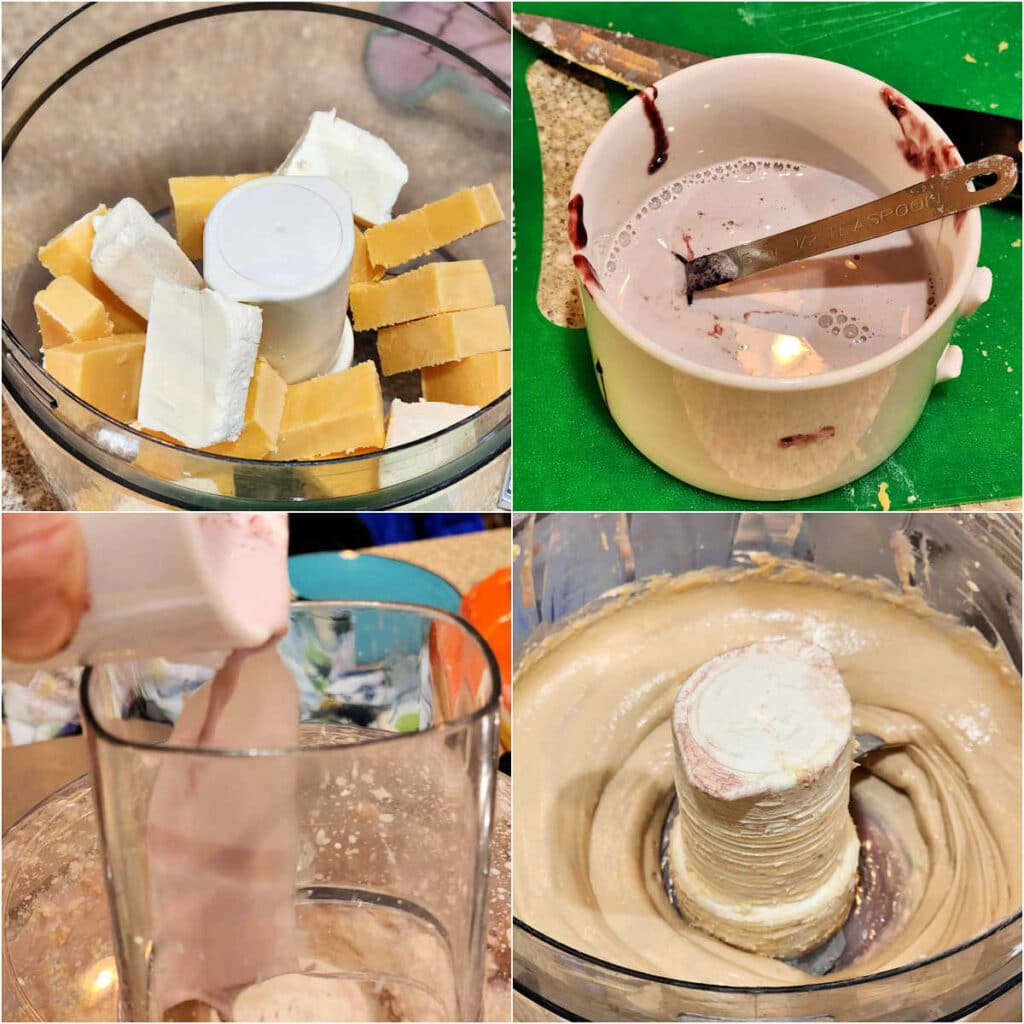
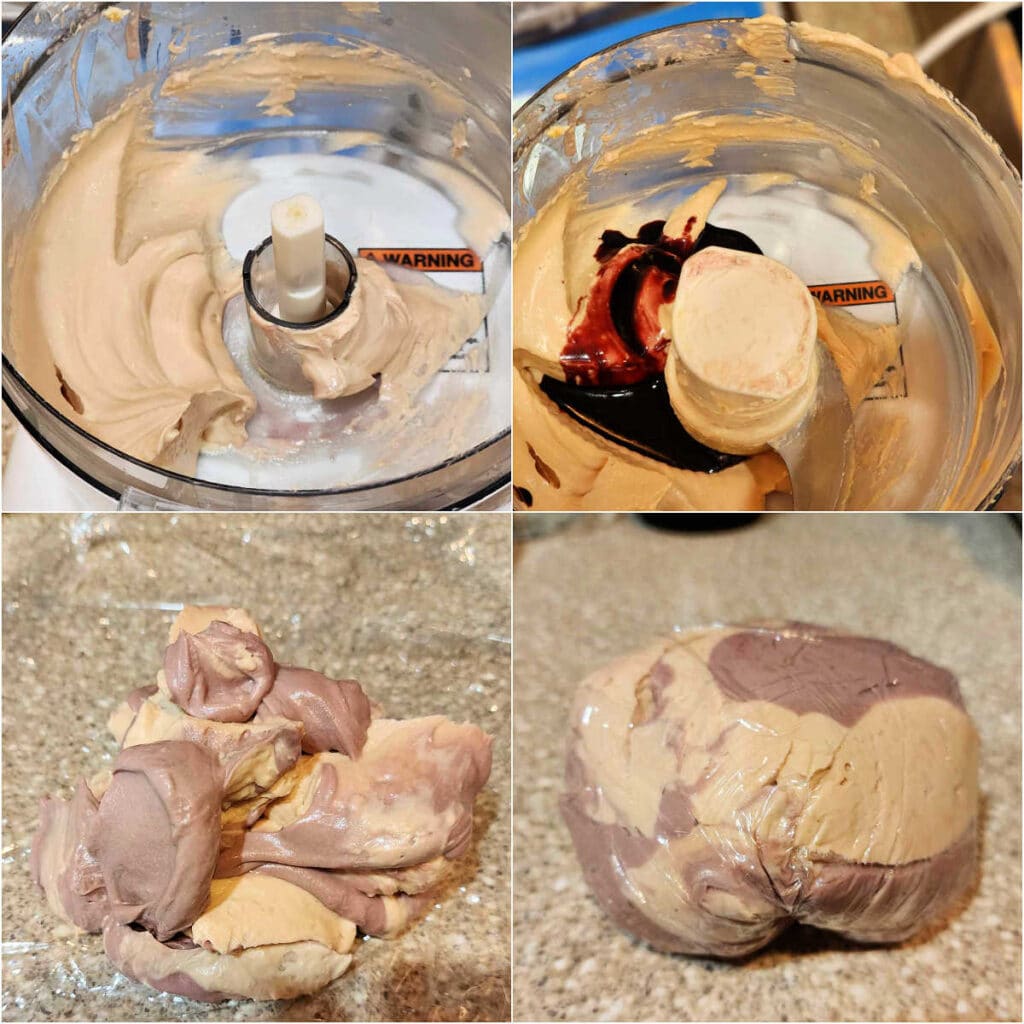
Remove 2/3 of the cheese spread to a bowl, and then add more port reduction to the remaining third, processing until a uniform purple color. You’ll probably need to scrape the bowl a couple of times to make sure the sticky port syrup is all blended in.
Then, spread plastic wrap on the counter and cross it with another sheet of plastic wrap, making sort of an “X.”Randomly plop on the orange and purple cheeses until you’ve used it up and you have a pile of cheese on the plastic wrap.
Pull the end up around the cheese and twist it tightly to form a ball.
Would you like to save this post?
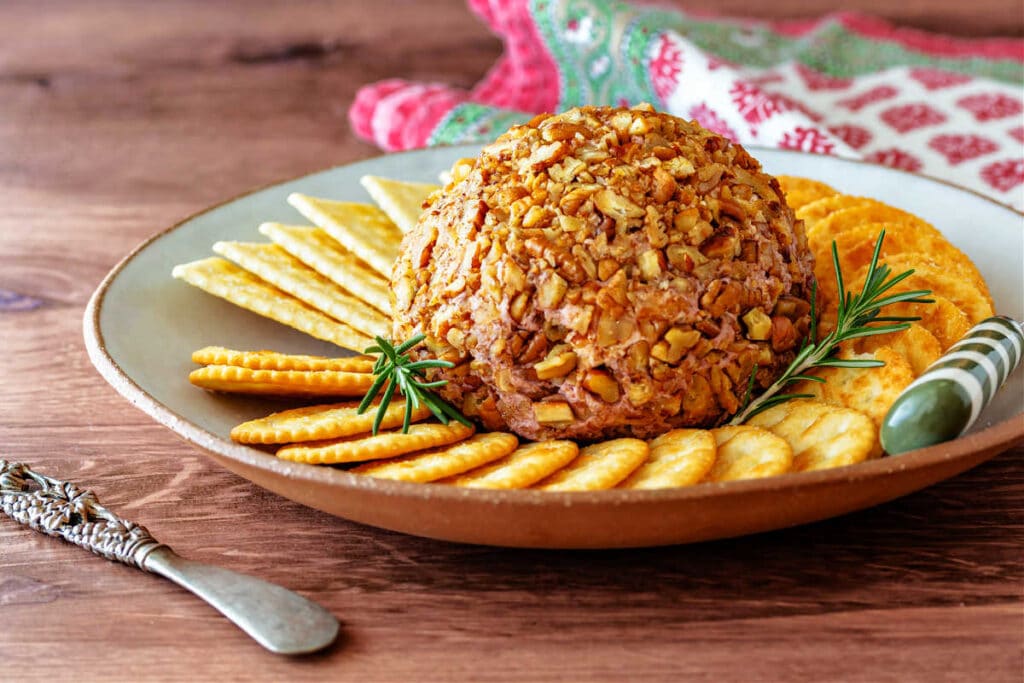
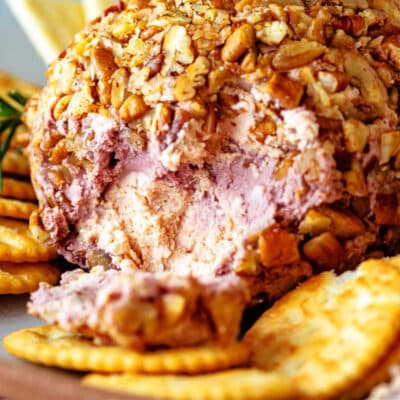
Chill it, and then roll them in your toasted, chopped pecans.
How to Make a Port Wine Reduction
Making a reduction, port wine or otherwise, is very easy to do.
Just measure out the amount of liquid to begin with, decide how much you want to reduce it by (by half? by four? etc), and then boil it on the stove until it reaches that amount.
For example, if you want to reduce 1 cup of liquid by half, you would periodically measure your simmering liquid until it measures 1/2 cup.
If you’re reducing it by a factor of 4, you’ll want to simmer it until your initial cup measures 1/4 cup.
For the port (750 ml bottle), you’ll reduce it by a factor of 8, ending up with about 3.5 oz of port reduction.
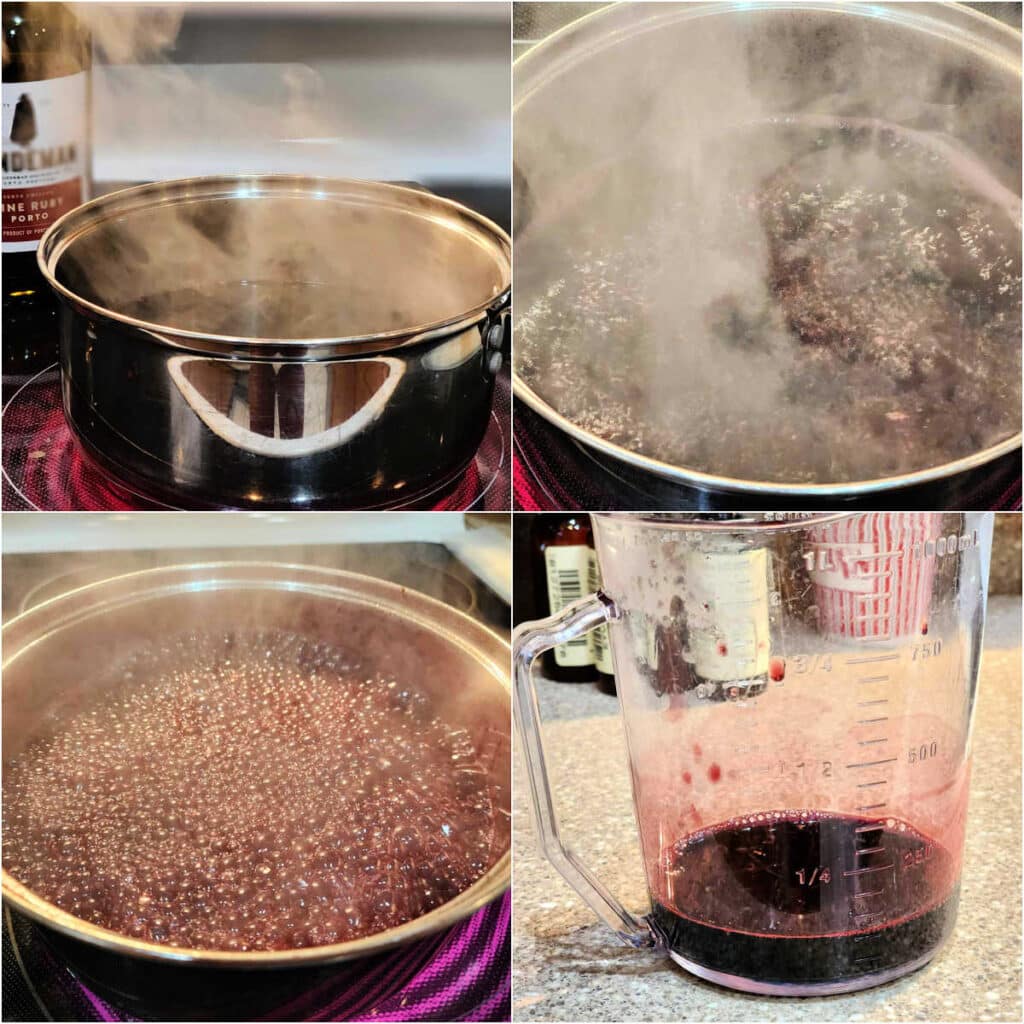
You’ll know you’re getting close when the port bubbles up to fill the pan and small bubbles are popping all over the surface.
Watch your heat, because you don’t want it to boil over. Periodically remove the pan from the heat and pour it into a measuring cup. You’re looking for the level to reach between the 1/4 and 1/2 cup markings.
And that is all there is to it. Let your port reduction cool, and you’re good to go.
Cooking the Pecan Coating
You’re welcome to roll your cheese ball in sliced almonds, chopped walnuts, or whatever you like.
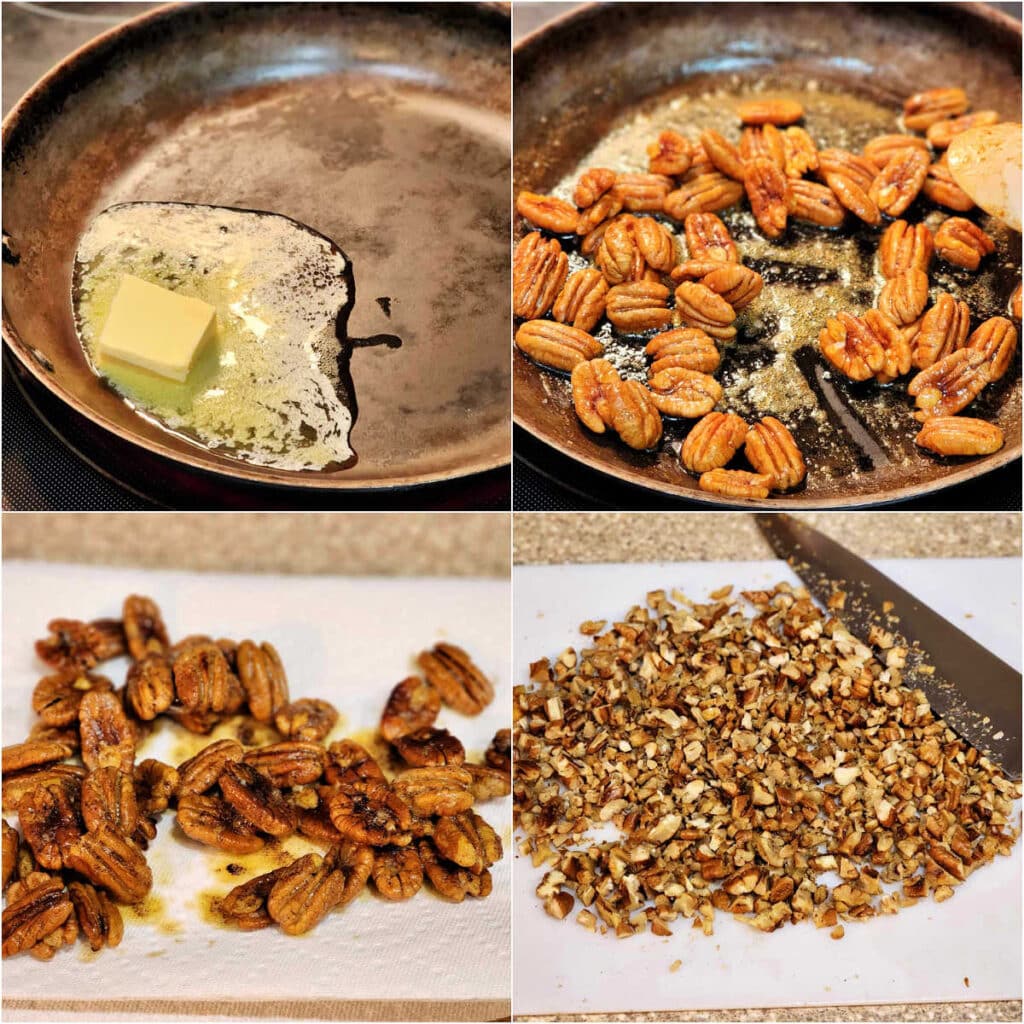
If you are a pecan lover, you owe it to yourself to cook up some pecans in a skillet, though.
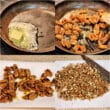
Melt some butter in your pan, and add pecans, salt, and paprika (or whatever spice/s you choose to use).
Cook, stirring constantly, until the pecans darken in color and the butter is very foamy. This will take about 5 minutes.
Spoon the pecans out onto a few layers of paper towel to drain. Leave the excess butter, if any, in the pan.
Once the pecans have cooled, chop them up fairly finely with a chef knife.
Now all that’s left to do is roll the cheese ball in the chopped nuts and serve it.
Cheese Spread Variation
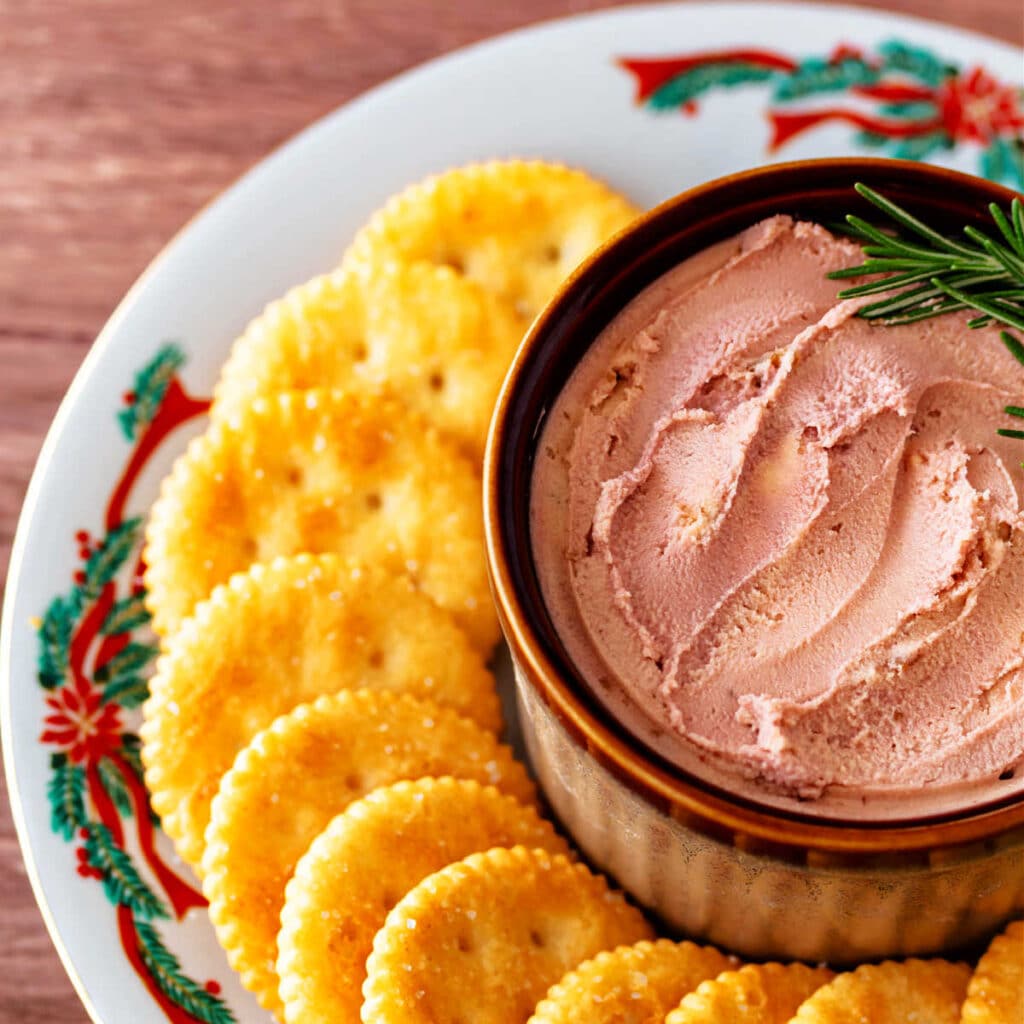
Skip the shaping into a ball and the pecans and just pack the orange and purple cheeses randomly into a crock or ramekin for serving.
Port wine cheese spread is every bit as legit as a cheeseball, and there aren’t as many steps. Plus, you won’t have to worry about nut allergies.
More Retro Classics
I don’t know about you, but I think the recipes that have been around for decades have been around for a reason: they’re good recipes, and they should be celebrated!
Some of my favorites include my all-time favorite appetizer that falls into the “pouring something over a block of cream cheese” category, Cream Cheese and Red Sauce. Sweet and Tangy poured over creamy and served on crunchy crackers. Y’all.
Want another cheese ball? This pomegranate cheese ball from my friend Laura is rolled in pomegranate arils. So tasty and pretty!
I am also a super fan of what I grew up knowing as “Poppy Seed Party Ham Biscuits,” but these days they’re mostly called Ham and Cheese Sliders. I can eat my weight in those things!
Last up, consider serving my pimento cheese spread with pepper jelly. Two Southern classics that go really well together, yielding a sweet, spicy, cheddar-y bite that’s hard to resist!
And if you love a good hot, cheesy, poppable appetizer, try my mom’s cheese olive puff recipe.
Questions?
If you have any questions about this post or recipe, I am happy to help.
Simply leave a comment here and I will get back to you soon. I also invite you to ask questions in my Facebook group, Fearless Kitchen Fun.
If your question is more pressing, please feel free to email me. I should be back in touch ASAP, as long as I’m not asleep.
A Note About Measurements
My recipes are almost all written by weight, including liquids, unless otherwise specified.
For accuracy and consistency of results, I encourage you to buy–and use–a kitchen scale.
I promise that baking and cleanup will be so much quicker and easier.
This is the scale that I recommend for home use. I have owned and used one for years.
It helps me and other readers so much if you take a moment to rate and review this recipe.
Your star rating and comments help others decide whether the recipe is worth making, and your feedback helps me continue improving recipes here at Pastry Chef Online.
Other lovely ways to share include pinning or posting on your favorite social media platform.
Thank you so much for taking the time!

Port Wine Cheese Ball Recipe
Equipment
Ingredients
For the Port Reduction
- 1 bottle ruby port 750 ml bottle. This will be enough to make 3-4 cheese balls.
For the Port Wine Cheese Ball
- 8 oz extra sharp cheddar cheese at room temperature (the orange kind is more traditional)
- 3 oz cream cheese
- 2-3 oz half and half Use 2 oz for a firmer cheeseball and 3 ounces for one that is easier to spread straight from the fridge.
- ¼ teaspoon kosher salt or to taste
- Generous 1 1/2 teaspoons port wine reduction divided use
For the Nuts
- 1 cup pecans
- 2 Tablespoons unsalted butter
- pinch of salt
- ½ teaspoon hot smoked paprika or to taste
To Serve
- Your choice of finely chopped fresh herbs for rolling (optional)
Instructions
For the Port Wine Reduction
- Pour the port into a small saucepan.
- Crank up the heat and boil until reduced to a thick syrup with a volume of about 1/4 cup.** Towards the end, watch it carefully. As the sugar content gets more concentrated, the chances of it burning increase.
- Once the bubbles go from "watery boiling" bubbles to a thicker, syrupy kind of boil, periodically pour it into a heat-proof liquid measure to check for volume. On my stove on high, this took 18 minutes. Start checking at around 15 minutes of boiling.
- Set aside to cool.
For the Port Wine Cheese Ball
- Cut the cheddar and the cream cheese into about 1" chunks and place in the bowl of your food processor. Begin by pulsing to get the cheese chopped up in little bits before just letting it run.
- Mix a slightly generous 1/2 teaspoon of the port wine reduction and the salt into the half and half.
- Slowly pour the dairy mixture in through the feed tube.
- Process until the cheese mixture is very, very smooth, about 2 minutes or so. Taste and add just a tiny bit more salt if you think it needs it.
- Clean off the blade of the food processor and eyeball the cheese mixture to divide it into thirds. Place 2/3 of the mixture in one bowl and leave the remaining third in the food processor.
- To that third, add 1 slightly generous teaspoon of port wine reduction. Process until smooth, scraping the sides of the container and processing some more until the mixture is a uniform purple-y color. You can add a touch more of the port wine concentrate if you'd like it more purple, but I was happy with mine, so I quit there.
- Spread 2 layers of plastic wrap overlapping in an "X" on a clean countertop. Working randomly, plop spoonfuls of the orange and purple cheese mixtures into a pile in the middle of the plastic wrap.
- Carefully pull up the ends of the plastic wrap around the pile of cheese and bring them together over the top, twisting to form the cheese into a ball. Refrigerate, twisted-side-down, until firm, about 4 hours.

- In the meantime, make the pecans.
For the Pecans
- Melt the butter in a heavy skillet over medium heat. Add the pecans, the salt and the hot smoked paprika and stir well with a spatula to coat all the nuts in the butter mixture.
- Cook, stirring frequently, until the nuts are nicely browned, the butter is sort of foamy and the whole thing smells great, about 5 minutes or so.
- Let the nuts cool spread out on several thicknesses of paper towels.
- Once the nuts are cool, chop them fairly finely and set aside.
To Assemble the Port Wine Cheese Ball
- Spread the spiced pecans out in a thick layer on a plate. Unwrap and roll the cheese ball in the nuts until it is evenly coated. You may have to press some on with your hands. Just try to get it evenly coated. Wrap in a clean sheet of plastic wrap until serving time.
- About 45 minutes before serving, roll the ball in the optional chopped herbs and allow to sit at room temperature for best flavor and texture.
- Serve with crackers, pita chips, vegetables or whatever your heart desires.
- Rejoice in the deliciousness of your retro masterpiece.
Did You Make Any Changes?
Notes
Nutrition
Would you like to save this post?

Hi, y’all! I hope you’ve enjoyed this post and hopefully also learned a thing or two.
If you like my style, I invite you to sign up for my occasional newsletter, The Inbox Pastry Chef.
Expect updates on new and tasty recipes as well as a bit of behind-the-scenes action. I hope to see you there!

So good, right? If you only have one port wine cheese ball recipe in your repertoire, please make it this one.
Thanks for spending some time with me today.
Take care, y’all.


Join in Today!
I made this port wine cheese ball and it was too soft to form into a ball. What happened and how do I correct? The mixture looks great and the taste is good but cannot shape into the ball please help!!!!
Hey, Brenda, The mixture is pretty soft straight out of the food processor. I refrigerate it for at least a couple of hours. It’s still pretty sticky, but rolling it in the nuts usually keeps things in place. If, after refrigerating, it still isn’t cooperating, just pack it into little ramekins and serve it as a spread with a knife and crackers. I’m glad you like the flavor, and I hope you can end up enjoying the final product, too!
I think I’m going to try this for this year’s neighbourhood Christmas party, but just two questions:
What size bottle of port are you starting with?
How long will the leftover reduction last and how should it be stored?
Thank you!
Hey, Laurel! I use a standard size bottle of Port from the wine section at the grocery store. No mini bottle. You won’t have much leftover, but what you do have will keep for at least a couple of weeks in the fridge. You can use it to make champagne cocktails or pour some over vanilla ice cream. Enjoy!
LOL I’m in Canada, and there is no port in my grocery store… 😀 So I don’t know what “standard size” is. But after I asked the question I actually thought to use my brain and my calculator to figure out how much I’d have to start with to get 3.5oz after an 8x reduction: 28oz. For any other “foreigners” out there, it’s the 750ml bottle, though it is a little smaller at only 25oz.
Thanks again. I’ve never made a cheese ball before and my extra old cheddar is off-white, so it will be interesting to see the colour. Looking forward to it!
Laurel 🙂
You are a genius! I will be sure to update the post with the ml! I really hope you enjoy it–it is very nostalgic for me. Did you grow up eating port wine cheese? Mom used to buy it in little brown pottery crocks at the store at Christmastime.
I don’t remember ever even hearing of “port wine cheese”. 😀 I know my sister-in-law used to make cheese balls for our Christmas Eve family gatherings, but I have no idea what she put in them. And my VERY British grandmother used to have a glass of sherry every afternoon at 4pm. Kind of like port, no, just a different country? 😀 😀
Thanks again for the recipe. Now to go buy the port. 🙂
It’s similar to sherry in that it’s a fortified wine. Boiled down to a syrup, it has a ton of flavor and lends a gorgeous color. Hope you like it, Laurel!
Hello, Jennifer. I happened on this recipe and am definitely making this! Thank you for the recipe. Please forgive me for asking what is probably obvious, but you divided the cheese mixture into thirds, therefore making three balls? You processed each ball separately using a generous 1 tsp of the reduction per ball? Have you ever processed the entire amount of the cheese mixture and 3 tsp of the reduction (or more depending on preference for color) to make a spread for a cheese crock? Thank you in advance for your time in answering.
Natalie
Hi, Natalie! I generally split the mixture into 2 parts, 1 part is about 2/3 of the total, and the other part is 1/3 of the total. The only reason I do that is so there is some color variation, with the 1/3 that gets the extra amount of port reduction providing redder swirls in the more orange part. But you can absolutely leave it in one batch and flavor the entire amount with the reduction. It will taste just as good and also simplifies the process. So yes, go for it! Enjoy, and share if you can. I have a hard time sharing because I love it so much!
Thank you, very much, Jennifer. I really appreciate your response and explanation. I believe I will follow your recipe to the letter. 🙂
I hope you love it as much as I do! Happy Thanksgiving!
Do you think it will freeze well? I would like to make it ahead for gifts.
Hey, Wendy. Honestly, I don’t think it will freeze well. Cream cheese gets weird when frozen and then thawed, so I expect the cheese ball would end up somewhat grainy. If you’d like to give for gifts, my vote is to make a week or two ahead and pack in small jars/crocks as a spread rather than rolling in nuts for cheese balls. If you want to give cheese balls rather than crocks, then wait until the day before gifting to roll them in the chopped nuts so they retain some crunch. Hope that helps!
Hi,
Looks like a winner! I am curious, have you ever tried this using blue cheese in lieu of the cheddar? I realize it is now a different recipe, but I think it would be delicious. I was actually looking for Blue cheese, Port wine and pecan spread recipe and landed on yours. I do love a good old fashioned Port wine cheddar spread. Thanks!
Peggy
Hey, Peggy!
I am all about the blue cheese, so yes, I think it would be great. My husband thinks the port might get lost in the assertive blue cheese, but I think it would add a little sweetness to the cheeseball. My vote is to go for it. If you have time, I’d love to hear how it turns out. I could use it as a variation in the post if it’s delicious! Thanks, and Happy New Year. 🙂
I am so used to the artifical colors in store bought port wine cheese but dont let looks fool you! This recipe is legit and I would prefer to make my own everytime. This tastes so much better then store bought and you know whats going in it!
Brilliant! Thank you! I can’t wait to make it! Nothing says “holiday party” like a port wine cheese ball! The ones in the store are overpriced and full of cheap, gross ingredients. I’ve tried homemade before, but with straight-up wine, and like you said, that makes it taste bad as well as being too soft from all the liquid. This is going to be great!
Oh, yay! So glad you found me. I eagerly await your review!
Would it make a huge difference in flavor or texture if I used pre-packaged shredded cheese instead of dicing up the block?
I think since it’s blended, probably not, but generally speaking, pre-shredded cheese is tossed with some anti-caking powdery…stuff (technical term!) that can affect the texture and its meltability. But since you’re not melting it, I’m guessing it will probably be okay. Give it a shot–it most likely will work. Do let me know, and thanks for getting in touch, Hol!
I always love those gift baskets with port wine cheese spread. Now I can make my own! So delicious!!
Yes–people will be very impressed! Or you could make it and keep it for yourself. I’ll never tell! lol
I have always loved port wine cheeseballs – and yes, totally the height of fancy! Yours looks perfect and even better than the ones I remember growing up. This is a must-try for me. Thanks for hosting this fun theme. 🙂
I think you are really going to love it, Heather! And that port wine reduction has so many possibilities apart from the cheese ball. #nom =)
Yum, love a good cheese ball! I’ve never tried making my own port wine cheese, though. Great idea!
Thanks, Megan! I was really happy with how it turned out–and it was much easier to make than I had initially thought. Hooray!
I loved this month’s theme. So elegant and nice. I love what you did with port wine! Amazing stuff, Jenni.
Thanks, Anshie! I was in pursuit of the perfect port wine cheddar! =) And your pears! Talk about elegant. So lovely! xo
I have a bottle of port that a friend gave me a while back and I’ve never done anything with it. Wonder if it’s still good? If it is, I’m definitely pouring it into this cheese ball! As always, you take a recipe and improve on it – I learn so much from you Jenni.
Oh Laura, that means so much to me! Thank you! And I bet your port is fine. The alcohol content is pretty high which keeps things from getting squirrely, especially if it’s unopened. You’ll have to let me know if this version lives up to your recollections! =)
Wow!!! This looks really gorgeous! And reducing the Port is genius. Thanks so much for taking the helm with us this week. Your topic was very fun to play with!
Thank you, Susan! I thought this theme would give folks the opportunity to play some–glad you enjoyed it! =)
Wow, adding syrupy port was genius! What a terrific, irresistible way to combine wine and cheese! Thanks for hosting, Jenni!!!
Thanks Liz! And once you have the syrup, the cheese ball comes together really quickly. I will definitely be bringing this one back for holiday parties! Looking forward to your mascarpone cheesecake for dessert!