


These homemade asiago bagel recipe is an excellent Panera copycat for their signature Asiago Bagels.
A long, slow rise gives them a lovely chewy texture, and as far as I’m concerned, these homemade bagels are better than Panera’s. Way better.
Find all my bread and rolls recipes in one place.
Asiago Bagels, At a Glance
✔️Skill Level: Advanced
✔️Skills: Mixing Yeast Dough, Shaping individual bagels, boiling, baking
✔️Type: Individual shaped breads
✔️Number of Ingredients: 6
✔️Prep Time: 30 minutes
✔️Fridge Time: 5 hours up to 36 hours
✔️Cook Time: 16 minutes
✔️Yield: 12 bagels
Jump Straight to the Recipe
I was so happy to find your asiago cheese bagel recipe, I followed your directions exactly and they turned out amazing!
Reader And Bagel Provider Jessica
I’m excited to bring the homemade ones to church this Sunday for the first time, and saved $50. Going from $60 to $10!!
Panera Bagels
I worked at Panera during culinary school. Their bagels are huge. Huge!
Pastry Chef Online Participates in Affiliate Programs. If you make a purchase through one of my links, I may earn a small commission. For more information click to read my disclosure policy
Maybe softer than a New York bagel, but size counts.
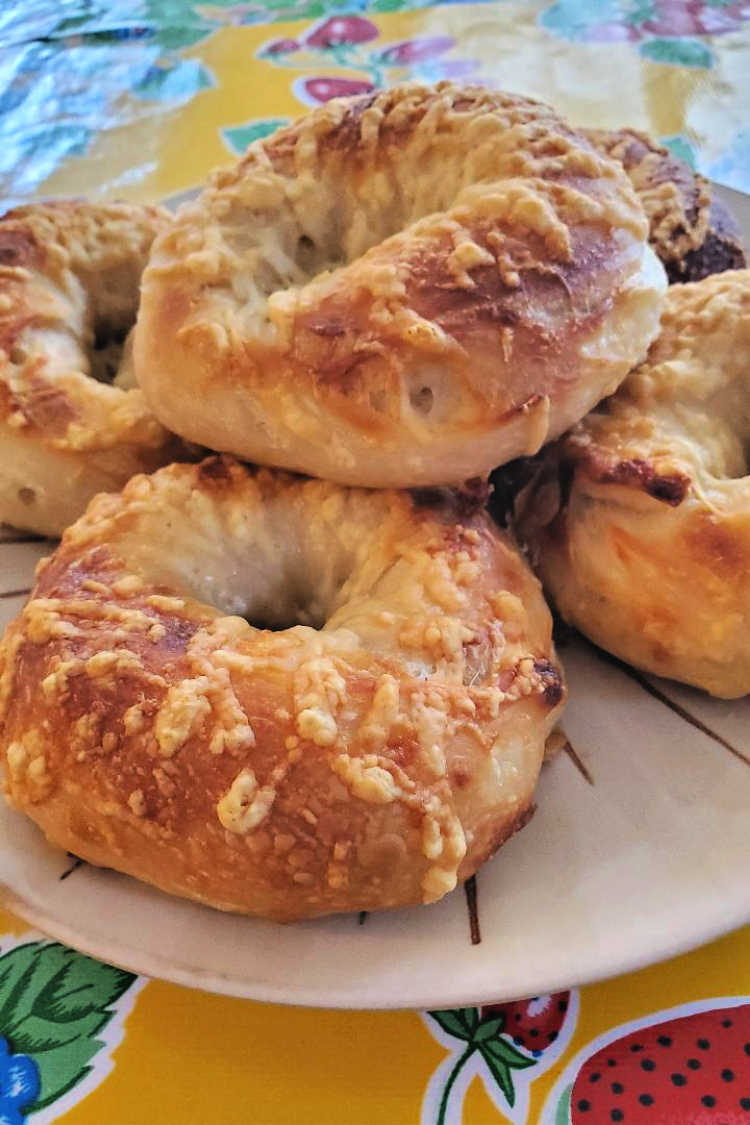
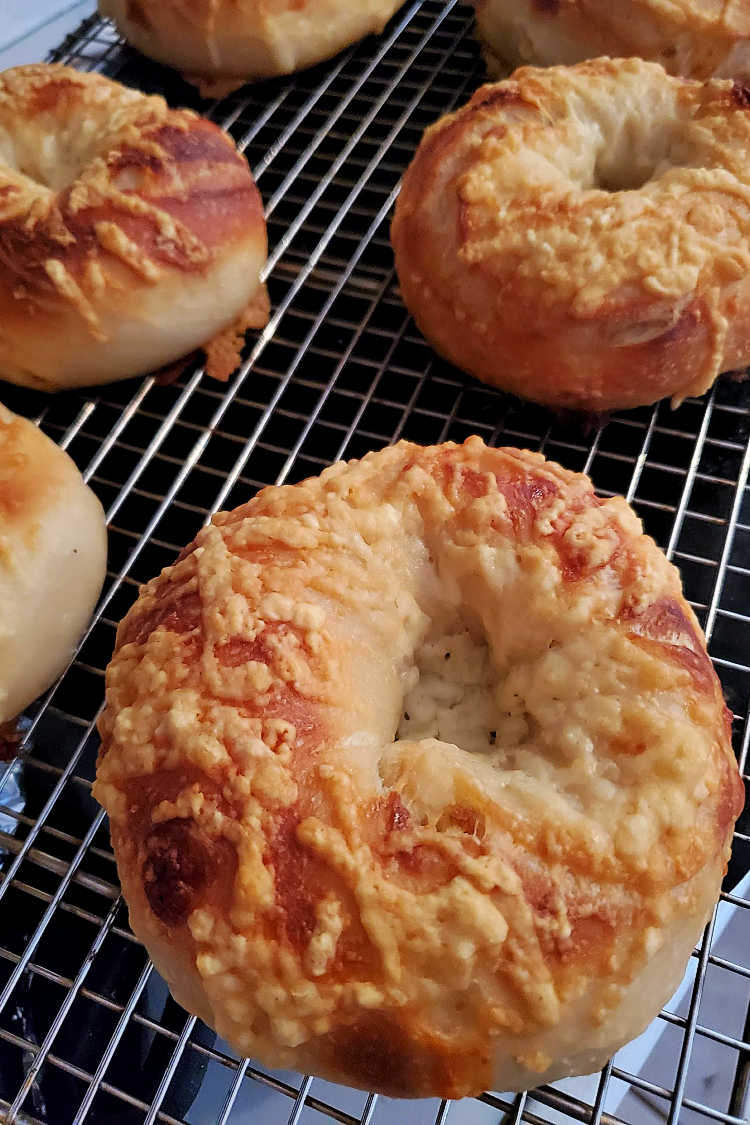
The most popular bagels we sold–by a long shot–were asiago bagels.
Shredded cheese in the dough. Shredded cheese baked to golden perfection on top of each bagel.
Sometimes we’d pull them off the trays and little shelves of cheese would jut out from the bottom. Those were real winners, those cheese shelf bagels.
So, as an ode to my time working at Panera Bread, I give you Panera Copycat Asiago Cheese Bagels.
Credit Where Credit is Due
Since I had never made bagels before, I wanted to stick with a trusted recipe.
I generally like to find a few inspiration recipes and then do my own thing, using the recipes as a jumping off point.
This time, I stuck pretty close to the script. And the script was asiago bagels from Brown Eyed Baker.
Michelle’s recipe is based on a Peter Reinhart recipe, and as far as I’m concerned, bread doesn’t get too much more legit than that. (I know–I have and adore his Perfect Pan Pizza cookbook.)
He even assisted her in adapting his basic recipe to an asiago version via email. And that’s more than enough for me. He literally wrote the how-to of bagels.
So Why Make This Recipe?
The answer to that is in the changes I made to the original recipe:
- I diced the cheese for mixing in the dough in about 3/16″-1/4″ dice rather than shredding it. I wanted wee pockets of melty-cheesy goodness. It was more of a pain to incorporate the wee cubes of cheese into the stiff dough, but I think it was worth it. The flavor will be the same if you shred it though, so do what you feel led to do.
- Shaping: I give two ways to shape the bagels. The traditional method of making a rope of dough yields much chewier bagels, and that’s the method I recommend.
In the dough, diced cheese is better than shredded cheese, although you’ll want shredded cheese to top your bagels with.
If you already know you want to make this recipe, you can jump straight to it. And when you do make it, I have a favor to ask:
When you do make this recipe, it will help me and other readers if you:
✅Rate the recipes using the stars in the recipe card
✅Leave a review when prompted in the recipe card (If it’s a positive review, and I hope it is, I’ll use it in the post as social proof)
✅Leave a comment on the post
Thank you so much!
If You Need More Instruction
If you are confident in your bagel-making game, you can jump straight to the recipe.
There is a lot of additional information I’ve provided after the recipe, so if you need refreshers or specific instructions on this admittedly rather detailed recipe with a lot of steps, here are some highlights.
Just click to head straight to each section:
✅Ingredients and Outline for Making Bagels
✅Mixing the Dough
✅How to Shape Bagels
✅The Effect of Rising Time
✅What If I Don’t Have a Baking Stone?
Questions?
If you have any questions about this post or recipe, I am happy to help.
Simply leave a comment here and I will get back to you soon. I also invite you to ask questions in my Facebook group, Fearless Kitchen Fun.
If your question is more pressing, please feel free to email me. I should be back in touch ASAP, as long as I’m not asleep.
A Note About Measurements
My recipes are almost all written by weight, including liquids, unless otherwise specified.
For accuracy and consistency of results, I encourage you to buy–and use–a kitchen scale.
I promise that baking and cleanup will be so much quicker and easier.
This is the scale that I recommend for home use. I have owned and used one for years.
Love This Recipe? Please Rate and Review. Thanks!
It helps me and other readers so much if you take a moment to rate and review this recipe.
Your star rating and comments help others decide whether the recipe is worth making, and your feedback helps me continue improving recipes here at Pastry Chef Online.
Other lovely ways to share include pinning or posting on your favorite social media platform.
Thank you so much for taking the time!


Asiago Bagel Recipe
Video
Equipment
Ingredients
For the Sponge
- 1 teaspoon active dry yeast (you can also use instant which is what the original recipe calls for)
- 18 oz bread flour (I used King Arthur)
- 20.3 oz filtered water at room temperature (it is very cold in my kitchen right now, so I heated my water to about 80F)
For the Dough
- all of the sponge
- ½ teaspoon active dry yeast (or instant. See above)
- 15 oz bread flour
- 2 ½ teaspoons kosher salt (yes, you need this much. Don’t skimp on the salt)
- 1 Tablespoon malt syrup (or honey or dark corn syrup)
- 6 oz asiago cheese cut into small dice (or shredded)
To Finish
- wide pot of water
- 1 Tablespoon malt syrup dark corn syrup, or honey
- 5 oz asiago cheese shredded
Instructions
For the Sponge
- Combine the yeast, flour and water in a large bowl. Stir well to combine completely. It will be the consistency of a thick batter.
- Cover and let rise at room temperature for 2-3 hours, or until it has more than doubled in bulk and is very, very bubbly. It should be so bubbly that it collapses if you give the side of the bowl a whack. How long it takes to achieve this will depend on the temperature in your kitchen, but it will probably take at least 2 hours.
For the Dough
- Combine the sponge and the rest of the ingredients except the cheese in the bowl of your heavy duty stand mixer. (Unless you’re making the dough by hand, do not try this with anything but a powerful stand mixer. My poor old 5 quart KitchenAid became alarmingly hot during kneading and threatened to die. The motor even momentarily would stop turning the dough hook. This dough is Serious.)
- Mix on low speed until all the flour is incorporated and then turn the mixer up to medium-low speed and knead for 6-8 minutes. The dough will be firm yet supple. At the end of kneading, it should be very smooth and very extensible and not at all sticky.
- Give it the windowpane test to make sure the gluten is good and developed.
- Knead in the cheese by hand. This might take awhile, but just go for it.
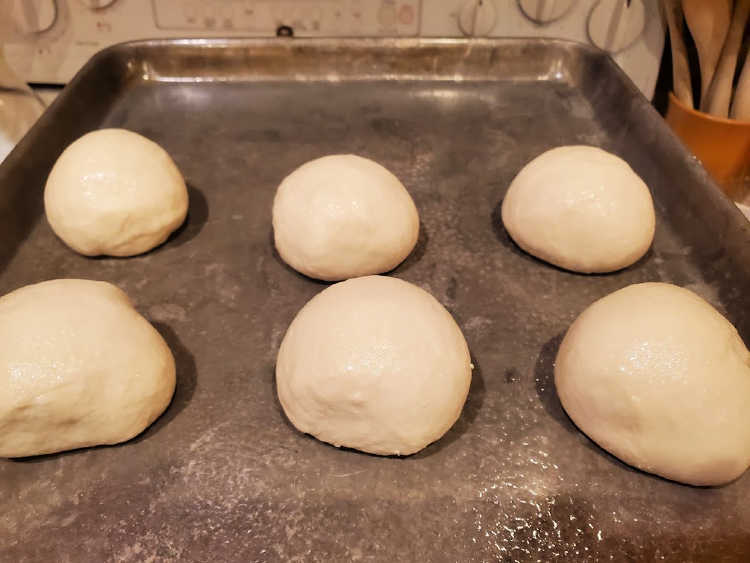
- Divide the dough into 12 equal pieces. Mine scaled out at 4.75-4.8oz each.
- Form each into a smooth ball and let rest, covered for 20-40 minutes. (20 minutes for a warmer kitchen. 40 for a cooler kitchen. My kitchen is currently about 65F during the day)
- After the rest, shape the bagels.
- To Shape the Bagels (See NOTES for a simplified method of shaping)
- Press one of your pieces of dough down flat so it looks sort of like a tortilla about 6" diameter.
- Fold two of the "sides" in about an inch and pat down.
- Roll up the piece of dough like a burrito and place it back on the sprayed baking sheet, seam side down.
- Repeat with the rest of the dough.
- Then starting with the first piece of dough, roll it out into a snaked about 10-12" long.
- Wrap the dough around your hand, overlapping the edges by an inch or two. Have the overlap be on the palm side of your hand.
- Put your palm down on the counter (with the bagel still wrapped around it) and roll the overlapped part of the bagel firmly back and forth on the counter to make sure the dough sticks.
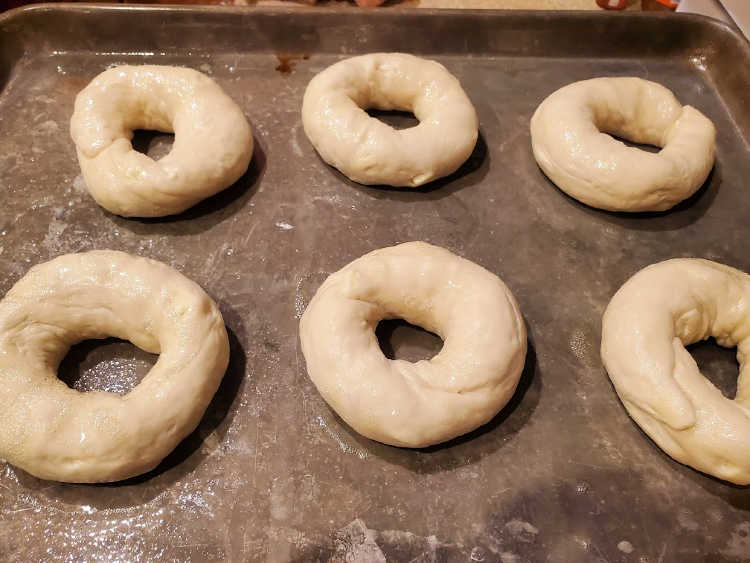
- Place the proto-bagel on a sprayed baking sheet.
- Put six bagels on one tray and six on another.
- Lightly spray the tops of the bagels with cooking spray, cover them with plastic wrap and let them sit for 20-30 minutes (again, depending on the temperature of your kitchen).
- You don't want to see any more rising, but you'll know they're ready for a rest in the fridge when they float in a dish of water. Just test one. If it sinks, give it a few more minutes of rest time (but do dry that guy off with a paper towel) If it floats, it's a witch. No. If it floats, it won't be like lead when you bake it. So once your tester guy floats, dry him off, re-spray and then put all the bagels in the fridge for a nice, long rest.
- Refrigerate the bagels for at least five hours and preferably longer, up to about 36 hours. I went with about 16 hours and they were glorious.
To Finish the Bagels
- When ready to bake, preheat the oven to 500F with a rack in the center of the oven. Put your pizza stone in the oven to preheat. You’ll be baking directly on it.
- Heat the water to a boil and add the malt syrup or corn syrup.
- Pull one tray of bagels out of the fridge and leave the other in there.
- Have your baking stone heating in the oven
- Boil the bagels, two at a time, for about 10-15 seconds on each side. I started with the top side up, then flipped so the top side was down. I fished the bagels out of the water with a skimmer, let them drain for a couple of seconds and then flipped them over onto the cornmeal-dusted pan so the top side was up again. Tada!
- Right after boiling, liberally sprinkle the top of each bagel with some of the shredded cheese.
- Once all six bagels are boiled and topped, use a metal spatula to transfer each to the baking stone and bake for 8 minutes at 500F.
- Turn the pan 180 degrees and bake another 8 minutes. You’re shooting for an internal temperature of about 200F, so keep an eye on them. NOTE If you like a bagel with a bit less color, turn the heat down to 450 for the second half of the bake.
- When done, use a metal spatula to remove them from the baking stone to a cooling rack.
- Cool the bagels on the rack for at least fifteen minutes before slicing and serving. I prefer to let them cool all the way so the structure has a chance to completely firm up before slicing and toasting.
- Boil and bake the second tray the same way as the first.
- To keep them very fresh, cool them completely, slice them (or not), and then store them in heavy-duty zip-top bags in the freezer. They thaw in about 25 seconds in the microwave.
Did You Make Any Changes?
Notes
An Easier Way to Shape the Bagels
Poke your pointer finger into the very center of the top of one of your smooth balls of dough. Poke it all the way through and then have your other pointer finger join the first one. Pull your fingers apart and rotate them, gently stretching the dough as you go. I stretched mine out so my fingers were probably 4″ apart. Once you shape the bagel, place it on the sprayed tray and press it down just a bit. Repeat with the rest of the balls of dough.Variations
Leave the cheese out of the basic recipe, and then you have a great bagel dough you can turn into plain bagels, Everything Bagels (use homemade everything bagel seasoning), salt bagels, or poppyseed bagels.Nutrition
Would you like to save this post?
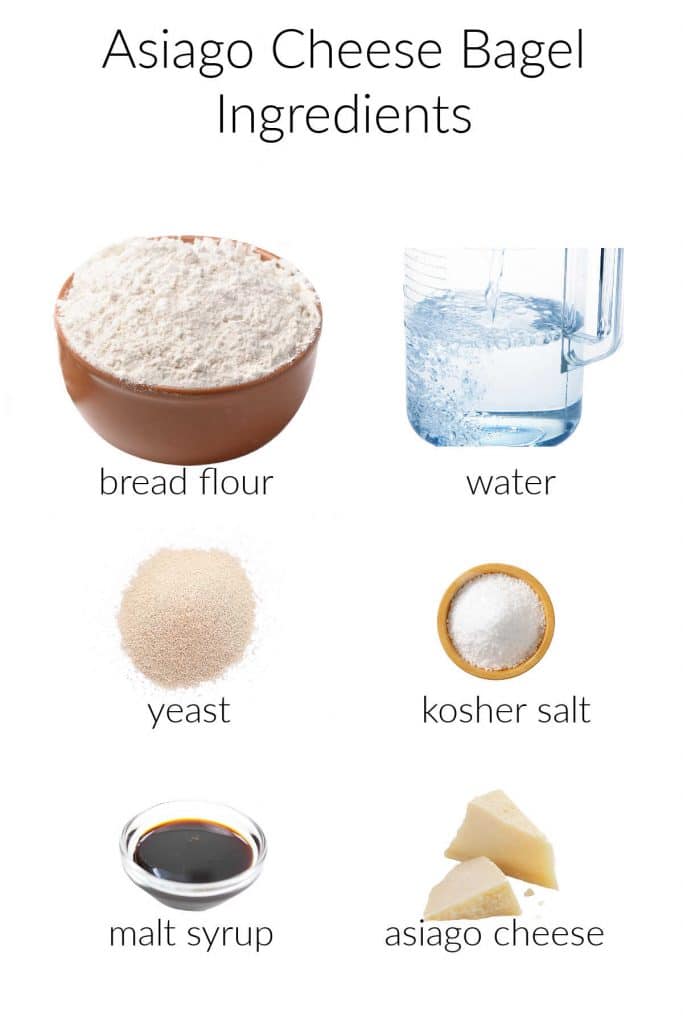
Ingredients
The ingredients for this asiago bagel recipe are surprisingly straightforward. The trick is, you use several ingredients more than once and in different ways.
Still, the list is short:
The Sponge
Making a sponge is easy, I promise.
All you do is mix flour, water, and yeast together to make a thick batter and then let it rise for a few hours.
This gives the flour a chance to start being converted into sugars by the yeast and allows the yeast to eat and happily multiply before being weighed down by extra flour.
The Dough
To make the dough, you use all the sponge you made plus additional flour, a touch of yeast for added oomph, malt syrup (or honey or dark corn syrup), and kosher salt.
The salt adds flavor and moderates the yeast production to keep that dense/chewy bagel texture we love.
And of course, you then knead in the cheese.
The Boil
Aside from bringing a big old pot of water to a boil, add some malt syrup (or honey or dark corn sryup) to the water.
The point of boiling the bagels is to gelatinize the outside of them to keep them from rising more than just a little bit.
This keeps the crumb nice and tight and the texture chewy.
Adding a touch of malt syrup adds the merest bit of sweetness and shine to the crackly bagel crust.
Mixing the Dough
Making the dough is a pretty straightforward process, although there are multiple steps.
Would you like to save this post?
Please, if you are going to make these, I cannot stress enough that you really need to use a heavy-duty
The dough is stiff and your mixer will definitely get a workout!
- mix sponge ingredients together
- allow to rise until very light and bubbly
- mix in additional flour and yeast plus salt and malt syrup
- knead the dough until smooth and supple
- knead in the cheese by hand
- scale out the dough and let it rest
How to Shape Bagels
There are two main ways to shape your bagels. Each method starts the same way:
Scale out your dough into bagel-sized portions (most bagel recipes scaled for home baking make 12, so divide the dough into 12 equal pieces. I weigh the entire amount of dough and then divide by 12, scaling each piece accordingly.
Once you scale your dough, you roll the dough into rounds.
After that, you have two choices:
- either poke a hole in the center of each round, stretching it out well so it doesn’t close up while baking or
- roll each piece of dough into a rope, overlap the two ends and roll them together to make a ring.
PRO TIP: Since poking a hole in the center effectively shortens the gluten strands, rolling the dough into a rope will yield a chewier bagel. Either way will work, but I prefer the traditional method for the chewiest bagels.
I have tried numerous bagel recipes, and BY FAR, yours is the BEST!
Reader Kathy
The slightly crispy on the outside and soft on the inside. Delicious! Thank you!
The Traditional Way
There are a few steps to shaping bagels traditionally, but they’re not hard. Here’s how it goes, by the number:
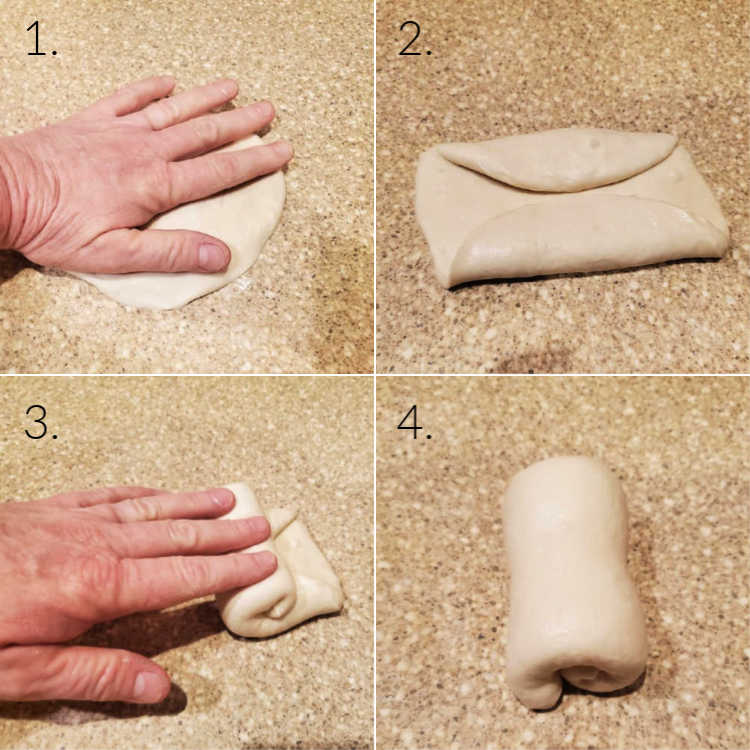
- Flatten each round of dough down, pressing out as much of the gas as you can.
- Fold opposite side of your flattened round in by about an inch, like how you’d start a burrito or an egg roll.
- Tightly roll up the (now) strip of dough.
- Place seam side down.
Perform all of those steps in a row for each piece of dough. Once you’ve shaped them, place them back on your pan-sprayed sheet pan to rest. This will make them easier to roll out in step 5.
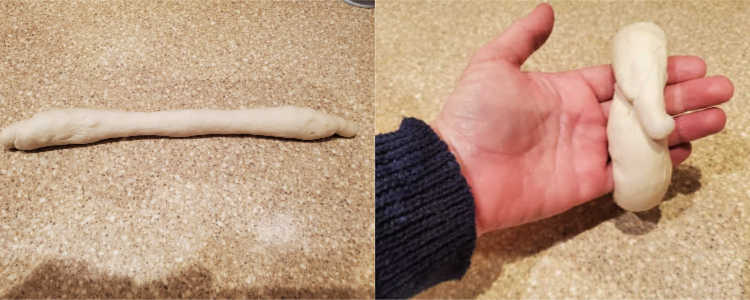
Once all 12 pieces of dough are shaped, take each one, and one by one, roll them out into a snake about 10-12″ long.
Once you have your snake, simply wrap it around your hand, overlapping the ends by about 1-2″ in your palm.
Then, slap your hand, palm side down, onto the counter and roll firmly to make sure the overlapped ends of the dough seal well.
And now, you have proto-bagels!
I was a bit concerned some of mine would Sproing open, but they all stayed nicely together.
Do take time to make sure you roll them firmly to prevent sproinging when boiling or baking.
The Effect of Rising Time
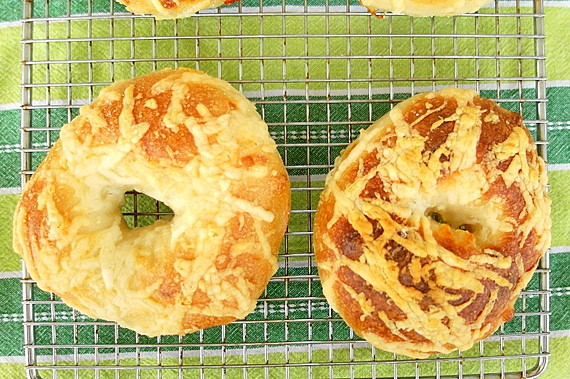
I did an experiment, mainly because I was hungry and didn’t want to wait until the next day to enjoy bagels.
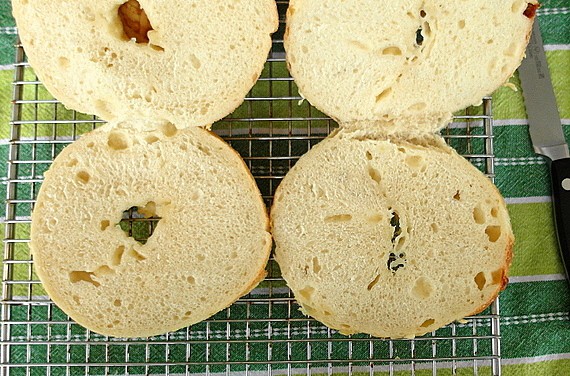
I split the recipe in two and allowed half the bagels a 5-hour rest in the fridge after shaping and the other half a 15-hour rest.
The results? The two batches look almost identical, but the bagels that were allowed a longer rest in the fridge had more chew, definitely.
I wouldn’t sneak either batch to the dog or anything (if I had a dog), but given the choice in the future, I’ll go with the overnight rise.
If you like a less chewy bagel, 5 hours in the refrigerator is more than sufficient.
Even though I preferred the 15-hour asiago bagels to their 5-hour friends, I had no problem enjoying both kinds!
What If I Don’t Have a Baking Stone?
I recommend baking these on a preheated baking stone, letting the stone heat up in the oven for a good 30-45 minutes before baking.
But if you don’t have one, here’s some good news: you can bake the bagels, 3 at a time, in a Dutch oven!
How do I know this? One of my readers, Anthony, asked the question because they didn’t have a baking stone.
I suggested stacking 3 cookie sheets together to have more mass and therefore more heat retention. I didn’t want him to have to do 4 rounds of baking in a Dutch oven, but as he was in a pinch, he went for it, and he said they turned out great.
Note, he made a half recipe, so 6 bagels only required 2 rounds of baking in his Dutch oven. Pretty cool!
Here’s Anthony’s review:
I was in a pinch so I used the dutch oven anyway. They turned out beautiful!
Reader Anthony
I only made a half batch, so ultimately it was two batches in the oven. Not too much extra work.
Fabulous recipe, I shared it with all my family!
If you’re interested in the whole exchange between the two of us, you can find that discussion below in the comments.
Can I Freeze Asiago Bagels?
Absolutely. I like to slice my bagels once they have cooled completely and then store them in a freezer bag in the freezer.
When I want one, I’ll thaw it in the microwave, which only takes about 15-20 seconds, and then open it up and toast it in my toaster oven.
If you don’t take into account all the mixing and rising and whatnot, homemade bagels are the perfect convenience food!
Other Breakfast Bread Recipes To Try
If you’re a fan of a good carby breakfast, give these other recipes a try.
- Whole Wheat English Muffins I made mine with sprouted wheat flour. They are so much better than store bought English muffins. You gotta try them!
- Pancakes for One The recipe doesn’t have any eggs in it, and it’s easy to scale it up to make pancakes for as many folks as want them. But just in case you don’t want to share, a single recipe makes 3 pancakes just for you.
- German Pancakes (Dutch Baby) My version of German pancakes uses potato in the dough for a heartier and more rustic oven-baked pancake. The center is nice and custardy. Seriously tasty.
- Hawaiian Roll French Toast Muffins Perfect portions of Hawaiian rolls soaked in custard, stuck in muffin tins, topped with streusel then baked. Grab one or two for an easy breakfast, or serve them for brunch


Hi, y’all! I hope you’ve enjoyed this post and hopefully also learned a thing or two.
If you like my style, I invite you to sign up for my occasional newsletter, The Inbox Pastry Chef.
Expect updates on new and tasty recipes as well as a bit of behind-the-scenes action. I hope to see you there!

Thanks for spending some time with me today, friends.
Enjoy the asiago bagels. I know you will!
Take care, y’all.


Join in Today!
Some of the BESR homemade bagels. I have tried so many different recipes and none looked as perfect as these do. I made 12, and my 3 kids scarfed them up so quickly, I’m on to making my second batch. This is definitely an award winning recipe.
Oh, wow, Carrie! I am so thrilled these met and even exceeded your expectations! Thank you for letting me know, and enjoy all the bagel goodness! 🙂
If I wanted to go for a longer rise time in the fridge (greater than 36hrs as listed in the recipe), would I need to reduce the amount of total yeast? I wanted a 48 hour rise time, how much yeast would you recommend?
Thank you!
I don’t think I’d push it past 36 hours because you may run the risk of all the yeast dying during the process and being left with a funky off-flavor. If you want a 48-hr rise time, which if done correctly will enhance the flavor and the chew, try making the sponge with about 1/3 of the yeast called for and refrigerating that for 24 hours. Then make the dough with the other 2/3 of the yeast and let it go for 36. I think that should work well for you. Please report back!
Hi! You mentioned that you used diastatic malt powder instead of barley malt syrup. If replacing the malt syrup with malt powder, would you still use 1 tablespoon? Or a different amount? Thank you!
Hi, Katya! Yes, I’ve made it with both the powder and with malt syrup. The difference in moisture is pretty minimal, so a 1:1 sub works fine. Enjoy the bagels, and yell if you have any other questions!
I have tried numerous bagel recipes, and BY FAR, yours is the BEST! The slightly crispy on the outside and soft on the inside. Delicious! Thank you! Can’t wait to try more of your recipes.
Kathy, I’m so glad you like them! You can also leave out the cheese and dip these in Everything seasoning or poppyseeds. Or leave them plain! Glad you found me. Enjoy every bite of bagel, and I’m always around if you have questions about any of my recipes. Take care!
Hi Jenni, I made your Asiago bagels today (with your help and tips). there is nothing like the smell of melting gooey cheese baking in the oven. the bagels are absolutely amazing. Golden brown perfect bagels!
I can’t wait to make more of your recipes
I bow to your golden spatula and your baking excellence!
Thanks
Yay, Christina! I’m thrilled they turned out and that you love them! I love this recipe–I rarely do “replays” of my recipes, but I make this one on repeat. Also, now I need to get a golden spatula! lol
Hello, I usually use the brown eyed baker recipe. Why does her recipe ask that us boil 1 – 2 min per side – longer the chewier and you ask they boil only 10-15 seconds per side? Just curious at the difference.
In addition you only use about half the flour. Will your recipe make smaller bagels?
Thanks
I just finished shaping the bagels and will put in the fridge in 30 min so won’t boil/bake until tomorrow. Thanks!
Honestly, if you boil them any longer than a few seconds, the gelatinization just continues below the surface of the dough. That can lead to a too-thick crust. I boil mine just long enough to gelatinize the very outside of the dough for a thin, crackly crust that still keeps the bagels nice and chewy inside.
Our flour measurements are almost exactly the same. I call for a total of 33 oz bread flour by weight between the sponge and the dough, and BEB calls for 7 3/4 cups by volume between the two. I measure my cups of bread flour at 4/5 oz/cup, for a total “volume of flour of about 7 1/3 cups.
At about 4 3/4 oz/bagel, mine are pretty hefty. You can always scale them at 3 oz each for more but slightly smaller bagels.
I hope that helps. Please yell if you have any other questions–happy to help!
Wow! These were fun to make and to eat! My favorite bagel. I didn’t have malt powder/syrup so I used natural honey in the bagel dough and corn syrup for the bagel boil. I didn’t do the burrito roll up for shaping them. I just measured out 4.5-5 oz each and shaped them into round pillows and poked a finger through. I did the float test too! Very important step to me! I did use the pizza stone and they were perfectly brown! I love the detail in the instructions. I did the window test and they made all the difference. The bagels rested in my fridge for 16 hours. They were the real deal! Dense, light chew. Full of Asiago goodness! Thank you so much for this recipe!
Another recipe to try (but yikes! the carb count!)…regardless, these bagels are my second favorite at Panera. My first favorite (if that’s a thing) are the seasonal cranberry walnut ones! I found a “copycat” recipe for those, but…they’re more a fall thing. I’m going to give these Asiago bagels a try once I get some cheeeeese.
Thanks for the recipe, Jenni!
Yeah, the carb count is nothing to sneeze at, but man are they good! And it is absolutely a thing to have a first favorite and a second favorite! Let me know how they turn out! Oh, and I have made these with cheddar as well, and they turn out just fine, so use the cheese you have unless you are really dying for the “real deal.” The base is also great for any flavor bagel, from plain to everything (which are my favorite!)
I don’t have a pizza stone, my wife and I can’t justify owning one yet.
Our two options would be to use a pan with parchment paper, or cook them 3 at a time in our wide Dutch oven. What do you recommend?
Hey Anthony! I vote a double or even triple stack of cookie sheets if you have them since the greater mass will hold and radiate more heat. I wouldn’t necessarily recommend using the Dutch oven, although if you do it, do it with the lid on. That could be good. I hate for you to have to bake 4 rounds. Honestly, homemade bagels baked on a pan with parchment are going to be better than either no bagels or bagels from the store, so use what you have! I hope you enjoy them!
I was in a pinch so I used the dutch oven anyway. They turned out beautiful!
I only made a half batch, so ultimately it was two batches in the oven. Not too much extra work.
Fabulous recipe, I shared it with all my family!
Oh, I’m thrilled they worked out and that you enjoyed them! Oh, and with 3 at a time, smart to half the recipe. Yay! It’s a great bagel base, so use them to make all your favorites. 🙂
These are my go to order out bagels! Now I can make them at home. YAY!
You’re going to love them! A labor of love but so worth it.
Man, times like this that I hate being gluten free…that looks like the most amazing, ultimate puffy, chewy, dreamy bagel you created.
I wish I could share them with you, Sandi. Surely there must be a great gf bagel out there somewhere…? xo
Oh my these sound wonderful with cheese inside and on top. I love that you experimented with the length of rise time. Sometimes I wonder if it is really worth it. In this case, I guess it is.
I don’t think you’d be able to tell the difference if they weren’t side by side, but if you love a chewy bagel, a longer rise is definitely your best bet!
These look amazing!
Gorgeous, gorgeous bagels, Jenni! Love the color, love the crumb. If only I could grab one off the screen! I, too, was inspired by Panera to take on asiago cheese bagels and I think I also adapted the Brown Eyed Baker’s recipe. You can’t argue with a winner, especially when it gets the stamp of approval from the Bagel Master himself.
Yes, Ma’am, I’m now in love. What a treat these would be for everyone.
I ouched at the thought of the guy with burning soup in his glove. Owie!
It was pretty bad, Maureen. Poor guy. I would definitely make these again, although next time, I think I’ll let them hang out in the fridge for even longer and shape them as closed ropes rather than poking a hold in the middle for even *more* chew! =)
Excellent work Jeni! Wonderful photography, and a great story!
Thank you so much! I’m so glad you stopped in and left a comment from G+! =)
Oh Jenni, I just want to eat that cheesy crust! Congratulations on your first bagels. They are spectacular! I also love the stories of your first restaurant experiences.
Thank you very much! Yay!
Next time I make bagels, I’ll do the rope method. I think you are completely right about longer gluten strands. These guys–especially the 15 hour ones–were already really chewy. Can’t wait to get a load of the chew on a rope bagel, Karen!
Cheese and bagels are an unbeatable match! Yours look delicious
The only problem? It’s hard to know what to put on them since they’re already so cheesey. More cheese somehow seems wrong and right at the same time, Sophie! lol
Asiago cheese in the bagel AND on the outside! Cheese Heaven!
No such thing as too much cheese, Cindy! lol
What an interesting life you have had….what are you going to be now that you are all grown up? Your bagels look wonderful.
That is a very good question. I’m not so sure, Wendy! lol =)
I’d never made bagels before this too, yours look brilliant! I love your cheesy theme, I’d love to eat with hot with marmite, yum!!
I’ve never had marmite before, although I have tried vegemite. My friend Julie loves it on a bagel–just a thin scraping on a buttered bagel. And cheese makes everything better! =)
You got me at asiago, one of my favorite cheeses. Your bagels look fantastic!
Thanks Tara! We are enjoying every mouthful! =)
Yes! I love these bagels at Panera and love the thought of making the same ones at home. Yours look so nice!
Thanks so much! This was my first bagel attempt, and it won’t be my last. They were so good, Holly!
Panera was the first thing I thought of when I saw that you were making these! Yours came out wonderfully, and toasted up perfectly! I’m not sure if I can wait to make these myself, I might have to head to the Panera a few blocks away today…
I will trade you some asiago bagels for some of those simit, Adam! Nice you have a Panera so close so you can curb your cravings when they come up!
So if it floats, it’s a witch and I should burn it at the stake? How about I just bake it till it confesses to being deliciously golden brown and cheesy?
These are gorgeous, Jenni, and I love hearing about former jobs! I could just see you punching that Panera screen. I’ll bet the customers adored you.
P.S. Holy crap! 500°F! I can barely coax my oven up past 420°F on a good day. I need a better oven.
Yeah, 500F is as high as mine will go, and the smoke detector went off a few times. Very exciting!
I think baking is probably preferable to burning. Usually anyway! =) Some of the customers liked me very much. Others, not so much. That’s okay, though. It was very…interesting…working with the public in that way. It was a good experience, but I don’t think I’d ever do it again. Especially since I can just bake my own bagels!
what a great last photo of them toasted too! Now I need to go get some. Wished you could blink one to me. my favorite by far so I guess I am in that pool of people who love this kind! 🙂
It’s hard not to love an asiago cheese bagel, Claudia! I mean, what’s better than bread and cheese? Not much! I would blink them to you if I could! xo
I couldn’t wait to read all about these bagels and get the recipe after seeing all your teaser photos about them. They are fantastic!
I’m just getting ready to make the rounds myself, Renee! Nothing like bagels (and bagels and bagels) and coffee in the morning!
These look amazing! I love any bagel with cheese on it and I can’t wait to try these
Sometimes I want a nice, lean bread. Not this time! LOL Thanks for this challenge, Heather. I really enjoyed it (and we are enjoying the Mess out of the bagels)!
Wow I love the addition of Asiago That is m favorite cheese.
Thank you! Those Panera people are diabolical in the best way. Love these cheesy bagels! The aroma and flavor of the Asiago really comes through in these bagels–they’ll be right up your alley. =)