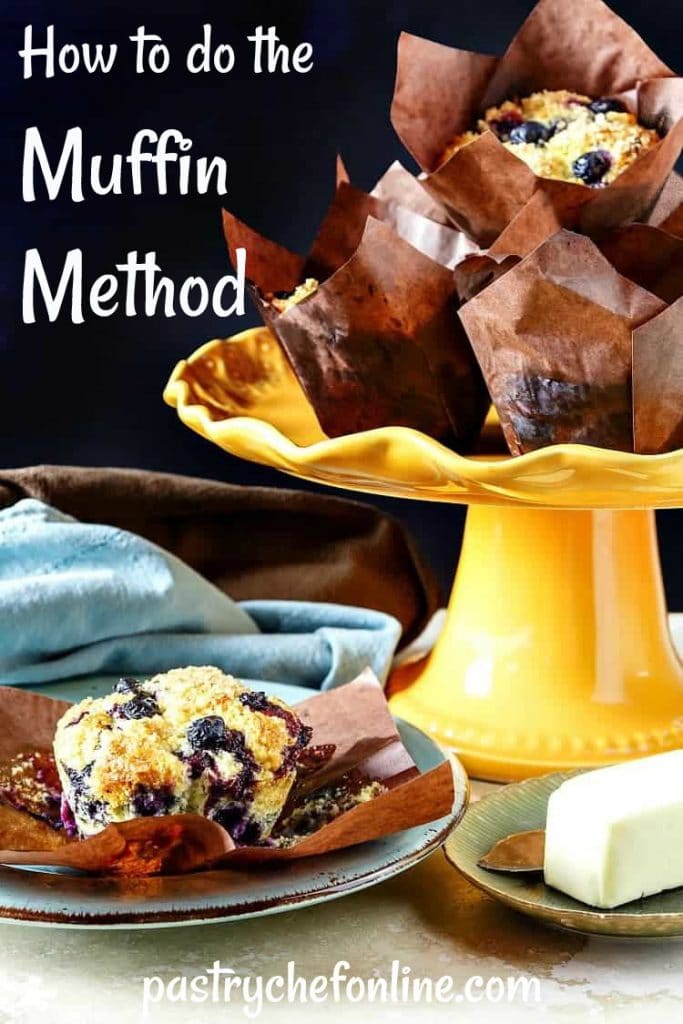
Today, we’re talking about how to do the muffin method: what it is, the steps, examples, and more. There’s even a video for you to watch to learn the steps in the muffin mixing method.
Settle in, friends, because I’m not only going to teach you how to make muffins (and quick breads and pancakes) but also help you understand why we make them using this method. Let’s go!
You can find all my mixing method posts in one place. And don’t miss all my muffin and quick bread recipes. Thanks for stopping by!
Pastry Chef Online Participates in Affiliate Programs. If you make a purchase through one of my links, I may earn a small commission. For more information click to read my disclosure policy
The Muffin Method Mixing Method
Here’s another one of those basic mixing methods that can really mess us up. Sure, the muffin method sounds like a day at the beach:
- Dry in one bowl.
- Wet in another.
- Wet in dry.
- Stir, stir, stir.
- Bake.
But like with many things that seem easy and straightforward, there are ways you can trip up.
And I don’t want that to happen to you.
What Is the Difference Between a Muffin and a Cupcake?
The main differences are that muffins:
- use liquid rather than solid fat (oil or melted butter)
- less fat than cupcakes
- less sugar than cupcakes
- can have lots of mix-ins
- are not necessarily frosted
If you try to use The Creaming Method (which is how most American-style cakes and cupcakes are made) to make a muffin recipe–to be clear, a muffin recipe written as a muffin, with relatively little fat and low-sugar, etc–you won’t be able to build up a viable batter because there is too little sugar and fat to cream together to have it hold onto the eggs and dry ingredients without breaking.
So muffin recipes that are written to be made using the creaming method will generally have more fat and sugar in them than traditional muffins.
This makes them cupcakes and not muffins. If you’re going to make a muffin, just make a muffin.
Don’t get me wrong. I enjoy a good cupcake, but when I want a muffin, I want that tender, almost fall-apart consistency, and I want it lean enough (low enough in fat) that I can slather it with butter and jam without feeling too guilty.
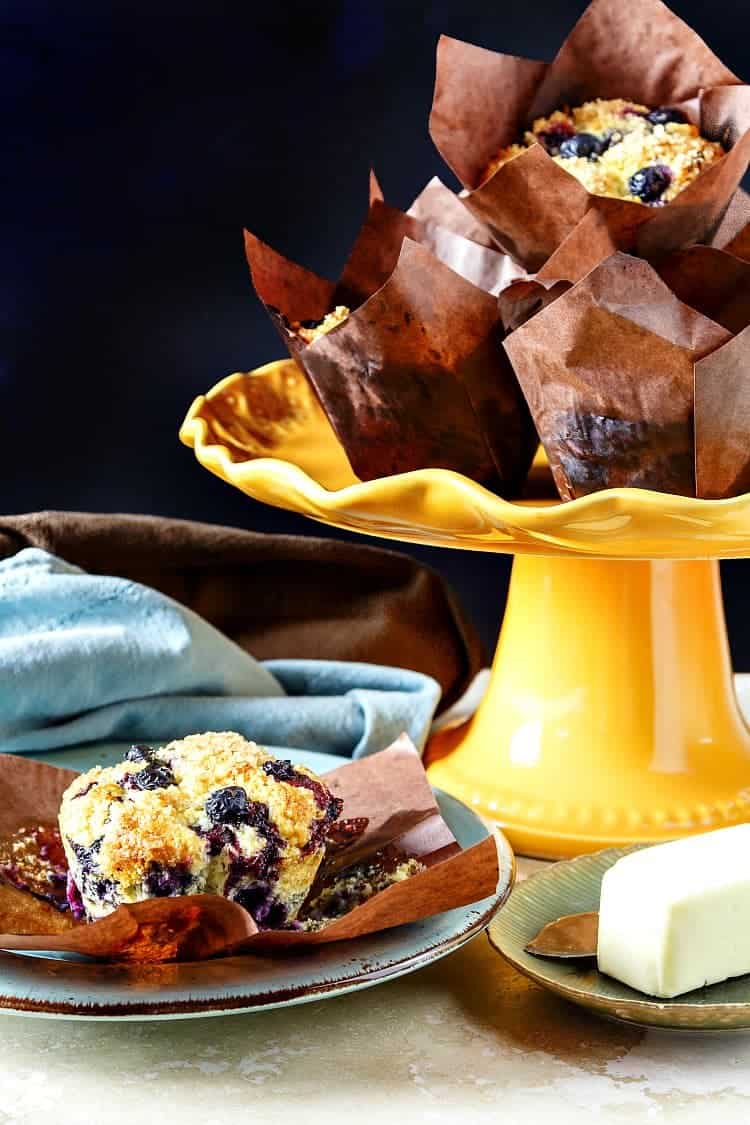
For example, these chocolate cherry buttermilk muffins. A great example of the power of the Muffin Method!
So, let’s forget the creaming method for muffins and focus on making lean, tender muffins the “right” way!
What Else Can I Use The Muffin Method For?
This is the right mixing method to use if:
- The fat content is relatively low and is in liquid form (oil or melted butter)
- The sugar content is relatively low
- The amount of liquid is relatively high
Recipes that check those boxes are generally quick bread coffee cakes like this brown butter blueberry buckle, pancakes, banana bread, and other classic quick breads like cornbread.
How to Do the Muffin Method
Here are the steps for performing the muffin mixing method. This is a method you do not want to use the mixer for.
Trust me, as much as you love your
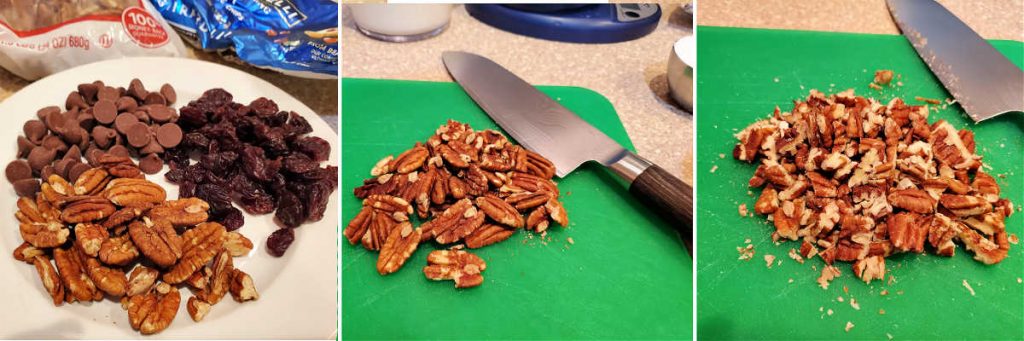
The before step: If you’re using mix-ins, toast any nuts, measure everything out, chop any mix-ins that seem too big, and have them ready to go.
1. Whisk the dry ingredients–low-protein flour (White Lily is a nice one if you’re in the southern US, or use cake flour) together with salt, sugar, leavenings and any spices–together in a large bowl.
Whisk your dry ingredients together very well. You are looking for even dispersal of the salt and leaveners. Sifting doesn’t necessarily do a great job of this, so whisk all the dry together thoroughly, for at least 20 seconds. More would be good.
To be extra sure, sift and then whisk.
2. In another bowl or a large liquid measure, combine all the wet ingredients–dairy (milk, cream, 1/2 and 1/2, sour cream, creme fraiche), eggs, liquid fat, liquid flavorings.
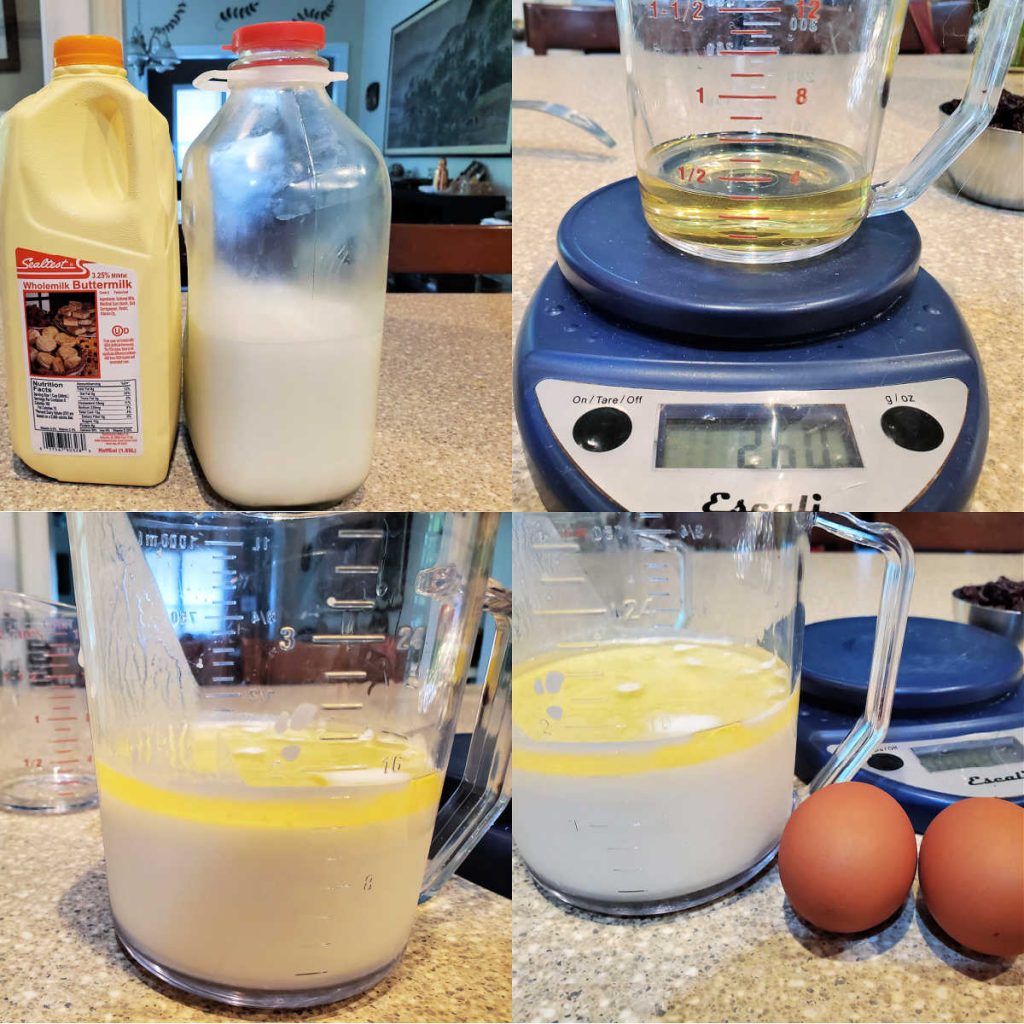
Notice I said “liquid fat.” This is one of the points where the muffin method differs from the creaming method which relies on creaming solid fat and butter together to help with leavening.
When you add the fat to the liquid, you want to make sure that all of the liquid ingredients are at room temperature.
You want the fat to be evenly dispersed throughout the batter. For this to happen, you’re going to have to have the rest of the wet ingredients warm enough that the butter won’t turn hard on you the moment you pour it in the measuring cup.
3. Pour the wet on top of the dry and fold them gently together.
Let’s take a moment to really look at what’s going on here.
You’re trying to mix a lot of water-type ingredients together with flour that hasn’t been coated with fat. Remember, in the two-stage mixing method, we coated our flour with a good amount of fat to inhibit gluten formation. Here, we don’t have that luxury.
In the muffin method, we are pouring a ton of wet ingredients on poor, defenseless flour. How do we keep from having dense, chewy muffins, then?
- we’re using a low protein flour, so that’s a good thing–low protein equals less gluten formation.
- When mixing wet into naked flour with the intention of producing a tender muffin, easy does it. You really just want to fold the ingredients together, making sure that you limit agitation as much as possible.
Alton Brown says to stir for a count of ten, but your ten and my ten might be different. I say:
Fold the ingredients together until all the flour is off the bottom of the bowl and you don’t have any big pockets of flour floating around in your batter.
NOTE: Stir in your mix-ins before you get your batter completely mixed. This will help make sure you don’t overmix.
The batter will be somewhat lumpy, and it will be much thinner than a batter made with the creaming method, but you’ll just have to trust that it’ll be okay.
At this point, if you are leavening with baking powder, you can let the batter sit for 15-20 minutes. This gives the flour time to properly hydrate.
It will sort of magically finish mixing itself. Double-acting baking powder gives some rise when it gets wet and then some more when it gets hot, so your muffins will still rise in the oven, even after sitting out for a bit.
If the recipe only calls for baking soda, skip the resting step, as the bubbles are all given up when the soda gets wet.
With recipes that only call for baking soda, you want to get those little guys in the oven as quickly as possible before the chemical reaction stops.
4. Scoop your batter into well-greased (or paper-lined) muffin tins. Fill the cavities about 80% full.

5. Bake at a relatively high temperature–425F is a good place to start.
So, why this high temperature?
To me, and to lots of folks, muffins are defined by their crowns–their majestic peaks.
In order to get this to happen, you have to bake at a high enough temperature that the edges of the muffin set pretty quickly.
Would you like to save this post?
Picture it as the batter setting in concentric circles, from the outside, in, and as each “band” of batter sets up, the remaining batter will continue to rise.
The last to set is the very peak. If you bake at a lower temperature, you will end up with something that looks more like a cupcake rather than a peaked muffin.
If you like them that way, go for it, and bake at a lower temperature. Just wanted you to know the “why” behind the peak.
6. Remove from oven. Cool in pans for about ten minutes, and then turn out to cool completely–or not. You could just go ahead and eat one.
What About Mix-Ins?
One of the joys of a great muffin is the mix-in possibilities. They are pretty limitless, whether you want to add just one mix-in or a mixture of harmonious flavors and/or contrasting textures.
Here are some ideas for stand alone additions as well as likely combinations of flavors.
Single Mix-Ins
- Nuts (peanuts, pecans, walnuts, cashews, etc)
- Dried fruits (raisins, apricots, apple, dates, figs, etc)
- Small whole fruits (blueberries, raspberries, currants, etc)
- Diced fresh fruit (strawberries, large blackberries, apple, mango, pineapple, peach, etc)
- Chocolate chips (dark, milk, white, or chopped chocolate bar of any type)
- Other Chips (toffee, peanut butter, etc)
- Miscellaneous (cocoa nibs, shredded coconut, etc)
Combination Flavors
Broadly, this can mean:
- Nuts and chocolate (dealer’s choice!)
- fruit and nuts
- fruit and chocolate
- fruit, chocolate, and nuts
More specifically (and these are just off the top of my head):
- chopped mandarin orange, chopped pineapple, and coconut
- chocolate chips and peanut butter chips
- chocolate chips and hazelnuts
- chopped fresh peaches and pecans
- apple (and/or pear) and walnuts
- chocolate and cherry
- a mixture of stone fruits (cherry, apricot, peach) and almonds
- and pretty much the sky is the limit
Three Rules for Muffins Mix-Ins
- The maximum amount of mix-ins per 12 standard sized muffins is about 2 cups. Any more than that, and your muffins may not hold together very well.
- If you’re going to use nuts, please toast them first. They’ll have more flavor and a crunchier texture. I toast mine in the toaster oven for about 4 minutes, but watch them carefully so they don’t burn.
NOTE: You have more leeway if you toast the nuts whole before chopping them rather than trying to toast them once they’re chopped. More surface area means they will burn more easily. - As much as possible, have all your mix-ins the same size. You don’t necessarily want to bite into a whole Brazil nut or a big old fig. If you are using mix-ins of different sizes, chop the larger mix-ins to roughly match the size of the smaller ones.
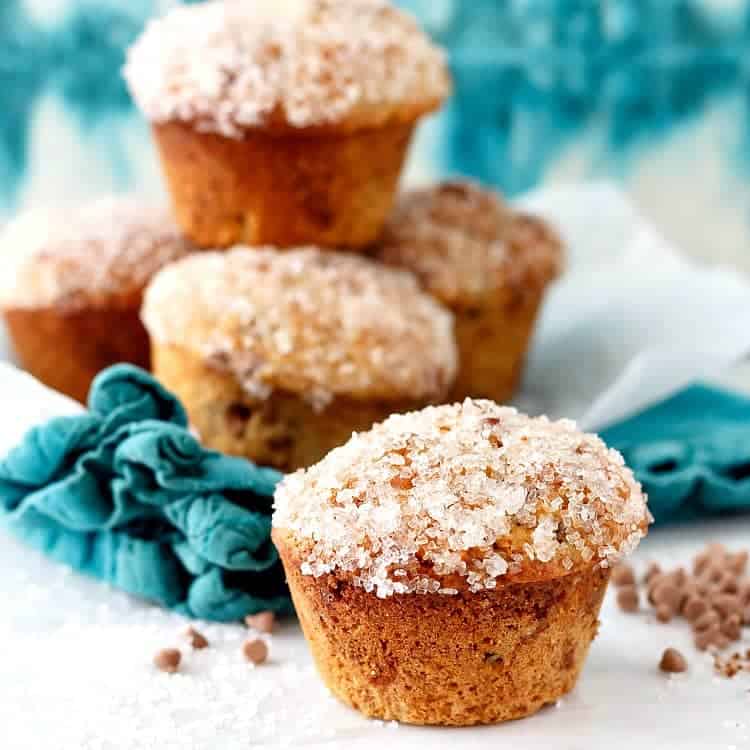
For example, in my chocolate chip, cherry, and pecan buttermilk muffins, the pecans are larger than the cherry pieces and chocolate chips, so I chopped the pecans so they were all of similar size.
What To Look for In a Great Muffin
After you’ve baked your muffins, you can test yourself to see if you’ve done an Excellent Job with this mixing method.
- Cut or break a muffin in half, right down the middle, from peak to bottom.
- Look at the crumb. It should be fairly coarse but moist.
- It should also be very uniform. If you have little tunnels running up through the muffins, you know that you were a little too exuberant in your mixing.
- The tunnels show the path of air bubbles as they passed through the batter and were caught by sheets of gluten. The gluten then sets in that bubble-path shape, a silent reminder of your enthusiastic mixing.
- Tunnels are a sure sign of over-mixing your muffin batter.
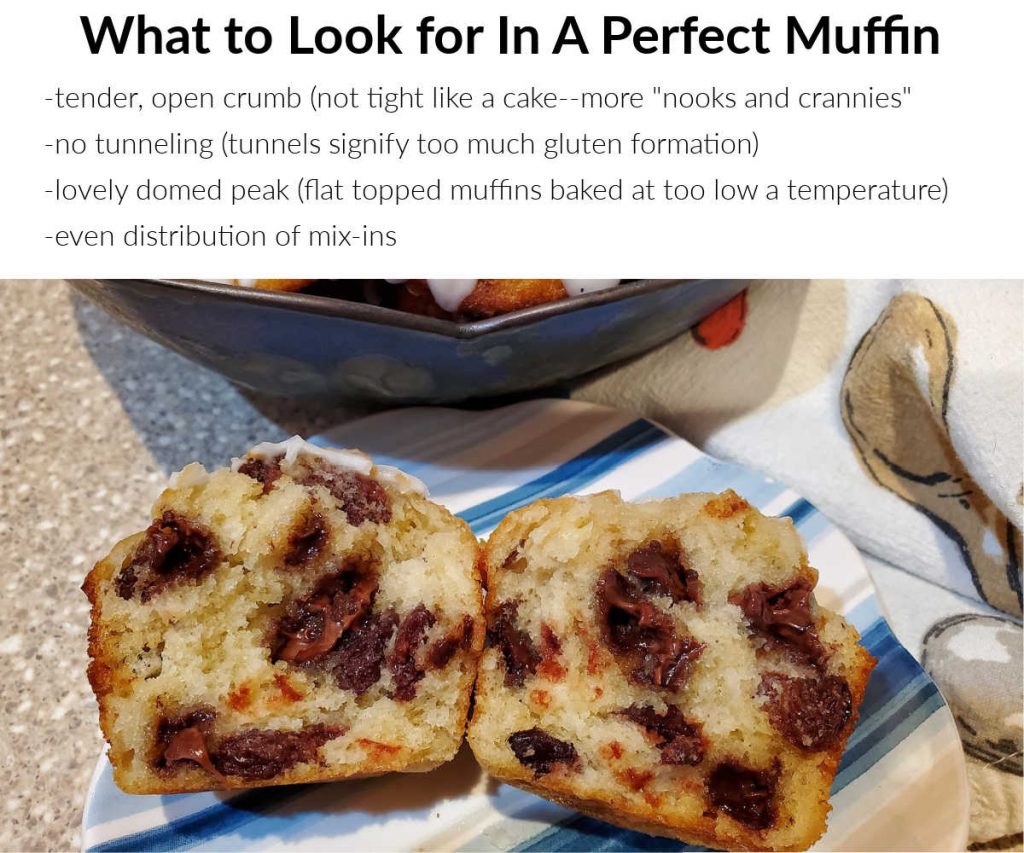
Aside from the crumb, pay attention to the shape of your muffins. They should rise high and be domed on top, like non-craggy mountain peaks.
If your muffins are flatter on top, most likely either:
- your leavening was out of date or
- your didn’t bake in a hot enough oven.
You’ll also want to check that your mix-ins are evenly distributed throughout your batter.
Pro-Tip
If you are concerned that your mix-ins might all fall to the bottom, only mix them into about 2/3 of the batter.
Then fill the muffin cups about 1/4 of the way with plain batter and top them all off with the batter containing the mix-ins.
That will give you a bit of a buffer to help ensure that your mixins stay suspended. I learned that trick from Stella Parks over at Serious Eats.
The Muffin Method Recap
- Whisk dry ingredients together thoroughly.
- Have all wet ingredients at room temp. Not the creaming method’s magical “cool room temperature,” because you’re not worried about the butter remaining plastic–it’s already melted. By room temperature, I’m talking around 75F.
- Fold gently. Stop before you think you’re finished.
- If you’re adding mix-ins, be sure to add them while there is plenty of loose flour in the batter so you are extra sure not to over-mix.
- Let the batter sit (baking powder only).
- Bake at a relatively high temperature.
I baked a batch of blueberry muffins using ‘The muffin method’ and they were quite simply the most delicious muffins I have ever tasted! I gave some to a friend and she said the same.
Muffin Maker Jane
What Size Should I Make My Muffins?
The keen thing about making muffins is that you can make them in all sorts of sizes–mini muffins, regular muffins or jumbo muffins. Pans are readily available, too, which makes it easy to get started.
Jumbo muffin tins hold anywhere between 2 and 3 times the amount of batter as regular muffin tins. My recipe for 6 jumbo blackberry muffins will fill between 12 and 18 regular muffin tin cavities.
I don’t recommend baking muffins in silicone muffin tins.
While they won’t stick, which is great, they also don’t brown since silicone is such a good insulator.
Muffin Method Q & A
The main challenge of the muffin method is mixing the wet ingredients into the dry ingredients without activating too much gluten. This is especially challenging with traditional muffins which contain relatively little sugar and fat that would help tenderize gluten.
The main leavener in muffins is carbon dioxide bubbles which are produced by chemical leaveners: either baking powder and/or baking soda. Baking powder reacts with liquid and heat to create bubbles. Baking soda reacts with acids to create bubbles.
Making a well in the dry ingredients just means using a spoon or whisk to make sure that your dry ingredients are higher on the sides of your bowl and have a depression in the center. This depression leaves a place for you to pour your wet ingredients. Then when you start folding the two together, the flour around the edges will naturally fall into the center and on top of the wet ingredients. This helps you mix more quickly while still being gentle to inhibit gluten formation.
Muffin batter is generally fairly thick and can be somewhat lumpy. Not just from the mix-ins, but also from little pockets of flour. If your muffin batter is too smooth, it probably means you have overmixed it.
Overmixed muffins will bake up dense and chewy. They may also have lots of little tunnels in them. The tunnels form as the bubbles in the batter work their way up and out of the batter during baking. The gluten ends up getting u0022pushed asideu0022 and then holds the shape of the bubbles as they pass.
If you are leavening your muffins with baking powder or a mixture of baking powder and baking soda, you can let the batter sit out for about 20 minutes. This will help make sure your flour is nice and hydrated before baking. If you must, you can even refrigerate baking powder-leavened muffin batter overnight and then scoop and bake the next day. If, however, the only leavener is baking soda, you need to get them in the oven as soon after mixing as possible so you don’t lose all the bubbles.
Fill muffin cups 80% full. Sometimes, especially with thick batters, I fill them almost completely full. To fill muffin cups without making a mess, either mix the batter in a batter bowl with a spout or scrape your batter into a pitcher. Alternatively, you may fill your muffin cups with a portion scoop or an ice cream scoop.
You’ll know your muffins are done when they are firm and dry on top and have nice rounded peaks. They should be a lovely golden brown. If you take the internal temperature, you’re looking for about 200F.
Allow muffins to sit about 5-10 minutes before removing from the pan to cool completely on cooling racks.
After allowing your muffins to cool for 5-10 minutes in the pan, I like to use a small, tapered spatula or even just a butter knife to lift up one side of the muffins so I can then grab them and remove them to a cooling rack.
No. All the bubbles from the leavener will have long since dissipated, so if you have a doughy center, you’ll just end up with a dense, baked center. To make sure your muffins are baked through, take the internal temperature. If they are browning too much before they’re done in the center, loosely tent the muffins with aluminum foil during the last few minutes of baking.
Questions?
If you have any questions about this post or recipe, I am happy to help.
Simply leave a comment here and I will get back to you soon. I also invite you to ask questions in my Facebook group, Fearless Kitchen Fun.
If your question is more pressing, please feel free to email me. I should be back in touch ASAP, as long as I’m not asleep.
A Note About Measurements
My recipes are almost all written by weight, including liquids, unless otherwise specified.
For accuracy and consistency of results, I encourage you to buy–and use–a kitchen scale.
I promise that baking and cleanup will be so much quicker and easier.
This is the scale that I recommend for home use. I have owned and used one for years.
It helps me and other readers so much if you take a moment to rate and review this recipe.
Your star rating and comments help others decide whether the recipe is worth making, and your feedback helps me continue improving recipes here at Pastry Chef Online.
Other lovely ways to share include pinning or posting on your favorite social media platform.
Thank you so much for taking the time!


Basic Muffin Recipe
Video
Equipment
Ingredients
- 8 oz low protein flour ( 2 scant cups) such as cake flour, pastry flour or White Lily flour
- 3.5 oz 1/2 cup granulated sugar
- 2 ½ teaspoons baking powder
- ½ teaspoon fine sea salt
- 1 large egg at room temperature
- 6 oz 3/4 cup whole milk at room temperature
- 2 ½ oz 5 Tablespoons or a little over 1/2 stick butter, melted and cooled to barely warm
Instructions
- Position a rack in the center of the oven. Preheat oven to 425F.
- Line a 12-cavity muffin tin with paper liners or spray lightly with pan spray. Set aside.
- Whisk together the dry ingredients in a large bowl–flour, sugar, baking powder, and salt.
- Whisk together the wet ingredients in a small bowl–egg, milk, and melted butter.
- Make a well in the center of the dry ingredients. Pour in the wet, and stir/fold until mixed but still a little lumpy.
- Allow the batter to sit for about 10 minutes, then portion out using a disher (ice cream scoop).
- Bake until well risen, nicely peaked, and deep golden brown on top, 15-20 minutes. Look for an internal temperature of 200-205F.
Did You Make Any Changes?
Notes
- Flavor the batter with citrus zest, spices, extracts, and/or herbs.
- Mix in up to 2 cups of inclusions: fresh or frozen fruit (don’t thaw frozen fruit), nuts, raisins, chocolate chips, etc. Toss together with the dry ingredients right before adding the wet ingredients. Use a mixture of inclusions to equal 2 cups. For example, 1 cup fresh or frozen cranberries, 1/2 cup chopped oranges, well drained, and 1/2 cup toasted pecans
- Top muffins with sparkling sugar or a simple streusel.
Nutrition
Would you like to save this post?

Hi, y’all! I hope you’ve enjoyed this post and hopefully also learned a thing or two.
If you like my style, I invite you to sign up for my occasional newsletter, The Inbox Pastry Chef.
Expect updates on new and tasty recipes as well as a bit of behind-the-scenes action. I hope to see you there!

Now, go make some tender muffins using the muffin method. No tunnels.
Thank you for spending some time with me today.
Take care, y’all.


Join in Today!
Do you have to let my batter sit for 10 mins? Is it a necessary step?
Hey Rhylee. While not strictly necessary, the rest, which you can give up to 30 minutes if using baking powder, will give the flour a chance to completely hydrate and for the batter to thicken and lighten with bubbles. It also makes the batter easier to scoop into your muffin tins because it gets very thick.
I baked a batch of blueberry muffins using ‘The muffin method’ and they were quite simply the most delicious muffins I have ever tasted! I gave some to a friend and she said the same.
Thanks for this great muffin tutorial! I love understanding how and why the science works.
Hi, Kate! You are very welcome–I love this kind of information, too, and I am happy to share it!
The last two muffin recipes I used called for sour cream and only baking powder as the leavener. While the flavor was great and they were very moist (berry muffins), the texture was more like very moist banana bread. I thought I was being very cautious about overmixing. I’ll have to check the ratio of flour (used AP flour) to baking powder but any other ideas of what may cause this? I baked the first batter soon after mixing. Read about refrigerating batter but didn’t have the patience to keep in the fridge overnight; refrigerated about 45 minutes but still the same result. I will be trying your recipe tonight just as written but am curious to find out what may have created the issues with my other two attempts.
Hey, Deb. I’d have to see your complete recipe to form any opinions on why your muffins had a different texture than what you were expecting. Off the top of my head, it sounds like it was a higher-suger recipe. Since sugar is hygroscopic, the more sugar, the moister the result. For me, a “true muffin” is relatively lean and is relatively low sugar and bake up with a drier and loose crumb, perfect for slathering with butter and jam. Let me know how this recipe does for you and check your amounts of sugar and fat against my basic recipe and see how the two stack up.
Thank you for all those tips and explanation. Wow! I learned soo much. Made banana muffins and they domed beautifully! Wow! I had a recipe very similar to yours but they indicated 350F. I put it at 425F as you indicated and that was it! Shared your recipe with my family in France with your tips. I am going to look at other recipes on your site. Can’t wait. Thank you, thank you thank you.
Hi, Nathalie! I’m so pleased my muffin tips helped you and that your banana muffins rose to great heights! I’m glad you found my site. Please don’t hesitate to get in touch if you have any questions!
this is truly useful…Thanks a lot for sharing !!!!!!
You’re more than welcome. Understanding how and why to use each mixing method is fundamental! So glad you found this helpful!
This was a very informative and comprehensive explanation on the muffin method, I learned a lot. I mostly make whole grain(whole wheat flour) muffins because that’s better for my Crohn’s. How much more liquid should I add to the batter to make sure the muffins are moist? Should it be in the form of more oil? Or some Greek yogurt or milk? For example, how would you change your basic muffin recipe using whole wheat flour? Thanks!
Hey, Becky! Glad you found the post helpful! Whole wheat flour is a bit “thirstier” than refined flour for sure. I’d add an additional 2 teaspoons to 1 tablespoon liquid per cup of flour. In the base recipe in the post, for 8 oz whole wheat flour, I’d increase the milk by 2 Tablespoons. You could also use a bit less of the whole wheat flour and leave the liquid measurement the same. I haven’t done the conversion on that, so I don’t really know how much less you would have to use, but it is definitely worth experimenting with. I hope that helps at least some. 🙂
muffins are so good I love them I wish they had timtam and minteslice and Maltese muffins 😀
Once you know how to make muffins, you can put anything you want in them! =)
Hi there , I find very good article , but I have a guestion , when we bake the muffing at 400 f , how long should we bake ?? 10-15 min ??
Thank you
It depends on a lot of factors: how dense your batter is, how accurate your oven is, what size muffins, etc. That’s why I often hesitate to give a solid answer. The glib answer is “until they’re done,” but it’s also true. I would give them a good 10-12 min and then check them and go from there. They could take as long as 20-ish minutes. I wish I could be more specific, but there are just too many variables. The good news is that once you figure out how long it takes in your oven, that can be your new target time.
I made 2 dozen Blueberry Banana Oat muffins this morning…tasty, but pretty darn flat. I found this post and decided to try your recipe right away. This time I made Chocolate chip muffins, what a difference! I doubled your recipe but only had about four oz of milk..made up the difference with 6 oz of greek yogurt and a little water. They turned out beautiful! Can’t wait to fiddle with it some more! Thank you!
I’m so glad it worked out for you, Suzanne! Enjoy your experimentation and your lovely peaked muffins!
Woops I left a a defunct email address in the previous post. Please use this one instead.
I’m interested in the difference between using baking soda or baking powder. Why would a recipe call for one over the other in muffin recipes ….the effects etc.
If you look at my post on leaveners, that will give you the basics: http://www.squidoo.com/bakingandpastry#module12253950 Baking soda is the actual leavener in both soda and powder. The powder is soda plus an acidic ingredient to balance the pH of the batter. Basic rule of thumb is to use baking powder as the neutral leavener and also baking soda to balance any acidic ingredients, at the rate of about 1/4 teaspoon per cup. Acidic ingredients that would need soda to balance them out include coffee, buttermilk, yogurt, sour cream, molasses/brown sugar (if enough if used), etc.
Thank you so much for your well written information. Very helpful!
I am iinterested in making whole grain muffins with whole spelt and whole wheat flour.
Can I still expect to get a crusted top with these? Have you any tips or guidelines for baking muffins with whole grains?
Also if I simply replace milk with soy, rice, or almond milk to make it non dairy would that work?
Thanks
Chaya
Hi, Chaya! Glad you found the post helpful!
I don’t do much baking with whole grain/whole wheat, so I don’t really know how to advise you there. I think that to get the nicest texture/peak, you may have to only sub about 30% of your total flour for whole grains.
As to the milk, generally speaking, you should be fine to sub in coconut milk, soy milk, etc for the dairy. There may be a bit of a difference in texture, but it should be minimal.
Hi, I recently made pumpkin pie and had about 2.5 cups of leftover mix. The site suggested making pumpkin bread or muffins with the remaining mix but didn’t give instructions so I followed a suggestion in the comments and mixed together baking powder and flour. Then I added some oil to the liquid mix and mixed the dry in with the wet. The batter seemed a decent consistency but the muffins turned out very dense and undercooked even though I cooked th over 25 minutes. I did bake them at 325 because my pie was still cooking. Emma’s the oven way too low? Was there another issue? I’d appreciate any insights you might have!
*was my oven
First of all, yay for you for just going for it! When I want to try something new (to me, anyway), I do some research and find some recipes that are similar to what I’m going for to look at proportions of ingredients. Off the top of my head, it sounds like you needed more leavening and a higher temp. Muffins generally bake in a hot oven–maybe 425F or so, so the slower rise probably made for a denser muffin. How was the flavor, otherwise? For me, the flavor is the thing, so if that part is good, you’re more than halfway there!
Hi Jennifer,
Thank you for taking the time to respond to my question. The muffins were pretty bland. I’m going to do some research as you suggested because the pie came out so well I’ll make the recipe again, which means another try at the muffins!
Hopefully it’ll go better this time. Do make sure you’re using a reasonable amount of salt in them. All desserts need it, but pumpkin *really* needs it to perk up the flavor. =)
Thanks so much for a delicious and perfect muffin recipe! As an avowed health nut (who, unfortunately still has a sweet tooth and a desire for that irresistible crunch of muffin tops) I switched out the flower for King Arthurs White Whole Wheat flour (it’s the best WWW out there!) and put in a quarter cup of Extra Virgin Olive Oil as my fat, but it still was delicious!
Brilliant tips, beautiful explanations and delicious muffins!! (how much better can you get?)
Oh yay! I am so glad it worked out for you, and I’m really happy to know that my post was helpful to you. Thank you so much for stopping in and commenting, and enjoy the muffins! (and if you’re feeling very healthy, add some flaxmeal to some streusel topping)! =)
Hello,
The recipe below produces what seems to me to be cupcakes – not muffins. The look of the crumb looks like cake, I swear. The cakes turn out very good. Still, there is no creaming method involved. Would you say the method in this recipe is the “muffin method” anyway?
Thanks!!!
Chris
Vanilla Cupcakes:
1 1/4 cups cake flour
1 1/4 teaspoons baking powder
1/2 teaspoon baking soda
1/2 teaspoon salt
2 eggs
3/4 cup sugar
1 1/2 teaspoons pure vanilla extract
1/2 cup oil (vegetable, canola or extra light olive oil)
1/2 cup buttermilk
Directions-
* Preheat oven to 350*F.
* In a medium bowl, add cake flour, baking powder, baking soda and salt. Stir together with whisk, and set aside.
* In the bowl of an electric mixer, add eggs and beat 10-20 seconds. Add sugar and continue to beat on medium speed about 30 seconds. Add vanilla and oil, beat.
* Reduce mixer speed to low and slowly add about half of the flour mixture. Add half of the milk, then the rest of the flour and the rest of the milk. Beat until just combined. Scrap down the side of the bowl.
* The batter will be thin. Pour batter into a muffin pan prepared with paper liners. Fill liners about 2/3 full.
* Bake cupcakes in pre-heated oven for 12-14 minutes.
Very helpful information. Thank you!
How do I change this recipe if I want to make chocolate muffin?
Well, this post is really more about the technique than the recipe. But, if you want to play around with turning this into a chocolate muffin while keeping the mixing method the same, you can start by subbing in cocoa powder for a portion of the flour (equal substitution, by weight). Maybe start with 1.5 oz of cocoa powder and 6.5 oz of flour to start with. You could also consider subbing part buttermilk, part coffee for the milk called for in the recipe. The buttermilk will play well with the cocoa and the coffee will reinforce the chocolate flavor.
If you do that, add in a teaspoon of baking soda along with the baking powder to balance the acidity in the coffee/buttermilk.
You can also stir in some chocolate chips as well.
Hope that is helpful.
The grain in my muffins is gooey and waay too moist. What am I doing wrong? Too much liquid, or overmixing?
From what info you’ve provided, it sounds like they’re underbaked. If you could give me a lot more specific information, maybe I can help you troubleshoot a little better. Thanks!
Hey, I have been making muffins for years for my family and I thought I had it down. Now, because of your writeup I let them sit for a few mins. The muffins come out great. Thanks.
Hey I am so pleased to hear it! Baking is so cool in that there is always something you can do to refine the process. 🙂
what utensil is used to mix the muffin batter
Hi @disqus_78egUYcVPa:disqus . Good question. I find that a large rubber spatula does the most efficient job w/o overworking the batter.
why do my muffins always have a harder coating surrounding them and the harder outside seperates from the good moist inside? Would like them the same cake like moist all around.
Without knowing your recipe or exactly the way you mixed them, it’s hard for me to say for sure, but it sounds like you may have over-mixed and perhaps baked at too high a temperature and/or for too long a time. Check your oven temp, and make sure that once you introduce the wet to the dry, you mix for a bare minimum of time. Hope that helps.
I want to make blueberry muffins, and the only blueberries I have access to are frozen. Will adding the frozen ones alter or change anything in the batter. What is best in this situation?? Please help.
I often use frozen berries in my muffins. Barely fold the still-frozen berries in at the very end of mixing, and you’ll be fine. Make sure they’re not starting to thaw, so they don’t bleed color. Enjoy your muffins!
THANKS YOU
Hi! Wow, these are really interesting points! I’m wondering how i can get a softer outside to the muffins, they’re coming out a wee bit firm/crunchy on the sides. Thanks:)
Try reducing the temperature by 25F during the last 10 minutes in the oven. 🙂
Thank you, i’ll try that:)
Have a friend who wants to know why her muffins come out with a “lean” to the right or left and not a peaked in the middle top. I don’t seem to have this problem so hope you can provide the answer
bushcook
It could be that her oven bakes unevenly so she might have to turn the pans after the first few minutes or so. She can check this by taking the temperature in different parts of her oven. Short of seeing her recipe and hearing about her whole technique in detail, this is the most likely culprit. Also, she might not be baking at a high enough temperature. Hope that helps.
Lovely! Thank you for the article.
To get the “higher” looking middle, I always fill the cups 2/3 then go back and add a tablespoon of batter to each MIddle of the cups. The dense middle makes a bigger peak for me!
Thanks for the why behind the how 🙂
That’s a great tip! Thank you. 🙂
Hi!I’m a beginner in baking muffins.
This website really helps me alot!
But I have some questions here,hope that you can answer it for me.
(1) I was baking apple raisin muffins yesterday but it turns out wet and not fluffy at all inside. Can you please help me t solve this problem?
(2) Is it possible to keep the muffins for 4 days in an airtight container under room temperature without freezing it?
Thanks in advance!^^
ming
Hi! I’m glad you’re finding my site useful:)
I’d love to answer your first question, but I really can’t w/o seeing your ingredient list and understanding your procedure. Just off the top of my head, I’d guess that 1) the oven was too cool and/or 2) you left out your leavener by mistake. As to keeping muffins, the short answer is “no.” Homebaked goods don’t contain preservatives and will stale very quickly if not treated right. Freezing will not hurt the texture of your muffins at all–just bake, cool completely and then freeze immediately. Take out what you need about half an hour before you need it, then heat them up in the toaster oven. They’ll taste just-baked fresh.
If you can’t do that, you can store them as you describe, but then I’d suggest sprinkling them w/a little water or apple juice or something, wrapping them up in foil and reheating them in the oven. No promises, but I think it might work.
Good luck, and feel free to email me your ingredients and procedure for your muffins.
Hi, thanks a lot for your explainations!!I am going to try and apply that right now.haha!!These are the ingredients & methods that i got from other website^^
Ingredients:
o 1 apple, coarsely chopped
o 3½ tbsp lemon juice
o 150g castor sugar
o 150g butter
o 2 large eggs
o 1/2 tsp vanilla essence
o 100ml apple juice
o 225g self-raising flour
o 1/2 tsp baking powder
o 1/2 tsp bicarbonate of soda
o 75g raisins
Method:
Place chopped apple, raisins, lemon juice and sugar in a saucepan and cook over medium heat. Allow to simmer, stirring for 5-6 minutes or until the sugar dissolves and the apple has softened. Set aside to cool.
Line patty tins with paper cupcake cases and preheat oven to 190°C.
Sift self-raising flour, baking powder and bicarbonate of soda onto a piece of greaseproof paper. Set aside.
Beat butter in the bowl of an electric mixer until creamy. Beat in eggs one at a time and add the vanilla essence. (Should the mixture curdle, add a handful of sifted flour to mix.)
Fold in the apple mixture and lastly add in the flour. Stir in apple juice to mix.
Fill the paper cups with the muffin mixture and bake for 25- 30 minutes or until muffins spring back when lightly touched.
(2) I’m using small, pensonic oven to bake my muffins. But i’m thinking wanna get a new one. What kind of oven or which brand do you think would be suitable for baking muffins?
Thank you!^^
hi,
thanks a lot for your explanations!!I’m going to try it right now!^^
These are the ingredients & methods for my muffins:
Ingredients:
o 60g butter, melted
o 2 eggs, lightly beaten
o 250ml UHT milk
o 1 tsp vanilla essence
o 250g self-raising flour
o 1/2 tsp bicarbonate of soda
o 125g chopped walnuts
o 55g castor sugar
o 2 large ripe bananas, mashed
Topping:
o 250g cream cheese, at room temperature
o 1 tbsp icing sugar
o 2 tbsp plain yoghurt
Method:
Preheat oven to 210 ºC. Lightly grease a muffin pan.
Combine melted butter, milk, eggs and essence in a mixing bowl. Gradually sift in flour and bicarbonate of soda and add in chopped nuts and sugar. Mix evenly. Stir in mashed bananas and mix. (do not overdo the mixing.)
Spoon mixture into muffin pan to three-quarters full and bake in preheated oven for 20 to 25 minutes.
Remove and leave in wire racks to cool. Spread with cream cheese topping, if desired.
To make the topping: beat cream cheese with a handheld electric mixer until softened. Add icing sugar and yoghurt and continue to beat until smooth and well combined.
(2) Recently I’m thinking of want to get a new big oven (produce 12 cups in one time). Can you please give me some suggestions on which brand or what kind of oven should i buy?^^
p/s:The Pensonic oven that i’m using now can only fit in 6 cups in one time.
Thank you!!=)
My muffins turned out the best! Thank you so much for sharing! I make muffins for the kids every single week, and they have never turned out this great.
I have been searching your site for something regarding cookies. Do you have a direct link to share? TIA!
Hi! Glad you experienced Muffin Success! Here’s a link to one of my posts on The Creaming Method. It talks about regulating your speed during the creaming of the fat and sugar depending on what texture of cookie you want. http://onlinepastrychef.wordpress.com/2008/11/03/the-creaming-method/
Hello Jenny,
Hope you can answer my questions.
– if I find a recipe that needs both baking powder and baking soda what should I do with the batter. Should I bake it immmediately or wait the 15-20 minutes. Or can I “convert” the baking soda into baking powder.
-When I mix the wet into the dry ingredients should I use a wooden spoon or a metal one. Why some recipes do specify what to use?
-Since I live in Cyprus there is no such thing like half and half. Can I make my own with cream (the one that can be whipped) and milk? If not what can I substitue it with?
Thank you very much in advance.
PS: ALL of my muffins look great!!! THANK YOU for sharing your knowledge.
Well. I just baked oatmeal muffins (recipe from magnolia book) following all the suggestions I read. After many past attempts, the muffins came with a nice dome. FINALLY! I will try try to elevate the temperature to 425 instead of 400 and also add 1/4 tsp of more BP. I will post the results.
Thanks.
Glad they’re turning out the way you want them to! Ain’t science wonderful?! 🙂
It is when things start to make a little more sense and is not just a matter of luck!! Always thanks.
I have a muffin problem…..Whenever I bake muffins, then store them in a container after they are completely cool the next day the tops are always wet! I’ve even left them for hours before storing them, and still wet tops!
Any suggestions?!
Thanks so much for the great advice. Moist batter = moist muffins makes sense. I will try peaking the whites and maybe adding a little sugar to the tops for crunch!
Yum. I can’t wait to try some of your recipes.
Hi Jenni!
I second all the responses — what a great and informative article. I have a question about muffin crispiness — I seem to be able to get a pretty good texture and shape to my muffins, but what main factors affect the “crisp” on the outside of a muffin. I love love muffin tops that are a little crunchy to contrast with a soft inside. It seems like higher temperatures help, but when I cook at 425, sometimes the insides don’t get cooked.
Are there any particular ingredients to use/stay away from in my quest for crunchy muffins (dairy, certain oils?), or is temperature the main thing?
Thanks in advance!
Jess
Hi, Jess–glad you stopped by; I hope you found some answers to your questions. 🙂
Rather than messing around w/baking temperatures–which, as you’ve noted, have a way of leaving you with less than perfect results, I would apply a crunchy coating to the outside of top of the muffins before baking. A healthy sprinkle of Sugar in the Raw or even white sugar will caramelize in the oven and lend a lovely crunch. For even more of a crunch, pile on the streusel before baking. An easy one is more-or-less equal parts of butter, sugar and flour with a pinch of salt. You can also substitute some oats for part of the flour, add chopped toasted nuts and/or any spices/zest that will complement your muffin batter.
As far as ingredients to stay away from, I’d not use honey in a muffin, especially if you’re looking for a crisp top–honey is very hygroscopic. As such, it’s good for keeping muffins moist, not maintaining a crisp topping.
Best of luck with your muffins, Jess!
Thank you thank you thank you for this educational post. I never knew there was a “muffin method” and what a differance it made in my muffins! Did I say Thank you yet?
Hi, Leslie!
You are welcome–but the fact that you are now producing tender, lovely muffins is thanks enough! 🙂
helo! boy, i LOVE this website! I have always been a why this, why that person … and I wanted insights on reasons to why we had to do the steps in muffin making! and of course, proper techniques. most people will juz giv u the recipe and expect u to magical conjure up good muffins … poooooh. So, my highest compliments to the creator of this! thank u very much! 🙂
oh, my question is regarding the nuts and fruits that i would like to use, when shud I add it? with the wet ingredients? add lastly after he wet-dry mixing? and could I have the formula for a basic muffin please?
again, my highest compliments to u, who has the good heart of sharing ur knowlegde to other bakers! Cheers! 🙂
Thanks for stopping by at my website, it’s been an honour ^^, yes your post made me don’t shy away from muffin anymore. I always Overmix it, thinking still not undermix ^^, now I know the reason. Thanks to you
Tara,
I’m glad you told me you live at a higher elevation. Scratch the add-more-baking-powder idea and just fill the cups a bit higher. And, yes, your AP flour is just fine to use:)
I always say that we’re all home cooks when we’re cooking at home! We should all help each other be better bakers; I learn something new every day.
Thanks for responding Jenni! So I take it the all purpose flour was in fact okay to use? I also live at around 5000ft. elevation, so should I change anything else with high altitude?
I really appreciate what you do because it allows us “at home wanna be professional chefs, but can’t be” learn and have success in our own kitchens.
Hi Jenni-
I had been searching for the reason why my muffins were flat and not domed. I also wanted to have a recipe that would give me the really tall dome like you get in bakeries. I just made your recipe and everyone should know that these were absolutely terrific and everything that you said they would be… tender and moist inside with a slightly crunchy top.
My only question is how do you get a higher dome? I had little domes on my muffins with filling the muffin pan 3/4 full. Can I fill it higher to get more of a dome, or can the muffin pan have something to do with it? I used a calphalon muffin pan. The only slightly different thing I did is used all purpose flour, maybe that’s it as I know you discussed the flour in your directions. Just curious on your thoughts to getting closer to that “bakery muffin” result. Thanks so much for this website, it’s absolutely terrific!!!!
Hi, Tara! Glad the muffins turned out so well for you! You can try filling the cups almost all the way to the top, especially if your batter is nice and thick. You can also add a judicious amount of extra baking powder. We don’t want any muffin lava flowing all over your oven, so I’d try maybe just an extra 1/4 teaspoon.
I can’t imagine that the pan was the issue. If your pan is that dark Calphalon color, it would have helped to set the sides more quickly, which is really what you’re going for if you want a nice peak.
Thanks for reading; it makes me happy to know that there are folks learning from and enjoying my mad ramblings 🙂
I made some failed muffins at the weekend. this article was just want i needed! THANKS!
I had to make blueberry muffins (we called them breakfast cakes for our guests to enjoy the following morning after their dinner) by the mountains! I had to use frozen – the little IQF wild ones from Maine. I kept them in the freezer till the very last second…they thaw so quickly and I agree, you don’t want that. Yes – I always sprinkled more berries on top and a little crumble topping. If you make enough of them you know exactly how much batter to put in the ice cream scoop for the perfect sized muffins.
I’m a blueberry muffin over a cupcake (with frosting) person any day!
oh, the flour thing…agree, its unnecessary.
So glad I found your blog. Now I’m hungry though, and craving muffins. Nice job. 🙂
Yes, bakers need not fear hot temps! Muffins need it for that poof.
No mixers for tender muffin batter – and this also helps when you make blueberry muffins so you don’t end up with purple batter instead of muffin batter with blueberries in it!
What’s your take on fresh vs. frozen blueberries for muffins and tossing blueberries in flour before adding (to prevent bleeding)?
Goodness, what a wealth of incredibly useful information. Thank you, thank you, thank you! Are you sure we shouldn’t be paying you for baking lessons?
Now I’ll never have to eat all those failed, lumpy muffins by myself ever again…
John B–Read your recipe for cranberry-lime muffins over at your place. They sound really good!
Daily Spud–Hooray! If you understand the differences between muffins and cupcakes, and why they are different, I am doing my job! Yay–I’m giving myself a 100% raise immediately:D
Gastroanthropologist–I say either frozen-not-thawed or fresh-not-mushy blueberries. Never frozen-then-thawed. I always just barely fold them in right before the muffins are “completely” mixed–when there are still large pockets of flour in. A couple of folds, and I’m done. I’ve never floured them, as I just don’t see that it makes a huge difference. I do take a few and press them into the top of the muffin batter (so their little tops are still showing) for added insurance there will be Even Berry Distribution.
I’m wondering now have I ever really tried to make muffins or have they all really been cupcakes (or what I would call buns). For the first time I think I have a clear picture of what the differences are and why (that’s what this blog is all about, ain’t it 🙂 ). Also interested in the response to the blueberry question above…
Wow, can’t wait to try this out. Thanks!