


Overnight malted yeast waffles are deeply flavorful, crisp on the outside, and fluffy yet substantial inside. The overnight rise and malted milk powder give them that old-school diner and hotel waffle flavor that’s almost impossible to resist.
Even better, the batter comes together the night before, so all the hard work is done before you go to bed. In the morning, just fire up the waffle iron and prepare to be amazed by your Waffle Prowess.
This recipe makes 7–8 large Belgian-style waffles that are perfect for soaking up maple syrup, butter, jam, or honestly whatever else makes you happy.
Pastry Chef Online Participates in Affiliate Programs. If you make a purchase through one of my links, I may earn a small commission. For more information click to read my disclosure policy
Best waffle I’ve ever made; light, fluffy, and browned beautifully…Tried them tonight, DH, who is not a huge pancake or waffle fan…also gave five stars.
Reader Victoria
Overnight Malted Waffles at a Glance
Even if you have never worked with yeast before, I encourage you to make these waffles. There is no kneading–just stirring ingredients together and letting them hang out in the fridge. The flavor and texture payoff is more than worth it. Trust me.
✅Skill Level: Beginner
✅Skills: Warming milk, whisking, using a waffle maker
✅Type: Breakfast yeast waffles
✅Number of Ingredients: 11
✅Prep Time: 10-15 minutes
✅Rise Time: 12-24 hours
✅Cook Time: about 3 minutes per waffle
✅Yield: 7-8 large, Belgian-style waffles
Jump Straight to the Recipe
Tasting Notes
Malt lovers, these waffles are for you.
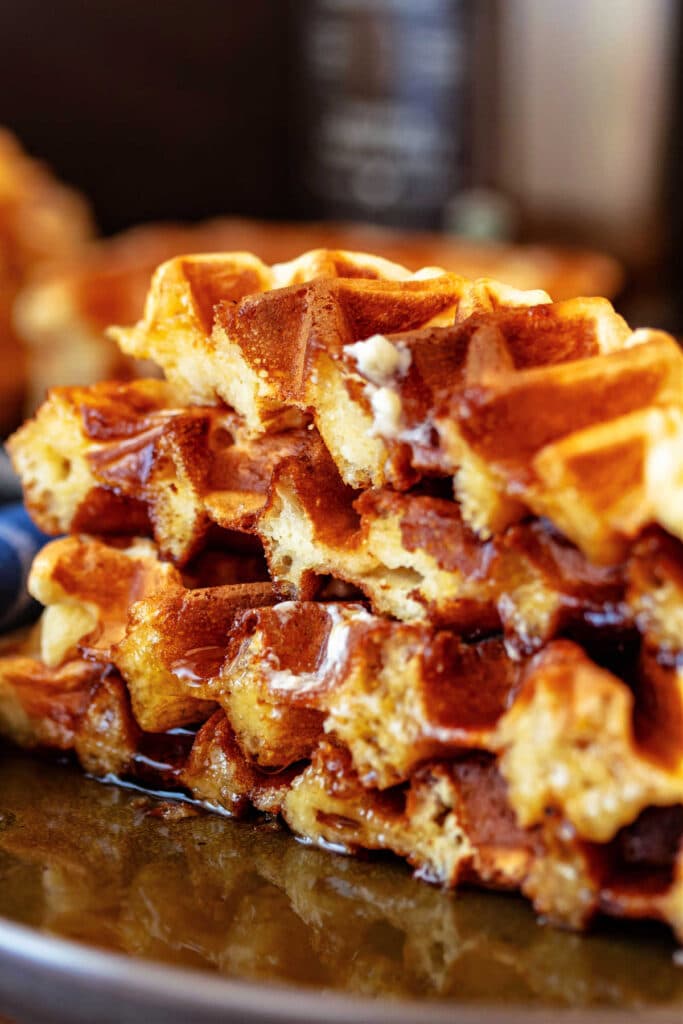
They are just off-sweet, light and fluffy with a bit of chew thanks to an overnight rise, and their outsides are spectacularly crisp.
Check out this cutaway shot:

The malt flavor comes through as a gentle milky, earthy sweetness that is hard to describe if you’ve never had malted milk before. Think Whoppers, Maltesers, or a nice malted shake. The aroma of malt really shines in the batter, too. So good.
The vanilla lends its cozy, familiar woody, creamy, and floral notes. These waffles pack a lot of flavor and are truly head and shoulders more interesting than baking powder-leavened waffles.
Since the insides are so fluffy, they make excellent little sponges to soak up all the butter and syrup.
If these malted waffles sound like your idea of a good time and you make and love them, I have a favor to ask:
When you do make this recipe, it will help me and other readers if you:
✅Rate the recipes using the stars in the recipe card
✅Leave a review when prompted in the recipe card (If it’s a positive review, and I hope it is, I’ll use it in the post as social proof)
✅Leave a comment on the post
Thank you so much!
Credit Where Credit is Due
After two less-than-stellar results with highly rated baking powder waffle recipes, I turned to a yeast-raised waffle from Mel’s Kitchen.
The flavor and texture were so far superior to baking powder-raised waffles that I never looked back. And I’ll never make another baking powder raised waffle unless someone is paying me.
I used Mel’s recipe as a template to make malted waffles, adding malted milk powder and splitting the liquid between milk and water. I made a few other little changes as well, but her “inspiration waffles” are also excellent.
Using Mel’s recipe as a base, I probably made 6-8 iterations before I was able to fine tune it to get
- enough malt flavor
- crispy outsides
- tender and fluffy insides
Because, there’s nothing worse than a floppy waffle. Not only do they not hold up to butter and syrup, they also tend to shrink a bit, making it nearly impossible to reheat leftovers in the waffle iron.
Jenni Says: To enjoy Maximum Waffle Crispiness, serve them as soon as they come out of the waffle iron or, if you want to serve everyone at the same time, hold them in a 300°F oven until they are all cooked.
How to Make Malted Waffles
Please don’t let the yeast scare you off. Pretend it’s baking powder and just toss it in with the dry ingredients.
If you already know how to make waffles and are ready to get started, go ahead and skip down to the recipe.
Would you like to save this post?
Otherwise, I’ll go over ingredients, offering substitutions where it makes sense to do so.

- whole milk: Provides the majority of the liquid for the batter along with some milk sugars and proteins to assist in browning
- water: Most waffle batters are made with all milk, but since we’re adding some malted milk powder, we need the water to basically turn the powder into malted milk. Using all milk would be overkill on the milk proteins and would result in denser waffles.
- vegetable oil: Tenderizes the batter and assists in browning. For a buttery malted waffle, substitute the same amount of ghee rather than butter since ghee and oil are both 100% fat while butter is only about 80-81% fat
- all-purpose flour: Gives the waffles structure and allows them to set and have a nice crumb structure
- cornstarch: The magical ingredient that binds some water during cooking, helping to ensure waffles with a lovely, crispy exterior. If you don’t like to use cornstarch, leave it out and increase the flour amount by 2 oz in the full recipe
- malted milk powder: Gives us our delicious malty flavor while adding milk sugars and proteins. Malted milk powder is also a little bit sweet, which lends an overall sweet milkiness to the waffles without adding a lot of sugar
- sugar: The full recipe only requires 2 Tablespoons. A little sweetness is always welcome, and sugar assists in browning as well as turning into a syrup with some of the liquid, helping to give the batter body
- salt: Enhances all the flavors and brings them into focus
- yeast: This provides the leavening or rise to the batter. Using yeast for a longer, slower rise than you’d get from baking powder allows the batter to develop delicious flavor. You can use instant yeast or active dry. If using active dry, proof the yeast in a portion of your warm milk and water mixture before adding the oil. Once bubbly, add to the rest of the batter
- eggs: Provides some emulsifiers in the yolk as well as proteins in the white to help crisp up the waffles
- vanilla extract: Rounds out all the flavors, adding warm, woody and floral notes to the waffles
Making the Waffle Batter
I can tell you after making waffle batters over and over and over again during testing that these waffles are very easy to make.
You’ll need a medium bowl, a larger bowl, and a small saucepan. Here’s what goes in each:
- Saucepan: Heat whole milk, water, and oil to no hotter than 120F
- Medium bowl: Whisk egg and vanilla until foamy and a bit paler in color
- Large bowl: Combine flour, cornstarch, malted milk powder, sugar, salt, and yeast
Once you have those three components ready, simply whisk the warm milk mixture into the dry mixture, and then whisk in the eggs last.
Cover, refrigerate overnight, and when you’re ready to waffle, remove it from the fridge, stir it well–no need to let it rise again–and make waffles according to the instructions that came with your waffle maker.
Different waffle makers hold different amounts of waffle batter, so depending on your waffle maker, you may end up with a different number of waffles than the recipe states. I use a Cuisinart Belgian waffle maker like this one. I have not tested this batter in other waffle makers, but I expect you will be making delicious malted yeast waffles with whatever model you happen to have.
If you’re a visual learner, please take a look at the recipe video.
Malted Waffle Q & A

These waffles, and waffles in general, will stay at peak crispiness for about 5 minutes before they start to soften a bit. This happens because the interior of the waffle is still moist and fluffy, and the steam evaporating out of the waffles starts to soften the crispy exterior. It’s just what waffles do.
Serve them as they come off the waffle iron and let people eat in shifts about 4 minutes apart. Or, if you really want to serve everyone together (I don’t blame you), keep them hot in a single layer directly on the oven rack in a 300F oven. 300F should be hot enough to keep them crispy since it’s hotter than the boiling point of water, but since it’s lower than when browning occurs, you should still end up with perfectly golden-brown waffles.
Yes. Waffles freeze really well. Store them in a heavy-duty zip-top freezer bag, pressing out as much air from the bag as you can before sealing it. To reheat and recrisp, microwave the waffles for about 20 seconds so they’re floppy, and then fit them into your preheated waffle maker for about 30-45 seconds. If your waffle maker isn’t handy, reheating in a toaster oven on the toast setting works great, but just take care that the ridges don’t get too browned while toasting.
Amazing waffles! Crispy and tasty and scrumptious all at the same time! Double batch fed a crowd with lots of compliments! It was so great to have them ready to go in the morning. I will make them again and again.
Reader Jane
More Decadent Breakfast Goodies
If you’re the kind of person to make overnight malted waffles, maybe you are the kind of person who’d like to give yeast-raised chocolate chocolate chip pancakes, “regular” but still decadent chocolate pancakes, or homemade cinnamon rolls a try.
And if doing most of the work the night before is a selling point, try my overnight yeast-raised pancakes, too.
Questions?
If you have any questions about this post or recipe, I am happy to help.
Simply leave a comment here and I will get back to you soon. I also invite you to ask questions in my Facebook group, Fearless Kitchen Fun.
If your question is more pressing, please feel free to email me. I should be back in touch ASAP, as long as I’m not asleep.

Overnight Malted Yeast Waffle Recipe
Video
Equipment
Ingredients
- 10 oz whole milk
- 8 oz water
- 4 Tablespoons vegetable oil
- 2 eggs
- 2 teaspoons vanilla extract
- 13 oz all-purpose flour
- 2 oz cornstarch
- 2 oz malted milk powder
- 2 Tablespoon sugar
- 2 teaspoons Morton's kosher salt weigh out 10 grams if using a different salt
- 1 ½ teaspoons instant yeast
Instructions
- In a small saucepan, heat the milk, water, and oil over medium heat for about 5 minutes or until the milk is about 115F and no hotter than 120F. Remove from heat and set aside.
- In a medium bowl, whisk together the eggs and vanilla until creamy and foamy, about 2-3 minutes of serious whisking. Set aside.
- In a large bowl, whisk together the flour, cornstarch, malted milk powder, sugar, salt, and yeast.
- While whisking, stream in the warm milk mixture until mostly blended–a few lumps are okay. This will take about 10 seconds of whisking.
- Rewhisk the eggs for a few seconds and then pour them into the batter, scraping the bowl with a spatula to get all the eggy goodness.
- Whisk the eggs in until completely incorporated.
- Cover the bowl with some plastic wrap and refrigerate for 12-24 hours.
- When ready to waffle, preheat your waffle iron for a good 10 minutes–you want it super hot. If your waffle has variable temperatures, set it to the highest setting.
- Cook waffle batter according to manufacturer's instructions until deeply golden brown and crisp on the outsides.
- It's really best to let someone start eating as soon as the waffle is off the iron–they'll be at peak crispiness then. If you want to hold them to serve all at once, keep them hot in a single layer directly on the middle rack of a 300F oven until all the waffles are cooked. If you try to hold them at a lower temperature, they may lose their crispiness.
Did You Make Any Changes?
Notes
Half Batch Amounts (3-4 Waffles)
- 5 oz whole milk
- 4 oz water
- 2 Tablespoons vegetable oil (or ghee)
- 6.5 oz all-purpose flour
- 1 oz cornstarch
- 1 oz malted milk powder
- 1 Tablespoons sugar
- 1 teaspoon Morton’s kosher salt
- 3/4 teaspoon instant yeast
- 1 egg
- 1 teaspoon vanilla extract
Large Batch Amounts (12-13 Waffles)
- 15 oz whole milk
- 12 oz water
- 6 Tablespoons vegetable oil (or ghee)
- 19.5 oz all-purpose flour
- 3 oz cornstarch
- 3 oz malted milk powder
- 3 Tablespoons sugar
- 3 teaspoons (1 Tablespoon) Morton’s kosher salt
- 2 1/4 teaspoons instant yeast
- 3 eggs
- 3 teaspoons (1 Tablespoon) vanilla extract
Storing
Keep waffles leftover waffles in the fridge for 2-3 days. For longer storage, seal tightly in freezer bags. For best reheating, fit the waffles back in your waffle iron for about 30-45 seconds on high heat. Otherwise, reheat on the center rack in the oven, in your toaster oven, or a toaster with wide slots until hot and recrisped.Nutrition
Would you like to save this post?
Love These Yeast Waffles? Please Rate and Review
It helps me and other readers so much if you take a moment to rate and review this recipe.
Your star rating and comments help others decide whether the recipe is worth making, and your feedback helps me continue improving recipes here at Pastry Chef Online.
Other lovely ways to share include pinning or posting on your favorite social media platform.
Thank you so much for taking the time!

And there you have it, friends. I really hope you enjoy these overnight waffles. They really are delicious (even if I’m a little tired of testing them)!
Thanks for spending some time with me today.
Take care, y’all!

Hi, y’all! I hope you’ve enjoyed this post and hopefully also learned a thing or two.
If you like my style, I invite you to sign up for my occasional newsletter, The Inbox Pastry Chef.
Expect updates on new and tasty recipes as well as a bit of behind-the-scenes action. I hope to see you there!


Join in Today!
I have not made them yet, but I’m thinking I might make a batch this morning to have for Sunday evening. I love the directions for a small batch for us and a big batch for when our daughter and her family are over.
I think you’ll really enjoy them. Small batch is great for us, but I do like to give options! Let me know what you think when you make them, Teresa!
Amazing waffles! Crispy and tasty and scrumptious all at the same time! Double batch fed a crowd with lots of compliments! It was so great to have them ready to go in the morning. I will make them again and again.
Hooray, Jane! I am thrilled that y’all love them! ❤️
I see nowhere in the instructions for the water, when is it added?
Oh my goodness, good catch! Heat the water and milk together along with the oil in the first step. I’ll make that clear now. Enjoy the waffles!
Yes! It was incredibly convenient to have the mix ready to use in the morning.
Best waffle I’ve ever made; light, fluffy, and browned beautifully. Whipped up a half batch last night to test the recipe as my goal is waffles on Christmas Morning. Tried them tonight, DH, who is not a huge pancake or waffle fan (he eats annoyingly healthy), also gave five stars.
Victoria, I am so, so happy y’all love the waffles! Here’s to Christmas waffles and to winning over the waffle-averse!