Crème Brûlée (pronounced krem BROO-lay, more or less) is magical. And while it has a short ingredient list and is not hard to make, there are rules to follow to ensure your creme brulee tastes even better than restaurant creme brulee. Stick with me!
Watch my how to make perfect creme brulee web story here.
Welcome to My Creme Brulee Class
And I’m not just saying that. Here’s a comment from reader (and creme brulee maker) Gayla:
Thank you so much the wonderful details you have given here! I had made creme brulee once before and it was very good. Following your recipe and instructions this time, it was absolutely fantastic! I appreciate very much your taking the time to post this, what is actually, in effect, a class on making creme brulee. Thanks for sharing your expertise!
Reader Gayla
Like Gayla, if you read this post all the way through and follow all my tips and tricks, you will be rewarded with a perfect creme brulee. Hooray!
Pastry Chef Online Participates in Affiliate Programs. If you make a purchase through one of my links, I may earn a small commission. For more information click to read my disclosure policy
What Is Crème Brûlée?
Crème brûlée is a classic French still custard.
By still, I mean it is cooked undisturbed in the oven unlike stirred custards such as pastry cream and pudding that cook on the stove top.
The name literally means “burnt cream,” but in reality, the only “burnt” part is the sugar you sprinkle on top and then melt and caramelize with a handheld torch or under your broiler.
The classic flavor is vanilla bean, but you can easily make variations by steeping different spices and flavorings into the cream in the recipe.
What Makes the Perfect Crème Brûlée?
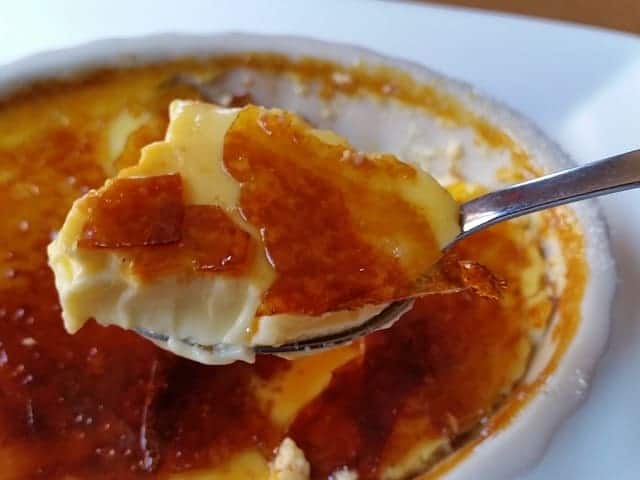
With varying textures and temperatures all in one bite, a truly excellent crème brûlée is a perfect dish all by itself.A perfect crème brûlée is a delight. Rarely do you find a perfect one. Follow my tips, and you’ll soon be making your own perfect creme brulee. Probably even better than ones you’ve had in restaurants.
Ever seen crème brûlée served in ramekins like these?
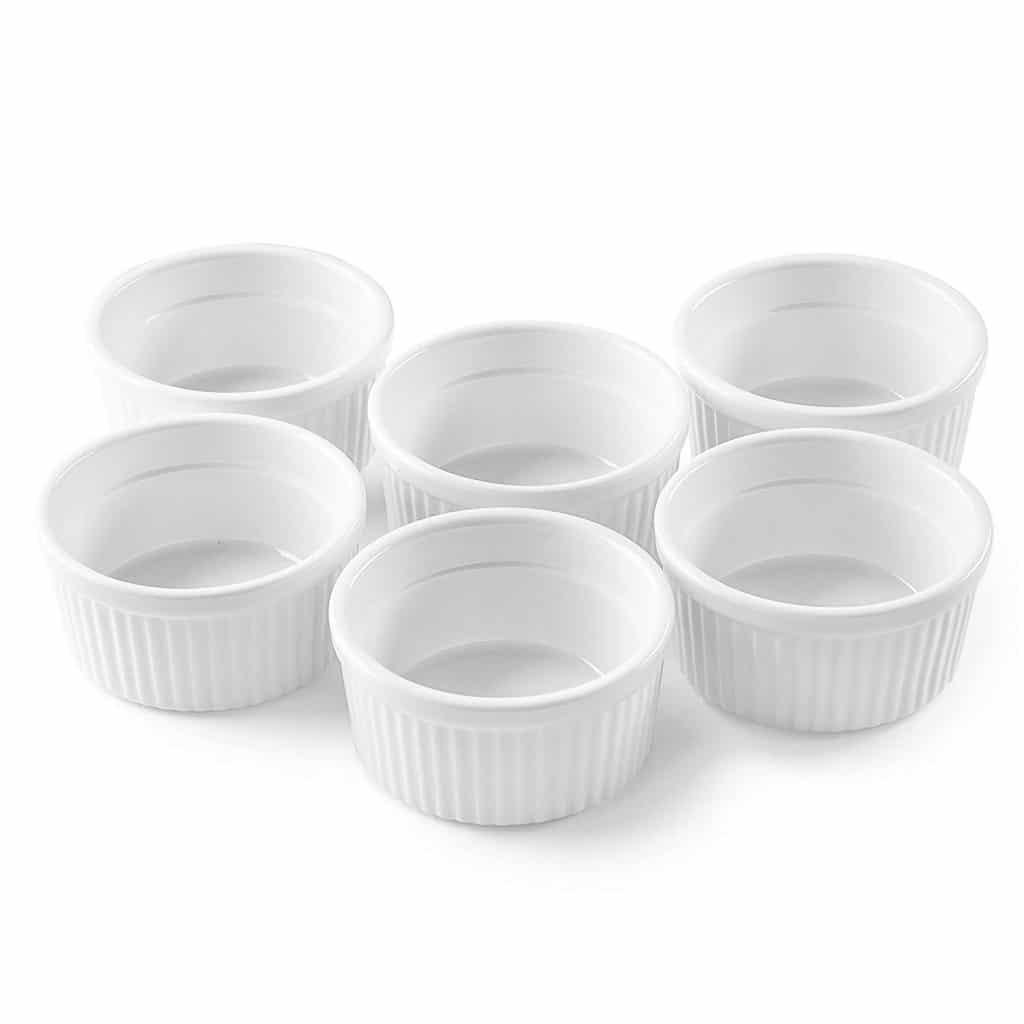
Look for this sort of wide and shallow ramekin, below, instead. As a bonus, the handles make them much easier to remove from the water bath.
The shape and shallow depth ensure that you get a bite that runs from cold at the bottom through warm and then hot at the top and from silky smooth to crunchy with the lovely, thin, glass-like caramelized sugar topping, all without being so rich it’s hard to enjoy.
What Kind of Torch To Get to Brulee Your Fancy French Custard
Here’s the Bernz-o-matic torch I have. It makes me feel like a badass.
You can also purchase these types of torches at your local home improvement store, along with the canisters.
Make sure to purchase the type of canister rated to go with the nozzle you buy.
If you’d like something a bit more understated for occasional use, consider a butane torch model.
You will need to purchase the butane canisters separately. You can get them at camping and outdoor stores, or go to your local Asian grocery store.
You can often purchase cases of butane cans there for use in table top cookers for hot pot dishes such as shabu shabu.
I can’t believe how perfect your recipe and instructions were!! Kudos and many thanks. First time making a creme brûlée and it was perfect!
Pinner Sudeepta
Tips for Making Crème Brûlée
- Do not leave out the salt. You will need approximately 1/4 teaspoon salt per 2 cups of cream. If you leave it out the creme brulee will taste very flat and won’t have a lot of character. The salt will bring out the sweetness, the vanilla, and the eggy goodness. Seriously, don’t leave it out.
- Crème brûlée should be served in a shallow ramekin. It’s rich, so 4-6 oz. is plenty.
- It should be brûléed (torched) right before service because part of the joy of the crème brûlée is the sensation of warm on top/cold on the bottom and the juxtaposition of the warm crisp sugar brûlée with the creamy cool custard.
To reiterate, I am Very Serious about NOT leaving out the salt. Learn why salt is necessary in desserts.
Crème Brûlée Questions & Answers

The two types of custards are similar, but they do have some differences. Flan is generally baked in deeper ramekins. The custard is a bit less rich (not necessarily made with heavy cream but with a mixture of cream and milk, or half and half). The custard mixture for flan gets poured into ramekins lined with caramelized sugar. This sugar melts during baking and refrigeration, and when you invert the flan to serve, the caramel serves as a sauce. Creme brulee is served in its ramekin and flan is served turned out onto a plate. Flan is served chilled through while creme brulee is served cold on the bottom and warm on top.
Do you cover crème brûlée when baking?
It isn’t necessary to cover the custards as they bake. Do make sure you place the ramekins in a shallow water bath. I like to use a half sheet pan lined with a kitchen towel. Once the custards are on the tray and the tray is in the oven, I carefully pour in boiling water to come about halfway up the sides of the ramekins, so really only about 1/2″ since the ramekins are so shallow.
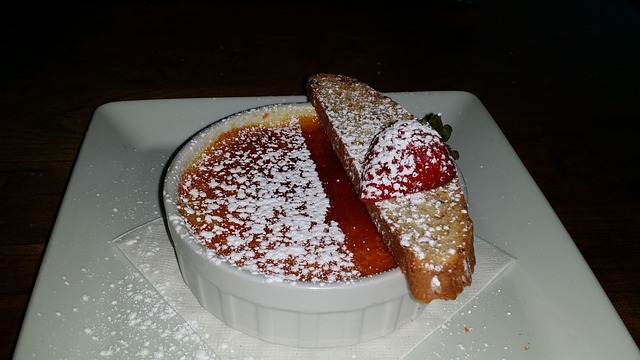
I love the simplicity of just serving the ramekin of creme brulee without any garnish. A few perfect raspberries would be a nice accompaniment, though.
If your creme brulee is warm all the way through, you’ll be missing some of the magic. Chill the custards well, carefully blot up any water from the tops (if there is any condensation on them), and then add a very thin layer of sugar. Torch quickly and evenly. You can add an additional layer of sugar and brûlée again, quickly and evenly.
The goal is to make sure your sugar has caramelized but that the very bottom of the custard is still cool. You can help to ensure it stays that way by placing the custards on a chilled tray while quickly brûléeing the tops.
It isn’t a matter of being served at one or the other temperature. A perfect crème brûlée is served warm at the top of the custard (nearest the torching) and cold on the bottom.
Crème brûlée needs to be torched right before serving and taken out of the fridge just moments before torching it. Again, this is all to make sure the custard is cold on the bottom and warm on top when you serve it.
You want to make sure your custard is thoroughly chilled, so allow at least 4 hours before torching and serving.
You can, but most likely the lovely, glass-like topping of caramelized sugar will get all sticky and/or runny, and you won’t be able to re-torch it, either. While it will still taste good, you won’t have the temperature or textural contrasts.
This is a good reason to only torch the exact number you need, and do it right before serving. “Plain” crème brûlée without sugar topping can be refrigerated for up to 3 days and be just fine.
How to Make Crème Brûlée, Step by Step
As I said at the beginning of this post, crème brûlée isn’t necessarily hard to make, but like many French desserts, the magic is in the details. Here’s how to make it like a pastry chef.
- Heat dairy.
Bring the dairy to a simmer. If you are steeping anything in it, such as a split and scraped vanilla bean, lemon zest, a cinnamon stick, etc, put those in the hot cream and let them steep for at least 30 minutes or up to an hour. - Divide sugar between the dairy and the yolks.
Add half the sugar to the steeped cream and reheat to a simmer. Whisk the yolks together with the rest of the sugar and the salt. Whisk this mixture occasionally to keep the yolks nice and creamy. - Temper your cream into the eggs.
While whisking the yolk mixture constantly, pour the hot cream (and whatever you’re steeping) into the yolks to bring the temperature up gradually. Once you’ve added about half the hot cream, you can pour the egg mixture back into the pan and whisk well. Resist the urge to continue to cook the custard until it thickens. You’ll end up with creme Anglaise and it will never set up in the oven. - Chill custard overnight.
To get the smoothest, most gorgeous crème brûlée, cover the bowl and chill overnight. If you don’t have the time, you can continue with the baking, but you’ll get the silkiest custards by chilling the mix for at least a few hours.
Chilling the custard overnight, or ripening it, ensures that it is completely cold before putting it in the oven.
As I’ve said, the slower you cook it, the creamier it will be, so starting with a super chilled base makes sense.
How to Bake It Without Making a Big Fat Mess
Water baths can be intimidating. You don’t want hot water to get on you or to splash into your custard or all over your oven. This is the best way I’ve found to get the custard into the ramekins, the ramekins in the pan, the pan in the oven, and hot water into the pan all without making a mess.
- Heat your oven to 250F-300F (depending on how much time you have).
- Bring a kettle of water to a boil (or heat a quart of water to a boil in the microwave).
- Line a shallow baking pan such as a half sheet pan with a kitchen towel.
- Place the empty ramekins into the pan on top of the towel.
- Pour the custard mixture into each ramekin to within 1/8″ of the top.
- If there are any bubbles on the surface of your custard, pop them by running your torch over each one.
- Pull out the center rack in your preheated oven.
- Carefully place the tray onto the rack and slide it back in.
- Once the rack is back in place, slowly pour the boiling water into the tray near the edge, away from the custards to keep it from splashing. Pouring slowly and pouring onto the towel will also help keep it from splashing.
- Fill the pan with water until it comes about halfway up the sides of the ramekins.
- Close the oven door.
- Tada! No mess!
Pro Tip: To ensure the surface of your custard is completely smooth with no bubbles, briefly run your torch over the surface before baking to magically pop them.
How Do I Know When It’s Done?
This is a great question and one that often trips people up.
You can rely on visual cues–that the custard shimmies rather than sloshes–but if you’ve never made it before, you may not be able to tell when the slosh ends and the shimmy begins.
To be perfectly sure, cook your creme brulees to an internal temperature of 165F. Just stick the probe of you instant read thermometer into the center of the custard.
Don’t worry. Any stab marks will be covered by the layer of sugar you brulee on top.
For an
A Decadent Variation
What do you do to make a creme brulee even more decadent than it already is?
Add cream cheese and Greek yogurt and turn it into a cheesecake creme brulee.
If you love the original, you owe it to yourself to give this version a try!
Questions?

Don't let its small price and small size fool you. The Escali Primo is an accurate and easy-to-use food scale that I have used for years. It's easy to store, easy to use, has a tare function, and easily switches between grams and ounces/pounds for accurate measurements.
Recipe for Perfect Crème Brûlée
I really hope you love this recipe, you guys! If you make it, please share a photo with me, either in the PCO Facebook Group or on instagram by tagging @onlinepastrychef and using hashtag #pcorecipe. Thanks, and enjoy!
Looking for a great Butterscotch Creme Brulee? I can help with that, too!
It will help me and other readers so much if you take a moment to rate and leave a review for this recipe.
You can use the stars to rate 1-5 (5 is best), and leave a review in the comments. It helps me make adjustments if any are needed, and comments help others decide whether the recipe is worth making.
Other ways to share include pinning, and/or sharing on your favorite social media platform.
Thank you so much for taking the time!


Crème Brûlée
Equipment
Ingredients
- 1 quart heavy cream
- 200 g. sugar
- 10 egg yolks
- flavoring (steeped vanilla bean is traditional, but steep cinnamon, zest, espresso beans or herbs or use any extract or liqueur you’d like)
- heavy pinch of salt
- Enough hot water to come halfway up the sides of the ramekins
Instructions
- Put cream (and vanilla bean or anything else you’re steeping in it) and half the sugar in a heavy saucepan.
- Whisk yolks, salt and rest of sugar together thoroughly in a stainless steel bowl. Do not leave out the salt. Please. If you do, your creme brule will taste flat and dumb instead of complex and amazing.
- Bring cream mixture to a simmer. Turn off heat and let whatever you’re steeping steep for 30 minutes, otherwise, just keep going.
- If you’ve steeped something, bring the cream back up to a simmer and temper into the yolk mixture. Whisk thoroughly. It is not necessary to put the mixture back on the heat since you’ll be cooking it more in the oven. If you can’t help yourself and you put it back on the heat and stir until it thickens, it won’t work. The eggs will have thickened as much as they can. The best you’ll be able to do is get a skin on top of what is now basically Creme Anglaise. Nasty.
- Strain your mixture into a bowl placed in an ice bath and cool quickly. Add extracts at this time.
- Chill custard overnight. This is not strictly necessary, but it will give you a better, creamier finished product. If you don’t have the time, just keep going; it’s up to you.
Day Two (or just later)
- The next day, arrange your little ramekins in a large roasting pan with a tea towel in the bottom. Don’t let your ramekins touch.
- Preheat oven to 250 degrees, F. (You can do this at 300 or even 325, but again, your finished product will be better if you do it slowly. If you have the time, use the lower temperature).
- Carefully fill your ramekins almost to the top with the custard. If there are any bubbles on top, pop them with your torch. This is fun, plus, your end product will look better without any bubbles to mar the top before torching.
- If you have the time, let the custards sit at room temperature for a couple of hours. If not, just keep going.
- Pull out your oven rack, set roasting pan with filled ramekins on the rack, then slowly pour in hot water. There will be less chance of splashing if you pour onto the towel. (It is also there for extra insulation).
- Loosely cover pan with aluminum foil, making sure it’s not sagging down into the custard.
- Bake until custards are set but still shimmy just a bit. The whole surface of the custard should move as one with no waves or wiggling. This will take a long time, so check them after 40 minutes and then go from there. In a convection oven on low fan at 250 degrees, it takes over an hour, so if you don’t have a convection oven, you’re in for a long baking time. Don’t give up, just check them periodically. I promise, your patience will be rewarded.
- Creme brulee is done when they reach an internal temperature of 165F.
- Remove them from the water bath and let cool for an hour at room temperature, then refrigerate uncovered overnight or up to 2-3 days. (Cover them once they are refrigerator temperature). This should help with any nasty condensation that could inhibit caramelization.
To Brûlée
- Remove the custards from the refrigerator and check for condensation. If you see any, blot it off with a lint-free towel of some sort.
- Sprinkle a relatively thick (almost 1/8 inch) layer of granulated sugar evenly over the surface of the custard.
- Hold the flame of your torch a couple of inches from the custard, moving it in even little circles to melt the sugar evenly, then brown it evenly. If your flame is too hot or too close to the custard, you’ll end up with carbon on top of granulated sugar, and that’s not at all what we’re going for here.
- Take your time to get a thick, even layer of caramel on top. If you don’t have a heavy-duty torch, you can brûlée in two layers. Sprinkle on your sugar and tilt the brulee until the sugar coats the entire surface. Torch. Repeat.
- Let sit for a minute or two for the caramel to harden into the characteristic crisp shell, then serve. Heaven.
Did You Make Any Changes?
Notes
Nutrition
And that’s it, friends. Enjoy your delicious, creamy French custard. Thanks for spending some time with me today. Take care, and have a lovely day.

Hi, y’all! I hope you’ve enjoyed this post and hopefully also learned a thing or two.
If you like my style, I invite you to sign up for my occasional newsletter, The Inbox Pastry Chef.
Expect updates on new and tasty recipes as well as a bit of behind-the-scenes action. I hope to see you there!


Join in Today!
Chef Jennifer, I’m curious if you have any experience with crème brûlée made by the sous vide method. I’m thinking of trying that recipe for a Christmas dinner. Crème Brûlée is my favorite restaurant dessert, but I’m not much of a baker and haven’t tried making it at home previously. I’m considering using a sealed bag for cooking it sous vide, then placing it into ramekins to chill after cooking. I would appreciate hearing any comments you might have, such as possible impact to creaminess from the sous vide method.
I found your recipe while researching how to serve it warmed. Most restaurants I’ve experienced have used a deeper dish, I think so they can serve it as a “shared” dessert for the table. I think that makes it eat as a chilled dessert with just the thin sugar layer warmed. My favorite place uses shallow ramekins with only about 3-4 oz and that produces a much more distinct temp profile as you described. It’s also why I’d not to use the mason jar method some sources describe.
Hi, Kevin.
I have no experience making creme brulee using the sous vide method. However, in theory, it should work just fine.
On the other hand, folks have been making creme brulee successfully for a very long time without this much newer technology. If you follow the instructions I give, I am certain you will end up with a lovely creme brulee with the perfect texture.
But yeah–if you want to experiment with sous vide, I expect you will have good success with it.
There are many good creme brûlée recipes out there–but this is the best! For someone like me, making this for the first time, I truly appreciate not just the technique, but the rationale behind the technique, including internal temps, etc. This is not just a recipe, but an education. My creme brûlée was perfect–thank you!
Chef Jennifer, this recipe is amazing!!! I’ve made Crème Brule in the past, and certainly have eaten many a ramekin at various restaurants, this by far is THE BEST! So silky smooth and worth the extra time in the straining, refrigeration time and slow bake!!! I did add a vanilla bean and orange – and Grand Marnier! OUSTANDING! Thank you!
Karen, I’m thrilled it turned out so well for you! And with that vanilla bean in it, I bet it tastes like a grown up Creamsicle, too! Enjoy every bite, and thanks so much for letting me know! Happy Thanksgiving!
Hi Chef Jennifer, please instruct me on how to turn your Crème Brulee into Grand Marnier Crème Brulee. I am making it today to serve to guests tomorrow. Thank you.
Ooh, that sounds great! Steep the zest of 1 or two oranges in woth the cream. Only the orange part or it could be bitter. Strain it out. Add an ounce of Grand Marnier to the mix once it is cool and before baking. You should be good to go!
Thank you so much for your quick and thorough response.
You’re very welcome! Can’t wait to hear how it turns out!
Chef Jennifer, this recipe is amazing!!! I’ve made Crème Brule in the past, and certainly have eaten many a ramekin a various restaurants, this by far is THE BEST! So silky smooth and worth the extra time in the straining, refrigeration time and slow bake!!! I did add a vanilla bean and orange – and Grand Marnier! OUSTANDING! Thank you!