


Friends, if you want to learn to make the best possible creme brulee at home, please stick with me.
This is more a class in making creme brulee more than it is just a recipe, so if you want to know all the ins and outs of making perfect creme brulee, you’re in the right place!
You may also want to take a look at my butterscotch creme brulee. And for ease of browsing, you can find all my custard recipes in one place. Now let’s jump right in.
Pastry Chef Online Participates in Affiliate Programs. If you make a purchase through one of my links, I may earn a small commission. For more information click to read my disclosure policy

Creme Brulee, At a Glance
✅Skill Level: Intermediate
✅Skills: Tempering eggs, baking in a water bath, using a kitchen torch
✅Type: Individual Custards
✅Number of Ingredients: 4
✅Prep Time: 20 minutes
✅Fridge Time: overnight for the custard, and overnight (ideally) after baking and before torching
✅Cook Time: about 45-50 minutes
✅Yield: 6-8, depending on volume of ramekins
Additional Reading: All About Custard
Jump Straight to the Recipe
Welcome to My Creme Brulee Class
And I’m not just saying that. Here’s a comment from reader (and creme brulee maker) Gayla:
Thank you so much the wonderful details you have given here! I had made creme brulee once before and it was very good. Following your recipe and instructions this time, it was absolutely fantastic! I appreciate very much your taking the time to post this, what is actually, in effect, a class on making creme brulee. Thanks for sharing your expertise!
Reader Gayla
Like Gayla, if you read this post all the way through and follow all my tips and tricks, you will be rewarded with a perfect creme brulee. Hooray!
And if you just want the recipe and are ready to go for it, please jump down to the recipe.
What Is Crème Brûlée?
Crème brûlée is a classic French still custard.
By still, I mean it is cooked undisturbed in the oven unlike stirred custards such as pastry cream and pudding that cook on the stove top.
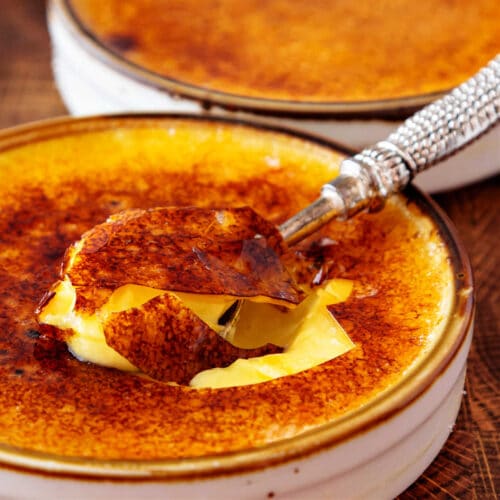
The name literally means “burnt cream,” but in reality, the only “burnt” part is the sugar you sprinkle on top and then melt and caramelize with a handheld torch or under your broiler.
The classic flavor is vanilla bean, but you can easily make variations by steeping different spices and flavorings into the cream in the recipe.
What Makes the Perfect Crème Brûlée?

A perfect crème brûlée is a delight. Rarely do you find a perfect one.
Follow my tips, and you’ll soon be making your own perfect creme brulee. Probably even better than ones you’ve had in restaurants.
The Best Ramekins to Use
Ever seen crème brûlée served in ramekins like these?
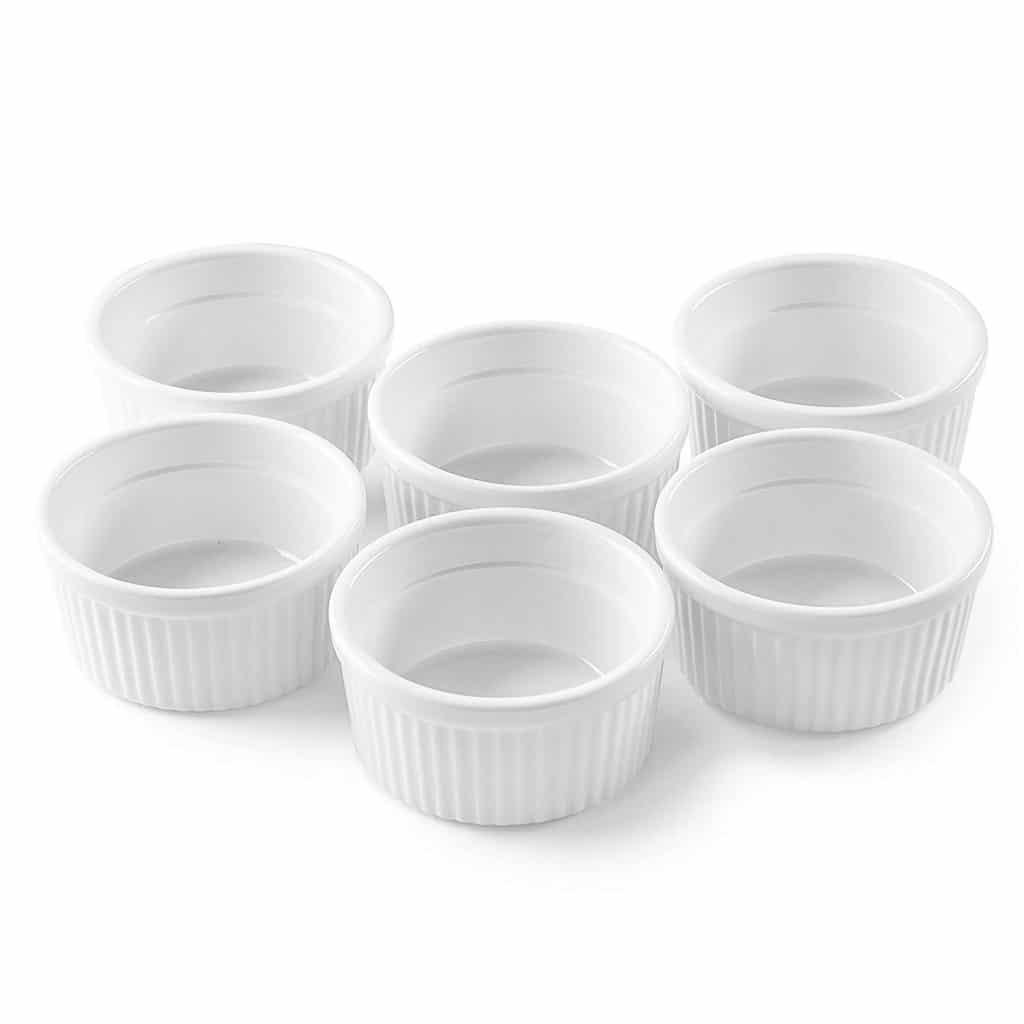
If this is what you have, go ahead and use them, but my preferred ramekins are shallow and wide like the ones in my photographs.
Using ramekins that are shallow and wide ensures that you get a bite that runs from cold at the bottom through warm and then hot at the top and from silky smooth to crunchy with the lovely, thin, glass-like caramelized sugar topping, all without being so rich it’s hard to enjoy.
And it’s hard to deny that you get more delicious caramelized sugar crunch with wider ramekins.
So save your “souffle-style” ramekins for other desserts like lemon pudding or flan.
What Kind of Torch To Get to Brulee Your Fancy French Custard
Here’s the Bernz-o-matic torch I have. It makes me feel like a badass.
You can also purchase these types of torches at your local home improvement store, along with the canisters.
Make sure to purchase the type of canister rated to go with the nozzle you buy.
If you’d like something a bit more understated for occasional use, consider a butane torch model.
You will need to purchase the butane canisters separately. You can get them at camping and outdoor stores, or go to your local Asian grocery store.
I can’t believe how perfect your recipe and instructions were!! Kudos and many thanks. First time making a creme brûlée and it was perfect!
Pinner Sudeepta
Tips for Making Crème Brûlée
- Do not leave out the salt. You will need approximately 1/4 teaspoon salt per 2 cups of cream. If you leave it out the creme brulee will taste very flat and won’t have a lot of character. The salt will bring out the sweetness, the vanilla, and the eggy goodness. Seriously, don’t leave it out.
- Crème brûlée should be served in shallow and wide ramekins. It’s rich, so 4-6 oz. is plenty.
- It should be brûléed (torched) right before service because part of the joy of the crème brûlée is the sensation of warm on top/cold on the bottom and the juxtaposition of the warm crisp sugar brûlée with the creamy cool custard.
To reiterate, I am Very Serious about NOT leaving out the salt. Learn why salt is necessary in desserts.
Vanilla Beans vs Vanilla Extract
I have made creme brulee with vanilla extract and with vanilla beans, and I am not sure I have a preference.
Since vanilla is the predominant flavor, if you’re going to use an extract, use an excellent quality extract. And if you like the look of specks of vanilla suspended in the custard, use a vanilla paste or an extract that features vanilla bean flecks in it.
Personally, I love Mexican vanilla, so I steeped a whole slit and scraped Mexican vanilla bean in the cream.
If you’d like to try Mexican vanilla extract, try Blue Cattle Truck. It’s one of the best I’ve found.
How to Make Crème Brûlée, Step by Step
As I said at the beginning of this post, crème brûlée isn’t necessarily hard to make, but like many French desserts, the magic is in the details. Here’s how to make it like a pastry chef.
- Heat dairy.
Bring the dairy to a simmer. If you are steeping anything in it, such as a split and scraped vanilla bean, lemon zest, a cinnamon stick, etc, put those in the hot cream and let them steep for at least 30 minutes or up to an hour. You can also pour your cream into a bowl, add your split and scraped vanilla bean (or whatever your using), and let it infuse for 24-48 hours in the fridge before heating anything up. - Divide sugar between the dairy and the yolks.
Add half the sugar to the steeped cream and reheat to a simmer. Whisk the yolks together with the rest of the sugar and the salt. Whisk this mixture occasionally to keep the yolks nice and creamy. - Temper your cream into the eggs.
While whisking the yolk mixture constantly, pour the hot cream (and whatever you’re steeping) into the yolks to bring the temperature up gradually. Once you’ve added about half the hot cream, you can pour the egg mixture back into the pan and whisk well. Resist the urge to continue to cook the custard until it thickens. You’ll end up with creme Anglaise and it will never set up in the oven. - Chill custard overnight.
To get the smoothest, most gorgeous crème brûlée, cover the bowl and chill overnight. If you don’t have the time, you can continue with the baking, but you’ll get the silkiest custards by chilling the mix for at least a few hours.
Jenni Says: Chilling the custard overnight, or ripening it, ensures that it is completely cold before putting it in the oven. As I’ve said, the slower you cook it, the creamier it will be, so starting with a super chilled base makes sense.
Step-by-Step in Photos
For those of you who love a good visual, I’ve made some collages of some of the more important points of making creme brulee.
For each subheading, you’ll get an overview, a collage of numbered images, and, below the collage a detailed description of each photo.
Chilling Custard and Filling Ramekins
After you make the custard, ideally you’ll chill it overnight. Here’s what happens next:

Would you like to save this post?
- After making your custard, tempering in the eggs, and pouring into a bowl, let it cool to warm, then cover and refrigerate overnight.
- Strain the custard through a fine-mesh strainer and into a pitcher. DO THIS even if you didn’t steep anything in it. You want the custard to be as smooth as possible.
- Arrange your ramekins on a half-sheet pan on an oven rack (pulled out) in your preheated oven. NOTE: You can line the pan with a kitchen towel to minimize splashing when you add the hot water. Fill each ramekin to within about 1/8″ of the top.
- Carefully slide the rack back into position–there may be some sloshing. It happened to me. It’s fine. Carefully pour boiling water in to come halfway up the sides of the ramekins. NOTE: When my rack is pulled out, it tilts down just a bit, so I filled the pan a little way, then pushed the rack in so it would be level before adding the rest of the water. That way I don’t accidentally add too much.
As you can see in the photo collage above, I had to use a couple of souffle-style ramekins since I only had 6 of my shallow, wide ramekins.
Don’t be like me, and make sure you have at least 8 shallow ramekins for this recipe.
Go Deeper: Filling the Ramekins and Getting That Water Bath Going
Water baths can be intimidating. You don’t want hot water to get on you or to splash into your custard or all over your oven. This is the best way I’ve found to get the custard into the ramekins, the ramekins in the pan, the pan in the oven, and hot water into the pan all without making a mess.
- Heat your oven to 250F-300F (depending on how much time you have).
- Bring a kettle of water to a boil (or heat a quart of water to a boil in the microwave).
- Line a shallow baking pan such as a half sheet pan with a kitchen towel. (Optional. But using a towel can minimize accidental splashing.)
- Place the empty ramekins into the pan on top of the towel.
- Pour the custard mixture into each ramekin to within 1/8″ of the top.
- If there are any bubbles on the surface of your custard, pop them by running your torch over each one.
- Pull out the center rack in your preheated oven.
- Carefully place the tray onto the rack and slide it back in.
- Once the rack is back in place, slowly pour the boiling water into the tray near the edge, away from the custards to keep it from splashing. Pouring slowly and pouring onto the towel will also help keep it from splashing.
- Fill the pan with water until it comes about halfway up the sides of the ramekins.
- Close the oven door.
- Tada! No mess!
Pro Tip: To ensure the surface of your custard is completely smooth with no bubbles, briefly run your torch over the surface before baking to magically pop them.
Baking and Removing from the Oven
Filling your water bath and pushing the rack back into the oven is the hardest part. Now, to bake and get them out of the hot water without hurting yourself or dropping anything!

- The custards will bake for roughly 45-50 minutes at 300F. Check them at about 40 minutes, and jiggle them a bit.
- The custards are done when they wobble but don’t slosh. Another good indicator is that any egg mixture that ended up in your pan will also be done. You may also be able to tell that they are a bit more yellow when baked.
- Pull the oven rack out, and lift each ramekin out of the hot water with a spatula. Get the ones in front and then place them on a dry pan, starting at the side away from you. This will minimize any accidental dripping into other custards while “de-water bathing.”
- Allow the custards to cool to warm, and then refrigerate until cold. DO NOT cover with plastic wrap until they are cold. This minimizes condensation. This is important, because for even torching, the tops of the custards must be dry.
Getting Ready to Torch!
Can you serve creme brulee without torching it? Yeah, but then it’s not bruleed. You may as well just make vanilla pudding.
The torching part doesn’t have to be intimidating. Let’s run through it together.

- Use a spoon to sprinkle a generous amount of sugar on top of your chilled and DRY custards.
- Tilt the custards and tap them to spread the sugar evenly. When the first one is done, dump the excess onto the next one, adding more sugar as necessary.
- Once the custards are nicely coated with a thin layer of sugar, wipe off the rims so you don’t get burnt sugar on your ramekins.
- Torch! Hold the torch about 2″ (5 cm) from the custard and keep it moving. Move fairly quickly, but don’t rush.
If you want a thicker layer of sugar, repeat steps 1-4, but do it quickly. Remember, we still want the custard to be chilled on the bottom and warm at the top.
Troubleshooting the Caramelized Sugar
Using a torch, especially a big guy from the home improvement store, can be a little bit fraught. It’s a little heavy, and it takes a little time to get a smooth and even layer of caramel.
Here are a couple of issues that can come up and also how to prevent or at least minimize them.
Because, face it, even a less than perfect creme brulee is way better than having no creme brulee at all.

- In the first image, I have just started to torch that guy. Notice that little bits are starting to burn. That’s because the surface of the custard wasn’t completely flat–I think I must’ve accidentally run parchment over it and messed it up a bit.
- In the second photo, I’m holding the torch still in the center for just a second or two. Too long! I did this for y’all. But it’s a reminder to keep that torch moving in little circles while holding it far enough away from the custard that the sugar has time to melt before it caramelizes.
- The two “problem children.” The one on the left has burned sugar in the center. It’s still edible, but it will definitely be a little bitter there in the middle. And the one on the right? The brulee is actually kind of beautiful, but it’s not perfect since the custard didn’t have a smooth, flat surface.
Crème Brûlée Questions & Answers

The two types of custards are similar, but they do have some differences. Flan is generally baked in deeper ramekins. The custard is a bit less rich (not necessarily made with heavy cream but with a mixture of cream and milk, or half and half). The custard mixture for flan gets poured into ramekins lined with caramelized sugar. This sugar melts during baking and refrigeration, and when you invert the flan to serve, the caramel serves as a sauce. Creme brulee is served in its ramekin and flan is served turned out onto a plate. Flan is served chilled through while creme brulee is served cold on the bottom and warm on top.
Do you cover crème brûlée when baking?
It isn’t necessary to cover the custards as they bake. Do make sure you place the ramekins in a shallow water bath. I like to use a half sheet pan lined with a kitchen towel. Once the custards are on the tray and the tray is in the oven, I carefully pour in boiling water to come about halfway up the sides of the ramekins, so really only about 1/2u0022 since the ramekins are so shallow.
I love the simplicity of just serving the ramekin of creme brulee without any garnish. A few perfect raspberries would be a nice accompaniment, though.
If your creme brulee is warm all the way through, you’ll be missing some of the magic. Chill the custards well, carefully blot up any water from the tops (if there is any condensation on them), and then add a very thin layer of sugar. Torch quickly and evenly. You can add an additional layer of sugar and brûlée again, quickly and evenly.
The goal is to make sure your sugar has caramelized but that the very bottom of the custard is still cool. You can help to ensure it stays that way by placing the custards on a chilled tray while quickly brûléeing the tops.
It isn’t a matter of being served at one or the other temperature. A perfect crème brûlée is served warm at the top of the custard (nearest the torching) and cold on the bottom.
Crème brûlée needs to be torched right before serving and taken out of the fridge just moments before torching it. Again, this is all to make sure the custard is cold on the bottom and warm on top when you serve it.
You want to make sure your custard is thoroughly chilled, so allow at least 4 hours before torching and serving. I like to refrigerate mine overnight.
You can, but most likely the lovely, glass-like topping of caramelized sugar will get all sticky and/or runny, and you won’t be able to re-torch it, either. While it will still taste good, you won’t have the temperature or textural contrasts.
This is a good reason to only torch the exact number you need, and do it right before serving. Keep extras in the fridge and only torch when you’re ready to serve them.
How Do I Know When It’s Done?
This is a great question and one that often trips people up.
You can rely on visual cues–that the custard shimmies rather than sloshes–but if you’ve never made it before, you may not be able to tell when the slosh ends and the shimmy begins.
To be perfectly sure, cook your creme brulees to an internal temperature of 165F. Just stick the probe of you instant read thermometer into the center of the custard.
Don’t worry. Any stab marks will be covered by the layer of sugar you brulee on top.
A Decadent Variation
What do you do to make a creme brulee even more decadent than it already is?
Add cream cheese and Greek yogurt and turn it into a cheesecake creme brulee.
If you love the original, you owe it to yourself to give this version a try!
Questions?
If you have any questions about this post or recipe, I am happy to help.
Simply leave a comment here and I will get back to you soon. I also invite you to ask questions in my Facebook group, Fearless Kitchen Fun.
If your question is more pressing, please feel free to email me. I should be back in touch ASAP, as long as I’m not asleep.
A Note About Measurements
My recipes are almost all written by weight, including liquids, unless otherwise specified.
For accuracy and consistency of results, I encourage you to buy–and use–a kitchen scale.
I promise that baking and cleanup will be so much quicker and easier.
This is the scale that I recommend for home use. I have owned and used one for years.
Love This? Please Rate and Review
It helps me and other readers so much if you take a moment to rate and review this recipe.
Your star rating and comments help others decide whether the recipe is worth making, and your feedback helps me continue improving recipes here at Pastry Chef Online.
Other lovely ways to share include pinning or posting on your favorite social media platform.
Thank you so much for taking the time!

Crème Brûlée
Equipment
Ingredients
- 1 quart heavy cream 907 grams
- 200 g. sugar 7 oz or a scant cup
- 10 egg yolks
- flavoring (steeped vanilla bean is traditional, but steep cinnamon, zest, espresso beans or herbs or use any extract or liqueur you’d like)
- ½ teaspoon Morton's kosher salt If using a different salt, weigh at 2.5 grams
- Enough hot water to come halfway up the sides of the ramekins
Instructions
- Put cream (and vanilla bean or anything else you’re steeping in it) and half the sugar in a heavy saucepan.
- Whisk yolks, salt and rest of sugar together thoroughly in a stainless steel bowl. Do not leave out the salt. Please. If you do, your creme brule will taste flat and dumb instead of complex and amazing.
- Bring cream mixture to a simmer. Turn off heat and let whatever you’re steeping steep for 30 minutes, otherwise, just keep going.
- If you’ve steeped something, bring the cream back up to a simmer and temper into the yolk mixture. Whisk thoroughly. It is not necessary to put the mixture back on the heat since you’ll be cooking it more in the oven. If you can’t help yourself and you put it back on the heat and stir until it thickens, it won’t work. The eggs will have thickened as much as they can. The best you’ll be able to do is get a skin on top of what is now basically Creme Anglaise. Nasty.
- Strain your mixture into a bowl placed in an ice bath and cool quickly. Add extracts at this time.
- Chill custard overnight. This is not strictly necessary, but it will give you a better, creamier finished product. If you don’t have the time, just keep going; it’s up to you.
Day Two (or just later)
- The next day, arrange your little ramekins in a large roasting pan with a tea towel in the bottom. Don’t let your ramekins touch.
- Preheat oven to 300 degrees, F. at a higher temperature, but again, your finished product will be better if you do it slowly. If you have the time, you can even go with 250F.
- Carefully fill your ramekins almost to the top with the custard. If there are any bubbles on top, pop them with your torch. This is fun, plus, your end product will look better without any bubbles to mar the top before torching.
- If you have the time, let the custards sit at room temperature for a couple of hours. If not, just keep going.
- Pull out your oven rack, set roasting pan with filled ramekins on the rack, then slowly pour in hot water. There will be less chance of splashing if you pour onto the towel. (It is also there for extra insulation).
- Bake until custards are set but still shimmy just a bit. The whole surface of the custard should move as one with no waves or wiggling. This will take a long time, so check them after 40 minutes and then go from there. In a conventional oven 300 degrees, it takes 45-50 minutes. At 250F, it could take over an hour.
- Creme brulee is done when they reach an internal temperature of 165F. Another way to check is to carefully shake the ramekins. When they're done, they'll shimmy without rippling. Think soft-set Jello and not water.
- Remove them from the water bath and let cool for an hour at room temperature, then refrigerate uncovered overnight or up to 2-3 days. (Cover them once they are refrigerator temperature). This should help with any nasty condensation that could inhibit caramelization. NOTE: The safest way to remove them from the hot water is to carefully shove a spatula under each ramekin and move it carefully to a cooling rack.
To Brûlée
- Remove the custards from the refrigerator and check for condensation. If you see any, blot it off with a lint-free towel of some sort.
- Sprinkle a relatively thin layer of granulated sugar evenly over the surface of the custard. Tilt each one to evenly distribute the sugar and pour the excess over the next ramekin of custard.
- Hold the flame of your torch a couple of inches from the custard, constantly moving it in even little circles to melt the sugar evenly, then brown it evenly. If your flame is too hot or too close to the custard, you'll end up with carbon on top of granulated sugar, and that's not at all what we're going for here. Keep your torch moving and don't get too close to the surface of the custard, and you'll be fine.
- If you'd like, you can brûlée in two layers. Sprinkle on a second layer of sugar, and repeat the previous step. Work quickly so the bottoms of the custards stay cold.
- Let sit for a minute or two for the caramel to harden into the characteristic crisp shell, then serve. Heaven.
Did You Make Any Changes?
Notes
Nutrition
Would you like to save this post?
And that’s it, friends. Enjoy your delicious, creamy French custard. Thanks for spending some time with me today.

Hi, y’all! I hope you’ve enjoyed this post and hopefully also learned a thing or two.
If you like my style, I invite you to sign up for my occasional newsletter, The Inbox Pastry Chef.
Expect updates on new and tasty recipes as well as a bit of behind-the-scenes action. I hope to see you there!


Join in Today!
BRAVO! After reading dozens of recipes and watching multiple videos… I was completely frustrated until I found yours.
I am an accomplished cook and always research multiple recipes before attempting a new one.
This is the ONLY recipe I found that was so well written and detailed that it gave me the to make it for a very special occasion.
It got RAVE reviews!
I wish that more chefs would stop assuming that we should just know what they are talking about! I want to know what the texture should be, what the mistakes that are made from small errors and what the best techniques for each detail are.
I must say that after many years of cooking and meeting many famous chefs in the Napa Valley as an event designer, I have never found anyone who really took the time to explain everything in detail and describe the techniques of each step.
Thank you for your diligence and your obvious effort to teach an art that is out of reach if you didn’t attend culinary school.
I will be making this more often and feel completely confident after just one try.
If you haven’t written a cookbook… it’s time!
Fabulous, delicious and beautiful…
I added a few raspberries and mint leaves to decorate the top and they were beautiful.
100 stars.
Leslie, thank you so very much for your comments. I am so thrilled you are confident in making creme brulee and that I played even a small part in that. My goal with this site, which has evolved quite a bit over the last 17 years, is to make it possible for anyone, no matter their skill level coming in, to find success with my recipes. Not everyone wants to learn all the foundational skills and science, but everyone wants to make something delicious. Not everyone loves my super detailed approach, but when someone like you *does* and takes the time to let me know I helped you, it truly means the world. Thank you, thank you!
I haven’t made creme brulee in a long time, so I needed a refresher. I thought, Hey I bet Jenni has a recipe! And indeed you did! This technique is fabulous. Worked perfectly. I’m so glad you posted a temperature for the custard. I baked at 275 for roughly 50 minutes. I steeped walnuts and vanilla beans and made a caramelized walnut and maple topping. Yummy! Thanks again for a great recipe! Dawn
Oh, man, Dawn, that sounds fantastic! I’m so glad you like the base recipe and procedure, and I love that you made it your own in such a delicious way!
Thank you so much for this amazing tutorial! I made these for my family for Christmas and everyone LOVED it! Including several who had never had it before. I was so thrilled with how these turned out.
Tammy, Merry Christmas! I’m so very glad the post and recipe were helpful and that everyone loved the cream brulee. Very cool that you could introduce some folks to it for the first time, too!
Forgive me if this is redundant, my review disappeared while I was still typing. This recipe will be my go-to recipe for creme brûlée from now on! I followed the instructions very carefully, using vanilla paste for my flavoring. I didn’t have time to let it set up overnight, I can only imagine how the texture could be any creamier. I’ve made plenty of creme brûlée sun my career, and I’d give this recipe on a scale of 1 to 5 a solid 10!
I am so thrilled you love it! Hooray!
Chef Jennifer, I’m curious if you have any experience with crème brûlée made by the sous vide method. I’m thinking of trying that recipe for a Christmas dinner. Crème Brûlée is my favorite restaurant dessert, but I’m not much of a baker and haven’t tried making it at home previously. I’m considering using a sealed bag for cooking it sous vide, then placing it into ramekins to chill after cooking. I would appreciate hearing any comments you might have, such as possible impact to creaminess from the sous vide method.
I found your recipe while researching how to serve it warmed. Most restaurants I’ve experienced have used a deeper dish, I think so they can serve it as a “shared” dessert for the table. I think that makes it eat as a chilled dessert with just the thin sugar layer warmed. My favorite place uses shallow ramekins with only about 3-4 oz and that produces a much more distinct temp profile as you described. It’s also why I’d not to use the mason jar method some sources describe.
Hi, Kevin.
I have no experience making creme brulee using the sous vide method. However, in theory, it should work just fine.
On the other hand, folks have been making creme brulee successfully for a very long time without this much newer technology. If you follow the instructions I give, I am certain you will end up with a lovely creme brulee with the perfect texture.
But yeah–if you want to experiment with sous vide, I expect you will have good success with it.
There are many good creme brûlée recipes out there–but this is the best! For someone like me, making this for the first time, I truly appreciate not just the technique, but the rationale behind the technique, including internal temps, etc. This is not just a recipe, but an education. My creme brûlée was perfect–thank you!
Chef Jennifer, this recipe is amazing!!! I’ve made Crème Brule in the past, and certainly have eaten many a ramekin at various restaurants, this by far is THE BEST! So silky smooth and worth the extra time in the straining, refrigeration time and slow bake!!! I did add a vanilla bean and orange – and Grand Marnier! OUSTANDING! Thank you!
Karen, I’m thrilled it turned out so well for you! And with that vanilla bean in it, I bet it tastes like a grown up Creamsicle, too! Enjoy every bite, and thanks so much for letting me know! Happy Thanksgiving!
Hi Chef Jennifer, please instruct me on how to turn your Crème Brulee into Grand Marnier Crème Brulee. I am making it today to serve to guests tomorrow. Thank you.
Ooh, that sounds great! Steep the zest of 1 or two oranges in woth the cream. Only the orange part or it could be bitter. Strain it out. Add an ounce of Grand Marnier to the mix once it is cool and before baking. You should be good to go!
Thank you so much for your quick and thorough response.
You’re very welcome! Can’t wait to hear how it turns out!
Chef Jennifer, this recipe is amazing!!! I’ve made Crème Brule in the past, and certainly have eaten many a ramekin a various restaurants, this by far is THE BEST! So silky smooth and worth the extra time in the straining, refrigeration time and slow bake!!! I did add a vanilla bean and orange – and Grand Marnier! OUSTANDING! Thank you!
Hello Chef,
I have two question about creme brulee.
1) If I’m using ana electric convection oven, should I use bottom heat only or bottom heat with a fan as well?
2) If I add Xanthan gum to the mixture, will it damage the whole thing or it would make the custard look thicker and more consistent?
Thanks
Hi, Nori. Good questions. I generally don’t bake creme brulee using the convection fan because it can lead to more of a “skin” on top of the custard. Keep the heat as even and gentle as possible, so I vote “no” to using convection. As to the Xanthan gum, why do you want to add it? I’ve never used it in making creme brulee, and I can’t see any good reason for the addition. My creme brulee has always been lovely and silky and consistent with just “regular” ingredients, so I don’t know that adding a gum is necessary.
Hi Jennifer,
Thank you so much for the great recipe. I was wondering if you could walk me through the reasoning behind chilling the custard before baking and how this steps gives a creamier product. Would love to hear the science or reasoning behind this! Thank you again for so many details. One last thing, I have been having a hard time with baking times. I am baking at 300F for probably about 50 minutes to 75 min and still have a temperature of 170F. I am using maybe a slighter thicker container instead of the shallow ramekin.
Hey there! I have actually added to the post because of your questions, so thank you for that. Chilling the base overnight ensures that the base is as cold as it can be before baking. The slower it bakes, the smoother and creamier your end result, so starting from a temp of maybe 39F it better than starting it at say 100F. Another reason is that flavors tend to ripen and round out with a bit of a rest in the fridge. This is true for cookie dough, too. Your guys are done at an internal temperature of 165F. I realize I left out that rather critical piece of information, so I have added it to the discussion and to the recipe. Enjoy!
Thank you so much the wonderful details you have given here! I had made creme brulee once before and it was very good. Following your recipe and instructions this time, it was absolutely fantastic! I appreciate very much your taking the time to post this, what is actually, in effect, a class on making creme brulee. Thanks for sharing your expertise!
Oh, I am so very glad you loved it! For a simple dessert there’s a lot to know to make it as good as it can be! Thank you very much for taking the time to comment, Gayla. I appreciate it, and I’m so happy the post was instructive!
Hello it’s Brenda I’m so excited that you responded. OMG so many variables. 1st I did use my oven thermometer and oven at 250 as instructed lol. However, I did not do the cold water bath I kept going and put the cream in the ramkins that I wasn’t suppose to use because that is what I had before I read your post. I had purchased the creme brulee set from William Sonoma it comes in a set of 4 taller ones not the oval ones like you said use. Poured in my boiling water 1/2 way up and let it do its thing. I check the temperature every 40 minutes until it reached that 170. I understand what you are saying about the time and so many variables that I didn’t consider. However I guess I did something right because they’re still raving lol thank you for your help!
You did everything right, Brenda! The depth of the custard in the ramekins makes a huge difference, as you found out. The good thing about that kind of ramekin is that you can get a really good temperature differential between the top of the custard where you torch it and the bottom that will still be nice and cold. For something as “simple” to make as creme brulee, there are tons of things that can make it go sideways, so that’s why I wrote such a detailed post. You are a creme brulee Rockstar, and I’m thrilled your guests are still raving!
Just to confirm in my previous post that was 2 and a 1/2 hours for brulee to get to 170.
Hello chef Jenny, I am a rock star now after following your step-by-step instructions. I was hosting a friend’s surprise 70th birthday party last nite and this was her all time favorite dessert needless to say they raved! There is only one thing that would have been helpful In step 7 .You said be patient and I was but I wasn’t sure of how long I had to be patient. I had another recipe and they suggested you cook your brulee’s until they get to a temperature of 170 when testing so 21/2 hours later is when they got to the 170 . I took them out very apprehensively cause they were still wiggling or shimmy as you said. I’d like to know your thoughts on the temperature because it took so long. Thanks again for making me look like a rock star.. you’ve got a new follower!
Hey there, Brenda! First of all, I am really glad you and your guests enjoyed the creme brulee! As to the time, it depends on the temperature you decided to set the oven, how cold the base was when you put it in the ramekins, and how hot the water in the water batch is. So many variables. I understand that it isn’t always ideal for a recipe to take so long to bake, especially in a home kitchen. But you were right to just check the temp and take it out at 170F rather than just pulling them because it had been a long time.
I am a fan of the lowest temp possible to get the creamiest result possible, but you can also speed up the process by letting the base come to room temperature before putting in the oven, making sure the water for the water bath is boiling when you add it to the pan, and having your oven set at about 300-325. I hesitate to give a time because of all the variables, but I would think they should be done under those conditions in about 45 minutes or so, depending on how deep your ramekins are.
I wish I could send you a rockstar badge, Brenda!
Also, Brenda, what temp did you set your oven to? And have you checked your oven with an oven thermometer to make sure it’s heating to the correct temp?
Hi Chef Jenni,
If i wanted to add pumpkin puree to do a “pumpkin cream brulee” would I need to alter the dairy egg ratio?
Thanks,
No So Pastry Chef Dom lol
Hey, Dom! With the number of yolks in my recipe, I think you will be totally fine to add a full cup of pumpkin puree to the mix and with maybe an additional egg. You may not even need the extra egg, especially since you won’t be unmolding it. You may have to up the sugar a smidge, so taste the mix. Add in some standard pumpkin pie spice or your choice of spices–ginger alone is pretty lovely with pumpkin–and then refrigerate your mix overnight before straining and baking in a water bath. Hope that helps–happy pumpkin creme brulee-ing!
Gregory loved creme brulee – we even bought him a set of ramekins and such to make it with – so I guess I need to get to work! thanks for the 5-star instructions.
Your son had good taste.❤️ It’s dreamy stuff. I vote you make some, asap!
This is my husband’s all time favorite dessert. And now my kids are older, they like it, too. They are so fancy, schmancy! Thank you for the perfect recipe!
It is a magical dessert! I will be playing with more flavors as well, even though it could be dangerous. Someone has to do it. Imma be super fancy schmancy with these guys!
Ohhhh, I am a Creme Brulee fanatic. I love all of your step by step directions to make it look so easy!
You and me both. I may have to do a series on different flavors…! =)