In this post, I’m going to teach you all about how to make pate brisee, which is a standard French pie dough that can be used for sweet or savory pies.
We’ll also go over how to roll layers into your crust, how to patch it if it tears, how to line your pie pan, crimp your crust, how to keep your pie crust from shrinking, and how to blind bake.
With all that going on, we’d better get this pate brisee tutorial started!
For a great tart shell, consider making sable dough. And for ease of browsing, you can find all my pastry dough recipes in one place. Now let’s get to it.
Watch my flaky pate brisee web story here.
Please Help Me With My Pie Crust!
Brave Will, from Recipe Play boldly asked a question yesterday. Here it is: “Why does my pastry always, ALWAYS shrink so much when I’m pre-baking it? It always shrinks down below the sides. Drive me nuts!”
Can you feel the frustration? I can, and I’m with you, Will. Spending time and sweat on making a crust only to see it shrivel away into a tiny version of itself in the oven is most disheartening, to say the least.
Pastry Chef Online Participates in Affiliate Programs. If you make a purchase through one of my links, I may earn a small commission. For more information click to read my disclosure policy
This whole shrinkage phenomenon needs to be addressed. And let me just say to you, Will–it’s not just you.
Let’s all take the first step towards healing and full-sized crusts together.
Making Pate Brisee Can Be Scary
Pie crust.
I wish I could make reverb happen when I write that. :: PpIeEe CcRrUuSsTt:: There!
Pie crust strikes fear into the heart of even the most intrepid bakers.
Let me tell you a story.
At one of the restaurants I worked in, it fell to the pastry department to make the pate brisee for the savory tarts.
Four ingredients. How hard could it possibly be?
Let me tell you: I struggled with that dough and even sheepishly asked for a Brisee In-service so I could figure out what I was doing wrong.
More than once, my what-I-thought-was-lovely-brisee ended up as not much more than a disc of cracker in the bottom of the small tart pans.
It took me longer to master this stupid dough than it did to master fudge, toffee, burnt caramel buttercream and lemon sabayon.
I confess this to you so you will know that I’ve been there.
What Makes Pie Crust Shrink?
Do you guys remember gluten and what activates it?
Flour+water+agitation=gluten
And how do we make a standard pie crust?
Flour+some fat+water+mixing. This is just a recipe for tough, shrinking pie crust.
If you end up activating the gluten in your flour, and then you stretch your dough into your pie pan, the dough will shrink. Simple as that.
How To Keep Your Pie Crust From Shrinking
Cardinal Rules of making crust that won’t shrink:
The most important thing to remember is that too much water in your dough will lead to crust that ends up with too much gluten and will 100% shrink when you bake it.
So remember, I’d rather you have too-dry pie crust than too-wet. Too dry? You can add a little extra water when you fold in the layers.
Too wet? Too bad. Start again.
Another great tip, especially for new pie crust makers is that gluten only forms in the presence of water.
This means that you can use other liquids that are not 100% water.
The “not water” will allow your crust to be wet without activating gluten.
The best example of this is vodka, which at 80 proof means it’s 40% alcohol and only 60% water.
Jenni Says: To guard against using too much water in your pie crust, regardless of recipe, substitute vodka for 1/3 of the water. That’s a built-in safety net that will allow you to easily form your dough without activating too much gluten.
It’s also important to line your pie plate with dough correctly.
The act of stretching your dough, even gently, is a recipe for shrinking crust. Stretching is a form of agitation, and we already learned that flour + water + agitation = gluten.
Rather than pulling your dough to fit, push it into the center from the edges so it lays easily into the corners without having to pull. Once the dough is in the pan, use your knuckles to gently press it into the corners as you “feed” extra dough in from the edges by pushing it down the sides with your other hand.
How to Make Pate Brisee
Here are the ingredients you’ll need to make pate brisee or most any other type of pie crust.
The only things that really change are the proportions.
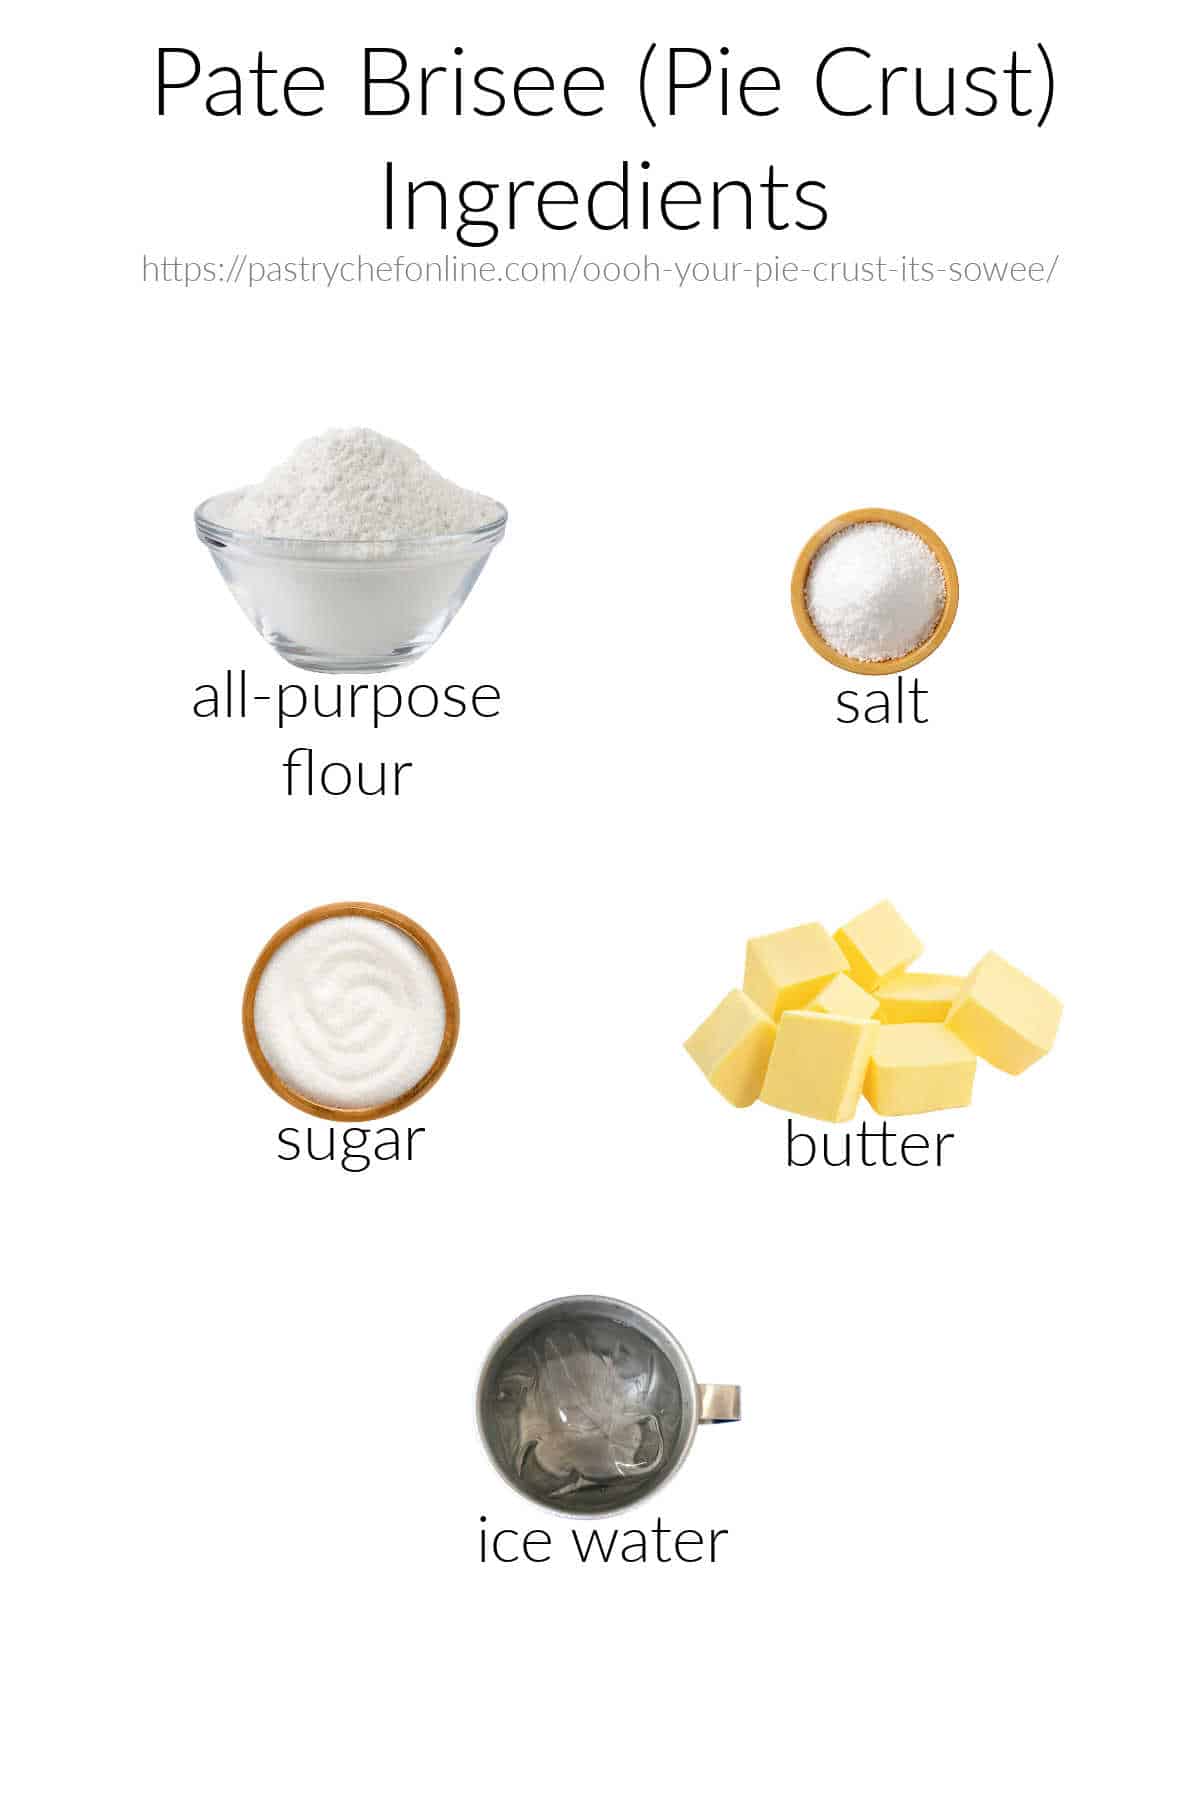
- all-purpose flour: provides structure, bulk, and texture. To get a dough that rolls out nicely and isn’t too fragile, stick with all-purpose flour
- salt: provides flavor and depth
- sugar: Adds just a touch of sweetness and assists in browning
- butter: Cold butter, straight from the fridge. I use unsalted so I can fine-tune the amount of salt I use.
- ice water: Provides the liquid needed to moisten/bind the ingredients and to activate a moderate amount of gluten
Ways to Keep from Activating Gluten in Your Pate Brisee
If you don’t want to activate the gluten, there are two ways you can go:
Way 1–Coat all the flour particles with fat. The fat will form a barrier between the flour and the water and keep gluten from forming. There is a condom joke in there somewhere. Please, tell it to yourselves. Okay.
Way 2–Limit agitation of the flour and water.
Way 1: Shortening the Crust
If you coat the flour really well with fat, you will have a very short crust.
I don’t mean that in terms of height. When folks talk about “shortening” and shortened doughs, cakes, etc, what they are talking about is the state of the gluten.
Coating flour with fat inhibits gluten formation. It “shortens” the gluten strands.
Short gluten=tender. Short gluten also=less structure. T,
his is why shortbread–made with sugar, butter and flour, is so crumbly.
While crumbly-ness can be desirable in a cookie–it even spawned a saying “That’s how the cookie crumbles”–it is less desirable for a crust that needs to be strong enough to hold a filling.
What you can do is work the fat into the flour so it resembles coarse cornmeal with a few peas thrown in (in texture, not in color).
This will coat enough of the flour to allow tenderness but also allow enough gluten formation that the crust will be sturdy.
There are oil-based pie crust recipes out there.
Oil coats the flour very effectively, so that kind of crust will treat you right and stay the correct size for you.
I prefer some flakes, so I go the solid fat (butter) route.
Way 2: The Biscuit Method
Making pate brisee is all about the mixing method.
Actually, don’t think “mix,” think another, less mixy word. Combine, maybe. Or commingle or unite.
It’s basically using The Biscuit Method with a lot less liquid. Here’s what you do–I do it by hand so I can feel the dough. You can use a food processor if you want:
- Rub together fat and flour until it resembles the above-mentioned cornmeal and pea mixture.
- Sprinkle in a tablespoon or so of ice water. Here’s where it gets interesting. Sprinkle the water evenly over the flour mixture, and then toss the flour and the water together. Kind of like when you mixed water with sand to get the perfect sand castle consistency. You guys did that, right?
- Continue doing the sprinkle/toss method. After each incorporation, squeeze a wee handful of the flour. If it sticks together and doesn’t crumble apart when you open your hand, it’s ready. When the dough is ready, it will still mostly look like crumbly flour. If you add enough water that it looks like your idea of “dough” it will be too much.
- Once your dough is ready, sort of compact it into a disc in the bottom of the big bowl in which you’ve been working. I do this by just pushing down and pulling any flour crumbles that might have migrated up the sides of the bowl into the center.
- Here’s where my method differs from others. Most recipes tell you to refrigerate the dough for 30 minutes-2 hours before rolling. I immediately roll the compacted puck of dough between two pieces of parchment paper, and then put the sheet of dough, parchment and all, into the fridge. While the dough is in the fridge, the flour will continue to hydrate, and your dough will be beautiful when you’re ready to bake. (If you’re going to bake on some other day, go ahead and freeze your sheet o’ dough).
How to Make Pate Brisee to Get the Right Mix of Sturdy and Tender
Here we go:

- Flour, salt, sugar, and cold butter in a bowl. I whisk the dry ingredients together before tossing in the butter.
- Start by tossing the dry and butter together to coat the butter. Then start pressing the pieces of butter apart into two pieces, and then four, making rubbing motions with your thumb and the rest of your fingers. This works some of the fat into the flour, making sure that a good amount–but not all–gets completely coated with fat.
- Keep going, making smaller and smaller pieces out of the larger pieces of butter until…
- …the mixture looks like this photo. Lots of mealy-looking flour with some larger, pea-sized pieces of butter.
Now it’s time to add very cold water.
You can add ice to your water, or just leave 4 oz water in the freezer for about 30 minutes or so until it is very, very cold.
- My water actually iced over a little in the freezer. All good. The colder the better.
- Drizzle in a little of the water evenly over the mixed flour/butter.
- Reach your hands down underneath the mass of dough and toss it evenly so the water gets distributed.
- Squeeze a handful of dough tightly together. See how it looks like it’s ready?
That last photo is after I gently pressed the dough with my thumb. See how it fell apart? Repeat steps 3-4 until the dough holds together when pressed with your thumb with just a little bit of crumbling.
Once you’ve added enough water, here’s what the dough will look like when squeezed and then pressed:
See how I am able to press the dough out and it mostly holds together?
If it didn’t crumble at all, it would already have too much liquid in it.
The Cardinal Rule of Pate Brisee and Other Pie Dough
It is always better to add too little water than too much. You can always add a touch more, but you cannot take it out.
Folding in Layers (Optional…?)
When I first started making pate brisee, I just rolled it out and was done with it.
These days, after I get the dough all compacted into a Puck, I roll in a few layers.
This is helpful in a couple of ways.
First, it helps to make a flaky crust that subtly puffs like low-key puff pastry but not even as much as rough puff pastry. Just enough for some textural interest.
Second, it makes sure that there will be no spots where there is nothing but butter, because once the butter melts in the oven, you’ll be left with a hole.
The only way to keep that from happening is to make sure no bits of butter occupy the entire depth of the crust.
And the best way to do that is to fold in some layers.
It’s easy. Here’s how it goes:
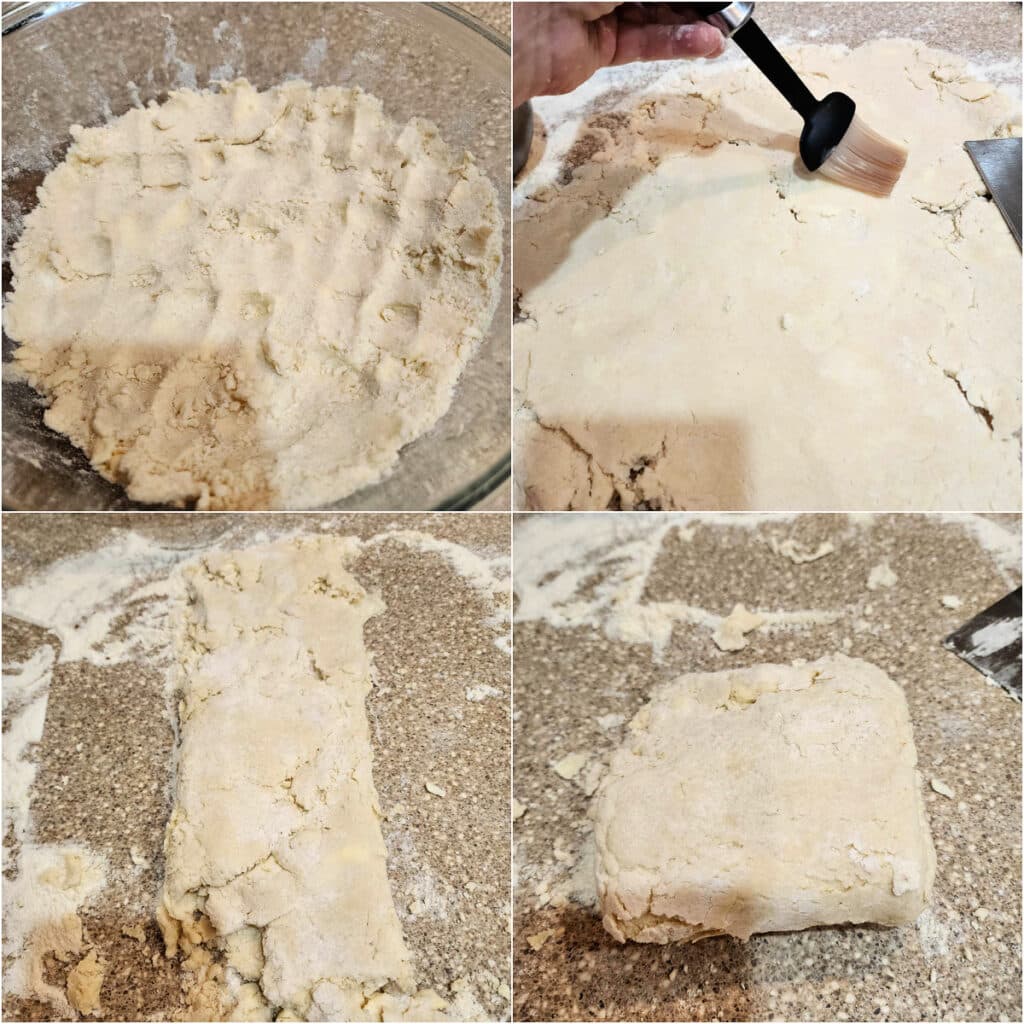
- Once the dough passes the squeeze test, press it into the bottom of the bowl to compact it.
- Turn the dough out onto a floured surface and roughly roll it out. It will be crumbly. Worry not. Very lightly brush the surface of the dough with a bit of the remaining ice water. Very lightly.
- With the help of your bench knife, fold the dough roughly into thirds like a letter.
- Brush with a little more ice water and then fold the top third down and the bottom third up so you have a square.
Then, you’ll cut that square in half and roll each half out into a round, thus giving you two lovely, layered pieces of dough, enough for one two-crust pie, a single-crust pie and a quiche, etc.
Now, let’s go over some of the more common How-To questions about pie dough once you have made it.
Equipment You May Need
Making pate brisee is a very low-tech endeavor.
You need a big bowl, a bench knife, a brush for adding a bit of water before making your folds, and of course a rolling pin.
My preference is for a French pin, which is tapered on the ends making it much easier to roll a radius without making a crease in your dough.
They are inexpensive and should last you forever.

A French rolling pin is lightweight and the tapered ends make it very easy to roll a radius or vary pressure across the surface of the pin. I much prefer a tapered pin to a straight one.
How Do I Roll Out My Pie Dough?
For this pate brisee recipe specifically, divide the dough into two pieces, and work with one at a time. Unless you work quickly, refrigerate the other one until you’re ready for it.
I like to roll initially between two pieces of parchment paper. I roll it out about halfway, until it’s roughly 3/8″ thick (no measuring, just thicker than you want it to be when you’re done).
Then, I peel off the parchment from both sides and put the dough on a well-floured work surface and continue to roll, flipping the dough and moving it frequently to make sure it’s not sticking.
If it does stick a bit, use your bench knife to help gently un-stick it by sliding it under the stuck part.
Once I have it rolled into about a 12″-14″ rough round, I roll it up with a sheet of parchment and set it aside.
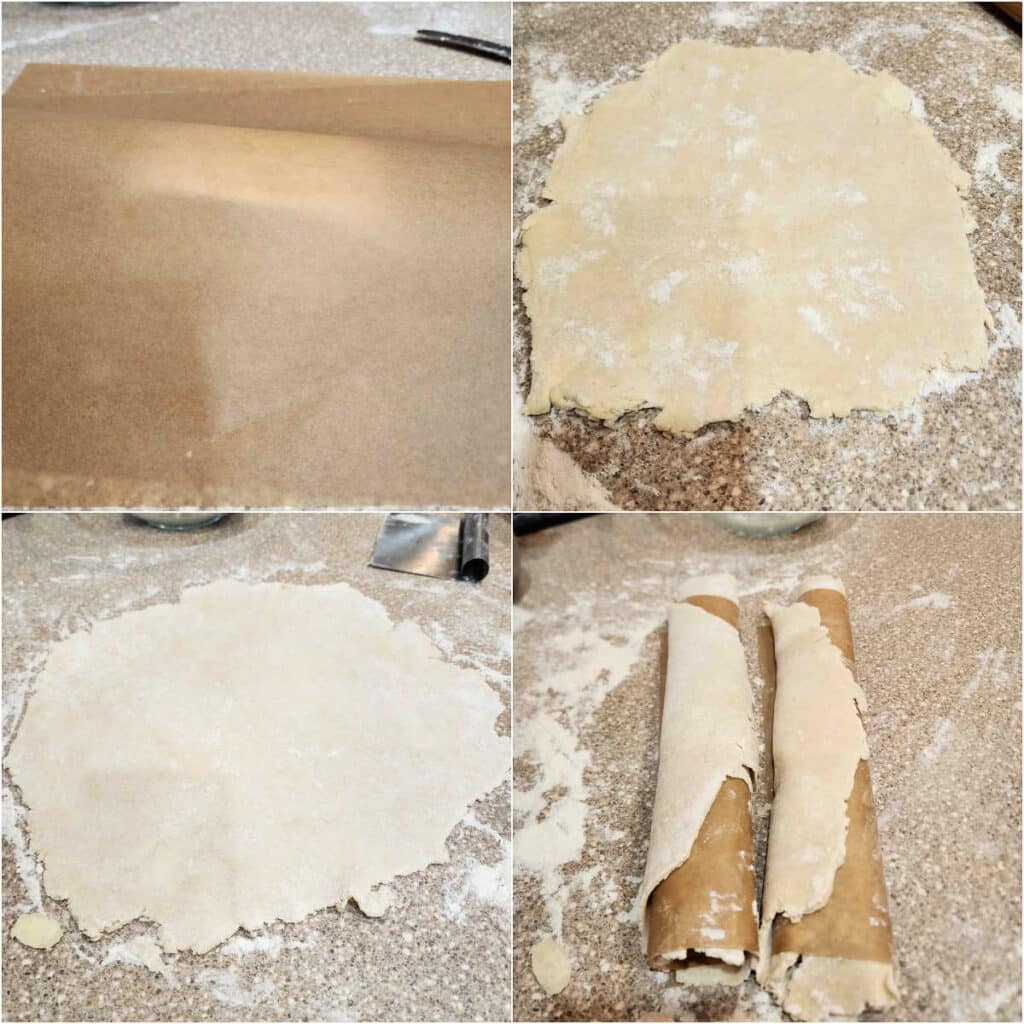
- Start rolling between parchment. The parchment will wrinkle as the dough rolls out. Just peel it off, smooth it out, and keep going.
- Once it’s about 10″ or so, remove both pieces of parchment and put it out on a floured work surface.
- Keep rolling until the brisee is about 12-13″ and no thicker than about 1/8″.
- Place a piece of parchment on the circle of dough and roll them up together loosely. This makes it easier to fit into the pie plate/tart pan later.
Store the filled biscuits back in the wrapper the rolls came in. They’ll be fine in the fridge for up to a week.
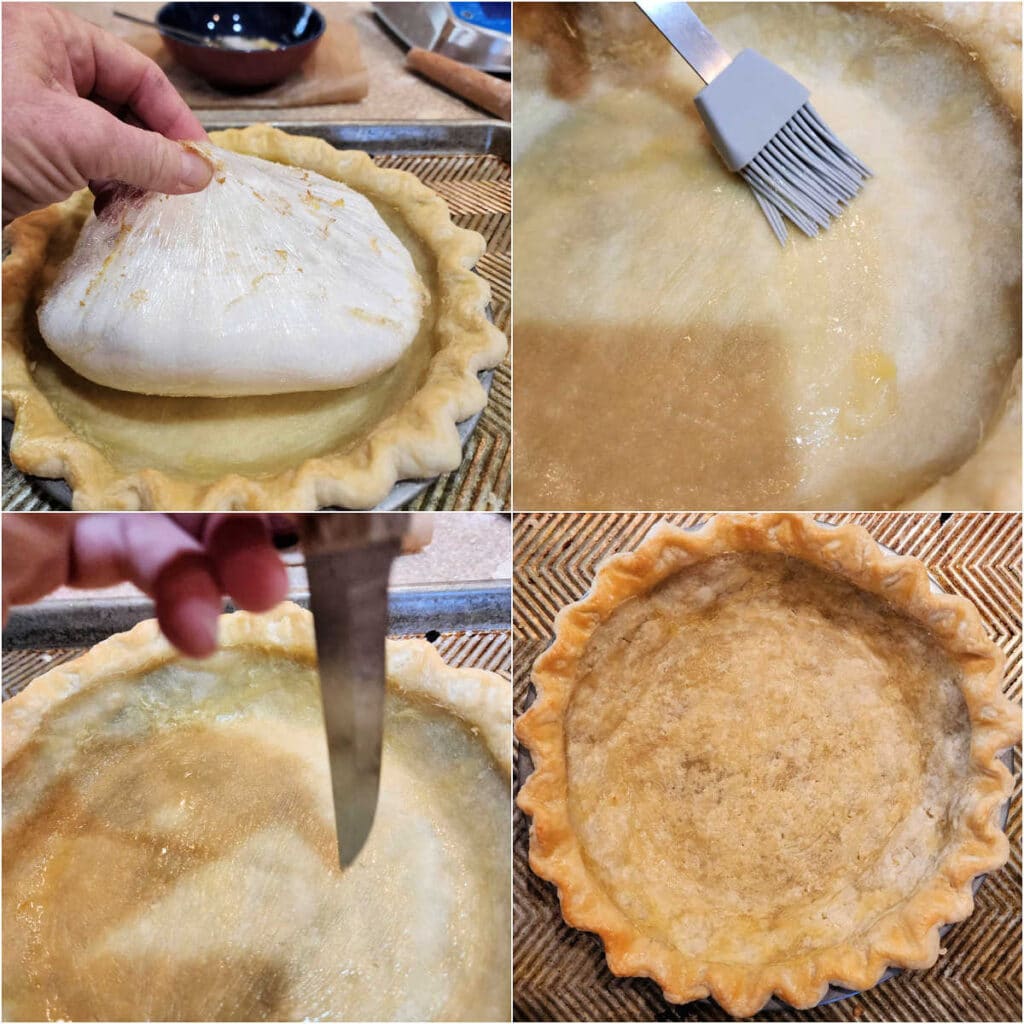
How Do I Patch a Cracked Crust?
Easy, friends. Just cut a piece of your excess dough to fit over the crack.
Wet the dough right around the crack–in this case, water is glue.
Place the cut piece of dough over the crack, press it down well, then gently roll that area so the patch adheres.
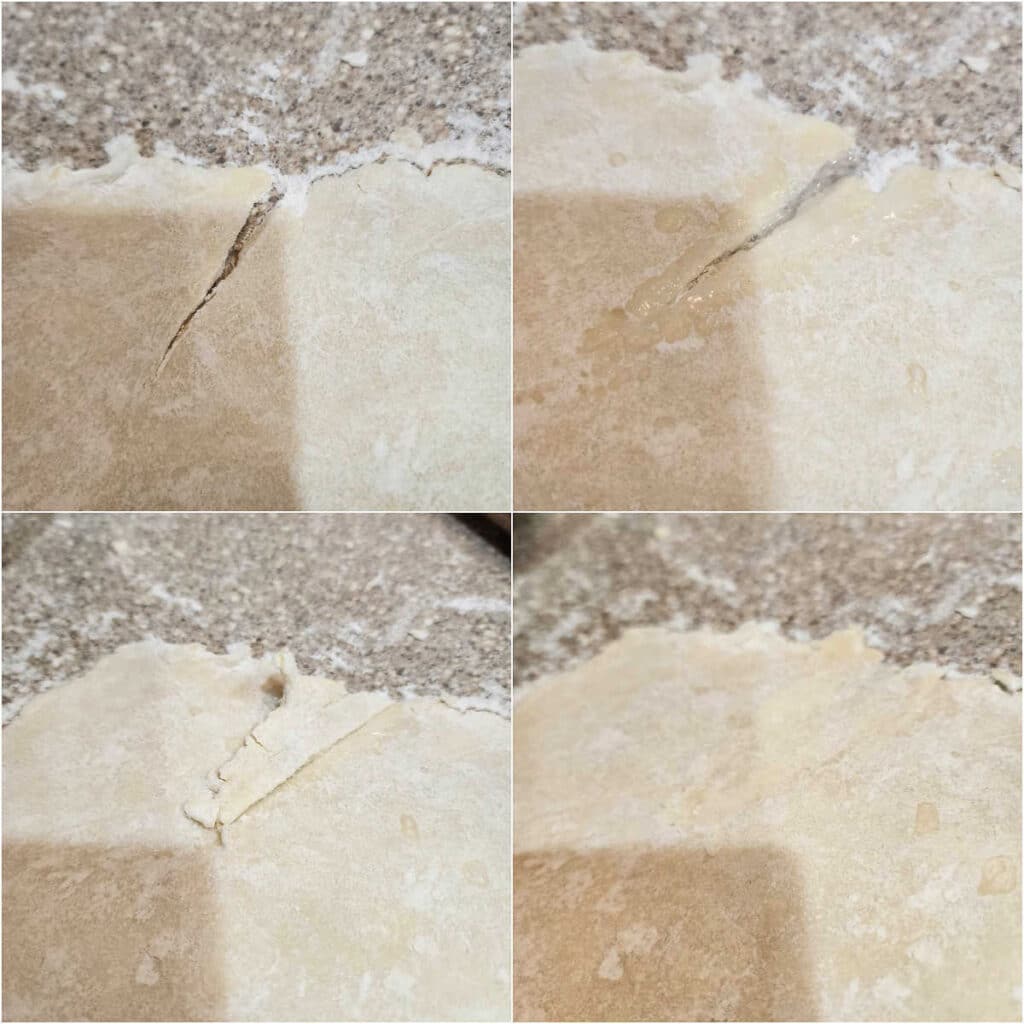
See that fourth photo?
You can barely see where the patch is.
Success!
How Do I Line My Pie Pan with Dough?
The biggest rule about lining your pie pan is not to stretch the dough. And that’s because stretching activates gluten and will cause the dough to shrink when you bake it.
Rather than pulling from the edges, push inward from the edges to carefully fit your dough down the sides and across the bottom of your pie pan.
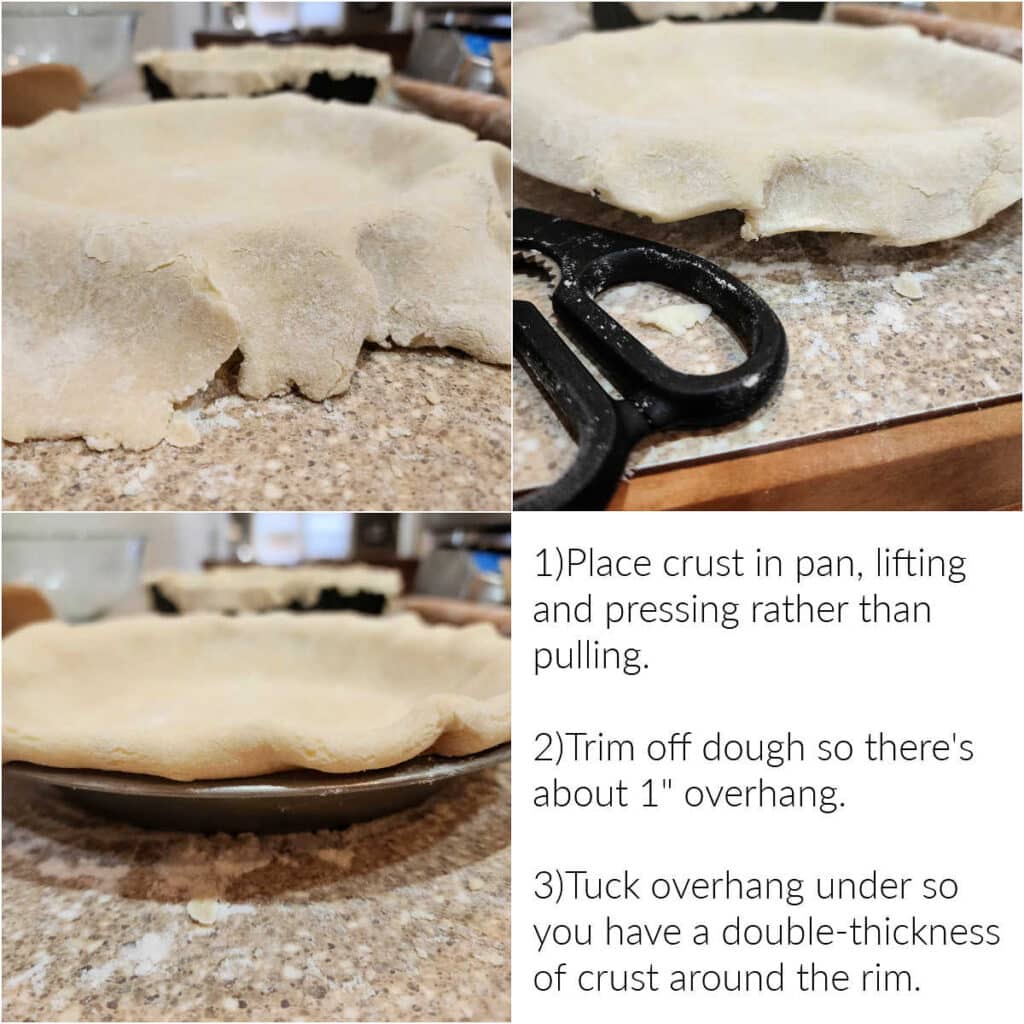
Rather than trimming your crust before putting it in the pan, use kitchen scissors to trim it once it’s in your pie plate. That way, you know exactly where to trim and don’t have to guess.
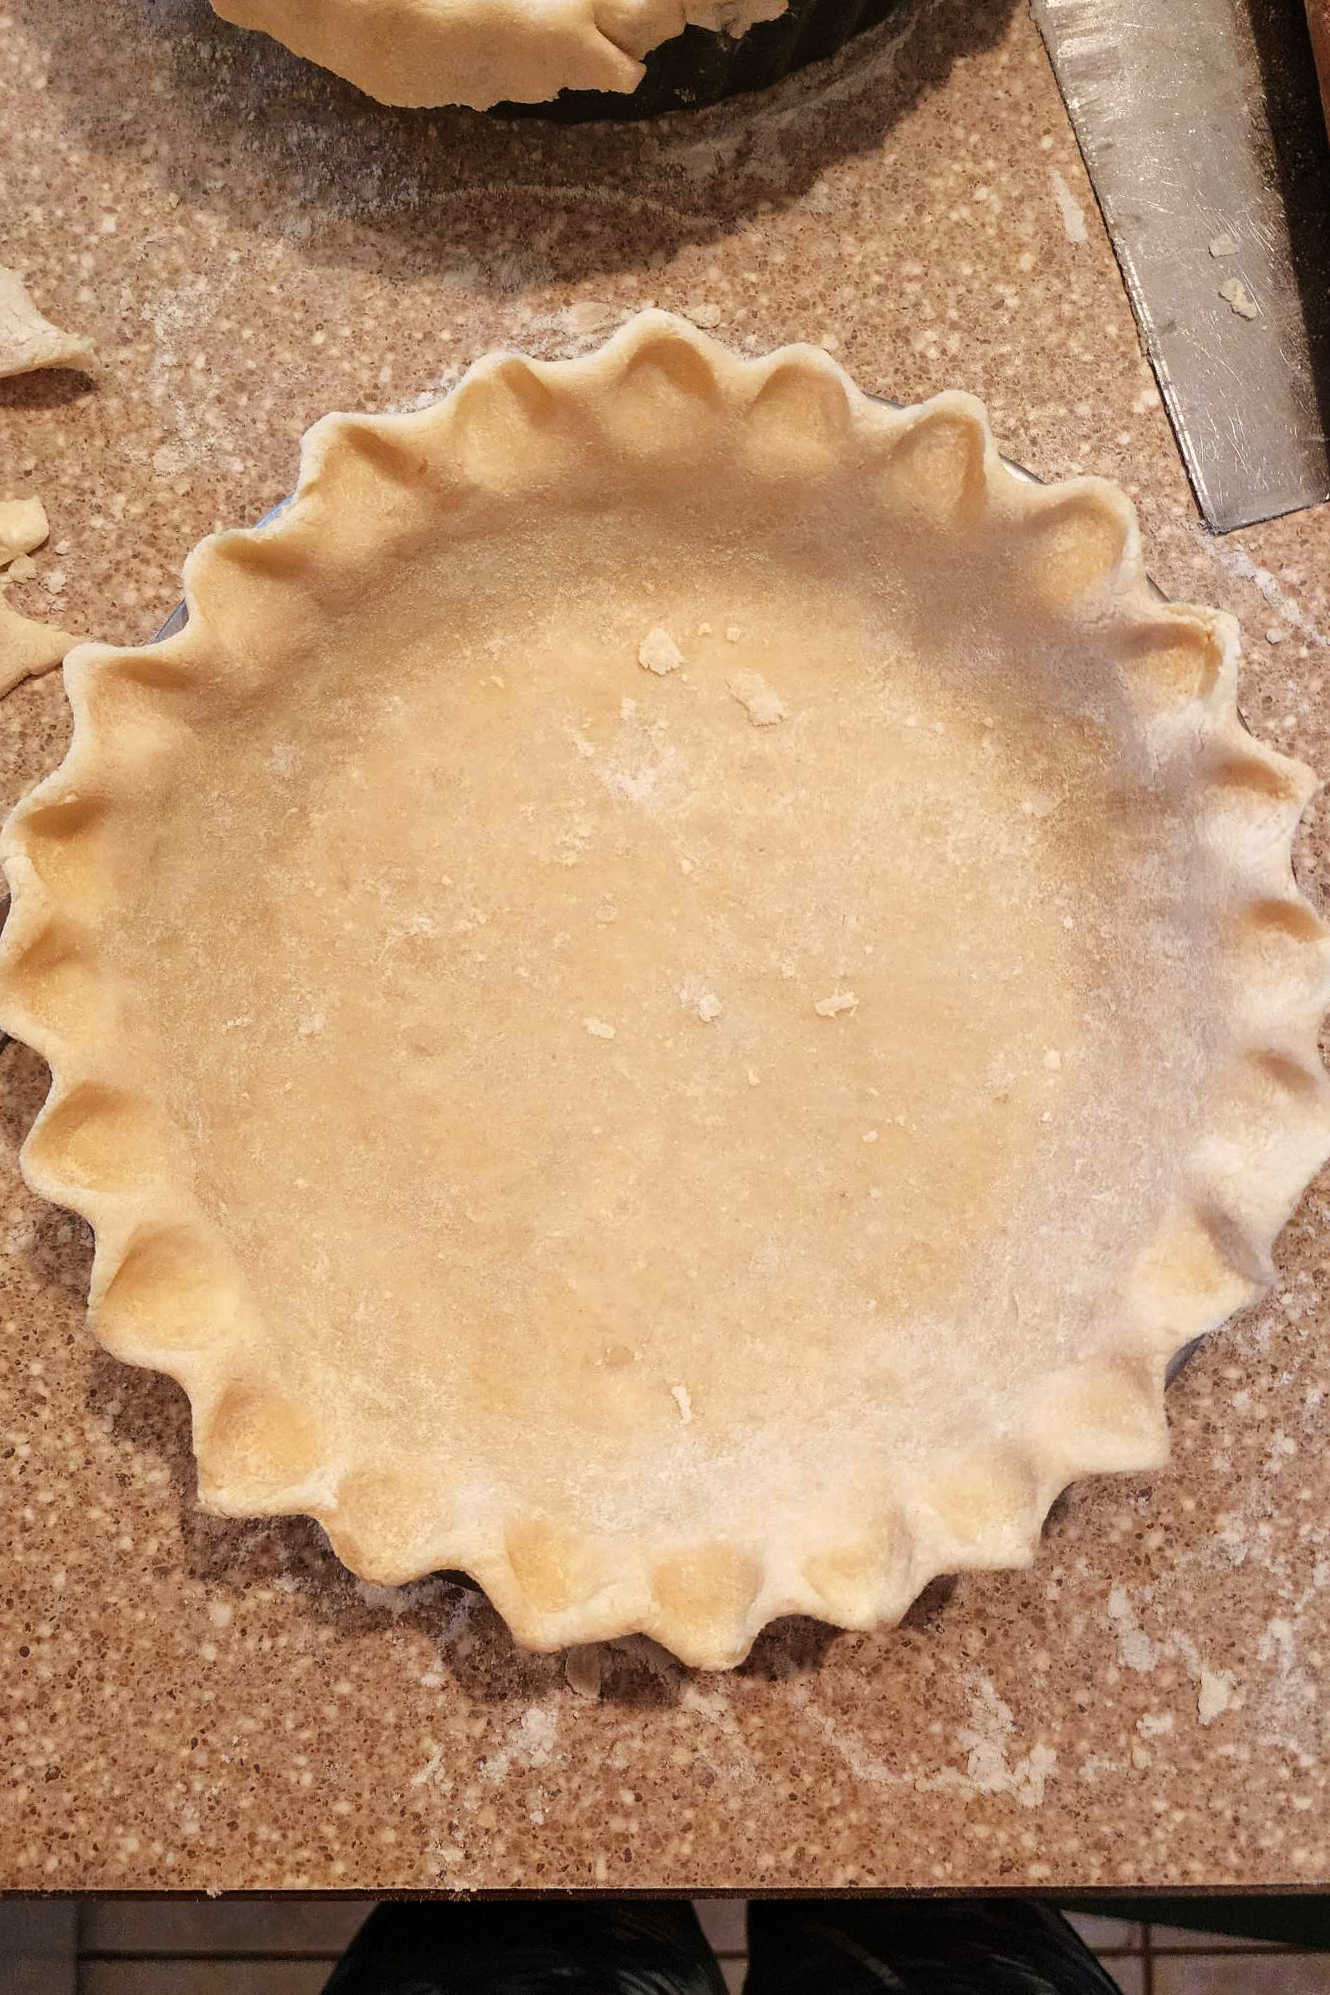
How Do I Make a Pretty, Crimped Crust?
There are plenty of ways to make fancy pie crust “treatments,” including cutting out shapes to “glue” on all around, adding baked pieces of dough after baking, and doing a classic crimp.
The classic seems to make everyone a little scared, but it’s easy to do. If you have fingers, you can do it.
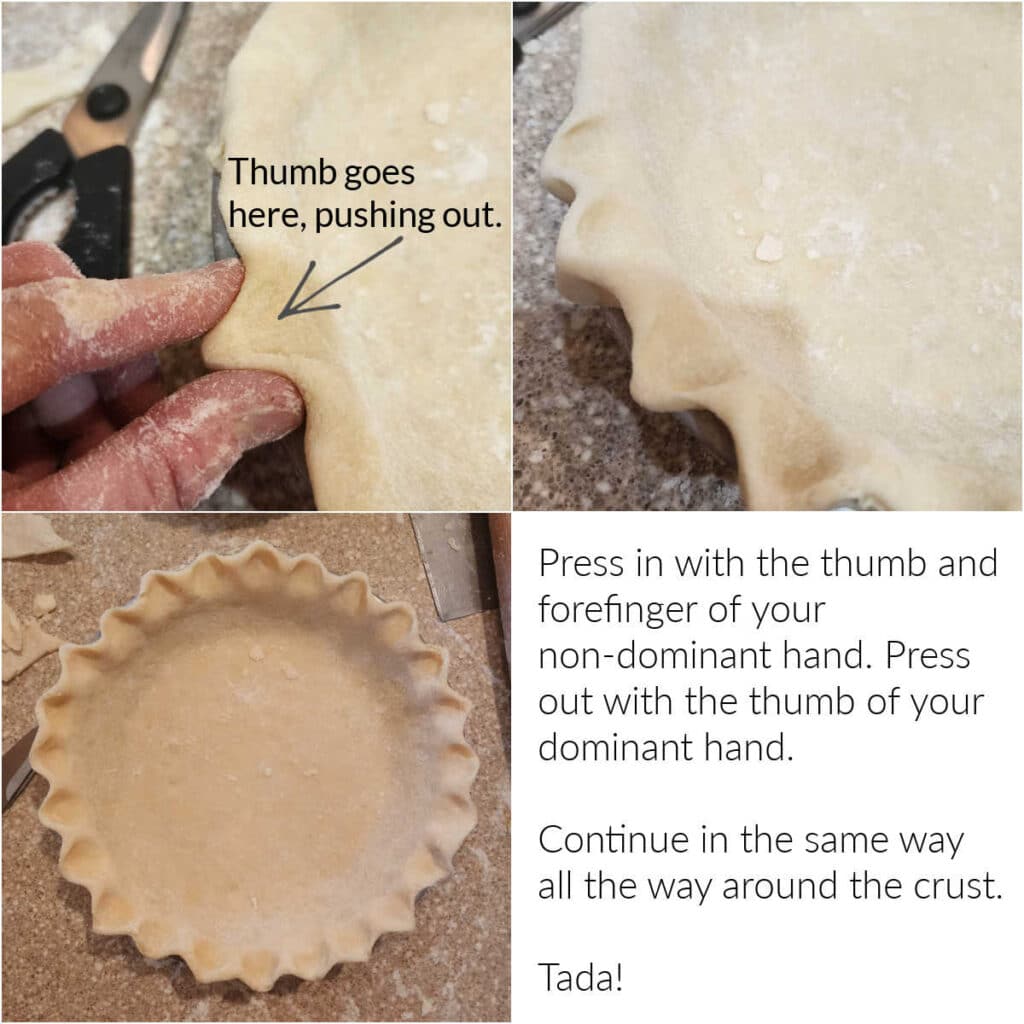
Just pick any spot on your crust to start. Place your forefinger and thumb close together and set them down on the edge of the crust, sort of pinching in towards the center of the (eventual) pie.
Use your thumb to press the dough between those two fingers outward, forcing it to form a triangular shape as you press it out.
Next, move your thumb on the “outside” hand to the place where your finger was, and, and continue around the pie, using the last crimp from your finger as the starting place for the next as you crimp all the way around.
Some people prefer to use their knuckle to press out. Experiment with what works for you.
And there is no rule saying you can’t just press down with the tines of a fork all the way around. It will be lovely, regardless.
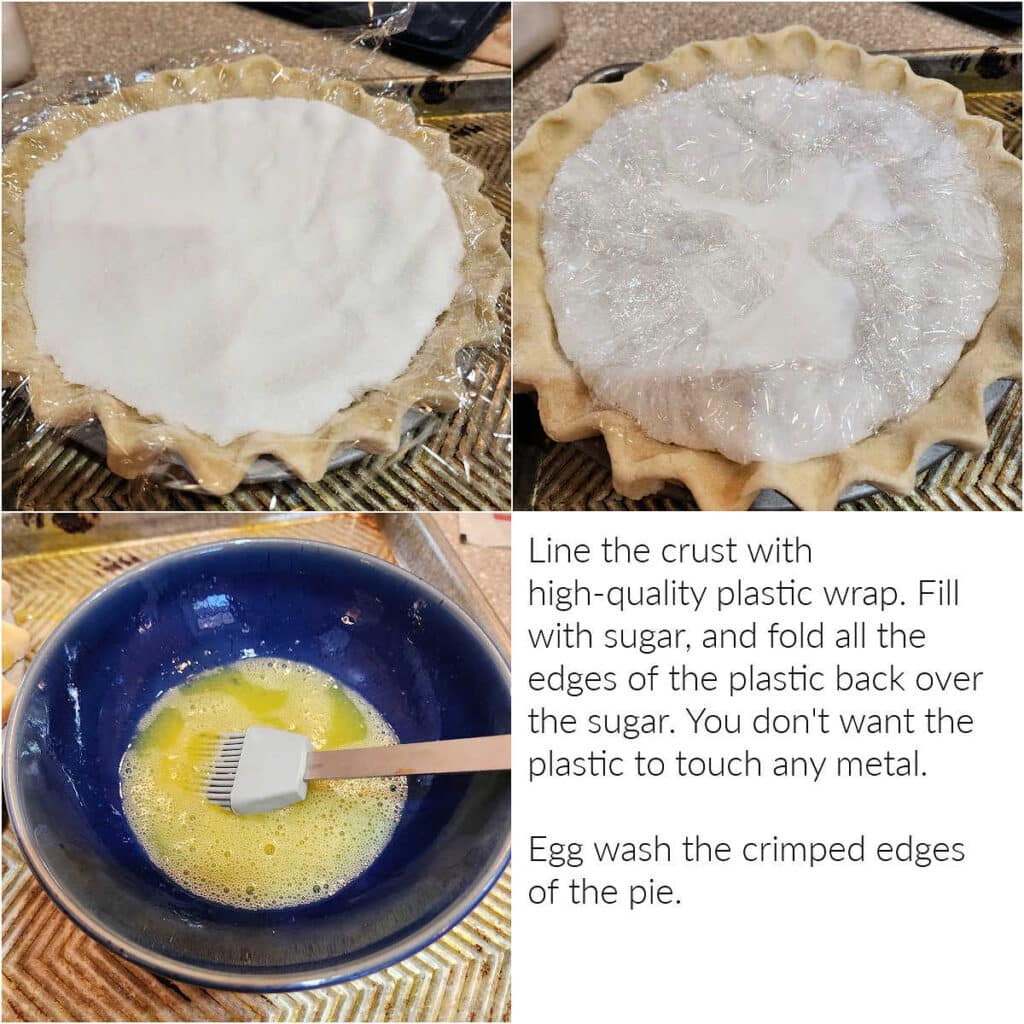
How Do I Blind Bake My Crust?
It’s time for a kitchen “secret:” You can put Saran wrap (and other high-quality plastic wrap) in the oven.
Using plastic wrap is my preferred way of lining the crust for blind baking because it doesn’t poke holes in your dough and conforms very easily to the contours of the pie crust.
My go-to pie weights used to be dry chickpeas, and I still recommend those, but sugar makes a great pie weight too.
Here’s what I do:
If you hate the idea of putting plastic wrap in the oven, my other favorite lining options are:
- crumpled and uncrumpled parchment paper
- large commercial coffee filters
Do NOT waste your money on pie weights that just stay in the bottom of your crust. You need something that will fill the crust as full as you will fill it with actual pie filling in order to keep the sides from sliding down during blind baking.
Note the amount of sugar I put in the plastic.
Once you have your pie all lined and filled with weights of your choice and egg-washed around the edges, bake at 375F for about 15-20 minutes.
This will set the top, crimped crust so it won’t slump and will act as an anchor for the rest of your dough once you remove the weights.
Next up:
- See how the plastic sort of shrinks up around the sugar, making it very easy to pull the whole thing out of the crust like a little bag? That’s why I like using plastic-wrap. But whether you use that or parchment or a coffee filter, carefully gather up the edges so sugar doesn’t go spilling everywhere and remove the whole thing to a bowl to cool off.
- Egg wash the rest of the crust.
- Poke holes with the tip of a knife to allow steam to escape and minimize the crust puffing up. It will still probably puff a bit, but it will be okay. I prefer using a knife to a fork, because the tines of a fork can leave big holes that could allow your eventual filling to leak out.
- Bake for another 10 minutes if you’re going to be adding a filling that needs to be baked, or bake until the crust is deeply golden brown all over if you are using an unbaked filling (like pudding or something). In this photo, since I’m using this crust to make a chess pie, the crust is only par-baked (which is just short for partially baked. No mysteries there!)
Helpful Pate Brisee Videos
UPDATE: I now have a three-part video series up all about how to make pie crust. Check it out.
Serving Suggestions
Use pate brisee as the crust for an indulgent quiche.
This is also my go-to pie crust for vinegar pie, chocolate chess pie, “plain” chess pie, and more.
The crust works equally well for both sweet and savory pies.
And you can also use the dough to make turnovers, homemade “pop tarts,” and hand pies.
Questions?
A Note About Measurements

Don't let its small price and small size fool you. The Escali Primo is an accurate and easy-to-use food scale that I have used for years. It's easy to store, easy to use, has a tare function, and easily switches between grams and ounces/pounds for accurate measurements.
It will help me and other readers so much if you take a moment to rate and leave a review for this recipe.
You can use the stars to rate 1-5 (5 is best), and leave a review in the comments. It helps me make adjustments if any are needed, and comments help others decide whether the recipe is worth making.
Other ways to share include pinning, and/or sharing on your favorite social media platform.
Thank you so much for taking the time!


Pate Brisee Recipe
The cook time given is for a par-baked or partially baked crust that you can then fill with whatever filling you like before baking everything together.
Ingredients
- 280 grams all-purpose flour 10 oz or 2 cups measured by whisking, spooning, and sweeping
- 224 grams unsalted butter 8 oz or 2 sticks
- heavy pinch of kosher salt I use Morton’s probably about 1/2 teaspoon
- 15 grams granulated sugar 1 tablespoon (optional)
- 112 grams ice cold water 4 oz or 1/2 cup 4 (you will probably not need all of it, so only add until the dough comes together as per the directions below)
Instructions
- Whisk together flour, salt and sugar (if using).
- Rub in the butter by hand. Do this by pinching the cubes of butter together with the flour.
- Continue pinching and making smaller pieces of butter while smearing a little of the butter into the flour. The smearing part will add to tenderness by coating the flour really well. The pinching part makes sure you have some larger pieces of butter for flakiness. Do this kind of quickly so the butter doesn’t warm up and start melting into the flour. If things start getting warm, throw the whole deal into the fridge or even the freezer for a few minutes to cool things back down.
- Once you’ve got your flour mixture to a nice consistency, start sprinkling in the water, a little at a time. In between each addition, toss the mixture by reaching your hands down the insides of the bowl and tossing the flour, butter, and water all together so the water evenly wets the rest of the ingredients.
- Resist the urge to add extra water. Once the dough (which will still look like flour crumbles) holds together when you squeeze it, you’re there.
- The whole “stop the processor when the dough comes together in a ball” makes us want to add too much water. If the dough is coming together in a ball, it’s too wet. Remember, the flour hasn’t even had a chance to fully hydrate yet. It takes a strong person to walk away, but I know you can do it.
- Please see the post for rolling, blind baking, and other specific instructions
Did You Make Any Changes?
Notes
Rolling Out the Dough
I like to roll initially between two pieces of parchment paper. I roll it out about halfway, until it’s roughly 3/8″ thick (no measuring, just thicker than you want it to be when you’re done). Then, I peel off the parchment from both sides and put the dough on a well-floured work surface and continue to roll, flipping the dough and moving it frequently to make sure it’s not sticking. If it does stick a bit, use your bench knife to help gently un-stick it by sliding it under the stuck part. Once I have it rolled into about a 12″-14″ rough round, I roll it up with a sheet of parchment and set it aside.How to Patch a Cracked Crust
Easy, friends. Just cut a piece of your excess dough to fit over the crack. Wet the dough right around the crack–in this case, water is glue. Place the cut piece of dough over the crack, press it down well, then gently roll that area so the patch adheres.How to Line the Pan with Dough
The biggest rule about lining your pie pan is not to stretch the dough. And that’s because stretching activates gluten and will cause the dough to shrink when you bake it. Rather than pulling from the edges, push inward from the edges to carefully fit your dough down the sides and across the bottom of your pie pan. Rather than trimming your crust before putting it in the pan, use kitchen scissors to trim it once it’s in your pie plate. That way, you know exactly where to trim and don’t have to guess.How To Make a Decorative Crimp
There are plenty of ways to make fancy pie crust “treatments,” including cutting out shapes to “glue” on all around, adding baked pieces of dough after baking, and doing a classic crimp.How to Blind Bake a Pie Crust
It’s time for a kitchen “secret:” You can put Saran wrap (and other high-quality plastic wrap) in the oven. Using plastic wrap is my preferred way of lining the crust for blind baking because it doesn’t poke holes in your dough and conforms very easily to the contours of the pie crust. My go-to pie weights used to be dry chickpeas, and I still recommend those, but sugar makes a great pie weight too.- crumpled and uncrumpled parchment paper
- large commercial coffee filters
- Whether you use that or parchment or a coffee filter, carefully gather up the edges so sugar doesn’t go spilling everywhere and remove the whole thing to a bowl to cool off.
- Egg wash the rest of the crust.
- Poke holes with the tip of a knife to allow steam to escape and minimize the crust puffing up. It will still probably puff a bit, but it will be okay. I prefer using a knife to a fork, because the tines of a fork can leave big holes that could allow your eventual filling to leak out.
- Bake for another 10 minutes if you’re going to be adding a filling that needs to be baked, or bake until the crust is deeply golden brown all over if you are using an unbaked filling (like pudding or something). In this photo, since I’m using this crust to make a chess pie, the crust is only par-baked (which is just short for partially baked. No mysteries there!)
Nutrition
And there you have it. I really hope this pate brisee tutorial has helped to demystify and de-scarify the process of making pie crust.

Hi, y’all! I hope you’ve enjoyed this post and hopefully also learned a thing or two.
If you like my style, I invite you to sign up for my occasional newsletter, The Inbox Pastry Chef.
Expect updates on new and tasty recipes as well as a bit of behind-the-scenes action. I hope to see you there!


Join in Today!
Line the pan with Saran Wrap or other heavy duty plastic wrap.
I think maybe you meant aluminum foil? Plastic wrap will just melt.
As odd as it sounds, plastic wrap will not melt in the oven. I do it this way all the time, and I find it’s the best way to line a pie crust for blind baking. It was one of the two truly new pieces of information I learned in culinary school.
The only caveat to using the plastic wrap is you don’t want to let it touch the oven racks or any other metal, including the pie pan. Because then, yes, it would melt. Just line your shell with plastic wrap, pour in your beans and then fold the overhanging edges up loosely over the beans. Works like a charm:)
Hi Pastry Chef
I had a major pastry fail yesterday and the daily spud pointed me in the direction of this post. I think I can see where I went wrong with my pastry. I’ll definitely be trying it again and will be using this post as a source!!
Thank you for the creation of this post! I found your blog just this morning and it’s simply smashing. I’ve only attempted pie crust once and was shocked at my failure. You bring me renewed hope for bragging rights!
Hi, Jessica! Glad you found me, and thanks for commenting! I have been shocked by some of my pastry failures, too! 😆 If you still need some encouragement, here’s another post with a certificate of Pie Crust Mastery for you to print out and hang on your fridge: http://onlinepastrychef.wordpress.com/2009/03/06/pie-crust/
Take care!
Wonderful information! I’ll have to give this a go.
Thanks for an incredibly informative post! I hope that over time I can internalize these tips and consistently make a fantastic crust 🙂
Wow, I feel so honored! This is amazing. Thank you for taking the time to go into such detail. I indeed practice many of the no-nos in this post (too much water, stretching the dough when it’s in the pie tin, etc. I kind of want to record this and play it on my ipod while I’m making the dough – kind of like those language lessons where you have to repeat after the instructor.
Cheers!
Will
Hi, Will.
I’m so pleased I could help. And as far as I’m concerned, there’s no point in explaining something half-way. I know your next crust–and everyone else’s will turn out perfectly! Have fun in the kitchen with your Recipe Play!
FFFantastically informative post 🙂 This will improve my pastry efforts no end!
Congrats on making the FFF list! 🙂