This post will teach you exactly how to make real puff pastry, the kind where you have to get a block of butter and a block of dough combined using nothing but a rolling pin and the power of your mind.
Puff pastry is not hard to make, but there are a lot of rules. I promise to go over all the rules of making puff pastry, all the hows and whys behind the what-to-dos, so that by the end of the post, you will be able to confidently make your own puff pastry.
If you’re still a little apprehensive, maybe start with rough puff pastry or my easy croissant recipe instead.
For ease of browsing, you can find all my pastry dough recipes in one place. Now let’s get to it!

Watch my how to make puff pastry web story here.
I wrote about puff pastry Long, Long Ago, but apparently the word isn’t out that puff isn’t that big a deal. So, because I am a Selfless Helper, I will now tell you all about puff pastry–the ins and outs, the folds, the terminology: all of it.
Puff Pastry Isn’t That Hard To Make. Honest.
First, here’s a secret: it is more difficult to make a good pie crust like pate brisee than it is to make puff pastry. For real.
Pastry Chef Online Participates in Affiliate Programs. If you make a purchase through one of my links, I may earn a small commission. For more information click to read my disclosure policy
Most folks consider making puff pastry a daunting task because it is time-consuming. That it is, but it is not difficult at all.
As a matter of fact, it’s pretty mindless.
You don’t even have to remember how many times you’ve turned the blasted thing–all the directions I’ve ever seen tell you to make marks in the dough after each turn to keep count!
Like this:
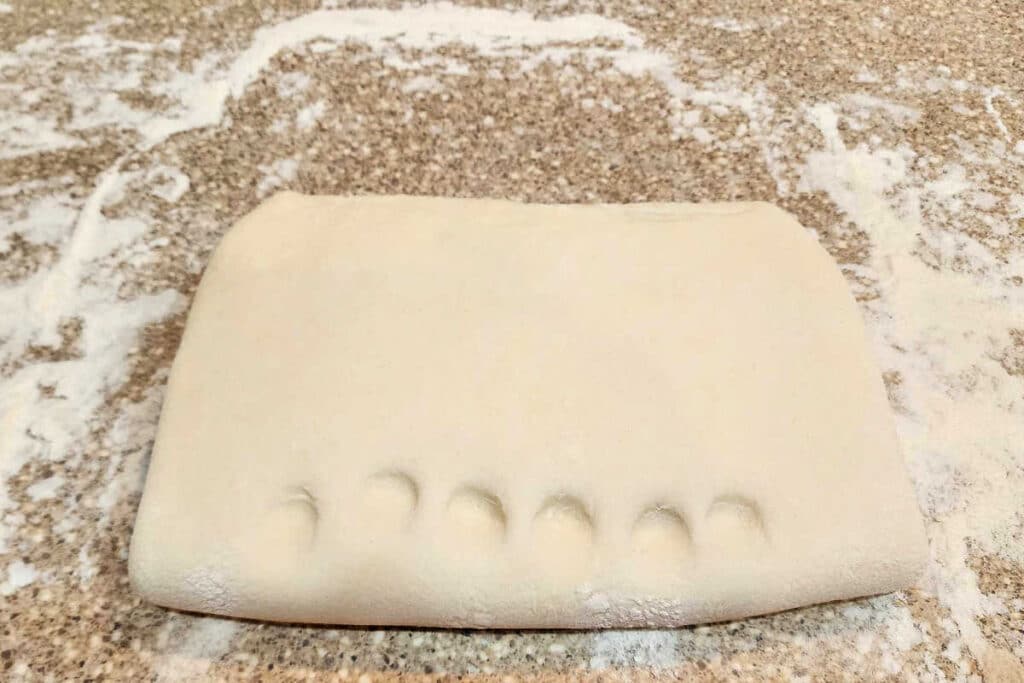
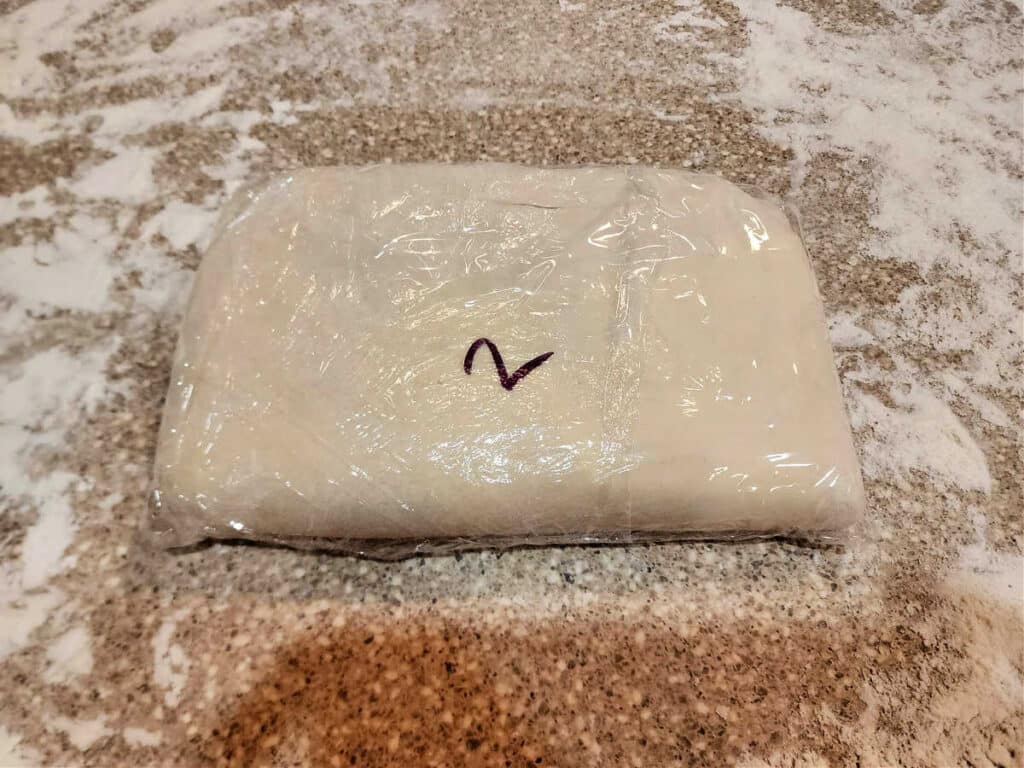
In this present time of wonders, I tend to forgo finger marks in favor of a Sharpie!
What Is Laminated Dough?
Puff pastry is a laminated dough.
This means that the whole is comprised of layers that are all sandwiched together. In the case of plywood, you’ve got thin layers of wood sandwiched together with glue.
In the case of puff, you’ve got thin layers of gluten-rich dough sandwiched together with butter.
The Difference Between Puff Pastry and Croissant Dough
While both puff pastry and croissant dough are laminated, croissant dough contains yeast while the dough portion of puff pastry is basically pie crust.
On the ease-of-making scale, it is much easier to work with puff pastry than it is to work with croissant dough, because while you’re working, you don’t have a bunch of yeast working to make your dough rise at the same time you’re trying to roll it out.
Puff pastry shines in recipes where you want a single layer of pastry that will rise to (sometimes) dizzying heights.
Croissant dough, a yeasted laminated dough, is really made for making croissants where the layering is amplified by rolling triangles of the dough up into crescents, letting them rise, and then baking.
How to Make the Dough (Detrempe)
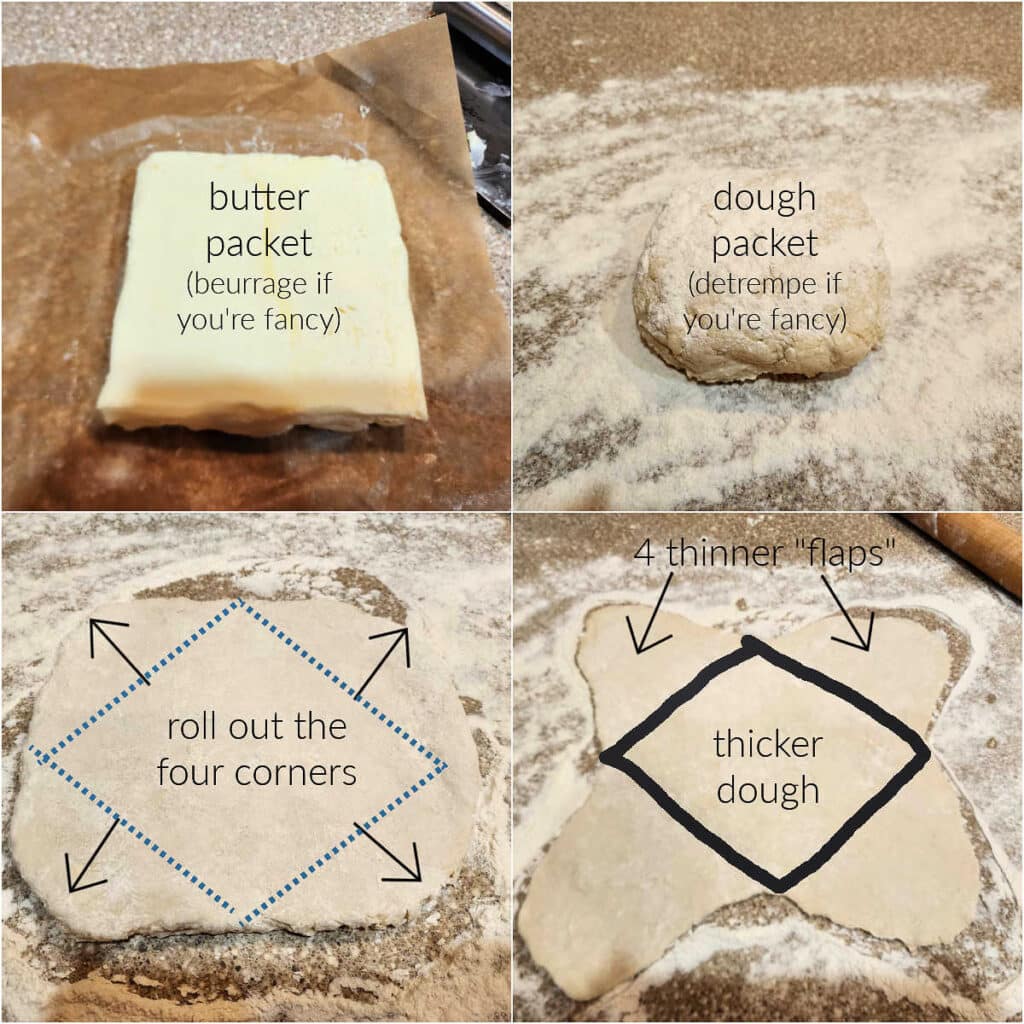
Making the butter packet (beurrage) is pretty easy, and there’s no one specific way to do it.
Just bash and mash the butter together until it’s about a 5-6″ square roughly 1/2″ thick or so. Chill it for a bit while you make the dough (detrempe).
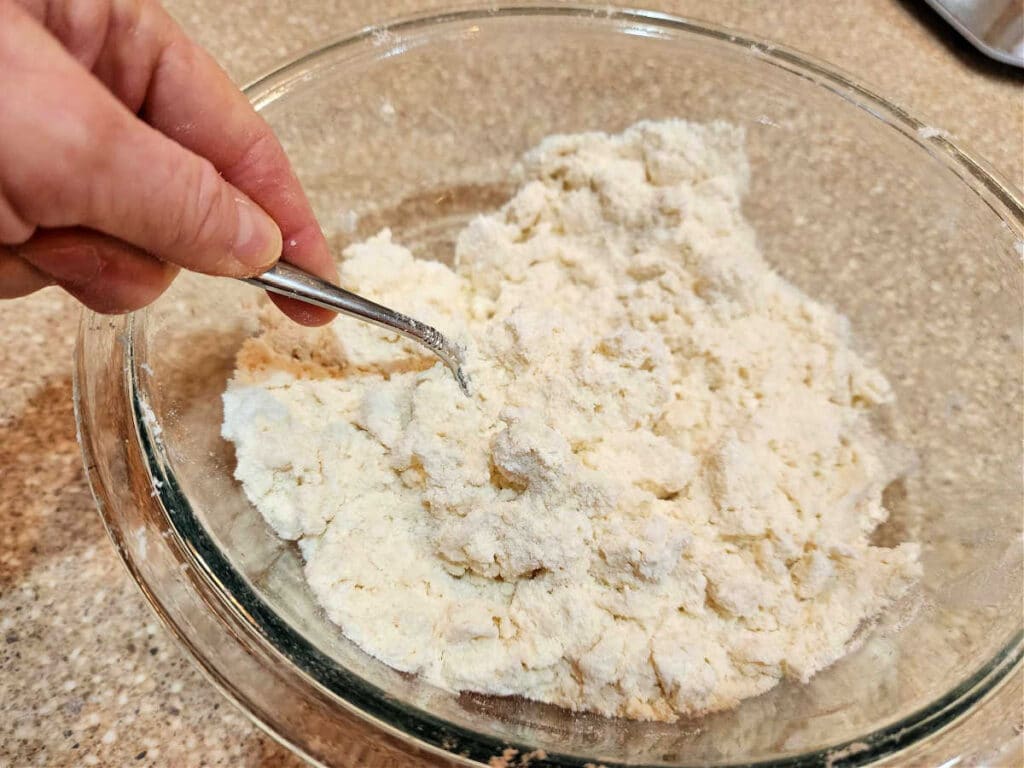
The detrempe is made very much like you’d make regular pie crust.
The main difference is that you want to completely work the small amount of butter (2 oz or 1/2 stick) evenly and completely into the flour and salt mixture.
We don’t need or want “pea sized pieces of butter,” because we have a whole honking beurrage to deal with later.
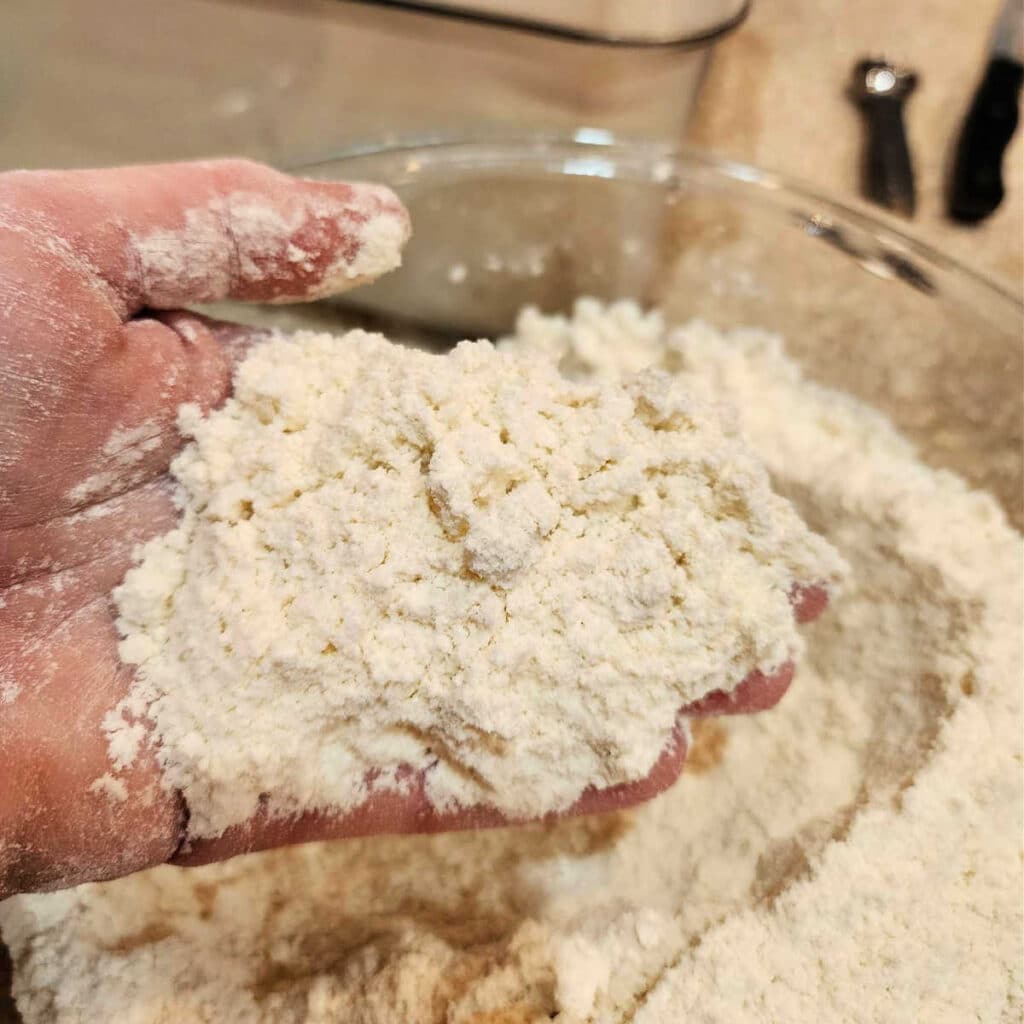
So use your fingertips to smear all the butter into the flour.
Every time you feel a piece of butter, smoosh it into the flour until you cannot feel anymore pieces at all.
You should end up with a fairly evenly “mealy” texture with zero pieces of butter visible.
Once you have that part done, make a well in the center and add all the lemon juice or vinegar.
Start by adding about 1/2 of your ice water, and then toss everything together with a fork.
Keep adding water and tossing until there is very little loose flour in the bowl and you have a shaggy and rather unattractive dough.
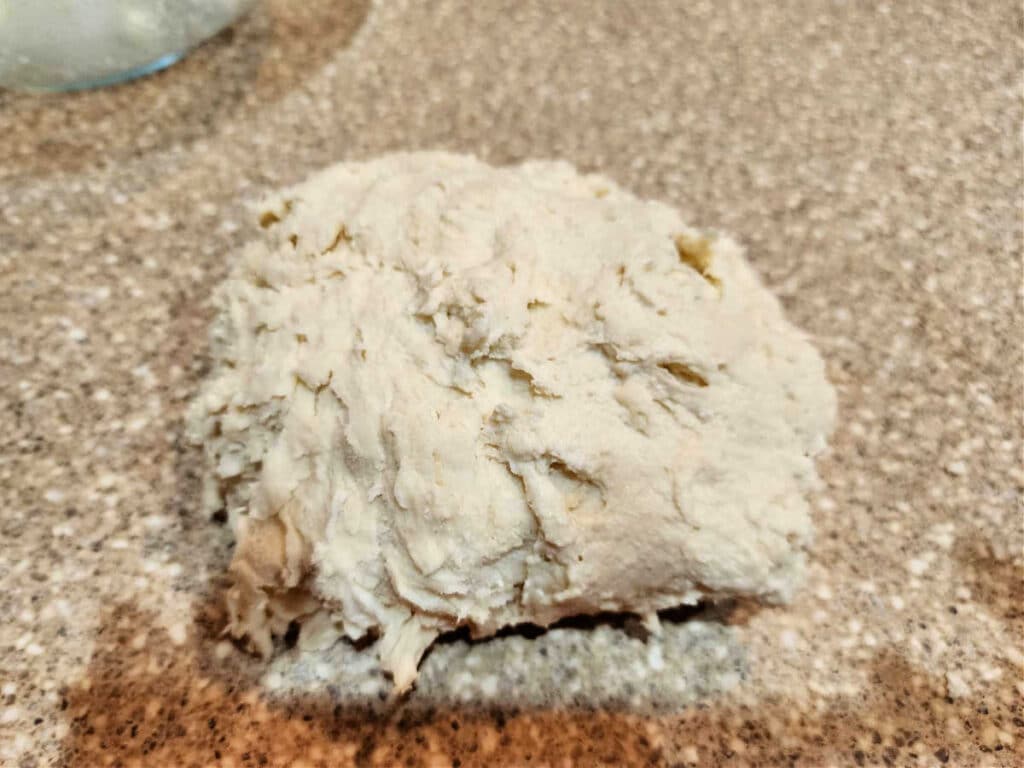
The dough will be slightly sticky and won’t feel very cohesive.
It’s fine.
Jenni Says: If the detrempe is a bit drier than it should be (and if it’s your first time, how would you know?) it will still be fine. Brushing on a little ice water with each turn helps to both keep things chilled and adds more liquid.
How to Wrap the Butter in Dough (Paton)
No, you don’t need to know these fancy words.
But when you do the initial “introduction” of the butter (beurrage) into the dough (detrempe), what you end up with is called the “paton.”
I call it an envelope of dough with a butter letter inside.
Whatever. Same thing.
Anyway, here’s how to do it:
- Have your cool-not-cold packet of butter ready.
- Take your detrempe and put it on a floured surface.
- Roll it into a rough 10-ish” square-ish shape.
- Roll each corner of the square into a thinner flap.
So far, so good, right?
Okay, now to get that butter into the dough.
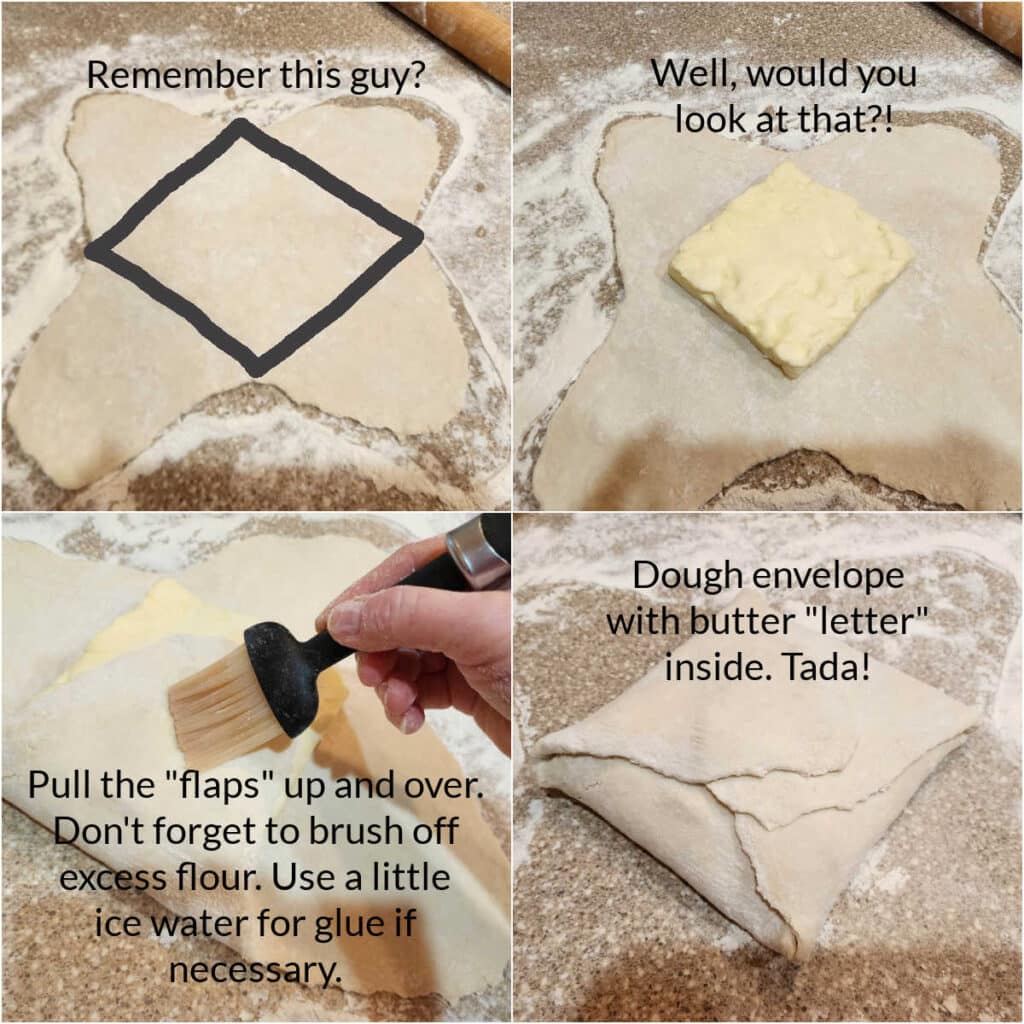
- We start again with the dough with the flaps rolled out fairly thinly.
- Look how the butter fits right there in the middle!
- Fold all the flaps in to completely cover the butter. Brush off excess flour and brush on a little ice water if you have to to get everything to stick.
- Paton achieved! Admire your work.
How to Get Layers in Your Puff Pastry
To achieve the layering effect, you could just roll out ridiculously thin pieces of dough, brush some butter on them, and stack them up. That’s exactly what you’re doing when you use phyllo dough. Think of that process as sort of a deconstructed method of making puff pastry.
In order to make puff pastry, here’s the rundown:
- Take some lean dough (very little, if any, fat) and wrap it around a slab of butter.
- Start rolling it carefully so it’s thin enough to fold. This first rolling starts you off with three layers–the bottom lean dough, the butter in the middle, and the top lean dough.
- If you fold it into thirds like a business letter (a letter fold), you’ll have 7 layers: dough, butter, (dough, dough), butter, (dough, dough), butter, dough. The doughs are in parentheses because the two layers get mashed into one by rolling.
OR
- Fold both ends into the middle and then fold at the middle (a book fold), you’ll have 9 layers: dough, butter, (dough, dough), butter, (dough, dough), butter, (dough, dough), butter, dough.
- From there, keep the dough chilled between rollings and proceed with making book folds and/or letter folds until you have hundreds of layers–about 6 turns.
Most pastry experts agree that classic French puff pastry is made by folding the dough into thirds and rolling it out again a total of six times.
Jenni Says: My rolling schedule is make the dough, chill it for an hour, Make the butter packet and enclose it in the dough, do 2 turns. Chill one hour, do two more turns. Chill two hours. Do the last two turns and then roll out to 1/4″. Done!
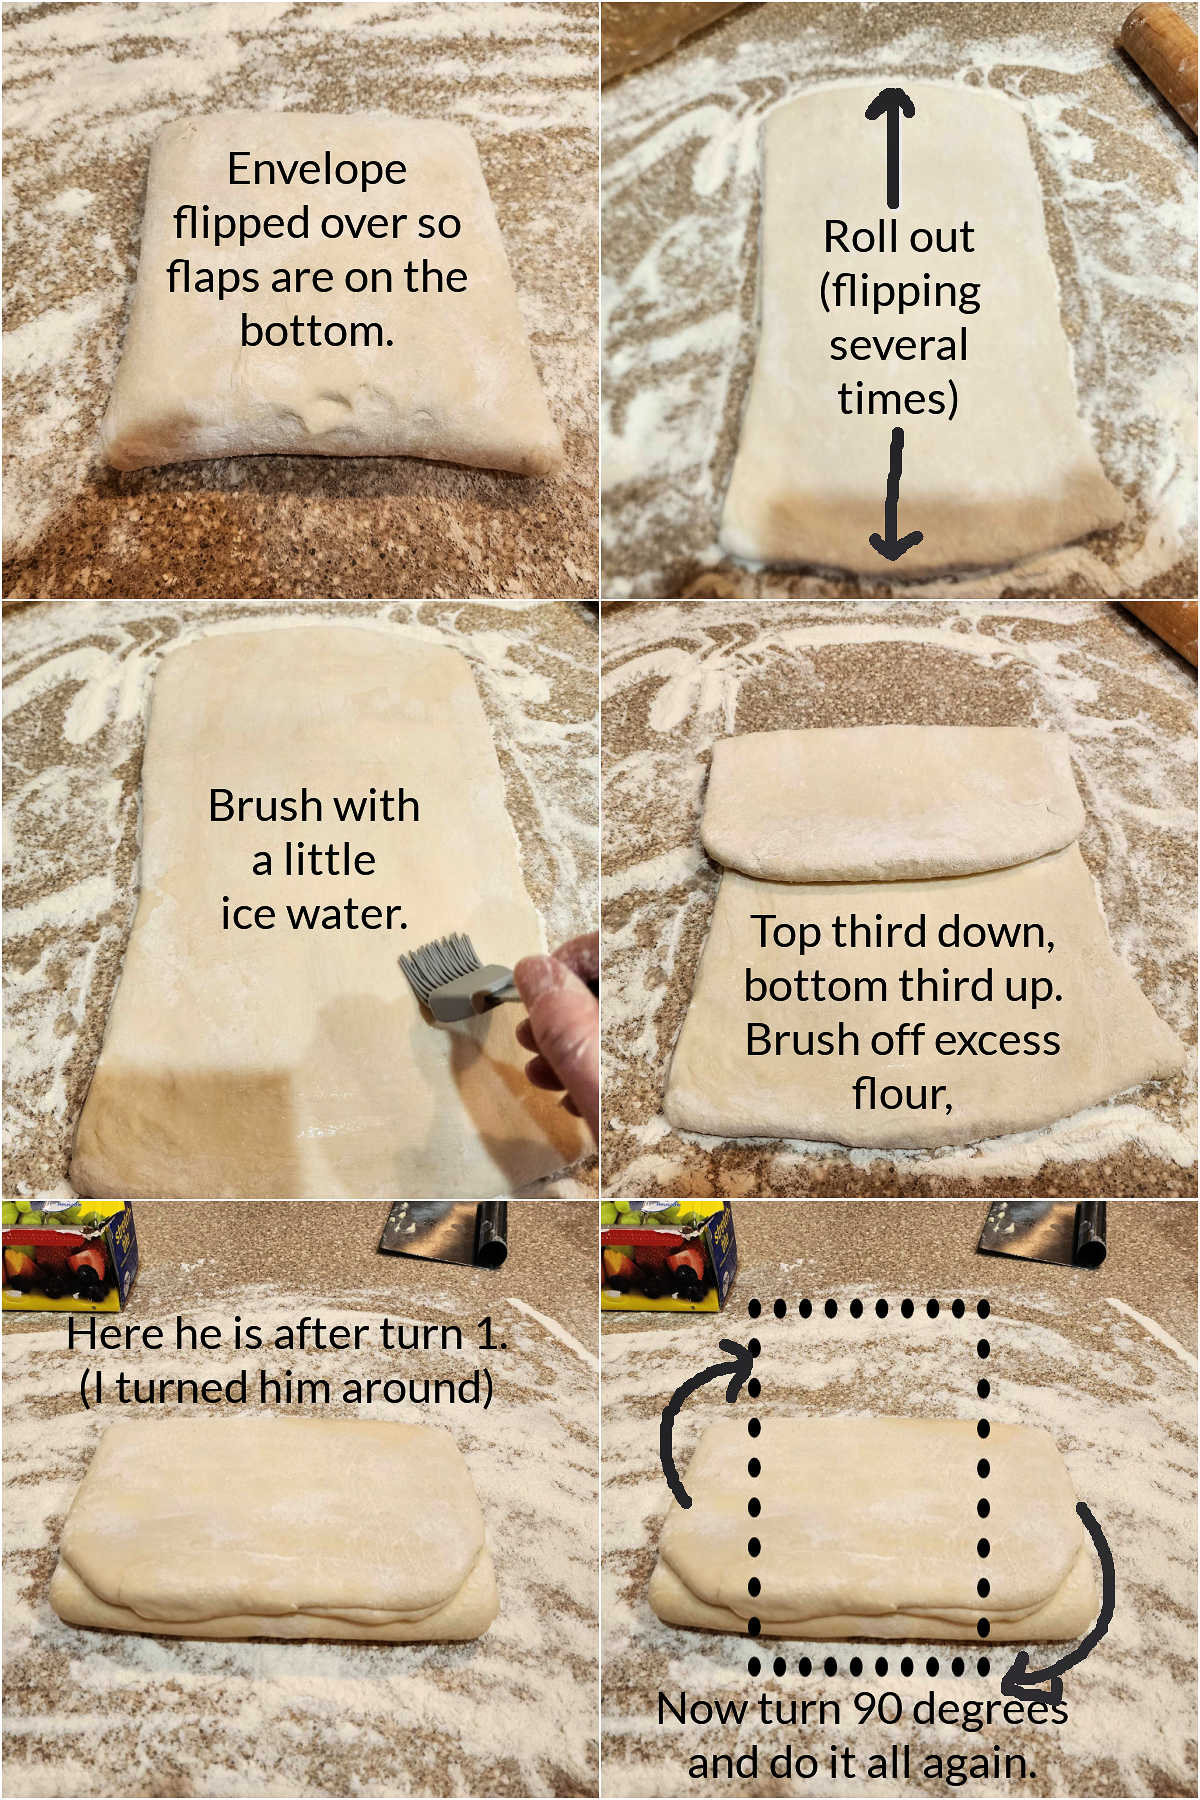
What Does a Complete Turn Look Like?
First, let’s walk through it in words. Then I’ll show you a picture.
- For the first turn, flip the envelope of dough over so the flaps are down.
- Roll out in one direction until it’s roughly 2 1/2 times longer than it is wide.
- Brush with some ice water.
- Fold the top third down and the bottom third up.
- Turn 90 degrees.
- That’s one turn.
Would you like to save this post?
If you work fairly quickly, you can do two consecutive turns before you’ll need to refrigerate your dough.
Jenni Says: If your dough starts getting soft and no longer feels cool, refrigerate it for at least 30 minutes, even if you’ve only done one turn.
Keep in mind that you can make as few or as many folds and turns as you want, though.
Fewer layers (although we’re still talking over 100) will rise higher but won’t be as flaky and ethereal.
More layers will certainly puff, but not as high. After 7 turns, your layers will be so thin that they won’t puff much at all, negating all your hard work.
I recommend rolling and folding between 5-7 times, but honestly, I generally go with the standard 6 turns.
The classic ideal is that the dough should rise 8x its initial height. So, if your dough is 1/4″ to begin with, you can expect the height after baking to be around 2″.
And look: I made a video to help you out!
Tips for Successfully Making Puff Pastry
Don’t let the minutiae scare you.
Rather than saying “I have to follow all these rules,” and say “Yay, I get to follow all these rules. Fun!”
- Rule number One for achieving Lovely Lamination is that the consistency of the butter should mimic as closely as possible the consistency of the dough (called detrempe, if you’re fancy).
If the butter is too hard, it will just break up and poke holes in the detrempe. Rolling out will be Difficult At Best, and you won’t end up with a continuous sheet of butter.
If the butter is too soft, it will just soak into the dough and guish out the sides, leaving you with an overly-rich dough with exactly one layer. Not good. - Rule number Two: extra flour is mandatory.
Make sure your rolling surface and the surface of the dough is lightly floured at all times. This means that you’ll have to keep adding more, a little at a time.
Sticking can tear your delicate layers, allowing even right-consistency butter to guish out.
Since the tough layers (lean-ish dough) are separate from the tender layers (butter), a little more flour isn’t going to hurt anything–you’ll still get an excellent rise. - Rule number Two-A: brush off the excess flour before folding.
See, that’s why this is rule 2A instead of rule 3. The time that you want the dough to stick is when the dough layers are being rolled together.
To make sure that those two layers become one, you need to make sure that the surface is as flour-free as you can make it before folding.
They make a keen tool called a bench brush made especially for this purpose, but you can just as easily use a fairly stiff pastry brush or paintbrush. - Rule number Three: as you roll, flip your dough over fairly frequently.
Because of friction, the top layer will always roll farther than the bottom layer. In order to keep the layers even, flip your dough frequently. - Rule number Four: Chill out.
The refrigeration periods between folding and rolling (turns), allow for the butter to maintain Optimum Plasticity–not too cold; not too hot–and for the gluten formed by all the turning (which is really just a type of kneading) to relax enough to be able to roll out multiple times.
Don’t think you can get away with making more than two turns at a time.
Either your butter will start guishing out or the detrempe will become too sproingy, making it very hard to roll out.
Thirty minutes to an hour under refrigeration will take care of Both Issues. - Rule number Five: It’s hip to be square.
As much as I love the rustic look of Free Form Baked Goods, puff pastry requires fairly strict adherence to the Ideal Rectangle.
Roll with finesse, and when finesse fails pull gently with your hands, to square up the dough as much as possible before folding.
Keeping the dough square with all the edges meeting up more or less perfectly gives you the maximum amount of dough containing all possible layers.
If you don’t keep the dough square, there will be some areas around the edges that could lack as many as hundreds of layers, causing uneven rising.
This is especially crucial if you want to bake a large sheet of puff, but for consistency’s sake, it’s always good practice to Shoot for the Rectangle.
More Helpful Puff Pastry Tips
What Type of Flour Should I Use?
If you can find it, use a high-protein pastry flour. You want a lot of protein to develop a lot of gluten. You want pastry flour because it is finely ground and sifted. If you can’t find high protein pastry flour, a higher-protein all-purpose flour such as King Arthur will work just fine. It’s what I use.
What Type of Butter Should I Use?
For the best puff in your puff, you’ll want to use a “European style” butter with relatively low moisture content.
Granted, water releases steam which causes the puff in the first place, but there’s already some water both in the detrempe and in Special Butter.
Using plain old store brand or even name brand Amurkin Butter pushes you right over the edge to soggy.
Plugra is an excellent US-made brand that is widely available and that I’ve had very good luck with.
Regardless, look for butter with a butterfat content of 82%. And, no, 80% butterfat isn’t close enough. That’s what “normal” butter contains.
Jenni Says: While you don’t have to spring for fancy high butterfat butter, your puff will rise higher if you use it. And if you’re going to go to the trouble of making homemade puff pastry, you may as well go all-in.
What Do I Do After I Make All Six Turns?
Once you’ve finished making all of your turns, trim off all the edges of your sheet of puff pastry.
If you bake the folded portions, it’ll end up puffing like a book with a warped cover with leaves fanning out only in one direction instead of rising High and Even.
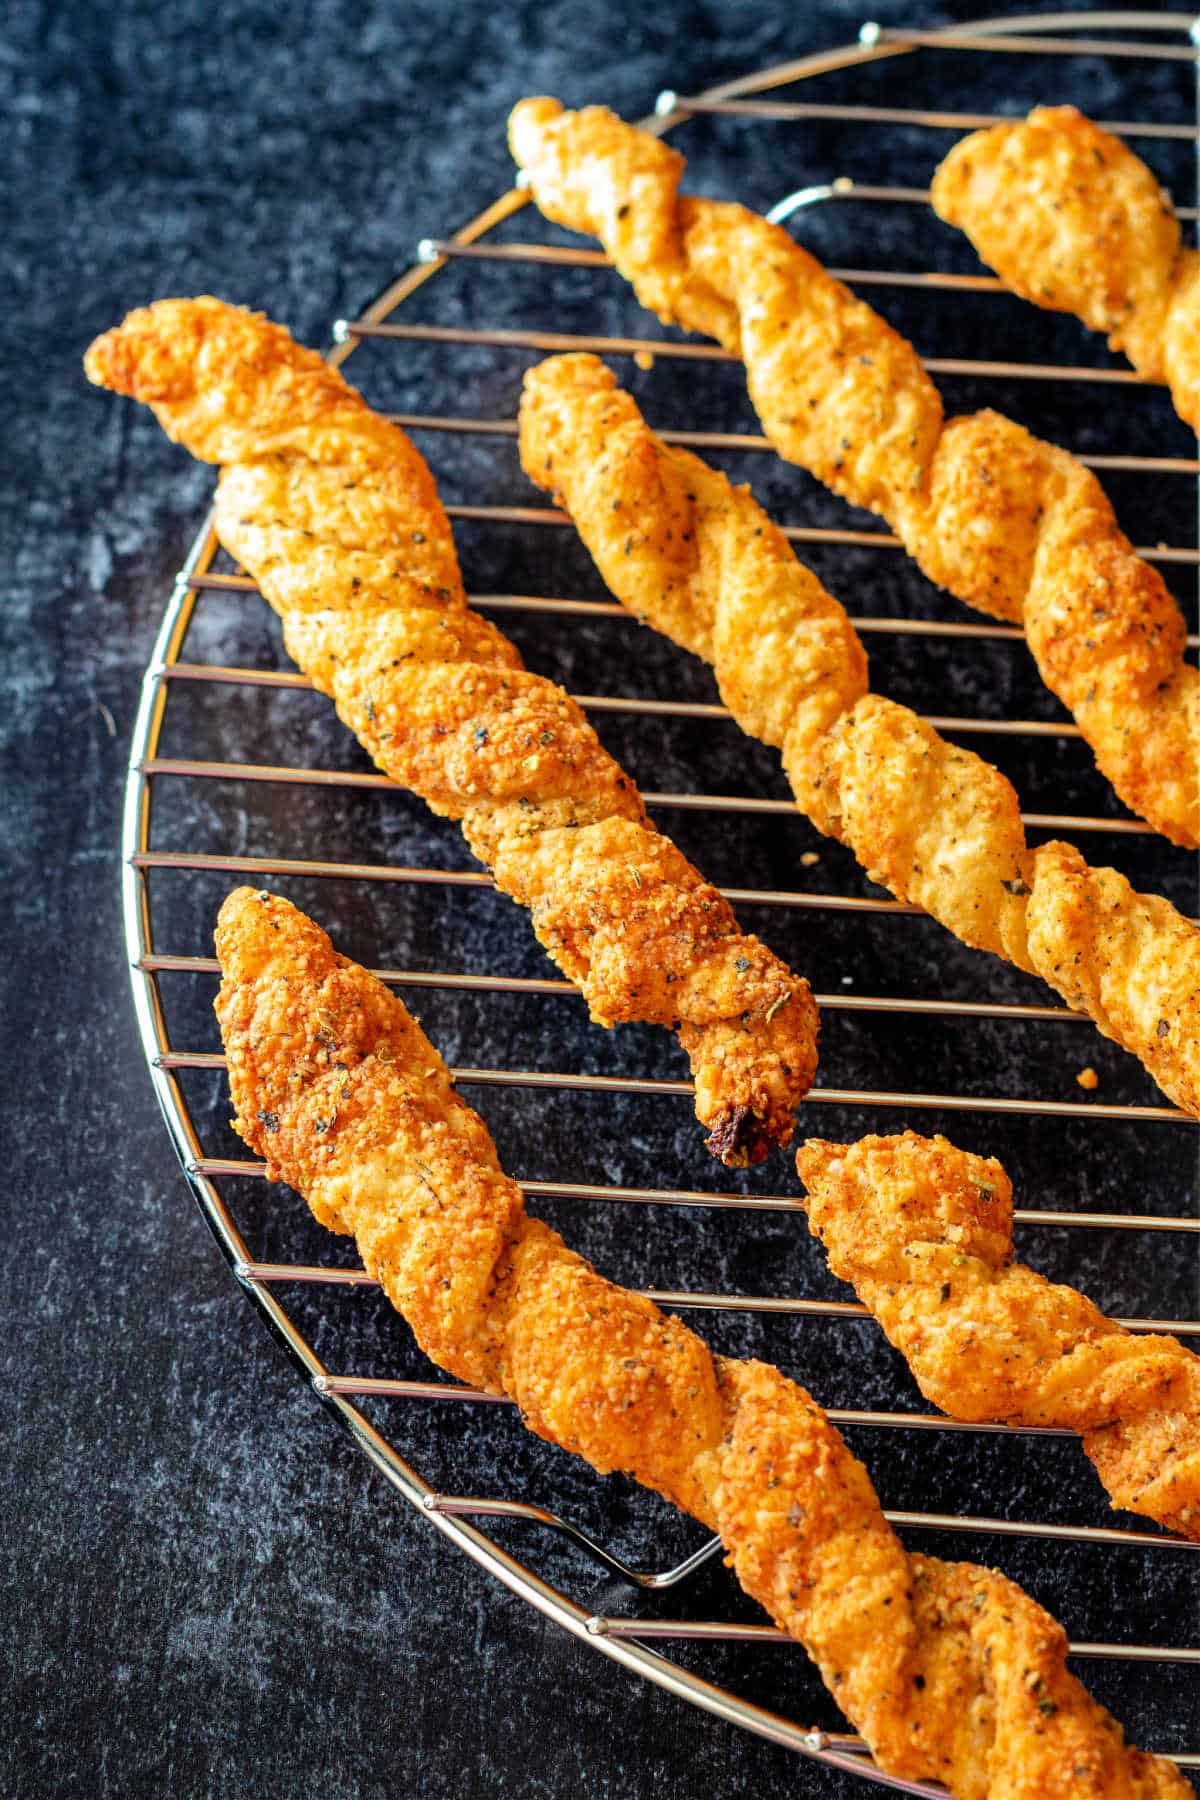
Don’t worry, you won’t waste them. use the edges to make some puff pastry cheese straws (recipe coming soon).
What’s the Best Way to Cut Puff Pastry?
If you’ll be using cutters to cut your puff pastry, or even if you’re cutting with a sharp knife, cut straight down rather than twisting or pulling the blade.
You might also have heard of this in directions for making biscuits.
In both cases, the rule exists to keep you from accidentally gluing your edges together and impeding the rise.
Still More Puff Pastry Tips from Culinary School and Restaurant Kitchen Experience
- If you egg wash your puff pastry, be very careful that no egg wash drips down the sides. This too can impede the rise.
If you don’t believe me, egg wash a whole piece of puff, sides and all. It’ll bake up all dome-shaped and stupid.
You really don’t want your efforts to be thwarted when Victory is Within Your Grasp. - After you cut your pieces of puff, turn them over (cut side up) before baking. This will also help with even rise.
- Chilling the pieces before baking is a Good Idea.
I usually let mine hang out in the fridge on parchment-lined baking sheets for half an hour or so or even in the freezer for maybe 30 minutes. - DO NOT USE a convection oven to bake small pieces of puff. You’ll end up with Slinkies as the air blows the layers over.
I know; I’ve been there.
The effect may not be as dramatic as in a commercial convection oven, which is like a wind tunnel, but still.
A nice hot oven without any breeze will ensure a straight and tall rise. - Bake your puff pieces with a piece of parchment paper on top. Catch the video below to see why.
- To make a classic Napoleon, or just to make a crisp layer of puff that doesn’t puff very much, place a few baking sheets on top of your sheet of puff.
Every fifteen minutes or so, take all the baking sheets out of the oven and push down on the top ones to keep the sheet of puff from rising to Great Heights. - If you need to cut puff pastry after baking, a serrated knife is an Excellent Tool.
Puff Pastry Re-Cap
I know that’s a lot of rules and tips and suggestions and whatnot.
So here’s a short recap of the most important takeaways:
- Be Not Afraid.
- The refrigerator is your friend.
- Keep it nice and square. Puff pastry is the Anal Retentive Chef’s favorite thing to make.
- Do Not Stress. Repeat: Do Not Stress.
- Don’t forget to pick up your Puff Pastry Prowess Certification. (downloadable. Fill it out and then share a photo with me on the Pastry Chef Online Facebook page.
What To Do with Puff Pastry Once You Make It
Here’s another video I made showing some different ways to use puff pastry. To watch a time-lapse of the rise in the oven, head to the 8 minute and 35 second mark.
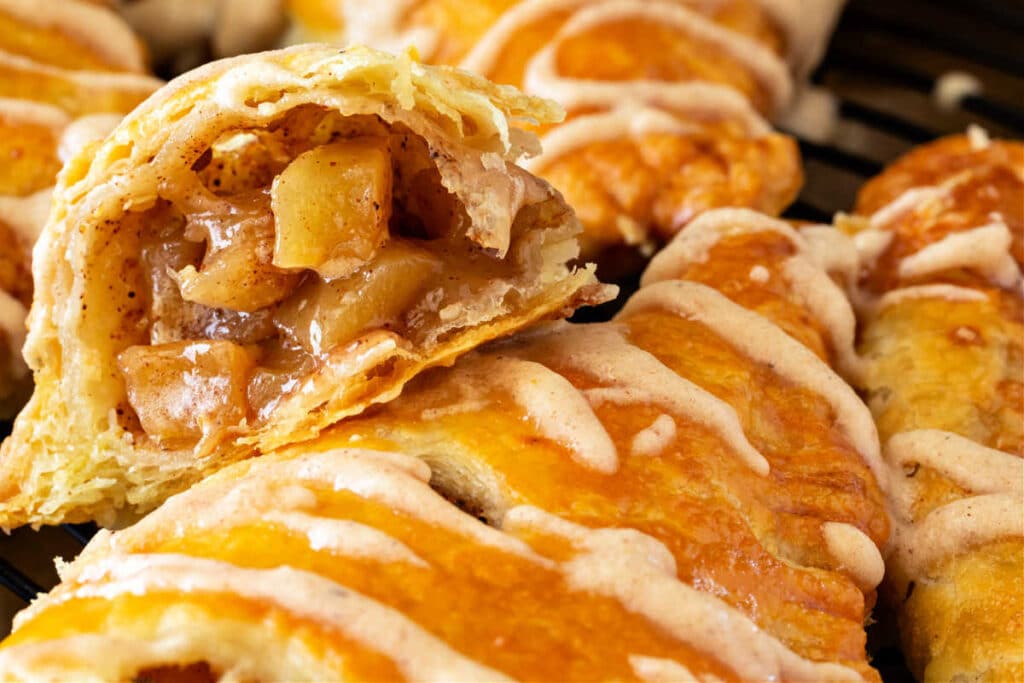
Aside from just making shapes to fill, you can of course use puff pastry in much the same way as you would a standard pie crust.
My puff pastry apple turnovers are To Die For, y’all. See?
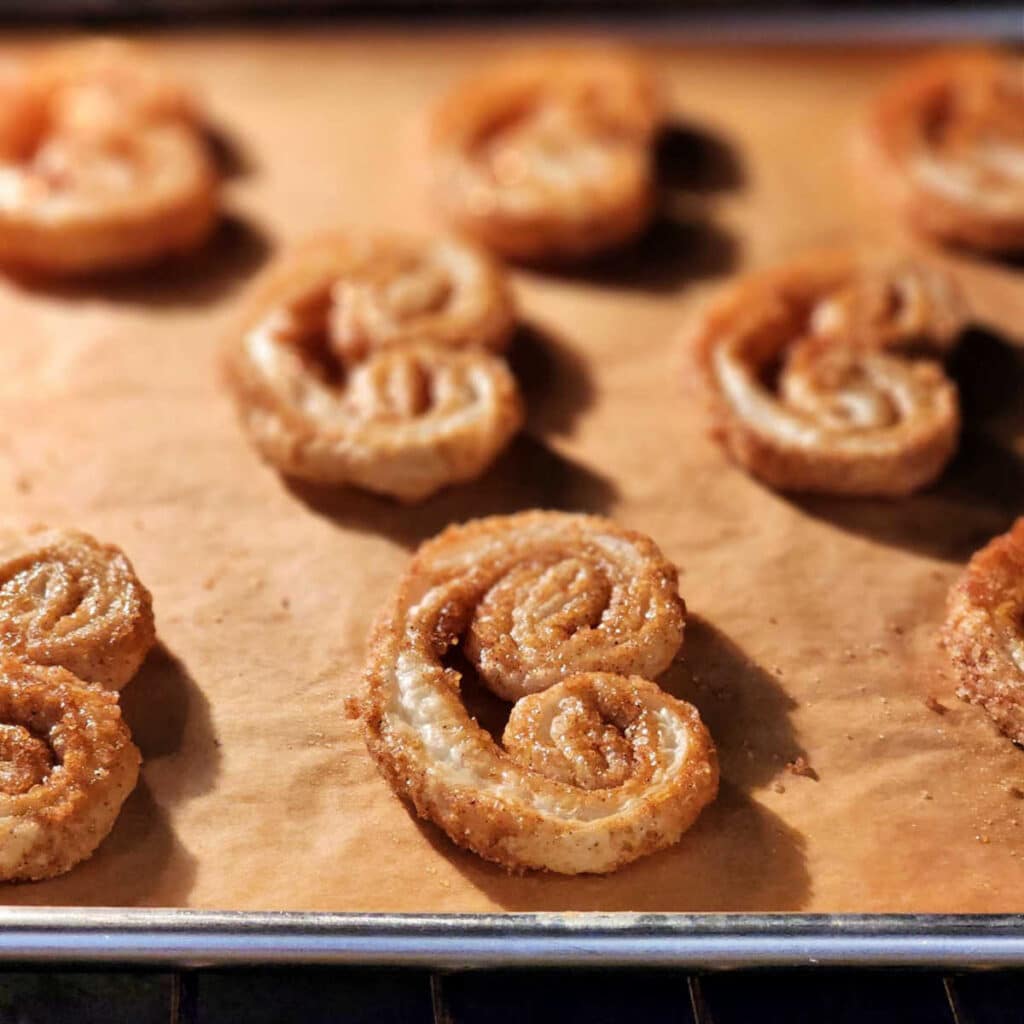
Another easy and tasty use for puff pastry is to make palmiers or elephant ears.
Palmiers are puffy, crispy, caramelized little pastry cookies that are Very Delicious.
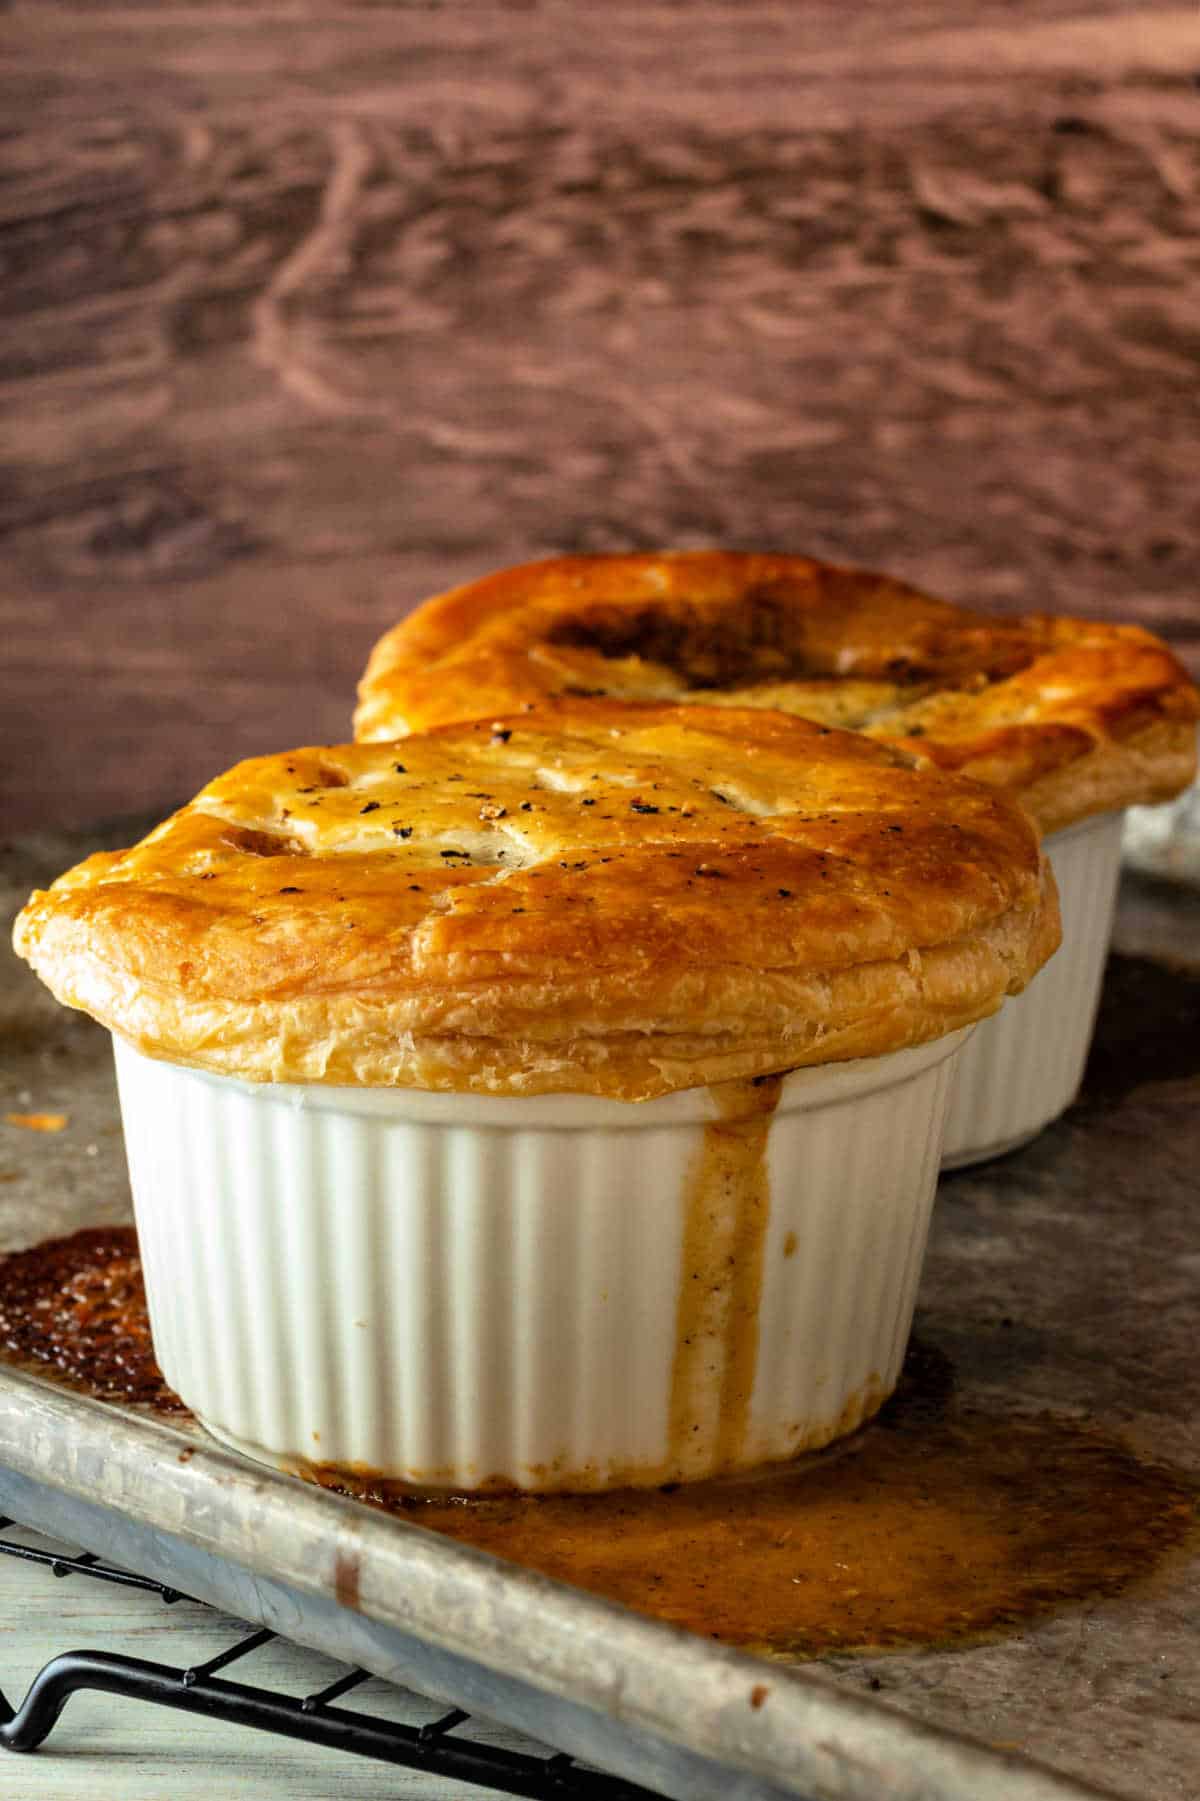
And you do not want to miss making chicken pot pie with puff pastry, friends.
If you have scraps of puff pastry leftover, puff pastry cheese straws are a delicious way to use them up.
Jenni Says: If you are a visual learner, please watch the videos. They are super helpful, I promise.
Questions?
A Note About Measurements
It helps me and other readers so much if you take a moment to rate and review this recipe.
Your star rating and comments help others decide whether the recipe is worth making, and your feedback helps me continue improving recipes here at Pastry Chef Online.
Other lovely ways to share include pinning or posting on your favorite social media platform.
Thank you so much for taking the time!


Puff Pastry
Ingredients
- 14 oz. all purpose flour (King Arthur preferred for higher protein content.
- 1 teaspoons salt
- 14 oz. unsalted butter divided
- 2 teaspoons lemon juice or vinegar
- 7-8 oz ice water
You will also need:
- a brush with firm bristles for brushing off excess flour
- a separate brush for brushing ice water on the layers optional
- a bench scraper just in case
- a good rolling pin
- a pile of extra flour for dusting
- a bowl of extra ice water
- plastic wrap
- lots of room
Instructions
- In a large bowl, whisk together the flour and the salt. Dice 2 oz. (4 TBSP) butter and toss in with the flour/salt mixture. Refrigerate the rest of the butter.
- With your fingers, rub the butter into the flour until the whole shebang looks like coarse meal. You don't want any larger pebbles of butter. If you feel a pebble, smoosh it. Keep doing this until the whole mixture is uniform.
- Make a well in the center of the flour and add all the lemon juice and the water, a bit at a time, until you have formed a sticky, shaggy, rather ugly dough. You might not use all the water, but you might–just keep your eyes on the sticky, ugly, shaggy prize.
- Gather up your ugly dough, flatten it into a vague rectangle, and wrap it in plastic wrap. Refrigerate for about an hour or so to give the flour a chance to completely hydrate and to let the butter firm back up a bit.
- Take the other 12 oz (3 sticks) of butter out of the fridge. Put it on a large clean work surface and bash it with a rolling pin to soften it. Your goal is to get the butter pliable and into a square shape about 5″ on a side and about 1/2″ thick (or so). Use a bench scraper to help shape your packet o’ butter, if you want.
- And now, let the fun begin. I personally find making puff pastry to be a relaxing pastime. Put on some music, grab a glass of your favorite beverage, and get ready to introduce dough to butter and make 2 become 1.
- Once your dough has been in the fridge for about an hour, take it out and check to see if the consistency of the butter and dough are similar. Just poke each one to see. If the butter is firmer than the dough, refrigerate the dough for a bit longer. If the dough is firmer than the butter, refrigerate the butter for a little while. Always keep everything right around a magical 67-68F. The last thing you want is for your butter to melt all over the place.
- Liberally flour your work surface and the dough, and roll until you have a square about 10″ on a side. Now, roll each corner of the square out into a thinner flap. What you’ll end up with is a thick-ish diamond of dough about 5-6″ on a side with thinner flaps. (See Video)
- Brush the top of the dough off, and place the packet o’ butter in the center of the thick-ish square of dough. Fold up one flap at a time to completely encase the butter in dough. Don’t forget to brush off all the excess flour. You might need to use a bit of ice water here to get the four flaps to stick together over the butter. For you visual guys out there, what you should end up with is something that looks like a dough envelope with a butter letter inside of it. Make sure the butter is all the way enclosed in the detremps (the dough). If you have futzed about with this for awhile, wrap it in plastic and throw it in the fridge for 30 minutes or so. (See Video)
- Flour your work surface again, and pound the packet of dough with your rolling pin to flatten it somewhat and start to make it a bit bigger. Roll your dough into a rectangle about 16″x 8″. Work with short strokes up and down the packet until things are nice and pliable. This will help keep your dough from ripping. If you do get a tear in your dough, patch it with some flour.
- Don't forget to flip the dough over occasionally while you're rolling.
- Brush off the surface of the dough very well, then brush the surface with just a bit of ice water. (This is a Shirley Corriher trick, and she swears that, not only does this help to keep things cold, but that she gets a better rise because of the additional steam. Try this, or not–it’s here as an additional step, if you want to give it a shot. See video for this action). Fold the dough in thirds, like a business letter, being sure to brush off the excess flour.
- What you have just done is make one turn. Congratulations!
- Keep the edges as square as possible. Rotate the dough 90 degrees, and repeat the rolling and folding a second time. Wrap the whole thing in plastic wrap, and mark a “2” on the wrap with a sharpie. Traditionally, you’re supposed to make finger indentations, but I figure that God made sharpies for this purpose. Besides, if you accidentally dent your pastry, you might get confused. If you’re me, anyway. Throw the now twice turned dough into the fridge for an hour.
- After an hour, take the dough out and give it two more turns (a turn=rolling out and folding up), rotating 90 degrees between each turn. Use the ice water step, or not. If at any time you feel the butter starting to slide around inside the dough, throw it back in the fridge. Conversely, if the butter gets too hard, whack it a few times with the rolling pin to help keep it pliable. After the 2nd (4th) turn, wrap it up, mark it with a “4,” and throw it the fridge for at least 2 hours and up to overnight.
- The next day (or a couple of hours later), take your dough out, whack it with the rolling pin a few times, and give it two more turns. Always rotate the dough 90 degrees between folds and keep the edges as square and even as possible, and always roll to a 16″x 8″ rectangle. Don't forget to flip it a few times while rolling. Roll to a finished thickness of 1/4″, and the dough is finally ready to be used. Hooray!
- Cut the shapes you need, or cut the sheet to the desired dimensions, turn the piece/s over, chill for 30 minutes, and then bake at 425F until puffed and deeply golden brown. Time will vary depending on the size of your pieces, so keep an eye on them.
Did You Make Any Changes?
Notes
Tips–So Many Tips
- Rule number One for achieving Lovely Lamination is that the consistency of the butter should mimic as closely as possible the consistency of the dough (called detrempe, if you're fancy). If the butter is too hard, it will just break up and poke holes in the detrempe. Rolling out will be Difficult At Best, and you won't end up with a continuous sheet of butter. If the butter is too soft, it will just soak into the dough and guish out the sides, leaving you with an overly-rich dough with exactly one layer. Not good.
- Rule number Two: extra flour is mandatory. Make sure your rolling surface and the surface of the dough is lightly floured at all times. This means that you'll have to keep adding more, a little at a time. Sticking can tear your delicate layers, allowing even right-consistency butter to guish out. Since the tough layers (lean-ish dough) are separate from the tender layers (butter), a little more flour isn't going to hurt anything–you'll still get an excellent rise.
- Rule number Two-A: brush off the excess flour before folding. See, that's why this is rule 2A instead of rule 3. The time that you want the dough to stick is when the dough layers are being rolled together. To make sure that those two layers become one, you need to make sure that the surface is as flour-free as you can make it before folding. They make a keen tool called a bench brush made especially for this purpose, but you can just as easily use a fairly stiff pastry brush or paintbrush.
- Rule number Three: as you roll, flip your dough over fairly frequently. Because of friction, the top layer will always roll farther than the bottom layer. In order to keep the layers even, flip your dough frequently.
- Rule number Four: Chill out. The refrigeration periods between folding and rolling (turns), allow for the butter to maintain Optimum Plasticity–not too cold; not too hot–and for the gluten formed by all the turning (which is really just a type of kneading) to relax enough to be able to roll out multiple times. Don't think you can get away with making more than two turns at a time. Either your butter will start guishing out or the detrempe will become too sproingy, making it very hard to roll out. Thirty minutes to an hour under refrigeration will take care of Both Issues.
- Rule number Five: It's hip to be square. As much as I love the rustic look of Free Form Baked Goods, puff pastry requires fairly strict adherence to the Ideal Rectangle. Roll with finesse, and when finesse fails pull gently with your hands, to square up the dough as much as possible before folding. Keeping the dough square with all the edges meeting up more or less perfectly gives you the maximum amount of dough containing all possible layers. If you don't keep the dough square, there will be some areas around the edges that could lack as many as hundreds of layers, causing uneven rising. This is especially crucial if you want to bake a large sheet of puff, but for consistency's sake, it's always good practice to Shoot for the Rectangle.
More Helpful Puff Pastry Info
- If you egg wash your puff pastry, be very careful that no egg wash drips down the sides. This too can impede the rise.If you don’t believe me, egg wash a whole piece of puff, sides and all. It’ll bake up all dome-shaped and stupid.You really don’t want your efforts to be thwarted when Victory is Within Your Grasp.
- After you cut your pieces of puff, turn them over (cut side up) before baking. This will also help with even rise.
- Chilling the pieces before baking is a Good Idea.I usually let mine hang out in the fridge on parchment-lined baking sheets for half an hour or so or even in the freezer for maybe 30 minutes.
- DO NOT USE a convection oven to bake small pieces of puff. You’ll end up with Slinkies as the air blows the layers over.I know; I’ve been there.The effect may not be as dramatic as in a commercial convection oven, which is like a wind tunnel, but still.A nice hot oven without any breeze will ensure a straight and tall rise.
- Bake your puff pieces with a piece of parchment paper on top. Catch the video below to see why.
- To make a classic Napoleon, or just to make a crisp layer of puff that doesn’t puff very much, place a few baking sheets on top of your sheet of puff.Every fifteen minutes or so, take all the baking sheets out of the oven and push down on the top ones to keep the sheet of puff from rising to Great Heights.
- If you need to cut puff pastry after baking, a serrated knife is an Excellent Tool.
Nutrition
Would you like to save this post?

Hi, y’all! I hope you’ve enjoyed this post and hopefully also learned a thing or two.
If you like my style, I invite you to sign up for my occasional newsletter, The Inbox Pastry Chef.
Expect updates on new and tasty recipes as well as a bit of behind-the-scenes action. I hope to see you there!


Join in Today!
I really like how Chinese puff pastry combines flakiness with a slightly tender bite
Yeasted puff pastry has a unique combination of airy texture and flaky layers. It creates a really satisfying bite
Yes, nothing like it.
But I find it difficult to laminate by hand, much more so than “regular” puff.
French pastries are the perfect blend of elegance and flavor
Agree! It’s all about the technique, because most contain simple ingredients. 🙂
Made this recipe to try to make cream horns for my Mom this Christmas as they are her favorites. I’ve tried other recipes, but this one was more detailed and the individual steps much more clear to me. After a couple of tries keeping the dough on the molds, I made some pretty impressive, and most importantly, delicious horns. She took all of the remaining ones home with her. I think that is a win. So thanks for posting this; now it’s my to go to recipe for puff pastry.
I’m very glad you were successful, Mark! It’s always my goal to write the clearest possible instructions. Most importantly, you made something delicious for your mom. Everyone wins!
For the water, are the ounces in weight or in fluid ounces? Thanks.
All my measurements are written in ounces by weight, but in the case of water, you may use either weight or volume since it’s 1:1. Enjoy!
Oh my goodness! You restored my faith in my ability to make puff pastry! I had been having trouble with the rolling out of my puff, rough puff and danish dough and following along with your tutorial, It was so easy to roll out and the butter didn’t poke through or anything! Thank you so much for this post. I can’t wait to see your other posts
Hi, Gale! I am so glad you found my tutorial helpful! Have fun with the site and please ask if you have any questions.