Whipped shortbread cookies are a much-loved Christmas cookie for a reason, but please don’t save them just for Christmas. With a short ingredient list and an easy mixing method, whipped shortbread cookies are perfect with a cup of tea, for after-school snacks, or any time you need a light, crisp, buttery cookie.
Many recipes call for cornstarch, but I’m here to tell you that cornstarch is not necessary to make these ethereal cookies. And if you think “ethereal” is too fancy a word for these cookies, you haven’t tried them yet!
You may also want to take a look at my classic shortbread. It is very similar but made with a different method. For ease of browsing, you can find all my cookie recipes in one place. Thanks for visiting!
Pastry Chef Online Participates in Affiliate Programs. If you make a purchase through one of my links, I may earn a small commission. For more information click to read my disclosure policy

Whipped Shortbread Cookies, At a Glance
✅Skill Level: Beginner
✅Skills: Whipping for a long time, baking
✅Type: Shaped Cookies
✅Number of Ingredients: 4
✅Prep Time: 10 minutes
✅Cook Time: 19 minutes
✅Yield: 36 cookies
Jump Straight to the Recipe
Why Do Some Whipped Shortbread Recipes Call for Cornstarch?
Cornstarch can be a secret ingredient. It adds bulk to dough or batter without adding additional protein, so it can make cakes and cookies more tender.
And I love Instant Clear Jel, which is modified cornstarch, for making magical stabilized whipped cream.
I guess at some point, folks decided it could do the same for whipped shortbread cookies.
I guess that could be true if all you have on hand is bread flour, but I’m here to tell you that it is not necessary to use cornstarch in your whipped shortbread recipe, friends.
To ensure my recipe wouldn’t require any additional ingredients other than salted butter, sugar, and flour, I used cake flour since it’s naturally lower in protein, and I grabbed my bag of confectioner’s sugar, because that bakes up very delicately as well.
The third thing I did was to alter the mixing method from the standard creaming method used for most cookies, including standard shortbread, and went with a modified reverse creaming method that I use to make my sour cream cinnamon coffee cake.
But since there are only 3 ingredients and no eggs or liquid, this is what that modification looks like here:
- Put all ingredients in the bowl of your mixer.
- Turn it on and beat until fluffy.
- The End.
Why You Need to Make These Cookies
The main reason to make this recipe is that it is 100% delicious.
I have added a bit of nutmeg to the batter, and nutmeg and butter go together beautifully.
I should note it wasn’t my idea. A reader is trying to replicate her grandmother’s recipe, and grandma always used nutmeg.
Smart lady.
Anyway, for anyone who has a corn allergy, these will work great for you. Just make sure your powdered sugar doesn’t have cornstarch in it.
Also, these cookies are ridiculously easy to make. I mean, put everything in the mixing bowl and mix until the dough looks like buttercream. Done.
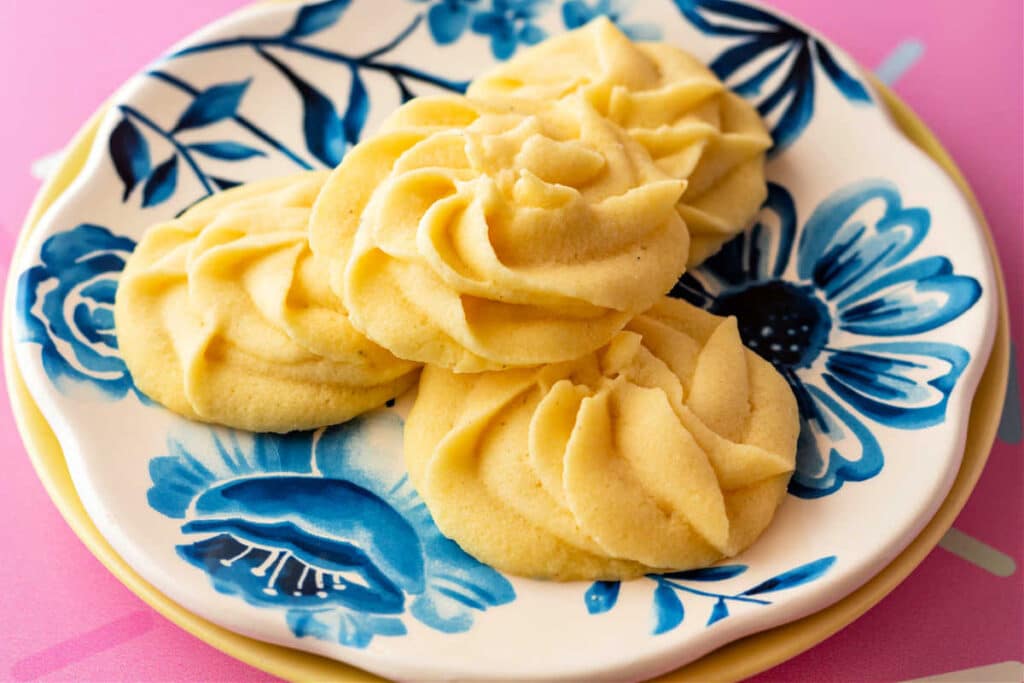
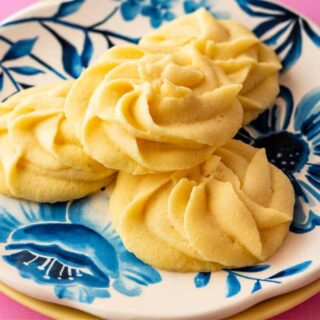
I personally like the piped cookies because the edges are so delicate.
Many people grew up with the kind with a fork impression in them, and those are just as tasty.
And as far as decor, you can make these for any occasion, including “hey, it’s teatime.”
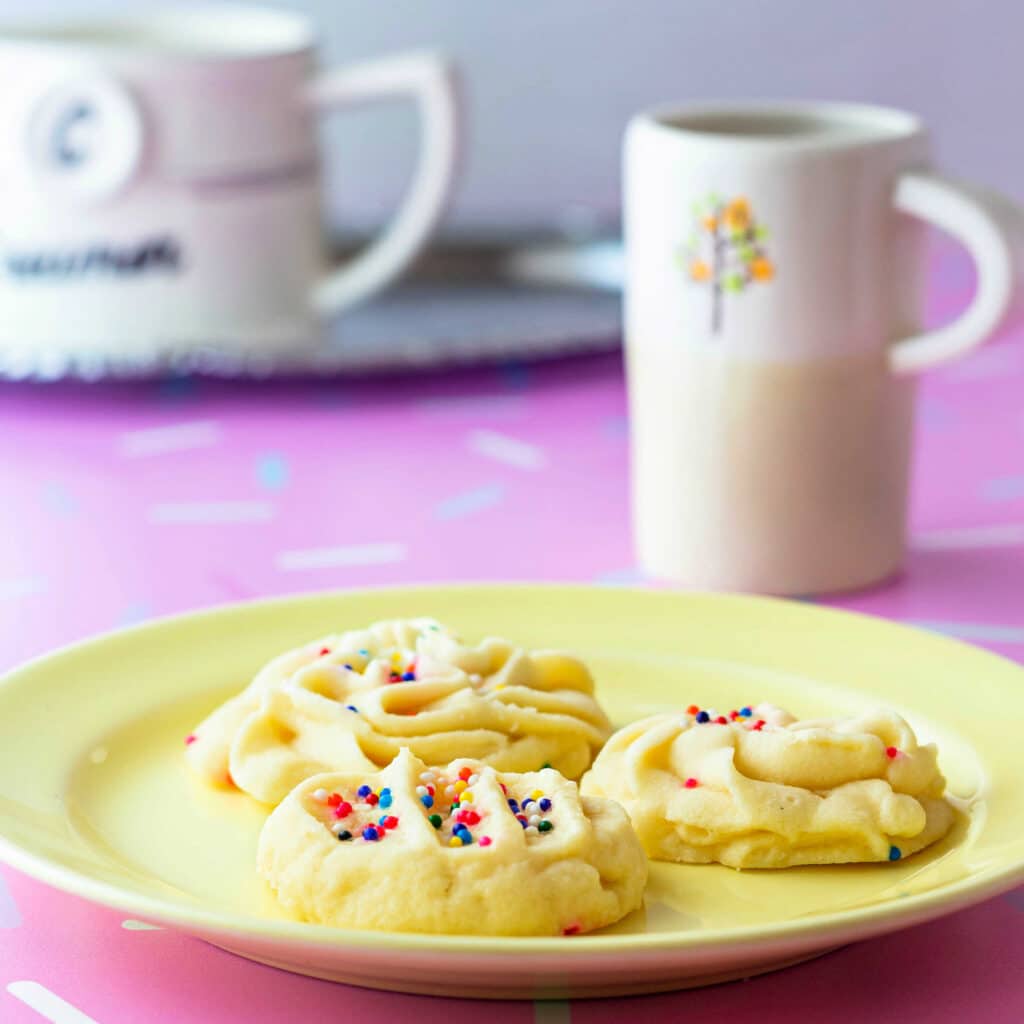
Use different sprinkles and enjoy them for any holiday: Christmas, Easter, Valentine’s Day, etc.
How To Make Whipped Shortbread
As I’ve said, these cookies are very easy to make.
If you’ve not made these before, I have a few pointers for you, too.
If you have made them before, head straight to the recipe.
Ingredients and Substitutions
With an ingredient list so short and such pure flavors, you will want to use the best quality ingredients you can find.
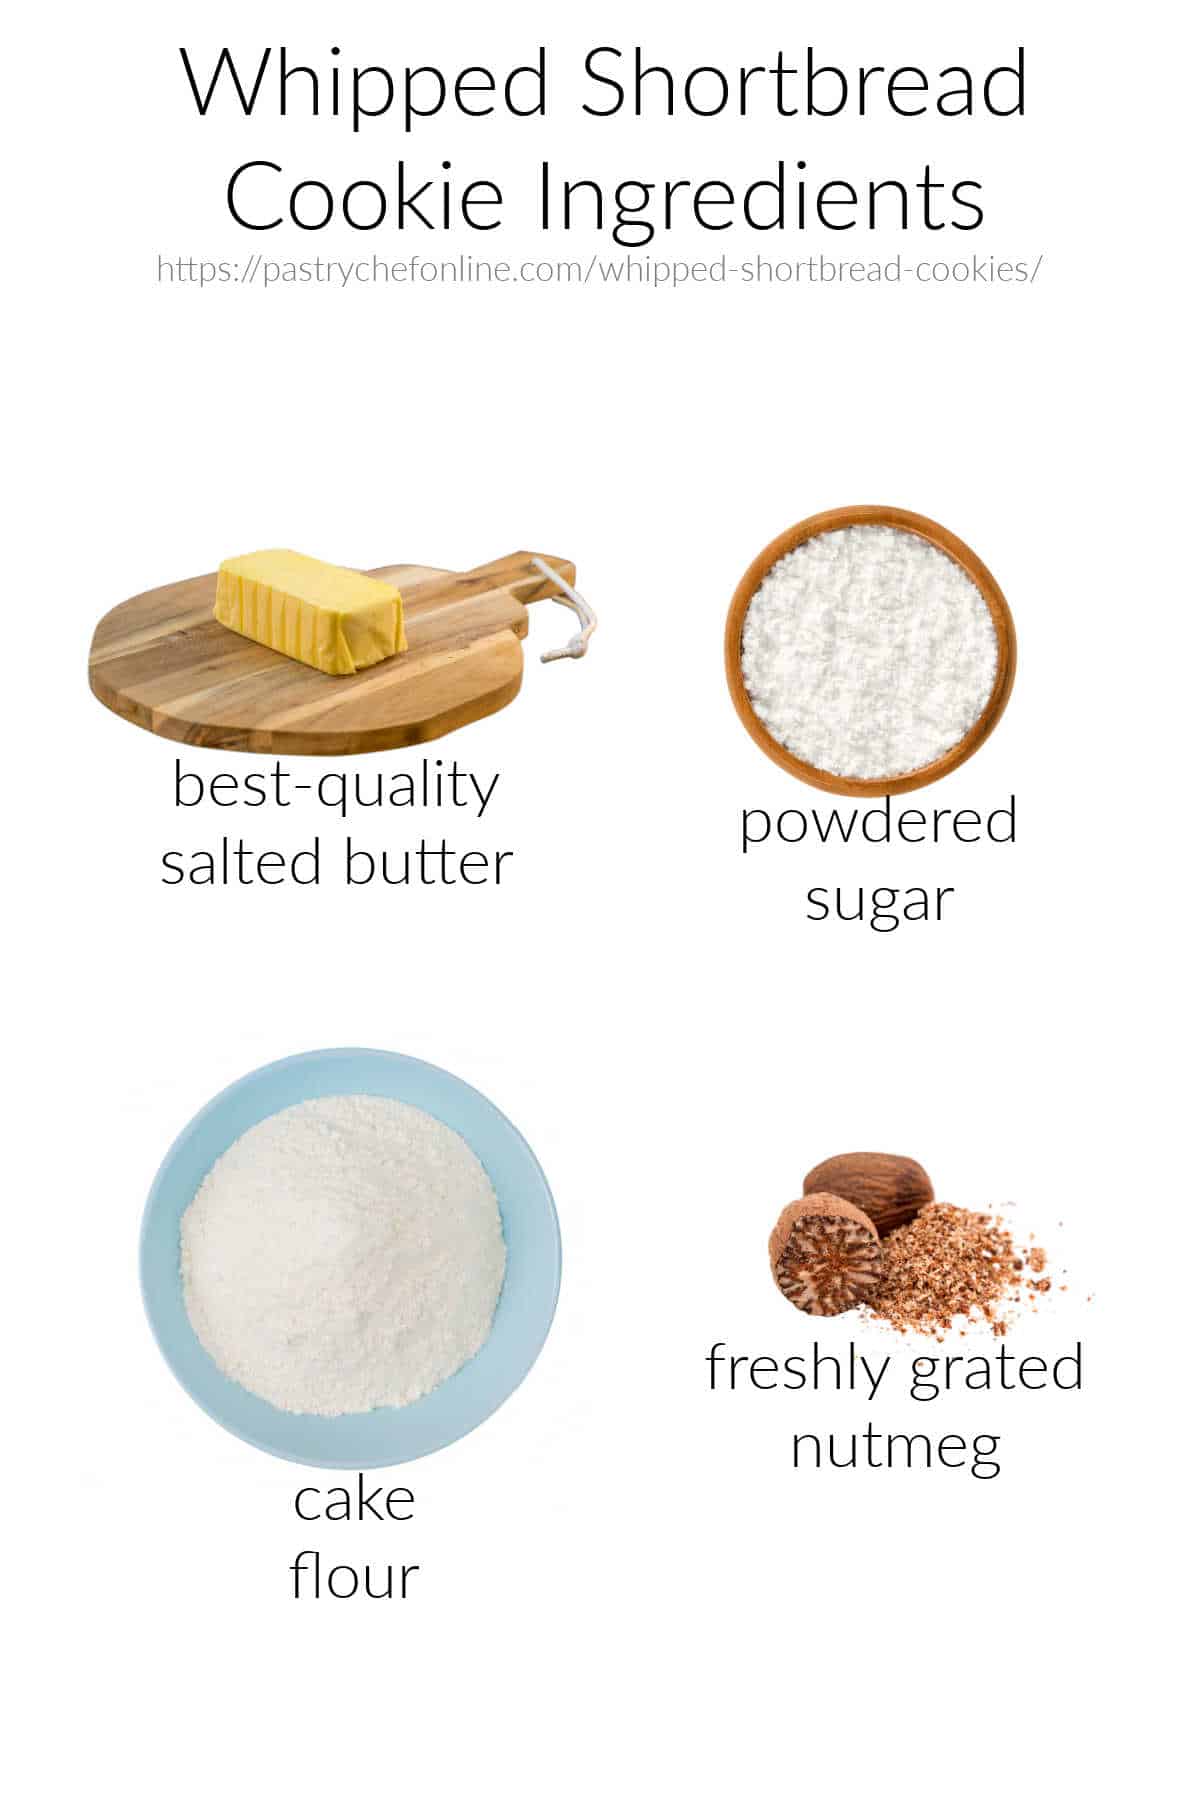
- butter: This is not the time for store-brand butter. Use the best quality salted butter you can find. I used Kerry Gold. Its rich, yellow color comes from the rich milk of grass-fed cows, and the butter flavor is very pronounced. Do NOT substitute unsalted butter without adding in some additional salt. A very healthy 1/4 teaspoon of fine salt should do. If you don’t use salted butter or add salt, your cookies will taste very flat and you’ll wonder what the fuss is all about.
- powdered sugar: I use any brand that says “cane sugar” on it. If the bag doesn’t say that, it could be made from beets, which isn’t a bad thing in and of itself. It does tend to get “wetter” than cane sugar, though.
- cake flour: Use bleached cake flour such as Swans Down. Aside from being made with low-protein wheat, the bleaching further softens the proteins and limits gluten production. It can usually be found near the cake mixes in the grocery store. If you cannot find bleached cake flour, try a low-protein all-purpose flour such as White Lily.
- nutmeg: Freshly grated nutmeg will have a much more pungent aroma and intense flavor than ground.
Procedure
This is easy, y’all. Ready?
- Place all the ingredients in the bowl of your
stand mixer fitted with the paddle attachment. - Mix on medium-low speed until there is no loose flour or sugar in the bowl.
- Increase speed to medium-to-medium-high, and beat, scraping the bowl as necessary, until the mixture is light and fluffy like frosting.
Once you have made your dough, you have choices about how to make your cookies:
- Simply drop tablespoon-sized portions onto a parchment-lined pan and call it a day. Or add sprinkles and/or a half glace cherry
- Load into a piping bag fitted with a star attachment and pipe in rosettes wreaths, hearts, or whatever you desire. TIP: If making for a special occasion and you want color to be a theme, consider adding a little food coloring to your dough when you start mixing.
- Load into a cookie press and press cookies directly onto parchment
- Refrigerate the dough for about 45 minutes and then portion into tablespoon-sized portions (about 1/2 ounce each) and then quickly roll each into a ball. Press the back of a fork into each ball and then sprinkle with desired sprinkles. NOTE: You must refrigerate your dough to ensure it is firm enough to roll into balls. Otherwise, it’s like trying to roll whipped lotion into balls. Impossible.
Regardless of how you shape them, bake them in a 300F oven for 19 minutes. I know that’s a very specific time, but it is what it is. Enough time for the cookies to set without browning.
Your oven may run a little cooler or hotter than mine, so check them starting at about 15 minutes.
Visual How-To
This collage shows what the dough/whipped batter looks like every step of the way:
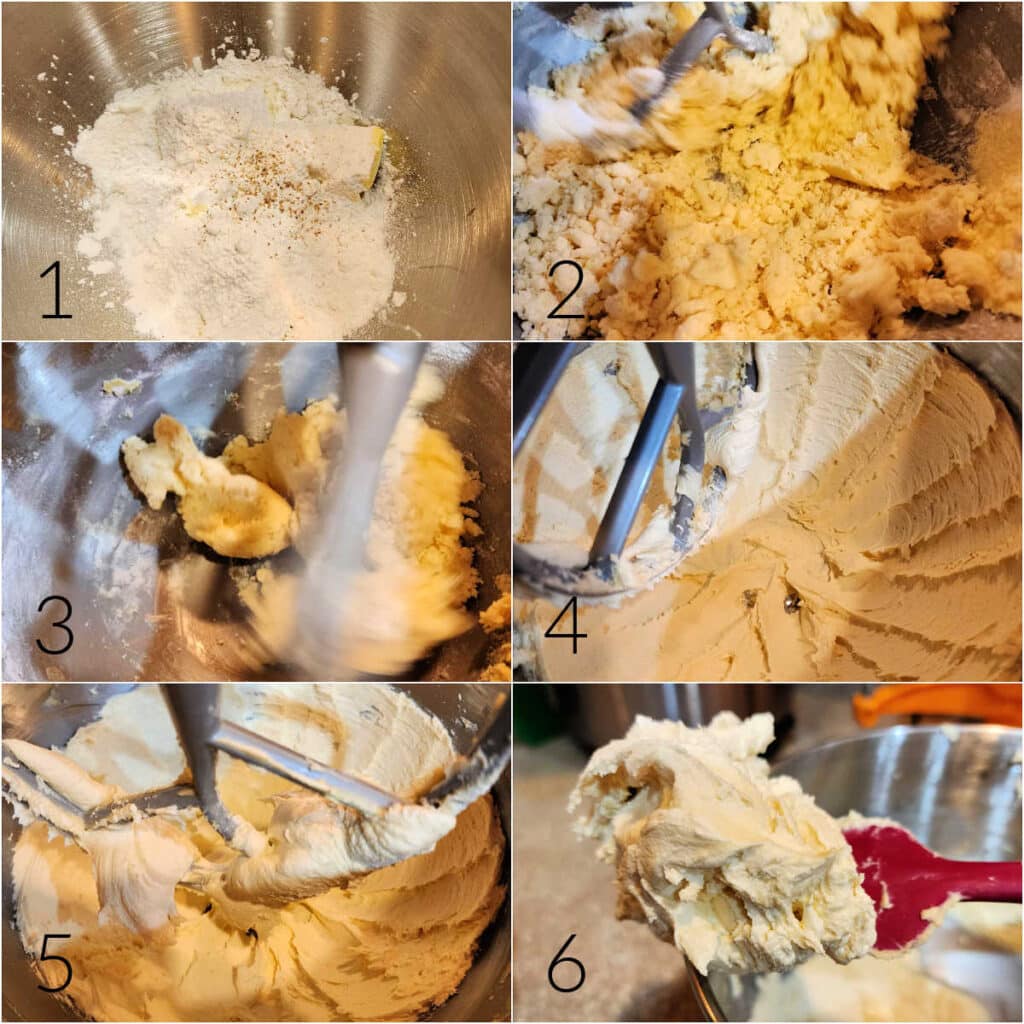
- All four ingredients–cake flour, soft salted butter, powdered sugar, and nutmeg–go in the mixer bowl.
- Start on low speed until the mixture is crumbly.
- Continue on medium-low speed until the dough just comes together with no loose flour or sugar in the bottom of the bowl.
- Increase speed to medium and whip for a few minutes, scraping the bowl as necessary.
- Turn the speed up to medium-high and continue whipping for a couple of minutes more until the dough is light and airy and looks like buttercream.
- The finished whipped dough.
Equipment You May Need
While I’m sure grandma made these by hand with a big old wooden spoon, I am not grandma.
I recommend using a stand mixer to make these cookies. A hand mixer might work, but it would take a very long time to beat it until the dough has the consistency of frosting.
Would you like to save this post?
You’ll also want to bake on a sturdy half-sheet pan or two.
Cheaper cookie sheets will warp when they get hot, and then your cookies will not have flat bottoms.
To make pressed cookies, you’ll need a cookie press. I recommend this one by OXO.
Variations
These are classic cookies, and they don’t really need much done to them.
You can certainly alter the flavor a bit by omitting the nutmeg and/or adding 1/2-1 teaspoon of vanilla.
Here are some decorating ideas so you can at least switch up the visual appeal:
- Roll dough balls in sugar before pressing the back of a fork into them.
- Use different sprinkles or colored sugars to vary the look.
- Make an indentation in the centers of either dough balls or piped cookies and fill with a teaspoon of jam before baking.
- Press a candy-coated chocolate into the centers immediately after baking. Don’t press too hard or you’ll end up with a candy shoved all the way through–remember these are delicate cookies. Just press hard enough to recess the candy by about 1/8 inch or so
- Drizzle the cooled cookies with some pastel candy melts (these would be cute for Easter or a baby shower) or chocolate (for any time!)
Tips for Success
You may be tempted to use the whisk attachment, but the paddle does a much better job of the initial creaming. It also works really well for incorporating air, so stick with the paddle attachment for making whipped shortbread.
These cookies are extremely fragile when hot, so allow them to cool for 3-5 minutes on the parchment-lined cookie sheet before carefully moving them to a cooling rack using an offset spatula. Don’t try to pick them us as you would a “regular” cookie. This will just make you sad.
I tested these cookies with and without refrigeration after piping, and I found very little difference. So, once shaped, go ahead and pop them in the oven. There should be very little spread although the piped cookies will “soften” a bit.
NOTE: If you’re going to make the kind with the fork impressions, you have to refrigerate the dough so it’s firm enough to roll into balls. If piping the dough, you should not refrigerate the dough before piping.
Whipped Shortbread Cookies Q & A

Keep at room temperature, tightly covered, for up to 4 days. For longer storage, you can freeze them in a single layer. Thaw to serve. They’ll be good for up to a couple of months.
Absolutely. You can shape the cookies however you’d like, freeze them, and then bake from frozen when you need some cookies. Add 1-2 minutes to the baking time.
I tested both ways and found there was very little difference in the final cookies whether I refrigerated for 30 minutes first or just baked them straightaway. So it’s really up to you.
A Word About the Amount of Sugar
I tested these cookies with two amounts of powdered sugar: 2.5 oz and 3 ounces.
The ones with more sugar were much more fragile and spread a bit more than the cookies with a lesser amount of sugar.
If you want your cookies on the sweeter side, go ahead and use 3 ounces, and consider putting the formed cookies in the freezer for about 30 minutes before baking to limit the spread.
The cookies with more sugar will also take about 4 extra minutes to bake through, so set your timer for 23 minutes, give or take, depending on your oven.
Once baked, allow them to sit on the baking pan undisturbed for a good 5 minutes before using an offset spatula to carefully move them, one at a time, to a cooling rack to cool completely.
Using These as Part of a Cookie Tray
Since whipped shortbread is a classic Christmas cookie, consider assembling cookie trays for holiday dessert tables or gifts.
Along with these guys, maybe add some angel slices, some crispy cocoa cookies, chocolate peppermint crinkle cookies, and some old-fashioned fudge.
And for a couple of year-round treats that also are right at home on a Christmas cookie plate, consider sugar cookies (frosted or rolled in sugar), snickerdoodles, or peanut butter cookies.
These would be delicious served with coffee, a nice chai, hot chocolate, or a decadent, warm Tom & Jerry in front of the Christmas tree.
Depending on the color of sprinkles you use, these are also appropriate for Easter/Spring. Pair them with some no bake birds nest cookies for an adorable display.
A Note About Measurements
Questions
If you have any questions about this post or recipe, I am happy to help.
Simply leave a comment here and I will get back to you soon. I also invite you to ask questions in my Facebook group, Fearless Kitchen Fun.
If your question is more pressing, please feel free to email me. I should be back in touch ASAP, as long as I’m not asleep.
Love This Shortbread? Please Rate and Review to Let Others Know What You Think!
It helps me and other readers so much if you take a moment to rate and review this recipe.
Your star rating and comments help others decide whether the recipe is worth making, and your feedback helps me continue improving recipes here at Pastry Chef Online.
Other lovely ways to share include pinning or posting on your favorite social media platform.
Thank you so much for taking the time!

Whipped Shortbread Cookies (No Cornstarch)
Ingredients
- 70 grams powdered sugar* (See Notes, below) 2.5 oz or about 1/2 cup
- 224 grams salted butter (I use Kerry Gold) 8 oz, 2 sticks, or 1 cup
- 196 grams cake flour 7 oz or about 1 3/4 cups
- several gratings of nutmeg optional
Optional Garnishes
- Glace cherries either red or green
- Sprinkles of your choice
Instructions
- Line a cookie sheet or half-sheet pan with parchment. Place an oven rack in the center of your oven. Preheat to 300F.
- Place all ingredients in the bowl of your stand mixer fitted with the paddle attachment.
- Mix on low speed until there is no loose flour or sugar.
- Increase speed to medium and whip for 3-4 minutes, scraping the bowl as necessary.
- Increase speed to medium-high and whip an additional 2-3 minutes. The texture of the dough should be like a fluffy American buttercream.
- Place in a large piping bag fitted with a large star tip, and pipe as desired, 12-15 to a sheet.
- (Optional) Sprinkle each cookie with sprinkles of choice or place half of a candied cherry in the center of each piped cookie.
- Bake at 300F for 19 minutes, rotating the pan halfway through baking. NOTE: Cookies will not brown, even on the bottoms.
- Allow cookies to cool on the pan for 3 minutes, and then carefully remove each one to a cooling rack to let cool completely.
- Alternatively, refrigerate the dough for about 45 minutes. Scale dough into 1/2 ounce pieces, and quickly roll into balls between your palms. Top with a piece of glace cherry or make indentations with the back of a fork and add sprinkles of your choice.
Did You Make Any Changes?
Notes
A Note About the Amount of Sugar
You can use up to 3 ounces of powdered sugar in this recipe, but no more than that. The cookies will be a touch sweeter and much more fragile. They will also spread a bit more than ones made with less sugar.Tips for Success
Use the paddle attachment to make these cookies rather than the whisk attachment. It does a much better job at creaming the ingredients together.Variations
Here are some decorating ideas so you can at least switch up the visual appeal:- Roll dough balls in sugar before pressing the back of a fork into them.
- Use different sprinkles or colored sugars to vary the look.
- Make an indentation in the centers of either dough balls or piped cookies and fill with a teaspoon of jam before baking.
- Press a candy-coated chocolate into the centers immediately after baking. Don’t press too hard or you’ll end up with a candy shoved all the way through–remember these are delicate cookies. Just press hard enough to recess the candy by about 1/8 inch or so
- Drizzle the cooled cookies with some pastel candy melts (these would be cute for Easter or a baby shower) or chocolate (for any time!)
FAQ
How long will whipped shortbread cookies keep? Keep at room temperature, tightly covered, for up to 4 days. For longer storage, you can freeze them in a single layer. Thaw to serve. They’ll be good for up to a couple of months. Can I bake the dough from frozen? Absolutely. You can shape the cookies however you’d like, freeze them, and then bake from frozen when you need some cookies. Add 1-2 minutes to the baking time. Do I need to refrigerate the formed cookies before baking? I tested both ways and found there was very little difference in the final cookies whether I refrigerated for 30 minutes first or just baked them straightaway. So it’s really up to you.Nutrition
Would you like to save this post?
Thanks for spending some time with me today.
I’m excited for y’all to try these whipped shortbread cookies!
Take care.

Hi, y’all! I hope you’ve enjoyed this post and hopefully also learned a thing or two.
If you like my style, I invite you to sign up for my occasional newsletter, The Inbox Pastry Chef.
Expect updates on new and tasty recipes as well as a bit of behind-the-scenes action. I hope to see you there!


Join in Today!