


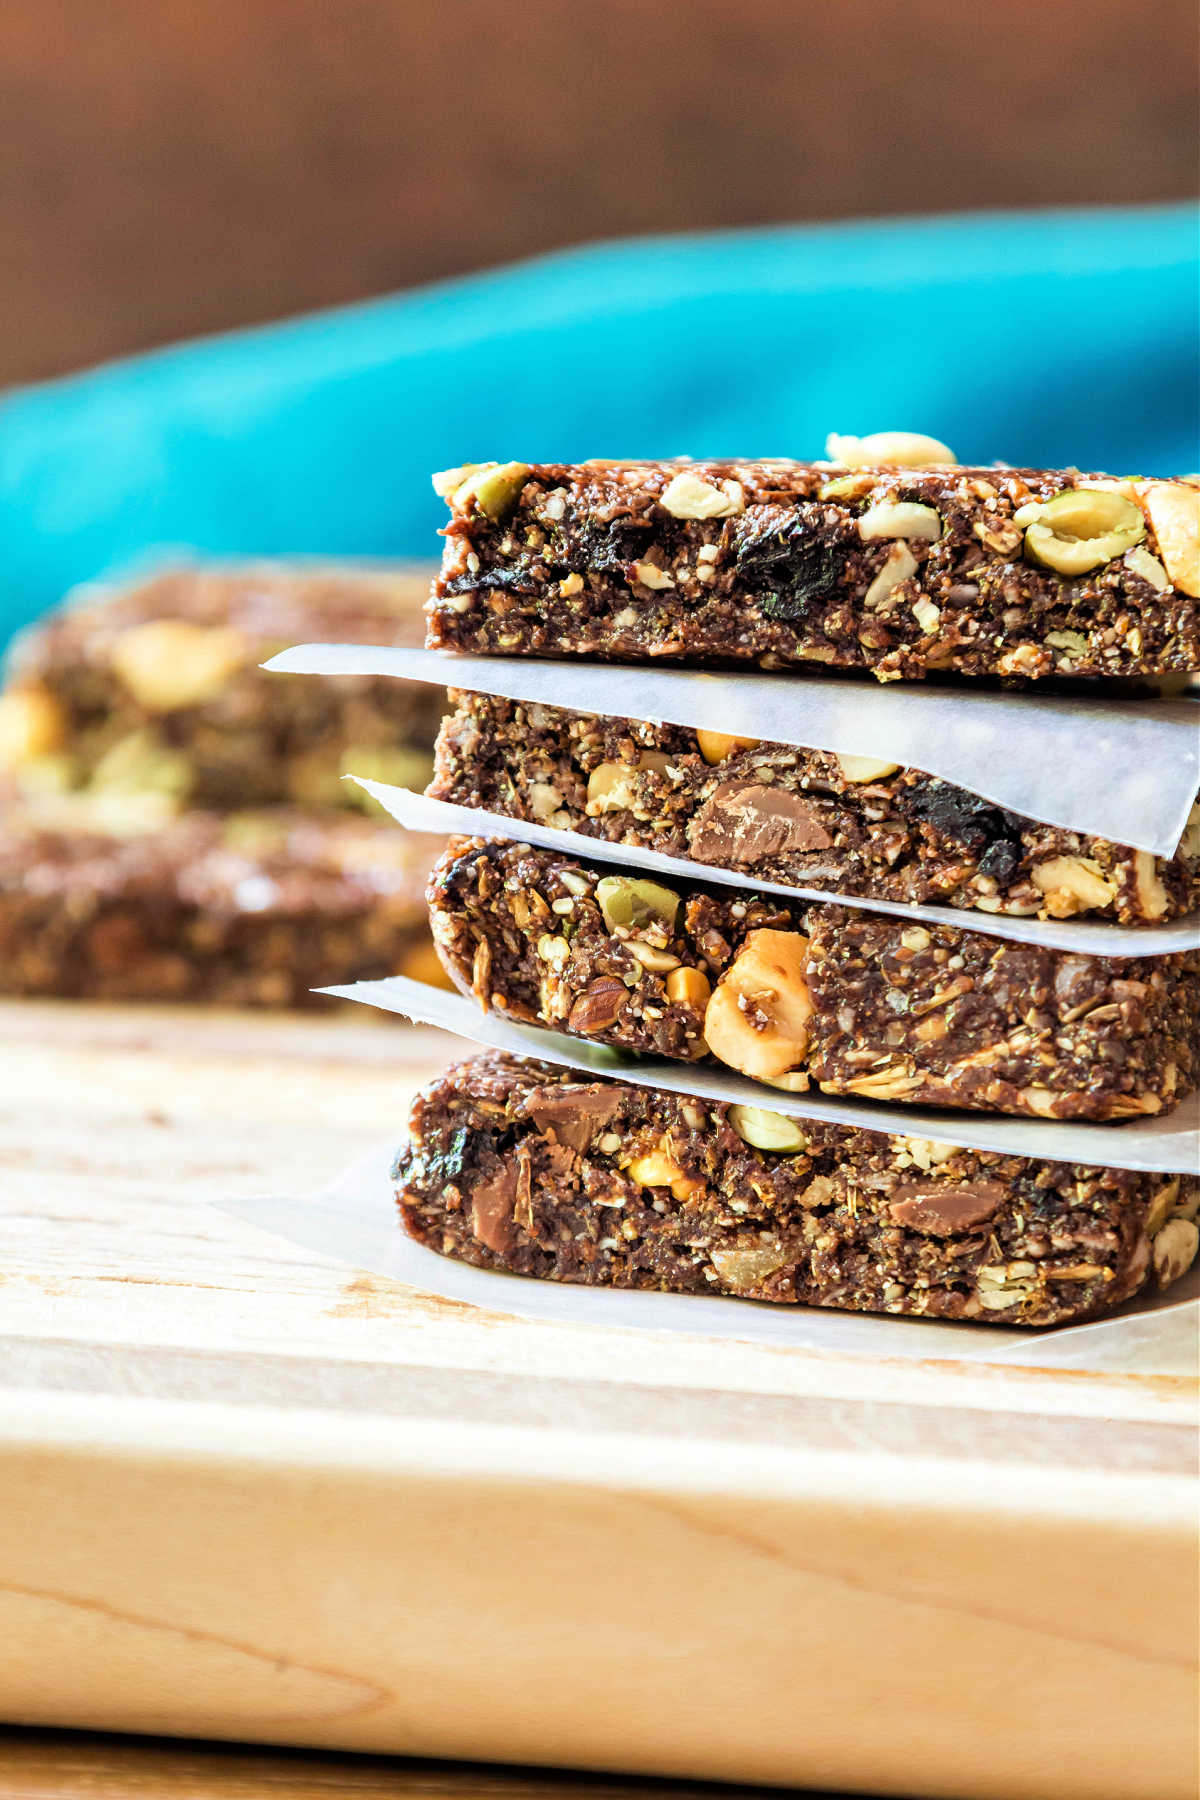
Today, I have a fantastic chewy, no-bake granola bar recipe for you. These spent grain granola bars are flavored with cocoa powder and studded with milk chocolate chips and dried tart cherries.
Up the nutrition by using both quinoa flakes and rolled amaranth along with the spent grains. Add in chopped, mixed nuts and pepitas, and you have a bar that not only allows you to use some (more) of your spent grains, but also packs a good amount of high-quality plant-based protein to keep you going.
If you’re a fan of a chewy granola bar, you may like my raw vegan chocolate granola bars, and if crunchy is more your style, don’t miss my chocolate cherry granola or my super crunchy spent grain granola.
Looking for more recipes for spent grains? Try my spent grain crackers or my fantastic soft spent grain sandwich bread.
For ease of browsing, you can find all my breakfast recipes in one place. Thanks for visiting!
Why Make This Recipe?
That’s a fair question. Aside from the fact that there are very few recipes out there for spent grain granola, and practically none for no-bake, chewy spent grain granola bars, here’s why you need to make these guys:
- This recipe strikes an excellent flavor balance between sweet, creamy milk chocolate chips and extra tart dried cherries.
- Since dried spent grains can be super crunchy and a little spiky due to the way they’re cracked rather than rolled, the no-bake recipe gives back some moisture to the dried spent grains making them more “approachable.”
- These last in the fridge for a good 2 weeks.
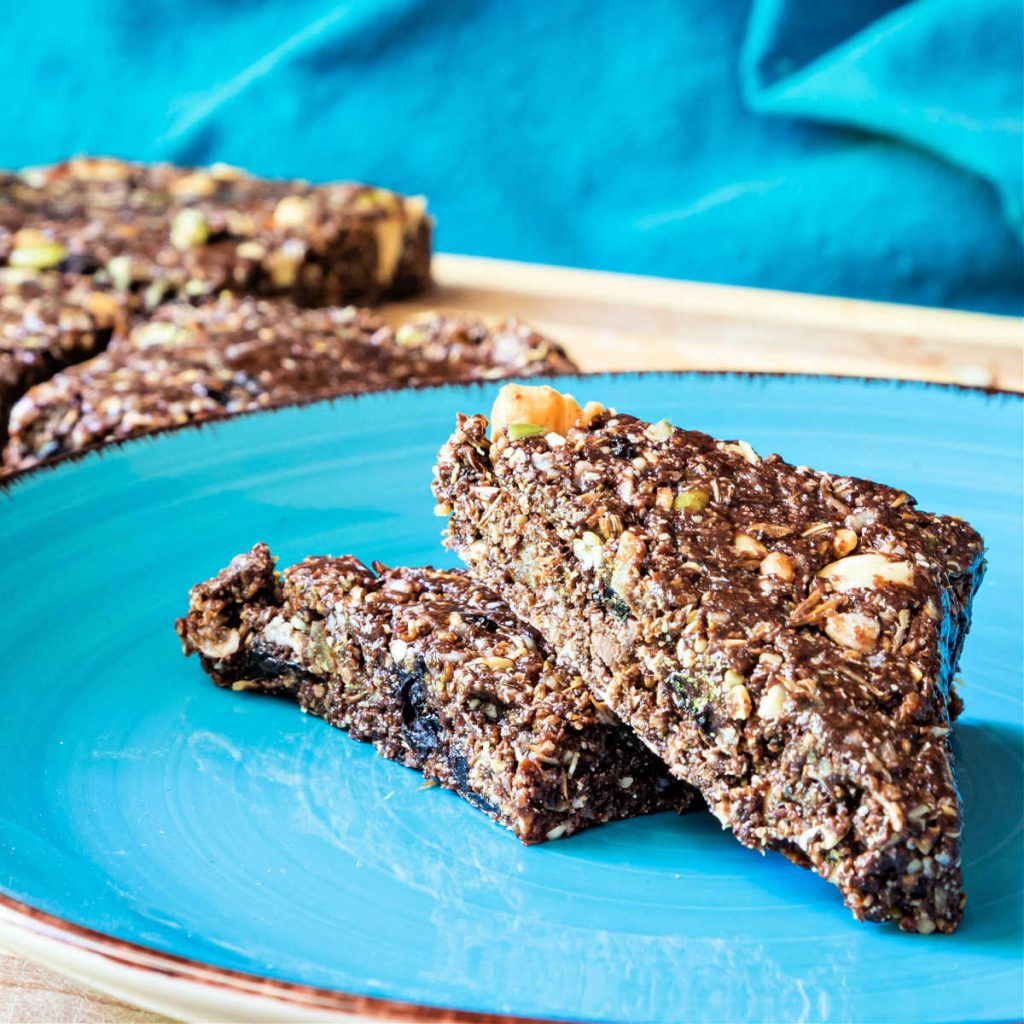
- The recipe makes 16 bars that are about the shape and size of an RxBar (for size comparison only)
- At about 240 calories per bar (if you slice into 16 pieces like I did), these guys make a portable and tasty breakfast or lunchbox treat for kids or adults.
- Since these are no-bake, there’s no need to turn on your oven and heat up your kitchen.
How to Make These Bars
Chewy granola bars are really easy to make. In short, all you have to do is:
- Toast the quinoa and amaranth flakes.
- Mix all the dry ingredients together.
- Mix all the “goo” ingredients together.
- Thoroughly combine the two.
- Press evenly into your pan and chill overnight.
Ingredients
Here’s what you’ll need. In this overview of the ingredients, I’ll give you sources (affiliate links) as well as ideas for substitutions. So please feel free to play and make this recipe your own!
Pastry Chef Online Participates in Affiliate Programs. If you make a purchase through one of my links, I may earn a small commission. For more information click to read my disclosure policy
NOTE: For the full recipe and ingredient amounts, please scroll down to the end of the post. This is just a checklist of what you’ll need.
- dried spent grains: Use your own from brewing beer or get some from your local homebrewing friends. Most homebrewers are happy to give you some since otherwise they’d just throw them away. Here’s how to dry your spent grains. And for a less crunchy texture, you can even turn your dried grains into spent grain flour.
- rolled quinoa: A cereal version of everyone’s favorite high protein seed, rolled quinoa is in flakes that are much smaller than oatmeal.
- rolled amaranth: A lower carb and lower fat rolled grain. The flakes are super tiny and thin, so they make a good binder for the granola bars
- chopped mixed nuts: your choice. A mix with pistachios in it would be fantastic, or you can use all of 1 kind of nut–it’s completely up to you. Since the spent grain granola bars are no-bake, if your mix isn’t toasted first, toast them up in the toaster oven. You definitely want to coarsely chop the nuts here so they all pack down and are more easily sliced.
- flaked coconut: I like to use unsweetened, but good old Angel Flake will work here too. I wouldn’t use the super thick and broad flakes in these bars. Smaller pieces of ingredients will pack down and hold together better.
- pepitas: I use toasted and lightly salted pepitas that I get from the produce section of the regular grocery. You can also substitute sunflower seeds or sesame seeds, or use additional mixed nuts.
- milk chocolate: I usually use dark chocolate, but the dried cherries I recommend are super tart, so the milk chips balance them out nicely. I use Ghirardelli, but use your favorite. You can even use your favorite milk chocolate bar chipped up into tiny pieces.
- dried tart cherries: With no added sugar, they are very tart and intensely cherry-ish. So very good. They are also great tossed on salads as well.
- cashew butter: I get mine from Big Spoon Roasters Cashew Butter because I love their signature not-quite-smooth/not-quite-crunchy texture.
- almond butter: Ditto for Big Spoon Roasters Almond Butter. You can certainly use all of one or the other, or use your favorite nut butter or sunbutter. Peanut butter will work here too. I prefer a natural smooth peanut butter like Smucker’s Natural Creamy Peanut Butter, which is available at most grocery stores.
- sorghum syrup: Sorghum syrup is a particularly southern ingredient that tastes a bit like molasses with less bitterness. It’s one of my favorite natural sweeteners and works really well in this recipe and in most granola recipes. If you don’t have any on hand, feel free to substitute maple syrup or use additional honey. I wouldn’t sub molasses here because I think the flavor is too assertive.
- honey: Use your favorite honey here. You can also use all sorghum or maple syrup to keep these bars vegan.
- cocoa powder: I use Valrhona cocoa powder which is really rich and gorgeous. Any cocoa powder will do, though.
- salt: Brings out all the flavors and counteracts any bitterness from the cocoa powder, quinoa, and sorghum.
- vanilla: rounds out all the flavors. Use your favorite brand.
Procedure
Here’s how to put the bars together.

- Line a 9″x9″ square pan with 2 criss-crossed layers of either non-stick foil or parchment, making sure the edges extend above the sides of your pan on all 4 sides. Set aside.
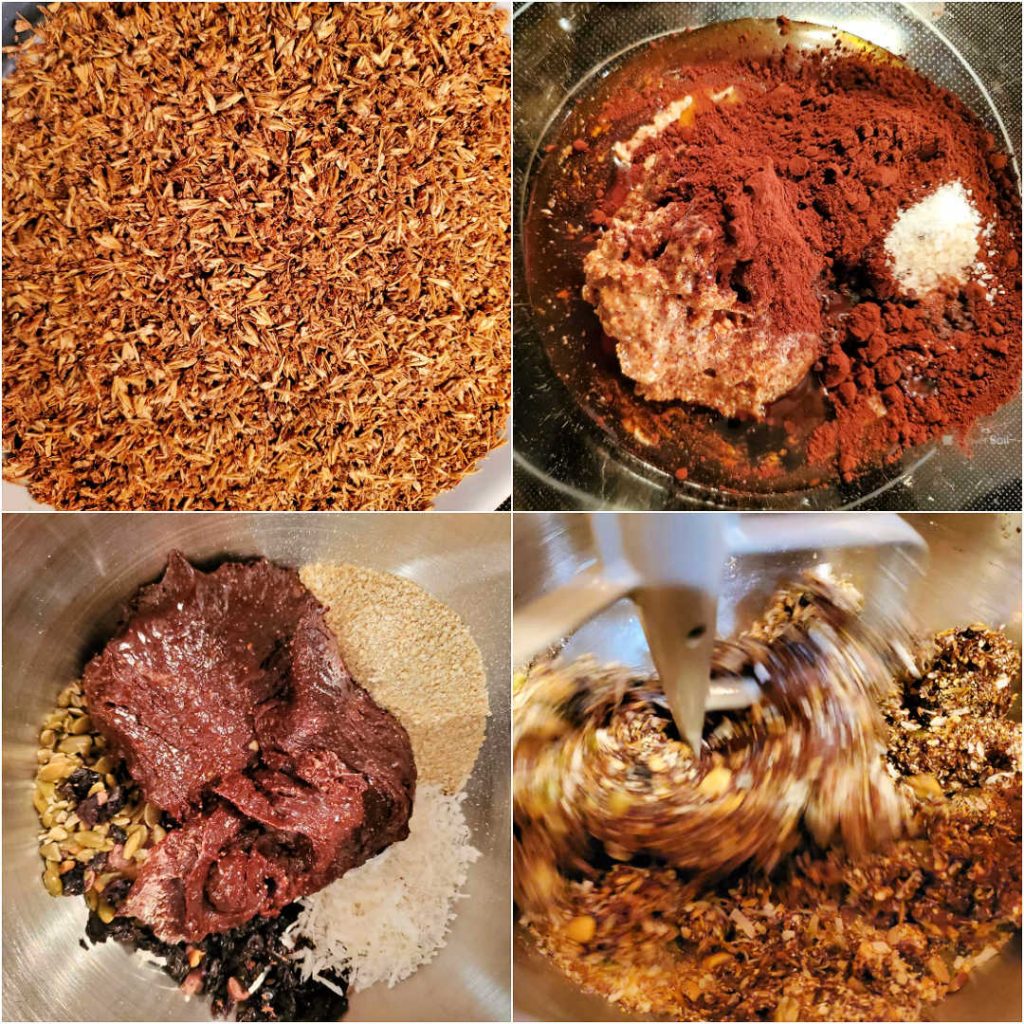
- Toast the quinoa and amaranth in a dry saute pan until fragrant and no longer raw-smelling, about 7-8 minutes over medium-low heat. Keep them moving with a wooden spatula. You don’t want them to burn.
- Pour out onto a plate to cool, and toast the pepitas and/or mixed nuts if they are not already toasted. (I buy roasted, salted pepitas and nuts, so I didn’t have to do this step).
- Roughly chop the pepitas, cherries, chocolate chips and mixed nuts so the whole mixture will pack easily into your pan.

- Place the spent grains, quinoa, amaranth, coconut, nuts, coconut, pepitas, milk chocolate, and dried cherries into the bowl of your
stand mixer . Whisk to combine. - In a medium bowl, mix together the cashew and almond butters, the sorghum, honey, cocoa powder, salt, and vanilla.
- Pour/scrape the “goo” on top of your dry ingredients in your mixer bowl.
- On low speed, use the paddle attachment to mix everything together evenly.
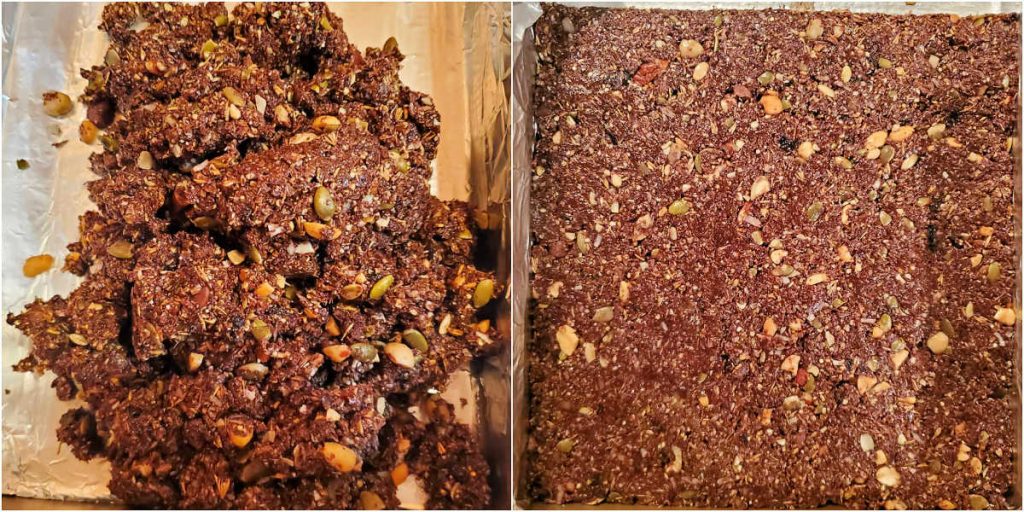
- Scrape your granola mixture into the prepared pan and press down evenly, making sure to press the mixture into all four corners and down into the pan as evenly as possible to minimize air gaps. The more thoroughly you do this step, the better your bars will hold together.
- Cover with foil or plastic wrap and refrigerate overnight so the dry ingredients can hydrate. This will help make the bars easier to cut as well as allowing them to hold together better so you can pick them up and bite into them without fear of them crumbling all over the front of your shirt.
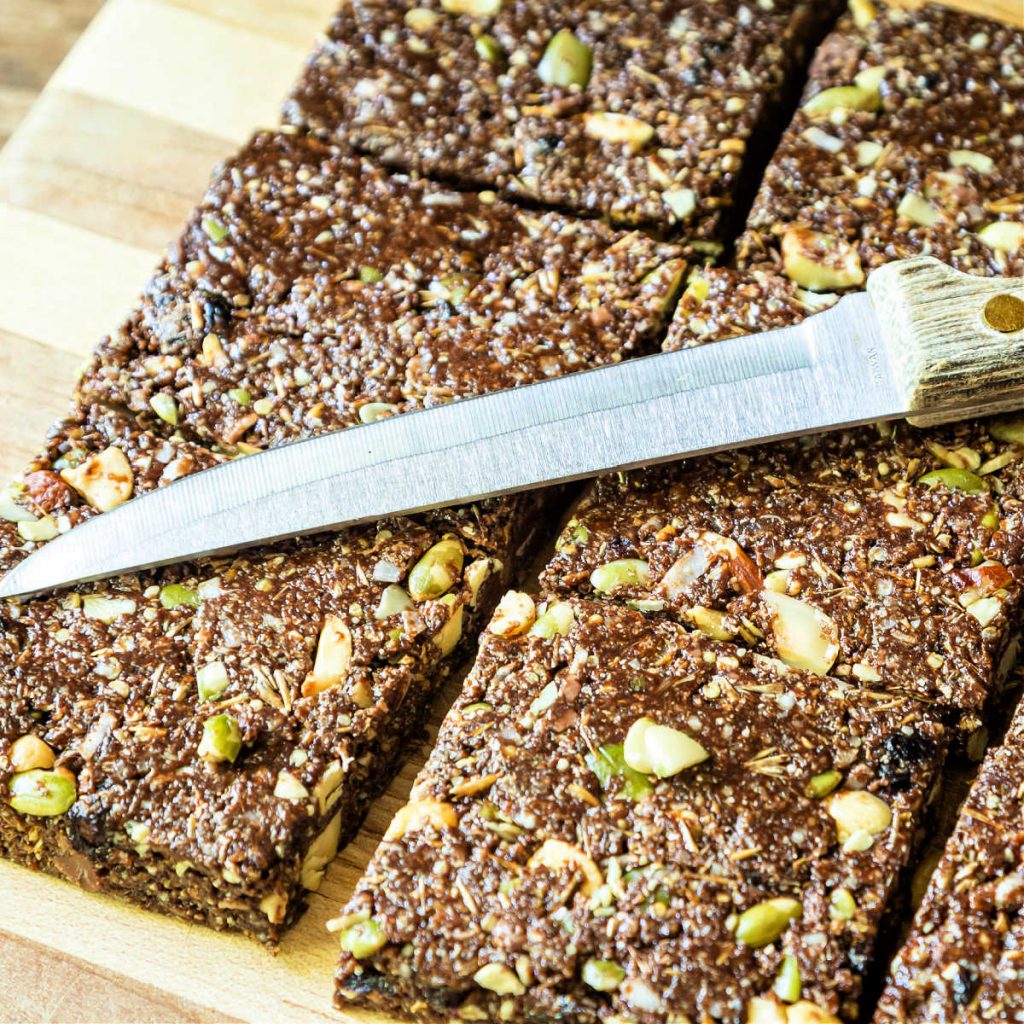
- Remove the bars from the pan by pulling up on the edges of your parchment or foil “sling.” With a sharp pizza cutter or knife, slice into 16 even squares, or 4 squares in 4 rows.
- Wrap individually or leave store covered in the original pan. Either way, store them in the fridge, because they may be too soft at room temperature to bite into.
Would you like to save this post?
Equipment Recommendations
While you don’t need a
Then again, I don’t want to expend the extra elbow grease! If you don’t mind a good upper body workout, a large spoon and a large bowl will work just as well.
You will want a 9″ x 9″ pan though. It’s my go-to brownie pan, for one, and it also allows you to make no-bake granola bars of the perfect thickness (about 1/2″ thick).
I especially like Reynold’s nonstick foil for lining the pan here. It’s even more non-stick than parchment.
Spent Grain Granola Bars Q & A
No, making these bars with spent grains is a great way to use up some of your brewing waste, but you can absolutely substitute a cup of rolled oats for the spent grains. Do make sure to toast them along with the quinoa and amaranth so you don’t end up with a raw oat flavor.
If you know someone who is a homebrewer, you can ask them for some. Or do what I did. Find a local homebrew Facebook group and ask there. Members are generally more than happy to share what they’d otherwise throw away. If you’re not on Facebook, contact your nearest homebrew shop (a store that sells brewing ingredients and equipment) or even a local bottle shop or microbrewery and ask for some of their spent grains.
If you are a strict vegan and do not eat honey, you’ll need to replace the honey with an equal amount of sorghum or maple syrup. All the other ingredients are vegan.
Most spent grains contain wheat and/or barley as part of the grain bill, so these bars are not gluten-free. You can make them gluten-free by using all gf rolled oats or other rolled grains such as the amaranth and quinoa also used here. But if you want to use up your dried spent grains, they are not gluten-free.
This recipe will double with no problem, although you will definitely want to use a
These bars will keep in the fridge for a good 2 weeks. You can individually wrap them and store them in a zip-top freezer bag in the freezer for longer storage. Thaw in the fridge as needed.
A Note About Measurements
Credit Where Credit Is Due
I got my basic proportions for these chewy granola bars from this post from Cookie and Kate.
Thanks for the inspiration, Kate!
And as Kate says and I will reiterate, make these bars your own by changing up mixins and flavors as well as grains. But do try them with the spent grains!
It helps me and other readers so much if you take a moment to rate and review this recipe.
Your star rating and comments help others decide whether the recipe is worth making, and your feedback helps me continue improving recipes here at Pastry Chef Online.
Other lovely ways to share include pinning or posting on your favorite social media platform.
Thank you so much for taking the time!


No-Bake Spent Grain Granola Bars Recipe
Ingredients
- 1 cup dried spent grains
- ½ cup rolled quinoa lightly toasted
- ¼ cup rolled amaranth lightly toasted (or substitute 3/4 cup rolled oats for the quinoa and amaranth)
- ⅔ cup mixed nuts coarsely chopped
- ⅓ cup unsweetened flaked coconut
- ⅓ cup roasted and salted pepitas
- ⅓ cup chopped milk chocolate chips
- ⅓ cup dried tart cherries
- ½ cup cashew butter
- ½ cup almond butter or substitute 1 cup natural peanut butter or sun butter for the cashew and almond butters
- ¼ cup sorghum syrup
- 6 Tablespoons honey or substitute 1/2 cup plus 2 Tablespoons honey for the sorghum and honey
- ¼ cup cocoa powder
- ¾ teaspoon kosher salt or 1/2 teaspoon fine salt
- 1 teaspoon vanilla extract
Instructions
- Line a 9" square pan with non-stick foil (my preference), waxed paper, or parchment paper. Cut to fit into the bottom and up the sides of the pan. Lay 1 strip 1 way and the other at a 90-degree angle so you have foil/paper extending above the edges of your pan on all four sides. Set aside.
- Coarsely chop the mixed nuts, pepitas, milk chocolate chips, and dried cherries. Set aside.
- Toast quinoa and amaranth in a dry skillet over medium/medium-low heat until fragrant. Pour onto a plate to cool to room temperature.
- In the bowl of your stand mixer, combine dried spent grains, toasted quinoa and amaranth, nuts, coconut, pepitas, milk chocolate, and tart dried cherries.
- Use the paddle attachment and mix on low just to combine the ingredients evenly.
- In another bowl, mix together the nut butter/s, sorghum syrup, honey, cocoa powder, salt, and vanilla extract. Whisk to combine into a thick paste.
- Scrape the wet ingredients into the mixer bowl and combine with the dry on low speed until all dry ingredients are lightly coated with the paste.
- Scrape into your prepared pan, and, using your hands and/or a large spatula, pack evenly and thoroughly into an even 1/2" layer. Make sure to press the mixture down well into the corners.
- Cover and refrigerate for at least 8 hours or overnight.
- Slice into 16 square bars using a very sharp knife or a sharp pizza cutter.
- Wrap each bar individually in waxed paper and store in the fridge for up to two weeks. You can also keep the whole batch refrigerated and grab a bar when you need one.
- For longer storage, freeze individually wrapped bars in a large zip-top freezer bag for up to 3 months. Let thaw in the fridge overnight or allow to sit out at room temperature until thawed but still cool.
- Enjoy!
Did You Make Any Changes?
Notes
Nutrition
Would you like to save this post?

Hi, y’all! I hope you’ve enjoyed this post and hopefully also learned a thing or two.
If you like my style, I invite you to sign up for my occasional newsletter, The Inbox Pastry Chef.
Expect updates on new and tasty recipes as well as a bit of behind-the-scenes action. I hope to see you there!

And that’s it friends! Enjoy the spent grain granola bars, and have a lovely day.


Join in Today!
This is such a smart way to use spent grains and I love the fact that they are no bake and filled with such yummy ingredients. This is such a smart and delicious recipe Jenni!
Thank you, Beth! I have really gotten into making allll the different kinds of granola all thanks to you!
This is such a smart way to use spent grains and I love the fact that they are no bake and filled with such yummy ingredients. This is such a smart and delicious recipe Jenni!
Oooh a good friend of ours brews. I’m going to get some of his spent grains and try this recipe. These bars look incredible!
I think you’ll have fun coming up with different ways to figure out how to use them. I know it’s fun for me! Enjoy the bars, Laura!
We used to have spent grains often when my hubby made beer. I love that you can put them to good use!