Homemade marshmallows are lovely and bear little resemblance to store-bought. They are a bit denser and more flavorful. These are ridiculously easy to make.
As written, the recipe makes chocolate marshmallows. There are endless ways to vary them, though. Coffee marshmallows are great, as are peppermint, orange, or almost any flavor you can think of.
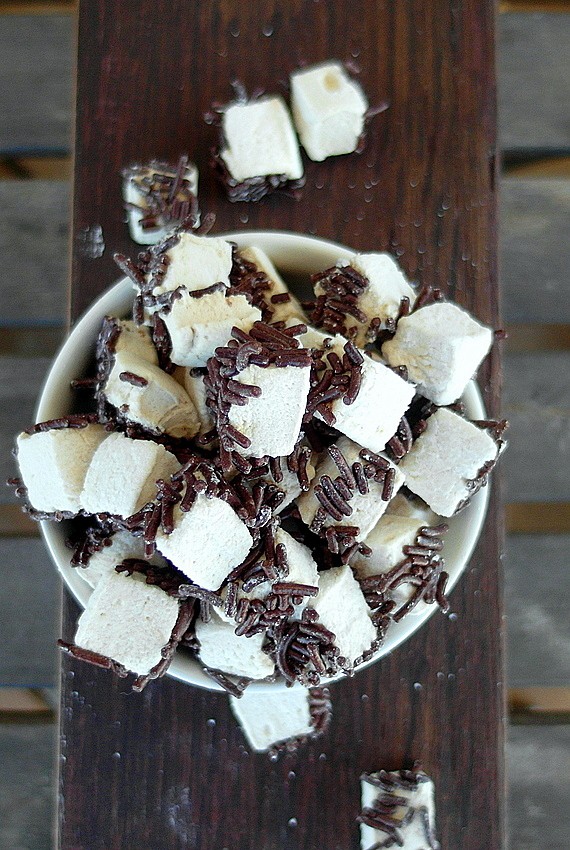
The video in this post shows me making coffee marshmallows, but I make all sorts of flavors of mallows using the exact same process. Get creative with your candy!
And consider serving your marshmallows floating in some heavenly hot chocolate custard. (Serving Suggestion)

Types of Marshmallows
There are two major types of marshmallows. French marshmallows contain both gelatin and egg whites and the other is thickened solely with gelatin.
I prefer the gelatin version of homemade marshmallows because I don’t have to worry about any little bits of inadvertently scrambled egg white in my candy.
How to Make Homemade Marshmallows
Homemade marshmallows are easier to make than you might think. It takes longer to wait for them to cure than it does to make them.
Pastry Chef Online Participates in Affiliate Programs. If you make a purchase through one of my links, I may earn a small commission. For more information click to read my disclosure policy
- Prepare the Pan: I like to spray a half sheet pan liberally with pan spray and then coat thickly with a mixture of corn syrup and powdered sugar. This makes the candy easy to get out of the pan once it has set up.
- Mix Gelatin, Water and Flavorings: In the bowl of your
stand mixer , combine the gelatin, water, and any additional flavorings you’re adding. Allow the gelatin to bloom for about 5 minutes, and then turn the mixer, fitted with the whip attachment, on to low speed while you make the sugar syrup. - Cook Sugar, Corn Syrup and Water: Stir the sugar, corn syrup, and water together in a heavy-bottomed saucepan. Cook until the mixture reaches 244F on a candy thermometer or instant-read thermometer.
- Pour the Cooked Sugar into the Gelatin Mixture: Carefully stream the sugar syrup into the gelatin. Mix on low speed for a minute or so to completely dissolve the gelatin.
- Whip: Slowly increase the speed of your mixer to high and whip until the candy triples in volume and gets very thick. You may hear your mixer’s motor labor some once it thickens.
- Pan Them Up: Use an oiled or pan-sprayed spatula to scrape the candy into the prepared pan. Spread it out as evenly as you can. You may have to add additional pan spray to keep it from sticking. Use a sieve to dust another liberal layer of corn starch and powdered sugar all over the top of the candy.
- Let the Candy Cure: Allow your newly minted homemade marshmallows to sit out, loosely covered, at room temperature for several hours or even overnight before cutting, tossing the cut candies in more powdered sugar and cornstarch, and storing in an air-tight container.
What Do I Need to Make Homemade Marshmallows?
You don’t need a lot of super fancy equipment to make mallows, but I highly recommend you get a
If you’re a mallow fan, definitely get the best stand mixer you can afford and put it to work.
You’ll also need a half sheet pan (I like that size–it makes a ton of mallows that are perfect for sharing and gifting), an accurate thermometer, and something to cut them with–a greased pizza wheel is generally my choice, but you can also use greased kitchen shears.
Would you like to save this post?
Other Candy Recipes You Might Enjoy
If you’re a fan of homemade candy, I have a few recipes you may like. Let me know what’s your favorite!
- Butterscotch Hard Candy: This recipe took me a few times to perfect, and my kitchen hero, Nathalie Dupree told me they were better than Werther’s!
- Chewy Butterscotch Candy: based on what is possibly the original written recipe for butterscotch candy, I made mine chewy rather than crunchy for a little bit of a change
- Old Fashioned Divinity Candy: egg whites never had it so good!
- Orange Cocoa Taffy (Homemade Tootsie Rolls)
- Butter Mints (No-Cook)
It will help me and other readers so much if you take a moment to rate and leave a review for this recipe.
You can use the stars to rate 1-5 (5 is best), and leave a review in the comments. It helps me make adjustments if any are needed, and comments help others decide whether the recipe is worth making.
Other ways to share include pinning, and/or sharing on your favorite social media platform.
Thank you so much for taking the time!


Marshmallows
Would you like to save this post?
Ingredients
- 4 ½ tablespoons powdered gelatin
- 1 cup plus 2 tablespoons cold water
- ½ teaspoon salt
- 1 teaspoon vanilla (or flavoring of your choice)
- 3 cups sugar
- 2 cups corn syrup
- ⅔ cup cocoa powder (optional, for chocolate marshmallows)
- water
- powdered sugar/corn starch (1:1 ratio, more or less)
Instructions
- In the bowl of your stand mixer, combine gelatin, cold water, salt and vanilla. Add the cocoa powder here, if using.
I highly recommend using some peppermint extract along with the vanilla whether you’re making plain or chocolate marshmallows. Stir well so there are no clumps of gelatin. Let it sit there while you do this:
- Spray a half-sheet pan with pan spray. (The pan spray is glue, in this case).
- Line the tray with plastic wrap, making sure it goes up the sides, too. If you have big air pockets under the wrap, poke them with a pin and press the wrap down onto the pan.
- Spray the pan again with pan spray. Put about 1 cup of powdered sugar/corn starch mixture in a strainer or sieve or sifter and sift a thick layer of sugar in the bottom of the pan.
- In a heavy saucepan over medium-high heat, bring sugar, corn syrup and a splash or two of water to a boil. Cover with a lid or plastic wrap, let boil for 2-3 minutes, then uncover.
- Cook sugar to 244 degrees, F.
- While sugar is coming to temperature, turn mixer, fitted with the whip attachment, on to medium-low.
- When sugar reaches 244F, remove from heat and carefully pour syrup down the inside of the mixing bowl.
- When it’s all in, turn up speed to medium for a minute or so, then crank it to high and whip until the mixture is tripled in volume and starts to pull away from the sides of the bowl in threads.
- Surprise, surprise: the mixture will look like marshmallow cream.
- Remove bowl from mixer.
- Spray your biggest rubber spatula very well with pan spray on both sides.
- Use the lubed up spatula to coax the sticky marshmallow into the pan in a big pile. If it starts sticking, turn over the spatula, or spray with more pan spray.
- Spray the top of the big pile of marshmallow and the spatula with more pan spray (all hail the pan spray), and smooth out the marshmallow as evenly as you can. It should reach the top of the half-sheet pan.
- Sift a generous amount of powdered sugar/corn starch over the top (you don’t want any shiny marshmallow showing through) and let sit, uncovered, at room temperature to set up. This could take several hours.
- Once set, cut with a greased cutter into fun shapes, or use a greased knife or scissors. Toss cut mallows in more of the powdered sugar mixture to keep the sides from drying out.
Did You Make Any Changes?
Notes

Hi, y’all! I hope you’ve enjoyed this post and hopefully also learned a thing or two.
If you like my style, I invite you to sign up for my occasional newsletter, The Inbox Pastry Chef.
Expect updates on new and tasty recipes as well as a bit of behind-the-scenes action. I hope to see you there!


Join in Today!
I do so love this recipe. Perhaps when it cools down I can drench them in chocolate. Until then, vive la fruit flavorings!
You could always melt the choc w/some coconut oil to make coating chocolate… =) It makes me so happy that you have taken this recipe and adapted it almost every way you can think of! Love your creativity!
Now I totally want to eat chocolate drenched marshmallows in the bathtub with a good book. Thanks for that. 😉
That is only a serving suggestion, mind you. You don’t *have* to eat them in the bathtub… LOL