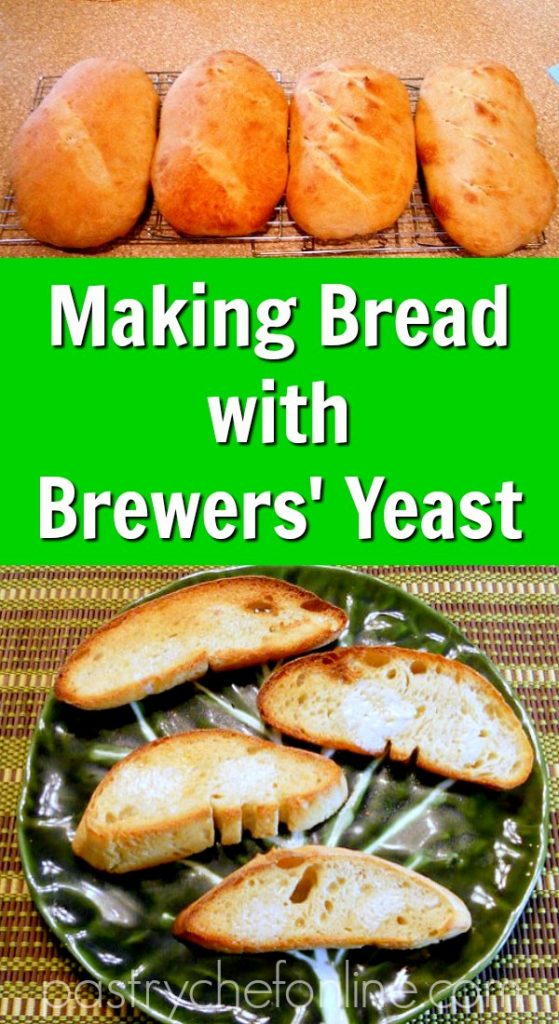
Welcome to my experiment in baking with beer yeast you guys. Especially if you are a brewer, I can wholeheartedly recommend using dry brewing yeast for bread baking. You can also learn more about the function of yeast in general
More baking with brewers yeast with my Champagne Yeast Pita and Champagne Yeast Brioche.
For ease of browsing, you can find all my bread recipes in one place. Thanks for being here!
Want to refer back to this post?
Baking with Brewers’ Yeast Pinterest Link
The beginnings of a plan
Sometimes I get crazy ideas. Sometimes these ideas don’t work out. But a few weeks ago, I actually had a good crazy idea. I thought that it would be Fun to experiment with different strains of brewers’ yeast in my bread.
Pastry Chef Online Participates in Affiliate Programs. If you make a purchase through one of my links, I may earn a small commission. For more information click to read my disclosure policy
Granted, bakers’ yeast has been optimized for baking, so I guess it’s a fan of the particular sugars present in wheat flour.
But all yeasts eat sugars and expel carbon dioxide and alcohol. I figured that trying to bake with beer yeast might be a fun experiment.
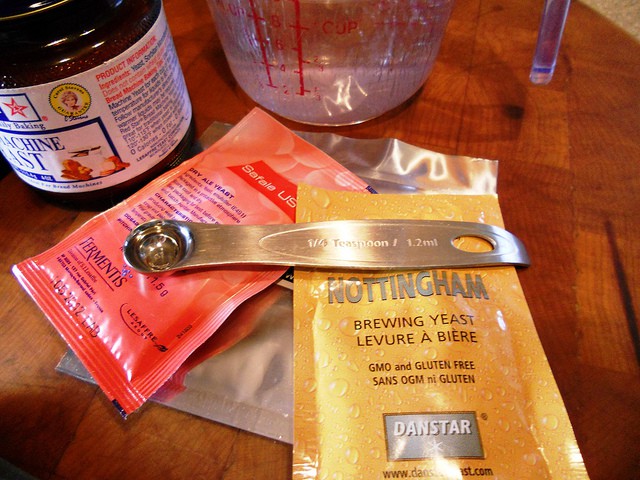
The Beloved and I took a trip out to the local home brew store, American Brewmaster. I came home with a veritable Treasure Trove of goodies.
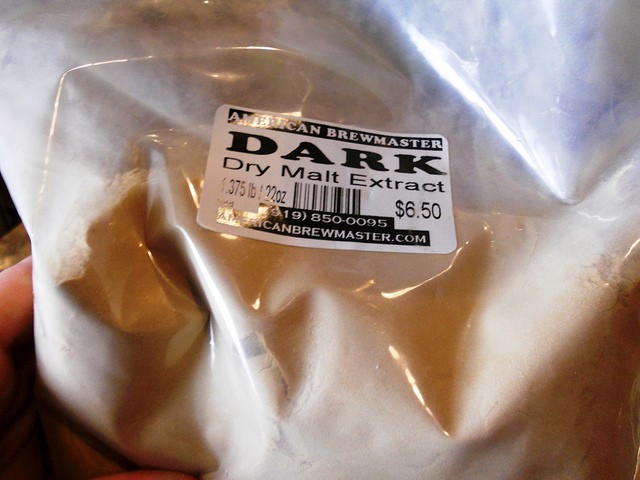
I bought three kinds of yeast, some Belgian candy sugar (which sat on the sidelines during this experiment–I kind of forgot about it), and some dry malt extract.
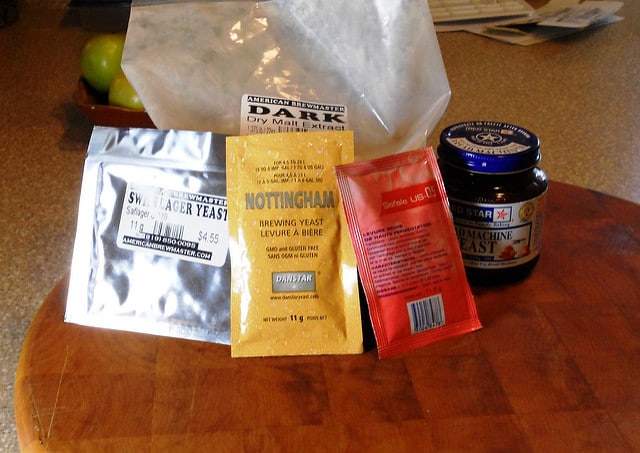
I was going to get the syrupy malt extract, but The Guy told me that it is Very Susceptible to bacterial infiltration and just to get the dried. I sullenly accepted his advice.
So, then, there they were. All my ingredients. Facing me. Day after day. Finally, after a couple of weeks, I broke down and decided that That Day was The Day. I decided to be kind of scientific-y about the whole thing.
Getting started (and get in touch)
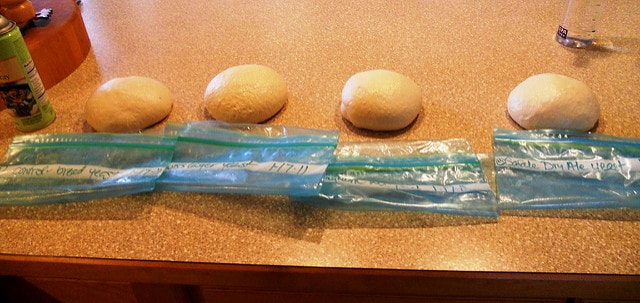
I used exactly the same ingredients in the same proportions for each dough. The only difference was the type of yeast I used.
I also labeled everything and gave all the dough the same amount of rise time both on the counter and in the fridge.
Read on to learn everything you want to know about baking with brewers yeast.
And if you don’t find what you’re looking for, email me. Seriously.
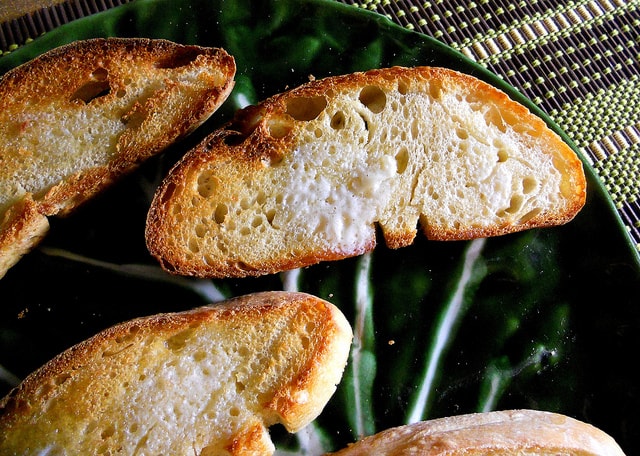
About this dough
Incidentally, this is a fantastic wet-ish dough. The long, uber-slow rise helps to develop some really nice chew and flavor, even using all purpose flour.
Even if you’re not feeling Up to the whole brewers’ yeast thing, this recipe makes a great loaf that weighs about 1 1/2 pounds.
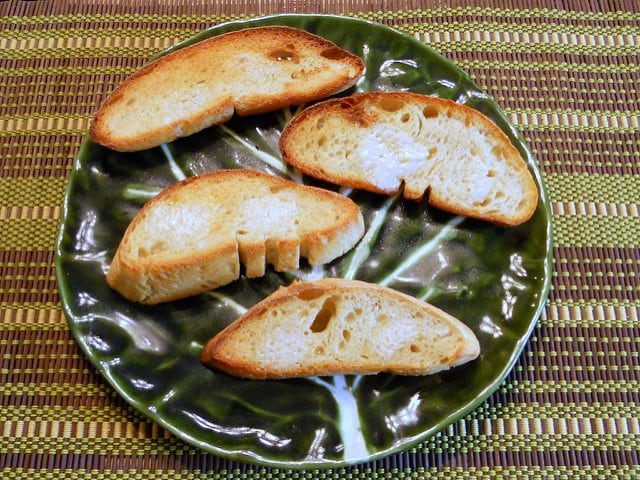
This recipe yields a chewy bread with a reasonably open crumb. If you are looking for a sandwich bread, try my Spent Grain Bread and use brewers’ yeast rather than bread yeast.
Supplies you may need
Here are some recommendations for brewer’s yeast and other products and ingredients you can use in baking bread to enhance flavor or switch up the flavor profile a bit. Not all your experiments will be perfect, but you’ll always learn something.
Some good yeasts to start with are SafAle Ale Yeast, the Nottingham yeast (the one that made the bread smell like oatmeal), and of course the lager yeast, that loves the cold anyway.
You may also want to check out this Mangrove Jack’s US West Coast dry yeast.
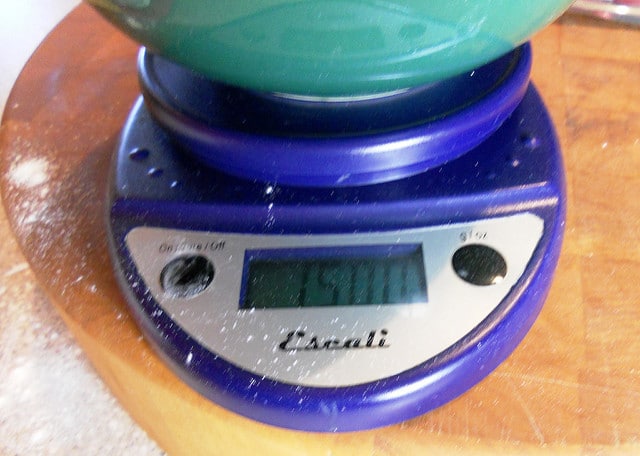
Consider picking up some malt powder or even some rock sugar for feeding the yeast. I also have added a link for a reliable instant read thermometer, a high quality but reasonably priced kitchen scale, and a lamé for scoring bread.
I consider the thermometer and the scale to be essential kitchen tools, whether baking bread of not. And the lamé is certainly nice to have if you do a lot of bread baking.
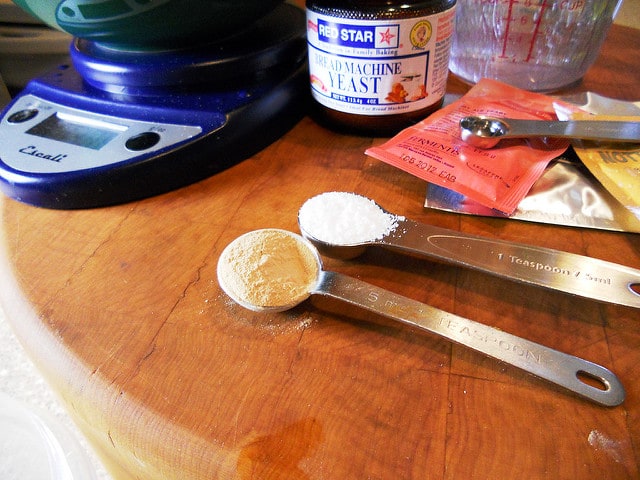
Basic bread ingredients for this experiment (per loaf):
- 15 oz all purpose flour (I used King Arthur)
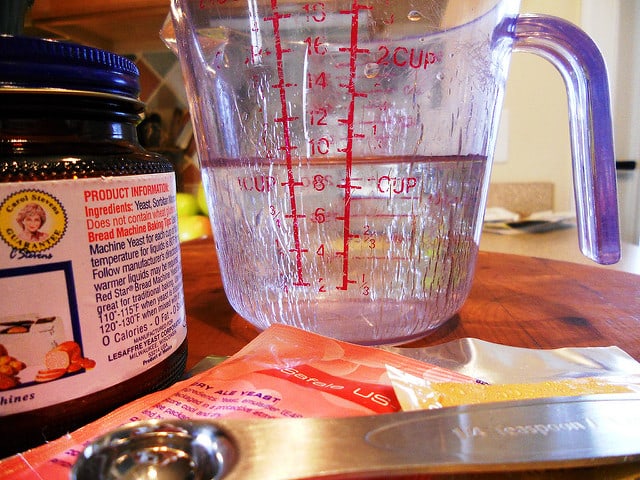
- 9 oz cool warm-ish water (about 100F)
- 1 teaspoon salt
- 1 teaspoon dry malt extract (feel free to substitute molasses, honey, sugar, maple syrup–whatever type of sugar you want)
- 1/4 teaspoon dried yeast
Procedure
NOTE: I made 4 separate loaves with 15 oz flour each to make it easier to blend the yeast into each loaf.
First, weigh out your flour.
Choose your yeast. You’ll only be using 1/4 teaspoon.
Salt and malt extract go into each loaf.
Would you like to save this post?
And 9 ounces of water. If you don’t have a scale or a liquid measure with accurate markings, use 1 cup (carefully filled to the top) plus 2 tablespoons of water. (Again, please buy a scale.)
Whisk together dry ingredients in a mixing bowl. Turn on your mixer (fitted with the dough hook) to low speed and mix for three minutes.
Raise the speed to medium and knead for seven minutes.
**What follows is the rising schedule I used to bring out as much flavor as possible. If you don’t have the time, increase the yeast to 1-2 teaspoons and let it rise once until doubled.
Punch down, shape, let rise again and then bake. Let the last rise happen in a greased 1 pound loaf pan if you want a taller loaf. Since this dough is pretty loose, it tends to spread a bit.
Apocalyptic rising schedule
- Put each dough in a 1-gallon zip top bag. Label (!) and let rise in a cool kitchen (65F) for 3 1/2 hours
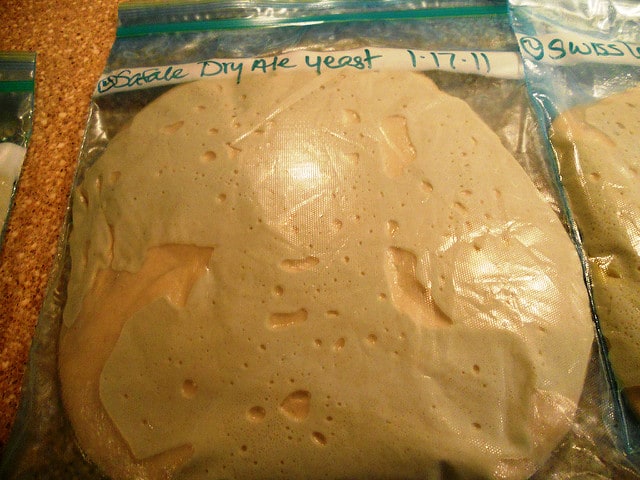
- Transfer to the fridge–don’t stack them–and let rise for a long over-night. Mine rose for about 10 hours.

- In the morning, put them back on the counter for 3 hours.
- Oil your hands. Take each piece of dough out of its pouch. Punch each piece down and knead a few times to redistribute the yeast. Round, oil and cover. Let rise again for 3 hours.
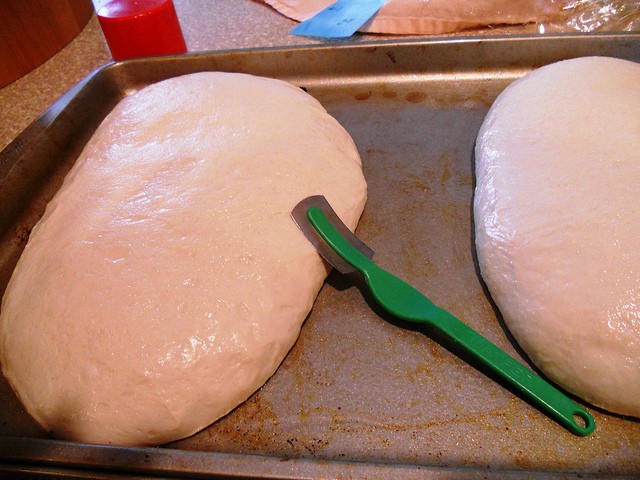
- Punch down again, press out all (most) of the large air bubbles, and shape. Oil and cover. Let rise on a prepared baking sheet for another 1 1/2 hours OR
- Shape lightly and don’t press out the gases for a loaf with a more “artisinal” open-crumbed texture.

- Slash with your lame (if you want) and bake at 350F for 25 minutes.
- Remove from baking sheets and finish them directly on the racks for another 10-15 minutes, or until the internal temperature is 200-205F.
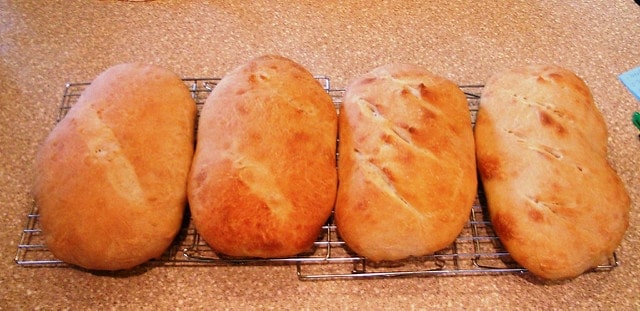
- Let cool completely on racks. Slice and freeze.
Since this dough is so slack and sticky, make sure to oil (or spray Pam on) your hands to keep it from sticking (to you or the counter) or to help you resist the urge to add more flour.
You Can’t Make This with Brewers Yeast Supplement
I had a reader message me to say their yeast wasn’t working. Then they sent a photo of a brewers yeast supplement they were trying to use.
Please note: the supplement version of brewers yeast will not work in this recipe or any other bread recipe, if you want to use it as the leavening agent.
This type of nutritional supplement is an inactive form of yeast. Otherwise, you’d have a tummy full of alcohol and would be burping carbon dioxide for who knows how long!
Takeaways
So, what did I learn from my experiment of baking with beer yeast? Well, I learned lots of stuff.
- Each yeast lends a slightly different character to the dough.
- The differences that I noted were fairly subtle. I could only really detect them in side by side tests.
- Lager yeast definitely enjoys being in the fridge. Lagers ferment at a lower temperature than ales, so it makes sense that the lager yeast was pretty happy in the fridge and in our 65F kitchen.
- Bread made with Nottingham ale yeast smells like oatmeal. This is a Very Good Thing.
- The loaf made with the bread yeast (the Control Loaf), while still tasty, was the least interesting of the four loaves. Sorry, bread yeast. I can absolutely Quit You.
- This base recipe would absolutely make the best baguettes. Try it. A twitter friend uses the Safale Dry Ale yeast in her baguettes. It yielded a pretty fine and regular crumb–perfect for baguettes.
- You can never have too much bread in the house.
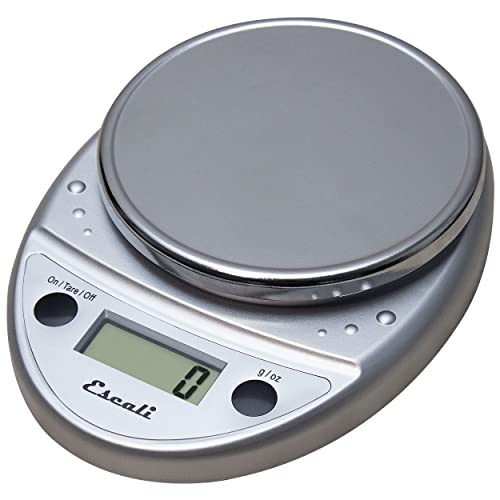
Don't let its small price and small size fool you. The Escali Primo is an accurate and easy-to-use food scale that I have used for years. It's easy to store, easy to use, has a tare function, and easily switches between grams and ounces/pounds for accurate measurements.
It will help me and other readers so much if you take a moment to rate and leave a review for this recipe.
You can use the stars to rate 1-5 (5 is best), and leave a review in the comments. It helps me make adjustments if any are needed, and comments help others decide whether the recipe is worth making.
Other ways to share include pinning, and/or sharing on your favorite social media platform.
Thank you so much for taking the time!

Bread Made with Beer Yeast
Would you like to save this post?
Ingredients
- 15 oz all purpose flour I used King Arthur
- 9 oz water just above body temperature
- 1 teaspoon salt
- 1 teaspoon dry malt extract or powder or sweetener of choice
- ¼ teaspoon active dry yeast
Instructions
- Whisk together dry ingredients in a mixing bowl.
- Pour the water on top.
- Turn on your mixer (fitted with the dough hook) to low speed and mix for three minutes.
- Raise the speed to medium and knead for seven minutes.
Rising Schedule I Used
- Put dough in a 1-gallon zip top bag. (See Notes) Label (!) and let rise in a cool kitchen (65F) for 3 1/2 hours
- Transfer to the fridge and let rise for a long over-night. Mine rose for about 10 hours.
- In the morning, put the dough still in the bag on the counter for 3 hours.
- Take dough out of its pouch.
- Oil your hands, and punch down and knead a few times to redistribute the yeast. Round the loaf, oil and cover.
- Let rise again for 3 hours.
- Punch down again, press out all (most) of the large air bubbles, and shape.
- Oil and cover. Let rise on a prepared baking sheet for another 1 1/2 hours
- If you prefer, you can shape lightly and don’t press out the gases for a loaf with a more “artisinal” open-crumbed texture.
- Slash (if you want) and bake at 350F for 25 minutes.
- Remove from baking sheet and finish the loaf directly on the rack for another 10-15 minutes, or until the internal temperature is 200-205F.
- Let cool completely on rack.
- Slice and enjoy.
Did You Make Any Changes?
Notes
To Freeze
If you do not intend to eat or share the whole loaf within a day, slice it and then freeze in a heavy duty zip top bag. Then you can remove slices as needed. The bread will keep in the freezer for about 3 months. To thaw, take out the pieces you need and allow them to come to room temperature. You can also toast the bread from frozen or microwave it for just a few seconds to thaw it out more quickly.Nutrition

Hi, y’all! I hope you’ve enjoyed this post and hopefully also learned a thing or two.
If you like my style, I invite you to sign up for my occasional newsletter, The Inbox Pastry Chef.
Expect updates on new and tasty recipes as well as a bit of behind-the-scenes action. I hope to see you there!

Enjoy experimenting with baking with brewers yeast, and have a lovely day!


Join in Today!
I’m so glad I found this, and thank you for posting, Jenni. I am interested in brewing a beer and baking bread that have the same yeast and malt. I’m going to have to turn my malted grains from the homebrew shop into flour, but I’m excited to see how they taste similar! Would love to know if you’ve ever done anything similar. Thanks!
Hey, Ana! I’m so glad you found this post too! I haven’t done what you propose, mainly because I’m not a brewer, but it is definitely a natural extension of the experiment! I also have a brewer’s bread made with still-wet spent grains, so you may be able to incorporate both the same yeast and the spent grains into your loaf: https://pastrychefonline.com/brewers-bread/ I hope you’ll let me know how your experiments turn out!
Hi Jenni. I am an experienced home cook and baker and am looking forward to trying my hand at brewer’s yeast bread. However, not all of us have the budget for fancy gadgets and equipment. I’m fine with weights and measures so I doubt I’ll be spending my fixed income on scale. But since I don’t have a mixer with a dough hook (and prefer the therapy of hand kneading my bread instead of someone’s head) how long should I knead the dough before setting it to rise?
Hi, Joy. Since I’ve never kneaded this by hand, I can’t give you a solid amount of time, but I would think around 10 minutes. You can also do a few stretches and folds, letting the dough rest for 20 minutes or so between each round of stretching/folding. Do maybe 4-5 rounds, 20 minutes apart. Or go the solid 10 minutes, evaluate the feel of the dough, do the windowpane test, and then just go from there. A stand mixer is definitely a luxury and is never an absolute necessity for making a great loaf of bread. Enjoy!
Can I use Brewer’s Yeast to make bread in a bread maker machine? Do I need to add the yeast to the water first before adding the flour? Usual instructions are to add water (and egg if using) to the pan, add the flour, oil, salt, sugar, yeast and turn the machine on. A basic bread takes about 3 odd hours, including baking time.
Hi, Karen. Since beer yeast is not optimized for bread baking, it is entirely possible, probable even, that it will not give you the same amount of rise in the confines of a bread machine program. You can make and knead the bread in the machine, but then I’d take it out, give it a long rise on the counter, then shape it, give it a second rise, and bake in the oven. I can’t tell you how long it will take because there are so many different types of beer yeast. But if you consider this kind of baking experimental and go into it knowing it will take as long as it takes, you’ll always learn something and end up with a loaf to be proud of.
Thanks Jennifer! I’ll try it out when I have the time to let it rise… probably turn the machine off after the first or second knead and let the dough rise in the pan and turn the machine back on the next day. My oven’s ‘broken’ at the moment so I need to rely on the bread machine.
I’ve never used a bread machine, so that sounds like a good plan! Let me know how it goes!
You don’t need to knead the dough at all just mix, the long fermentation will do the rest! Just pull and fold a couple times!
Yes, thanks for that modification. I know that now, but I didn’t back when I wrote this post. I should add another section to explain that. Have you tried the bread? My favorite in the head to head taste rest was the one made with Nottingham ale yeast.
Thankyou so much. I’m living in Malawi and bread isn’t very popular, especially at local level. Stuff we buy from a shop is very cheap industrially produced. I only have brewers yeast as I make pineapple beer, and this recipe seems perfect. Great explanation of everything!
Hi, Erik! Please let me know how your bread turns out. Brewing yeast can often bring unexpected flavors and make the bread more I teresting than a standardized bread yeast.
Hi Jenni. Just wondering if you ended up trying the Mangrove jack’s West Coast Ale yeast and, if so, how did it compare to the others?
Question: did the doughs rise in the fridge, especially the ones made with brewer’s yeast? I am just wondering because I am a home brewer and in my experience most ale yeast go to sleep below 16C; Nottingham is an exception and will still ferment at 10C, as will lager yeast. But fridges are usually around 4C. I wouldn’t think there would be much fermentation happening at 4C.
BTW, if Nottingham yeast is fermented at 22-23C it makes a lot of banana flavoured esters, which could be interesting in a bread.
Hey, Christina! I never did try that yeast, I’m afraid. In the fridge, all 4 doughs fermented, although slowly. The retard in the fridge helps to develop the flavor even though the dough doesn’t really rise appreciably. It would definitely be interesting to control the temperature of the ferment more closely to see what different flavor compounds develop.
I have KAL brewer’s yeast powder. The label states that it is “unfortified- 100% natural, unsweetened. From 100% brewing process. This is the only yeast that I could find! Do you
think that it would work? I’m so spoiled using the regular day activitie yeast pouches.
Hey, Michelle. No, I’m sorry, but that’s an inactive form of yeast and is sold as a dietary supplement. I wish I could tell you it will work, but it won’t. 🙁 Have you checked with a homebrew store? You can order online at https://www.northernbrewer.com/collections/dry-yeast
I made this bread with a few tweaks (and happily I have scales that have both metric & imperial measures!) and it was probably the best bread I’ve ever eaten! Totally amazing!
Oh, I’m so glad you enjoyed it! I’d love to hear your tweaks and what kind of yeast you used! 🙂
My hubby bought Everland Debitters Brewers yeast. He read that it is the same as regular yeast. From what I have been reading it wouldn’t work for bread.
I would love some feedback if you know the right answer
I am not familiar with that type of yeast, but while different strains of yeast have been selected for doing better or worse for bread, beer, etc, all yeast eat simple and expel both alcohol and CO2. So it should work, as far as that goes. Is it dry or liquid? My vote is it certainly can’t hurt to use 1/4-1/2 teaspoons in a bread recipe, give it long, slow rises, and see what happens. Good luck!
Hey! This post is AWESOME. I’m a homebrewer of almost 20 yrs. I was wondering if I could take the yeast slurry from the bottom of my carboy after a fermentation and use it to bake bread. I wonder how much slurry I would use? Crazy possibilities.
I have read about people using sediment as a “starter.” It definitely opens up all sorts of delicious possibilities. I don’t know how much to advise you to start with, not having done it myself. My only experience has been with dry yeast. But my husband who is also a homebrewer thinks it’s a great idea. No way 100% of the yeast dies during fermentation, especially if you’re brewing low ABV. Plus, bottle conditioning gets you carbonation, and that wouldn’t happen if there were no yeasties left alive. I would hazard a guess to start with maybe 1/4 cup of slurry and see how it behaves. You may be in for a long, slow fermentation, but that will just build flavor. Thanks so much for commenting, and have fun experimenting! Stay safe!
Hi! Thank you for the great recipe!
It’s my first try backing with yeast and I only could find brewers one ( apocalypses indeed).
How much the dough should rise? I didn’t notice much of increase in size… The dough is very elastic and nice to the tough though…
Followed your instructions to the letter ( except did the bowl and not bag)
Thank you!
Esya
Hey, Esya! The title of that post is pretty prophetic, right?! If you did the long, apocalyptic rising schedule and you’re ready for the last rise before baking, you’re not necessarily looking for doubling in size. Bake once the loaves are “puffy.” I wish I could be more specific, but it depends on the temp of your kitchen. Let me know how it goes!
Hi Jennifer! Thanks for the great recipe. Just to clarify, if you increase the yeast for a single proof, would you let it rise in an oiled bowl on the counter? I’m assuming the ziplock is mostly to keep it from gaining other tastes from the fridge foods 🙂
Thanks!
Hi, Gladis, yes. I just put everyone in Zip Lock bags because I didn’t have enough room in the fridge for 4 bowls. If you increase the yeast to make in 1 day, a counter rise is just fine. You can even make a cozy place in your microwave. Boil a mug of water, move it to one side and then put your covered bowl in the microwave next to the water and shut it up. Nice and cozy for bread rising! Enjoy, and stay safe!
Thank you Jennifer! I will let my parents know. In the meantime, my parents sent me photo of their beautiful “beer” breads. They used 1 packet for 1kg of flour, took them 4 hours to rise their bread. I will tell them they can experiment with much smaller amount of yeast. Also want to share with you, their recipe is a “lazy” but very delicious bread. No kneading, no proofing. Just put your flour (plus nuts and seeds optional), salt, sugar, water (enough to make a wet dough) and yeast (for instant just add directly to the bowl, for beer yeast, hydrate them following the method on the yeast packet). Then just mix gently with a wooden spoon untill combined, transfer to a bread tin, rise, place in a very hot oven (240C), reduce heat to 220C, bake for 40 minutes. This is their method. Thank you for the inspiration and encouragement about the beer yeast!
Oh, wonderful! I’m so glad it worked out, and it’s great to know that there are other methods that work, too. As it happens, I have bread yeast right now, but I may have to get some more brewers yeast to experiment with pan pizza dough. That would hit the spot! You guys take care, and tell your parents thanks for sharing their method with me!
This post is God sent!
I have flour and can’t find bread yeast anywhere but brewers yeast. It took me forever to find this recipe on Google. I had to rearrange my words many times. I am so pleased that I found it. I already order the brewers yeast and I am looking forward to play with it. Thank you so much xx Stay safe xx
I’m so glad you found it! Know that you can up the amount of yeast to make the bread in one day (maybe 1-1 1/2 teaspoons), but you can also use the tiny amount I used and make more bread, just spreading the rise out over a few days so the yeast can multiply. Enjoy it, and you stay safe too. xo
Hi Jenni, when do you add the water it doesn’t say in the recipe.
Oh man, Alina, I’m sorry–good catch. I’ll fix it. Mix the dry together and then add the water on top! Hope you enjoy the bread. Be well.
Hi Jenni, The title of this post is quite appropriate. It’s March 2020, and the apocalypse is here. Amazon had no more baking yeast, so I wondered if there was a way to make bread with brewers’ yeast. And this was the top of the list (and only) article I could find. Very prescient. The detail you included is great.
One question. Do you think Honey could be used in place of Malt Extract? Thanks for your help!
Hi, Nancy. I’m glad I wrote this post so it’s here to help you out. And yes, you can absolutely use honey. Stay well, and enjoy the bread. ❤️
I’m in the same boat Nancy haha 🙂
I think a lot of folks are right about now, John! Stay well, and enjoy the bread!
Thank you!! All I have is yeast similar to this and need to make bread!! The title is correct 😉 Very much appreciate the time you took to make this. Very, very helpful!
Have fun baking with whatever brewers yeast you have on hand. I wrote this post forever ago, and you’re right. The title is pretty apt right now. Stay well, Matt, and thanks for commenting.
Tks Jenni God bless
Enjoy the bread, Joe. Stay well. xo
Tks Jenni
Hello
What can I bake with left over sourdough?
Tks and God bless.
Hey, Joe! I don’t bake with sourdough, but if you are looking for recipes for what to do with the leftover starter when you feed it, that’s called “sourdough discard,” and I know many people use it in quick breads, pancakes, etc. Here are a couple of posts to start with: there are 3 recipes here for waffles, pancakes, and quick bread: https://www.theperfectloaf.com/my-top-3-leftover-sourdough-starter-recipes/ and this post has a cracker recipe https://www.loveandoliveoil.com/2019/03/sourdough-crackers-with-olive-oil-herbs.html Hope that helps!
Hi Jenni, I came here for the same reason as Nancy! I managed to get Nottingham yeast for my parents to bake their bread and I was so happy to find your post. Am I reading right that you only used 1/4 teaspoon of yeast for almost 500 g flour? It seems that 1/4 tsp of yeast is less than 1 g, and the whole packet is 11g, so 11 breads from the whole packet, is that right? I was thinking more like half a lacket for 500g flour so only 2 breads from 1 packet… I appreciate if you could help me understand your proportions.
Yes, you read it correctly, Joanna. But of course you can use more. I wanted a super long, slow rise, and using that tiny amount of yeast did it for me. If you want to speed the process along, use a teaspoon or 1 1/2 and have a more “normal” rising schedule of maybe 2-3 hours for the first, then shape and let proof again for an hour or so. You don’t have to do the retard in the fridge either. These days, you want bread fast, so just go for it with a bit extra yeast in the mix.. I hope you enjoy it.
If you do want to make the yeast last, you can absolutely use the tiny amount I used. But just know it’ll take it quite a while to really get going.
Take care, and I hope this helped. 🙂
Just a note to say that Nottingham yeast is an ale yeast, not lager. It will do better if you don’t chill it!
Hi and thanks for checking in. I know that Nottingham is an ale yeast, but I treated all four pieces of dough exactly the same way. Refrigeration usually retards the rise, and I noted that the lager yeast stayed much more active in the fridge than did the other three yeasts. Even were I to use only Nottingham yeast to make bread, I most likely would still give it a nice overnight in the fridge to develop flavor and chew, especially since it will “wake up” again once I take it out and it warms up. I guess a logical experiment using only Nottingham would be to divide the dough in two, making one loaf on a day without any refrigeration and giving the other an overnight chill and then see if there is any difference in the two loaves. Hmmm… =) Thanks again for stopping by!
I searched ‘net for this kind of experiments, and was glad there’s others interested in using beer yeast in baking. Just for this week, I tried to expand volume of yeast gathered from the bottom of the commercial beer bottle. It seemed to succeed, and I created sourdough from about a litre of yeast and flour mixture. Bread rised well during baking, and had a delicious crust. I think I’ll repeat what I learned and maybe publish what the process yielded.
Wow–love that you used “collected” yeast from the bottle. I’d love to see photos of your results if you feel like sharing. You can email to onlinepastrychef at yahoo dot com or post them to the “Jenni Field’s Pastry Chef Online” facebook page. Thanks so much for stopping in, Michael!
My husband has just started brewing beer, he first gave me leftover yeast and now he’s giving me spent grains. Do you think I could work some of the spent grains into the recipe? I had to dry them because I couldn’t come up with a recipe fast enough to use them wet.
I think you can, but I might try soaking them first with a portion of the liquid. When dried they are so scratchy that I’d be afraid they’d cut too much of the gluten. A nice soak in warm water or even mild beer should help with that. =)
PS: spent grains freeze really well, so next time just freeze them wet and thaw when you’re ready to bake!
I’m a brewer and I currently have a batch of cider brewing using the wild yeasts from the skin of the apples. I might try and replicate one of your loaves using my dregs when this cider gets finished, and see how different from a sourdough it is.
I love this idea, Ken! Please let me know how it goes!
Can this bread be made using gluten free flour and still be good?
Honestly, Jean, I have no real idea. I don’t do substitution baking, so I’ve never tried to make a gluten free version. There are many experts who could help you, though. Janice Mansfield comes to mind: http://janicemansfield.com/ I do know that you can’t just substitute one gluten free flour for the AP that I used. Since you won’t have gluten for structure, that has to come from gums, such as xanthan gum. I do hope Janice will be able to help. At the very least, I’m sure she has some lovely gf bread recipes on her site. 🙂
Fantastic! I was just wanting to try out brewer’s yeast for bread and am so glad I found your thread. I, too, live near American Brewmaster and will go out there today. I bake a lot with various wild yeast cultures from around the world and have been considering trying to introduce a brewer’s strain into one of those cultures to see if some kind of symbiosis might be possible among the naturally occurring yeast/bacilli and a 2nd yeast. Perhaps because brewer’s yeasts aren’t supercharged like baker’s yeast they might not out-compete. Can’t wait to try! Thanks for the inspiration.
Hey, that sounds like a fantastic idea! If you do create some sort of hybrid Franken-yeast, please let me know. I’d love to hear about your results!
Some beers are bottle-conditioned- meaning live yeast and extra sugar are pitched into the bottle to start another fermentation. Since the yeast is still alive, I wonder if you couldn’t just substitute a bottle conditioned beer for the water AND yeast in your recipe, and if a proper rise could be achieved that way. Yeast tends to settle in the bottle, so I’d probably give it a good shake before attempting this.
That’s an interesting idea. My only concern about that would be that once the beer is carbonated via the bottle conditioning, most of the yeast would be killed off by the alcohol in the beer. On the other hand, I don’t see why you couldn’t give it a shot to see what would happen. Some of the yeasties might just be dormant and throwing them in with a bunch of new food would wake them up.
Maybe try an experiment where you drain off all the beer and then pour the sediment out into a cup with a bit of warm water and a pinch or two of sugar and let it sit awhile to see if the yeast will start eating. If so, full steam ahead! If you try it, let me know, @3108fcc1a480dcff2c76ad5b3f49257a:disqus . I’d be interested in hearing your results!
Thanks for this! I’d always assumed brewer’s and baker’s yeast were not exchangeable. Now you got me all excited to go to the homebrew shop!
It opened a whole new world of possibilities, bread-wise, @google-afd6a762b92a3db25cb94570e301aa5f:disqus ! Enjoy and experiment away! I’m thinking playing w/a champagne yeast and using some champagne *in* the dough would be fun!
Love the recipe you got here. It is very easy to follow. Very simple and yet have great results.
So cool! This totally lends credence to the B&B (Brewery and Bakery) idea that Nick and I have been nursing for a while now. So interesting to see how the different yeasts work – I can’t wait to do my own experiments with brewer’s yeast!
Camille, if you and Nick make the B&B happen, I am coming to the opening! Now that I’ve done some experimenting, I think the possibilities might actually be limitless. You must start playing immediately! 🙂
I didn’t know that you brew–did I? My husband is the home brewer in the family. The bread is great–you should seriously try using brewing yeast in bread! 🙂
So cool!! I love reading your posts normally, but as a home brewer to read how you used the different brew yeasts YUM!!! Thank you! ~ MJ Schrader