
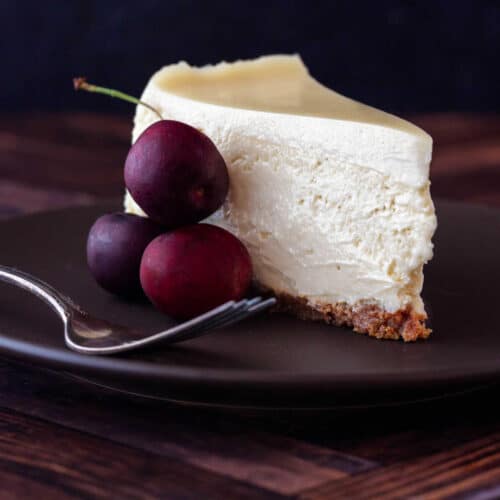
This classic bakery-style cheesecake is quintessential cheesecake: rich, decadent, impossibly smooth, and creamy without being soft or fluffy. It has the substantial, dense-but-silky texture of a proper bakery cheesecake, with enough heft that one unadorned slice feels like an occasion.
Buttermilk and sour cream give the filling a gentle cultured-dairy tang, while vanilla provides the main flavor. A little fresh lemon juice and zest brighten all that richness without making it taste lemony. And the thin layer of sweetened sour cream on top? That cool, silky lushness is the perfect finish.
I make mine with a buttery homemade graham cracker crust, but store-bought graham crackers work just fine. Either way, if your ideal cheesecake is creamy, rich yet bright, and heavy like a brick—in the best possible way—this guy is for you.
Pastry Chef Online Participates in Affiliate Programs. If you make a purchase through one of my links, I may earn a small commission. For more information click to read my disclosure policy
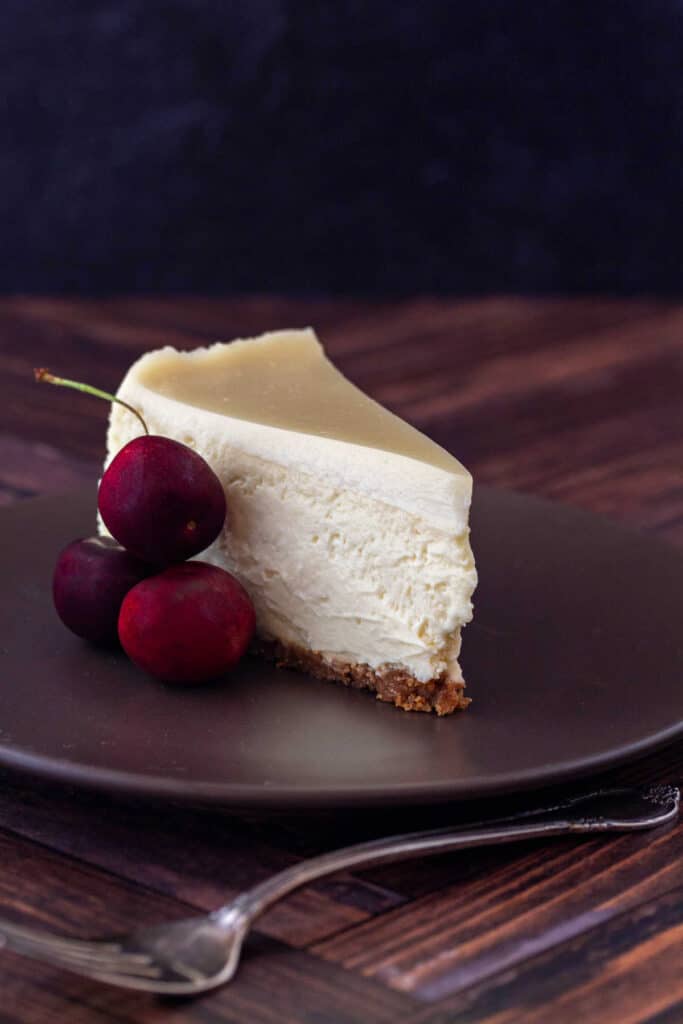
The texture is amazing! So much creamier than a standard cheesecake, which I love, but I love this even more.
Reader and Cheesecake lover Laurel
Bakery-Style Cheesecake, at a Glance
✅Skill Level: Confident Advanced Beginner
✅Skills: Making Custard, Baking in a Water Bath, Using an Instant-Read Thermometer
✅Type: Classic Cheesecake
✅Number of Ingredients: 10
✅Prep Time: 30 minutes
✅Cook Time: 70 minutes (crust plus filling)
✅Cooling Time: 3 hours
✅Chill Time: 8 hours or overnight
✅Yield: 12-16 slices
Jump Straight to the Recipe
What Makes This a Great Classic Cheesecake
I didn’t set out to revolutionize cheesecake. What I wanted to do, and what I think I’ve done, is fine-tune this cheesecake recipe so it can be the best possible version of itself.
I wanted every bite to be rich and creamy, with enough sweetness, enough brightness, and enough tang that you never find yourself wishing for a little more of anything. This guy can stand tall and proud on a plate without a single garnish or spoonful of sauce and be the star of the entire dinner party.
Buttermilk and sour cream work together to give the filling both flavor and a lush, creamy mouthfeel. Just enough cornstarch helps prevent weeping and buys you a little insurance against overbaking without sacrificing that silky texture. Lemon juice and zest brighten all that richness without turning this into a lemon cheesecake, while plenty of vanilla shines through and just enough salt brings everything into focus.
And then there’s the thin sour cream topping: silky, sweet, and cool against the rich filling underneath. It adds another layer of flavor and texture that makes the whole cheesecake feel complete. Think of it like the perfect scarf with a favorite dress. Each is lovely on its own, but put them together and they make each other better.
What You’ll Need
If you’re an old hand at making cheesecake and have a good feel for the process, water bath and all, feel free to skip ahead to the recipe.
Otherwise, read on for a discussion of the ingredients, how to make an impeccably smooth filling, and how to keep your masterpiece from cracking.
Up first, the ingredients:
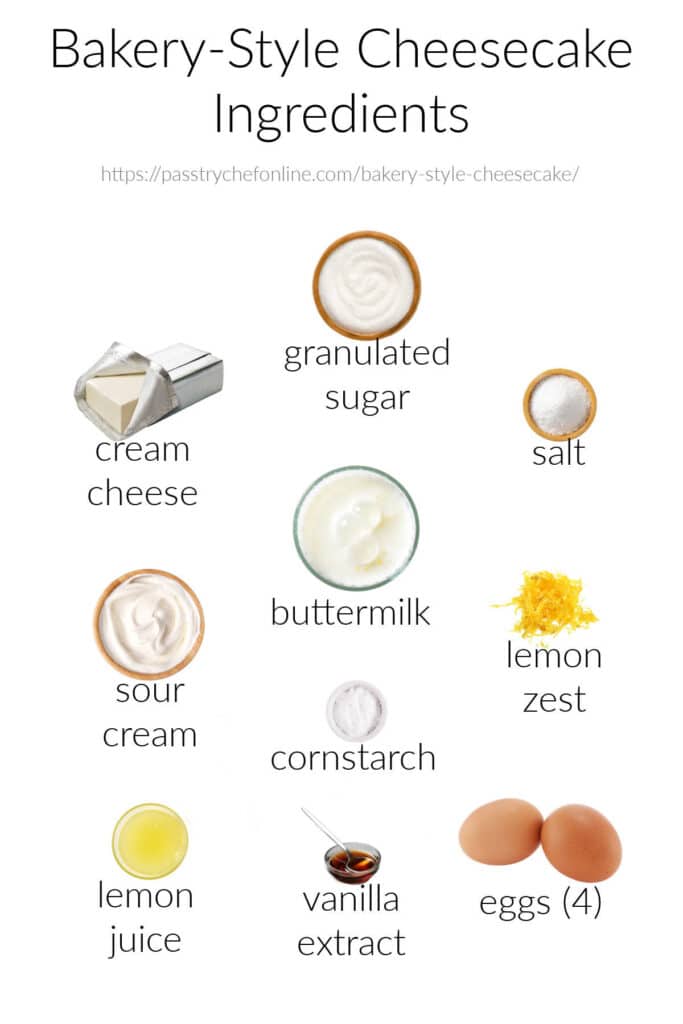
- cream cheese: The base of the whole operation, cream cheese provides a subtle tang, creamy, dense mouthfeel, and signature “bakery cheesecake” flavor
- granulated sugar: Provides sweetness in both the cheesecake batter and the sour cream topping, sugar also goes into solution with some of the liquid keeping the cheesecake more stable and less likely to weep
- kosher salt: Used judiciously in both the batter and topping, salt snaps all the flavors into focus and keeps a very rich dessert with a comparatively mild flavor from reading as flat
- sour cream: In the batter, sour cream contributes to a creamy mouthfeel and lends a bit of tang. In the topping, it is the star, baking into a sliceable, tangy-sweet layer that perfectly sets off the cheesecake beneath
- buttermilk: I tested with all sour cream and 50/50 buttermilk and sour cream before settling on 2:1 buttermilk to sour cream. It may seem fussy, but the buttermilk plays an important role by providing bright flavor without adding a substantial amount of additional fat. Using a majority of buttermilk limits the “stodgy” factor, keeping the cheesecake from sitting too heavily after a large meal
- cornstarch: just enough to gelatinize and bind some liquid in the batter. Along with the sugar, the cornstarch keeps the cheesecake from weeping without being so much that it ends up being more cakey than creamy
- lemon zest: provides a floral brightness to the whole endeavor. Note: don’t rub the zest into the sugar. We’re not making lemon cheesecake. We’re using the zest as “seasoning” to lift the flavor
- lemon juice: Adds a little extra background tang without reading as overtly lemony
- vanilla extract: 4 teaspoons or 1 Tablespoon plus 1 teaspoon yields lovely vanilla flavor that outshines the lemon. The cheesecake reads as decidedly vanilla without veering into ice cream territory
- eggs: 1 egg per 8 oz cream cheese plus about 1/4 cup additional dairy is the ideal ratio of eggs to cream cheese + additional dairy, allowing the cheesecake batter to set up into a sliceable consistency without getting rubbery or–heaven forfend– shrinking
For the Crust
For the crust, you may use either homemade Graham crackers or store-bought ones. Homemade Graham crackers contain a lot of butter relative to their store-bought cousins, so if you use homemade, you will need 4 Tablespoons of butter.
If you use store-bought grahams, then you’ll need to increase the butter to 6-7 Tablespoons.
Making Cheesecake, by the Numbers
In this section, I’ll share process shots for how to make this cheesecake. Afterwards, I’ll go into much more depth about how to make sure your cheesecake is super smooth, how to minimize the possibility of cracking, and how to cut the cleanest slices.
For now, here’s the “how-to rundown.”
Making the Crust
Note, these images show my homemade Graham cracker crumbs.
Whether using store-bought or homemade, make crumbs either by whizzing Graham crackers up in a food processor or by putting them in a heavy zip-top bag and bashing them with a rolling pin. Using the latter method, the crust will be a bit more rustic. I chose option 2.
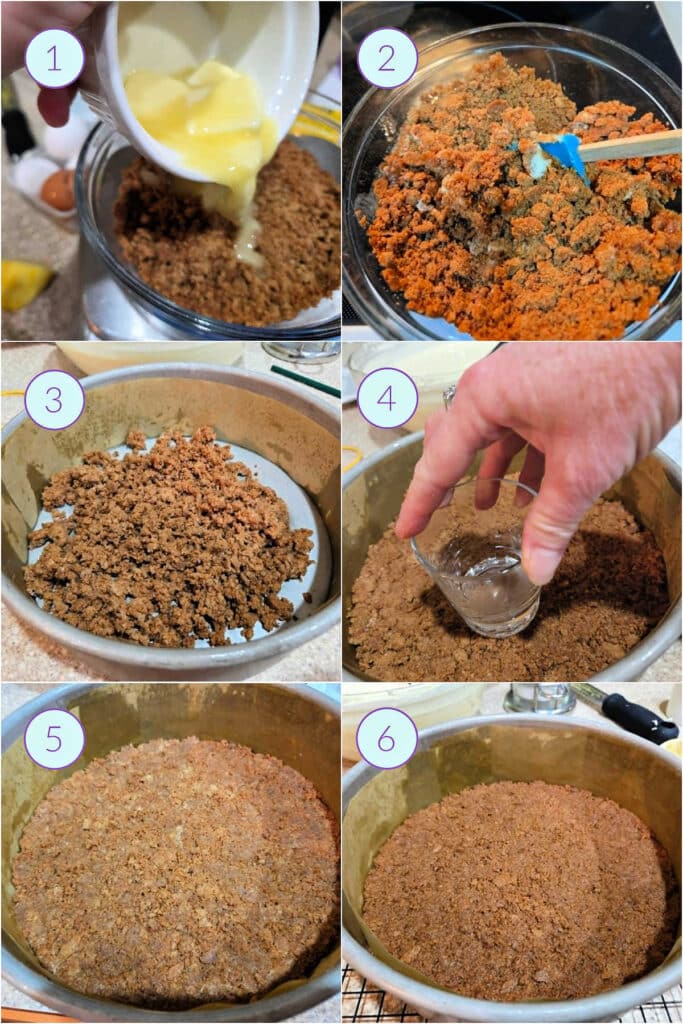
- Pour melted/very soft butter into the graham cracker crumbs.
- Mix together until all the crumbs are moistened and there are no pockets of butter hanging around.
- Tip the crumbs into your pan.
- Use your hands and a small, flat-bottomed glass or cup to press the crumbs evenly into the bottom of the pan.
- Press pretty hard so all the crumbs are compacted and you have a nice, even layer.
- Bake for 12 minutes to set the crust and deepen the color a bit.
Making the Cheesecake Batter
Making the batter is a bit of a process and it requires a little bit of planning to make sure that all your ingredients are at room temperature before beginning.
But nothing is hard, honest. Here’s how it goes:
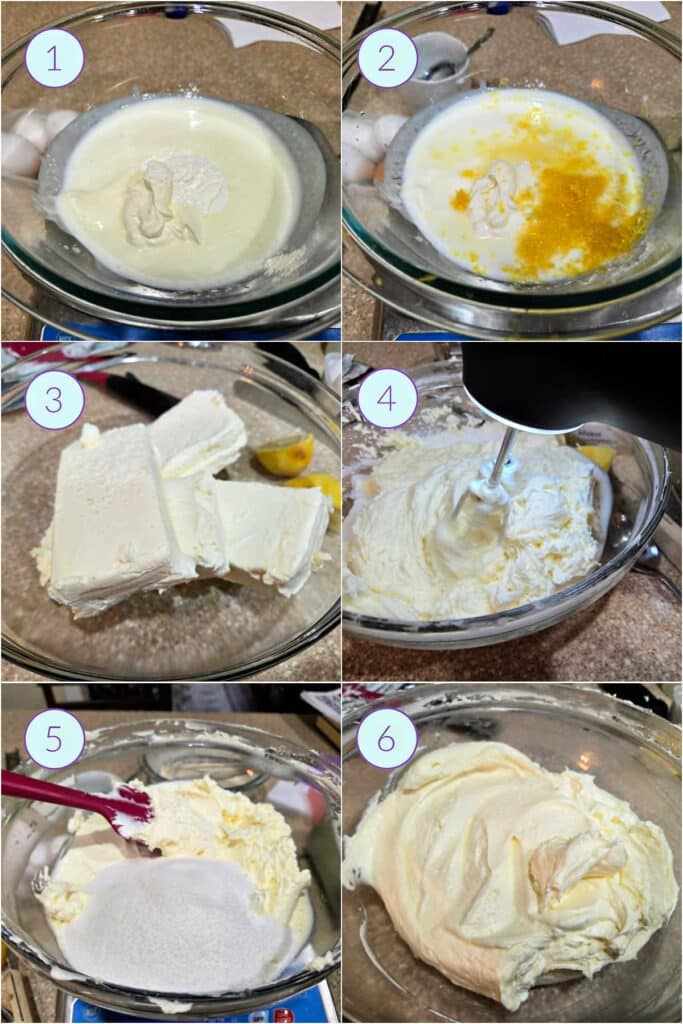
At least an hour before you begin, measure out the sour cream and buttermilk and get the cream cheese and eggs out of the fridge. I’m serious, everything needs to be at room temperature. We’re preventing lumps here, friends.
- Combine the sour cream and buttermilk.
- Add the lemon zest, lemon juice, vanilla, and cornstarch and whisk together until smooth. Set aside.
- Put the cream cheese and salt in a large bowl (or use your stand mixer).
- Mix on low speed, increasing to medium if necessary, until the cream cheese is completely smooth. This step is your best chance to avoid lumps in your batter.
- Add the granulated sugar.
- Beat on low and up to medium speed until creamy and smooth. Since sugar is abrasive, this step can help you smooth out any lumps, but if you’re thorough in step 4, you should be fine.
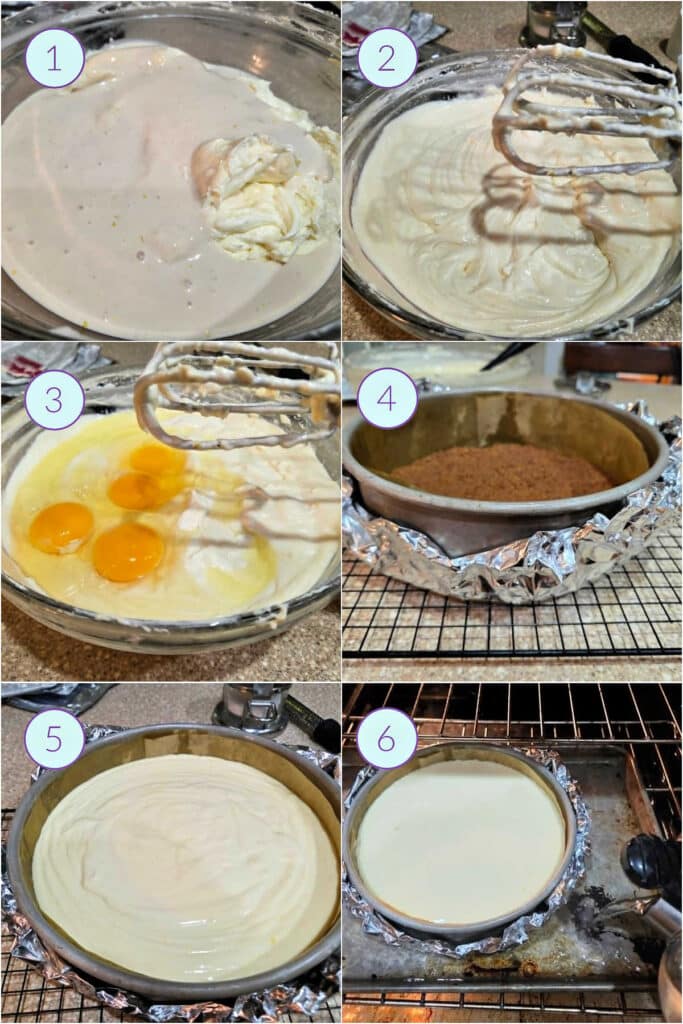
- Once you are sure your cream cheese/sugar mixture is almost impossibly smooth, add the buttermilk/sour cream mixture.
- Mix in on low to medium-low speed, scraping bowl as necessary, until the mixture is uniform.
- Add the eggs and mix in on low speed. Once those eggs are in, resist the urge to mix more quickly. Scrape the bowl and mix until the batter is smooth and creamy.
- Wrap the bottom of your pan in two layers of aluminum foil.
- Pour and scrape in all the batter. Wiggle the pan a little to level the batter.
- Place the cheesecake on a half sheet-pan in the center rack. Fill with very hot water, and bake for about 55 minutes. Top off the water about halfway through baking if it’s looking a little low.
Making the Sour Cream Topping
As far as I’m concerned, the sour cream topping is the crowning glory of a cheesecake. Other people think it unnecessary. I will leave you to make that call for yourself.
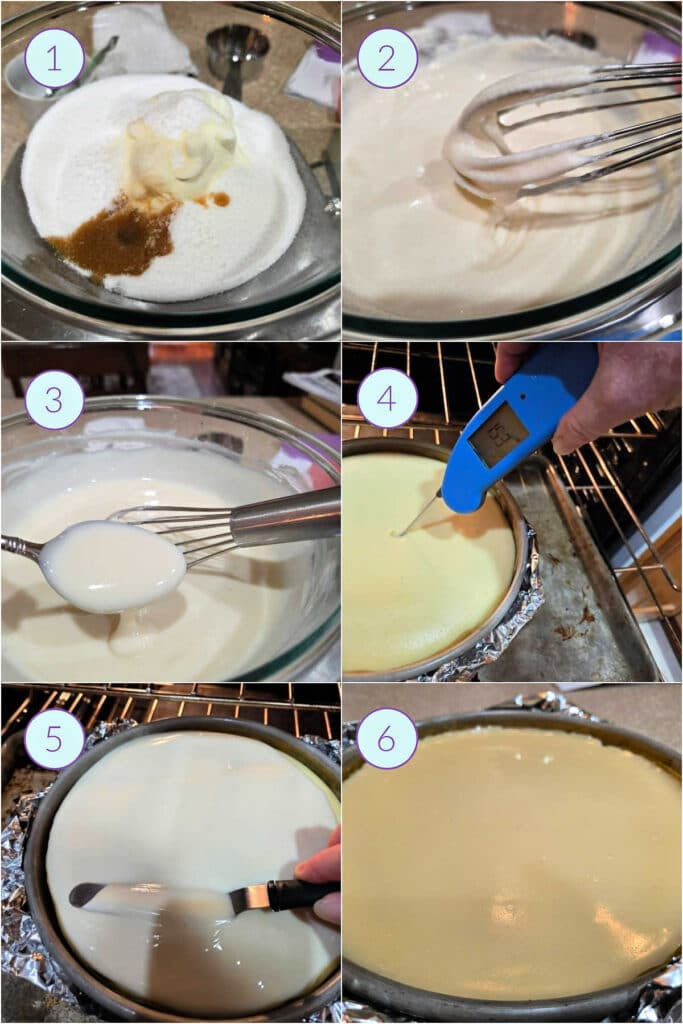
- While the cheesecake is baking, combine the sour cream, sugar, salt, and vanilla in a small bowl.
- Whisk to combine evenly. The mixture will be grainy. Let it sit for about 10 minutes.
- Whisk again. The sugar will be dissolved and the sour cream topping will be smooth, velvety, and sweet.
- Once the cheesecake has reached 152°-155° F/ 67°-68° C,
- scrape all of the topping onto the cheesecake and spread it evenly with a small, offset spatula.
- It magically sets in the oven in only about 8 minutes.
Allow your bakery-style cheesecake to cool gradually before refrigerating to chill for at least 8 hours or overnight.
And now, let’s take a closer look at how to make a smooth, creamy cheesecake, because that really is the whole ballgame, isn’t it?
If you have Got This, feel free to jump straight down to the recipe.
Would you like to save this post?
How to Make Smooth, Creamy Cheesecake
Cheesecake is a bit of a Gradual Dessert.
It doesn’t like to be rushed. It doesn’t like to be heated too quickly. It doesn’t like to be chilled too quickly.
Knowing those things will serve you well in making any type of cheesecake.
Here’s my progression for making a stable cheesecake with a pale, level top that neither rises nor sinks. It just is.
- Start with room temperature everything. That means cream cheese, sour cream, buttermilk, and eggs should all be at room temperature.
- In a stand mixer or using a hand mixer, beat the cream cheese by itself until it is absolutely smooth. Like, impossibly smooth.
- Add ingredients in order of more dense to less dense and mix thoroughly after each addition. In this case:
- sugar/salt
- sour cream and buttermilk with flavoring agents
- eggs
- Add the eggs last. Once you add the eggs, mix them in on low speed. You don’t want to whip air into the mixture once the eggs are in, or the batter could souffle (rise) in the oven and then sink, potentially cracking, when cooling.
Jenni Says: Cheesecake isn’t so precious that everything needs to be done on low speed. Feel free to beat the cream cheese and then cream cheese/sugar mixture on medium speed.
Your best chance of getting your cream cheese Impossibly Smooth™️is to thoroughly mix it by itself, or maybe with the salt. Your next—and only other—chance to get it smooth is when you mix in the sugar which is abrasive and can break down any remaining little lumps.
Once you start adding more liquid ingredients and thinning the batter, any remaining lumps will just…stay. So be thorough at the beginning of the mixing.
Bake in a Water Bath
A Gradual Dessert like cheesecake loves a water bath.
Water baths keep the oven nice and moist so you don’t get a weird skin on top of your cheesecake. They also keep the sides of the pan you’re baking in cooler. Since the water bath itself will never exceed 212° F / 100° C, it allows the cake to bake more gently.
Tempering Your Cheesecake for a Smooth, Crack-Free Finish
Just as we temper eggs to heat them gradually when making a stove-top custard, we also want to temper the eggs in the other direction, cooling them slowly so the cheesecake doesn’t contract too quickly and crack.
That’s where “gentle cooling” or “gradual cooling” comes into play.
I like to cool a cheesecake in stages, and to make it easy to remember, each stage takes about 45 minutes to one hour.
- Stage One: In the oven, still in the water bath. Oven off, door cracked open
- Stage Two: In a cozy place, out of the water bath. I use the microwave with the surface light on and the door cracked open. It wants to swing wide, but I tape it so it is open by maybe 4″ or so
- Stage Three: On the counter on a cooling rack at room temperature.
- Stage Four: Now that the cheesecake is probably only slightly above room temperature and the pan is comfortable to hold, it’s time to put it in the fridge to chill and set completely. Don’t cover the cheesecake, just let it chill for 8 hours/overnight/until serving, and then you can cover the leftovers
Extra Insurance Against Cracking
After the cake finishes its “Stage One” cooling in the water bath and before you start “Stage Two” in a cozy place, carefully run a thin knife or small offset spatula around the inside of the pan to release the cheesecake from the sides.
Even when using pan spray, dairy and eggs like to stick, so running a knife or spatula around the inside can release anything that might be stuck.
Cheesecakes tend to contract a little bit as they cool, and especially as they chill, so releasing the cake from the pan ensures it can contract cleanly without any tearing or potential cracking.
How to Get Beautiful, Clean Slices
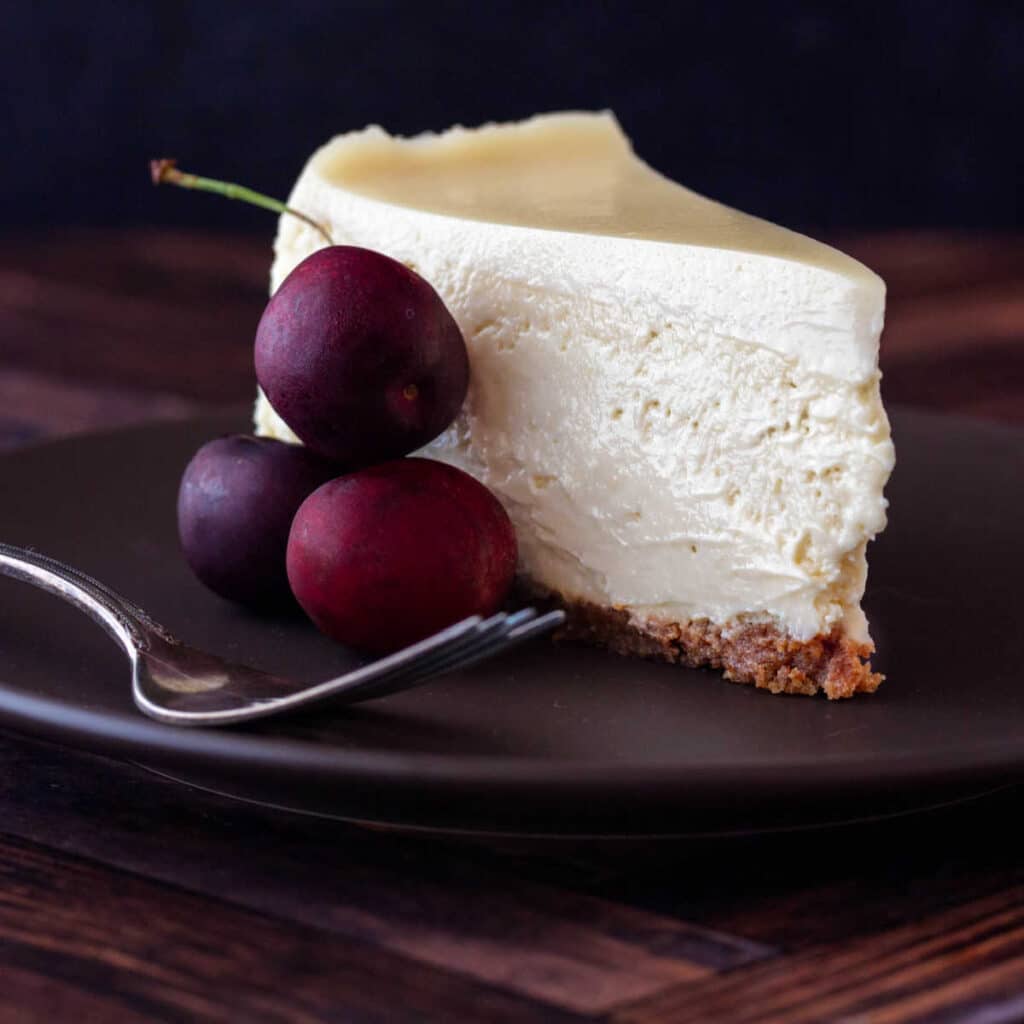
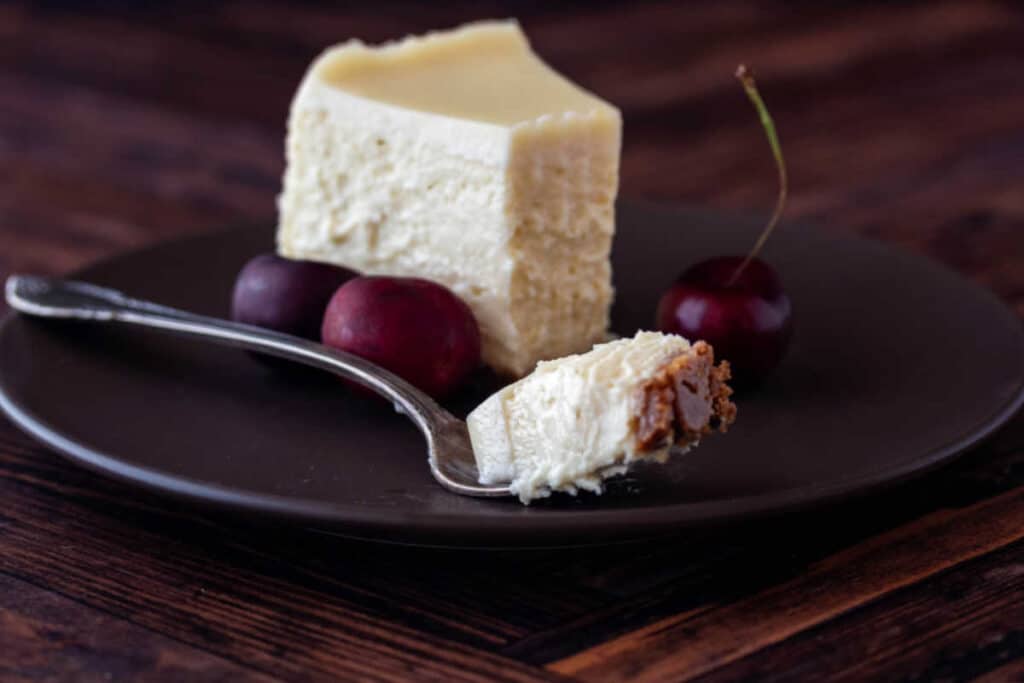
This cheesecake is creamy, y’all. And the best way to slice beautiful, clean wedges is to be a bit fussy.
The best way to get beautiful, bakery-style slices is to slice the cake as soon as it comes out of the fridge when it is as cold, and therefore as firm, as it’s gonna get.
Use a thin, sharp knife to make your cuts. Dip the blade in hot water, wipe it dry, then cut straight down in one motion, pressing firmly at the bottom to make sure you cut completely through the crust.
Wipe the blade clean, dip it in hot water again, wipe it, and make your second slice.
Use a cake server or a large offset spatula to get under the crust and lift the slice away. If it resists, repeat the hot water/wipe/slice maneurver again, taking special care to cut through the crust completely.
Jenni Says: The first piece is always the problem child, so make that one small and sacrificial, saving it for a treat just for yourself.
You may serve the slices cold, but I think the texture is much dreamier if you let the slices sit at room temperature for a good 30-45 minutes before eating. It’s totally your call, though.
Serving Suggestions
Honestly, this cheesecake needs nothing but a cup of coffee.
But it is also neutral enough in flavor that it will accept all sorts of supporting players, from jam or pie topping to hot fudge sauce to butterscotch sauce.
Bakery-Style Cheesecake Q & A
Yes, you can use store-bought grahams with no problem. Since the store-bought kind contain less fat and are therefore drier than my homemade version, you will need an additional 2-3 Tablespoons of melted/very soft butter to get them to bind for the crust.
Especially when using homemade Graham crackers, the crust will be adequately sweet without additional sugar. If you’d like, you may add 1-2 Tablespoons of sugar to the crumb and butter mixture, but no more than that. When you use too much sugar, it can melt while you’re baking it and then solidify into a rock-hard sheet that makes the crust very difficult to slice even with a sharp knife, let alone with a fork.
Yes, you can. You can substitute 1:1, so you won’t have to do any math. An all-sour-cream cheesecake will be delicious, but do know it will have a different character than when made as written. An all sour cream version will be denser, less tangy, and will have a higher fat content than the original buttermilk and sour cream version.
Technically, you don’t have to add the sour cream topping if you don’t want to, and especially if you’d like to top it with pie filling or something. But the sour cream topping really does enhance the overall cake. It’s there for additional sweetness and tang, for a little visual and textural contrast, and to act as a silky foil to the crunchy crust.
I would not. This cheesecake is more likely to rise and then fall or crack when baked in a dry oven. As well, in a dry oven, a skin can form on top of the cheesecake which can be a bit off-putting texturally. Give the custard what it wants: a hot and misty environment for gentle, even baking.
Visually, look for a pale, buttery cream color, a more matte/less shiny appearance, a very gentle puff around the edges and a center that jiggles a bit without sloshing. For accuracy, I use an instant read thermometer and aim to pull when the temperature reaches 152°-155° F / 67°-68° C.
No, not at first. When you put the gradually cooled cheesecake in the fridge, it will still be a little bit warm, so covering it will just encourage condensation. If you’re serving the cheesecake the following day, I wouldn’t bother to cover it until after you serve it and you’re storing the leftovers. If you won’t be serving for a couple of days, you can stretch a piece of plastic wrap over the top of the pan after it is completely chilled. Just be careful you don’t accidentally swipe it through the pristine sour cream topping.
That is a great question. While it is a little lemony, it does not read as a lemon cheesecake. The lemon zest and juice are there more for seasoning than to turn this guy into a lemon cheesecake. Together, they provide floral notes and tanginess so that the whole cheesecake reads as bright and tangy but not lemon.
Questions?
If you have any questions about this post or recipe, I am happy to help.
Simply leave a comment here and I will get back to you soon. I also invite you to ask questions in my Facebook group, Fearless Kitchen Fun.
If your question is more pressing, please feel free to email me. I should be back in touch ASAP, as long as I’m not asleep.
A Note About Measurements
My recipes are almost all written by weight, including liquids, unless otherwise specified.
For accuracy and consistency of results, I encourage you to buy–and use–a kitchen scale.
I promise that baking and cleanup will be so much quicker and easier.
This is the scale that I recommend for home use. I have owned and used one for years.
Bakery-Style Cheesecake
Equipment
- 1 KitchenAid Hand Mixer or stand mixer
- 1 Fat Daddio Push Pan Or a 9" springform pan
Ingredients
For the Crust
- 190 grams Graham cracker crumbs 6.7 oz, about 1 1/2 cups or 13 sheets, crushed, homemade or store bought (See NOTES)
- 57 grams butter 2 oz or 4 Tablespoons, salted or unsalted, very soft or melted
For the Cheesecake Batter
- 900 grams cream cheese 32 oz or 4 "blocks" at room temperature
- 260 grams granulated sugar 9.2 oz or about 1 1/4 cups
- 175 grams whole buttermilk 6.2 oz or about 3/4 cup, room temperature, not low-fat or non-fat
- 85 grams sour cream 3 oz or about 1/3 cup + 1 Tablespoon, room temperature
- 4 teaspoons vanilla extract 20 grams or 0.7 oz
- 1 Tbsp cornstarch 8 grams or 0.3 oz
- 1 Tbsp lemon juice 15 grams or 0.5 oz, freshly squeezed and strained
- 4 grams lemon zest from about 2 medium-sized lemons
- 4 grams kosher salt 1 scant teaspoon of Morton's, about 1 1/3 teaspoons Diamond Crystal, or about 2/3 teaspoon fine salt or table salt
- 4 eggs at room temperature
For the Sour Cream Topping
- 340 grams sour cream 12 oz or 1 1/2 cups
- 150 grams granulated sugar 5.3 oz or 3/4 cup
- 1 gram kosher salt slightly heavy pinch
- 1 teaspoon vanilla extract
Instructions
Mise en Place
- About an hour before you plan to bake, gather the cream cheese, sour cream, buttermilk, and eggs. Measure out the sour cream and buttermilk into the same bowl and then put the containers back in the fridge.
- Set a rack in the center of the oven and heat to 350° F / 177° C. Spray the bottom and sides of a 9" push pan or springform pan lightly with pan spray.
For the Crust
- Whether you make your graham crumbs in a food processor or by bashing them up in a zip top bag with a rolling pin, mix the Graham cracker crumbs and butter until evenly combined and the mixture holds together fairly well when squeezed.
- Press evenly and firmly into the bottom of a 9" push pan or springform pan. I use a small glass with a flat bottom to assist in getting the crust flat and nicely compacted.
- Bake for about 12 minutes until the crust has deepened in color just a bit.
- Remove from the oven to cool on a rack.
- Turn the oven temperature down to 325° F / 163° C.
For the Cheesecake Batter
- In the bowl you measured out the sour cream and buttermilk in, add 1 Tbsp cornstarch, the lemon zest, lemon juice, and vanilla, whisk together and set aside.
- In a large bowl or in the bowl of your stand mixer, beat the very soft cream cheese and salt until completely smooth. Start on low, but you can mix on medium if you need to.
- Add the granulated sugar and beat again on medium-low speed. Sugar is abrasive, so if you have any little lumps left in your cream cheese, this step should take care of them. Be thorough, scrape the bowl often, and make sure your mixture is soft and smooth.
- Pour/scrape in the buttermilk/sour cream mixture and mix on low to medium-low speed to evenly incorporate, scraping the bowl as needed. Mixture will now be much thinner and pourable.
- Add all 4 eggs and mix them in on low speed. Once the eggs are in, you don't want to beat any air in, so slow is the name of the game. Finish by hand, scraping the sides of the bowl and making sure all the eggs are incorporated and you have a gorgeous, smooth batter.
- Heat 6-7 cups of water on the stove or in the microwave until very hot. It doesn't necessarily have to be boiling, but it should be steaming.
Baking in a Water Bath
- Tear a long rectangle of aluminum foil and fold it in half so you have a square. Place the pan with the crust in it in the center of the square and bring up all the ends and sides, pleating it to form it to the pan. This does not have to be perfect. You just want to make sure the foil comes up higher than the water in the water bath will.
- Pour and scrape all the cheesecake batter into the foil-covered baking pan. Wiggle the pan a little to level the batter.
- Pull out the center rack, and place a half-sheet pan on the center rack.
- Put the cheesecake on the sheet pan and then pour in the hot water to come up the sides of the pan by about 3/4". I promise, it's all you need.
- Carefully slide the rack back into the oven to avoid sloshing, and bake the cake for about 55–60 minutes. Add more hot water during baking if needed to maintain the water level.If your oven has a pronounced hot spot that you know about, you can carefully rotate the pan inside the water bath. Otherwise, let the cake bake undisturbed.
- The cake is done when the top is a pale, buttery cream color, it looks marginally puffy around the edges, and the center jiggles but doesn't slosh. The internal temperature should read between 152°-155° F / 67°-68° C.
- Carefully pull out the rack, and pour the sour cream topping on top of the cheesecake. (Instructions below) Spread evenly with a small offset spatula, and push the rack back in. Continue baking for about 8 more minutes.
For the Sour Cream Topping
- While the cheesecake is baking, combine the sour cream, sugar, vanilla, and salt in a small bowl. Whisk well. The mixture will be grainy, but the sugar will dissolve within about 10 minutes.
- After 10 minutes, whisk again so the mixture is smooth, pourable, and creamy. Set aside.
For Gradual Cooling
- Turn the oven off, leave the cake in the water bath in the oven, and crack the oven door for about 45 minutes-1 hour.
- Remove the cake from the water bath, and carefully run a small offset spatula or thin knife down around the inside edge of the pan. This will make sure that, as the cheesecake continues to cool, nothing is stuck around the sides that could potentially cause a crack.
- Place the cheesecake somewhere cozy and draft-free. I use the microwave with the surface light on, taping the door to keep it cracked open by 4-5". Let it cool in the cozy place for 45 minutes-1 hour.NOTE: Leave the water bath in the oven until it cools completely so it's easier and safer to pour out.
- Remove the cake to a cooling rack on the counter at room temperature, and let cool for another 45 minutes to an hour. At this point, go ahead and take the foil off the pan. Then place the cheesecake in the fridge to cool completely and chill for at least 8 hours or overnight.
For Serving and Storing Leftovers
- Run a thin knife or small offset spatula around the inside edge/down the sides of the push pan or springform pan. Then place the push pan on a mug or small bowl so you can push the sides down to reveal the cheesecake. If using a springform, unlock the sides and carefully pull up to lift away from the cheesecake.
- Slice straight from the fridge, using a hot, clean knife to make each slice. For best flavor and texture allow the slices to sit out at room temperature for 30-45 minutes before serving. Cover leftovers with plastic wrap and refrigerate for up to 4 days. Honestly, I doubt it will last that long. Enjoy!
Did You Make Any Changes?
Notes
- If Using Store-Bought Graham Crackers: Increase the butter from 4 Tablespoons to 6–7 Tablespoons. Store-bought grahams are much drier than homemade and need more butter to bind them.
- Room Temperature Ingredients: The cream cheese, sour cream, buttermilk, and eggs should all be at room temperature before mixing. This is especially important for getting the cream cheese completely smooth and keeping the batter smooth as you add the remaining ingredients.
- About the Buttermilk: Use whole buttermilk rather than low-fat or nonfat. You can use all sour cream if you don’t have or don’t want to buy buttermilk. The recipe will work just fine, and the cheesecake will still taste great. Note that it will be less tangy, a bit denser, and will have a higher fat content than when made with whole buttermilk.
- Water Bath: A shallow water bath is plenty. You only need about 3/4″ of hot water in a rimmed half-sheet pan; there’s no need to haul out a deep roasting pan. If your oven heats unevenly, carefully rotate the cheesecake during baking; otherwise, leave it alone.
- Trust the Thermometer, Not the Clock: Start checking around 55 minutes, but pull the cheesecake based on its internal temperature, 152–155°F / 67–68°C, rather than baking for a specific number of minutes. The center should still jiggle slightly.
- Release the Edges After Baking: After the first stage of gradual cooling, run a thin knife or small offset spatula around the inside edge of the pan. The cheesecake may contract slightly as it continues to cool, and releasing it from the pan helps keep the edges from catching and potentially causing a crack.
- Plan Ahead: This is a make-ahead dessert. Allow roughly 2¼–3 hours for gradual cooling, followed by at least 8 hours in the refrigerator. Overnight is ideal.
- For the Cleanest Slices: Slice the cheesecake straight from the refrigerator with a thin knife dipped in hot water and wiped dry between every cut. For the creamiest texture and best flavor, let individual slices sit at room temperature for 30–45 minutes before serving.
Nutrition
Would you like to save this post?
Was This the Cheesecake of your Dreams? Please Rate and Review
It helps me and other readers so much if you take a moment to rate and review this recipe.
Your star rating and comments help others decide whether the recipe is worth making, and your feedback helps me continue improving recipes here at Pastry Chef Online.
Other lovely ways to share include pinning or posting on your favorite social media platform.
Thank you so much for taking the time!


Hi, y’all! I hope you’ve enjoyed this post and hopefully also learned a thing or two.
If you like my style, I invite you to sign up for my occasional newsletter, The Inbox Pastry Chef.
Expect updates on new and tasty recipes as well as a bit of behind-the-scenes action. I hope to see you there!



Join in Today!
ok… it’s half-way through baking. I wonder at the pulling at 67C and then pouring the sour cream on top and then baking for another 8 minutes. I’m going to pour it on at 60C instead, so that the cheesecake itself is not going over the “done” temp. I should have asked when I first planned this day but… ♀️♀️ I’ll post more once it’s done and my guinea pigs have given me feedback.
lol… those two pink symbols were supposed to be shrugging hands and a face palm…
Lol!
The difference between 60 and 67 C is substantial, and adding the sour cream early effectively insulates the top even more. Plus the cornstarch does give you some wiggle room with the temp. Go ahead and wait until at least 65C. Also, I hope you and your guinea pigs love the cheesecake!
Everybody raved!!! The texture is amazing! So much creamier than a standard cheesecake, which I love, but I love this even more. 🙂 The only thing I found was it was a bit saltier than I am used to. BUT…. the cream cheese had been in the freezer for over a year — well sealed and double-bagged, but not sure if that would have had an effect. AND maybe our Canadian products have more salt? I did weigh the salt, but the other possibility is that my scale isn’t that accurate at such small amounts? I wouldn’t cut back much, maybe 1/2t of table salt total. Also, I think next time I would beat the eggs as soon as I take them out of the fridge and get all the bits mixed up well, hoping all the air will have deflated by the time it’s time to add them. Every time I pulled the beaters out of the mixture after the eggs were added there were still long clumps of white attached and it took quite a while before that stopped. They were fresh eggs I had bought the day before. Well… as fresh as the grocery store gets… 😉
You were right about the sour cream mixture bringing the temperature down. I really should have waited longer. It took well over 10 minutes if not closer to 20 to finally come to temperature after I poured it on. And where I first poured it it sank into the still-uncooked batter. It was still yummy, and looked fine, but meant the centre got most of the sour cream topping. Mind you, it was a pretty amazing first bite… 😀
Anyway, SO DELICIOUS!!! I agree it doesn’t need anything else. It would be amazing with something simple poured over top, but totally unnecessary. When the pan was returned I was told I needed to fill it up again. 🙂 Oh, also, I only have a 9 1/2″ pan, and the slices were the perfect size. I cut it into 16. Granted, many people had two slices, but that way you feel like you are getting more! 😀
Thank you, Jenni! Looking forward to trying your other cheese cake recipes for all my Guinea pigs!! 🙂
I can *see* that first bite: half sour cream topping/half cheesecake! Personally, I would be all about a thicker sour cream topping! I’m glad it all worked out and that y’all loved it! Hooray! And about the salt, I use Morton’s kosher salt and by volume, 4 grams is a scant teaspoon. For table salt, I’d say no more than 1/2 teaspoon. Even start with 1/4 teaspoon and add more if needed.