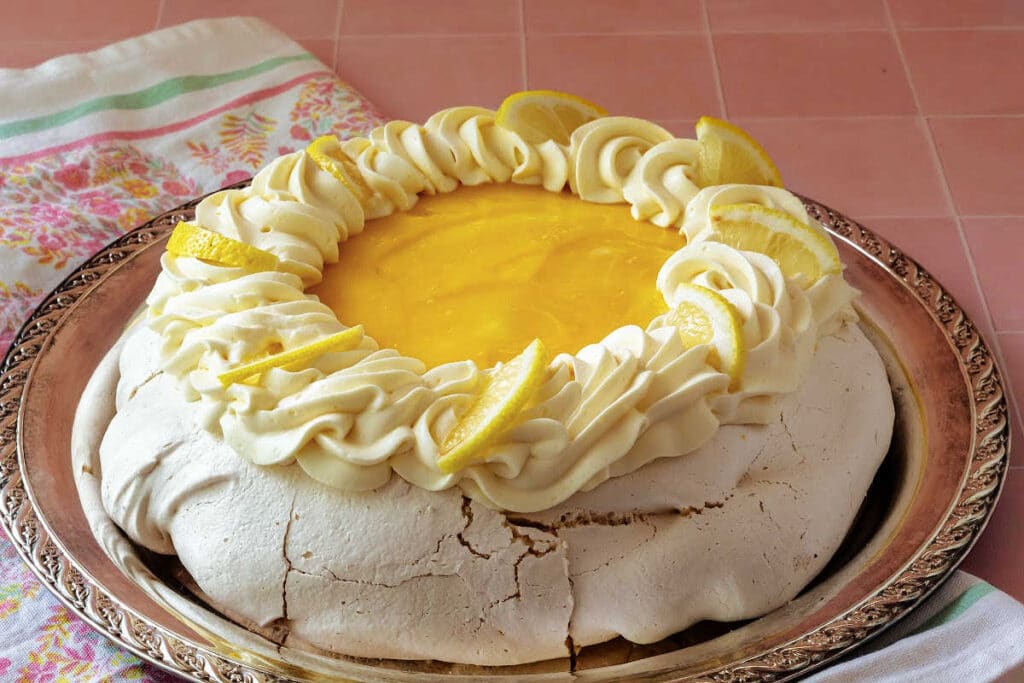
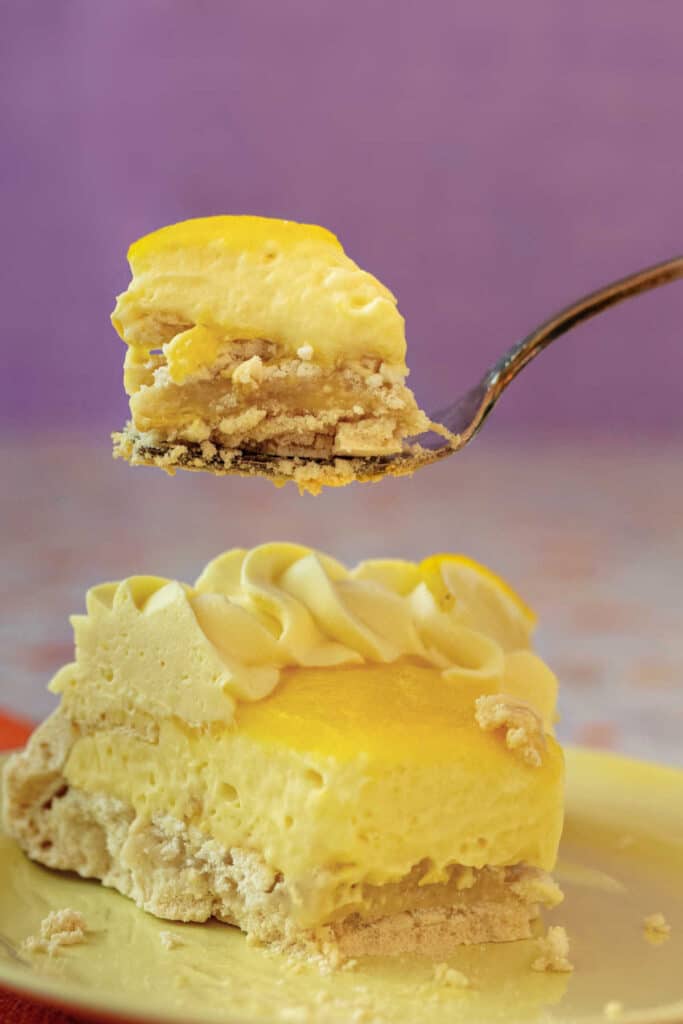
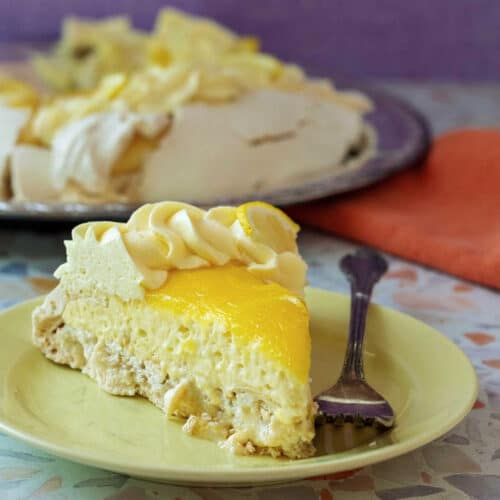
This Lemon Cloud Pavlova is what happens when lemon meringue pie steals a few pages from the pavlova playbook. A crisp, shattering meringue shell holds creamy, light lemon mousse, finished with a glossy layer of bright lemon curd and swirls of lemon whipped cream. It’s cool, creamy, crunchy, and ridiculously lemony without ever feeling heavy.
This recipe came about thanks to my reader Gail, who wondered if it was possible to make an “inside-out lemon meringue pie.” Challenge accepted. Instead of topping lemon filling with meringue, I built the whole dessert inside a crisp pavlova shell that is surprisingly make-ahead friendly. It’s plenty elegant for a holiday table but easy to imagine sneaking a second slice from the fridge. And believe me, I have.
The magic is in the interplay of textures. No single component steals the show. Instead, each bite shifts the balance between crisp, chewy, creamy, and airy, making it almost impossible to stop at one slice. Trust me on this one!
Pastry Chef Online Participates in Affiliate Programs. If you make a purchase through one of my links, I may earn a small commission. For more information click to read my disclosure policy
Lemon Cloud Pavlova, At a Glance
✅Skill Level: Intermediate
✅Skills: meringue, lemon curd, whipped cream
✅Type: Showstopping Make-Ahead Dessert
✅Number of Ingredients: 10
✅Prep Time: 45 minutes
✅Chill Time: Minimum of 4 hours
✅Cook Time: 2 hours (meringue), 15 minutes (lemon curd)
✅Yield: 10 generous servings
Jump Straight to the Recipe
Why You’ll Love This Pavlova
There are lots of reasons to love this pavlova, not least of which is the substantial meringue shell. It’s engineered to stay crisp for at least a couple of days, so you can assemble the dessert well ahead of time and actually enjoy your guests before the grand reveal.
Despite its showstopping looks, the process is surprisingly streamlined:
Bake the shell a day or two ahead → make the lemon curd → whip part into the mousse → in the same bowl, whip another portion into the topping → use the rest as the glossy lemon layer → assemble → chill → serve.
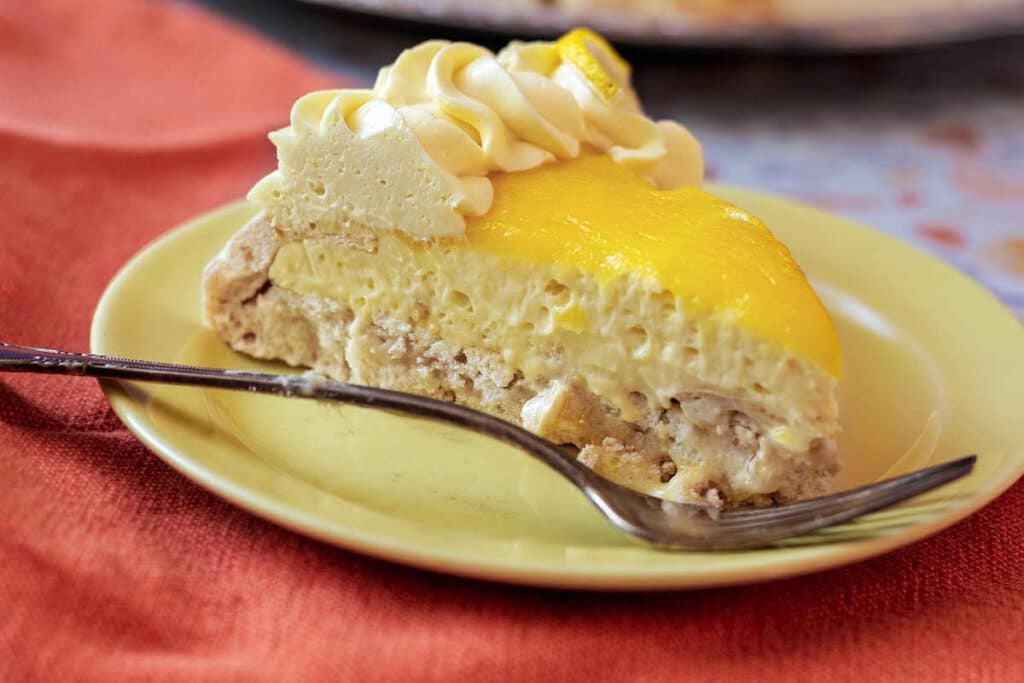
What really makes this dessert memorable, though, is the way every component builds on the last. The same lemon curd becomes a silky topping, a cloud-like mousse, and an airy whipped cream, giving you three distinct lemon textures from one core recipe. Add the crisp, marshmallowy shell, and every bite balances creamy, chewy, crunchy, and light.
Think of Lemon Cloud Pavlova as an inside-out lemon meringue pie that’s naturally gluten-free and more than a little bit fancier. At just under 400 calories per generous slice, it’s a celebratory dessert that’s surprisingly approachable.
Jenni Says: This Pavlova shell is different. Traditional pavlovas are baked with a thin, crisp shell and a generous marshmallowy interior so they can be topped with cream and fruit and served immediately. This shell is baked longer, intentionally minimizing the marshmallow interior so the crisp shell can take center stage. It’s designed to be filled well ahead of time and still retain its crispness.
How to Make This Lemon Pavlova
One of the things I love about this recipe is that, while it looks pretty fancy, the ingredient list is relatively short and the filling comes together in a surprisingly streamlined way.
Here’s the whole process in a nutshell. If you’re already feeling confident, jump straight to the recipe. Otherwise, stick with me and I’ll walk you through every ingredient and step.
- Whip the meringue for the shell.
- Bake and cool completely in the oven.
- Make a cornstarch-stabilized lemon curd and chill it.
- Whip cream and whip in half the curd to make the main filling: lemon mousse.
- In the same bowl, whip a portion of the curd with more cream for the lemon whipped cream.
- Fill the Pavlova shell with the mousse, top with a thin layer of plain lemon curd, and decorate with the lemon whipped cream.
- Chill for at least 4 hours or overnight before slicing with a serrated knife and serving.
Jenni Says: If piping the lemon cream, consider putting it into a pastry bag fitted with a large star tip right after making it and then piping it on the following day. It will be much firmer and will hold knife-sharp edges after a few hours in the fridge.
Ingredients and Substitutions
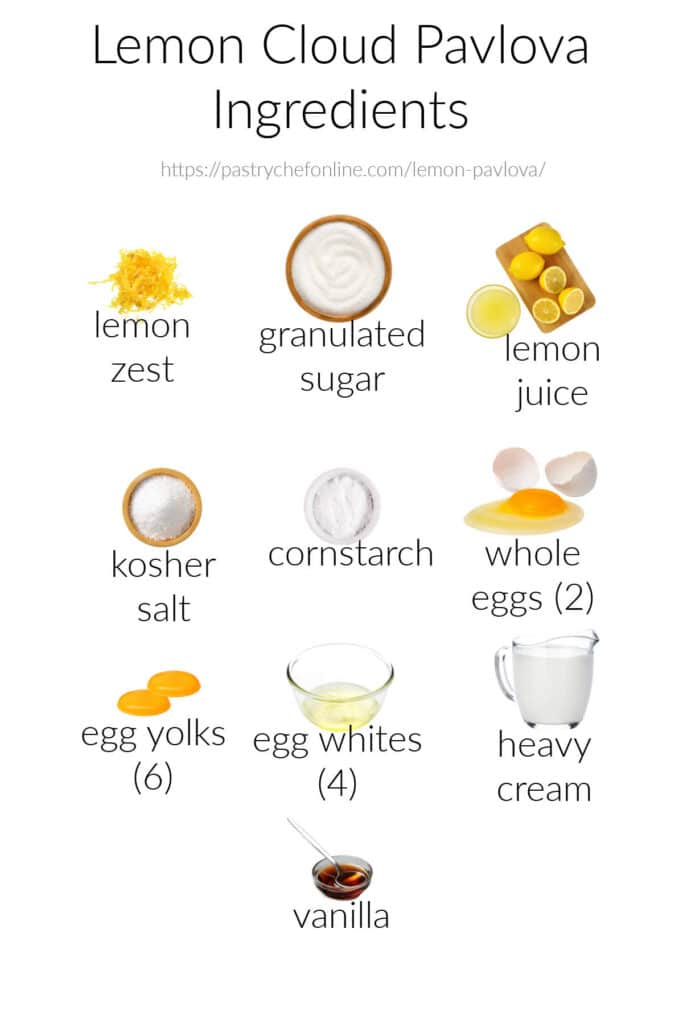
- lemon zest: Added to both the meringue shell and the lemon curd, the oils in the lemon zest provide the zingy yet floral lemon flavor to the party
- granulated sugar, superfine if you have it: Provides the sweetness in the dessert and acts to bind liquid in the meringue by borrowing some of the water in the egg whites to make a sugar syrup. The sugar also lends stability to both the curd and the meringue. If you don’t have superfine sugar, you can whiz up granulated sugar in a blender or food processor, or you can add the sugar to the whites and let it dissolve for half an hour or so before proceeding with the recipe.
- lemon juice: Provides almost all the free liquid in the curd, making a filling with a pronounced, unapologetic lemon flavor. The teaspoon of lemon juice in the meringue provides acid needed for a stable foam.
- kosher salt: Counteracts some of the bitterness of lemon while leaving the bright acidity. The salt also focuses the flavor and keeps the meringue shell from reading as too sweet
- cornstarch: The Barbara Hershey to the Bette Midler of this dessert, the cornstarch quietly does a ton of work, both binding excess liquid in the meringue shell and inhibiting curdling of the curd. The starch allows you to bring this curd to a full boil without ruining it. Approach with confidence and whisk like crazy!
- whole egg: Two eggs in the curd add to the volume while providing a balance of liquid, proteins, fats, and emulsifiers to keep the curd creamy.
- egg yolks: Six yolks help to keep the curd emulsified during cooking as well as giving it a silky, rich mouthfeel.
- egg whites: The stars of the meringue shell, four whites are all you need to bake a generous and structurally sound receptacle for all that gorgeous lemon filling.
- heavy cream: The magic ingredient that tames curd and provides two of the three lemon textures in this pavlova. It lightens the curd both visually and tactilely, ensuring a dessert that never fails to surprise the palate.
- vanilla: Used judiciously, vanilla adds a subtle creaminess to the mousse and lemon whipped cream while rounding out the flavors.
Making the Meringue Shell
This Pavlova shell doesn’t have any fancy ingredients in it. The ingredient list reads like any Pavlova shell ingredient list. What makes it different is the amount of time in the oven and the two-temperature bake which allows the walls of the shell to dry much thicker than a delicate, traditional Pavlova.
Here’s how to make it happen.
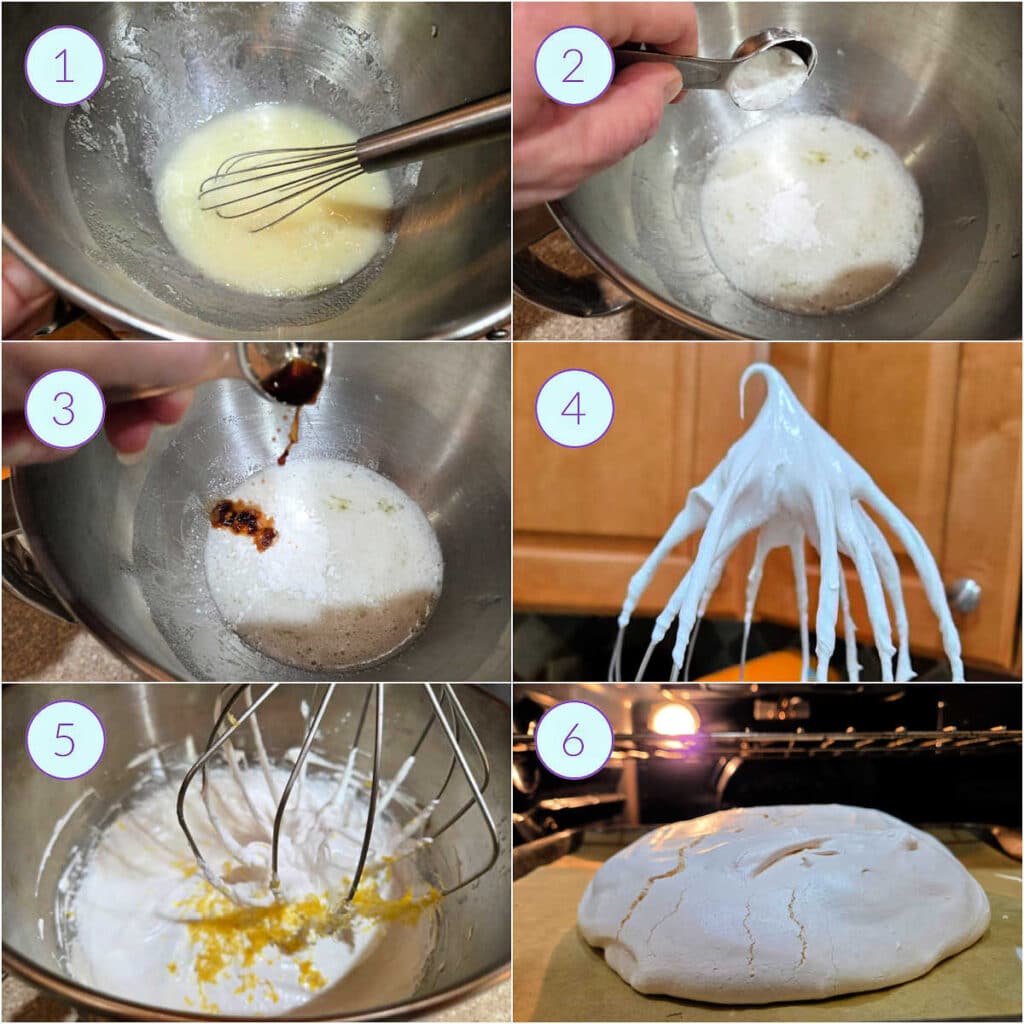
- Whisk together the sugar, egg whites, and salt and allow them to sit for 30 minutes to an hour, whisking very occasionally. This allows a lot of the sugar to dissolve. It will take longer to whip into a stiff meringue, but once made, the meringue will be very stable.
- Add the cornstarch…
- …vanilla, and lemon juice.
- Whip until peaks curl over slightly. This could take 10 minutes or so using a stand mixer on high speed.
- Add the zest of one lemon and whisk it in for a count of 10.
- Spread the meringue out in a round mound on parchment and bake as directed in the recipe. It will crack a little bit, and that’s completely okay and even expected.
Making the Lemon Curd
I love-love-love lemon curd. I could eat it every day.
For this recipe, I left out the butter that is usually an integral part of a curd. I did this for a couple of reasons.
First, butter moderates lemon flavor, and I wanted a screamingly bright lemon flavor, especially since I knew I’d be whipping cream into a large portion of it.
Second, butter is quite firm at refrigerator temperatures. Since this dessert needs to chill for several hours before serving, leaving it out keeps the curd silky rather than making it feel overly thick or stodgy.
Leaving the butter out keeps the brightness of the lemon and the smooth-as-silk texture this dessert requires.
Would you like to save this post?
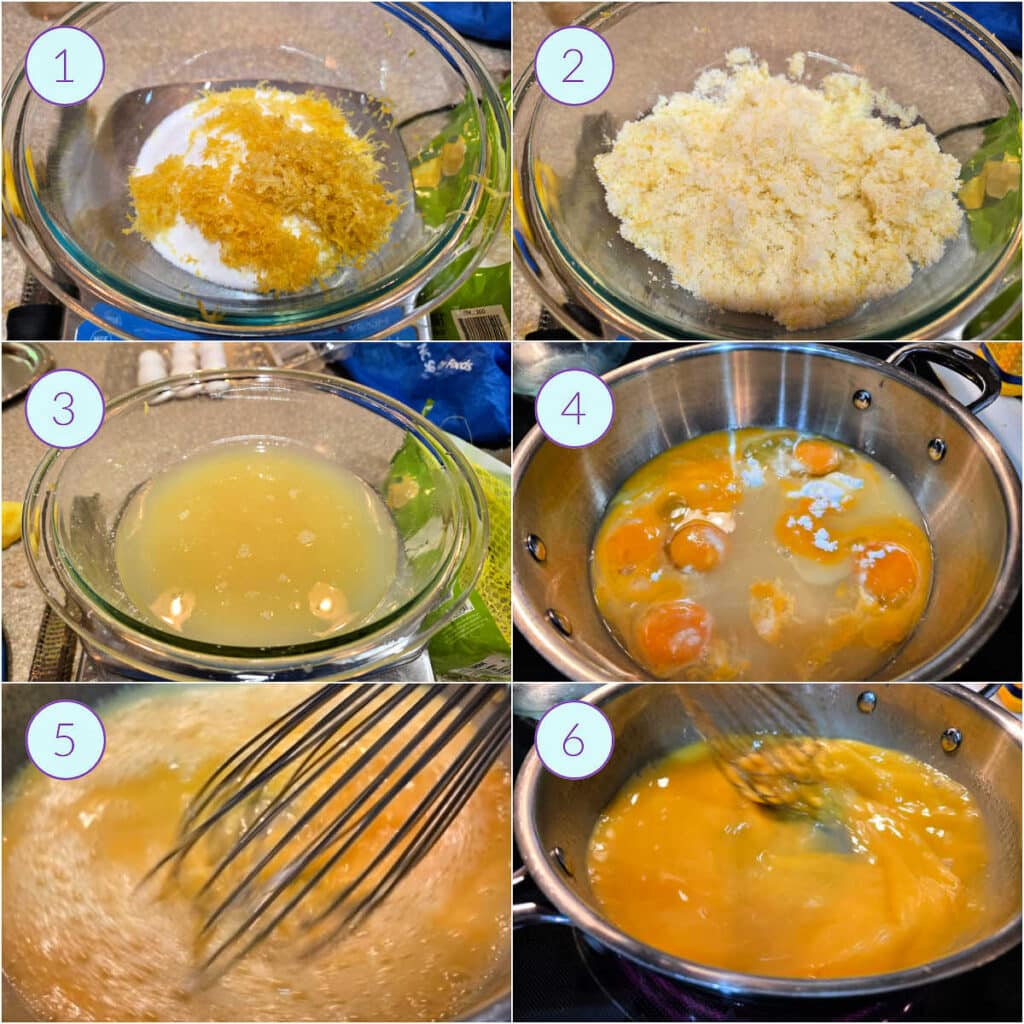
- Combine the sugar and lemon zest in a medium bowl.
- Use your fingertips to rub the zest into the sugar thoroughly. This releases all the lemon oil in the zest as well as the bright color. Skip this step if you want a paler curd with a bit less lemon punch.
- Add the lemon juice to the bowl.
- In a medium saucepan or saucier, combine eggs, egg yolks, salt, and cornstarch. Scrape in the juice and sugar mixture.
- Whisk constantly over medium to medium-high heat.
- As it heats, the curd will begin to thicken.
This next part of the procedure differs markedly from “regular” lemon curd. The cornstarch in the curd makes it possible to bring the curd to a boil–and keep it at a boil for one minute–without it curdling and turning into scrambled eggs.
Since we need the thickening power of the cornstarch to let us slice our pavlova, we set a timer for one minute and just let it boil, whisking madly the whole while.
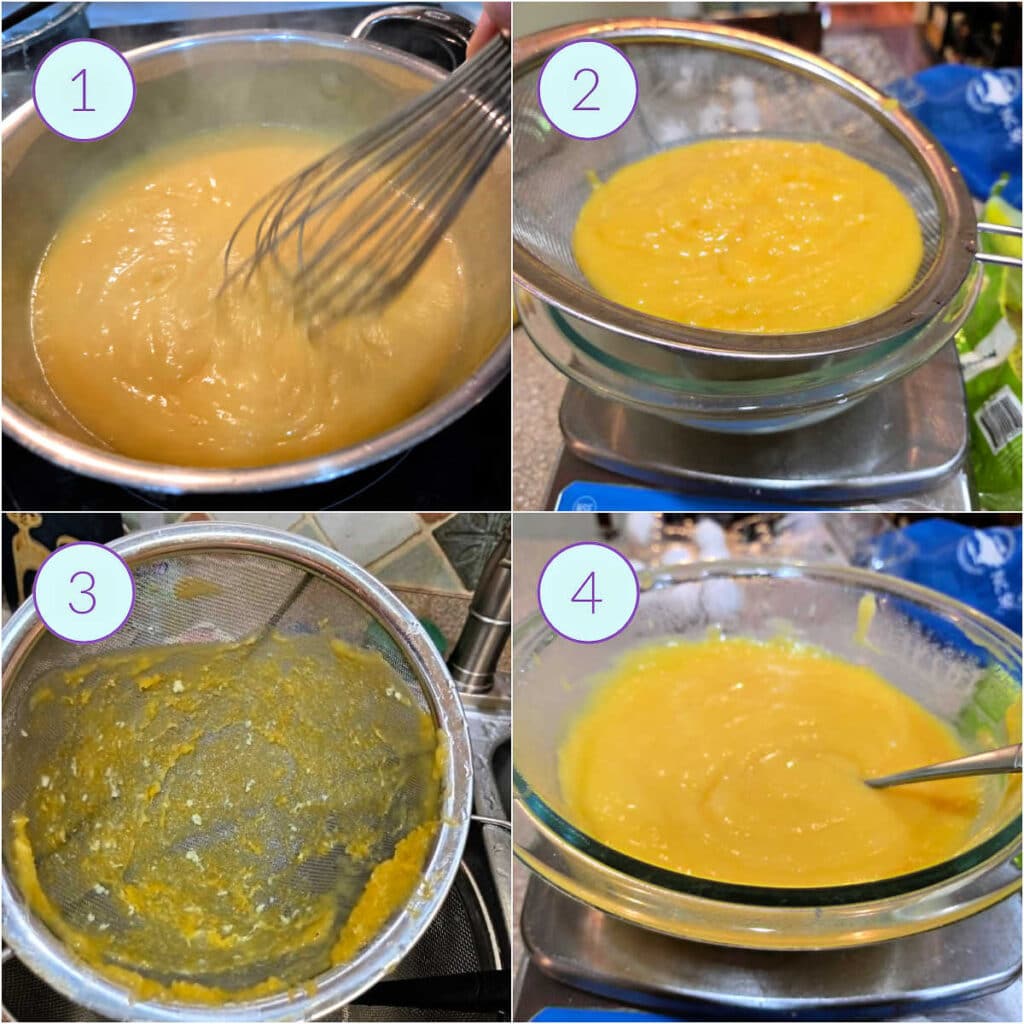
- Whisk vigorously until the curd begins to boil. Set a timer and keep whisking while the curd bubbles away.
- Once the timer goes off, immediately scrape it into a fine mesh strainer set over a medium-sized bowl.
- Using a silicone spatula, press all the curd through into the bowl, leaving behind the spent lemon zest and any eggy bits that would hurt the texture of the finished curd.
- You’ll have about 640 grams / 22.5 ounces of curd. Press plastic wrap onto its surface, and refrigerate until cool.
Jenni Says: Be sure to scrape the underside of your strainer. A LOT of curd can get stuck back there, and you don’t want to waste any of it.
Making the Lemon Mousse and Lemon Whipped Cream
Making the mousse and the lemon whipped cream follow the same process in the same bowl without cleaning it out in between. This is probably the easiest and also most magical part of the process as you quickly whip up two different textures of luscious lemony goodness for your pavlova.
For each component, here’s what you’ll do:
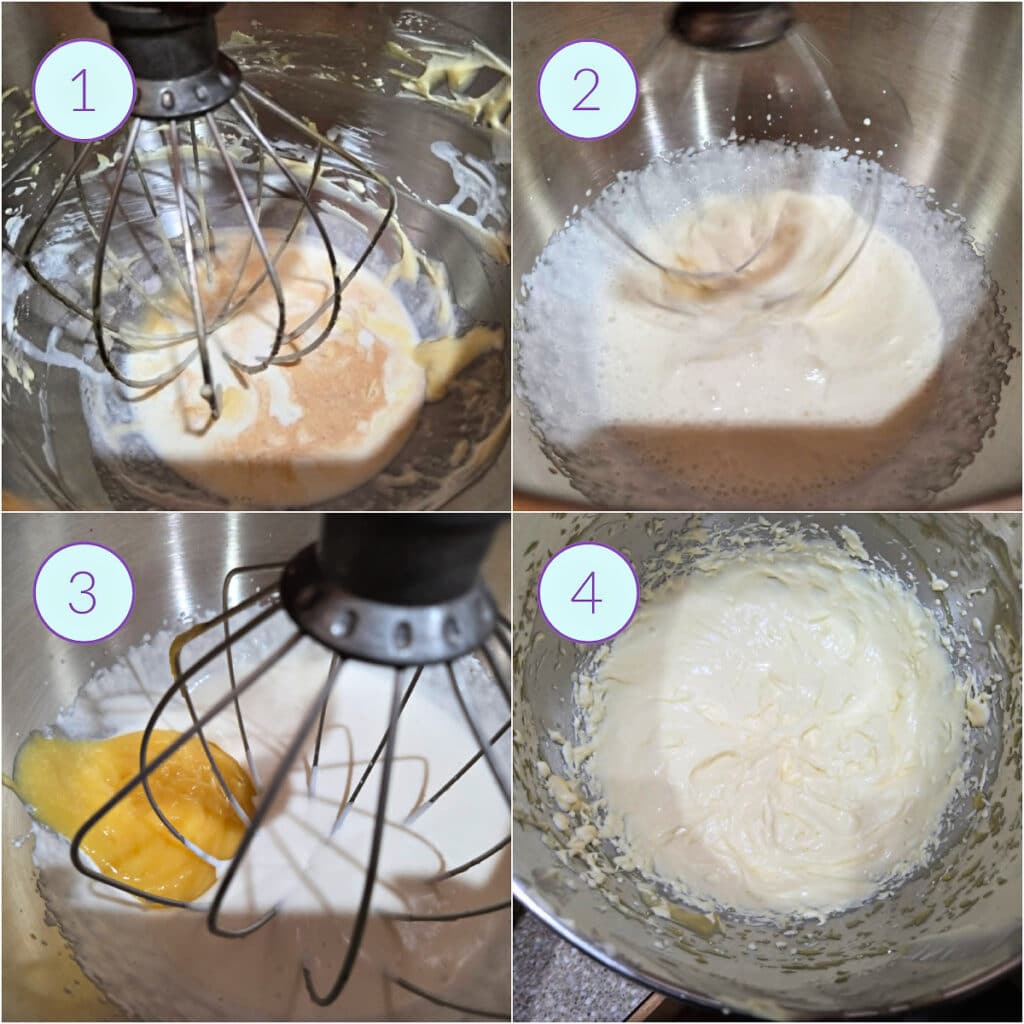
- Combine heavy cream, 1 teaspoon sugar, a small pinch of salt, and 1/4 teaspoon of vanilla in your mixer bowl.
- Whip until the whisk leaves tracks in the cream and the cream softly mounds.
- Add the specified amount of lemon curd.
- Whisk until the mixture reaches stiff peaks, scraping bowl once to make sure it’s thoroughly mixed.
And you don’t even need to clean the bowl between components. Nice!
If you prefer, you can put the lemon whipped cream in a pastry bag or zip top bag fitted with a large star tip and refrigerate it until right before presenting and serving. The cream will have a chance to firm up and will pipe beautiful, knife-sharp edges. If you pipe immediately, the piping will have softer edges and will still be beautiful. Your call.
Assembling and Chilling the Pavlova
Now that we have all the components, it’s time to put this bad boy together. And y’all, trust me, it will be beautiful!
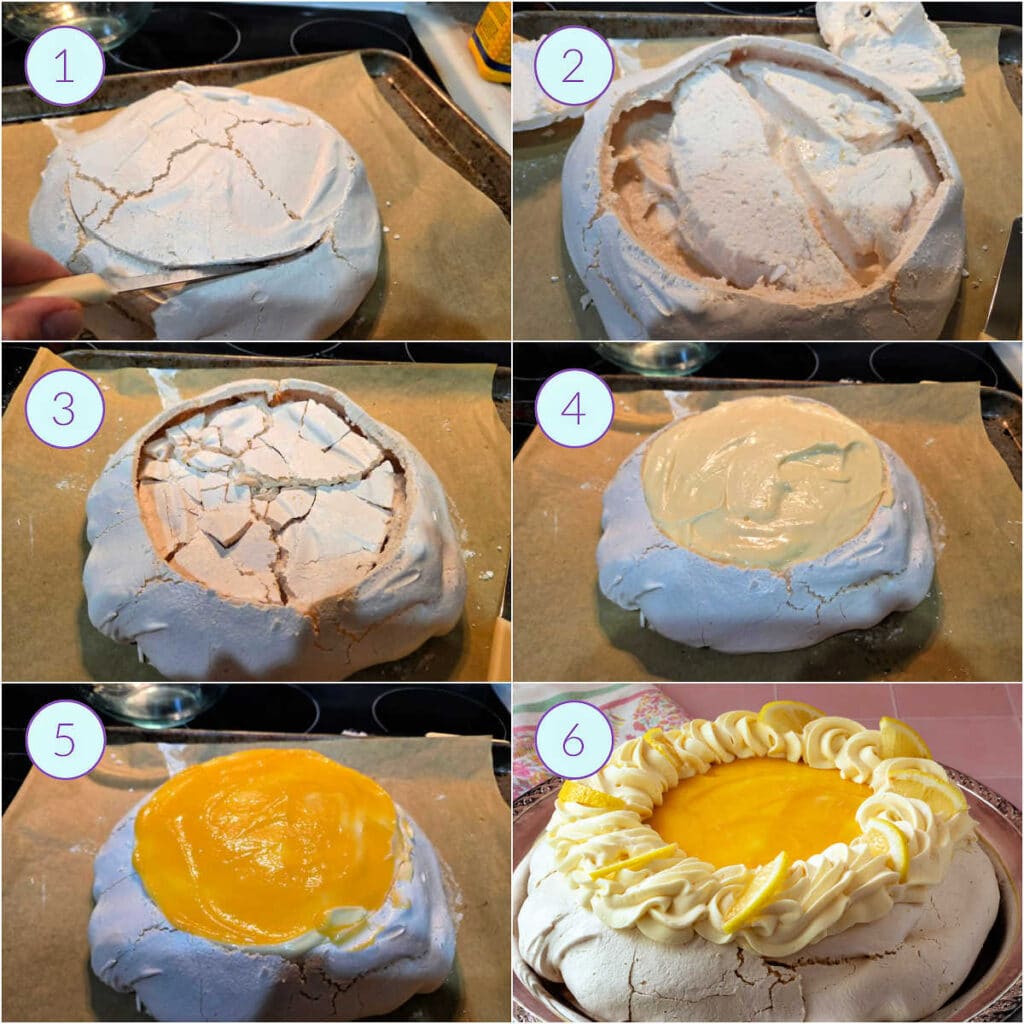
- Use a small, preferably serrated knife to cut a large circle out of the top of the meringue shell.
- Lift it out in 2-3 pieces and behold the drier marshmallow center. This is why we baked it longer. To keep the marshmallow from reading as gooey rather than chewy and to allow the walls to dry and crisp up to about 1/4″ so it will hold up proudly even after a few days in the fridge.
- Take the pieces you lifted out and press them firmly down into the marshmallow. We’re just making room, so don’t worry how it looks.
- Spread the lemon mousse into the cavity you just made.
- Dollop on the plain curd and gently spread it in a thin layer over the mousse.
- Pipe on the lemon whipped cream. It acts as decoration, another layer of lemon texture, and as camouflage for the “edge of the crater.” Refrigerate for at least 4 hours or overnight.
Lemon Cloud Pavlova Q & A
Yes. It’s practically the entire raison d’être of this recipe. While you can serve it immediately after filling it will slice more elegantly if you refrigerate it for at least four hours. The outer shell will retain its crispness for at least 4-5 days in the fridge, so you can even make it a couple of days in advance.
While a traditional pavlova boasts a delicately crisp shell with a voluptuous marshmallow center, we bake this one longer in order to dry out and thicken the walls while allowing the marshmallow to take a back seat. We’re trading some of the marshmallow center for a shell that stays crisp in the refrigerator and slices beautifully.
The mousse, curd, and cream need some time to set up in the fridge to keep from slumping and sliding once the pav is sliced to serve. During this time, the mousse will also sort of slide down into the cavity and start to soften the crunch of the meringue shell that we pushed down earlier.
For a short(er)-cut version of this dessert, you can buy 640 grams of lemon curd. But honestly, I can almost guarantee you’ll love the texture and flavor of the homemade version much more than store-bought.
Technically, yes, you can freeze Pavlova. But I don’t think you’ll need to. Even if you can’t serve it for three or four days after making, it will still behave beautifully for you.
More Light and Airy, Celebratory Desserts
If you love an ethereal, cloud-like dessert, and you also happen to love peanut butter, look no further than my peanut butter cloud pie. It’s made without cream cheese, so it has a pure peanut butter flavor while also being incredibly fluffy. It’ll make your eyes light up!
Other mousse recipes you may love include my chocolate mousse, coffee mousse, and lemon mousse.
And here are a few more multi-component citrus desserts that just might make your heart flutter:
- Key Lime Parfaits: everything you love about key lime pie–crunchy Graham crumbles, tart key lime curd, and fluffy meringue–in an elegant single serving so you don’t have to share.
- Lemon Meringue Tart: My deep dish lemon meringue tart features tangy, creamy, tart sweetened condensed milk filling topped with an egregious amount of torched Swiss meringue.
- Key Lime Pie donuts answers the burning question, “Can I turn a key lime pie into a donut?” affirmatively.
Questions?
If you have any questions about this post or recipe, I am happy to help.
Simply leave a comment here and I will get back to you soon. I also invite you to ask questions in my Facebook group, Fearless Kitchen Fun.
If your question is more pressing, please feel free to email me. I should be back in touch ASAP, as long as I’m not asleep.
A Note About Measurements
My recipes are almost all written by weight, including liquids, unless otherwise specified.
For accuracy and consistency of results, I encourage you to buy–and use–a kitchen scale.
I promise that baking and cleanup will be so much quicker and easier.
This is the scale that I recommend for home use. I have owned and used one for years.
Lemon Cloud Pavlova: A Trio of Lemon Textures
Ingredients
For the Pavlova Shell
- 4 large egg whites
- 270 grams granulated sugar 9.5 oz or about 1 1/3 cups
- kosher salt heavy pinch
- 1 teaspoon vanilla extract
- 1 teaspoon lemon juice
- zest of 1 medium lemon
For the Lemon Curd
- 270 grams granulated sugar 9.5 oz or about 1 1/3 cups
- zest of 5 lemons
- 6 egg yolks
- 2 whole eggs
- 270 grams freshly squeezed lemon juice 9.5 oz or 1 cup and 2 Tablespoons, strained before measuring
- 2 Tbsp cornstarch
- ¼ teaspoon kosher salt
For the Main Filling
- 350 grams lemon curd (above) 12.3 oz or about 1 1/3 cups
- 175 grams heavy cream 6.2 oz or about 3/4 cup
- 1 teaspoon sugar honestly, just grab a little bit in your hand
- pinch salt
- ¼ teaspoon vanilla
For the Lemon Whipped Cream
- 150 grams lemon curd (above) 5.3 oz or about 1/2 cup plus 2 Tablespoons
- 175 grams heavy cream 6.2 oz or about 3/4 cup
- 1 teaspoon sugar again, just add a little
- pinch salt
- ¼ teaspoon vanilla
To Assemble and Serve
- Pavlova shell
- the remainder of the lemon curd
Instructions
For the Pavlova Shell
- Set a rack in the middle of your oven. Draw an 8" circle on a 1/2 sheet of parchment paper, turn it over so the ink is on the underside, and line a half-sheet pan with the parchment.
- Preheat the oven to 300°F / 150°C.
- Separate the eggs, reserving the yolks for the curd.
- Add the whites, sugar, salt, and vanilla, and lemon juice to the bowl of your stand mixer. Give the mixture a whisk, and let the mixture sit for 30 minutes to an hour. This will help bring the whites to room temperature, making whipping easier, while dissolving the sugar for a smooth meringue. NOTE: Because a lot of the sugar is dissolved in the egg whites, it takes longer to whip this meringue to full volume. But you will end up with a very stable meringue, so the extra time is worth it.
- Start the mixer on medium speed and, once it becomes opaque, increase the speed to high and whip until you achieve stiff peaks. This will take about 10 minutes. You'll know it's done when peaks stand up straight in the bowl when you raise the whisk.
- Add the lemon zest and whip in on high speed for a count of ten.
- Scrape all the meringue out into the middle of the circle and spread it out with an offset spatula. Shoot for a disc that is higher in the center and slopes gently towards the edges. This does not have to be perfect. The main thing is that you try to keep the meringue nice and round.
- Put the meringue in the oven, immediately turn the thermostat down to 250°F / 120°C. Bake for 1 1/2 hours. To minimize cracking (and it will crack a little), don't open the oven while baking.
- Turn the thermostat down to as low as it will go. For my oven, that's 170°F / 78°C. Continue baking for 30-45 minutes to continue to dry the shell without it browning any further. This ensures a thicker, crispy, outer shell to hold our luscious lemon filling.
- Turn the oven off and allow the meringue shell to cool in the oven for several hours or overnight. For longer storage, place it in a large, air-tight container and keep it at room temperature until ready to fill.
For the Lemon Curd
- In a medium bowl, combine the sugar and lemon zest. Rub the zest into the sugar with your fingertips until it feels like damp sand and smells intensely lemony. This simple (and theoretically optional) step releases the oils from the zest, giving the curd a more rounded lemon flavor and a gloriously bright yellow color. It's worth the couple of minutes it takes.
- Juice the five lemons you zested along with 2-3 more. Strain and measure out 270 grams, and add the juice to the sugar/zest mixture.
- In a medium saucepan or saucier, combine the 2 whole eggs, 6 egg yolks, cornstarch, and salt.
- Scrape in the sugar and juice mixture. Keeping the sugar separate from the yolks until time to start cooking and whisking ensures that the sugar doesn't start denaturing the proteins in the eggs too quickly. This results in a smoother curd.
- Rinse out the bowl and save to hold the strained curd.
- Over medium-to-medium-high heat, whisk the mixture constantly until it begins to steam, thicken, and boil. Turn the heat down to medium-low and continue cooking, still whisking constantly, for an additional full minute. This 1-minute boil is made possible by the addition of cornstarch to the curd. It also ensures that the cornstarch gets to its peak thickening capacity.
- Strain the thick curd into a medium-sized bowl, pressing the curd through a fine-mesh strainer with a silicone spatula to remove the now-spent lemon zest and any eggy bits that might be lurking. Be sure to scrape the back of the strainer to get all the smooth curd into the bowl.
- Press plastic wrap directly onto the surface of the curd and refrigerate until cool. It doesn't have to be chilled. Shoot for about 60-65°F / 15-18°C.
For the Lemon Mousse Filling
- Add 175 grams of cold heavy cream, sugar, salt, and vanilla to the bowl of your stand mixer. Whip until the cream begins to mound in the bowl and the whisk leaves defined tracks.
- Scrape in 350 grams (just over half) of the cool lemon curd and whisk on high speed until the mixture reaches stiff peaks. Scrape the bowl once during whipping to ensure everything is evenly incorporated.
- Scrape the lemon mousse into a medium-sized bowl, and place in the fridge while you make the lemon whipped cream. Do not bother to wash or even wipe out the mixer bowl.
For the Lemon Whipped Cream
- In the bowl of your stand mixer, add 175 grams cold heavy cream, sugar, salt, and vanilla. Whip until the cream begins to mound in the bowl and the whisk leaves defined tracks.
- Scrape in 150 grams of lemon curd (about half the remaining curd), and whisk on high speed until the mixture reaches stiff peaks, scraping the bowl once to ensure everything is evenly incorporated.
- Scrape the lemon whipped cream into a pastry bag or zip top bag fitted with a large star tip.
To Assemble, Chill, and Serve
- Gently peel the parchment paper from the bottom of your pavlova shell and place it on a serving platter or cake stand.
- Insert the tip of a small, serrated knife into the top of the shell about 1 1/2" / 35mm from the edge. Using an up-and-down sawing motion, cut out a circle from the shell.
- Break the circle in 4-5 large pieces, and firmly press them down into the marshmallow layer, making a "crater" in the top of the shell about 1" deep. Don't worry if the circle breaks up even more. No one will see this part. We're just making room for the lemon mousse.
- Spread the lemon mousse into the cavity, smoothing the top with an offset spatula. Wipe off the spatula.
- Spoon the bright yellow curd over the mousse.
- Use your offset spatula to carefully spread the curd over the mousse layer.
- Pipe the lemon whipped cream decoratively around the outer edge of the meringue and into the bright lemon curd. This acts not only as a decorative and textural element but also as a way to camouflage where the curd meets the shell.
- Refrigerate the Pavlova for at least 4 hours or even overnight. You may lightly cover the Pav with plastic wrap once the cream has set up nicely. Alternatively, refrigerate the piping bag of lemon cream and wait until just before serving to pipe it on. The cream will have firmed up while in the fridge and will pipe beautifully, holding knife-sharp edges.
- Slice with a serrated blade and use a cake server to plate slices of your magical lemon creation. If I were you, I'd present the whole dessert before slicing so you can hear everyone's oohs and ahs over your lemon masterpiece.
- Store leftovers in the fridge. In my testing, I can confidently say the meringue shell will stay delicately crispy for up to 4 days.
Did You Make Any Changes?
Notes
- This is not a traditional pavlova shell. This shell is intentionally baked longer than a classic pavlova, creating a thicker, crispier exterior that can be filled several hours ahead without losing its crunch. The marshmallow center takes a back seat by design.
- The lemon mousse filling, bright curd, and lemon cream need time to set. When freshly made, everything is a bit too soft to slice cleanly. The time in the fridge ensures your pavlova slices more like a pie, holding its shape nicely for serving. That’s why I say it needs a minimum of 4 hours in the fridge. Don’t hesitate to assemble it all the day before and let it set up overnight.
- Don’t skip rubbing the zest into the sugar. It takes only a minute or two but makes a noticeable difference in both the flavor and the gorgeous yellow color of the curd.
- Spread out your timeline.
- Day 1: Make the meringue shell.
- Day 2: Make the filling, assemble the Pavlova, and chill for a minimum of 4 hours.
- Serving Day: If you refrigerated the piping bag of lemon cream separately, pipe it on now. Add any additional garnishes you desire, slice and serve.
Nutrition
Would you like to save this post?
Love This Intensely Lemony Lemon Meringue Pavlova? Please Rate and Review
It helps me and other readers so much if you take a moment to rate and review this recipe.
Your star rating and comments help others decide whether the recipe is worth making, and your feedback helps me continue improving recipes here at Pastry Chef Online.
Other lovely ways to share include pinning or posting on your favorite social media platform.
Thank you so much for taking the time!


Hi, y’all! I hope you’ve enjoyed this post and hopefully also learned a thing or two.
If you like my style, I invite you to sign up for my occasional newsletter, The Inbox Pastry Chef.
Expect updates on new and tasty recipes as well as a bit of behind-the-scenes action. I hope to see you there!


Join in Today!