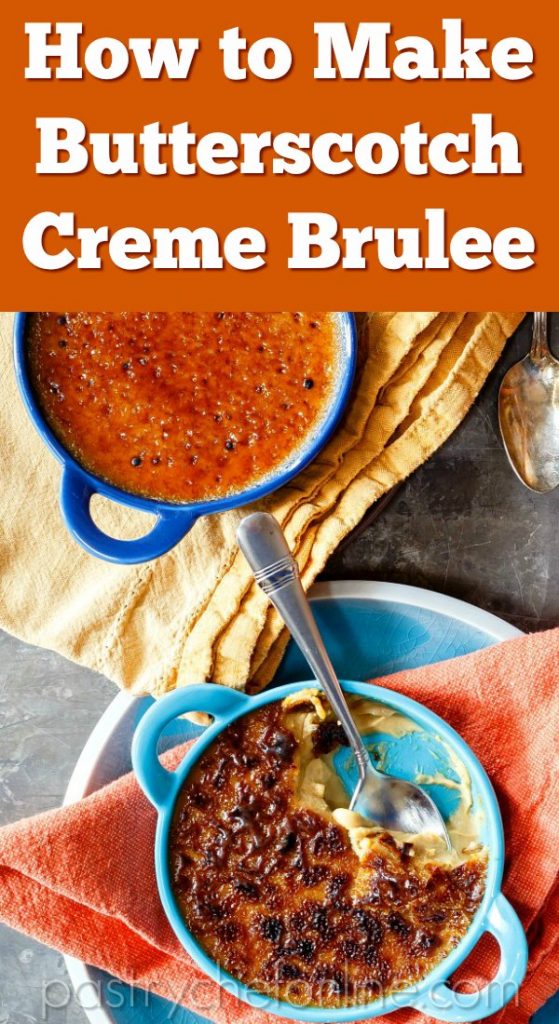
As much as I love classic vanilla creme brulee, I am going on record as saying I like this butterscotch creme brulee even more!
If you’re interested in learning all about the ins and outs of making a classic creme brulee, I can help you there, too.
And if you’re a butterscotch fan, you are in for a treat! You can find more of my butterscotch recipes here.
Pastry Chef Online Participates in Affiliate Programs. If you make a purchase through one of my links, I may earn a small commission. For more information click to read my disclosure policy
Loved this recipe! It was easy to follow, made flawless crème brûlée, and tasted wonderfully. The flavors and texture were on point. We’ll definitely make this again!
Reader Joe
Butterscotch Creme Brulee, At a Glance
✅Skill Level: Intermediate
✅Skills: Making Butterscotch, Making a Still Custard, Torching
✅Type: Individual Custards
✅Number of Ingredients: 7
✅Prep Time: 30 minutes
✅Cook Time: 40 minutes
✅Yield: 4 custards (can easily be doubled to get 8)
Jump Straight to the Recipe
What Puts the Butterscotch in This Creme Brulee
Many people incorrectly assume that butterscotch actually contains Scotch whisky. There is no rule saying you can’t add a shot of Scotch or rum or whatever alcohol you like to the mix, but it is not necessary to the flavor.
The origins of the word butterscotch are a little bit lost to the sands of time, so there are a couple of theories about where the name comes from.
One theory is that “scotch” meant to score something, as in to cut, but not all the way through. That is indeed how to shape butterscotch hard candy, breaking it apart on the score marks once it has cooled. But butterscotch flavor exists independently of the kind of treat you’re making, whether it’s hard candy, chewy candy, sauce, or what have you.
Another theory I’ve heard tossed about is that butterscotch is a shortened form of “scorch the butter.” In other words, browning butter in order to get butterscotch flavor.
Of the two, this second one is the one I’m more likely to put my money on.
Jenni Says: My own definition of butterscotch is the particular flavor you get when you cook butter, sugar and molasses (or butter and brown sugar, in modern terms) until the butter is browned and the sugar is caramelized. –Me
From there, you can add cream, milk, eggs, etc, depending on what kind of butterscotch treat you are making.
If your butterscotch smackerel doesn’t contain butter and brown sugar that you cook together until caramelized, then it isn’t truly butterscotch. Or not as deeply butterscotchy as it could be.
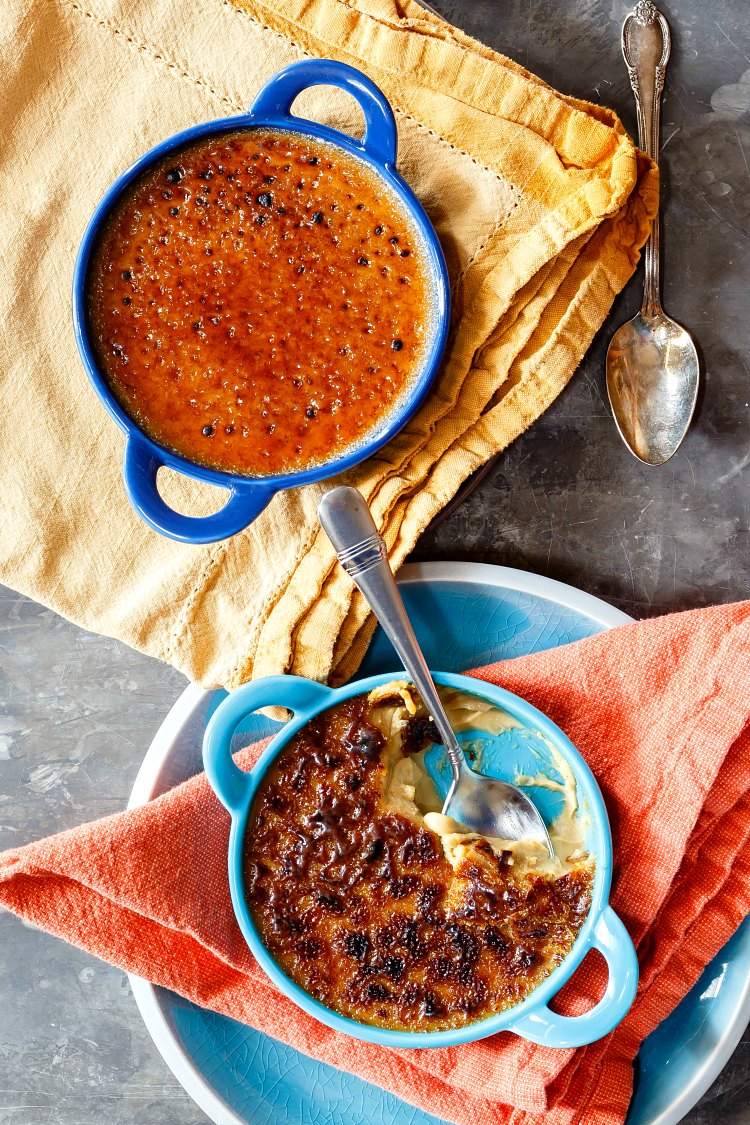
Making butterscotch creme brulee is a three step process, plus the brulee-ing.
- Make butterscotch
- Incorporate the butterscotch into the creme brulee mixture.
- Bake until set but jiggly.
How to Make Butterscotch
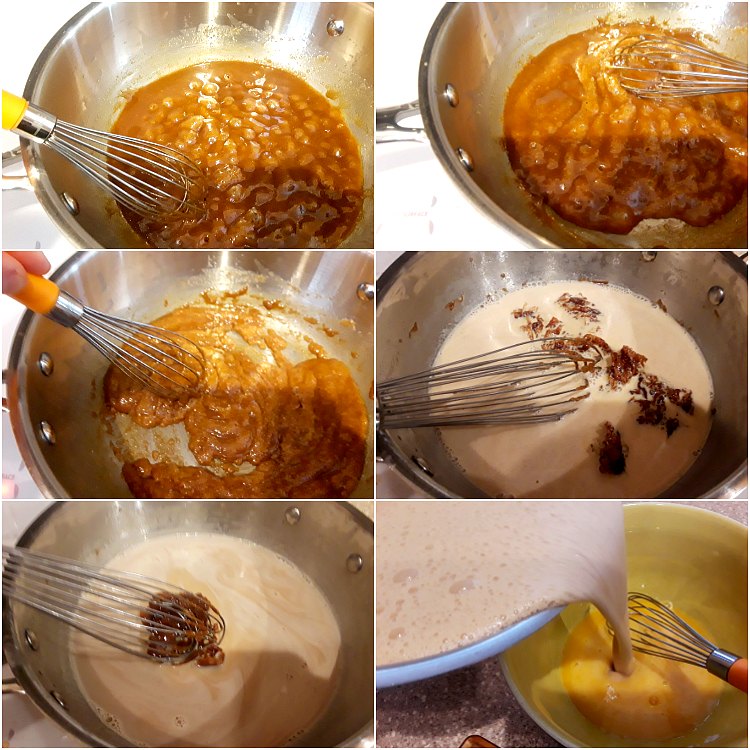
- In the first photo, the mixture is nice and “together.”
- In the next two, you can see how sloppy the butterscotch looks–the butter separates out and it just looks messy. As soon as it comes back together, add the cream. You’ll also know it’s ready when it begins to smell like caramelized sugar.
- You can see the butterscotch will harden, but keep stirring over medium low heat and it will melt back into the cream.
- The last photo shows pouring the hot butterscotch slowly into the eggs to temper them.
Melt the Butter
Use a heavy-bottomed saucepan to melt the butter over medium heat.
Cook the Butter and Brown Sugar Together
- Cook the butter and brown sugar together until the sugar has caramelized and the butter has browned.
- When you start cooking the two together, the melted butter and sugar will want to stay separate. When it comes to a boil, the two will come together.
- Continue cooking, and the butter will separate out again. At this point, watch it carefully, stirring the whole while.
- As soon as the butter and sugar come back together again smoothly, you will see it just barely beginning to smoke. You may also smell a bit of a burnt or caramelized sugar smell.
Immediately Add the Cream
Turn off the heat and begin adding the cream.
It will bubble and spit, and the butterscotch might harden if you add too much cold cream too quickly.
No problem. Just whisk and stir over medium heat until all the butterscotch has melted back into the cream.
How to Make Butterscotch Creme Brulee
Once you’ve made your butterscotch, it’s time to turn it into some tasty creme brulee. Here are the other ingredients you’ll need
- salt
- heavy cream
- egg yolks
- vanilla extract or paste
- granulated sugar or more brown sugar for bruleeing
As you can see, the ingredient list is pretty short. There are more steps to making perfect creme brulee than there are ingredients.
Some of the steps are optional. I’ll let you know which ones as we go through them.
Be sure to watch the video I made you guys so you can see some of these steps in action.
How to Make This Creme Brulee, Step by Step
If you’re an old hand at making creme brulee and don’t need further instruction, feel free to head straight to the recipe.
- Make the butterscotch. See the steps above. In short: cook butter and brown sugar together until the sugar has caramelized and the butter has browned.
(If the sugar is caramelized, rest assured the butter has browned since that happens at a lower temperature than caramelization). Stop the cooking by pouring in cold cream. Stir and cook gently until smooth. - Temper the butterscotch into the yolks. As in the last photograph above, slowly pour your hot butterscotch mixture into the egg yolks, whisking all the while. The raises the temperature of the yolks relatively slowly so they don’t curdle and the mixture stays smooth.
Add the vanilla extract. - OPTIONAL: Refrigerate overnight. For the dreamiest texture, refrigerate your custard overnight. If you don’t have time, continue making your creme brulee.
- OPTIONAL: Strain the custard. I always strain my custard through a fine-mesh strainer into a large measuring cup with a spout.
Straining will catch any tiny bits of cooked egg or pieces of caramel that didn’t completely smooth out. It is an optional step, but I recommend you do it. It takes 5 seconds and ensures your creme brulee is silky smooth. - Pour into ramekins. Use your spouted measuring cups to evenly divide the mixture among four wide, shallow ramekins.
- OPTIONAL: Pop any bubbles on the surface of your custard with your torch. Sometimes you’ll get little air bubbles in your custard. Passing your kitchen torch over the tops very briefly will pop those bubbles. While it’s not strictly necessary, it’s another step that will refine your final presentation. (See video)
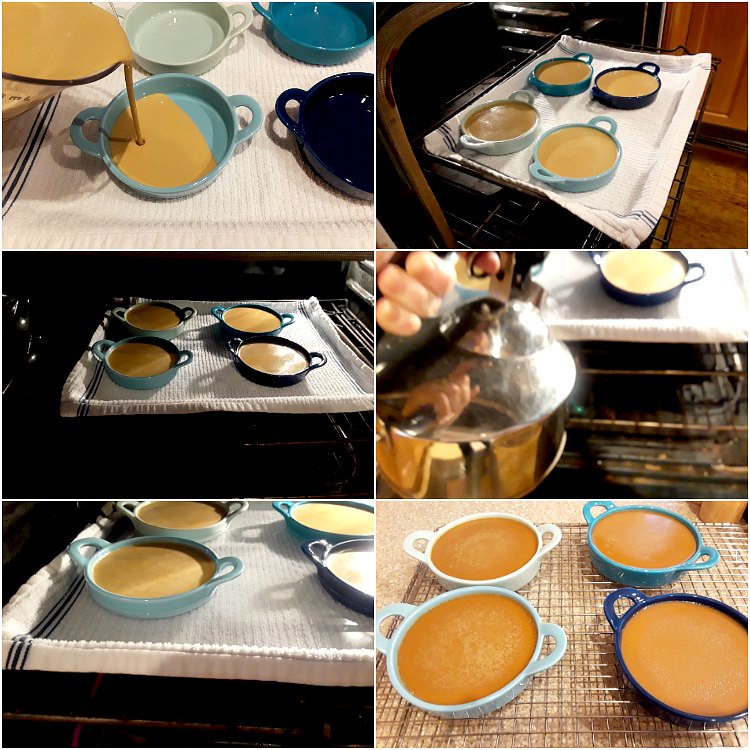
- Bake in a water bath. To get your custard into the oven and water in your large pan without making a mess, this is what I do (see the photo above):
–place a tea towel in the bottom of a half-sheet pan. The towel is optional but provides an additional layer of protection from heat on the bottom of the pan
–fill the ramekins and place them on the towel. Put the tray into the preheated oven.
–carefully push the rack in all the way.
–pour boiling water into the half-sheet pan to come halfway up the sides of the ramekins.
NOTE: pull the edges of the towel inside the tray so water doesn’t drip down onto the oven floor during baking. - Cool and chill. Once the custards are set around the edges and just a bit jiggly in the centers (about 40 minutes at 275F if using wide, shallow ramekins), carefully remove them from the water bath (I use silicone tongs for this)–leave the water-filled tray in the oven to minimize the risk of spilling water everywhere.
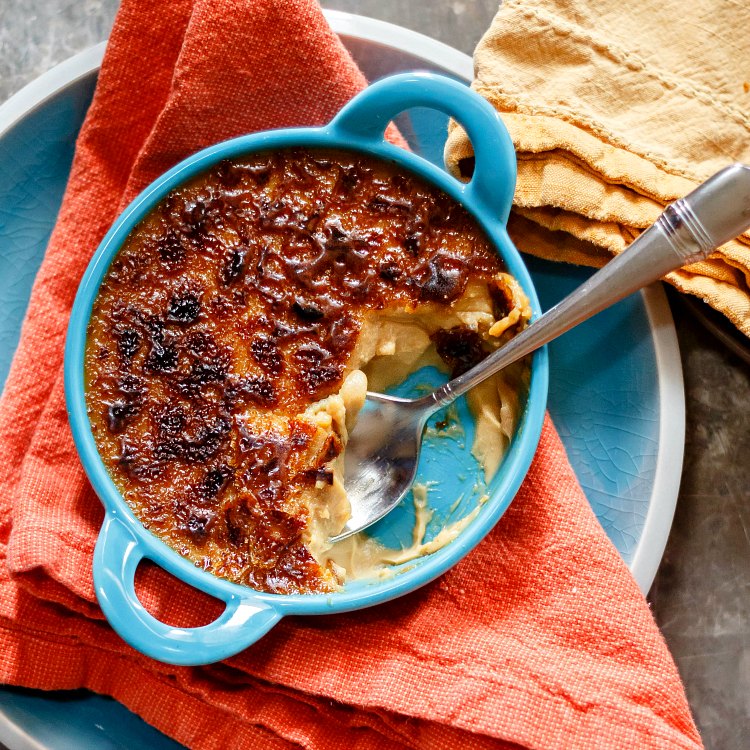
Allow the custards to cool for an hour at room temperature. Chill them, uncovered, for at least 2 hours. Once they are at refrigerator temperature, you can cover them with plastic wrap or foil. - Brulee the tops and serve. Sprinkle each custard with about a tablespoon of granulated sugar and shake and tilt the ramekin to distribute it evenly.
If you decide to brulee with brown sugar (it makes sense since it’s butterscotch), you’ll have to pat it on in as thin and even a layer as you can since it doesn’t flow like granulated sugar.
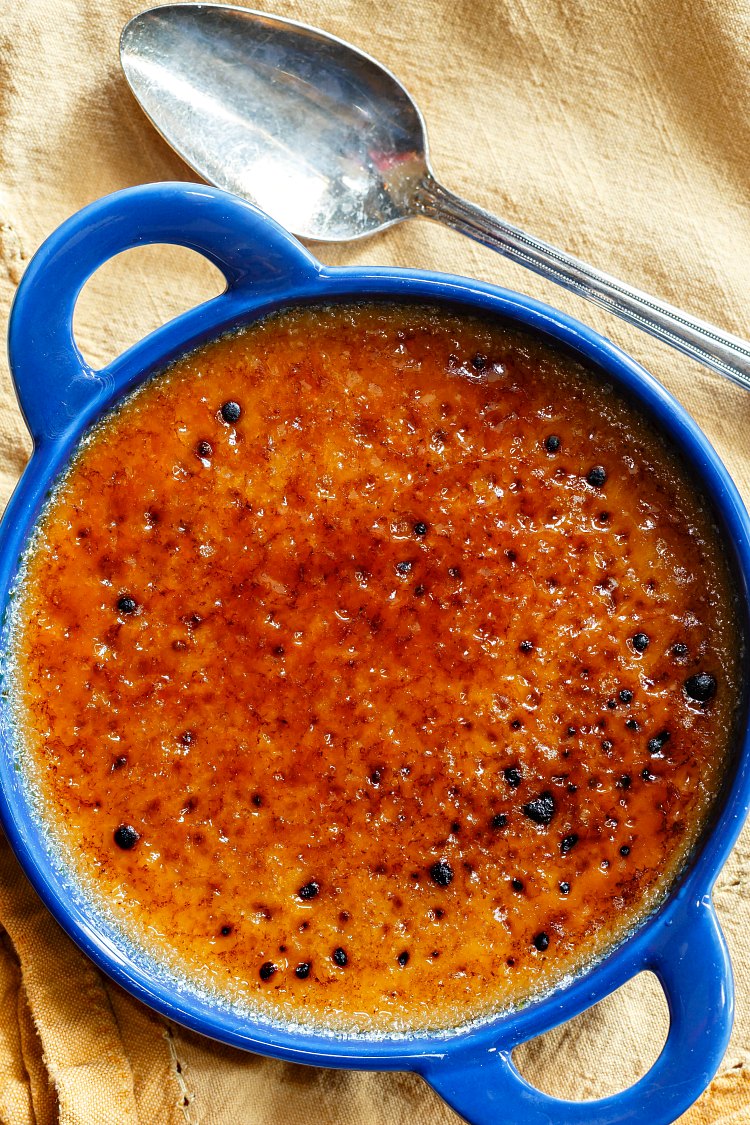
Turn on your torch and move it in small, even circles all over the surface of the custard, first melting the sugar and then caramelizing it.
Go slowly so you caramelize all the sugar and don’t leave a layer of granulated sugar under the caramel. Pay special attention to the edges of the ramekin to make sure no sugar crystals hide there. You really want the entire surface to be glass-like caramel.
Give the custards about a minute to 90 seconds for the caramel to harden, and then serve.
Tips for Success
After making your custard, if you have time, refrigerate it overnight. This will give you the silkiest, creamiest texture once you bake your creme brulee.
For a smooth canvas for torching, use your kitchen torch to pop any bubbles on top of your creme brulee batter before baking.
Would you like to save this post?
What Kind of Sugar to Use for the Brulee
Generally speaking, I would recommend granulated sugar for making the caramelized topping for your creme brulee.
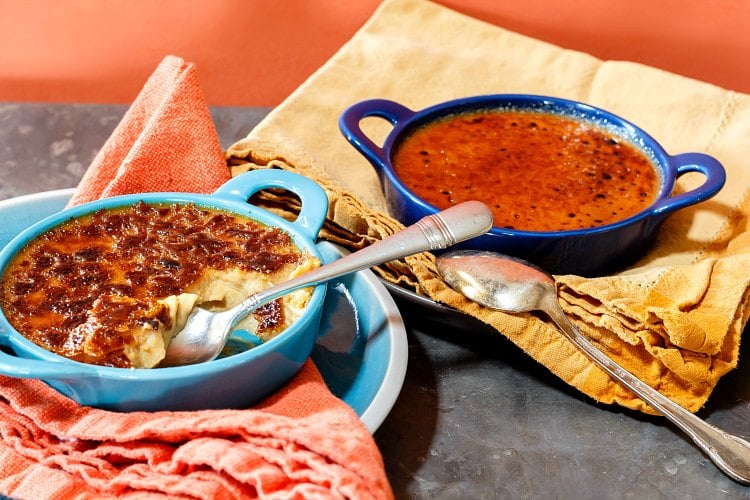
Since I made butterscotch and dark brown sugar is an integral part of the flavor, I used dark brown sugar on two of the custards and granulated on the other two.
The dark brown sugar is more difficult to work with since the impurities in the molasses tend to burn pretty easily.
If you have an adjustable torch, set the flame on low-ish so you can work to melt the sugar and then caramelize everything with a minimum of burning. The flavor will be much stronger than that of the granulated sugar.
I really rather like the more rustic look of the dark brown sugar brulee as well as the stronger flavor, but the granulated sugar is definitely easier to work with. So it’s your call.
Either way, keep your torch moving all the time so you don’t end up with unevenly bruleed creme brulee.
Equipment for Making Creme Brulee
You will definitely need a couple of pieces of specialized equipment for making creme brulee.
Wide, shallow ramekins ensure an evenly baked custard with a broad expanse of surface area to brulee, allowing you a nice ratio of crunchy topping to silky custard in every bite.
The ones with handles make it especially easy to retrieve them from the water bath. I used two sets of silicone-coated tongs to pick them up by their handles and put them on cooling racks.
And of course, you’ll need a kitchen torch. The one I use is a propane number with an adjustable flame. Butane torches also work well.
More Creme Brulee Recipes
If you’d like to learn to make classic creme brulee, I have you covered.
You may also enjoy these variations:
And do not miss my Cheesecake Creme Brulee. It is really decadent and lovely.
Other Butterscotch Posts on Pastry Chef Online
Wondering what butterscotch is? I can help.
And read on to find out what the difference is between butterscotch and caramel.
Questions?
If you have any questions about this post or recipe, I am happy to help.
Simply leave a comment here and I will get back to you soon. I also invite you to ask questions in my Facebook group, Fearless Kitchen Fun.
If your question is more pressing, please feel free to email me. I should be back in touch ASAP, as long as I’m not asleep.
A Note About Measurements
My recipes are almost all written by weight, including liquids, unless otherwise specified.
For accuracy and consistency of results, I encourage you to buy–and use–a kitchen scale.
I promise that baking and cleanup will be so much quicker and easier.
This is the scale that I recommend for home use. I have owned and used one for years.
Love This Recipe? Please Rate and Review. Thank You!
It helps me and other readers so much if you take a moment to rate and review this recipe.
Your star rating and comments help others decide whether the recipe is worth making, and your feedback helps me continue improving recipes here at Pastry Chef Online.
Other lovely ways to share include pinning or posting on your favorite social media platform.
Thank you so much for taking the time!


Butterscotch Creme Brulee Recipe
Video
Ingredients
- 100 grams packed dark brown sugar 3.5 oz or 1/2 cup
- 56 grams unsalted butter 2 oz or 4 Tablespoons
- ⅜ teaspoon kosher salt I used Morton's. Use 3/4 teaspoon if using Diamond Crystal.
- 454 grams heavy cream 16 oz or 2 cups
- 3 egg yolks
- 1 teaspoon vanilla extract
- additional granulated or dark brown sugar for the brulee Note it is easier to brulee granulated sugar than it is brown sugar
Instructions
- Make the butterscotch: melt the butter in a heavy-bottomed saucepan. Add the dark brown sugar and the salt can cook until the mixture comes to a boil. Stirring constantly, cook until the mixture breaks apart and then comes together again and just begins to smoke.
- Immediately pour in the heavy cream. It will bubble and spit, so be careful, and the mixture may harden up. Just keep stirring over medium-low heat until all the butterscotch melts back into the cream.
- Whisking constantly, temper the butterscotch mixture into the egg yolks.
- Off the heat, stir in the vanilla extract.
- (Optional Step)For creamiest results, refrigerate the custard overnight.
- Preheat oven to 275F. Place a tea towel in the bottom of a half-sheet pan, folding the edges in so they don't hang over the rim of the pan. Bring a quart of water to a boil.
- Strain custard through a fine mesh strainer into a spouted measuring cup.
- Divide the custard evenly among four 5oz ramekins. Pass the flame of your kitchen torch over the surface of the custard to pop any bubbles.
- Place the filled ramekins on the tray and put the tray in the oven.
- Carefully pour the boiling water into the pan so it comes halfway up the sides of the ramekins. Take care not to splash any water into the custard.
- Bake until custards are set around the edges and still a little jiggly in the centers, about 35-40 minutes, depending on your oven.
- Remove the ramekins to a cooling rack. I use silicone tongs to grab them by the handles, leaving the water bath in the oven to clean up after it has cooled off.
- Once the custards have cooled, chill for at least 2 hours. Cover once they have reached refrigerator temperature.
- When ready to serve, remove the custards from the fridge. If there is any condensation on the surfaces, use the corner of a paper towel to wick it away.
- Pour a generous spoonful of either dark brown or granulated sugar onto each custard. If using granulated sugar, tilt the ramekins to completely cover the tops of the custard. Pour off any excess sugar. If using dark brown sugar, use your fingers or an offset spatula to carefully spread a thin, even layer of sugar over each custard.
- Use your kitchen torch to first melt and then evenly (as evenly as possible, anyway) caramelize the sugar.
- Allow to cool off for maybe 1 1/2 minutes before serving. This allows the caramel to harden into a lovely sheet of edible glass. Use the side of your spoon to crack through and enjoy.
Did You Make Any Changes?
Notes
Nutrition
Would you like to save this post?

Hi, y’all! I hope you’ve enjoyed this post and hopefully also learned a thing or two.
If you like my style, I invite you to sign up for my occasional newsletter, The Inbox Pastry Chef.
Expect updates on new and tasty recipes as well as a bit of behind-the-scenes action. I hope to see you there!

And that’s pretty much that. I know you’ll love this butterscotchy, decadent custard.
Thanks so much for spending some time with me today.
Take care, y’all.


Join in Today!
I substituted bourbon for vanilla and added approx 2grams (1/2tsp) instant espresso and one dash of cinnamon. Very deep rich and incredible flavor that no one can resist!
Oh, very nice enhancements! I’m so glad everyone enjoyed it, Tony!
Hi- I’m making this for Christmas dinner. I need 12 servings. Can I just triple the recipe? Can I make a day or two ahead including cooking it and then just brûlée on that evening?
It may be a bit fussier to make with larger volumes, but on the other hand, you’ll have a bit more working time. I’d do a test batch of 4 just to get a feel for it maybe 3 days ahead. Then make a double batch the next day if the first batch works out well. They’ll hold in the fridge for up to 4 days. Make sure to dab any condensation off the tops before sprinkling with sugar and bruleeing right before serving. Enjoy!
I made this over the weekend and it was so creamy and decadent, really the best Creme Brulee I have had!! I followed advice to let mixture sit overnight and definitely worth it.
I also used the towel in the pan, worked great!! Cooking time, at least in my oven was much longer than instructions. It took about an hour but just kept watching until just had jiggly center. This was my first attempt ever to make Creme Brulee and was amazingly successful.
Thank you so much!!
Lisa, I am thrilled that it turned out for you! And hooray for your first creme brulee and a butterscotch one at that!
All ovens are different, so I am so glad you stuck with it and waited for that jiggly center. 🙂
I hope this won’t be the last time you make creme brulee–it’s such a delicious treat, no matter the flavor!
Loved this recipe! It was easy to follow, made flawless crème brûlée, and tasted wonderfully. The flavors and texture were on point. We’ll definitely make this again!
Hooray! I’m always so honored when someone tries one of my recipes (especially butterscotch!) and I’m thrilled that you guys enjoyed it!
Hi Jenni,
I love creme brulee! I have never made it yet, though I’m thinking about trying it soon. I was wondering – to make it even easier – can you torch it and then put it back in the fridge to serve later? I was thinking if I made several for Christmas for a family gathering, that it would be easier all around to torch it ahead of time before serving. What are your thoughts on that? Thanks!
Hey Linda! Best thing to do is make the custard ahead and then chill until before serving. Brulee then and serve. If you brulee and then refrigerate, the hard shell of sugar will get soggy/sticky. Creme brulee is all about textural and temperature variations in each bite, and you don’t want to lose that. Enjoy!
My fiance told me the best creme brule she ever had was a butterscotch creme brule from a very fancy restaurant here in RI. I was determined to find a similiar recipe to recreate for her. I fell upon yours and needless to say the custard is chilling in the fridge. I cannot wait to bake them and see her reaction when she tastes them. Thank you so much for posting this. I will certainly be back for many more recipes.
Hey, Brittney! I am so glad I had what you were looking for! And what a lovely thing to make some for your fiance. Please let me know if you ever have any questions. You are welcome to email me or leave a comment on any of my posts. I try to be as available as I possibly can! Looking forward to hearing your fiance’s review and hoping it stacks up to her memories of the one she had at the fancy restaurant!
Hi Jenni,
This recipe is the greatest ever! Tried it for a birthday girl who loves creme brulee but here where we live its hard for a restaurant to have them. Now its a must for Christmas dinner….. problem is thats a lot more people, so my question : I know you said it can be doubled, but what about if I need to make like a 9×13 in. baking pan size?
I’m so glad you love it! And yes, you can absolutely bake it as one large dessert rather than individuals. Enjoy every bite of your Christmas brulee!
Hi Jenni! I was fortunate enough to come across my favorite flavor and my favorite dessert in one heavenly match while browsing for a good butterscotch ice cream recipe. Yours was just what I needed. While waiting for it to churn in the cuisine art, I saw a link that brought me here. After I read your description that butterscotch isn’t truly butterscotch unless it contains browned butter and caramelized brown sugar (which I completely agree with)….I bookmarked your page. Anyhow, as a retired firefighter I have extra time on my hands so I continue my cooking tradition from the station but have turned to confections and baking. I woke up extra early today to get this made so that I can deliver to some of the widows and busy families in my neighborhood. Thank you for the recipe and for the great explanation.
A new fan,
Trae
Hi, Trae, and welcome, fellow butterscotch-lover! I’m so glad you found me, and I truly appreciate your taking the time to comment! I really hope everyone enjoys the creme brulee. I look forward to hearing your review! 🙂
OMG, that looks good!
It is ridiculously good–I’m glad it only made 4! lol
Right after I finish off the lemon posset with huckelberry preserves, this is going to be made. Creme Brulee is one of our favorite desserts!
Ooh, I love a good posset, too! Yum! And you do need to make this. And then be glad it only makes 4! lol 🙂
Dang girl! Two great flavor combos in one dish? SIGN ME UP! YUM!
I am pretty sure you need this in your life, Laura! It is seriously so good!
You are totally killing it with all of the delicious butterscotch recipes. I am going to have to go on a baking spree this weekend!
Thanks, Sandi! Stick with me. You’ll be in butterscotch heaven! Can’t wait to share the cheesecake with you!
Thank you for the detailed post Jenni! You make me feel like I could actually do this. I don’t have a torch and can’t really justify the cost just to make creme brulee. Is it still creme brulee without the torched top?
You can bruler them under the broiler, although it might not be as even. Without the crunchy caramelized tops, they’re still tasty custards, but try using your broiler to get the full creme brulee experience, Jenny! 🙂
This is such a wonderfully comprehensive post and you’ve answered ALL my questions. You are my butterscotch guru, Jenni Field!! I can’t wait to make this butterscotch creme brulee!
Thank you so much, Renee! Butterscotch isn’t hard to make, but it does go through a “awkward phase,” so I am glad to hear I’ve answered your questions. Can’t wait for your review when you make it! Enjoy!