Looking for deep, rich butterscotch flavor in your butterscotch cheesecake? Stick with me, because I’m going to teach you how! And as a bonus, it happens to be gluten-free.
We are talking deeply rich butterscotch cheesecake batter baked up and then topped with a beautiful brown sugar Swiss meringue. The butterscotch goodness doesn’t get much better than that!
Find more butterscotch recipes here. And if you’re all about cheesecake, I recommend taking a look at my Nutella cheesecake. For ease of browsing, here are all of my cheesecake recipes in one place. Thanks for stopping by!
Pastry Chef Online Participates in Affiliate Programs. If you make a purchase through one of my links, I may earn a small commission. For more information click to read my disclosure policy

Butterscotch Cheesecake, At a Glance
✅Skill Level: Intermediate/Advanced
✅Skills: Using a Food Processor, Making Butterscotch, Using a Water Bath, Swiss Meringue
✅Type: Cheesecake
✅Number of Ingredients: Crust-5, Batter-7, Meringue-4, Sauce-4
✅Prep Time: 1 hour
✅Cook Time: 90 minutes
✅Yield: 1 8” cheesecake, 12 servings
Jump Straight to the Recipe
For Butterscotch Lovers Only
Butterscotch has a deliciously complex flavor that only requires three ingredients.
Butterscotch happens when you cook butter and dark brown sugar together with a bit of salt until the sugar has caramelized and the butter has browned.
Think you don’t like it? Well, do you like toffee? That crunchy, nutty goodness often topped with chocolate?
If your answer is YES, then you like butterscotch. And you’re going to want to make this cheesecake.
Most people think they don’t like butterscotch because they’ve never had the real, homemade kind. If you fall into that category, please stick with me. I want to change your mind!
Why Not Make This Cheesecake with Butterscotch Pudding Mix?
You could make butterscotch cheesecake with pudding mix, but boxed butterscotch pudding isn’t real butterscotch. I’m honestly not sure what it is. But it’s not butterscotch.
Here are the ingredients in boxed, cook and serve butterscotch pudding:
- Sugar
- Dextrose
- Cornstarch
- Modified Cornstarch
Contains less than 2% of the following:
- Natural and Artificial Flavor
- Salt
- Polysorbate 60 (Prevents Scorching)
- Calcium Carrageenan (Thickener)
- Yellow 5
- Red 40
- Blue 1
Source–Wegman’s Website
Now, far be it from me to say that any of those ingredients is inherently bad. I’m just saying I see no brown sugar and no butter. And without those 2 ingredients, you can’t have real butterscotch. Period.
Butterscotch Sauce, Times Two
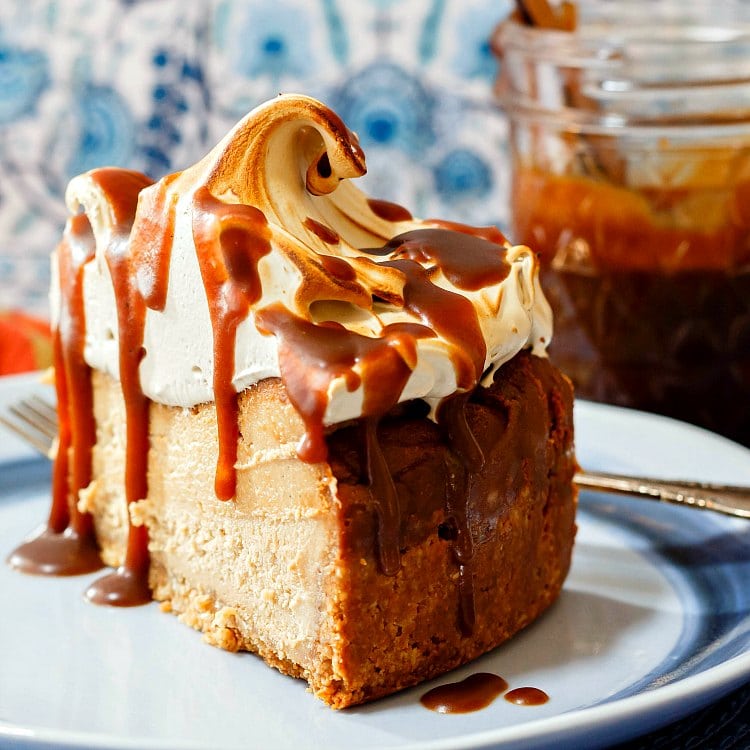
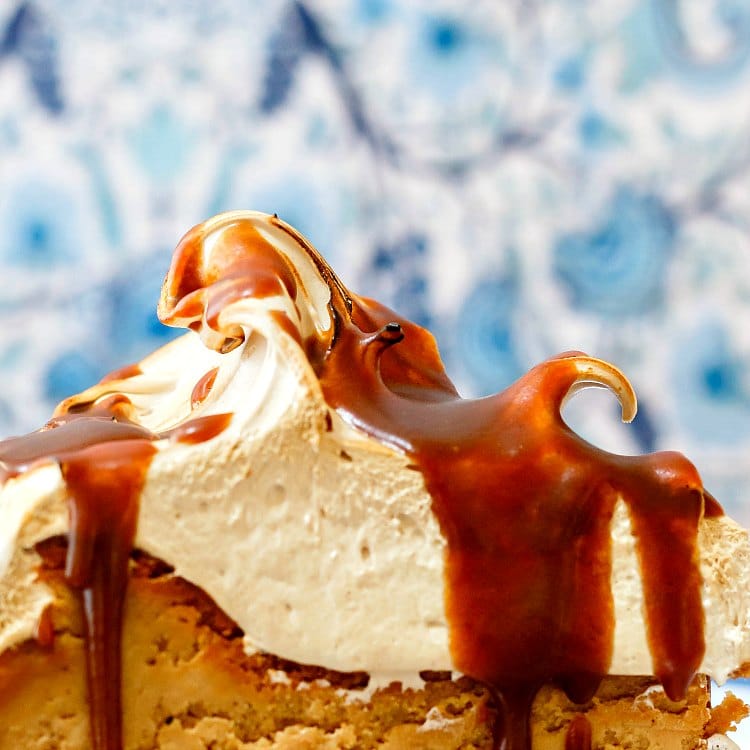
This butterscotch cheesecake gets its butterscotchiness from real, homemade butterscotch sauce added both to the cheesecake batter and drizzled on (or spooned over) the cake.
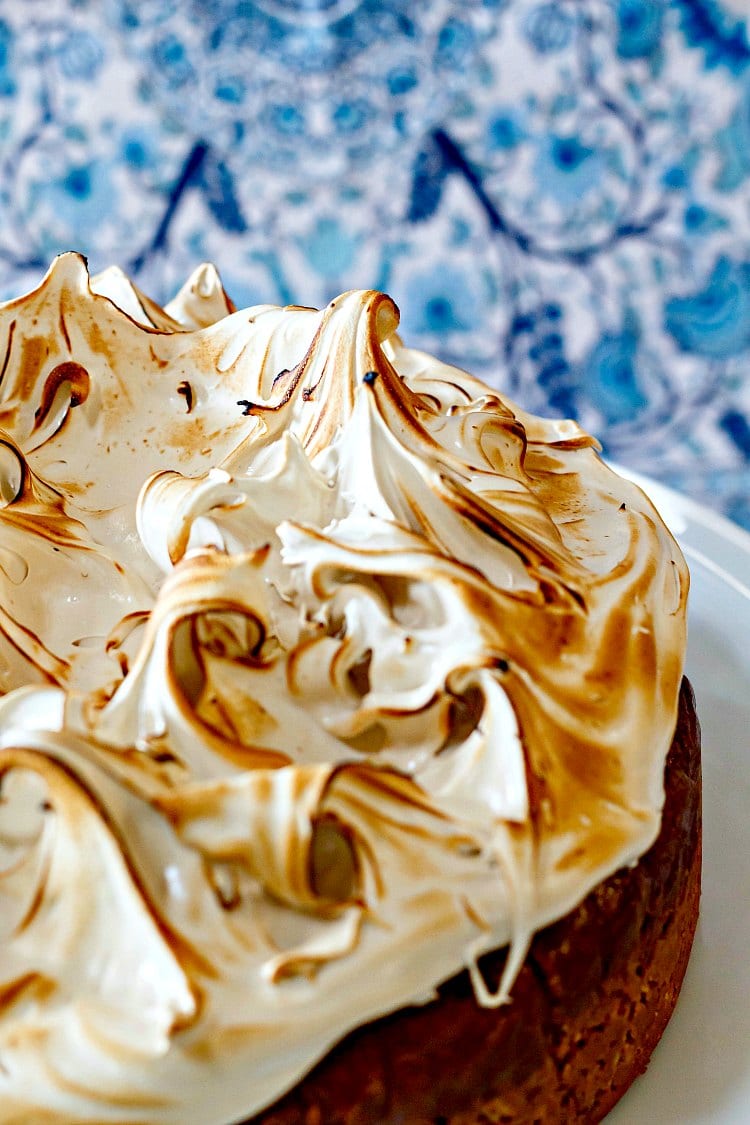
Since brown sugar is one of the two main flavor components in butterscotch, I made a brown sugar Swiss meringue to top it off. The texture of the creamy, dense cheesecake contrasts beautifully with the light and poofy meringue.
Both the cheesecake and the meringue are set off by a crunchy gluten-free crust made of gluten-free rolled oats, mixed nuts, a touch of brown sugar and some butter. (See, there are those 2 components again: butter + brown sugar)
Crunchy, creamy, poofy plus a bit of gooey from the butterscotch sauce topping, and you can see what a perfect bite of goodness you’re getting!
If this sounds like your idea of a good time and you make and love this cheesecake, I have a favor to ask:
When you do make this recipe, it will help me and other readers if you:
✅Rate the recipes using the stars in the recipe card
✅Leave a review when prompted in the recipe card (If it’s a positive review, and I hope it is, I’ll use it in the post as social proof)
✅Leave a comment on the post
Thank you so much!
What If I Want to These Into Bars?
Easy!
Rather than baking in an 8″ round springform pan, making your cheesecake in a 9 x 13″ pan and then slice in squares to serve. Voila: butterscotch cheesecake bars!
Step by Step Instructions
Making butterscotch cheesecake, or any cheesecake really, is a two-day process. Cheesecake has the best flavor once baked, cooled, chilled and then allowed to come back to room temperature, so I’ll break these steps down into Day 1 and Day 2
DAY ONE
- Make the Butterscotch Sauce for the Batter Cook butter and brown sugar together along with some salt. Stop the cooking process by adding heavy cream. Whisk over medium heat until it smooths out. Cool to warm.
- Make and Bake the Crust Whir all the crust ingredients together in a food processor. Press into your springform pan or push pan and bake at 350F for10-12 minutes and let cool.
- Make the Cheesecake Batter Mix cream cheese until smooth. Add the warm sauce 1/3 at a time, blending well. Add the eggs, one at a time. Blend in the vanilla.
- Bake the Cheesecake in a Water Bath Wrap the cheesecake pan in two layers of foil. Pour in the cheesecake batter and smooth the top.
Place the cheesecake in a larger pan and add boiling water to come about halfway up the sides of the pan. Bake at 325F until done. You’re looking for an internal temperature of 165F.
The center will still be a bit jiggly, but the edges will be set. Depending on your oven, this could take anywhere from an hour to an hour and a half. - Cool and Chill Turn off the oven, prop the door open, and cool the cake, still in the water bath, for an hour before removing to a rack to cool to just warm. Refrigerate for at least 6 hours.
DAY TWO
- Make the Swiss Meringue In the bowl of your stand mixer set over a pan of simmering water, whisk egg whites, brown sugar, and a pinch of salt together until the temperature reaches at least 160F You can take it as high as 180F, but be diligent in whisking quickly the entire time.
Put the mixing bowl on your mixer. Use the whisk attachment to whisk the meringue until it is billowy, poofy, cooled to room temperature, and holds firm peaks that just bend over into sexy swoops. - Apply Meringue to Cheesecake and Torch Spread the meringue all over the top of the cake, then pick your spatula straight up, causing big swoopy peaks to form.
Do this all over the surface of your cake until you like the way it looks.
Use your kitchen torch to brown your meringue Dramatically.
If you don’t have a torch, you can do this under the broiler for 2-3 minutes, turning the cake at least once. Just watch it carefully so you don’t burn it. - Make the Second Butterscotch Sauce for Serving You’ll make this sauce the way you make the sauce that goes in the batter. The sauce will cool to a solid, and it’ll definitely get Very Solid in the fridge, so reheat gently and stir well before serving.
Jenni Says: To serve, take the cheesecake out of the fridge, slice, and plate it about 30-45 minutes before serving. It will have a much more delicate, dreamy texture closer to room temperature.
Would you like to save this post?
But Seriously, Bake This Cake in a Water Bath
Let me tell you a very short story.
I used the recipe for regular cheesecake from Junior’s as my starting point for butterscotch cheesecake.
Their cheesecake recipe calls for it to be baked in a 350F oven without a water bath. Now, normally, I would never NOT use a water bath.
But I believed Junior.
The recipe says that because it contains starch, it keeps the eggs from curdling. And that’s true.
But what it does not do is keep the eggs from souffleeing, or rising up and then falling once it cools.
Cheesecake batter is very wet, and it generates a lot of steam. That steam pushes the batter up, up, up. Then it collapses down, down, down, leaving a weird crater in the middle of your cake. Not so great.
Jenni Says: Using starch in your cheesecake will keep the eggs from curdling at 350F, but it won’t keep your cake from rising and falling. Only a water bath and a low oven can do that.
In the photo above, you can see that this happened in my cake. A perfect cheesecake should have a lovely, flat top. Mine has Topography. Unwanted Topography. And while the texture did not suffer, the look of the cake definitely did.
Bake your cake in a water bath. The hot water will never get above 212F (at sea level), because that’s boiling point. And it will stay at the boiling point until all the water is gone. And that will take a lot longer than the time it takes your cake to bake.
Using a water bath keeps the sides of the cake cooler–212F at sea level, to be exact–so that they set at about the same rate as the rest of the cake, allowing for a lovely, flat surface.
Yes, it takes longer to bake. But do it, especially if you want to serve your cake minimally garnished, or maybe with just a thin slick of butterscotch sauce over the top as opposed to the meringue.
More Cheesecake Recipes
- Gluten-Free Pumpkin Cheesecake would make a perfect Thanksgiving dessert
- Mini Gluten-Free Pineapple Upside Down Cheesecakes individual desserts are fun because you don’t have to share!
- Double Chocolate Cheesecake because, I mean. Chocolate cheesecake is the best.
- For a bit of a boozy spin, give this Bailey’s cheesecake a try.
Butterscotch Cheesecake Q & A
Cheesecake will be fine in the fridge for up to 5 days.
Yes. To serve later, you can bake the crust and cheesecake, cool completely, then wrap well in plastic and foil and freeze for up to three months. Thaw in the fridge for at least 24 hours and then let it sit on the counter for about an hour before topping with the Swiss Meringue
Rather than topping with Swiss meringue, which admittedly can be a bit of a production, use whipped cream sweetened with brown sugar. You can also choose to leave off the topping entirely and just pour butterscotch sauce over the entire top of the cake. In that case, you can serve with a little dollop of whipped cream on top.
Questions?
If you have any questions about this post or recipe, I am happy to help.
Simply leave a comment here and I will get back to you soon. I also invite you to ask questions in my Facebook group, Fearless Kitchen Fun.
If your question is more pressing, please feel free to email me. I should be back in touch ASAP, as long as I’m not asleep.
A Note About Measurements
My recipes are almost all written by weight, including liquids, unless otherwise specified.
For accuracy and consistency of results, I encourage you to buy–and use–a kitchen scale.
I promise that baking and cleanup will be so much quicker and easier.
This is the scale that I recommend for home use. I have owned and used one for years.
Love This Butterscotch Cheesecake? Please Rate and Review!
It helps me and other readers so much if you take a moment to rate and review this recipe.
Your star rating and comments help others decide whether the recipe is worth making, and your feedback helps me continue improving recipes here at Pastry Chef Online.
Other lovely ways to share include pinning or posting on your favorite social media platform.
Thank you so much for taking the time!


Butterscotch Cheesecake Recipe (with Brown Sugar Meringue)
Video
Ingredients
For the Crust
- ½ cup gluten free rolled oats
- ¾ cup mixed salted nuts or 3/4 cup of your favorite toasted nut/s
- pinch of salt I use Morton’s kosher salt
- 3 Tablespoons dark brown sugar
- 3 Tablespoons cold butter
For the Butterscotch in the Batter
- 11 oz dark brown sugar 1 1/3 cups, packed
- 4 oz unsalted butter 1 stick
- ½ teaspoon kosher salt I use Morton’s
- 6 oz heavy cream 3/4 cup
For the Cheesecake
- all the butterscotch sauce from above
- 24 oz full fat cream cheese 3 8oz blocks, at room temperature
- 2 large eggs at room temperature
- 1 teaspoon vanilla extract or paste
For the Brown Sugar Meringue
- 3 large egg whites
- 6 oz dark brown sugar generous 3/4 cup, packed
- heavy pinch of salt
- ½ teaspoon vanilla extract or paste
For the Butterscotch Sauce
- 3 oz unsalted butter 6 Tablespoons or 3/4 stick
- 4 oz dark brown sugar 1/2 cup, packed
- ¼ teaspoon kosher salt I use Morton’s
- 6 oz heavy cream 3.4 cup
Instructions
To Make the Crust
- Line the bottom of a springform pan with a parchment circle. Spray the sides with pan spray. Wrap the bottom of the pan in two thicknesses of heavy duty aluminum foil. Preheat your oven to 350F.
- Put the rolled oats, nuts, salt, and dark brown sugar into the bowl of your food processor. Process in pulses until fairly finely ground, but don’t overprocess and end up with mixed nut butter.
- Cut the butter into pieces and scatter them into the bowl. Pulse to combine.
- Press evenly into the bottom of your 8" springform pan.
- Bake for 10-12 minutes and remove from oven. Allow to cool at least 30 minutes before adding the cheesecake batter.
To Make the Butterscotch for the Batter
- In a medium, heavy-bottomed saucepan, heat the butter over medium heat until about halfway melted. Add the dark brown sugar and salt and stir well.
- Continue to heat, stirring constantly, until the butter has all melted and the sugar has dissolved. Not all will dissolve because there isn't enough water in that small amount of butter to dissolve all the sugar. That's okay.
- Keep cooking and stirring, raising the heat to medium-high, until the sugar starts to caramelize. You'll smell that distinctive "burned sugar" smell and probably see some smoke rising from the pot. Stir for another few seconds, then carefully pour in the cream and remove from the heat. NOTE: Watch it carefully. If you burn it, you'll have to start over, so err on the side of slightly underdone rather than burned.
- Whisk well until as smooth as you can get it. Strain through a fine mesh strainer to catch any bits of sugar crystals.
- Set aside to cool until warm, stirring occasionally to further cool it, about 30-45 minutes.
For the Cheesecake Batter
- Preheat oven to 325F and put a large pot or kettle of water on to boil.
- Put the softened blocks of cream cheese into a large bowl. Mix with your hand mixer until smooth.
- Pour in about 1/3 of the butterscotch and blend until smooth, scraping bowl as necessary.
- Add the rest in two more additions, mixing in between on medium speed.
- Add the eggs, one at a time, and blend well, scraping bowl as needed.
- Blend in the vanilla and scrape the bowl while folding the batter together really well.
- Pour into the prepared pan and smooth the top.
- Place the pan into a larger roasting pan and put into the oven. Pour in boiling water to come halfway up the sides of the springform pan (about 1 1/2").
- Bake until the cheesecake is deep golden brown on top and is set completely around the edges with just a bit of a jiggle in the center. You’re looking for an internal temperature of 165F. This will take anywhere from 1 to 1 1/2 hours, depending on your oven.
- Turn off the oven and crack open the door. Let the cake cool in the water bath for about an hour. Then remove to cool completely on a cooling rack. Chill at least 6 hours.
To Make the Meringue
- Put the three egg whites, the sugar, and the salt into your stand mixer bowl. Bring about 1" of water to a boil in a pot that it big enough to let the mixer bowl sit down inside it but not so big that the bottom of the bowl touches the water.
- Keep the water at a high simmer, and heat the whites, whisking constantly, until the mixture has thinned out, is no longer grainy, and registers 180F on an instant read thermometer.
- Take the bowl off the heat and attach it to your mixer.
- Add the vanilla.
- Whip until the meringue holds glossy, stiff peaks that bend over sexily. Scrape the bowl a couple of times while whipping to make sure all your whites whip up beautifully.
- Spread the meringue on top of the chilled cake and lift up with your spatula to make dramatic swoops and curls all over the top. Stop when you like how it looks.
- Use your kitchen torch to brown the meringue as much as you like. You can also do this under your broiler for 2-3 minutes, turning the cake at least once and watching it carefully so the meringue doesn’t burn.
To Make the Butterscotch Sauce for Serving
- Follow the butterscotch-making rules above using 3 oz butter, 4 oz dark brown sugar, 1/4 teaspoon of salt and adding 6 oz heavy cream once the sugar caramelizes. Stir over low heat until smooth.
- Since this butterscotch has proportionally more butter than the first one, you should not have to deal with any sugar crystals. if you do end up with some, just strain them out.
- Use a hot knife to slice the cake into 12 serving. The servings will look small, but this is a whole lot of cheesecake going on, so 1/12 of this cake should be sufficient as a serving. Serve with the sauce drizzled over the top, swooshed onto the plate, or however you like. Note the butterscotch will cool, into a soft candy that won’t run, but it will be easy to eat and to cut with the side of your fork when you eat.
Did You Make Any Changes?
Notes
Nutrition
Would you like to save this post?

Hi, y’all! I hope you’ve enjoyed this post and hopefully also learned a thing or two.
If you like my style, I invite you to sign up for my occasional newsletter, The Inbox Pastry Chef.
Expect updates on new and tasty recipes as well as a bit of behind-the-scenes action. I hope to see you there!

And there you have it friends. Enjoy this showstopper of a cheesecake!
Thanks for spending some time with me today.
Take care, y’all.


Join in Today!
Just finished baking. I’ve never made butterscotch sauce before I fear I didn’t caramelize the sugar enough, although it was boiling. Also, can I make the butterscotch sauce and just pour it over the entire cheesecake before slicing?
Hey, Pam. I’m not sure, but did you put the first amount of butterscotch sauce *in* the cheesecake batter? Because that’s what gives it sweetness and butterscotch flavor. The second amount of sauce you can pour over before slicing or you can drizzle over each slice after cutting.
It can be hard to tell when butterscotch is done. For the deepest flavor, it should just *barely* start smoking–just a wisp or two–and you should smell caramelized sugar. That’s when you know you have a nice, deep butterscotch. If you didn’t quite take it there, it will still be butterscotchy, but a bit sweeter and less complex, so that shouldn’t be a huge issue.
hi I have a question about the crust – if I don’t put nuts in it, what can i replace that with? Also, i want to make as mini cheesecakes, any advice as to baking time? thanks
Hey, Alicia! Replace nuts with Graham cracker crumbs or gingers nap crumbs. If making minus, make sure the crust goes all the way up the sides for insulation during baking. My guess would be about 20 minutes at 325F, but I don’t know for sure. If you have an instant read thermometer, you’re looking for 165F in the centers. Enjoy!
The instructions for the cheesecake section does not tell you what to do with the butter and cream. I think that’s what Jennifer field was referring to. The butterscotch sauce directions are pretty straight forward
Also there seems to be no difference in the ingredients and amounts in the two butterscotch sauces.
The instructions for the second sauce (for pouring over finished cake) says its different so that you shouldn’t have to strain for smoothness. This confused me but I didn’t have to strain either sauce, so it was no issue for me- just caused me to read and re read the sauce instructions a few times.
Otherwise – a beautiful and really rich cheesecake!
Hey, Sheila! I’m glad you enjoyed the cake. I definitely take your point that I could have just made 1 batch of sauce and then divided it between the batter and the topping. I’ve been writing this blog a very long time, and sometimes reasonable refinements don’t make it. I will definitely revisit this recipe and update the instructions to streamline the process. Thanks for your comment!
so I am very confused on this recipe!! so there is only cream cheese, eggs, butterscotch & vanilla in the cheesecake batter? no sour cream or sugar? please confirm before I continue. thanks
I’m glad I caught this question quickly. You’re making butterscotch sauce to use in the cheesecake. Plenty of sugar in the sauce. If you find that the batter is not as sweet as you’d like it after mixing it up, you may add more. No sour cream is necessary in a cheesecake although it’s a welcome addition. This cheesecake is so rich with both cream cheese and the butter in the butterscotch I don’t think it needs it. If you have more questions, please email me at [email protected] thanks!
Would leftover slices freeze well? Currently trying to avoid a gestational diabetes diagnosis but I really need to make this!
Yes, please do try to avoid gestational diabetes! Cheesecake freezes really well, so you should be able to save yourself. Don’t bother with the meringue, because that would be hard to wrap and could break down. Serve thawed slices with some whipped cream and a drizzle of sauce. Enjoy!
I make cheesecakes all the time and this was my first fail. I followed instructions to the letter but it had no butterscotch flavor. It tasted like pancake batter. Going to have to hustle to get another dessert for Thanksgiving.
Wow, I’ve never had that complaint about this cheesecake before. So sorry it didn’t work out for you. It sounds like you perhaps didn’t cook the butterscotch dark enough. It’s the homemade butterscotch sauce that goes into the batter that gives it rich butterscotch flavor. I know it’s probably too late for tomorrow, but if you want help with troubleshooting, I’m happy to help you pinpoint the issue.
I made this cheesecake today following all the directions. It was perfect. I don’t know how to post a photo but it was just as beautiful as the photo in the recipe. Thank you for sharing this recipe. It is a new family favorite!
Oh, I am thrilled you like it, Rhyannon! I’m so happy–it’s one of my favorites too! I’d love to see it. Feel free to email me a pic at [email protected]. With your permission, I’ll use it in the post too!
in the cheesecake ingredients it calls for brown sugar and butter, but no where in the instructions does it say to cream the sugar or butter. im a bit confused and un happy that i have to ‘wing it’ for my works friday fish fry.
Hi, Kali. There is no creaming. In the first step of how to make the cheesecake batter, I tell you to use the brown sugar and butter to make butterscotch. Here is the section of the instructions that show that: “First make the butterscotch: in a medium, heavy-bottomed saucepan, heat the butter over medium heat until about halfway melted. Add the dark brown sugar and salt and stir well. Continue to heat, stirring constantly, until the butter has all melted and the sugar has dissolved. Not all will dissolve because there isn’t enough water in that small amount of butter to dissolve all the sugar. That’s okay. Keep cooking and stirring, raising the heat to medium-high, until the sugar starts to caramelize. You’ll smell that distinctive “burned sugar” smell and probably see some smoke rising from the pot. Stir for another few seconds, then carefully pour in the cream and remove from the heat. Whisk well until as smooth as you can get it. Strain through a fine mesh strainer to catch any bits of sugar crystals.Set aside to cool until warm, stirring occasionally to further cool it, about 30-45 minutes.”
I’m very sorry you felt you had to wing it. I do think a thorough reading of the recipe before getting started might have been helpful for you. And I am always available to answer questions via email or in the comments. I hope it turned out okay for you.
Going to be making this for a school fundraiser. Will let you know how many millions of dollars it raises 😉
Ooooh! Very exciting! Do report back!
I am happy to report that the dessert dash helped to raise over $4,000 for the school! And even better, our table won the cheesecake so we were able to enjoy the deliciousness. There was not ONE crumb left. And I mean not one crumb. Even the serving tray was licked clean!!!
I am thrilled! And yay for raising a ton of money!!
I am absolutely in love with the meringue on top. This is so gorgeous and smart Jenni! Will you please make one for me? I am not worthy of making cheesecake!
Good God that’s one hell of a cheesecake! This would be a spectacular dessert at my next dinner party!
I didn’t realize it was such a production until I started writing it up! lol It is seriously good, though, and worth making, especially if you’re a butterscotch fan!
Holy wow this looks absolutely amazing. Doing the things, scheduling to my FB so my readers can see!
Thank you, Sandi! Added a link to your awesome gf pumpkin cheesecake and a couple of other gf cheesecake recipes, too!