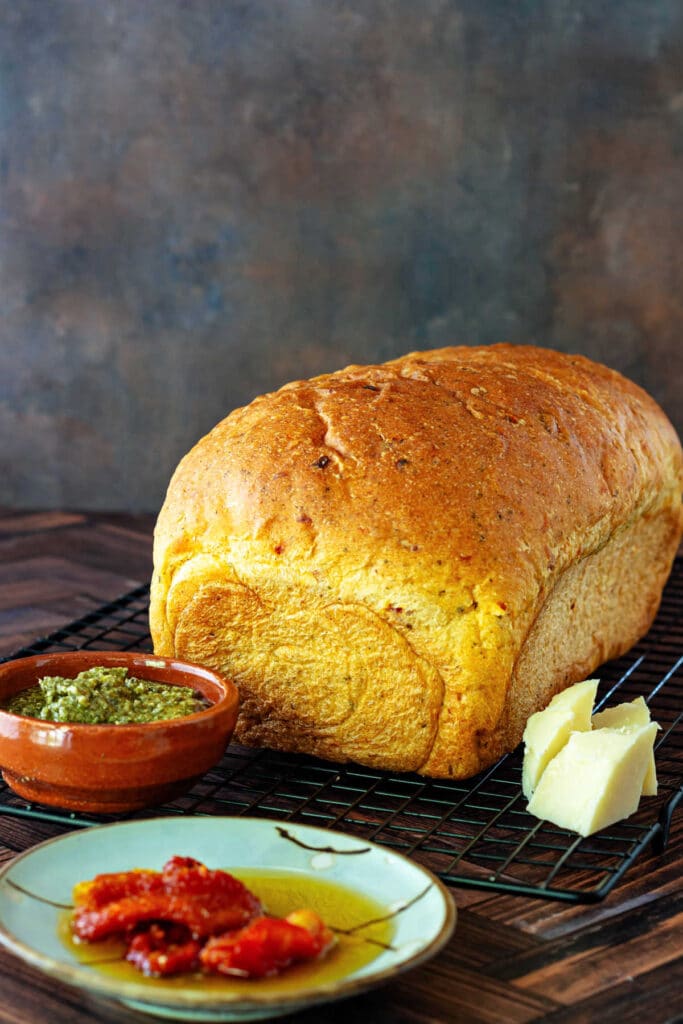
Let me introduce you to your next favorite savory sandwich bread recipe. Sun-dried tomato pesto sandwich bread is packed with flavor from minced oil-packed sun-dried tomatoes, prepared pesto, and Microplaned Parmesan cheese.
Fear not, though—despite all that flavor, it bakes up into a gorgeous loaf that slices cleanly and holds its shape. You already have bread for peanut butter and jelly. This one is made for cold cuts and cheese, marinated vegetables, or chicken or tuna salad.
Let me show you how to make this loaf so you’ll be ready for tomato sandwich season. It’ll be here before you know it!
Pastry Chef Online Participates in Affiliate Programs. If you make a purchase through one of my links, I may earn a small commission. For more information click to read my disclosure policy
Savory Sandwich Bread, at a Glance
✅Skill Level: Advanced Beginner
✅Skills: Using a Microplane, mixing and kneading dough, shaping a sandwich loaf
✅Type: Loaf bread
✅Number of Ingredients: 10
✅Prep Time: 30 minutes
✅Total Rise Time: 2 1/2-3 hrs
✅Cook Time: 35-40 minutes
✅Yield: 1 loaf, approximately 14 slices
Jump Straight to the Recipe
Developing This Recipe
Reader Carlin requested a savory swirl bread to go along with my much-loved cinnamon raisin swirl bread, so here we are.
But you have to walk before you run, so developing a solid savory base came first.
I was looking for a loaf with enough elasticity to hold inclusions—minced sun-dried tomatoes, pesto, and Parmesan—while still delivering great oven spring. It needed to be sturdy enough for hearty fillings, slice cleanly (even thin), and have a savory flavor profile that works with just about anything you want to put on it.
And, of course, it had to taste good.
After several iterations, this is the loaf—ready for all your savory sandwich needs.
What You Need to Make This Bread
In this section, I’ll walk you through all ten ingredients in the recipe, explaining why each ingredient is important and their function in the recipe. I’ll also give substitutions where appropriate. If you just want to get on with the baking, you may jump straight to the recipe.

- prepared basil pesto: Provides an overall “herby” background note to the loaf. Pesto contributes background flavor, fat from olive oil, pine nuts, and Parmesan, and a small amount of liquid
- oil-packed, sun-dried tomatoes: Mince these finely so they color the loaf a pretty pastel orange. The tomatoes are the predominant flavor in the loaf, and they also contribute color and a bit of fat
- Parmesan cheese: Make sure to Microplane your Parm for best results. It lends the loaf fat and a nuttiness you might not notice but you’d miss it if it weren’t there
- Kosher salt: Provides flavor, focuses the flavor in the pesto and sun-dried tomatoes, and modulates yeast growth so you don’t end up with a flabby dough that can easily overproof
- Granulated garlic: While the bread doesn’t read as “garlicky,” the granulated garlic provides a bit of an umami background which, along with the Parmesan, helps anchor this bread in savory territory. You may substitute garlic powder, but use only half as much
- Honey: Provides just a hint of sweet “lift” that keeps the tomatoes from reading as bitter. The honey also provides some moisture
- Water: Hydrates the dough and activates gluten development. Too much or too little will throw off your texture, so this is one place where accuracy really matters
- Bread flour: Provides bulk and the proteins necessary to produce gluten. I recommend King Arthur bread flour. At 12.7% protein, this flour is strong enough to bake up into a gorgeous loaf even with all the inclusions.
- All-purpose flour: I split the flour amount between bread flour and King Arthur all-purpose flour. It has a slightly lower protein content at 11.7%, adding to the gluten structure while allowing the bread to be soft, sliceable, and not overly chewy
- Instant yeast: Provides the lift for the bread so it rises. You can substitute active dry yeast, proofing it in a small portion of the water along with a pinch of sugar. I find instant yeast easier to use, because it streamlines the process. Sprinkle it on top of the flour, and you’re off to the races
Jenni Says: If you want to use all all-purpose flour in this recipe, you can with no changes needed. If you want to use all bread flour, add 5 grams additional water for a total of 270 grams. It might not seem like much, but hydration matters!
How to Make Sun-Dried Tomato Pesto Sandwich Bread
In this section, I’ll go over all the steps needed to make the dough, go through the first rise (called bulk fermentation), shape the bread, and cues to let you know it’s ready for the oven.
If you are comfortable with shaping loaves and baking bread, feel free to skip down to the recipe.
Making the Dough
Making dough for this sandwich bread is pretty straightforward. And thanks to rigorous testing (go me!), there’s no “maybe add flour if it’s too sticky.” Just follow the measurements in the recipe, and you’ll be fine.
Here’s how it goes:
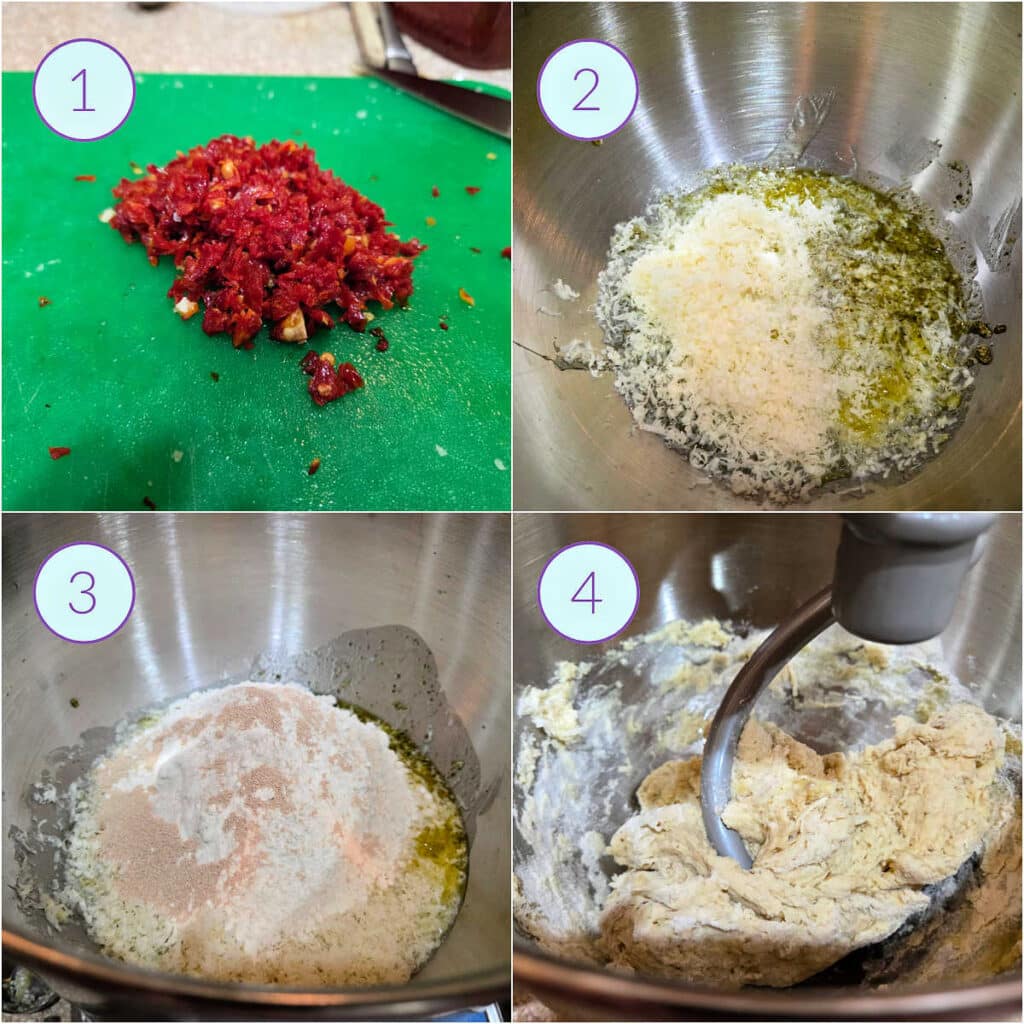
- Mince the sun-dried tomatoes very finely and (not pictured) Microplane your Parmesan cheese.
- In the bowl of your stand mixer, add pesto, minced tomatoes, salt, garlic powder, honey, water, and Parmesan.
- Pour in both flours and sprinkle the yeast on top.
- Mix on low speed until all the flour is moistened and you have a very shaggy dough.
Be prepared with mise en place.
✅mince sun-dried tomatoes
✅Microplane the Parmesan
✅Weigh out both flours
Would you like to save this post?
Kneading and First Rise (Bulk Fermentation)
Here are the next steps and also visual cues to let you know when the dough is ready for the next step in its journey to becoming delicious, delicious bread.
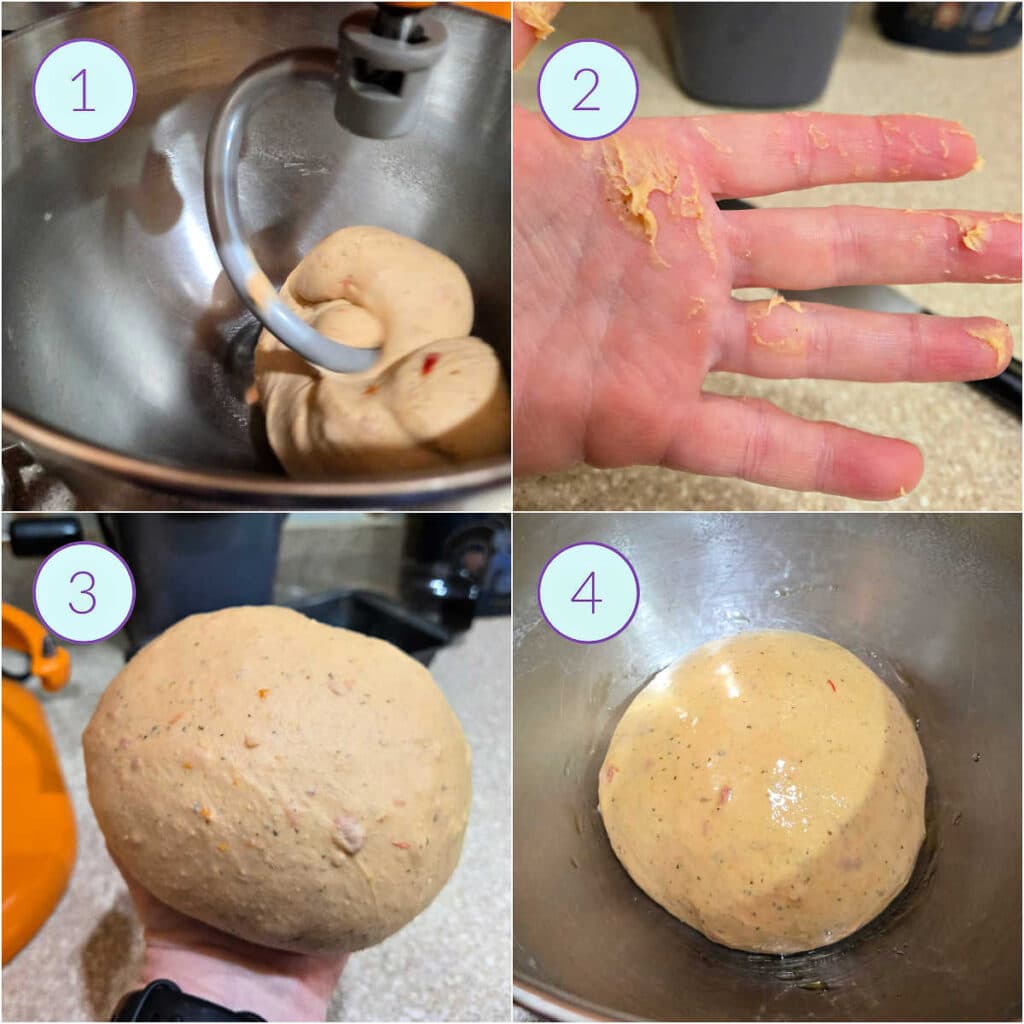
- After 12 minutes of kneading on speed 4, the dough will clear the sides and bottom of the bowl and be smooth, shiny, and supple. The 3 S’s!
- The dough is slightly tacky and will stick a bit to dry hands.
- Rub a couple of teaspoons of olive oil into your hands, and you’ll easily be able to shape the dough into a ball with a smooth surface.
- Plop it right back in the mixer bowl, oil the top, and cover with a lint-free cloth for the first rise (bulk ferment).
Shaping the Loaf
There’s nothing tricky about shaping a loaf. Think of it like rolling a burrito.
Here are the steps.
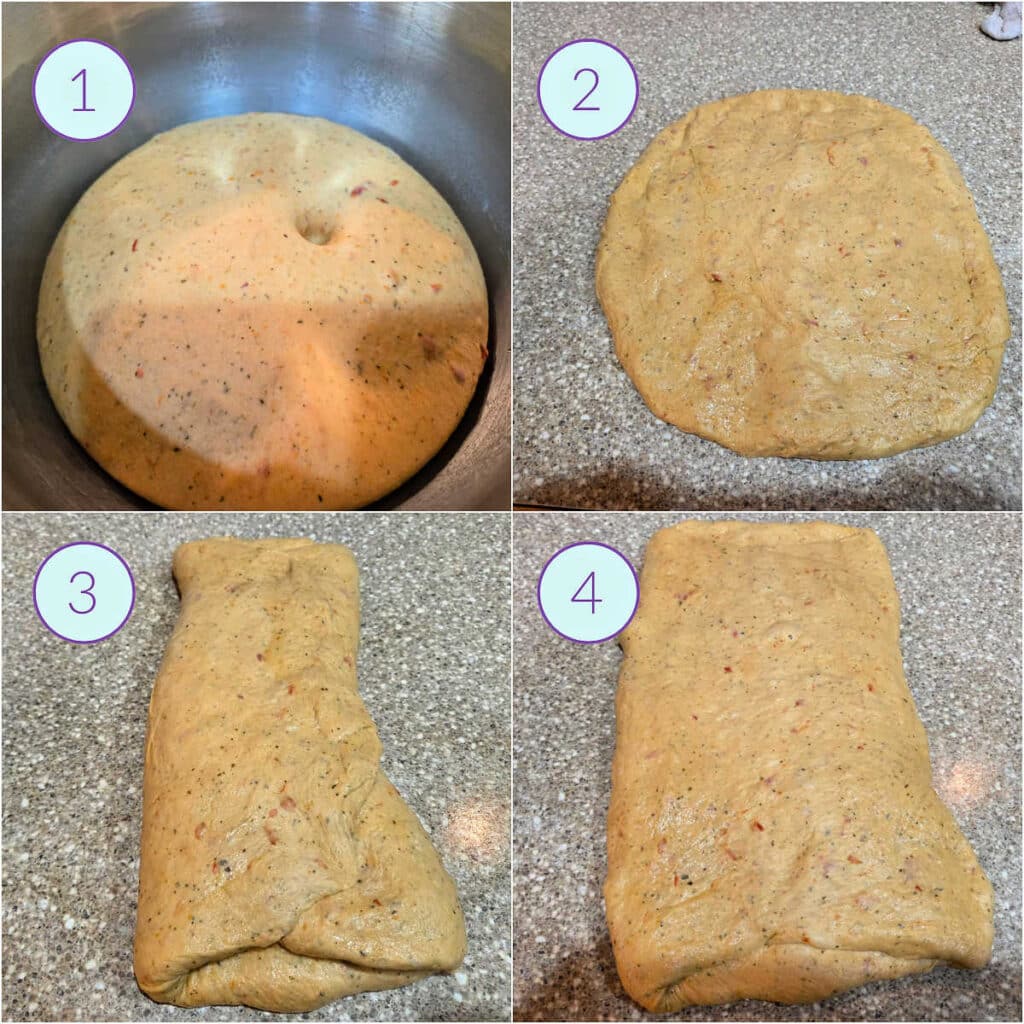
- The first rise will take about 1:45-2 hours in a cozy microwave. You’ll know it’s ready for shaping when you poke your finger into the dough and it stays indented without filling in at all.
- Turn the dough out onto your clean work surface. You may need to use a bowl scraper to get out any dough sticking in the bottom. Press the dough out into a sort-of rectangle 3/4″ thick. You’re redistributing the yeast and the gases to get a more even crumb structure in the finished bread.
- Fold the dough into thirds like a letter.
- Allow the dough to rest, covered, 5-10 minutes and then gently press the rectangle of dough a bit wider so it’s roughly 7″ wide and about 12″ long. Now you’re ready to roll!
Second Rise
Okay, we’re in the home stretch now. Let’s get this bread ready to bake!
At this point, set a rack in the bottom third of your oven and pre-heat to 350°F / 177°C.
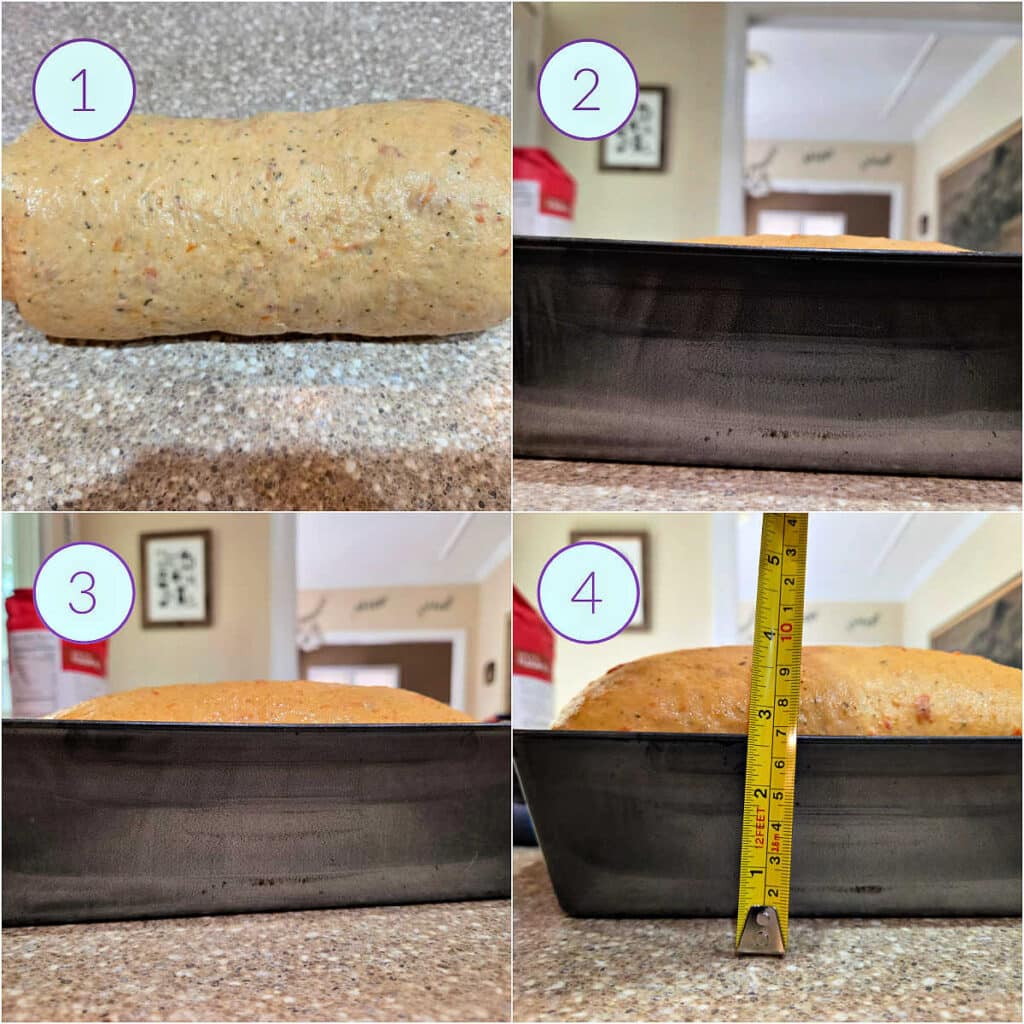
- Roll up your dough rectangle into a snug, even cylinder, pulling back on the dough slightly as you roll to maintain some tension.
- Put the shaped loaf into a clean, ungreased 9″ x 5″ bread pan, oil the top, and cover with a lint-free towel to rise. Photo 2 is after 15 minutes rising in the cozy microwave.
- The rest of the rise happens at room temperature on the counter. Photo 3 shows what the rise should look like after about 30 minutes.
- Somewhere between 45 minutes and an hour, the dough should crest 1″ over the rim of the pan. And yes, it’s okay to check with a tape measure or ruler.
Baking the Bread
At long last, it’s time to bake!
Bake for 30-40 minutes, depending on your oven. I rotate the pan every 10 minutes for an even bake, because my oven stays hotter in the back than the front.
After about 25 minutes, loosely tent the loaf with foil to prevent over-browning. The loaf is done when it is beautifully golden brown, matte and not shiny, and the internal temperature reads 195° – 200°F / 91° – 93°C.
Remove the loaf from the oven and, while still in the pan, brush the crust thoroughly with olive oil. Then, de-pan the loaf and allow it to cool completely on a cooling rack.
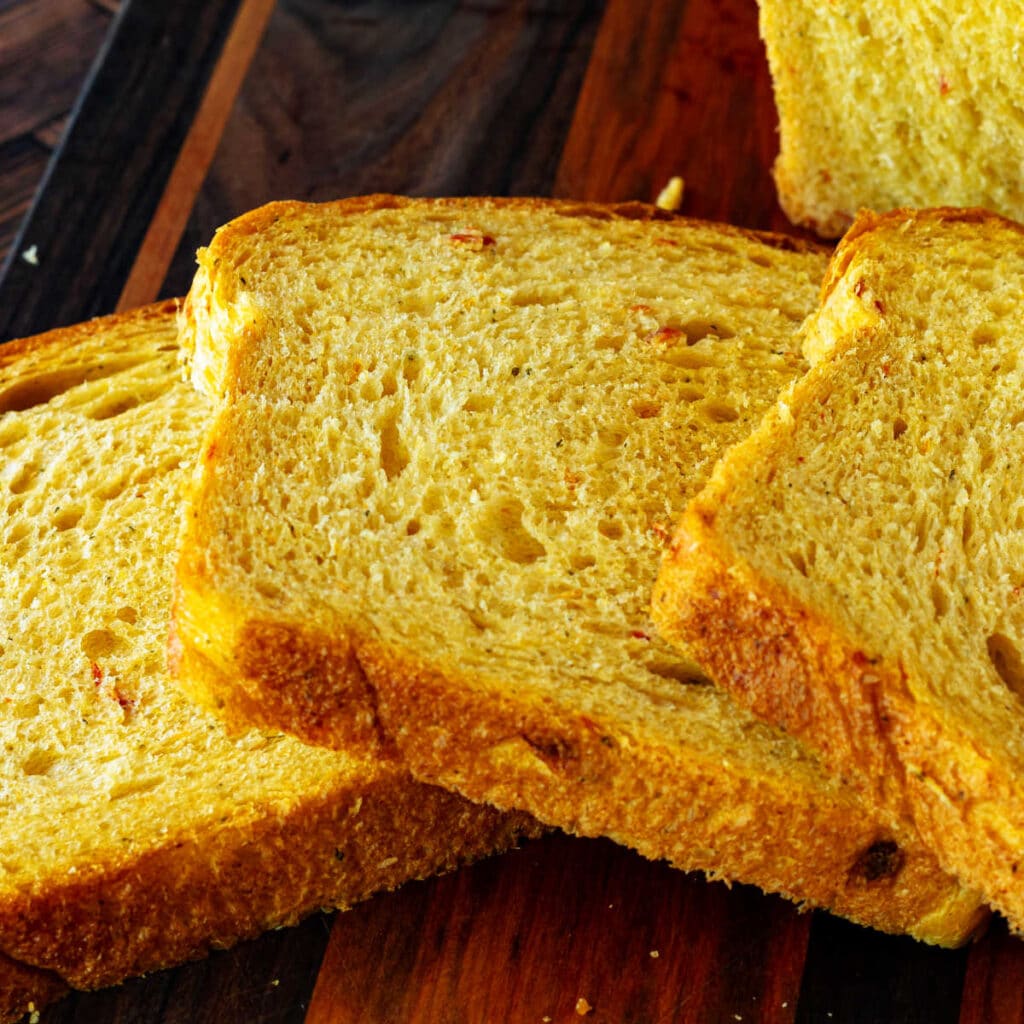
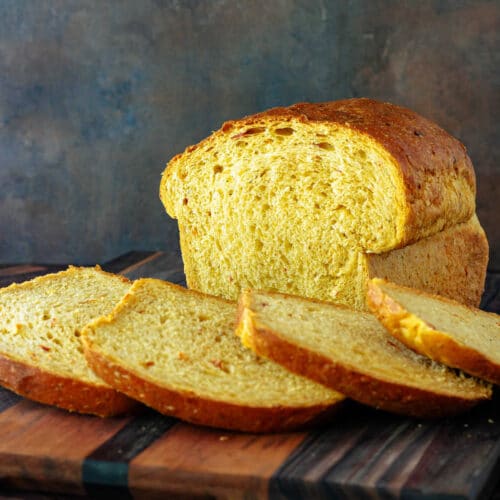
Here’s what you’ll see when you slice into your perfect, umami-ful sandwich bread.
Pro Flavor Building Move: If you have a flavored olive oil, now is the time to use it. Basil, Tuscan herb, or garlic oils will all work well here.
Serving Suggestions
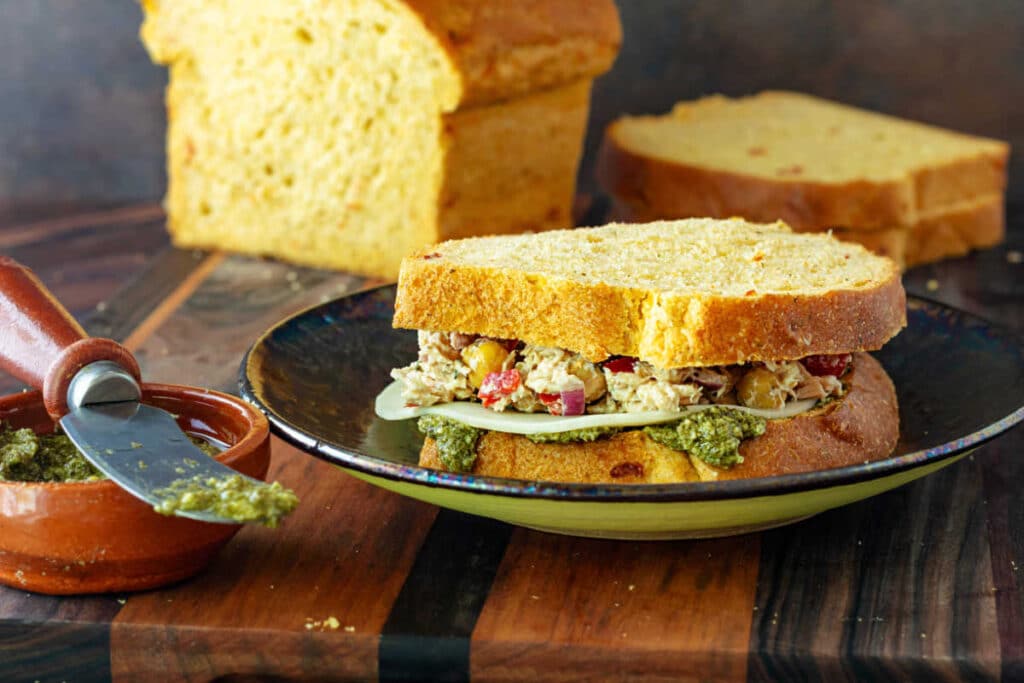
Of course you’ll be making sandwiches with this bread. That’s its whole raison d’etre, y’all. But here are some other ways to put it to good use.
- Cube day-old bread and toast for croutons
- Use this loaf for making stuffing or dressing for the holidays
- Feature it as a savory layer in a breakfast strata or other baked breakfast casserole
- Make my spicy chicken guacamole sandwich on it. Please.
- Don’t sleep on a good old-fashioned grilled cheese sandwich, either
Level up any sandwich with my savory onion jam, because that on this bread? A winning combination, for sure!
Savory Sandwich Bread Q&A

You can successfully make this loaf with either flour. For a slightly softer bread that might not rise quite as high, use all all-purpose flour without any other changes to the recipe. For a tall loaf with some nice chew to the crumb, use all bread flour and increase the water by 5 grams.
When properly made, the dough is a smooth, shiny, supple, and a little tacky. So you’re fine! Rub a couple of teaspoons of oil on your hands, and the dough will allow you to shape it without sticking. Any sticking is much more likely right after kneading than after the first rise.
Yes, you can. This loaf is sized for a 9″ x 5″ loaf pan, and when you first put it in the pan, you won’t be able to see the dough from the side at first. A 1″ crest ensures that the dough is amply proofed but still has some oomph left in it for oven spring once it hits the hot oven. If your dough looks like it wants to spill over the edge/s of the pan, you have gone too far, so keep your ruler handy.
Not necessarily, especially if your oven heats more evenly than mine does. Check the loaf after 15 minutes and rotate only if one side is looking a bit more done than the other. Regardless, loosely tent with foil after 25 minutes to prevent over-browning.
Lots of factors effect the final look of your bread: kitchen temperature, temperature during the rise, oven temperature, humidity, and more all play a part. A loaf that isn’t shaped with as much tension might not rise as high as one that has been snugly rolled, but I promise you, your bread is going to taste so good even if it doesn’t look exactly like mine!
Honestly, I wouldn’t recommend it. It can cause your mixer undue stress. I did double it during one test, and I ended up having to cool the mixer down with a bag of frozen cherries during the last 5 minutes of the knead! If you need two loaves, make one recipe at a time, and save the wear and tear on your mixer.
With the amount of fat in the pesto and Parmesan cheese, there should be minimal if any sticking, and your bread should tip right out of the pan. If you are noticing any sticking at all, run a small offset spatula around the inside of the loaf pan, keep it tight to the sides of the pan so you don’t inadvertently tear into your loaf. Then the bread will pop out onto the cooling rack.
Questions?
If you have any questions about this post or recipe, I am happy to help.
Simply leave a comment here and I will get back to you soon. I also invite you to ask question in my Facebook group, Fearless Kitchen Fun.
If your question is more pressing, please feel free to email me. I should be back in touch ASAP, as long as I’m not asleep.
A Note About Measurements
My recipes are almost all written by weight, including liquids, unless otherwise specified.
For accuracy and consistency of results, I encourage you to buy–and use–a kitchen scale.
I promise that baking and cleanup will be so much quicker and easier.
This is the scale that I recommend for home use. I have owned and used one for years.
Love This Sun-Dried Tomato Pesto Sandwich Bread? Consider Sharing and Rating!
It will help me and other readers so much if you take a moment to rate and leave a review for this recipe.
You can use the stars to rate 1-5 (5 is best), and leave a review in the comments. It helps me make adjustments if any are needed, and comments help others decide whether the recipe is worth making.
Other ways to share include pinning, and/or sharing on your favorite social media platform.
Thank you so much for taking the time!

Sun-Dried Tomato Pesto Sandwich Bread
Would you like to save this post?
Ingredients
For the Dough
- 9 grams kosher salt (0.32 oz or 1 1/2 tsp) I use Morton's
- 48 grams basil pesto (1.7 oz or 3 Tbsp) I use Alessi brand
- 42 grams Parmesan cheese 1.5 oz (about 3/4–1 cup, lightly packed—volume varies widely, so use a scale for best accuracy) finely shredded, I use a Microplane
- 35 grams oil-packed sun-dried tomatoes (1.2 oz or 1/4 cup) blotted of excess oil, finely chopped
- 1 Tbsp honey (20 grams or 0.75 oz)
- 1 tsp granulated garlic OR 1/2 tsp garlic powder
- 265 grams water (9.34 oz or 1 cup + 1 Tbsp + 2 tsp) room temperature
- 250 grams bread flour (8.8 oz or 2 cups minus 1 Tbsp) I use King Arthur
- 200 grams all-purpose flour (7.1 oz or 1 1/2 cups) I use King Arthur
- 1 ½ tsp instant yeast
To Finish the Loaf
- 1-2 Tbsp olive oil for brushing the crust, flavored oil if you're fancy
Instructions
For the Dough
- Combine the kosher salt, basil pesto, Parmesan cheese, minced sun-dried tomatoes, honey, granulated garlic, and water into the bowl of your stand mixer.
- Add the bread flour and all-purpose flour on top.
- Dump the instant yeast on top of the flour. (I like to keep the yeast and salt separate from each other until the last possible moment to minimize the chance that the salt will kill some of the yeast).
- Fit your mixer with the dough hook. Mix on low speed until all dry ingredients are incorporated, about 1-2 minutes.
- Increase to medium speed (speed 4 on a KitchenAid), and knead for 12 minutes. The dough will completely clear the sides and bottom of the bowl, but once you stop the mixer, the dough will slowly slump. You'll know it's done if it is shiny, smooth, and supple (3 S's).
- The dough will be pretty tacky when you touch it with dry fingers, so oil your hands to gather it into a smooth ball, stretching the top of the dough around to the bottom so the top is smooth and has a bit of tension.
- Oil the top of the dough, or spray it with pan spray. Cover with a lint-free cloth and let it rise in a cozy spot (I use my microwave with the surface light on) until doubled in size, about 1 1/2 – 2 hours. NOTE: My microwave gets to be a toasty 90F with the surface light on. This makes the yeast super bouncy and allows for a fairly short first rise. If you have time, allowing it to proof more slowly will yield slightly better flavor.
- Once the ball of dough holds a finger indent without filling back in, it's ready to shape. Plop the dough out onto a clean work surface–no flour, no oil–and press the dough into a rectangle-ish about 3/4" thick. You're redistributing yeast and the gases for an even crumb, so don't be too gentle. Press it out assertively but not aggressively.
- Fold 1/3 of the dough in towards the center and then fold the other 1/3 over that, just like you're folding a letter. This, not shockingly, is called a letter fold.
- Cover the dough and let it rest for about 5-10 minutes so the gluten can relax, making the next step easier.
- While the dough is resting, place a rack in the lower third of your oven and preheat to 350°F / 177°C.
- Press your rectangle of dough out so it is roughly 7" wide and about 12" long. Roll the dough up snugly, pulling back on the dough as you roll to keep gentle tension. Seal the seam by pinching, and place the shaped loaf, seam-side down, in an ungreased 9" x 5" loaf pan.
- Oil the loaf, cover with a lint-free towel, and let rise in the cozy microwave for fifteen minutes to give it a head start after all the pressing and rolling.
- Then, remove the loaf, still covered, to the counter to finish rising until it crests the rim of the pan by 1" / 2.5cm.
- Place the loaf in the oven and bake until well risen, deeply golden brown, and the internal temperature reads 195°-200°F / 91° – 93°C. Rotate the pan every 10-15 minutes if it seems to be browning unevenly, and loosely tent the loaf with foil after 25 minutes to prevent over-browning.
- Once the loaf reaches the target temperature, remove from the oven and immediately brush with olive oil. De-pan the loaf and allow it to cool completely on a cooling rack.
- Once completely cool, I like to slice it into sandwich slices and then freeze the whole loaf, taking pieces out of the freezer as needed. You may store the uncut loaf covered on the counter for a day and sliced, no more than 3 days. Slice and store leftovers in a zip top bag in the freezer.
Did You Make Any Changes?
Notes
Nutrition
And there you have it, the savory sandwich bread of your dreams. I hope you love it as much as I’ve enjoyed testing and eating it!

Hi, y’all! I hope you’ve enjoyed this post and hopefully also learned a thing or two.
If you like my style, I invite you to sign up for my occasional newsletter, The Inbox Pastry Chef.
Expect updates on new and tasty recipes as well as a bit of behind-the-scenes action. I hope to see you there!


Join in Today!