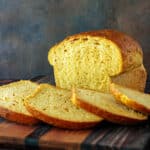
Sun-Dried Tomato Pesto Sandwich Bread
This soft, cleanly sliceable sun-dried tomato pesto bread is made for hearty sandwiches—tomato sandwiches, cold cuts and cheese, grilled cheese, and more. With a savory backbone, it’s just as good with simple fillings as it is piled high with Dagwood-style creations.NOTE: For best results, I recommend weighing your ingredients (grams or ounces). Volume measurements can vary and may affect accuracy and consistency.
Servings 14 slices
Calories 156kcal
Ingredients
For the Dough
- 9 grams kosher salt (0.32 oz or 1 1/2 tsp) I use Morton's
- 48 grams basil pesto (1.7 oz or 3 Tbsp) I use Alessi brand
- 42 grams Parmesan cheese 1.5 oz (about 3/4–1 cup, lightly packed—volume varies widely, so use a scale for best accuracy) finely shredded, I use a Microplane
- 35 grams oil-packed sun-dried tomatoes (1.2 oz or 1/4 cup) blotted of excess oil, finely chopped
- 1 Tbsp honey (20 grams or 0.75 oz)
- 1 tsp granulated garlic OR 1/2 tsp garlic powder
- 265 grams water (9.34 oz or 1 cup + 1 Tbsp + 2 tsp) room temperature
- 250 grams bread flour (8.8 oz or 2 cups minus 1 Tbsp) I use King Arthur
- 200 grams all-purpose flour (7.1 oz or 1 1/2 cups) I use King Arthur
- 1 ½ tsp instant yeast
To Finish the Loaf
- 1-2 Tbsp olive oil for brushing the crust, flavored oil if you're fancy
Instructions
For the Dough
- Combine the kosher salt, basil pesto, Parmesan cheese, minced sun-dried tomatoes, honey, granulated garlic, and water into the bowl of your stand mixer.
- Add the bread flour and all-purpose flour on top.
- Dump the instant yeast on top of the flour. (I like to keep the yeast and salt separate from each other until the last possible moment to minimize the chance that the salt will kill some of the yeast).
- Fit your mixer with the dough hook. Mix on low speed until all dry ingredients are incorporated, about 1-2 minutes.
- Increase to medium speed (speed 4 on a KitchenAid), and knead for 12 minutes. The dough will completely clear the sides and bottom of the bowl, but once you stop the mixer, the dough will slowly slump. You'll know it's done if it is shiny, smooth, and supple (3 S's).
- The dough will be pretty tacky when you touch it with dry fingers, so oil your hands to gather it into a smooth ball, stretching the top of the dough around to the bottom so the top is smooth and has a bit of tension.
- Oil the top of the dough, or spray it with pan spray. Cover with a lint-free cloth and let it rise in a cozy spot (I use my microwave with the surface light on) until doubled in size, about 1 1/2 - 2 hours. NOTE: My microwave gets to be a toasty 90F with the surface light on. This makes the yeast super bouncy and allows for a fairly short first rise. If you have time, allowing it to proof more slowly will yield slightly better flavor.
- Once the ball of dough holds a finger indent without filling back in, it's ready to shape. Plop the dough out onto a clean work surface--no flour, no oil--and press the dough into a rectangle-ish about 3/4" thick. You're redistributing yeast and the gases for an even crumb, so don't be too gentle. Press it out assertively but not aggressively.
- Fold 1/3 of the dough in towards the center and then fold the other 1/3 over that, just like you're folding a letter. This, not shockingly, is called a letter fold.
- Cover the dough and let it rest for about 5-10 minutes so the gluten can relax, making the next step easier.
- While the dough is resting, place a rack in the lower third of your oven and preheat to 350°F / 177°C.
- Press your rectangle of dough out so it is roughly 7" wide and about 12" long. Roll the dough up snugly, pulling back on the dough as you roll to keep gentle tension. Seal the seam by pinching, and place the shaped loaf, seam-side down, in an ungreased 9" x 5" loaf pan.
- Oil the loaf, cover with a lint-free towel, and let rise in the cozy microwave for fifteen minutes to give it a head start after all the pressing and rolling.
- Then, remove the loaf, still covered, to the counter to finish rising until it crests the rim of the pan by 1" / 2.5cm.
- Place the loaf in the oven and bake until well risen, deeply golden brown, and the internal temperature reads 195°-200°F / 91° - 93°C. Rotate the pan every 10-15 minutes if it seems to be browning unevenly, and loosely tent the loaf with foil after 25 minutes to prevent over-browning.
- Once the loaf reaches the target temperature, remove from the oven and immediately brush with olive oil. De-pan the loaf and allow it to cool completely on a cooling rack.
- Once completely cool, I like to slice it into sandwich slices and then freeze the whole loaf, taking pieces out of the freezer as needed. You may store the uncut loaf covered on the counter for a day and sliced, no more than 3 days. Slice and store leftovers in a zip top bag in the freezer.
Notes
For best accuracy and consistent results, use a kitchen scale and measure by weight whenever possible.
The dough will be soft, shiny, supple, and slightly tacky after mixing. This is normal. Use lightly oiled hands to handle it rather than adding extra flour.
For the best oven spring, let the dough rise until it crests about 1 inch over the rim of a 9 x 5-inch loaf pan.
This is a fairly heavy dough. I don’t recommend doubling the recipe in a standard home mixer. If you need two loaves, make two separate batches instead.
You can use all all-purpose flour with no changes. If using all bread flour, add 5 grams additional water.
Nutrition
Serving: 1slice | Calories: 156kcal | Carbohydrates: 27g | Protein: 6g | Fat: 3g | Saturated Fat: 1g | Polyunsaturated Fat: 0.3g | Monounsaturated Fat: 1g | Cholesterol: 2mg | Sodium: 311mg | Potassium: 91mg | Fiber: 1g | Sugar: 1g | Vitamin A: 125IU | Vitamin C: 3mg | Calcium: 48mg | Iron: 1mg