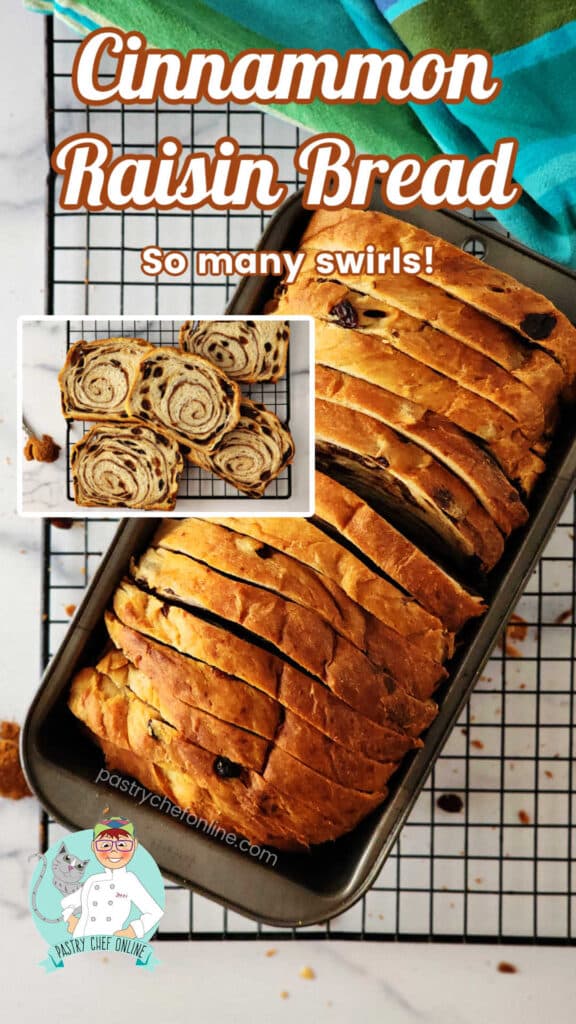
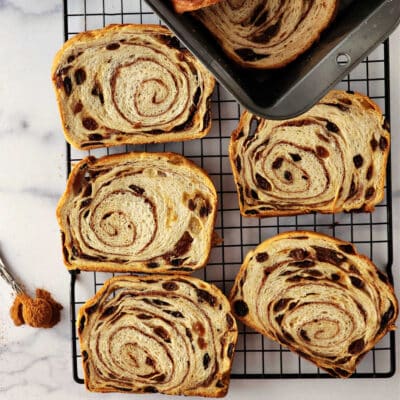
This cinnamon raisin bread recipe bakes up soft, fragrant, and beautifully swirled with cinnamon sugar in every slice. Liberally studded with plump raisins and made with an easy, reliable yeast dough, this is the kind of old-fashioned loaf that makes incredible toast, French toast, and next-level sandwiches.
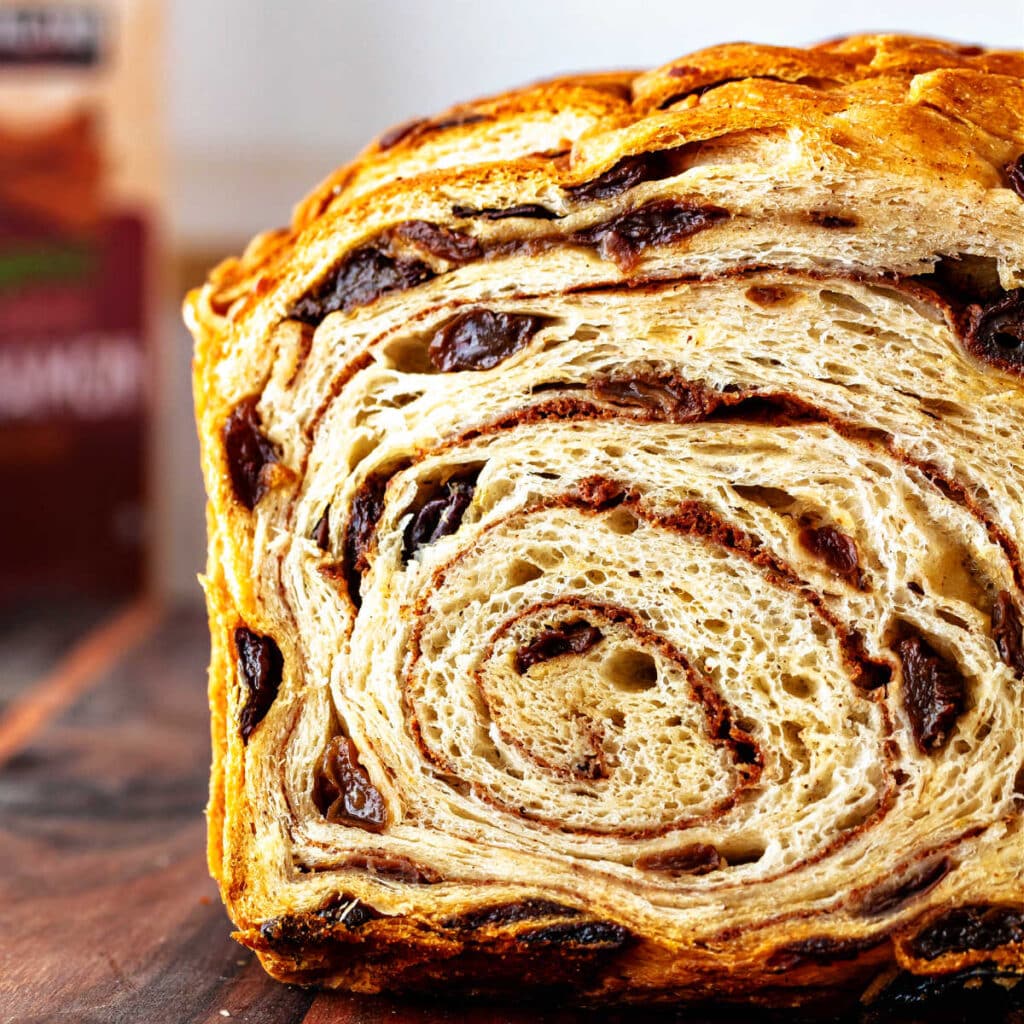
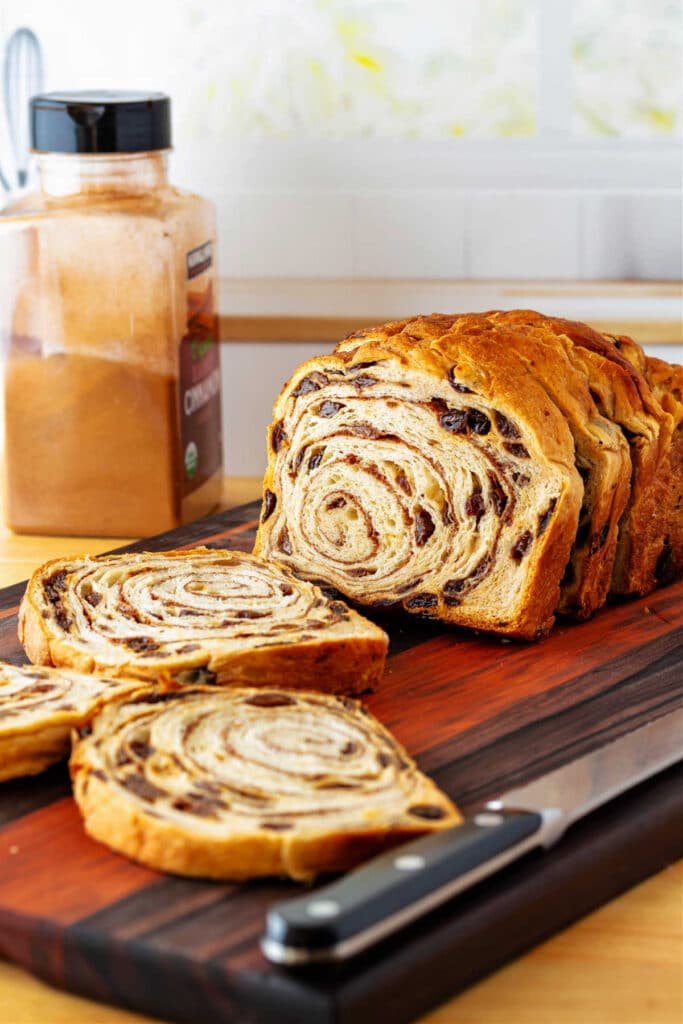
And unlike many cinnamon swirl breads, this one won’t separate or unravel when sliced. The swirl stays put, so you get neat, bakery-style slices instead of gaps and spirals Slinkying away from you.
Would you like to save this post?
It’s a deeply nostalgic recipe, and the technique is intentionally practical and reliable. I’ve tested this bread many times over the years, and the enthusiastic reader reviews back up just how reliable and delicious it is.
Pastry Chef Online Participates in Affiliate Programs. If you make a purchase through one of my links, I may earn a small commission. For more information click to read my disclosure policy
…a loaf full of raisins and cinnamon goodness. I have a feeling it won’t last for long. The smell as it was baking was amazing, the 45 minute wait seemed to last forever.
Reader Jane
Cinnamon Raisin Bread: At a Glance
✔️Skill Level: Intermediate (but do-able!)
✔️Skills: Mixing Bread Dough, Kneading, Proofing, and Tips for Swirl Success
✔️Texture:Soft, Fluffy, Sliceable, and No Gaps
✔️Number of Ingredients: 9 simple pantry staples
✔️Total Time: 4 hours (about 30 minutes of hands-on time)
✔️Yield: 1 loaf of about 16 perfectly swirled slices
Jump Straight to the Recipe
Why This Recipe Is a Reader Favorite
This is delicious! Followed the recipe exactly and the dough is lovely to work with. Made a loaf Saturday, toasted some Sunday for breakfast, now on Monday have another loaf rising. May be obsessed a little.
Reader and Raisin Bread Lover Carlin
If you are not interested in the why, you can skip straight to the recipe.
This dough is relatively lean—it has no eggs and just 5 tablespoons of butter—yet it still browns beautifully thanks to a touch of sugar and the natural milk sugars from whole milk.
Not only does milk assist in browning, it also provides for a more tender crumb and adds sweetness. Could you make this bread with water? Yes. But the bread won’t be as sweet, and it won’t brown as well.
Now, let’s talk about what really makes this recipe stand out: the swirl stays put. Even when sliced thin, each piece holds together beautifully without separating.
If you’ve ever tried to make a sandwich or toast with cinnamon raisin bread, only for the swirls to fall apart, you know how frustrating that can be.
So why does that happen in other recipes? And why doesn’t it happen here? Read on!
Why Do Other Swirl Breads Separate? (And Why This One Won’t)
Don’t use fat in your swirl. Period.
Butter is mostly fat, and fat is a lubricant—which means things don’t stick to it.
And guess what else won’t stick? Your bread dough.
If you have struggled with your swirled bread gapping or delaminating, butter in the swirl is the likely culprit.
Unlike cinnamon rolls, which have concentric swirls that are made to be pulled apart in layers to eat (just me?), a swirled bread has swirls that run parallel to the pan. That means when you slice it, you’re cutting through the swirl, and if it isn’t tightly bound, it will gap and pull apart.
If the swirls aren’t tightly bound to begin with, gapping can and will occur, and it’s no fun at all.
The bread will still taste good, but it will be frustrating if you want to toast it or use it as you would a “regular” piece of bread.
Want more in-depth info on why cinnamon bread separates and how to prevent it? Read my full post here:
How to Make Cinnamon Raisin Bread
Next up, I’ll go through the ingredients, possible substitutions, and a step-by-step run-through of how to make cinnamon raisin bread. If you don’t need the refresher, feel free to skip down to the recipe.
Ingredients and Substitutions
Here are the ingredients you’ll need to make this delightful breakfast bread.
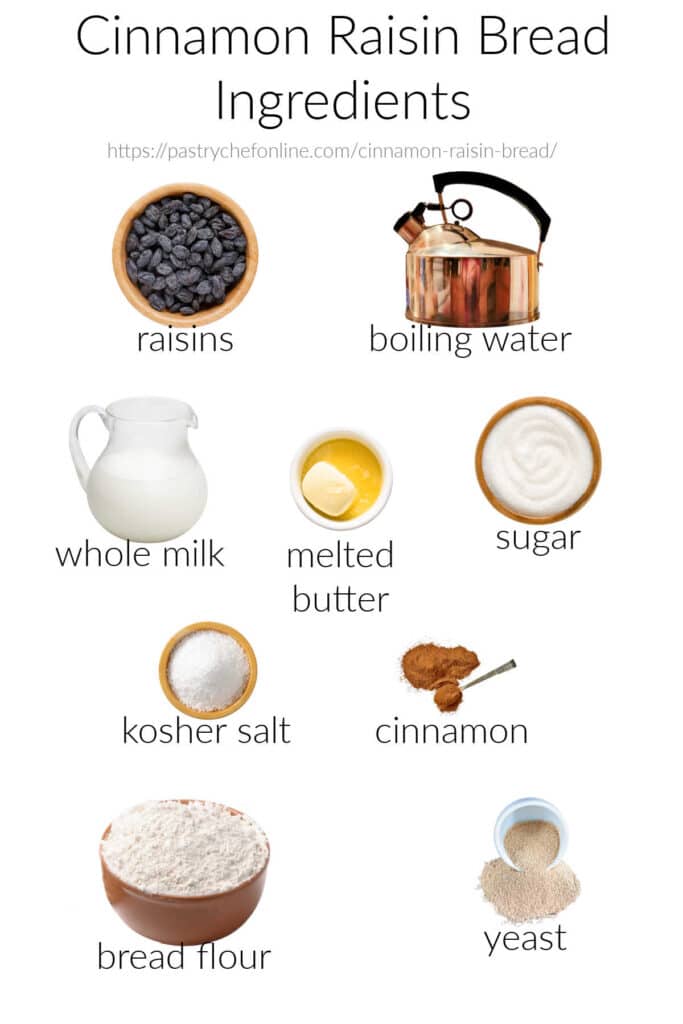
- raisins: You can omit them if you don’t like raisins. No other changes needed. If you like dates, I highly recommend using chopped dates in place of the raisins. Use any dried fruit of your choice such as cherries or dried cranberries
- boiling water: To hydrate the fruit. Don’t skip this step or the dried fruit will pull moisture from your dough resulting in a bread that dries out too quickly. Substitute fruit juice for water if you prefer
- whole milk: The main liquid in the dough. The milk lends milk sugar for a gentle sweetness as well as for brownability. You may substitute half milk/half water if you prefer
- melted butter: Adds tenderness, assists with browning, and carries flavors
- sugar: Much like the butter above, a bit of sugar adds sweetness and tenderness as well as assisting with browning. Substitute maple syrup and reduce the milk by 15-30 grams (1-2 Tablespoons)
- kosher salt: Regulates yeast growth and makes sure the flavors shine through
- yeast: I use instant yeast. For best rise, consider using (affiliate link) SAF Gold Instant Yeast, which is formulated to work best with enriched and sweeter yeast doughs
- cinnamon: Used in both the dough and the swirl. See section on “Does Cinnamon Kill Yeast?” to read more
- bread flour: Use a higher protein flour such as King Arthur breaf flour for nice chewy texture and the best possible rise. Bread flour yields the highest amount of gluten possible to catch all the carbon dioxide bubbles released by the yeast
Procedure
This bread is a bit of a process to make, but most of it is hands-off, and nothing is difficult, I promise.
First, you’ll soak the raisins in boiling water for 10-15 minutes until they plump up and lighten in color a little.
Drain them, spread them out on a couple of thicknesses of paper towel, and blot them dry. You want them plump on the inside, not wet on the outside.
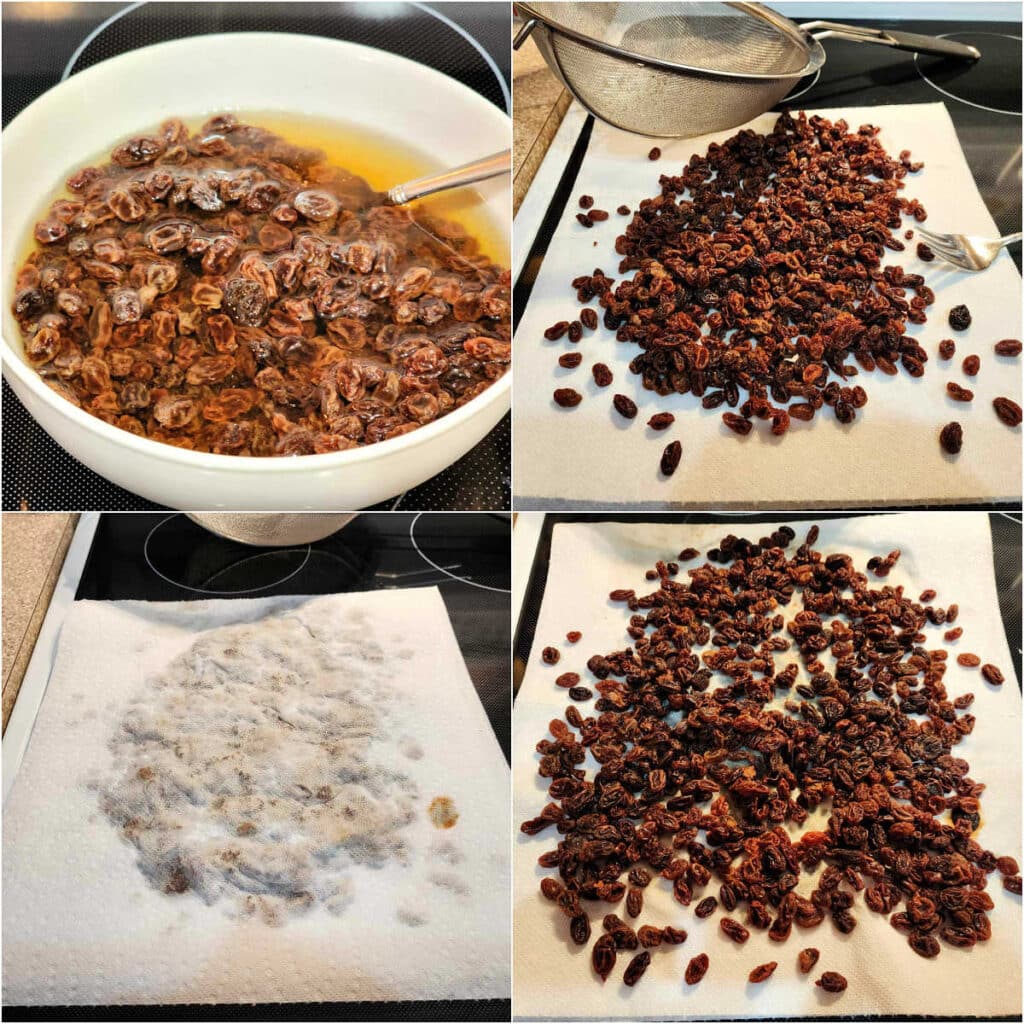
Scald the milk by bringing it up just to a high simmer, and then allow it to cool to about 120F. It should feel like cozy bath water. If it’s cozy for you, it’ll be cozy for the yeast.
PRO TIP: Kill two birds with one stone by cutting the butter in pieces and adding it to the hot milk. This will melt the butter AND cool the milk.
Next up, add the sugar, salt, warm milk, butter, and cinnamon to the bowl of your
Dump all the flour on top and then add the yeast on top of the flour.
With the dough hook, mix on low until the dough comes together and then knead on medium-low for about 10 minutes, until the dough is soft, smooth, and stretchy. Even if it starts out sticking in the bottom of the bowl, it will completely clear the bowl by the end of kneading time. Please resist the urge to add more flour.
Once the dough is nice and stretchy, knead in the raisins.
This step can be a bit time consuming, so I use the mixer, still fitted with the dough hook, for about 2 minutes and then finish up on the counter, by hand.
PRO TIP: As much as possible, you want the raisins to be inside the dough and not just stuck on the outside, so it can help to press the dough out and then fold it up over any naked raisins. Do this a few times, and you’re ready for the next step.
Now it’s time for the first rise, which is also called the “bulk fermentation.” (Why? Because in a bakery, this is a large mass of dough. After the “bulk” has risen in a big old tub, then it’s divided and shaped into multiple loaves/rolls/etc)
Shape your raisin-filled dough into a smooth ball, making sure to tighten up the outside membrane using your hands with the dough on the countertop.
Do not flour or grease your counter. You want the friction a dry surface provides.
Mist or brush lightly with oil, and then put the dough in a cozy place to rise until doubled, about 2 1/2 hours or so.
Jenni Says: Cinnamon can slow yeast down a bit, so your rise may take a little longer than expected. Totally normal.
If you started late in the day, you can refrigerate the dough at this point, and let it have a long, slow rise in the fridge overnight. The next day, bring it out, let it rest for an hour, and then continue with shaping.
Shaping the Loaf
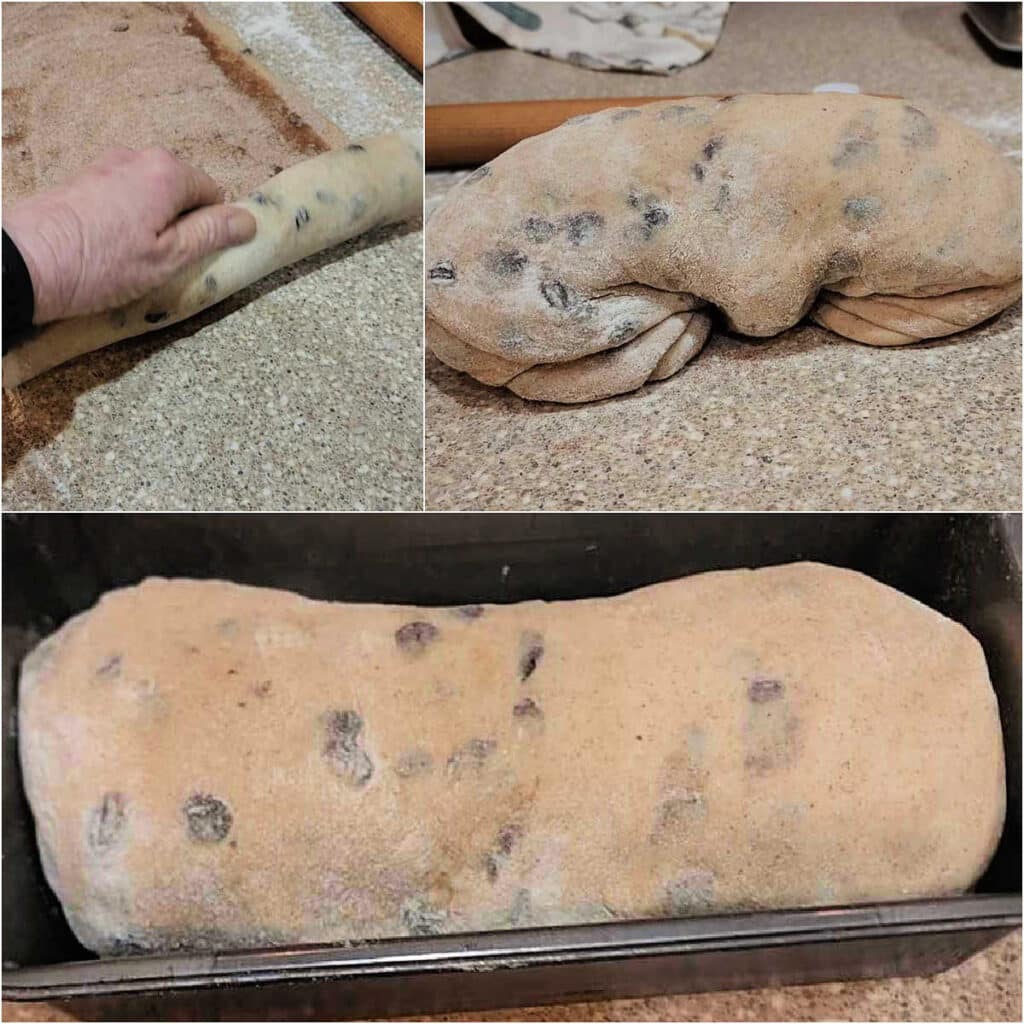
Plop the dough out onto a clean counter and press out the gases. Then roll it out into a long, thin rectangle, approximately 8″ x 24-26″. The longer it is, the more swirls you’ll have.
Brush the surface of the dough liberally with whole milk. You could also use water here. You just need a liquid the swirl can “bond” with into a thin sort of dough.
Sprinkle the swirl evenly on the dough and then spread it end to end and edge to edge.
Roll up the dough from a short side, keeping light tension on it as you roll. In other words, keep pulling back a little every roll or two to keep the spiral nice and tight.
When you get to the end pinch the seams closed as well as you can.
PRO TIP: For maximum adherence and near-zero delamination on the outside of the bread after baking, when you get towards the end of rolling, brush the OUTSIDE of the roll with more milk to ensure the end bonds well.
Your roll will now most likely be much longer than your pan. That’s fine. Part of the fun of these breads is seeing what kind of swirl you get once you cut into it.
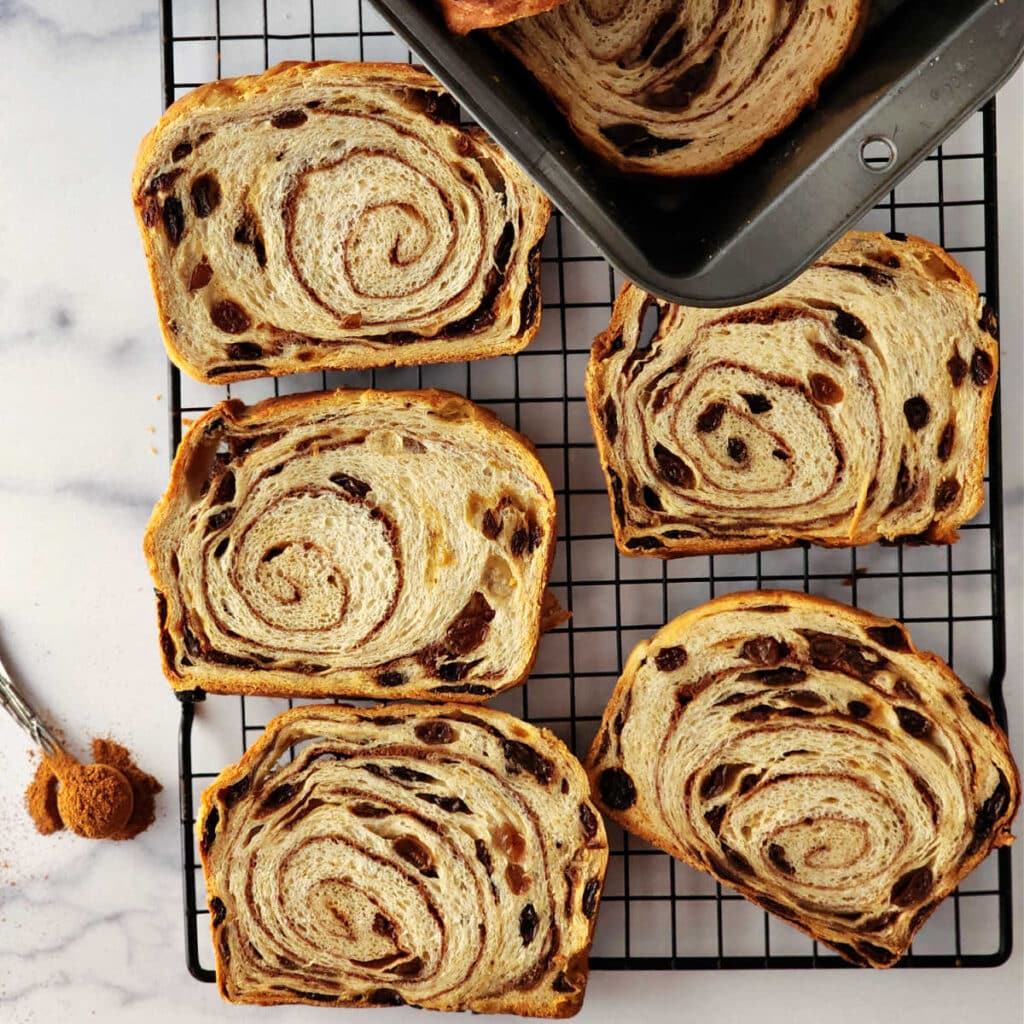
Just bend the log into a slinky shape, and then tuck the ends under. Then place the dough into a 9″x5″ loaf pan.
Press down firmly on the dough to even it out, spray it lightly with pan spray, cover, and let rise in a cozy place until the bread rises over the edge of the pan by about an inch.
All that’s left now is the baking.
…I am beyond happy with the results! The texture is absolutely wonderful and the flavor is spot on, not overwhelming with spices. It has the right amount of raisins, rose beautifully and the milk for the swirl was genius….
Reader Carol
Variations
I cannot recommend highly enough using my oatmeal bread recipe with the addition of a teaspoon (or even 2) of cinnamon, the swirl from this recipe, and chopped dates. (I get the kind in a bag near the raisins in our “regular” grocery store, and I don’t soak them).
This variation is magic, and your house will smell like breakfast while it’s baking.
Also feel free to substitute chocolate chips (no soaking!) for all or part of the (soaked) raisins.
Consider adding orange zest or lemon zest to the dough and adding some espresso powder or instant coffee to the swirl mixture.
Cinnamon Raisin Bread Q & A
For evenly moist bread, soaking the raisins is an important step. If you skip it, the raisins can pull moisture from the surrounding dough, resulting in a drier crumb around the fruit.
Yes. Since the swirl does not include any fat and uses flour and milk to help make a simple “cinnamon dough,” your swirls should bond with the main dough and stay perfectly laminated, even when sliced thinly.
This bread stays soft and fresh for up to 5 days at room temperature, even after slicing. Wrap it well to keep it from drying out.
For longer storage, slice the bread and then freeze in a zip top freezer bag, pressing out as much air as possible before sealing. Remove pieces as needed and put them straight into the toaster or toaster oven. Or thaw in the microwave for about 8-10 seconds.
I’ve made this bread 3 times now, and it is a beautiful, consistent recipe. Due to the lack of eggs this prices out to significantly less than a store-bought loaf, especially because it makes a larger quantity of bread. More than that, it tastes infinitely better. A slice of this toasted with peanut butter is my favorite breakfast.
Reader Shannon
Other Loaf Bread Recipes
If you love having homemade bread on hand for sandwiches, French toast, or for toasting, you may enjoy some of my other bread recipes.
- If you love flavorful bread and are looking for a savory version, try my sun-dried tomato pesto sandwich bread. There’s also a link to a delightful lemony pesto swirl if you’d like to go all in.
- Another loaf that has excellent keeping qualities and makes a great sandwich bread is my potato sandwich bread.
- If you love grits, try adding cooked grits to your yeast bread. Grits bread is savory, a bit toothsome, and toasts super well.
Questions?
If you have any questions about this post or recipe, I am happy to help.
Simply leave a comment here and I will get back to you soon. I also invite you to ask questions in my Facebook group, Fearless Kitchen Fun.
If your question is more pressing, please feel free to email me. I should be back in touch ASAP, as long as I’m not asleep.
A Note About Measurements
My recipes are almost all written by weight, including liquids, unless otherwise specified.
For accuracy and consistency of results, I encourage you to buy–and use–a kitchen scale.
I promise that baking and cleanup will be so much quicker and easier.
This is the scale that I recommend for home use. I have owned and used one for years.
Cinnamon Raisin Swirl Bread
Video
Equipment
Ingredients
For the Raisins
- 7 oz raisins 198 grams or about 1 1/2 cups
- water to cover by 1/2"
For the Dough
- 10.5 oz whole milk 298 grams or 1 1/4 cups plus 1 Tablespoon
- 2.5 oz melted butter 70 grams or 5 Tablespoons
- 2 teaspoons salt 9 grams
- 1 ½ oz sugar 43 grams or 3 Tablespoons
- 1 teaspoon cinnamon
- 16 oz bread flour 454 grams or about 3 1/2 cups
- 1 ½ teaspoons yeast** 7 grams (for a faster first rise, you may increase the yeast to 2 – 2 1/2 teaspoons)
For the Swirl
- 2 Tablespoons bread flour
- 2 Tablespoons sugar
- 4 teaspoons cinnamon
- pinch salt
To Shape and Bake
- 3 Tablespoons whole milk
- 2 Tablespoons butter melted
Instructions
For the Raisins
- Add the raisins to a heat-proof bowl, and pour boiling water over them to cover by about 1/2".
- Allow the raisins to hang out in the hot water for 10-15 minutes. You'll know they're ready when the color lightens slightly and the water level has dropped.
- Drain them, then spread them onto a couple of layers of paper toweling or a lint-free tea towel. Blot dry. Set aside.
For the Dough
- In a microwave-safe bowl or in a pan on the stove-top, heat the milk until it is steaming but not boiling.
- Pour the milk into the bowl of your stand mixer, and add the butter. Whisk together to melt the butter and cool the milk.
- Add sugar, salt, and cinnamon and whisk well.
- Dump in all the flour on top of the liquid, and add the yeast on top. This keeps the yeast from coming into contact too early with concentrated salt (and the cinnamon, for that matter).
- Attach your dough hook and mix on low speed until all the flour is incorporated, about 1 minute.
- Increase mixer speed to medium-low and knead for 10 minutes until the dough is smooth, springy, and very stretchy.
- Dump in the raisins and mix on low speed for 2 minutes. Not all the raisins will be incorporated yet, but that's okay.
- Dump the dough and any loose raisins onto your clean counter and knead the rest of the raisins in, folding the dough over and then pressing it out to distribute the raisins as evenly as you can.
- Form the dough into a smooth ball, rounding it on the counter and using friction to pull the outer membrane fairly taut.
- Place the dough back into the mixer bowl, spray with pan spray or brush lightly with oil, cover, and let rise in a cozy place until doubled in size, about 2 1/2 hours.
To Shape and Bake
- Whisk together the swirl ingredients in a small bowl. NOTE: Many people have had great success with mixing the swirl ingredients together with 3 Tablespoons of milk to make a bit of a paste that can then be evenly spread on the dough before rolling it up. If you are at all concerned about lamination, go ahead and do that rather than sprinkling the dry ingredients over the milk-brushed dough.
- Press the gases out of your dough, and then roll into a long, skinny rectangle, approximately 8" x 24-26" long.
- Brush the surface liberally with milk, and then sprinkle on the swirl mixture evenly. Use your clean hands to spread it evenly, top to bottom and end to end. Press the swirl mixture into the milk to encourage it to stick.
- Starting at one short end, roll up tightly, pulling back every couple of turns to keep the dough under tension. When you reach the end of the roll–maybe the last 2"–brush some additional milk on the outside of the roll to give those last 2" something to stick to. Pinch the seam together as well as you can, and roll the dough log seam side down.
- The dough roll will most likely now be much longer than the pan you're putting it in (9" x 5" loaf pan), so bend the dough like a slinky, with the two ends pointing down and then fit the dough into the pan. Press down firmly to even the dough out.
- Spray lightly with pan spray, cover, and let rise again until the dough rises over the edge of the pan by about 1", about 1-1 1/2 hours.
- Preheat your oven to 350F/180C. When your loaf is nicely risen, bake on the middle rack for about 45 minutes, or until the internal temperature of the bread reads 195-200F. Tent with foil if the bread is browning too quickly. This is likely, as cinnamon raisin bread takes longer to bake because of the moist raisins and swirl, so just go with it.
- Once your bread is done, remove the loaf to a rack and immediately brush the top liberally with the melted butter. Turn the loaf out of the pan and allow it to cool for at least an hour before slicing it. Ideally, you will wait until it's completely cool, but I won't blame you if you want to cut it early. I do. Every time.
- Enjoy straight-up, as toast, as a base for French toast or bread pudding, etc. Store cooled leftovers, well covered, at room temperature for up to 5 days. Slice and freeze for longer storage.
Did You Make Any Changes?
Notes
- apricots
- currants
- dried cherries
- dried cranberries
- dates
- figs
Nutrition
Would you like to save this post?
Love This Swirled Raisin Bread? Please Share It and Review It!
It helps me and other readers so much if you take a moment to rate and review this recipe.
Your star rating and comments help others decide whether the recipe is worth making, and your feedback helps me continue improving recipes here at Pastry Chef Online.
Other lovely ways to share include pinning or posting on your favorite social media platform.
Thank you so much for taking the time!

Thanks so much for spending some time with me today.
I hope you enjoy all the delicious cinnamony swirls in this bread, friends!
Take care, and have a lovely day.

Hi, y’all! I hope you’ve enjoyed this post and hopefully also learned a thing or two.
If you like my style, I invite you to sign up for my occasional newsletter, The Inbox Pastry Chef.
Expect updates on new and tasty recipes as well as a bit of behind-the-scenes action. I hope to see you there!


Join in Today!
I haven’t made it yet, but want to when I get the opportunity! It sounds delish…Thanx for the recipe!
I really hope you love it, Diana! If you have any questions before you start baking, please don’t hesitate to get in touch!
I haven’t made this yet and I’m so excited to try it. I don’t have the ability to do all the mixing and stuff and I wondered if these ingredients will fit into a 2lb bread maker pan for the mixing and initial rising. I might be able to handle the rolling out and rolling up then baking in an oven (not the bread maker)?
Hey, Dami! Yes, you can do the initial mix/knead/first rise in the bread maker and then bring it out, roll it out “long and skinny”, apply the cinnamon filling, roll her up, and let it do its second rise in a cozy place and then bake in your conventional oven. I hope you enjoy it, and if you have any questions before you get started, please let me know. You’re welcome to email me directly at [email protected] and I’ll get back to you ASAP. 🙂
I love that you provide metric quantities. It saves me a step since I recently realized that grams are more accurate measurements than imperial and it’s actually easier to measure since I can tare out the scale and measure each ingredient without getting all the tools dirty. Thanks for the quick help!
Right? So easy to toss in an ingredient, hit zero, and then toss in the next. I hope you enjoy the bread!
Can I add walnuts to the swirl? Thanks!
Rather than adding them to the swirl and risk delamination, add them to the dough with maybe 5 minutes left in the knead. If you’re using the full amount of raisins, I’d add 1/2 cups walnuts chopped raisin-sized, max. Toast them for a few minutes until fragrant before adding. They’ll have way more flavor that way. Cool them first then dump them in. Let me know how it turns out, Mo!
Thanks so much, I’m going to try that right now! 🙂
My pleasure! Can’t wait to hear your results!
Amazing bread! I made it last night, used instructions on toasting the walnuts, etc, adding to kneed process. Taste is amazing, nutty, toasty, with a touch of sweet from raisins, etc. I added 10 minutes to baking time in order to reach correct internal temperature, but otherwise followed instructions exactly (total 55 minutes). Thank you again so much for an amazing recipe, it’s a keeper for me. 🙂
Hooray! I’m so glad you’re a fan, Mo! And also, kudos for going by internal temp and not time when checking for doneness!
Hi, there! I just made this and it turned out pretty good! I did a cold proof- about 11houta- but I was wondering what the maximum amount of time I can leave it in the fridge?
Hey, Abby! Glad you like the bread! I would say you could leave it in the fridge for a good 24-36 hours in bulk ferment before rolling it out, filling, and shaping. Then let it rise all cozy and bake.
Amazing bread! I lost hope when I rolled it up and it was tall and short – but it all worked out in the end! Made the best ever French toast with it today. So good, definitely worth the effort! I did the BF in the fridge overnight, proofed for a few hours outside and it baked up perfect – huge oven spring. So great.
Excellent, Stephanie! I’m so glad you love it, and hooray for French toast, too! And thank goodness for loaf pans, right?!
This recipe is absolutely perfect! The dough was beautiful and easy to work with. The texture was perfect and the taste is wonderful. I can’t say enough good things about this bread. I’ll be making it again in a couple days and also a loaf for my son. He said it’s better than Wegmans.
Wow, I am so happy the bread is a hit! Enjoy every bite, Barbara, and I very much appreciate your taking the time to leave a comment!
I’ve made this twice, absolutely delicious! Bread making is therapeutic for me so I enjoy all of the steps! Question: what size loaf would you say this makes? 1.5 lb? 2 lb?
Hey, TeeBell! I’m so happy you like the bread! I’d say this approaches 2 pounds, mainly becasie of the raisins. Sans raisins, it’s closer to 1 1/2 pounds. Enjoy!
This recipe is not good at all. Don’t waste your time and resources
Many others would strongly disagree with you, John. If you can tell me what went wrong and give me a bit of information about how you measured your ingredients, I could help troubleshoot. Because this is my job, and I am exceptionally good at it.
Used 3 1/2 cups of King Arthur Flour. Dough is so dry it won’t stick to itself. Raisins would not blend in.
Did you scoop the flour or spoon and sweep? You will get the most accurate results by using a kitchen scale. You can most likely save it by adding in a bit more liquid.
I think the only thing missing in the recipe is the addition of eggs, my grandmother always added a couple eggs to her raisin bread. I tried it with 2 eggs and a bit more flour and the bread was delicious.
I’m glad you enjoyed it. Not everyone can have eggs and still want cinnamon bread, so now they have this option!
This recipe is awesome!!! I did change a few things – I mixed the warmed milk, butter, honey, (substitute for sugar. We have a local honey bee farm that I always support and use honey in my breads instead of sugar) and yeast together to let it proof. This is a “me” thing, instilled by generations of bread bakers before me. But this recipe is amazing!! I did have to cook my bread for an hour and 5 minutes with my oven, but that’s ok. And my bread deflated because I was too impatient and ready to eat it NOW!! But all the errors were on me! Haha. This bread has the perfect taste, beautiful swirl in the middle and spot on!! Thank you for sharing!! I will be making this again!
I am thrilled that you like it, michelle! I think the subs you made and the change in proofing the yeast are both perfectly reasonable. Nothing wrong with doing things the way you learn to do them. There is always more than one way to do anything. Enjoy the bread, and I hope that you make many more loaves of deliciousness for you and your family.
I so wanted this recipe to work out – but I think the yeast quantity is off. I don’t own a food scale, so I followed the instructions of 1.5 teaspoons of instant yeast, but it didn’t rise much at all. I didn’t quite understand the yeast notes until reading through the comments and seeing other folks had this issue. I think I should have used 2.25 teaspoons instead. My yeast comes in a jar so I didn’t know how much a packet weighs. Regardless the taste is great, just didn’t rise enough 🙁
How long did you give the first rise? And at what temperature? Rise time is a balance between amount of yeast and time. You’ll get the same rise with less yeast and more time with a bonus of more flavor. Sorry it didn’t work out so well for you this time. Hopefully you’ll give it a try again and it will warrant a few more stars. I only ever use 1-1 1/2 teaspoons in my loaves. Most standard recipes call for more than I use to reduce rise time. Not a great trade-off for me.
This is a late comment since you wrote in January. There are a couple of other things to check as well. If you look online, there is a quick procedure to see if your yeast is still fresh and active. My own breads begin to slip in ‘rise-ability’ when it’s time to get new yeast. Since you mention using a jar, maybe you need a fresh supply? Also, the temperature in your room can dramatically slow the rise. You wrote in January, which is a cold time of year. You could warm a small environment like your oven gently, then with the heat turned off, allow your dough to rise there. Perhaps your home or kitchen is colder in winter, which slows the rise of bread. Best wishes for better results! [I haven’t made the bread yet but plan to today!]
Yup, excellent advice. I hope you love the bread, Kelly, and thanks for taking the time to helps someone else out!
Made this and it was excellent! It stayed together well and is so yummy. It took about an hour to bake in my oven
Very glad you enjoyed it! Yay!
Hi Jennifer
I’m hoping you can help me. I’ve tried 3x now to make this recipe, and I can’t seem to get my dough to rise. I know the yeast is good as I used yesterday to make Hamburger buns. I wrapped my bowl with a towel underneath and a towel wrapped around it. the dough felt good when I put it in the bowl for the first rise. I’ve made bread many times and haven’t had a problem. So I’m hoping you might have some suggestions. TIA
Hey, Lori. Thanks for hanging in there, but 3x is 2 too many! Hopefully I can help. Please email me at [email protected] with a bit more information: what type of yeast are you using? Are you adding it with the dry ingredients or proofing first? What temp is your kitchen/the place you let your dough rise? Are you weighing your ingredients or using the volume measurements? Let me know and I’ll narrow down where things may be going sideways. Thank you!
This loaf is amazing, it took 2 tries, but I got it down. For the person for whom it won’t rise, the recipe says 1 1/2 tsp yeast, 7 grams. However, 7 grams is 1 packet which is 2 1/4 tsp yeast, so if she is measuring the yeast, it’s not enough.
For the swirl, I mix with the milk first and it is much easier to spread and I’ve had no separation at all.
Could be the difference in volume between instant yeast and active dry. That’s a good point, and I’ll make a note. I will also explicitly state to make a paste of there is any concern about lamination. I appreciate the review and wish the loaf had been worthy of 5 stars.
Made this today – and – it’s the first loaf of bread I’ve ever made. Followed instructions to the letter and it came out great. Mine took 55 min to hit 198 and I pulled it out. I covered it for the last 18 minutes to keep from browning further- I also read the contents and suggestions on the squirrel and made a light batter of the ingredients- took a photo of that if you need one- put it all around with a large spoon and used the back of it like staging pizza sauce around – worked fantastic- zero delamination – my wife said it was amazing and now we don’t have to buy her cinnamon bread for toast in the morning- I can make a better version myself and I’m amazed I could do it- thank you for the clear well written instructions – it gave me the confidence to give it a try. It’s a fantastic bread and I saved this one in my recipe app.
Kirk, I’m almost as excited about this as your wife is! I am impressed you went with a swirl bread for your first loaf, and I’m very glad my instructions gave you the confidence to give it a go. I try to be as explicit as possible for exactly that reason, so hooray! And you know, I will take you up on your offer of the photo of the swirl “batter.” I can add it to the post to reinforce the discussion and so folks can see what texture they should be going for. I really appreciate the offer. You can email me at onlinepastrychef at yahoo dot com, and please let me know how you’d like me to give you credit for the photo.
I hope you both enjoy the bread, and I really hope you try using it for grilled cheese. Life changing! Or for a Monte Cristo! Take care, and Happy New Year!
I used the water from the soaked raisins and added vanilla (rum works well too) to soak the top of the loaf before baking. Adds a nice touch! Great recipe!
Ooh, I love that little embellishment! So glad you are enjoying the bread!
I made your bread for the first time and it was easy enough for a me who’s not really a bread maker. Only thing is my swirl was close to the very top of the loaf so the crust sort of separated from the top of the bread when I cut slices. I wish I could share a picture. Maybe I didn’t pull enough during the rolling of the dough. Other than I can’t wait to try it for breakie tomorrow! It smells Devine! Thank you!
Please send me a photo via email and I’ll see if I can help you troubleshoot, Sarah! onlinepastrychef at yahoo dot com
I know it will taste great, regardless, but it shouldn’t separate at all. Looking forward to hearing from you!
I never leave reviews but this bread? No notes! I followed it to a T, measuring out the ingredients in grams. I hate internet “bread” recipes, but this is beautiful. Mine was really heavy and too moist but I think I know why (was NOT your recipe):
a) I always have a problem with bread burning on the top, so I just went ahead and covered it straight from the beginning.
b) it needed another 5 – 7 minutes in the oven.
Little timing tweaks and I think I’ll have it down! Thank you for sharing – you are very talented!
Meghan, yay! So glad you love the bread! And I bet you’re right. The moisture in the loaf needs some time to evaporate, so uncovered until you like the color on top is a better bet. But I am super happy, because it sounds like you’ll make it again. And again!
Yum. This recipe is really good. Made it in my bread machine under dough setting, baked in oven. Delicious!
So glad to hear the dough works in a bread machine. I’m glad you like it! Seriously try it for grilled cheese. Super tasty!
Do you need a loaf pan to bake it?
It’s a slicing bread, so a loaf pan is the best way to bake it so it bakes up into shape that cuts into square-ish slices. You can bake it just on a sheet pan as long as you don’t mind that the slices will taper toward the edges as the bread pushes more *out* than *up.* May I ask why you have given the recipe 4 stars if you haven’t made it yet?
Do you think I can incorporate some sourdough starter into the bread? It might help with the rise too. I think I’m going to just try it tomorrow and let you know how it turns out.
I think it is absolutely worth a shot. Sounds like you know more about sourdough than I do, so I say go for it. Let me know how it turns out!
There are not enough superlatives to describe just how FANTASTIC this bread (recipe) is. I’ve made 14 perfect loaves so far, and friends are asking for more. THANK YOU!!!!
Oooh, Lisa, you are now an expert in making this bread! So glad you’re a fan and that it is winning more fans!
I made this recipe; however, I was making something else and by accident added an egg, I had to add a little more flour. Waiting to see how it turns out, will try again the right way
The egg shouldn’t throw it off too much, especially if you added a little more flour to compensate. Let me know!
I made this raisin bread yesterday and it came out great!!! My swirls looked like the bread was made by a pro!!! Believe me, I’m not a pro!!! I followed the recipe just as stated and it was simple and wow! it is delicious!! Thanks so much
Hooray, Francene! So glad you love the bread! For a real treat, use a couple of slices to make a grilled cheese. Trust me.
Just made this well started yesterday and baked it today and wow it was delicious! Im just a beginner baker when it comes to making any type of bread so I wasnt sure if ot come out right. This was wonderful! I will be making this again its soooo good! Thanks!
Yay, Diane! I’m thrilled you like it, and I’m so glad you took a chance on it!
This bread definitely deserves the title “Worlds best” because it’s absolutely delicious! If you follow the directions and tips along the way, you will have the best cinnamon raisin bread. The dough was a little bit sticky and I did need a little more flour, a couple tablespoons but it was so soft after the first ( 2.5 hours) rise. It definitely takes longer than other recipes I’ve tried but I will use this one from now on! I used 2 smaller loaf pans so they were shorter but we like it that way! And I mixed the swirl ingredients together and brushed it onto the dough, worked perfectly, no gaps! Thanks for sharing this recipe and your tips for success!
Hello, Jody! I am so glad you’re the newest convert to this recipe! Thrilled you love it. When you make it again, rather than using a bit more flour, try oiling your hands. It’ll keep the dough from sticking and help you resist adding more flour. Sounds like you didn’t have to add too much, and that’s a good thing, because nobody wants a heavy loaf of bread! I think I will rewrite the rules for the filling and suggest folks mix all the filling ingredients together with milk until they get a thin paste. More exact than brushing with milk and sprinkling it on. Enjoy your bread, and thanks so much for giving it a try!
I’m always suspect when I hear somebody say they make something the best, but lady, you earned it! The directions were very easy to follow, the ratios were on point with the measurements being in weight, and oh my gosh, this swirls just make it look like you bought it at a bakery. I had to substitute half-and-half because I didn’t have any milk and it was absolutely fine.
Hooray, Heidi! I am so happy you love the bread! I work really hard to write instructions as plainly and accurately as possible so no one ends up with a wonky result! Enjoy every bite!
I have made this twice exactly as written, and the family loves it. I’ve made French toast, bread pudding and as a guilty pleasure, Peanut butter sandwiches from this bread. It a great recipe. This time around I used browned butter, raisins, and rehydrated blueberries in the dough, for the filling, I used half and half sugar(brown/white), and cinnamon chips. I got the chips from a bakery I formally worked at. Nothing wrong with the original recipe, I just like to experiment. Love the work. Keep it up
Hey, Nathan! I am so happy you love the recipe and even more happy that you’re making it your own! Your version sounds fantastic, and I expect you’ll be switching it up each time you make it. I think dried apples and toasted walnuts with apple pie spice would be a winner. Enjoy every iteration!
I’ve made this twice and it’s just excellent. A change I made was using half dark brown sugar and half white sugar in the filling, because we love brown sugar. This time the dough seemed a little wet, must be something I
did, but it’s very humid in Oklahoma this time of year, but it still made a lovely loaf. Thank you for your website and the recipes and suggestions.
Connie, hi! I’m so glad you like the bread! I love the half brown sugar in the filling substitution. Would definitely make for deeper flavor. As to the stickiness, is this loaf the first time you’ve used the brown sugar and it was sticky? If so, my guess is, since the brown sugar is more hygroscopic than white sugar, it pulled in additional moisture resulting in stickier dough. One benefit of having a stickier (wetter) dough is you’ll usually get an even better rise. As long as the dough wasn’t a serious pain to work with, I wouldn’t make any changes. Enjoy!
I loved this bread recipe and had to make myself stop before eating too many slices! The loaf’s 2nd rise was shorter. After baking, the top appeared to deflate, and I thought it was overproofed and ruined, but not so. The swirls were perfect, and the only delamination was the crust, but the bread was otherwise perfect. This will be my go-to bread recipe from now on.
Thank you!
This is one of my favorite breads on the site, Lana! So glad you’re a fan, too! I keep trying to get folks to use it to make a grilled cheese. I hope I finally succeed with you and that you let me know what you think!
Hi Jennifer- I made this yesterday and the taste was amazing. The bread was a bit dense and I’m not sure why. First rise was great but not so much for the second one.
I will definitely make this again.
Thanks,
Sean
Hey Sean! Glad you like the bread. Sometimes the rise just takes longer, so let it go until it looks right to your eye rather than using time guidelines. I hope that helps for next time!
The best cinnamon raisin bread I’ve ever eaten. I’m fairly new to baking bread and this recipe came out spectacularly. The video is very helpful so be sure to watch it. I have my 4th loaf in the past month rising right now! Thanks for this recipe.
Hey, Paula, I am so happy you love the bread and that you’re making it regularly! Try it sometime with chocolate chips and/or dried cherries for a bit of a different spin!
This bread is so delicious. I followed the recipe exactly, I weighed the necessary ingredients as most bakers recommend, and it came out just like the photo. I was a bit afraid when I started to knead the raisins into the dough, the dough seemed too wet but I did resist adding more flour as was warned in the notes. I might try to make the “paste” next time with the milk and flour mix before rolling. It reminds me of the bakery bread from my neighborhood as a kid. So worth all the little steps.
Debi, I am so glad you enjoyed the bread! I love it so much! I may rewrite it to just use the paste version, because sometimes, if you don’t get the milk and the dry spread out evenly, there could still be a little delamination. And no one wants that! 🙂
What is the “paste” way?
I need to go check and make sure I make this clear. If you mix the flour/sugar/spice mixture with the milk to make a paste rather than just brushing milk onto the dough and then sprinkling the dry over it. I hope that makes sense. Enjoy!
Excellent recipe. I doubled it for my Ooni spiral mixer and made two loaves. Everything came out as expected. Thank you.
So glad you enjoyed it, TJ!
In the shape and bake, you have 2 tablespoons of butter where does that fit in?
Hi, Kathy! The last instruction in the recipe specifies to melt the butter and brush it onto the finished loaf once it comes out of the oven. Enjoy the bread!
just made this yesterday and enjoying toast today. I used some seed bread flour because I bought in error. turns out. no error. tastes delicious and everyone is shocked lol!!!! thanks for the share. Will make again.
I love it when an unplanned sub works out beautifully, Tanja! So glad you’re enjoying the bread!
16 oz bread flour 454 grams or about 3 1/2 cups– witch one is it 16 oz is not 3 1/2 cups
Lizabeth, hi. 16 oz is 1 pound is 454 grams. Flour weighs anywhere between 4-5 oz per cup depending on how you fill the cup. A scale will be your most accurate way of measuring. If you don’t have a scale, 3 1/2 cups is my best guesstimate for you. A cup is 8 oz only for water, whole milk, and whole eggs. Particulate ingredients, such as flour that can pack down, weigh much less per ounce of volume than water.
I made this for the first time and it was perfect! Is there a time in one of the rises that I can refrigerate the dough? If so, when? And what would the instructions be? Thank you!
So glad you love it, Katie! Yes, there are two times you can press pause. Directly after mixing and kneading the dough, you can put it back in the bowl, spray it with pan spray, cover and let chill in the fridge overnight. Shape from cold, allowing a little extra time for the second rise. You’re still looking for about 1″ over the top of the pan at the highest point. The other time would be directly after shaping and putting it in the pan. Then you can spray it, cover it and refrigerate it overnight. If, after refrigeration, it is 1″ above the rim of the pan, let it temper on the counter for about 30 minutes and then bake. If not, let it rise in a cozy place until you hit the 1″ benchmark, and then bake.
Making this for the first time today, recipe was very clear and easy to follow. Thank you! My question is – my dough came out sticky. I followed the recipe to the T, using the weights and not just the measurements. Any guesses to what I may have done wrong? Also screwed up and did t realize my yeast wasn’t instant lol but it’s rising so that’s a good thing for me haha since it’s for Easter dinner tomorrow.
Hey, Kathy! I don’t think you have anything to worry about. Your flour may have absorbed a bit more moisture than mine resulting in slight stickiness. When I work with sticky dough, I just oil up my hands and call it a day. I expect your bread will be magical! Enjoy! And hi estly, instant yeast vs active dry is not a deal breaker at all. Some folks like to proof it first, but if it’s rising as advertised, it’s all good! Happy Easter, and enjoy the bread!
Hi! Can i freeze the dough? Thanks.
Hey, Kari. Yes, you can freeze it if you’d like. I’d up the yeast by maybe a gram or 2 to make up for any who don’t make it out of the freezer. I’d make it to the point of shaping it into the swirled loaf, wrapping it very well–pan and all–and freezing it. Let the dough come to room temperature and rise to peek above the rim of the pan by about an inch before baking. I wouldn’t freeze it for longer than a couple of weeks. If you just need to buy yourself a day, after making the dough, gather it into a ball, put it in an oiled bowl, brush on (or spray on) a thin coat of oil, cover and give it its first rise overnight in the fridge. The next day, take it out and proceed with the recipe. Either way, I hope you enjoy it. Please reach out if you have any other questions. 🙂
Perfect! I just made my second loaf of this bread! It’s delicious and turns out great. I mixed the milk with the swirl ingredients into a thick batter and it was excellent! No delamination and so many beautiful swirls. I definitely want to try the chocolate version and will be making this often!
Such a smart idea to mix the swirl ingredients into a batter. Excellent! I’m so glad you like the bread. I’m really proud of the recipe and am so happy when folks make it and have excellent results! Thanks for letting me know, Sarah!
Would I need to change any steps if I use active dry yeast instead of instant?
If your yeast is new and you are certain it’s active, you can proceed as written. If you want “proof” it’s alive, you can dissolve it in a portion of the milk–maybe 4 oz–and once it’s bubbling, add it in and proceed as written. Enjoy!
Hi, why are we separating the yeast from the warm milk? I always add my salt after I start mixing the dough anyway. Won’t that cause the bread not to rise?
The bread will rise just fine either way. I like to separate the salt from the yeast, so either adding yeast first and then salt on top of flour, or vice versa. This is a very forgiving dough and is made with the straight dough method–everything in at the same time. If you prefer to add your salt once you’ve started mixing because that’s what you’re used to doing, go for it! Always more than one way to skin a cat or make bread. 🙂 Enjoy!
Can I use all purpose flour?
You can, yes. You may need to reduce the liquid by just a smidge. Maybe a Tablespoon or two. Your bread will be a bit less chewy but it will still be delicious! Thanks for the question, Antoinette. Enjoy the bread!
Thanks!
My pleasure, Antoinette! Enjoy!
Can this recipe be doubled ?
Hey there! Yes, as long as your mixer can handle the load, you can double the recipe with no problem. Do use a scale so your measurements are as accurate as possible. Enjoy!
Can I make the dough in the bread machine for the mixing and kneading portion?
Hey, Marshall! I’ve never done that, but I expect you’ll be fine as Li g as the machine will accept the amount of dough. Then roll out, add the swirl, roll it up, let it do it’s second rise, then bake. Enjoy!
Oh Gosh this was So Good!
I Haven’t made raisin bread in Decades but we have our own grapes and I have accumulated So many raisins. Anyway I made this for the first time today for our breakfasts. But after waiting until it cooled (Hard to do !) I decided that an afternoon snack was in order. Cue the teapot !
What a dream ! Thank you so much for such a stellar recipe.
I am so glad you enjoyed it, and I can never stop at one slice, or even two, either! Also, I think it is very cool that you used “homegrown raisins!” I appreciate your taking the time to leave a review!
I thought 2 tsp salt was too much so I reduced to 1 tsp. I doubled the yeast which was not the amount in one 7 gram packet. 7 grams yeast is about 2 1/4 tsp.
I’ve made this at least 6 times now. Sometimes I add some freshly grated orange zest, about 1 or 2 tsps.
Everyone is Nutz for it. Except youngest granddaughter. She picked out every raisin !
I’ll have to try one of the alternative fruits next time I make for her.
If you’re using table salt, 2 reasons is definitely too much, so I’m glad you modified it to your taste. There is always 1 raisin hater in the group. lol Maybe they’d like Craisins, snipped dried apricots, or dried cherries instead?
Hello! Did you ever try the spreadable swirl filling with the mix and swril mix combined?
Hey, Simone. I’m not sure I know what you mean. You can absolutely mix milk into the swirl ingredients to make a thin-ish paste and spread that on the dough as an alternative to brushing with milk and the sprinkling on the swirl. Hope that helps!
At the end of the recipe you said you had not tried doing it this way and that you would update on whether or not it eliminated the delamination.
Hi, Alex. I haven’t, but someone else who made it did and it worked out just fine. I encourage you to give it a try if you prefer thatetgod. As long as your paste is thin enough in consistency to spread but not watery–think pancake batter c8nsistency, it should work out nicely for you. And yes, when I do try it that way, I’ll update. When you try it, I’d love to hear your results.
can you use a whole wheat flour? or a 50/50 blend with bread flour?
Hey,Danny. I’ve not tested it with whole wheat, but you could probably go 50/50 with no problem. It will probably need a bit more liquid than called for. Enjoy
Can someone tell me what size bread pan? I have lots and not sure what size to use.
Hi, Erin! In the post itself, I specify a 9″x5″ pan. I will update the recipe card to reflect the same. Enjoy the bread!
I can’t wait to try this…I am curious, could I use an egg wash to hold the swirl when I spread it out? I wonder if that would not separate?
Yes you can. Egg is a great glue. If you want, you can mix it all up as a paste woth the cinnamon and sugar. I didn’t go the egg route this time, because I wanter to keep the recipe egg-free. It will work great, though!
Greatest cinnamon bread ever. This is the first review I’ve ever written and it’s because I didn’t need to change anything at all. It made a crunchy crust, the swirl was reminiscent of Cinnabon, and it was chock full of raisins and flavor.
I am so so happy you love it, Jamie!! Yay! And I really appreciate your letting me know–it means a lot!
Can I add xtr raisins into the swirl?
Hey, Kathy. It’s a good question. I would not add extra raisins to the swirl, mainly because you will run the risk of the swirls delaminating around those raisins. And then the bread won’t work as well for sandwiches or toast with jam. You could probably get away with adding 10-15% more raisins in the dough, though!
Holy cow! This is the best cinnamon raisin bread I have ever made! What a great recipe and you don’t need to add any other ingredients. Just perfect!
Oh, yay, Bill! I’m so glad you like it! I worked hard to make it perfect, but not everyone has the same “perfect” for everything. So happy this recipe checked all your cinnamon raisin bread boxes!
I have never made a cinnamon raisin bread before, I followed all the directions, it rose beautifully, and looked so good when I cut it.
I had several slices then made french toast with some, the rest I sliced and froze, I will positively make again.
Wish I could send a picture of how beautiful it looked.
Alice, I’m so happy you love the bread and strongly approve of using some for making French toast! I’d love to see it. If you’d like, you can email a photo to [email protected] Take care, and enjoy the bread!
Love it!! Used sourdough starter for the yeast and doubled your sugar and salt when I should have tripled ♀️ and it’s still great!! But yes, needs more sugar…
Also, is half whole wheat. But I always soak my whole wheat in hottish water while I wait for the starter to double. My loaves are not your typical sourdough, they are just sourdough-starter-raised.
AND!!! LOVE THAT THERE’S NO SEPARATION!!! THANK YOU!!! I have a pic but I don’t know how to post it here.
I’d love to see your bread! You can email me a pic to [email protected] 🙂 I can’t imagine tripling the sugar, so I’m really glad you know how much you need to make your perfect loaf, Laurel! And it really is magical when you can cut a thin slice and it stays together. Enjoy every bite!
I forgot to say I had to triple everything because I was making three loaves. 😀 The other two I did not make into cinnamon-raisin bread. 🙂
Gotcha! Lots of bread for you!
This turned out amazing and I’ve never made bread before. I will say I am so thankful that you said your bread might take longer and I’m glad I didn’t take it out at 45 minutes and checked temp, it took a little over a hour. I don’t leave comments on recipes usually but this was too good to not too. I made a cream cheese dip and cinnamon sugar butter to go along with it!
Pamela!! Wow, I’m so impressed that your first bread was a cinnamon swirl and that it turned out so great! Thank you so much for leaving a rating and review, too. It helps Google–and other people–know it’s a good recipe! Also, yay for having an instant read–it can save a lot of heartache when guessing doneness. I love the cream cheese dip/cinnamon sugar butters to go with. Sounds fabulous!
Can you double this recipe to make 2 loafs at once?
Hey, Kourtney. Yes, you can double it with no problem as long as your mixer can handle the volume (or you have the arm power to knead a double batch). Hope you enjoy it!
I baked this today, adding some diced apple along with the raisins. The bread turned out perfectly. I especially like that the slices don’t separate along the swirl.
Oh, wow, I bet the apple is a great addition! And that has always been my issue with swirl breads–their propensity to “uncoil” when sliced. It’s fine for cinnamon rolls, but not so much for sliced bread. So glad you enjoyed it, Beth! xo
Can i use bread machine to make dough? thank you
Hey, Linda. I have never used a bread machine, but I imagine you’d be able to make the dough and do the first rise in a bread machine and then adding the swirl and shaping the loaf by hand. But I can’t swear to it since I’ve never done it. If it works out, please let me know and I can let folks know they can at least start the bread in a machine. I hope it works, because the bread is delicious!
Made this today….came out great and the house smelled wonderful on a chilly day
I’m so happy you’re enjoying it, Jeannie! Thanks for letting me know. Enjoy every bite!
I’ve been looking for the perfect raisin bread recipe with plenty of raisins. From your recipe and the amount of raisins along with the rave reviews, I know I’ve found the recipe I’m looking forward. Going to make it tomorrow!!!
I really hope you love it! Please let me know what you think. And definitely make a grilled cheese using it. Best grilled cheese ever! 🙂
Can this be made ahead and baked in the morning?
Hey, Karen! Yes, you can shape afyer the first rise, cover and refrigerate. Let it sit out the next day until it gets puffy and then bake. Or bake well ahead and the wrap it well and freeze for when you need it. Enjoy!
This bread is incredibly good. It does not fall apart. It is moist and sweet and I can’t wait to make it again. But I think there is a typo in the instructions. The milk instructions say 10.5 ounces (or 1 1/2 cups plus a TBS). But 10.5 ounces is 1 1/3 cups. I panicked when I was making this because I did not know which number to trust. I stuck with 10.5 ounces and ignored the 1 1/2 cups plus TBS. It came out perfect. Thanks for this recipe!
So glad you love the bread, Linda! And good catch on that amount–I will fix it! It should say 1 1/4 cups plus 1 Tablespoon.
Honestly, this was a rather different recipe compared to other cinnamon rasin breads I’ve made but I stuck with it since I had started it. Followed the recipie and instructions to a T, first rise the dough seemed very dry but I continued, second rise was over the time suggested in a warm environment and barely rose. Bread didnt cook all the way through so the center was raw after the 45 minutes and full rest time and the outer that was cooked was barely sweet and quite flavorless. Will definitely try a different recipie next time.
I’m very sorry this recipe didn’t work out for you. Many people have rated it 5 stars and love it, so it is possible that your yeast was dead. That would be my first thought, especially since your bread didn’t rise. I also wonder if you weighed or scooped your flour. This is a very supple dough and is not dry at all, so you could have used too much flour and/or not enough water. Happy to help you troubleshoot if you tell me exactly the measurements you used. Feel free to email me at [email protected] Thanks!
The most delicious cinnamon raisin bread ever
Suzanne, yay! I’m so happy you love it. Enjoy every bite!
I am probably wrong … however am asking this question anyway. The ratio of liquid to dry (1 1/2 c milk to 2c flour ) high?. ( would that not yield a batter like consistency?even in the summer)
Hi, Kim,
8 oz per cup is only for water-type liquids. Flour weighs in at around 4-4.5 oz per cup, so you’ll need 4-ish cups of flour. I can’t be more accurate than that since most people measure out their cups in different ways which affects the weight. Your baking will always be more accurate if you use weights, so you’ll need 1 pound of flour. I have updated the recipe to reflect the approximate number of cups of bread flour. Enjoy!
Wow!! This bread was absolutely delicious!! I had to sub “country crock vegan plant cream” for the whole milk because I was out. This recipe can easily be made vegan if someone wanted/needed. I will definitely be making this again! Thanks for the recipe!
So glad you love the bread, Alicia! It’s also good to know that your sub worked so well. Thanks for letting me know!
I wish I could leave a 10☆ rating… this was even better than I’ve ever bought!
The only thing I did differently was added a 1/2 Tbsp of Melipone Mexican Vanilla (I love vanilla & cinnamon ). I also did all the steps by hand, I don’t own a stand mixer. It was a nice workout ! I can’t thank you enough for sharing this recipe with us. I’ve tried a few before but none compared to the slice I just tried! THANKS SO MUCH!!!
Nicki, I am thrilled you are enjoying the bread! And I fully support the addition of vanilla. I bet it smelled *amazing* while baking! It’s my pleasure to bring you guys recipes that work!
I have made hundreds of different raisin bread recipes (my husbands favorite) and we agree this is the best! I did the paste method for the filling and was nice and soft not gritty like it’s been in past breads Also no holes!! May add a pinch of vanilla next time but otherwise perfect!
So glad you found my recipe, Missy! Happy you’re a fan. I fully support the addition of some vanilla, too!
I’ve made this bread 3 times now, and it is a beautiful, consistent recipe. Due to the lack of eggs this prices out to significantly less than a store-bought loaf, especially because it makes a larger quantity of bread. More than that, it tastes infinitely better. A slice of this toasted with peanut butter is my favorite breakfast.
Shannon, I am thrilled you love the bread, and thank you so much for taking the time to review the recipe. I truly appreciate your taking the time. Now I need to make more so I can try it with peanut butter!
Quick question…. No where in the recipe does it mention if you can use a quick rise yeast… has anyone tried this?
Hey, Carol! I’ve never used anything labeled rapid-rise yeast, but I routinely use instant yeast in my bread recipes. Active dry works well, also. Hope that helps, and I really hope you enjoy the bread!
I was wondering the same. Do you not have to activate the yeast before hand in the milk?
If using instant yeast, you can add everything together as described in the post and recipe. If using active dry yeast and you know it’s fresh, you can most likely do the same. If you prefer to proof it, you can do so in a portion of the liquid from the recipe, adding that back to the bowl once foamy. These days, most yeast is so standardized that proofing is not strictly necessary. My preferred yeast is SAF Instant Yeast, but any will do as long as it hasn’t been sitting around for a long time. I hope you enjoy the bread, Darla!
Delious moist bread, I would add more cinnamon if you love cinnamon, I will make it again!
Glad you enjoyed it, Tee!
This is by far, the BEST raisin bread I have ever made!!
Your directions seemed lengthy, but by the time I made the first loaf, I breezed through the prep of the second.
This is definitely a keeper!
Christine, I’m so pleased you enjoyed it!
I made this for a friend and sliced it to package for freezing. That left me with the heels for myself. I am beyond happy with the results! The texture is absolutely wonderful and the flavor is spot on, not overwhelming with spices. It has the right amount of raisins, rose beautifully and the milk for the swirl was genius. Thank you so so much!
Oh, Carol, yay! You’ll have to make another loaf just for yourself, and don’t forget to cut some thick for French toast, too! So pleased you love it!
This is a soft and lofty aromatic loaf of cinnamon bread. Sent some to work with spouse and received requests to make a couple more loaves. Comes together easily and turns out beautifully.
I am so happy they enjoyed it and that you loved working with the dough, Kathi. I think I probably need to make another loaf or two for myself!
This is delicious! Followed the recipe exactly and the dough is lovely to work with. Made a loaf Saturday, toasted some Sunday for breakfast, now on Monday have another loaf rising. May be obsessed a little. Thanks for a great recipe
I am thrilled you love it! I appreciate the review, too. 🙂 Have you tried it in a grilled cheese yet? That might be my favorite way to eat it. And I, too, am a little obsessed! lol
Great recipe. Easy to follow instructions. There aren’t many recipes for good cinnamon swirl bread. Came out tasting like it came from the bakery. Great as is, or toasted. Would also make great French toast. You could use the same recipe for other flavors as well. Apple cinnamon swirl, chocolate swirl, pumpkin. So many possibilities.
So glad it bakes up into a loaf to be proud of! Glad you love it, and than you so much for taking the time to leave a review, Pam!
Jenni has done it again, a loaf full of raisins and cinnamon goodness. I have a feeling it won’t last for long. The smell as it was baking was amazing, the 45 minute weight seemed to last forever.
*You* did that, Jane! I am *so* happy you love it!
OMG! How did you know that raisin bread is my most favorite bread in the whole world?! Either slathered with butter or cream cheese. Already made a loaf to enjoy this weekend and might even make some French toast with it too. Thanks for a great recipe!
I guess I’m just psychic! Enjoy every bite of that bread! ❤️
This is a stunning loaf. I can think of so many ways to enjoy it!
Thank you so much! Believe me, I’ve tried it a bunch of ways, and I’ve not found a single wrong way yet! 🙂
Oh, Jenni! Now you’ve done it! This is by far my most favoritest bread in the whole wide world! I positively adore cinnamon raisin bread. Thank you for making this easy to follow recipe so I can have this deliciousness any time I want it!
I can’t wait for you (and Lily) to make it! It only makes 1 loaf, so y’all will have to fight over it! lol