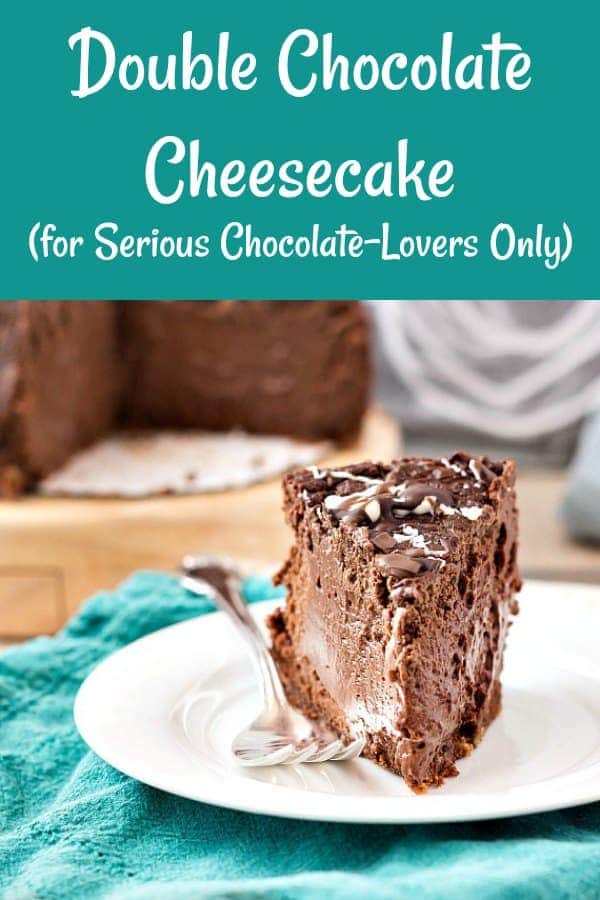
Chocolate lovers, this double chocolate cheesecake recipe is for you. For some reason, chocolate cheesecake has the reputation of being an old-fashioned dessert, and not in a good way. More like stuck in the 80’s.
I’m here to bring chocolate cheesecake back, because it is rich, creamy, super chocolatey, and with the sleek, abstract chocolate decorations instead of poofy whipped topping, this decadent cheesecake is more than ready for the 21st century!
Another delicious cheesecake to try is my Nutella cheesecake. For ease of browsing, you can see all my cheesecake recipes in one place. Thanks so much for visiting!
Pastry Chef Online Participates in Affiliate Programs. If you make a purchase through one of my links, I may earn a small commission. For more information click to read my disclosure policy
Double Chocolate Cheesecake, At a Glance
✅Skill Level: Beginner/Intermediate
✅Skills: Making a Crumb Crust, Softening, Baking in a Water Bath
✅Type: Cheesecake
✅Number of Ingredients: 2 in the crust, 8 in the batter
✅Prep Time: 30 minutes
✅Cook Time: 45 minutes
✅Chill Time: 6 hours
✅Yield: 8 slices
Jump Straight to the Recipe
This cheesecake is so unbelievably delicious that my niece has commanded that I make it for her wedding. This is the perfect special occasion major treat – it takes a while to make, and it is entirely worth the effort. I was a baker but had never previously made cheesecake. If you do exactly what the recipe says to do, you will have a wonderful dessert.
Reader Diya
Chocolate Cheesecake Gets a Bad Rap
I don’t know how chocolate cheesecake got the reputation of being stuck in the 80s or 90s. Sure, it was really popular then, but why shouldn’t it still be popular today?
While some preferences in the 80s and 90s were…questionable and best left back in the decades that celebrated neon excess, there is no reason why we shouldn’t make a place in our hearts and our kitchens for chocolate cheesecake now.
Sure, it’s a bit excessive, but it’s also delicious.
Why You Should Make This Double Chocolate Cheesecake
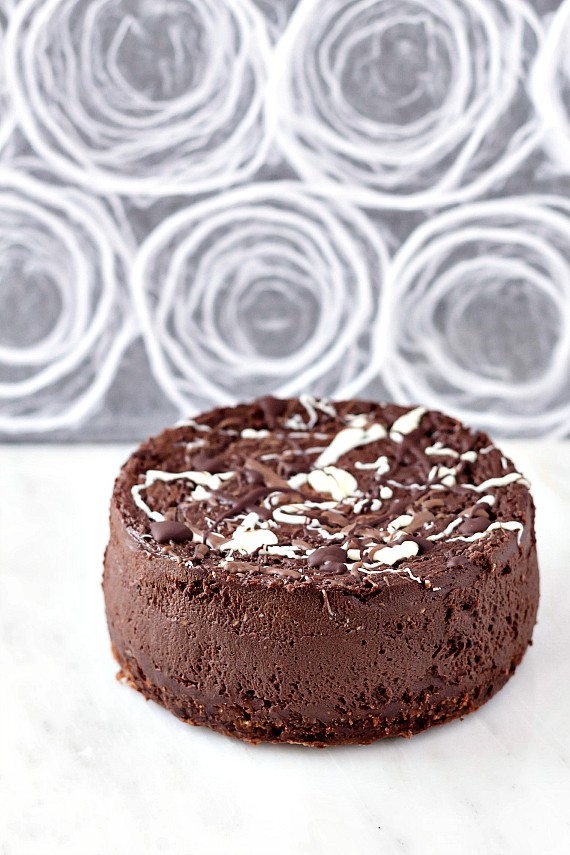
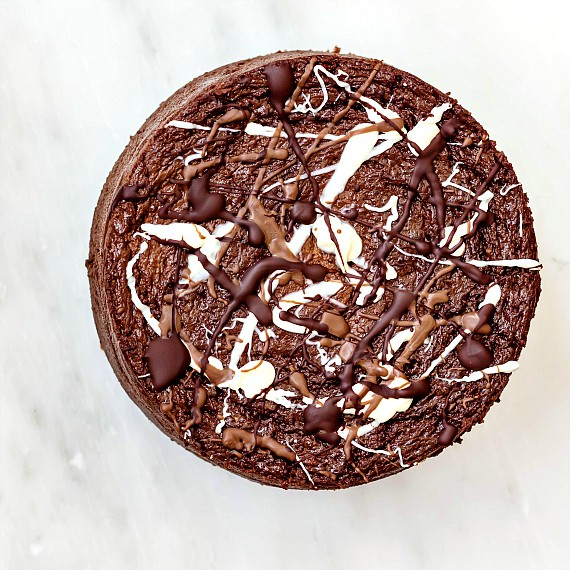
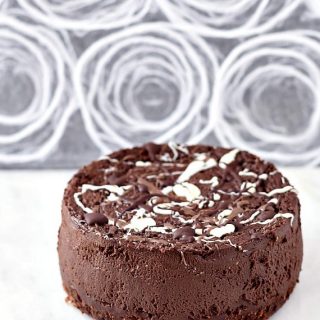
To help pull chocolate cheesecake out of the over the top 80s and 90s, lose the poofy whipped cream trim and the riot of chocolate curls and ganache oozing down the sides and the pile of mini Reese’s cups in the center.
Chocolate cheesecake doesn’t need all of that embellishment. Embellishment is often redirection from a boring recipe. Chocolate cheesecake is far from boring, so let it shine.
A thin chocolate crumb crust is really all it needs.
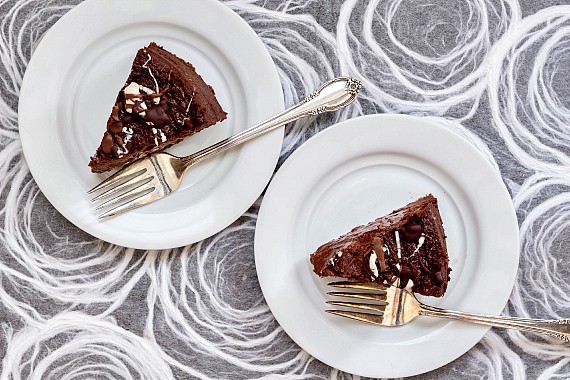
I did channel my inner Jackson Pollack with some splatters on the top of my cake in dark, milk and white chocolate. I think it looks pretty sleek and awesome.
More reasons to love this chocolate cheesecake recipe:
- Sweetened with brown sugar for deeper flavor
- Two kinds of chocolate (cocoa powder and dark chocolate) deepened even more with some espresso powder
- Simple and elegant chocolate-spattered top
If this sounds like a winner to you and you make it, I have a favor to ask:
When you do make this recipe, it will help me and other readers if you:
✅Rate the recipes using the stars in the recipe card
✅Leave a review when prompted in the recipe card (If it’s a positive review, and I hope it is, I’ll use it in the post as social proof)
✅Leave a comment on the post
Thank you so much!
Wonderfully easy recipe to make and a proven winner of a dessert. I substituted the sour cream for greek yoghurt to make it slightly less fatty and it worked out superbly. I highly recommend it.
Reader Kenny
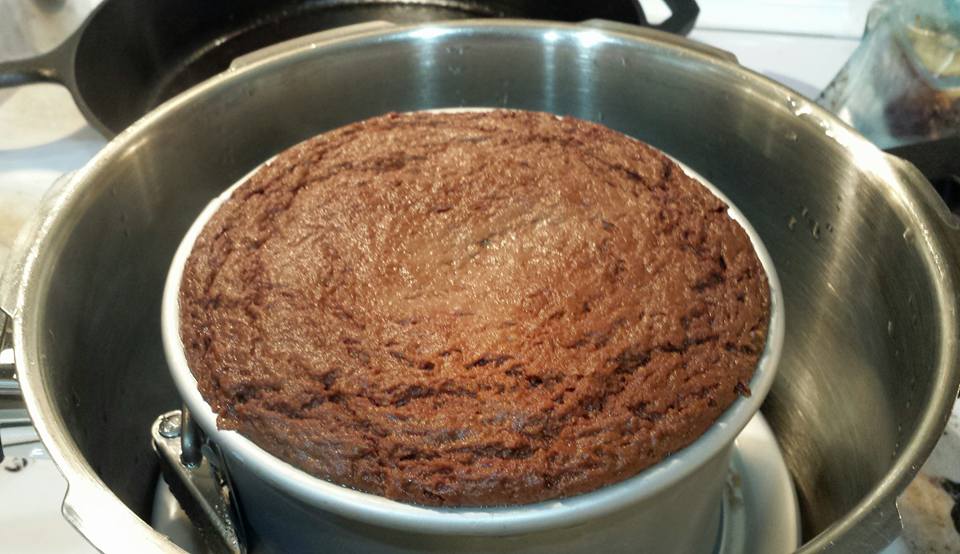
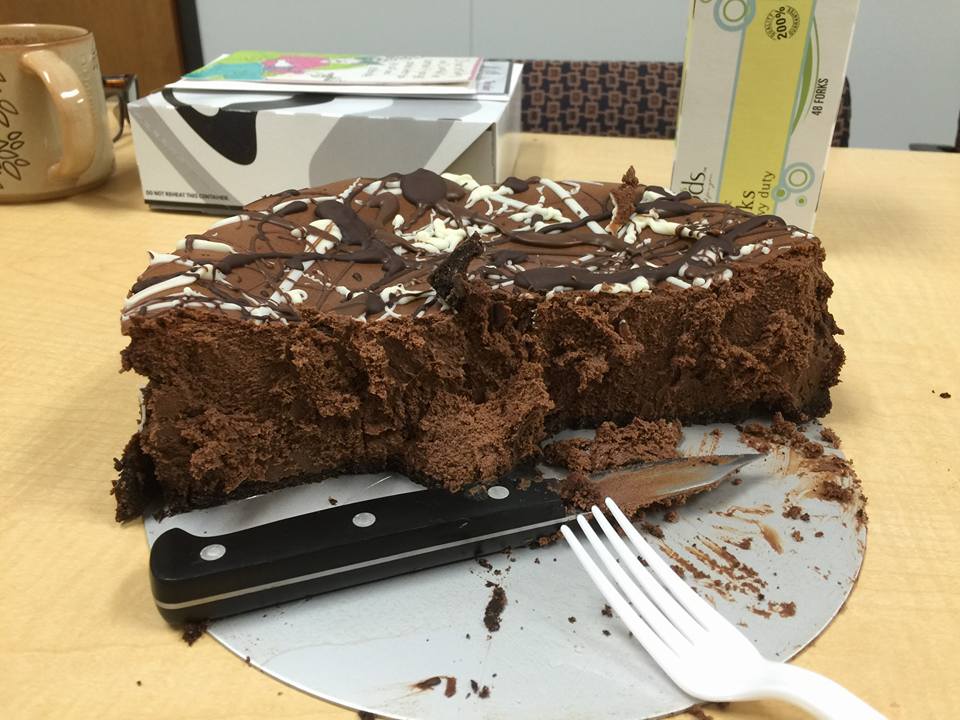
My first round for the double chocolate cheesecake was a 9″ number for a neighbor’s office birthday party.
It was so good that I decided I needed to make it again, but in a 6″ version. You know, for moderation.
Besides, I wanted to test out baking it in my pressure cooker.
The idea of cooking a cheesecake in a pressure cooker had come up on Facebook, and I thought it’d be fun to give it a shot.
I mean, it makes sense to have a cheesecake bake in a very moist, 250F environment. No way it could crack, right?
How to Make It
Ingredients and Substitutions
If you already know how to make cheesecake, feel free to skip on down to the recipe.
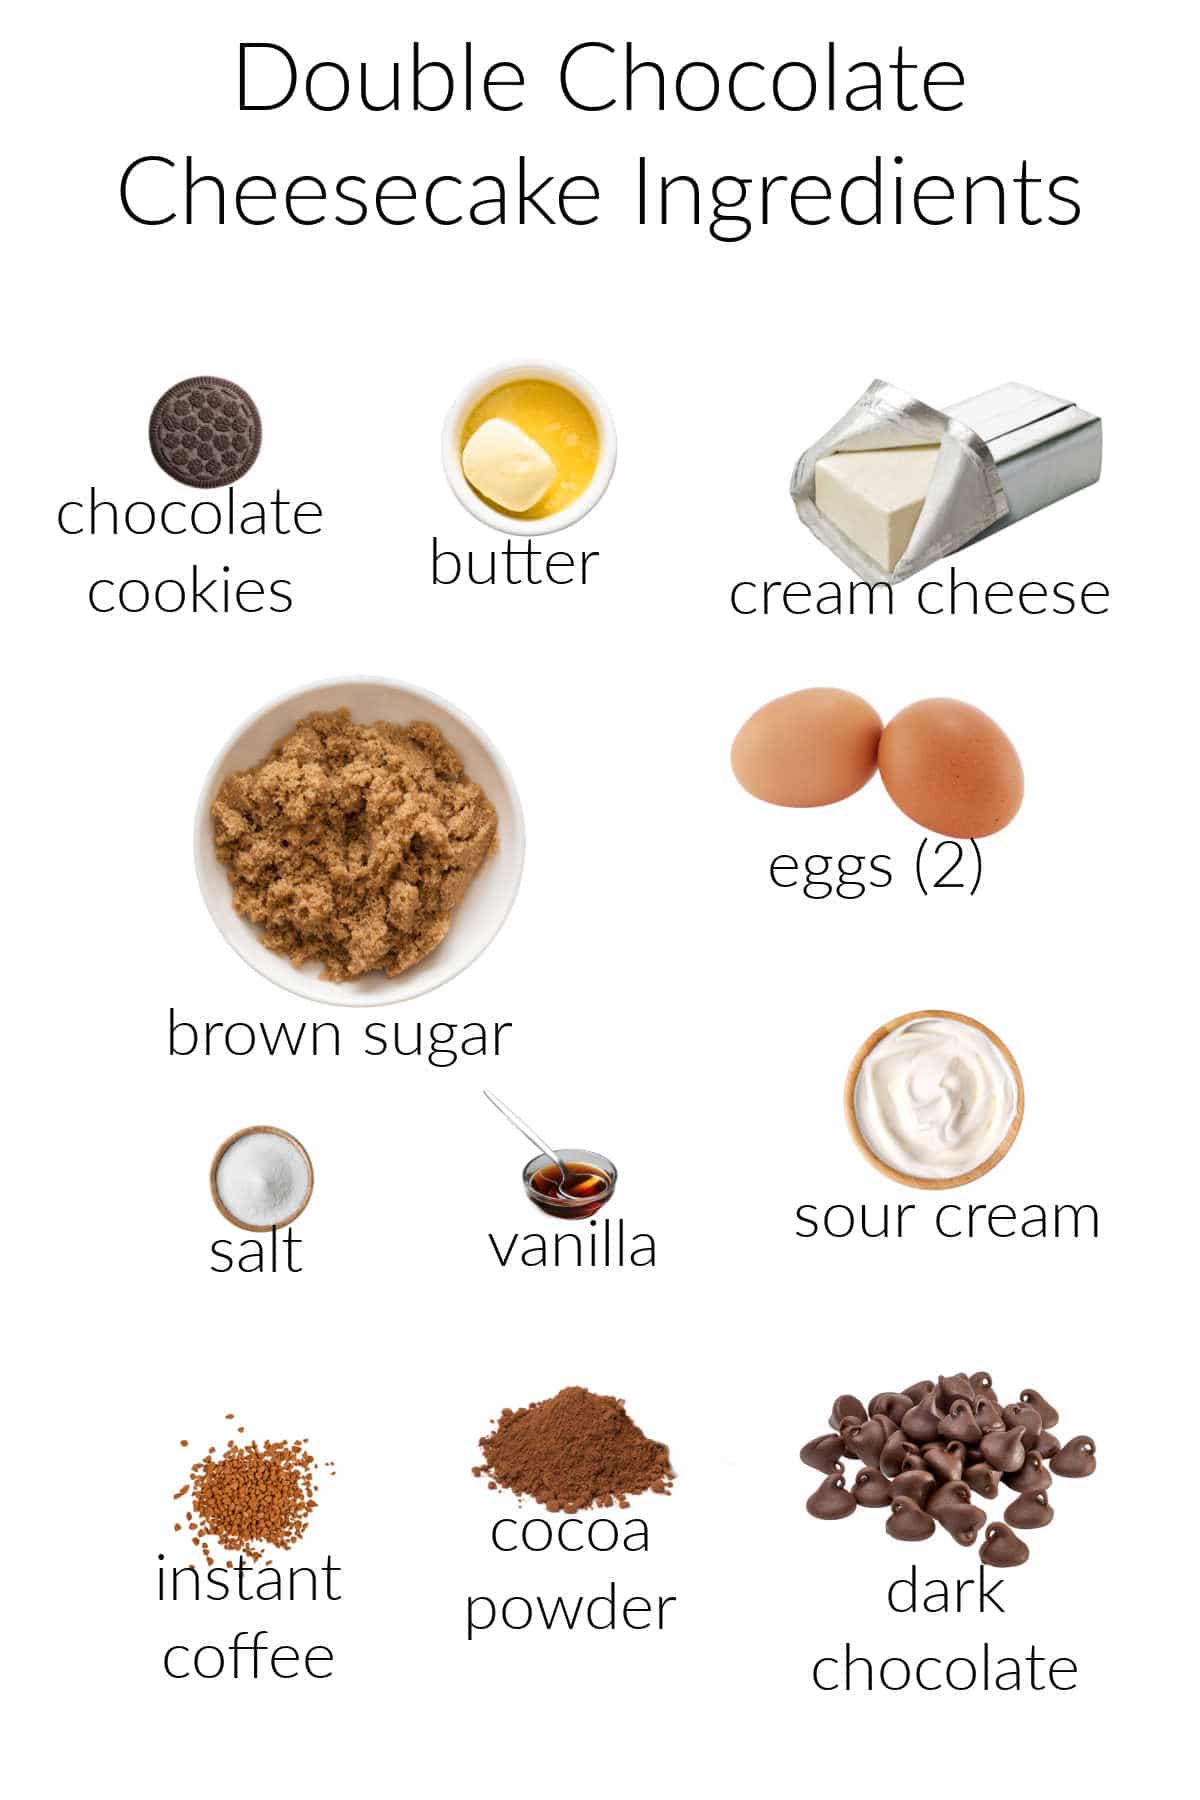
- Chocolate cookies: You can use chocolate sable or store-bought chocolate sandwich cookies. If you prefer, use Graham crackers or vanilla wafers instead
- Butter: Helps the crust bake and hold together. You can substitute coconut oil if you’d like
- Cream cheese: Use full-fat cream cheese in blocks, not from a tub. You could use neufchatel cheese, but since it’s softer, I’d consider adding an extra egg for structure
- Brown sugar: Adds sweetness, and the molasses in the brown sugar deepens the flavor just a bit. Use granulated sugar or coconut sugar as substitutes
- Eggs: For richness and structure. Mainly used for their setting power. You’ll need 2 large eggs
- Salt: Focuses all the flavors and counteracts any bitterness from the cocoa and coffee
- Vanilla: Rounds out the flavors. Not strictly necessary, but if you have some vanilla extract, go ahead and use it.
- Sour cream: Makes the batter a little more “liquid,” keeping it lighter and less dense. You can substitute Greek yogurt, regular plain yogurt, buttermilk, or whole milk.
- Instant coffee: Deepens the coffee flavor. Use instant coffee or espresso powder dissolved in a tiny bit of water, or use coffee extract if you have it
- Cocoa powder: Provides deep chocolate flavor
- Dark chocolate: Provides the rest of the chocolate flavor along with some fats and emulsifiers for structure. Use bittersweet or semi-sweet chocolate chips or a chopped chocolate bar.
Procedure
Here’s how to make the cheesecake:
- Make the crumb crust and press it into the pan.
- Make the batter:
- Mix cream cheese until smooth
- Mix in sugar, salt, and vanilla
- Add eggs, 1 at a time
- Add instant coffe mixture or coffee extract
- Mix cocoa powder into sour cream and then add to batter
- Melt and cool the chocolate and add to the batter
- Pour the batter into the pan
- Bake in a water bath in the oven or in your pressure cooker
NOTE: Both methods are explained fully in the recipe card.
Pro Tip
Always mix cheesecake batter on low speed and make sure your ingredients are all at room temperature.
This will ensure your ingredients mix together easily without lumps and that you don’t whip air into the batter, causing the cake to rise and then fall.
Pressure Cooker Cheesecake Troubleshooting
While my guy didn’t crack, his top was sort of craggy.
I was a bit dismayed since I wanted a smooth top, and my conventionally baked cheesecakes all have a beautiful, smooth, flat (or at least flattish) top for optimal Jackson Pollacking.
Would you like to save this post?
I posted a photo of this guy right out of the pressure cooker, and friends weighed in.
- Covered pan versus uncovered pan.
- High pressure versus low pressure.
- Ratio of sugar to fat. This last from Mark Scarbrough, one of the authors of The Great Big Pressure Cooker Book.
I was intrigued since I look at pressure cooking as just another cooking method as opposed to something I’d need to adapt all my recipes to use, you know?
But, upon reflection, it does stand to reason.
The moist environment is very different from the dry environment of the oven, and a pressure cooker’s locking mechanism doesn’t allow for evaporation, either from the cooking liquid or from the food itself, so one has to make allowances for that pretty crucial factor.
I summarily ordered my friends’ Mark and Bruce’s book, The Great Big Pressure Cooker Book, that I might learn more of the science of pressure cooking and how to adapt my recipes to that cooking method.
While I don’t love the look of the top of the cake, I Jackson Pollacked it up anyway and put it in the fridge to chill. Optimally, I’d chill it for at least four hours before cutting, but I’m impatient and was only able to wait one hour.
Can You Serve Cheesecake Warm?
Yes indeed.
You do want to make sure it’s not hot or you won’t be able to slice it.
In fact, your safest bet is to cool, chill, and then gently warm each slice in the microwave right before serving.
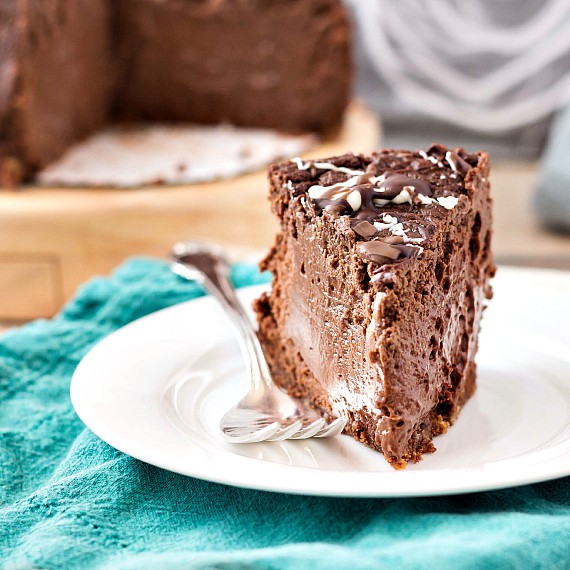
The interior texture was absolutely smooth and dreamy. Like pudding. If that’s your thing, I highly suggest you serve this cheesecake slightly warm, at about 90-100F in the center.
Worry not, though. After chilling overnight in the fridge, I sampled the cake again. Still smooth and dreamy, but firmer since it was completely chilled.
Just as delicious.

I’m providing the method for baking this cake in a conventional oven, but I’ll also add the how-to for baking it in a pressure cooker for those of you who don’t care that the formula isn’t perfected for that method. Just call it Old Rocky Top!
I mean to tell you, this is one fine cheesecake, and one I’ll be making again and again for special occasions.
Chocolate Cheesecake Q & A
Yes, use gluten-free cookies to make your crust. The rest of the recipe is gluten-free, as written.
Yes, store your cheesecake in the fridge, and make sure it’s well-covered so it doesn’t absorb any off-flavors from the fridge. You can refrigerate your cheesecake for up to 5 days. It may start to weep liquid just a bit after day 2-3, but it will still be fine to eat.
Yes, cheesecake freezes very well. You can freeze individual pieces or the whole cake. Make sure to wrap tightly in 2 layers of plastic wrap and some foil (or a zip-top freezer bag). Thaw overnight in the fridge before serving.
Don’t worry, I saved a piece for you guys, too.
Questions?
If you have any questions about this post or recipe, I am happy to help.
Simply leave a comment here and I will get back to you soon. I also invite you to ask questions in my Facebook group, Fearless Kitchen Fun.
If your question is more pressing, please feel free to email me. I should be back in touch ASAP, as long as I’m not asleep.
A Note About Measurements
My recipes are almost all written by weight, including liquids, unless otherwise specified.
For accuracy and consistency of results, I encourage you to buy–and use–a kitchen scale.
I promise that baking and cleanup will be so much quicker and easier.
This is the scale that I recommend for home use. I have owned and used one for years.
Love This Chocolate Cheesecake? Please Rate and Review. Thanks!
It helps me and other readers so much if you take a moment to rate and review this recipe.
Your star rating and comments help others decide whether the recipe is worth making, and your feedback helps me continue improving recipes here at Pastry Chef Online.
Other lovely ways to share include pinning or posting on your favorite social media platform.
Thank you so much for taking the time!

The Best Double Chocolate Cheesecake Recipe
Equipment
Ingredients
For the Crumb Crust
- 1 ½ cups cookie crumbs (chocolate, preferably. If you don’t have chocolate wafers or cookies, use graham crackers or vanilla wafers and add 1-1 1/2 Tablespoons cocoa powder)
- melted butter , about 4 Tablespoons
For the Cheesecake Batter
- 1 pound 2 8oz blocks cream cheese at room temperature
- 5 oz brown sugar , sifted to remove any lumps (about 2/3 cup, sifted and firmly packed)
- ¼ teaspoon fine sea salt
- 1 teaspoon vanilla paste or extract
- 2 large eggs at room temperature
- 1 ½ teaspoons instant coffee dissolved in 1 1/2 teaspoons water or use 2 teaspoons coffee extract if you have some.
- 2 oz sour cream , whipping cream or buttermilk at room temperature
- ½ oz 2 Tablespoons cocoa powder
- 6 oz bittersweet chocolate , melted and cooled to just warm (I used 60% cacao chocolate chips)
For the Decoration
- Feel free to do your own thing. If you want yours to look like mine , you’ll need about 1/2-1 oz each dark chocolate, milk chocolate and white chocolate, melted.
Instructions
For the Crust
- Spray a 6″ x 3″ springform pan with pan spray. Cut a parchment circle to fit in the bottom of the pan. If you don’t have a leak-proof pan, wrap the bottom and sides of the pan tightly in a double layer of heavy duty aluminum foil.
- Combine the cookie crumbs and the butter until the crumbs are evenly moistened but not greasy. They should hold together if you squeeze a bit.
- Press them evenly across the bottom and maybe 1/2″ up the sides of your prepared pan. You can bake it at 350F for 10 minutes, but I didn’t this time and it worked out just fine and saved me 10 minutes of oven time. Your choice.
- Set the pan aside.
For the Cheesecake Batter
- Preheat the oven to 325F. Place a large cake pan or roasting pan on the center rack. It should be large enough to hold the 6″ pan with about 2″ clearance all around.
- Put some water on to boil, maybe 2 quarts.
- Cream the cream cheese on low speed until completely smooth, scraping the bowl as necessary.
- Add the sugar, salt and vanilla and continue to cream on low speed until the batter is smooth. Scrape the bowl as necessary.
- Add one egg and mix completely into the batter. Don’t forget to scrape the bowl.
- Add the other egg and mix completely. You’re scraping the bowl, right?
- Add your homemade coffee extract (the instant coffee dissolved in water). If you own coffee extract, use 2 teaspoons of that instead.
- Whisk the sour cream and cocoa powder together thoroughly. It will look like it won’t want to mix, but keep at it. What you end up with will look like chocolate whipped cream.
- Add that mixture to the bowl and let it slowly incorporate. Scrape the bowl, people. All the way to the bottom.
- Pour in the lovely melted and cooled chocolate and mix just until incorporate. Scrape the bowl and stir by hand to make sure all the batter is chocolatey and delicious.
- Pour the batter into on top of the crust. It will come up to within about 1/2″ of the top of the pan.
To Bake
- Pull out the oven rack with the large pan on it.
- Place the filled pan in the larger pan and then carefully pour the boiling water in the larger pan, allowing the water to come about halfway up the sides of the pan. A little less isn’t a big deal, so don’t sweat it too much.
- Carefully push the rack back into position.
- Bake until the center of the cheesecake reads 155F-160F on an instant read thermometer. If you don’t have an instant read, bake until the edges of the cheesecake are firm but the center 2-3″ is still a bit jiggly. I can’t really give you a time for this, but I’d check it at 45 minutes and then go from there.
- Once your cake has hit the magical temperature, carefully remove it from the hot water bath–leave that bath right where it is until it cools off–and place it on a wire rack. After about 10 minutes, run a thin knife or spatula around the inside of the pan to make sure the cake hasn’t stuck anywhere. Allow to cool to room temperature, decorate as desired, and then chill until cold, at least 4 hours.
For the Decorations
- Melt each chocolate in a separate little dish.
- Using a spoon, fork, paintbrush or whatever, grab some of one chocolate and flick it onto the cake. Dribbles, dots, slashes, swirls–anything goes. Repeat with the other two chocolates. Admire your work.
- For best flavor, allow cake to temper on the counter for a good 1 1/2 hours before slicing.
Did You Make Any Changes?
Notes
Nutrition
Would you like to save this post?

Hi, y’all! I hope you’ve enjoyed this post and hopefully also learned a thing or two.
If you like my style, I invite you to sign up for my occasional newsletter, The Inbox Pastry Chef.
Expect updates on new and tasty recipes as well as a bit of behind-the-scenes action. I hope to see you there!

Thank you so much for spending some time with me today.
Enjoy the chocolate cheesecake, friends.
Take care, y’all.


Join in Today!
Follow this exactly ( I left out the coffee ) and it is simply delicious and as good as any French bakery. One of the best I have ever made or eaten. Oh my. And thank you! Try it!
Chocolate Cheesecake perfection, no doubt!
The CC is on its second round in the Instant pot. I’ve made 100s of cheesecakes, but never in the Instant Pot! I really wanted this to work so I can make while camping. There was no time mentioned, but another reader suggested 30/10 mins. Not only was it not cooked, at all, but there was water on top! I just set it for another 20/10. Fingers crossed!!
Cover it with a round of parchment to keep any condensation off the top of it. I will have to go back and remake to be sure of the time (oh darn! lol) Fortunately, you cannot overbake in an IP. You’re looking for an internal temp of 165F in the center, so if it’s at that temp, it’s ready and will firm up once it cools and then chills. I hope you enjoy it!
I ended up with another cooking round this time 33 mins, so 83 mins all up.
It is PERFECT! and, OMG it’s fabulous! My husband’s eye rolled back LOL
Thank you! I’ll try the parch. on top next time.
I am so glad you stuck with it–I guess I’m not surprised that it took that long. I think the temps only get up to 240 in an IP. BUT, that moist, low heat is magic for a cheesecake. My eyes rolled back when I made it, too! And thank you for letting me know the timing as well. But I’m still making it again. I want *my* eyes to roll back, too! lol 🙂
Wonderfully easy recipe to make and a proven winner of a dessert. I substituted the sour cream for greek yoghurt to make it slightly less fatty and it worked out superbly. I highly recommend it.
I’m so happy you made and enjoyed the cheesecake, Kenny! Great substitute with the Greek yogurt, too!
Hello Jennifer, you said that we should warm the chocolate cheesecake before serving. I wonder that chocolate will be melted down. Will it happen if the cake stays in the room temperature?
Hey, Logan. If you warm it just for a few seconds in the microwave, it will be enough to take the chill off and soften the texture without affecting the structure of the cake. Start with a few seconds and add 5 more at a time until you get the texture you like. I would not keep the cake at room temperature due to the high dairy and fat content. Best to keep the whole cake refrigerated. You can leave individual pieces out for an hour or even two before serving so they can some to room temp. Hope that helps. Enjoy the cheesecake!
I just made your recipe as my 1st instant pot cheese cake. Amazing! It came out perfect, super creamy. Thank you!
Oh, wow, that’s fantastic! I’m thrilled you like it, and thank you so much for letting me know!
it is rich, creamy, super chocolatey
I hear you. It’s a thin line to walk.
This cheesecake is so unbelievably delicious that my niece has commanded that I make it for her wedding. This is the perfect special occasion major treat – it takes a while to make, and it is entirely worth the effort. I was a baker but had never previously made cheesecake. If you do exactly what the recipe says to do, you will have a wonderful dessert.
Wow, I am thrilled! What an honor to have one of my recipes play even a small part in a wedding! How lovely! Thank you so very much for taking the time to leave a comment, too. It means a lot.
I am doing it and waiting for result. Lol… anw thanks your recipe much.. Continue to sharing!
Wonderful! I hope you enjoy it!
Amazing!! It’s so simple and cheap to make. I brought to a company party and everyone raved about how good it was. It’s very sweet and heavy, so if you don’t like that kind of thing avoid this recipe. I loved it!!!
Yeah, it’s definitely super rich. I’m so glad you enjoyed it! I appreciate your letting me know!
As sad as the truth is, I am super appreciative that you have nutritional analysis here. I am a chocolate lover but also a diabetes nurse. I try to teach my patients to be very deliberate in making allowances for “treats” rather than calling these things “cheats” and possibly feeling guilty. Having nutritional information when cooking/baking makes informed decision making (i.e. “how bad do I want this?” “How much can I eat and still manage with my current diabetes medication regimen and a bonus walk after dinner?” etc, etc). Can’t wait to make this but… shhhh…. don’t tell my patients 🙂
I hear you. It’s a thin line to walk. It’s exactly as you say: hoping the nutritional information helps folks decide if they want it that badly! Also, you will really enjoy this cheesecake, and I promise not to tell a soul!
If I make this in a 7″ in the IP what would the time be? Thanks
I don’t know for sure because I haven’t tested this recipe in an InstantPot. My guess is that it will take about 25 minutes and then natural pressure release. You are shooting for an internal temperature in the center of about 155F. Hope this HELPS. Enjoy!
Hi,
Jus tmade this today in my Instant Pot. First ever cheesecake I’ve made, it came out perfect and there was lots of good cussing when eating about how good it is! I cooked for 30 minutes on manual in my IP, then released for about 10 minutes. Thank you!!
This comment made my day, Rebecca! Good cussing is the very best kind of cussing and the highest compliment! So glad you guys like it, and congratulations on making your first ever cheesecake!
So, for a normal size Springform pan, do you think simply doubling the recipe would work?
It really looks delicious, scrumptious, irresistible!
Thank you for sharing.
Hi, Debbe! Glad you like the cheesecake–you describe it pretty perfectly! =) I would say for an 8″ – 9″ springform pan, you could use 3 blocks of cream cheese ( 1.5x recipe) to get a “regular height” cheesecake and go ahead and double it (2 pounds or 4 blocks cream cheese) to end up with a tall cheesecake. If you get within say 1/2″ inch of the top of your pan and still have a lot of batter leftover, go ahead and bake the extra in muffin tins. They’ll be done way before the cake, but at least you won’t waste the batter. Please let me know how you liked it! =)
Yumsters!!! Can I incorporate a layer of cake with it or is it too soft to try?
I think that would be fine, Elsie. If you make a cake layer in say an 8″x3″ pan (as opposed to the 6″ pan called for), you could then add the cheesecake mixture on top of the cake layer and bake the whole shebang in a water bath so you don’t dry out your cake layer. Let me know if you give it a shot!
Mine is in the oven now … with no crust. Fearlessly giving it a shot. Fingers crossed
I hope you love it, Dana! Please let me know how it turns out for you. Happy New Year!
It worked out perfectly for me, I’m happy to report. I will make this again and next time I’m indulging in a crust because it is definitely worthy of a crust!
Really loving smaller size desserts. Thanks for developing this 6 inch cheesecake recipe! More please ❤️
Hooray! Thanks for letting me know, Dana. Have pan, will develop! Let me know if you have any requests and I’ll see what I can do. 🙂
Yes! This is what this girl NEEDS right now.
Have at it, Cassandra! Good stuff!