Welcome to my post all about the science of making fudge. If you have burning questions about fudge like “why is my fudge grainy?” “How long do I cool it before stirring?” or just want some really great tips on making homemade fudge, this post is for you.
For recipes, try my creamy cocoa fudge or this old-fashioned fudge recipe.
This post is a part of my Fundamental Friday series about baking science and answering questions about how ingredients work in the kitchen.
Why Making Fudge Can Be Scary
There is something about fudge that fascinates yet strikes fear into the heart of the home cook.
And I will admit, homemade fudge can be kind of particular about how it is treated.
If you mistreat it, it will let you know by turning into a grainy, sullen mess. You can almost hear it muttering, “Serves you right, treating me like that.”
Pastry Chef Online Participates in Affiliate Programs. If you make a purchase through one of my links, I may earn a small commission. For more information click to read my disclosure policy
Take heart, friends, for I am here to help. Let me tell you, if college kids home on summer break can learn to make this stuff while singing in front of an audience on the boardwalk, you can learn to make it, too!
Fudge Science
First, let’s look a little bit at the science behind fudge.
Sugar is an amazing ingredient, and the hotter you cook it, the more firmly it will set up when cooled.
Also, sugar crystals can vary in size from so tiny that they give the finished product a creamy texture to huge rock candy crunchy crystals.
Here’s how fudge happens
- you heat sugar with some chocolate and some dairy and a few other things until enough water has evaporated to leave such a concentration of sugar that it will crystallize as it cools.
- Agitation at just the right temperature will result in those tiny creamy-feeling sugar crystals. If you heat the sugar too high or wait until it is too cool to stir it, you will pretty much end up with rock candy, so that’s why the first thing you need if you’re going to make fudge is a good candy thermometer.
Important Equipment
Owning a candy thermometer is a good investment, even if you only use it a few times a year–they don’t take up much storage space, and they can help ensure that your candies turn out perfectly every time.
And, by the way, if you’re saying to yourself, “I can just use the ice water test,” and are thinking to yourself that you don’t need a thermometer, I’m telling you: get one.
Even with ice water close at hand, you can seriously burn yourself if you’re dripping molten sugar around. Keep the sugar contained in the pan, and buy a candy thermometer.
I actually don’t use a clip-to-the-side-of-the-pan candy thermometer. My thermometer of choice is an instant read thermometer. I take the temperature periodically during the cooking process, plus I can use it for more than just cooking candy or deep frying.
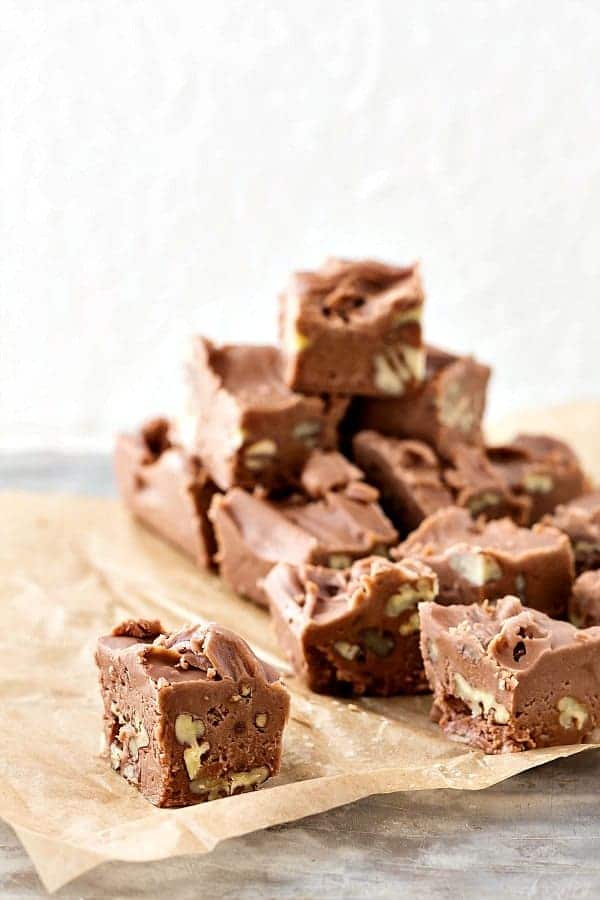
Here’s the fudge we used to make at my old restaurant (we’d give it out with the check instead of little Starlight mints). I think you’ll be surprised by how easy the procedure is:
Basic Fudge Ingredients and Amounts
- 2.5 cups sugar
- 4 oz. semi-sweet chocolate, chopped fine, or good quality semi sweet chocolate chips
- 1.5 oz. softened butter
- 8 oz. half and half
- about 1/2-1 teaspoon of salt, to taste (taste it before it comes to a boil)
- 1 T corn syrup
- 1 T vanilla
- toasted nuts (optional), 1 c.
Procedure, in Great Detail
Line a loaf pan or a 6″ square cake pan with parchment or magical non-stick foil. Butter the pan well.
Put all the fudge ingredients except for the butter, vanilla and nuts into a large, heavy-bottomed sauce pan.
Would you like to save this post?
Heat on medium-high heat, stirring with a wooden spoon or silicone spatula (so heat doesn’t transfer and burn your hand), to boiling.
PRO TIP: Stir with a wooden or silicone spoon so heat doesn’t travel up the handle of a metal spoon and burn you.
Cover the pan for 1-2 minutes to let the steam wash any errant sugar crystals down off the sides of the pan.
Remove the lid and turn down the heat to medium. Clip on the candy thermometer, and let the fudge cook without stirring until the thermometer read 234 degrees, F. (234F is the lower end of the soft ball stage. If you cook your fudge much hotter than this, it will be too firm to bite cleanly and will be more like taffy. Which is not what we want here).
Remove the pot from the heat, leaving the thermometer in the fudge.
Put the butter and vanilla on top of the molten candy, but don’t stir it in. Now, leave the pan alone. Do not bump it, slosh it or stir it until the thermometer reads 130 degrees, F.
What Happens if You Stir Too Early (or Too Late)
130F is the magical temperature at which you will get tiny creamy-feeling sugar crystals, and if you start stirring before then, the crystals might never form so your fudge won’t have the correct creamy fudge texture.
PRO TIP: Cook fudge to 234F and cool to 130F before stirring. Remember these 2 magic temperatures!
Conversely, if you start stirring too late (when the fudge mixture is cooler) it could set up before you’ve had a chance to thoroughly stir it. This could mean fudge with an uneven or grainy texture. The graininess happens because the mixture was too cool when you started stirring it.
Once it hits the magical 130 degrees, stir vigorously with a wooden spoon until the fudge thickens and is no longer shiny.
Streaky/shiny isn’t good enough. Make sure it’s uniformly matte and very thick.
This means you have achieved uniform crystallization. Yay!
Stir in the nuts, if using, and pour/scrape into the prepared pan.
You might need to press the fudge into a uniform thickness. Let it cool the rest of the way and then slice into tiny pieces.
If you’ve followed the directions and made perfect fudge, and I know you have, the fudge will have a delightful bite/chew/melt mouthfeel, and you (or the lucky recipient/s) will be swooningly happy.
Questions
It helps me and other readers so much if you take a moment to rate and review this recipe.
Your star rating and comments help others decide whether the recipe is worth making, and your feedback helps me continue improving recipes here at Pastry Chef Online.
Other lovely ways to share include pinning or posting on your favorite social media platform.
Thank you so much for taking the time!

While you’re here, I’d also love it if you could sign up for my newsletter. If you’d like to occasionally see me pop into your inbox, here’s how to make it happen:

Hi, y’all! I hope you’ve enjoyed this post and hopefully also learned a thing or two.
If you like my style, I invite you to sign up for my occasional newsletter, The Inbox Pastry Chef.
Expect updates on new and tasty recipes as well as a bit of behind-the-scenes action. I hope to see you there!

Thanks for joining me on this exploration of the science of making fudge, friends.
Take care, and have a lovely day.


Join in Today!
Thank you!! Love coming to your site when I want to find out if I can make changes to recipes!! This time it’s the Hershey’s cocoa fudge recipe. https://www.hersheyland.com/recipes/hersheys-rich-cocoa-fudge.html
Can I use some leftover frozen whipping cream instead of the milk?
Hey Laurel! I wouldn’t sub for the whole amount because there is so much less water/more butterfat in heavy cream than in whole milk. So maybe sub 1/3 the amount of milk for cream. That’ll help you use up 1/2 cup, anyway. Hope that helps!
ok… I have to understand…. 😀 😀
What is the problem with less water/more butterfat?
Could I just use less butter?
And, yes, 1/2c is better than nothing! I plan on making a few batches of different flavours anyway, so it’s definitely a start!
Thank you! 🙂
My point is you’ll be markedly changing the composition of the candy, and candy making is a pretty precise endeavor. You are welcome to give it a shot, and it may turn out great. It could also end up being too thick or too soft. If you want to do it as an experiment, absolutely go for it. Cutting back on the butter may be a good plan, actually. You’d have to figure out the amount of butterfat in 1 1/2 cups of cream and reduce the amount of butter in the recipe accordingly. If you give it a shot and it works out, or even if it doesn’t, please let me know!
Awesome!! That is exactly what I was thinking except about the fact that candy-making is an exact science, so you have absolutely answered my questions, as usual!!. I will do some calculations and hopefully get a chance to work on it next week. And yes, letting you know is the least I can do in exchange for your time. Thank you again!!
My pleasure! Can’t wait to hear your results!
I am very frustrated with so many different options of making fudge. Some recipes add the butter at the very beginning before the mixture comes to a boil. Other recipes use an electric hand mixer to stir fudge after it cools. I let my fudge cool to 130 deg. and it set up in the pot! I live in New Orleans (500 ft below sea level) so I don’t know if that has anything to do with it. I never seem to get it right. Last batch I made came out delicious, but I have never had it get creamy! Mine is always hard even though I remove the fudge right at 234 deg and wait to stir it. I am wondering if I should try the recipe with the butter incorporated with all ingredients, and cook that until 234. Please help me.
It could be that living in New Orleans, it’s very humid, and humidity and candy making just don’t mix well at all. Have you made sure your candy thermometer is accurate? The clip-to-the-side-of-the-pan models that go for about $10 can be inaccurate, especially uver time. You can rest it by immersing it in water that is at a full rolling boil and see if it reads 212F. It will be easy to tell if it’s running too hot or too cold. If you do t want to 8nvest Ina new thermometer, add or subtract the over/under from your target temperature. If your fudge always ends up too hard, I’d bet your thermometer is running too high. Shoot for 230-232F and see if that helps. If you have a stand mixer, you can adlo pour the hot fudge into the mixer bowl, let it cool down in there, and then start beating it at about 115F until it thickens and becomes matte. Then scrape into your prepared pan. I hope this helps!
I haven’t tried this exact recipe, but one that is similar (with same temperatures) and it has almost always turned out well. Some tips from my experience:
1) Make sure your thermometer is accurate. Can test by putting in boiling water, should register 212F at sea level, or adjust for your altitude. If it is off, just add or subtract some degrees based on any error you find. Or, if you don’t trust it because the reading is way off (you are only testing one temperature reading, after all), get a new one.
2) If the fudge starts to crystallize in the pan (stirred too long after it loses its gloss), it is often possible to reheat it a bit and give yourself more time to get it out of the pan.
3) Getting burned bits off the pan is normally not too difficult (but can require time). If the sugar is not totally carbonized on the bottom of the pan, you can simply put water in the pan (after removing any residue that comes off easily), and the reheat the pan. Don’t need to bring to a boil, but the sugar will eventually re-melt. You may have to heat it up and then let it sit overnight. If the pan is not aluminum, can use a lye-based oven cleaner. Spray thoroughly and let it sit. It will dissolve the biggest messes. But… DO NOT use on aluminum cookware, it will cause permanent pitting and discoloration.
4) If you make candy frequently enough, invest in a “sugar pot”. These are solid copper and can be very expensive if you buy new – however, used ones are often found at antique shops or on eBay at reasonable prices. They are not lined with tin and should not be used for anything other than making candy or possibly jam. The copper heats almost perfectly evenly and will greatly reduce the chance of burning due to having hot spots in your pan.
Great advice. The only thing I don’t necessarily agree with is getting copper pots for candy making. Unless you’re doing it every day and can get a feel for how these pans heat and conduct heat, I think they’re too conductive to be of help to the “holiday candy maker.” They heat too quickly and I think that’s scorched fudge just waiting to happen. But yes, for frequent–daily–use, copper would be great.
Hi Jenni, I’m wondering if you have any other flavored recipes of fudge. I grew up in a place where it was common to find about 30 or 40 different flavors. I feel like once I make 1 flavored type I’ll be able to do it on my own with other flavors. Any help would be massively appreciated!
Hey, Kevin! I have a peanut butter fudge https://pastrychefonline.com/peanut-butter-fudge/ and a brown sugar fudge (penuche) here: https://pastrychefonline.com/penuche/ Hopefully you can look at the ratios and then launch off on your own to do more experimentation. I also have a friend who has a TON of interesting and fun fudge flavors on her site. Check here: https://www.sweetrecipeas.com/#growMeSearch=fudge 🙂
Awesome, thanks!
My pleasure. Enjoy!
Thanks Jennifer. Will have to give it another go
Keep me posted. I have high hopes for your next batch. Were you able to salvage your pan?
Didn’t work for me. Now left with a badly burnt pan. Anyone know how to get burnt sugar off a pan?
What recipe did you use? When did it start to burn? I am happy to help troubleshoot if you’d like to share more info. Let me know. You can respond here, email me at [email protected] or message me on my fb page. https://www.facebook.com/pastrychefonline
Hi Jennifer,
Thanks for replying.
I used the recipe https://pastrychefonline.com/homemade-fudge/
Where I ran into trouble was “Remove the lid and turn down the heat to medium. Clip on the candy thermometer, and let the fudge cook without stirring until the thermometer read 234 degrees, F. ”
I left it for 15-20 minutes, it only got to about 220F, and burned thickly to the bottom of the pan. Any suggestions for cleaning much appreciated – the pan is looking like a throw away.
Kind Regards, Brian
Ugh, that’s no good. Have you tried baking soda? Sometimes the alkali can break down burned on stuff.
As to the fudge, the burned stuff created a barrier that kept the rest from getting hot enough. Moderate the heat, try stirring carefully occasionally, and don’t walk away. Rinse the spoon off between each stir.
Again, I’m sorry about your pan.
I’m wondering how I would make DARK chocolate fudge (with flake sea salt on top!). Is it just a matter of removing half a cup of cream? I’ve used the same [Martha Stewart fudge 101] fudge recipe for years, and it’s almost exactly like yours, though it calls for 1.5 cups of heavy cream, and I wonder how I could make it a darker flavor. I’m thinking if I remove any of the sugar, I won’t get the texture I want. Should I add a little coffee extract?
Hi, Kate! Definitely add some coffee extract with the vanilla, or use some instant coffee at the beginning. I don’t think you’ll want to mess with the liquid or sugar amounts, but maybe using a portion of unsweetened chocolate in place of some of the semisweet along with a heaping Tablespoon of cocoa powder. This is my best guess as I’ve not tried it. Still, I think it’s a safe bet. If you try it, do let me know how it turns out for you!
Thank you for the excellent explanation. I’ve been wanting to make dairy free fudge, but haven’t found a recipe I like as they all seem to be replicating sweetened condensed milk. I like to experiment, and have found if I understand what the science is and the reason for ingredients, I can usually find a good alternative. I’m working on my first batch now (trying really hard to resist stirring before 130), by following your recipe but swapping out the half and half for coconut milk and vegan butter.
Hi Cindy! I’m glad you found the post helpful. Please keep me posted on your experimentation! Happy Holidays!
Overall it came out well, however needs to be refrigerated to be solid. At room temperature it is too soft. Taste and mouthfeel are just what I remember for good fudge. Would it normally need to, be refrigerated to,be able cut and pick up individual pieces? If, not, do you have any suggestions for what to adjust? Would cooking it a slightly higher temp help, or cutting back on the vegan butter or coconut milk help?
Yay for the flavor and mouthfeel–those are the hardest. Yes, cook a little bit harder. The higher you cook it, the hotter the set (to a point, anyway). It may only need an extra 1-2 degrees. You will probably have to play with the temp a bit, but once you get it, you should be able to easily replicate it. Thanks for keeping me posted. I’m so glad you’re on the right track for an awesome *real* vegan fudge!
This took forever! We tripled it and it took about 2 hours of waiting for it to get hot, then waiting to cool, then stirring for about 30 minutes. Just FYI
A triple batch would indeed take a long time to cook and then cool. I hope it turned out well and that you enjoyed it. Merry Christmas!
Now that I have real fudge recipe and not cheating with the marshmallow fluff and will invest in a thermopen! I think I can do this.Thanks jenni
I *know* you can do it, Doris! =) And, you’re very welcome!
Cool. I usually make fudge only at Christmas but the Christmas season is seven months away and I just might have to make some before then but then maybe not since I’m trying to shed 20 pounds. I’m going to bookmark this recipe. Thanks for posting it.
FANTASTIC! Im going to try it!