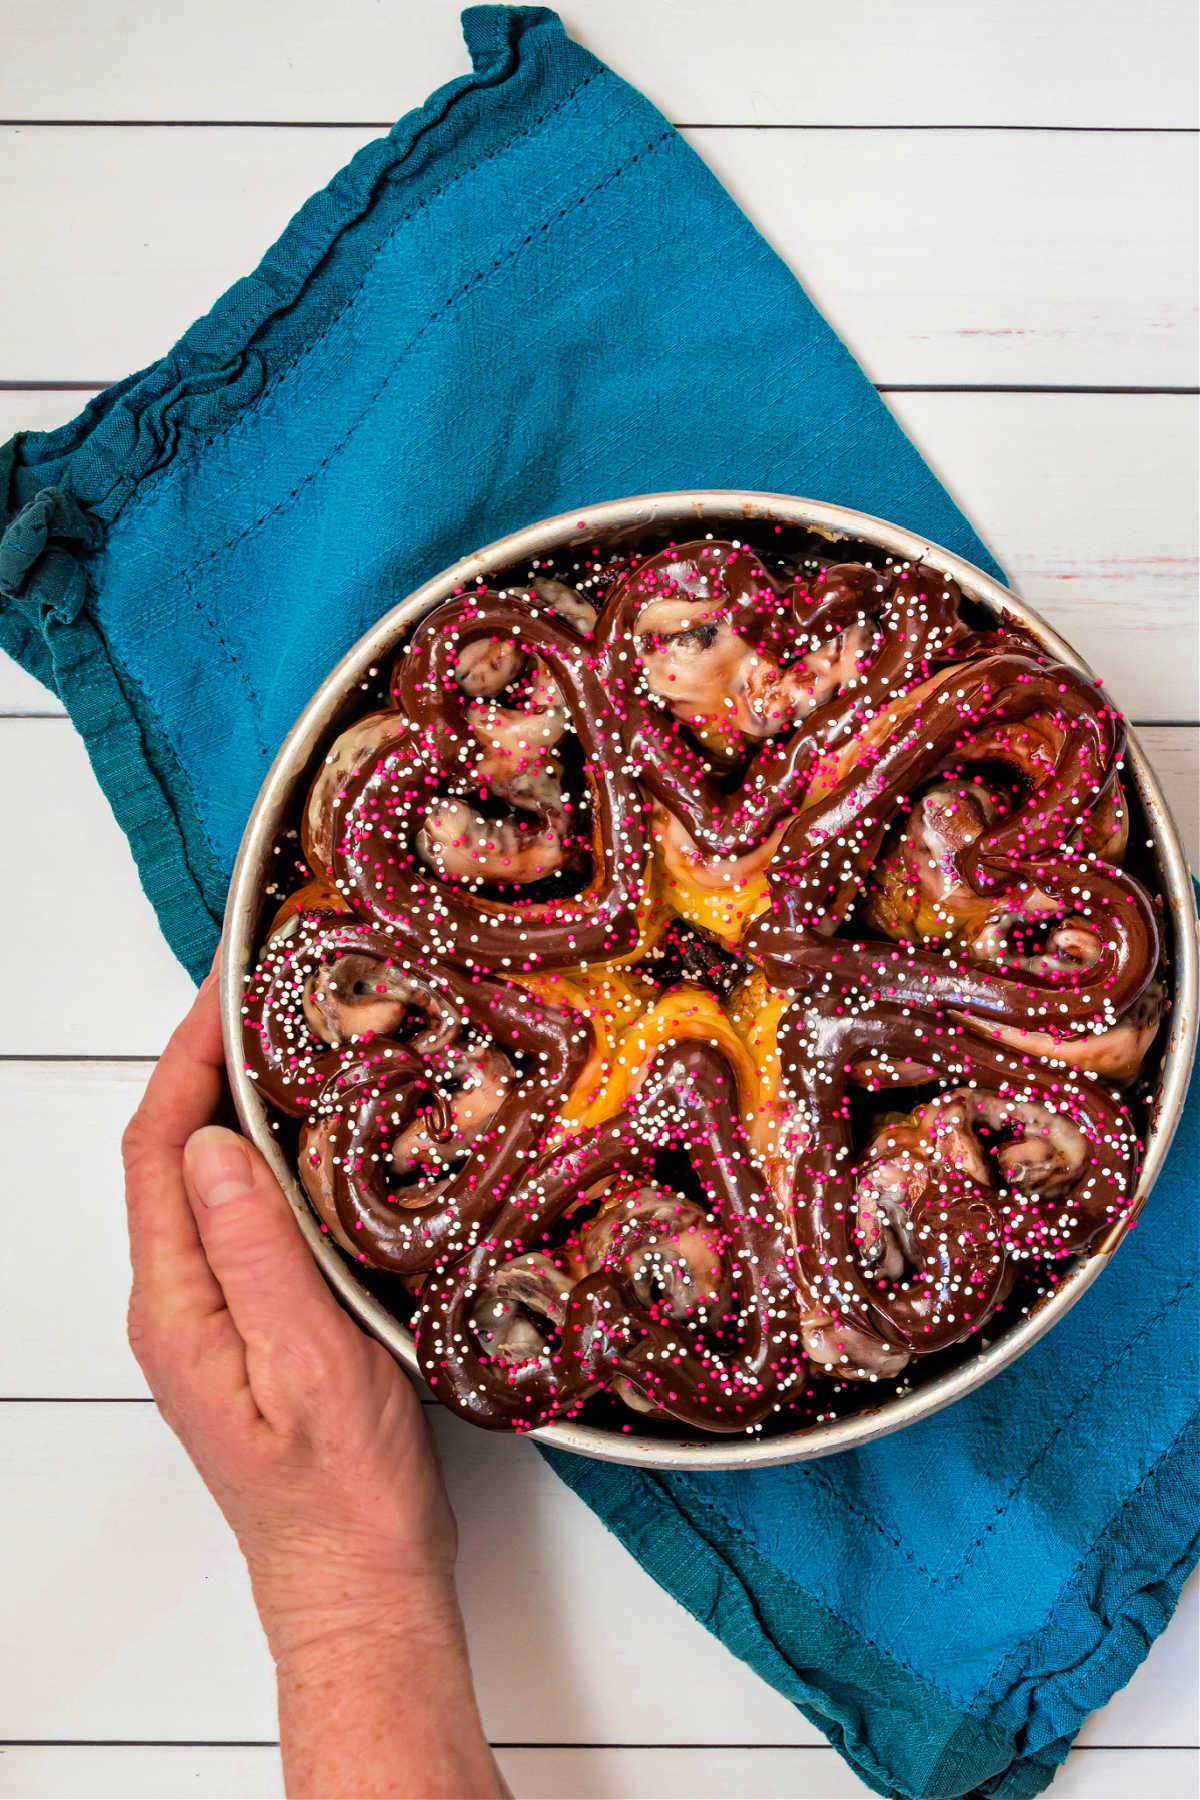
As a Valentine’s treat or just a treat anytime you want to say I love you, this chocolate honey bun recipe is the way to go. these little heart-shaped buns are sticky, sweet, and delicious!
You might also enjoy my peanut butter sweet rolls or these lovely gooey cinnamon rolls. Either can be shaped into hearts like these sweet rolls.
For ease of browsing, you can find all my sweet yeast bread recipes in one place. Thanks for visiting!
Watch my heart-shaped chocolate honey buns recipe web story here.
Why You’ll Love This Recipe
If you’re a fan of a gas station honey bun, you will adore this version, friends!
Not only does the recipe use liquid honey in the dough, but it’s also in the filling, the thin glaze, and the chocolate glaze. Honey in every bite!
Pastry Chef Online Participates in Affiliate Programs. If you make a purchase through one of my links, I may earn a small commission. For more information click to read my disclosure policy
And if honey buns are generally not chocolatey enough for you, this recipe has got you covered!
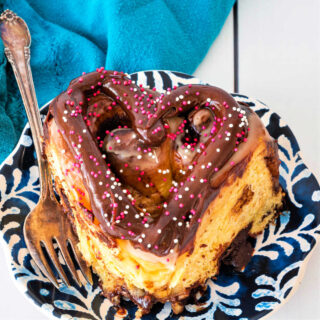
You get rich chocolate flavor from cocoa powder in the sticky filling plus a nice double-chocolate punch from the ganache hearts on top.
Sticky, honey-ish, chocolatey, and shaped into adorable little hearts–what’s not to love?
How to Make Honey Buns
There are four components to this recipe:
- Dough
- Filling
- Honey Glaze
- Chocolate Ganache
None of the components is hard to make, but obviously, it’s a bit of a process.
I’ll walk you through how to make each component.
First, let’s look at the ingredients for each. Where I can, I will offer substitutions.
Ingredients and Substitutions
This image shows all the ingredients for all components. Some may be used in more than one componenet.
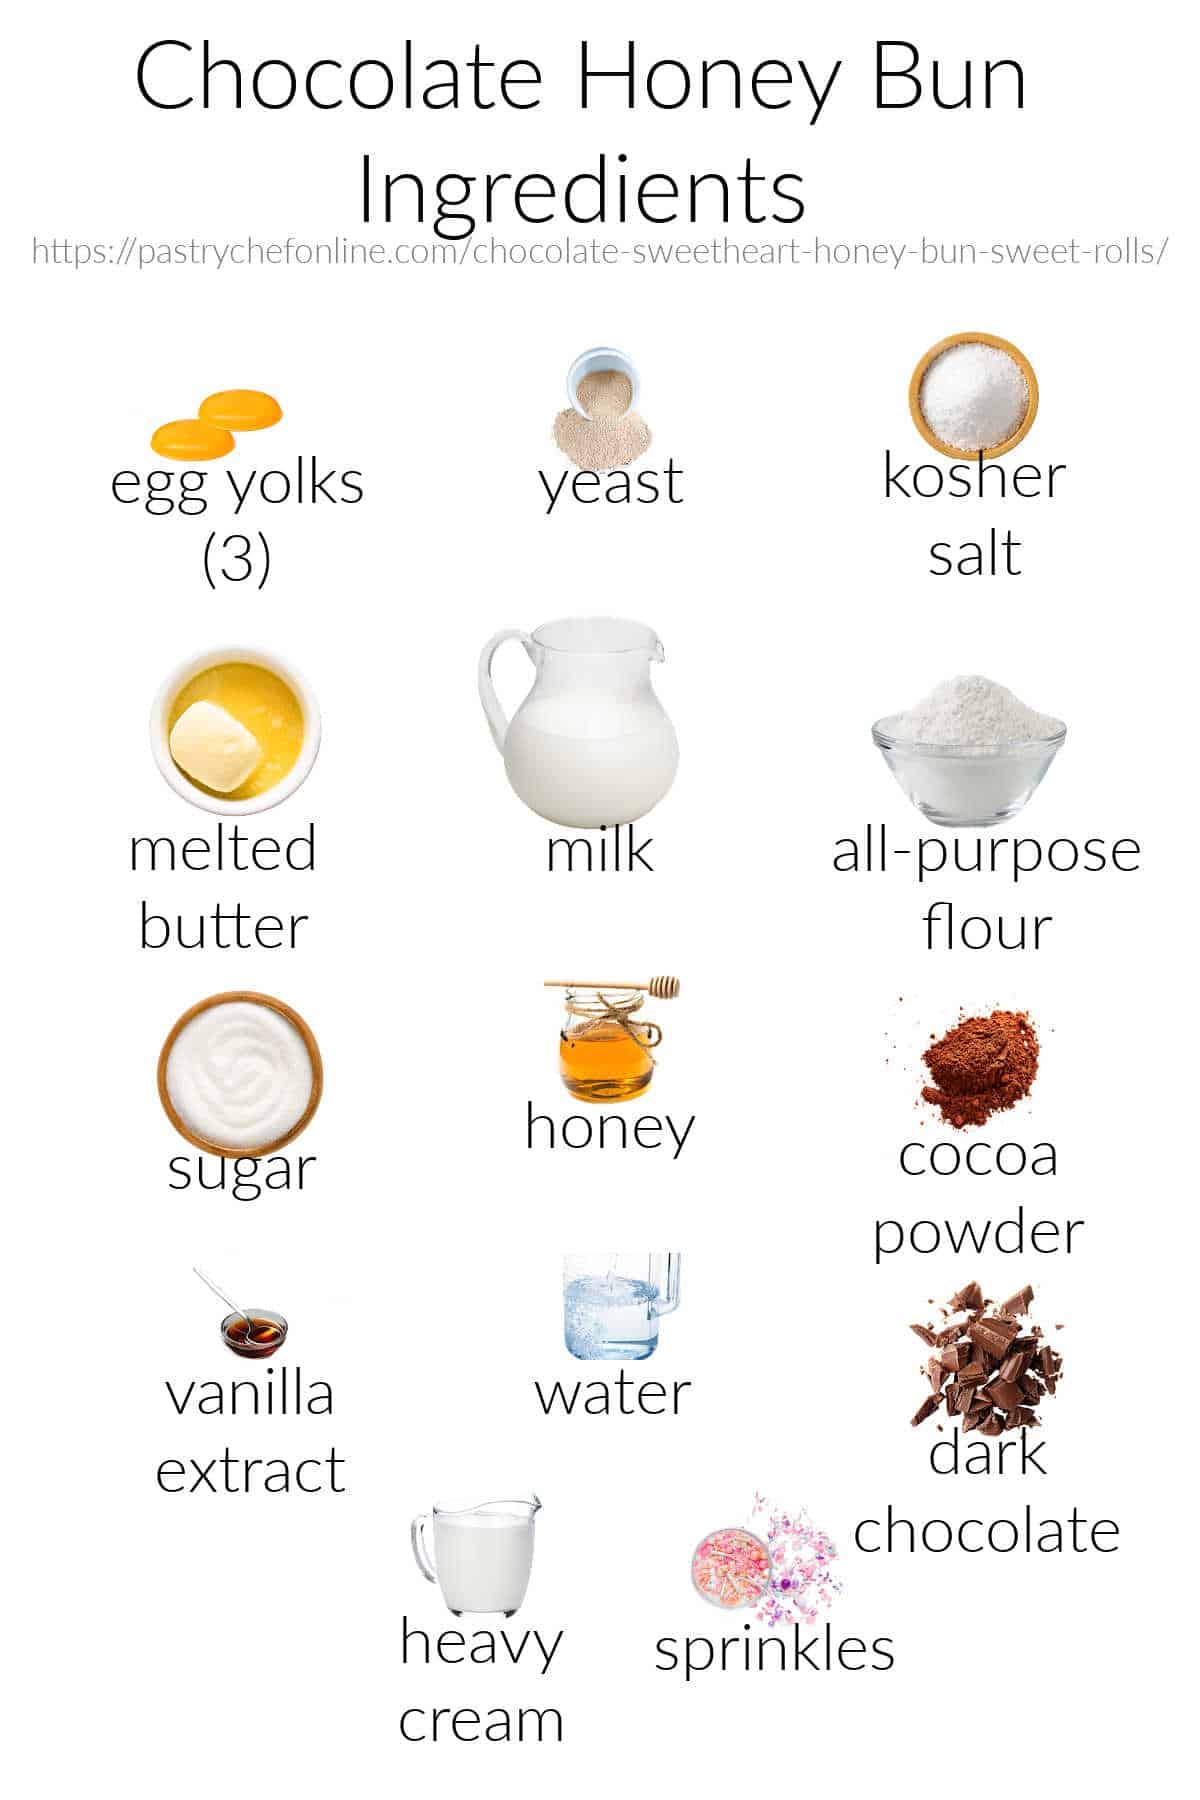
For the Dough
- Egg yolks: For a leaner dough, you can substitute 1 egg for the yolks. Note you may have to adjust the amount of milk you add to make a nice dough
- Yeast: Instant or active dry. If using active dry, proof it in a portion of the milk, warmed. Once it gets foamy, add that to the mixer along with the rest of the ingredients
- Salt: Salt regulates yeast formation so your dough doesn’t rise too much. It also adds to the flavor of the dough.
- Honey: Provides some sweetness and helps some with keeping properties. It also aids in browning the buns in the oven
- Butter: Adds a bit of richness and helps to tenderize the crumb. You can substitute plant-based butter or a little oil if you prefer
- Milk: I use whole milk. You may also use buttermilk if you have it. Using buttermilk will give you more tender honey buns because of the acidity. Other substitutions include 2% or 1% milk
- Flour: I call for all-purpose here. I think it’s the best flour for the job. If you substitute bread flour, you will need a bit more liquid than called for since higher-protein flours absorb more liquid than lower-protein flours.
For the Filling
- Butter: Carries all the flavor. You can substitute plant-based butter if you prefer
- Salt: Brings out the flavor and counteracts any bitterness from the cocoa powder
- Sugar: Allows for a spreadable consistency along with contributing sweetness
- Honey: Brings flavor and moisture to the filling
- Cocoa Powder: Provides the strong chocolate flavor
For the Glaze
- Powdered Sugar: This is the bulk of the glaze and provides sweetness
- Honey: Brings flavor and moisture to the glaze
- Butter: Adding fat helps to keep the glaze from getting too hard when it sets up. It also mellows the raw flavor of the powdered sugar
- Salt: Brings out the flavor in the rest of the ingredients and tempers the sweetness somewhat. Don’t leave it out!
- Vanilla: Rounds out the flavor. Technically it’s optional, so if you don’t have any, don’t worry
- Water: Just enough to make a pourable, spreadable consistency. You can use milk instead if you prefer
For the Ganache
- Honey: Carries the honey theme through, brings additional flavor and moisture to the ganache
- Chocolate: I use semi-sweet chocolate chips. You can also chop up a bar of dark chocolate if that’s what you have on hand
- Heavy Cream: In equal parts with the chocolate to form a basic ganache
- Salt: Just a wee pinch
Procedure
For the Dough
This is a straight dough method, which means you put all the ingredients in the mixer and let her rip.
It will take about minute mixing with the dough hook on low speed before the dough comes together.
Once it does, knead on medium speed for about 10 minutes.
The dough will be smooth, stretchy, and springy when finished.
It will pass the windowpane test as seen below. If your dough tears before it is translucent, knead for another minute or two and test again.
For the Filling
Heat up all the glaze ingredients in a small, microwave-safe bowl or in a pan on the stove.
Whisk until smooth.
The filling will be fairly thin when warm, so refrigerate it for 15-30 minutes so it is spreadable. It will make the buns much easier (and less mess) to fill.
The video below shows what thickness you’re looking for.
For the Glaze
Heat all ingredients except for the powdered sugar and vanilla.
When the butter is melted, whisk in the powdered sugar, vanilla, and enough water to make a thin, pourable glaze.
The video clip shows the texture you’re looking for:
For the Ganache
- Place all ingredients in a microwave-safe bowl.
- Heat on high power for 45 seconds.
- Whisk until smooth.
- Let cool until the consistency of frosting so you can pipe hearts.
If you don’t want to pipe hearts, you can drizzle it on in whatever pattern makes you happy without having to wait for it to cool and firm up.
How to Shape the Honey Buns
Making a heart shape with honey bun dough (or any dough, really) is pretty easy.
With a regular cinnamon bun, you roll the dough in one direction into a coil.
To make a heart shape:
- Spread the filling on your rolled out rectangle of dough.
- Roll the dough up into a coil from each longside, leaving about 1″ of space in the middle between the two coils.
- Cut the roll into 6 pieces and arrange, coils facing the edges of your round pan.
- As the rolls rise and then bake up, heart shapes magically form as the dough presses against itself to form the points of the heart. The two coils on each roll form the top of the hearts.
After baking and cooling, you can further emphasize the heart shape by outlining each heart-shaped honey bun with a thick line of chocolate glaze.
Here is what your dough will look like after rolling and cutting:
And here is the formed rolls in the pan ready to rise:
Equipment Recommendations
This is a recipe you definitely want to make with a
An 8″x 2″ round cake pan is ideal for shaping these little heart-shaped beauties, and since it’s also a great size for layer cakes, I recommend you grab two or even three.
I also have an 8″ x 3″ cake pan. It’s not as common a size for cake layers, but I used it for baking these guys. Either size will work.
Tips for Success

Spray your hands with pan spray or a little oil to make the dough easy to work with and keep it from sticking to your hands.
Feel free to shape these honey buns in conventional “snail” shapes.
You can slice cleanly through your dough by sliding a length of dental floss under the dough, bringing the ends up and crossing them over the top of the dough and then pulling to make slices. This works well, especially if you don’t have a serrated knife.
If you have limited time and cannot bake all in one day, you can refrigerate the dough either after kneading or after shaping into rolls. Continue with the recipe the following day, allowing the dough about 45 minutes on the counter before finishing.
Honey Bun Q & A
Shape your dough like a snail, being sure to pinch the dough together well at the seam. Cut them into 12 1″ pieces, place them on their sides 2″ apart on parchment-lined baking sheets. Press them down to flatten a bit and stretch them into slightly oval shapes.
Yes. After shaping the roll, cut them into 12 pieces instead of 6. Place in 2 8″ round pans, 6 in each. Baking time will be reduced, so start with 15 minutes at 375F, cover with foil, and bake 10-15 more minutes until they register 195-200F on an instant-read thermometer. Or make them the size called for and share with your sweetheart!
These are best the day they’re made, but they will be fine, tightly covered at room temperature for a couple of days. Reheat in the microwave for a few seconds before serving.
Yes. Cut them apart and remove them from the pan. Freeze until firm and then place them in zip-top freezer bags or other freezer-safe containers for up to 3 months. Be sure to press as much air out of the bags as you can before sealing. Allow to thaw at room temperature overnight and reheat to serve.
Variations
You can fill your honey buns with pretty much any delicious spread.
Some Nutella would not be out of order. Or make a mixed berry jam or apricot raspberry jam and use that as a filling.
You can also fill them as straight-up cinnamon rolls using your favorite cinnamon roll filling recipe.
To make cinnamon honeybuns, replace the cocoa powder with 1 Tablespoon of cinnamon.
Serving Suggestions
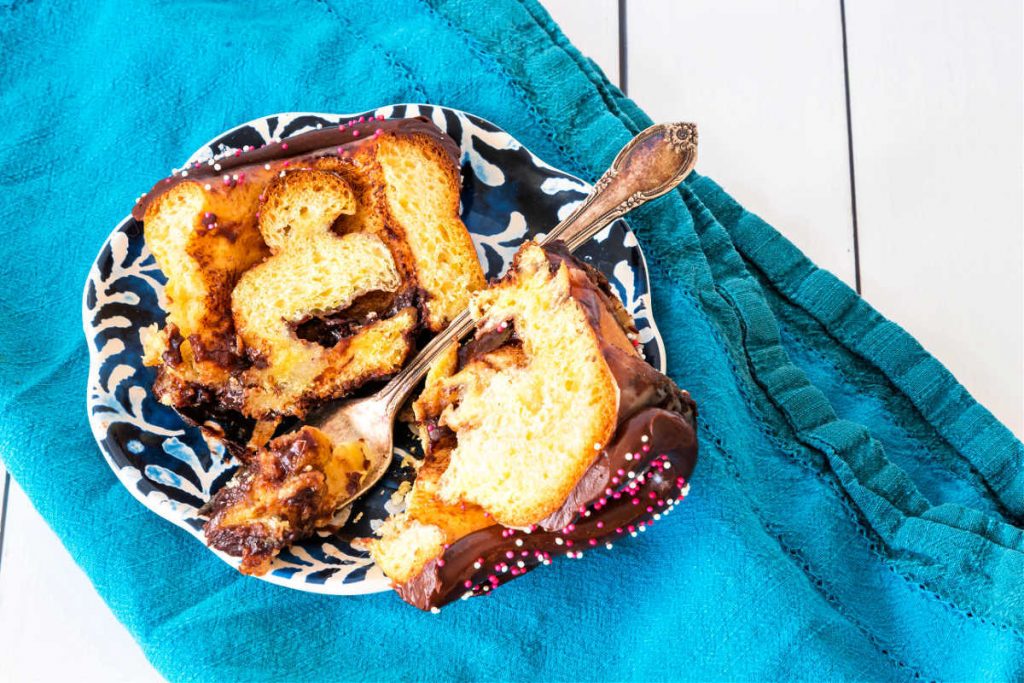
Served warm and shared with your sweetie, I can’t really think of anything else they need.
Gild the lily by spreading them with some salted butter, or spread them with unsalted butter and a little flaky sea salt.
Perfection!
Questions?
A Note About Measurements

Don't let its small price and small size fool you. The Escali Primo is an accurate and easy-to-use food scale that I have used for years. It's easy to store, easy to use, has a tare function, and easily switches between grams and ounces/pounds for accurate measurements.
It will help me and other readers so much if you take a moment to rate and leave a review for this recipe.
You can use the stars to rate 1-5 (5 is best), and leave a review in the comments. It helps me make adjustments if any are needed, and comments help others decide whether the recipe is worth making.
Other ways to share include pinning, and/or sharing on your favorite social media platform.
Thank you so much for taking the time!

Chocolate Sweetheart Honey Bun Sweet Rolls
Ingredients
For the Dough
- 3 egg yolks
- 1 teaspoon active dry yeast
- ¾ teaspoon kosher salt
- 1 ½ oz honey 2 Tablespoons
- 1 ½ oz 3 Tablespoons melted butter
- 5 oz milk 1/2 cup plus 2 Tablespoons. I use whole milk
- 10 oz all purpose flour about 2 1/4 to 2 1/2 cups
For the Filling
- 1 stick unsalted butter very soft
- ½ cup granulated sugar
- heavy pinch of salt
- 1 ½ oz honey
- 1 oz cocoa powder about 1/3 cup
For the Honey Glaze
- 1 oz honey
- 1 oz butter
- ½ teaspoon vanilla
- 1 cup powdered sugar
- water as needed to thin
For the Ganache Hearts
- 2 Tablespoons honey
- 2 ½ oz semisweet or bittersweet chocolate or chocolate chips
- 2 ½ oz heavy cream
- pinch salt
- optional colored sprinkles or nonpareils
Instructions
For the Dough
- In the bowl of your stand mixer fitted with the dough hook, add in all the ingredients and mix on low speed until no dry flour remains.
- Increase the mixer speed to medium and knead for 10-12 minutes. The dough will be soft and a bit sticky but be nice and extensible (stretchy).
- Once the dough is smooth and supple, gather it into a ball, and place it back in the mixer bowl.
- Spray the top with pan spray, cover, and let rise in a warm place until doubled in volume, about 2 1/2 hours
For the Filling
- Line an 8" round pan with parchment and/or spray lightly with pan spray. Set aside.
- Mix all filling ingredients except the chocolate together evenly. It should have a spreadable consistency.
- If it is too loose and runny, refrigerate so it thickens up.
- On a lightly greased surface roll the dough out into a rectangle about 14" wide and 12" tall. The dough should be about 1/4" thick.
- Evenly spread the filling mixture all over the dough. Spread it from end to end the short way and leave about 1/2" of bare dough on the long ends.
- Roll up the dough from either of the long ends, meeting in the middle so the whole thing looks like a scroll.
- Using a serrated knife, cut off either end of the scroll so the sides are even.
- Cut the remaining scroll into 6 even pieces, each about 2" tall.
- To form the heart shapes, unroll each piece just a bit from either end so there are about 2" of filling showing.
- Press the two still-rolled-up ends together, pressing the bend in the center into a point. (See video clips)
- Place each heart-shaped roll your prepared pan so the points face in and the rolls are facing the edges of the pan. The rolls should barely touch, if at all, and there should be about 1 1/2" in the center where you can see the bottom of the pan.
- Cover and let rise in a warm place for about 1 1/2-2 hours. It won't look like a ton is happening, but don't worry.
- Bake at 375F for about 20 minutes. Then turn down the heat to 350 and bake another 20 minutes or until the internal temperature is about 200F. You will need to cover the rolls with some foil during the last 15 minutes or so, because they will brown on the tops well before they are done in the center. Internal temperature should be 195-200F.
- Remove from the oven and let sit for 15 minutes before depanning them to cool completely upright on a wire rack.
For the Honey Glaze
- Heat the butter, honey, and salt until the butter is melted.
- Whisk in the powdered sugar, vanilla, and enough water to make a fairly thin, pourable glaze.
- Pour and brush glaze in a thin layer all over the baked honey buns While they are still hot.
- Let cool completely.
For the Ganache Hearts
- Place all ingredients in a microwave-safe bowl.
- Microwave on full power for 45 seconds.
- Whisk until smooth.
- Cool glaze in the fridge until it's about the consistency of frosting so you can pipe it.
- Put the ganache in a piping bag fitted with a #10 round tip (or cut off about 1/4" of the corner of a Zip-top bag).
- Pipe a chocolate heart on the top of each of the 6 rolls.
- Garnish with white and pink sprinkles, optional.
- Heat them up for a few seconds in the microwave just a bit to serve.
Did You Make Any Changes?
Notes
Overnight Version:
After kneading, you can put the dough in the fridge overnight. You can also do the first rise, shape the rolls, and then refrigerate them in the pan overnight. In either case, allow the dough to sit for about 45 minutes before continuing the recipe where you left off.To Make Smaller Chocolate Honey Buns
Slice roll into 12 rather than 6 slices and place in 2 8" pans, 6 in each. Reduce baking time to 15 minutes at 375 and start checking at 10 minutes at 350F. Storing: Keep on the counter in a sealed container for one-two days. For longer storage, cut rolls apart and freeze in an air-tight freezer bag. These are best served warm, so heat on medium power in the microwave for a few seconds before enjoying.Nutrition

Hi, y’all! I hope you’ve enjoyed this post and hopefully also learned a thing or two.
If you like my style, I invite you to sign up for my occasional newsletter, The Inbox Pastry Chef.
Expect updates on new and tasty recipes as well as a bit of behind-the-scenes action. I hope to see you there!
Thank you so much for being here, for spending some time with me today, and for allowing me to keep doing what I love to do.
Enjoy the chocolate honey buns, friends!
Have a lovely day.


Join in Today!
Made this for hubby for Valentine’s day. Easy recipe to follow and this was the biggest hit….he said I knocked it out of the ballpark .. will definitely make again…
Hooray! So glad he was impressed, and I’m thrilled you both love them. And thank you so much for rating! ❤️