


Jelly donut lovers, your ship has come in. If the raspberry-filled and glazed jelly donut is your Ultimate (like it is mine), I have the recipe for you.
Made with a super slack enriched dough for lightness and an intense raspberry filling for maximum raspberry goodness, you’ll want to make these at your earliest possible convenience!
You may also want to give my plain glazed donut recipe a try. For ease of browsing, you can find all my sweet yeast dough recipes in one place. Now, let’s get into it.
Pastry Chef Online Participates in Affiliate Programs. If you make a purchase through one of my links, I may earn a small commission. For more information click to read my disclosure policy

Watch my glazed jelly donut web story here.
I made these a few weeks ago and they were so delicious! My adult children said they were the best they’ve had.
Reader Debra
Glazed Jelly Donuts, At a Glance
✅Skill Level: Intermediate
✅Skills: Kneading dough, shaping dough, making quick jam, filling and glazing
✅Type: Filled Donuts
✅Number of Ingredients: Donuts: 9 Filling: 6 Glaze: 5
✅Prep Time: 45 minutes (active time)
✅Rise Time: about 2 hours split between first and second rise
✅Cook Time: 25 minutes
✅Yield: 12 donuts plus maybe 12 fried scrap pieces/”donut holes”
Jump Straight to the Recipe
Tasting Notes
Let’s just get straight to the chase and look at the inside of these bad boys.
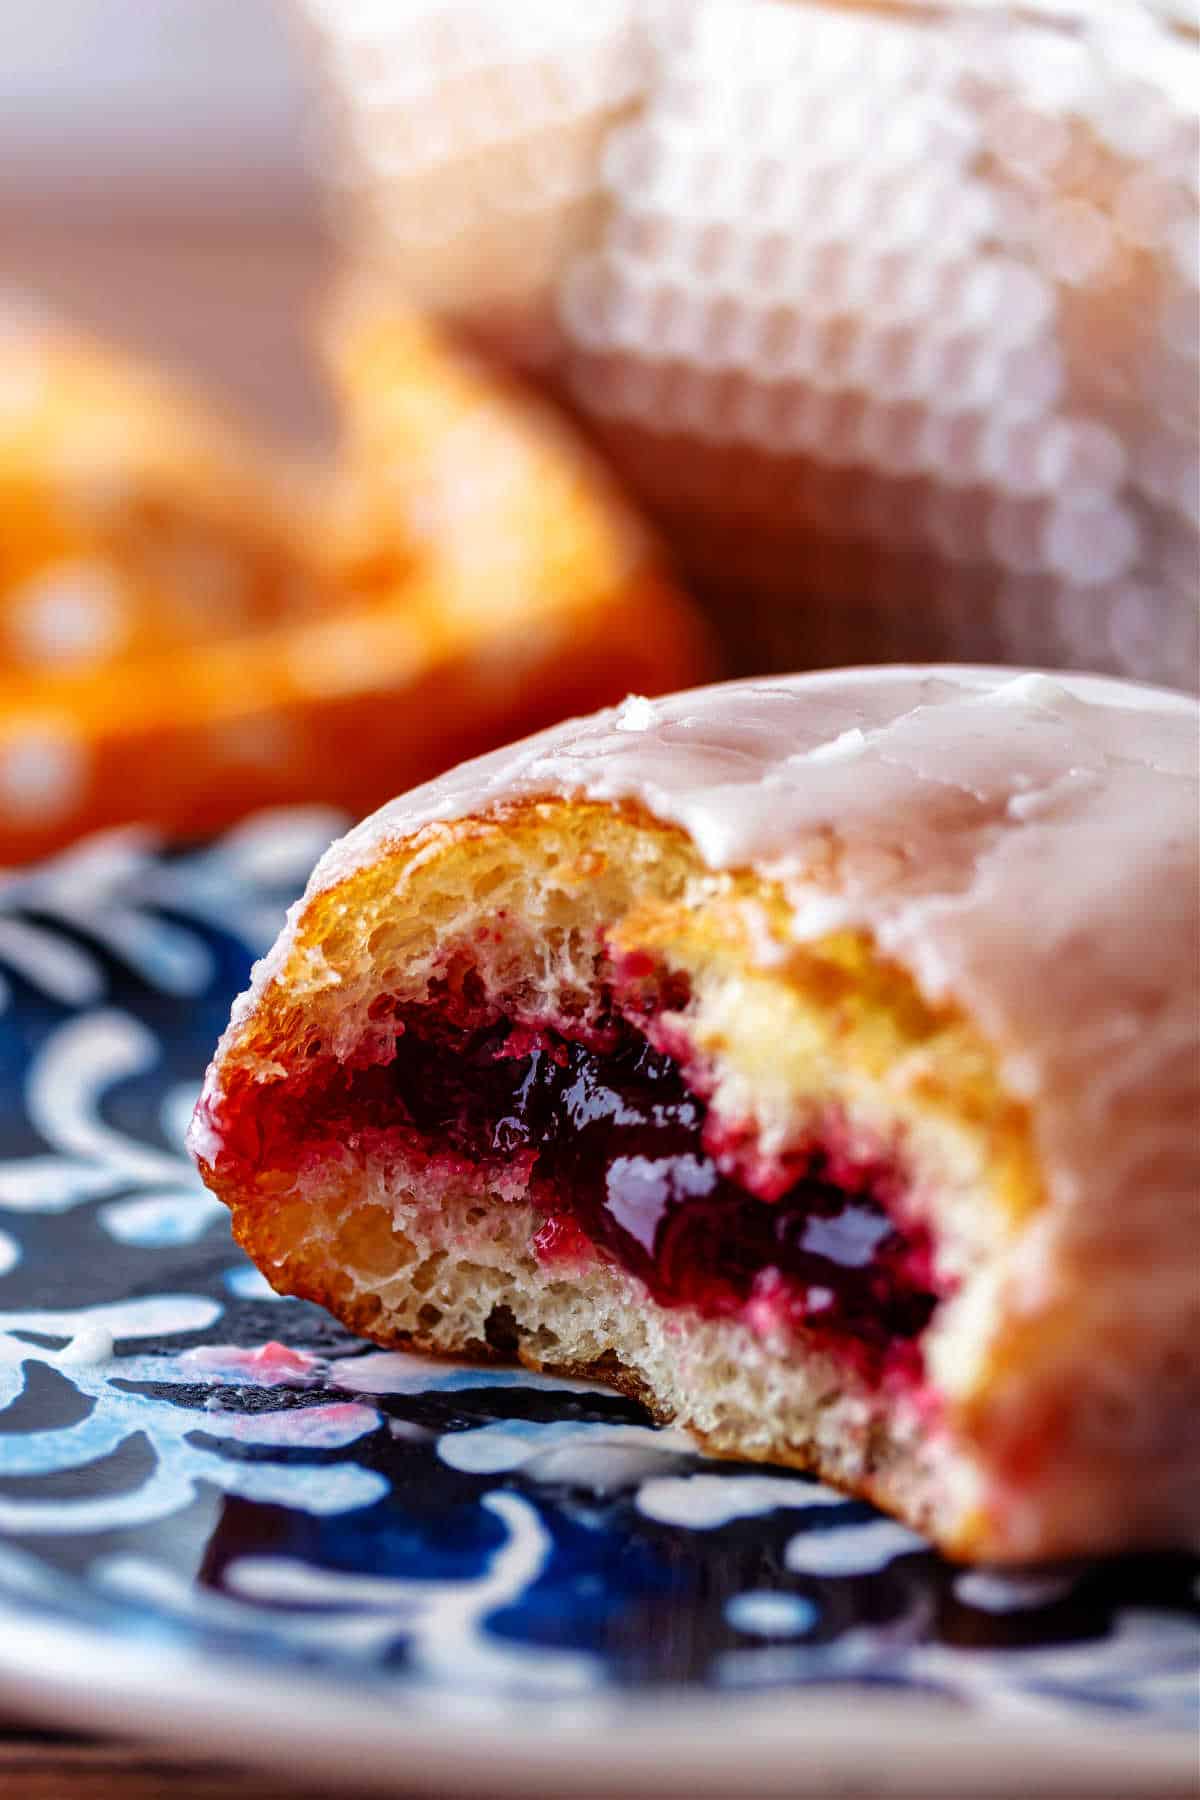
These doughnuts are really pretty excellent, y’all.
The filling, which you can strain to make it seedless if you want, is not too sweet and intensely raspberry-y. Any leftovers make a pretty excellent jam, too!
The doughnuts themselves are light and airy and puff up beautifully in the hot oil.
Making Filled Donuts
Making filled donuts is quite the process. If you’re familiar with it, you can jump straight to the recipe.
For those of you who’d like some step-by-step instructions, stick with me. We’ll go over ingredients, how to make each component, and how to put them all together into delicious, raspberry jelly-filled treats.
First up, ingredients:
For the Donut Dough
Here’s what you’ll need to make your dough.
It’s worth noting that you can use this dough to make any donut you want, from plain glazed to chocolate-dipped to maple-bacon or whatever you can think of.
If you need an egg-free version, use my dough for regular glazed donuts. That dough doesn’t contain eggs.
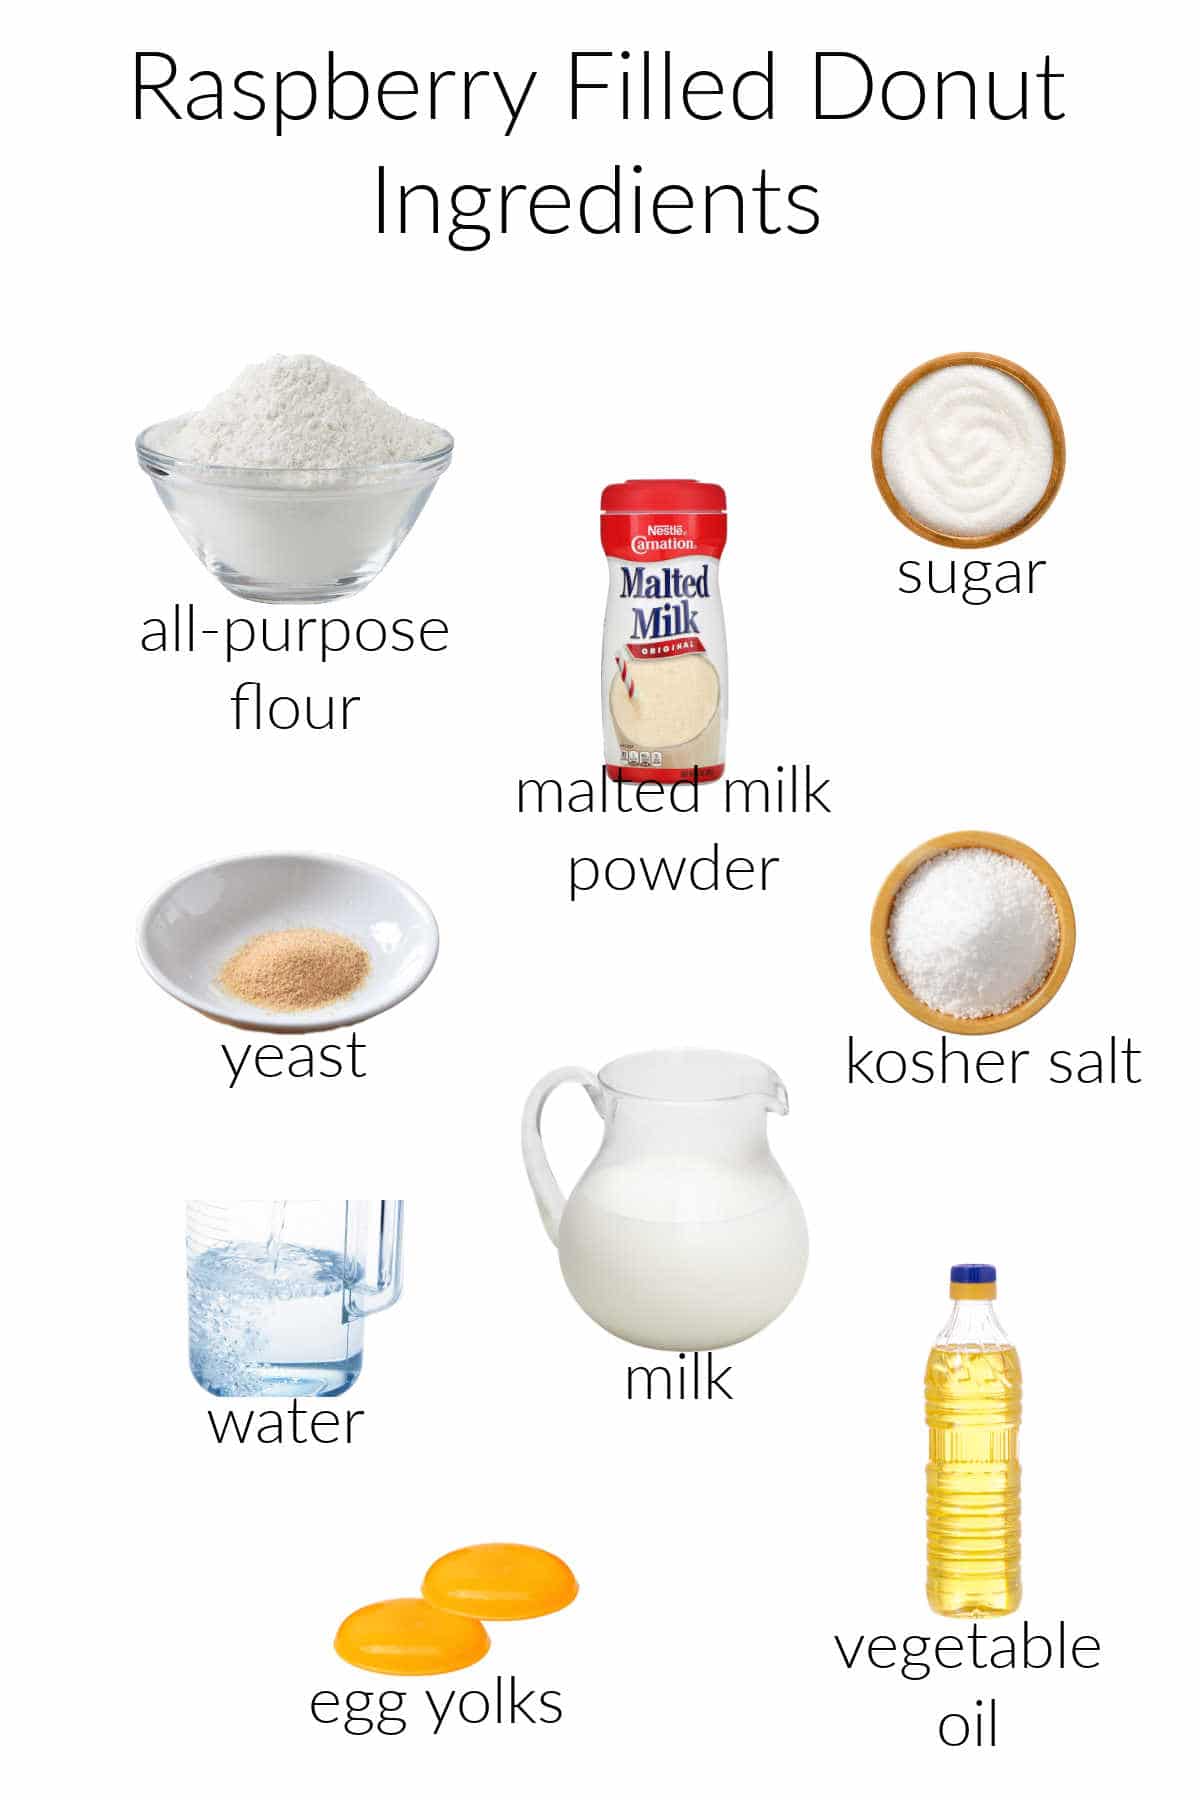
- flour: This provides the bulk and the gluten structure of the donuts. I recommend all-purpose. If you use bread flour, you’ll have a somewhat stiffer dough (though still slack) and your donuts will be a bit chewier
- sugar: provides some sweetness (but not too much), retains moisture, and assists in browning
- malted milk powder: Adds that delicious malty-donut flavor. If you don’t have malted milk powder, you can substitute dried or instant milk.
- yeast: either active dry or instant will work. If you are using active dry yeast and you’re not sure if it’s still alive, proof the yeast in the water called for along with a little bit of the sugar. Once it gets foamy, add everything to the mixer bowl.
- salt: I use Morton’s kosher. You can use fine salt as well, but decrease the amount by about 1/3.
- water: makes up part of the liquid in the dough. You could use all water, but then the donuts might not brown as much since it’ll have fewer milk solids in it to brown well
- milk: I use whole milk. You may substitute 2% if you like. Don’t use all milk. Keep the liquid 1/2 milk and 1/2 water so the donuts don’t overbrown (again, because of the milk solids)
- egg yolks: for added richness and color as well as flavor and emulsification of a very wet dough
- vegetable oil: you can substitute with melted butter if you prefer. Either helps to carry flavor and tenderize the dough
For the Filling

- raspberries: Substitute strawberries if you prefer
- sugar: The main sweetener in the filling. I kept it a bit on the tart side to balance out the sweet glaze
- kosher salt: Rounds out flavors and counteracts and bitterness
- lemon juice: Balances the berry sweetness and brings some brightness to the filling. You can substitute lime juice or even a little vinegar if that’s all you have
- cornstarch: Since this is a quick-cook filling as opposed to a jam, the cornstarch provides thickening
- white grape juice: Used for the cornstarch slurry. You can certainly use water, but using a fruit juice adds a bit of flavor
It is also possible to make the filling without the white grape juice. Just allow the sugar, berries, lemon juice, salt, and cornstarch to hang out together in a pan for about 30 minutes before putting it over heat.
The main issue is making sure the cornstarch doesn’t get clumpy before cooking. If you do choose to cook everything together rather than adding a slurry once it comes to a boil, you can reduce the cornstarch by 1 Tablespoon.
Jenni Says: This is a filling rather than a jam, so the sugar content is a bit lower than in jam. If you’d like to make a jam filling, follow the instructions in my French-style strawberry preserves recipe, or for a quicker version, use my mixed berry jam recipe.
For the Glaze

- butter: Salted or unsalted. Even if using salted butter, you may need an extra pinch of salt
- neutral oil: Use an oil that doesn’t have a lot of flavor like avocado oil, sunflower oil, or canola
- powdered sugar: This glaze calls for a pound of powdered sugar. You will not need all of it, not even close. But you do need enough glaze to make it easy to dunk your donuts in it to make sure they’re thoroughly coated. Then you can just let the excess run off.
- kosher salt: Brings all the flavors into focus. If you’ve used salted butter, taste the glaze, and then add additional salt if you think it needs it
- boiling water: Using hot water ensures the butter stays melted and the glaze stays nice and thin while you’re glazing.
Jenni Says: If your glaze begins to thicken, microwave it for a few seconds until it thins out. You can also whisk in a bit more hot/boiling water to keep the texture nice and loose.
How To Make the Components
Making the Dough
Note that this is a very slack dough. It is almost a batter. Don’t be intimidated, though. While I do not advise adding extra flour to the dough, in order to roll it out to make your cuts, you will need to liberally flour the counter and the dough itself.
Here’s how to make the dough:

- Whisk all the dry ingredients together in the mixing bowl. Add wet ingredients, including egg yolks, to a pitcher and pour the wet ingredients in over the dry ones.
- Mix on low, scraping the bowl as necessary, until a thick batter forms.
- Knead on medium speed for 15 minutes. Note the texture of the dough in photos 2-3. The dough isn’t really ever going to come together around the dough hook, so look for “pull back” as the dough hook orbits inside the bowl. The batter/dough will begin to pull back in strands, and that will let you know your gluten is nicely developed.
- Again, note the texture of the dough. It is Super Soft and very sticky.

- Scrape the dough into the bottom of the mixing bowl and brush it with oil/spray it with pan spray.
- Cover the bowl with a lint-free towel. Heat a mug of water on high power for 3 minutes. Carefully move the mug to the side, and put your dough in next to it. Close the microwave, making sure to turn on the surface light (if your microwave is over your stove), and allow the dough to rise.
- Dough will double in size.
- Liberally flour your clean work surface, scrape the soft dough out into the flour, and liberally dust the top of the dough with flour.
Shaping and Frying

Since the dough is so soft, it pays to prepare to work with it.
- Fold a piece of parchment into 12 squares.
- Unfold it, and then cut along the lines. Spread them out on a half-sheet pan.
- Grab a round cutter. My favorite size is the 3″ one, which in my set of Ateco cutters is the 3rd from the largest.
- Gently roll out the dough, then cut straight down, twisting the cutter on the counter to make sure you cut all the way through the dough.

- Use a bench knife or spatula to pick up each round of dough and place each on one of the pieces of parchment. Cover and let rise for about 45 minutes.
- Donuts should be noticeably “puffy.” See note, below.
- Carefully slide each donut on its little piece of parchment into the hot oil.
- Use a pair of tongs to pull each piece out from under the donut.
NOTE: To check that your donuts are ready to fry, put one in the hot oil after the second rise. It should bob high in the oil. Only about 1/3 of the doughnut should be below the oil. If the donut rides too low in the oil, take it out, and let the whole tray rest for an additional 15 minutes or so.
Making the Filling
The filling is pretty straightforward to make, friends.

- Place the berries, sugar, salt, and lemon juice in a large pan. Have your cornstarch/white grape juice slurry ready.
- Mash the berries as they heat.
- Once the mixture comes to a boil, pour in the slurry and cook to thicken and reduce.
- Straining is an optional step. You can certainly leave the seeds in if you prefer. If you do decide to strain it, be sure to scrape the back of the strainer after pushing the filling through. You don’t want to lose any of that goodness.
I strained half of my filling so you could see what it looks like both with seeds and without:
Would you like to save this post?

And now you’re ready!
Putting It All Together: Making Jelly Donuts
Here’s how you turn 3 components into one excellent treat.

- Make sure your donuts are completely cool.
- Cut a slit in the end of each one with a small, sharp knife. Wiggle the knife gently back and forth opening a pocket inside the donut. Be careful that you don’t stab through to the other side and open up more holes!
- Load your filling in a piping back fitted with a larger round tip, like a #10, and then squeeze a healthy amount into each donut.
Jenni Says: This can be a bit of a messy process. If you have a helper, you might be less messy. Teamwork makes the dream work!
4. Once your donuts are filled, it’s best to let them rest for 30 minutes or so to sort of let the jelly become one with the donuts.
This makes it a bit less precarious when you’re glazing them. If some raspberry does get in the glaze, you can spoon it out, or just whisk it in and keep going.

- Melt butter together with oil and salt, then whisk in the powdered sugar as evenly as you can. It will be very lumpy and sad looking.
- Drizzle in hot or boiling water, a little at a time, until you like the consistency.
- See the thin texture of the glaze?
- Use a fork to lower each donut into the bowl of glaze and then spoon additional glaze over the donut until it is completely covered. Allow as much of the glaze to run back off into the bowl as possible before placing each donut on a rack for the glaze to set up. You can also just flip each donut onto its other side to completely glaze them. Whichever works best for you.
Tools for Doughnut Success
Since donuts are kind of a specialty baked (fried) good, it does help to have some special equipment to help you make them.

This section contains affiliate links. For more information, please see my disclosure policy.
Before we make these fried donuts, I do have some recommendations for some products that will make your glazed donuts project go smoothly.
A
But for breads, especially ones made with very slack, enriched dough, you’ll just get frustrated trying to make them by hand.
I recommend a good, solid stand mixer with direct drive and all metal gearing for years of service.
If you’re going to spend a boatload of cash, you want your investment to last more than a year or two.
And as much as I don’t love having a tool that only does one thing, a donut cutter is actually a really nice tool to own if you’re going to make a lot of yeast doughnuts or even cake donuts.
You can also get a set of graduated cutters. I use the third from the largest cutter to cut out the dough for filled donuts.
A Bismarck pastry tip makes filling doughnuts, eclairs and cream puffs a snap. You’ll want a good instant-read thermometer to check the temperature of your oil, and some cooling racks for both cooling and letting the glaze dry.
Tips for Filled Donuts Success

While doughnuts aren’t hard to make, you do have to follow some Rules to help ensure success.
Make sure you allow at least 30 minutes for the second rise–more if it’s cold in your kitchen. Your doughnuts should look puffy and should bob along on top of the oil and not be submerged.
What you’re looking for is a doughnut where 1/3 is submerged and the rest is bobbing above the oil.
When you turn it, another third will get golden brown and delicious, and the middle third will stay pale.
Jenni Says: A perfectly risen donut should have a nice wide, pale stripe around the center after frying.
What To Do with the Scrap Dough
Second-roll donuts will be a bit more dense than the first rolls, mostly because extra flour will be worked in as you gather the scraps into a ball.
Gather them up anyway, let the dough rest for about 15 minutes, and then roll it out.
Cut little shapes with straight edges using a pizza cutter or bench knife. Cover them and let them rise until nice and puffy.
Fry them up and toss them in powdered sugar. Add some cinnamon to it if you’d like. Or just toss them in cinnamon sugar and call it a day. Yum!

Yeast-Raised Doughnut Q & A
Technically you can freeze them filled, but I recommend if you’re not going to eat these babies straight away, you fry them, cool them completely, and then freeze them, well-wrapped in plastic wrap and then in a freezer bag.
They will be fine for a couple of months. When you’re ready to fill them, thaw them, still wrapped, in the fridge overnight and then set them on the counter until they come to room temperature. Then you can use your Bismarck tip to fill them however you like.
Honestly, they will have the best texture if you make, fill, and eat them (or share them) on the same day or within a day or two, but if you have to freeze them, you certainly can,.
I added this question in response to a reader’s question. The answer is yes, you can make and cut the donuts the evening before, spray them with pan spray, cover, and refrigerate them overnight, and then fry them in the morning.
Test a donut to see if it floats in water. It should sit about 1/3 in the water when it’s ready to fry, so if they sink lower, give them 30 minutes or so and test again. Just be sure to blot off the excess water after testing so your hot oil doesn’t sputter and splatter to much when you fry.
Questions?
If you have any questions about this post or recipe, I am happy to help.
Simply leave a comment here and I will get back to you soon. I also invite you to ask questions in my Facebook group, Fearless Kitchen Fun.
If your question is more pressing, please feel free to email me. I should be back in touch ASAP, as long as I’m not asleep.
A Note About Measurements
My recipes are almost all written by weight, including liquids, unless otherwise specified.
For accuracy and consistency of results, I encourage you to buy–and use–a kitchen scale.
I promise that baking and cleanup will be so much quicker and easier.
This is the scale that I recommend for home use. I have owned and used one for years.
Love This? Please Consider Rating and Reviewing
It helps me and other readers so much if you take a moment to rate and review this recipe.
Your star rating and comments help others decide whether the recipe is worth making, and your feedback helps me continue improving recipes here at Pastry Chef Online.
Other lovely ways to share include pinning or posting on your favorite social media platform.
Thank you so much for taking the time!


Glazed Raspberry Jelly Donuts
Equipment
- Ateco #229 Large Bismark Stainless Steel Pastry Tip – Great for Filling Eclairs optional for injecting the filling
Ingredients
For the Dough
- 12 oz all purpose flour 340 grams or a scant 3 cups
- 1.45 oz granulated sugar 41 grams 3 Tablespoons
- 1 oz malted milk powder or powdered milk, 28 grams or about 2 1/2 Tablespoons
- 2 teaspoons active dry yeast 6 grams
- 1 teaspoon kosher salt 5 grams
- 4 oz room temperature water 113 grams or 1/2 cup
- 4 oz room temperature whole milk 113 grams or 1/2 cup
- 2 large egg yolks
- 1.2 oz neutral vegetable oil 34 grams or 2 Tablespoons
For the Filling
- 20 oz raspberries fresh or frozen
- 14 oz granulated sugar
- 1 oz lemon juice freshly squeezed
- ¼ teaspoon kosher salt
- 5-6 Tablespoons cornstarch
- 2 oz white grape juice or apple juice
For the Glaze
- 1.2 oz neutral vegetable oil 34 grams or 2 Tablespoons
- 1.5 oz unsalted butter 43 grams or 3 Tablespoons
- heavy pinch kosher salt
- 1 pound confectioners sugar
- 1/3-1/2 cup very hot filtered water
Instructions
For the Dough
- In the bowl of your stand mixer, mix together the flour, sugar, malted milk powder, salt, and yeast. Whisk to combine. Fit the mixer with the dough hook attachment.
- In a pitcher or bowl, whisk together the water, milk, egg yolks, and oil, and then pour that into the dry ingredients.
- Mix on low speed. After about a minute, increase the speed to medium and knead for 15 minutes, or until the dough completely clears the sides of the bowl and you can see ropy gluten strands around the sides. It will still be gooey in the bottom, and you think it will never happen, but it will. Give it time.
- Scrape the dough down into the bottom of the mixer bowl into a smooth-ish mass. Spray with pan spray or brush with oil.
- Cover and let rise in a warm place (I boil water in the microwave and then move the mug to the side or back, making room for the covered bowl) until doubled, about 1 hour to 1 hour and 15 minutes. If using the cozy microwave method, make sure the surface light on the bottom of the microwave is on. That will make it even warmer in the microwave.
- Cut a 1/2 sheet pan sheet of parchment into 12 pieces and place them on a half sheet pan.
- Liberally dust your clean counter with flour, scrape the risen dough out onto the floured surface, and generously dust the top with flour. Gently roll out to about 1/2" thick.
- Using a 3" cutter, cut circles out of the dough and place them on the awaiting pieces of parchment, 1 donut per piece. You should be able to get 12 donuts from the first roll. Gathered the scraps together, let them rest covered so the gluten can relax and then reroll and cut into whatever shapes you want. Cover and let rest
- Spray the doughnuts with some oil or pan spray and cover with plastic wrap. Let rise in the cozy microwave (or other warm spot) for about 45 minutes or until noticeably puffy.
- In a large skillet, heat about 1-1 1/2" oil to 360F.
- Fry 1 donut first. Fry on each side for about a minute, flipping with a chopsticks or a knife. Your donut should have a pale line all the way around. If it does not, recover, and allow the rest of the doughnuts to rise an additional 10-15 minutes.
- Fry 2-3 doughnuts at a time. Be careful to regulate your heat by turning the heat down or even off, or by occasionally sliding the pan off the hot burner. Use an instant-read thermometer to check the temp and keep it between 355F-365F as much as possible.
- Remove to a rack with paper towels under it to drain and cool. Let them cool completely before filling and topping. This will take about 30 minutes.
- Once cool, fill a pastry bag fitted with a Bismarck tip with the raspberry jam. Insert the tip all the way into one side of the doughnut. Slowly squeeze the bag and fill the doughnut while slowly pulling the tip out of the doughnut. Don’t overfill. You want about 2 Tablespoons of filling per doughnut.
For the Raspberry Filling
- In a medium saucepan, combine raspberries, sugar, lemon juice, and salt. Whisk the cornstarch and juice together in a small bowl.
- Bring the raspberries to a boil over medium heat, smashing them as they soften and cook.
- Once the berry mixture is boiling, pour in the cornstarch slurry, scraping the bowl to get it all.
- Keep at a low boil, stirring frequently, for seven minutes.
- You may choose to strain the mixture to get out all the seeds so you have a seedless raspberry filling, or you can keep the seeds in it. Your call. Either way, cool to warm and then refrigerate until cool.
To Fill
- With a small, sharp knife, cut a small slit in one end of each donut, moving the knife from left to right to open a pocket inside each donut without slicing into the sides.
- Load the cooled filling into a piping bag fitted with a coupler or a large round tip, or use a zip top bag with a corner cut off. Insert the tip into the little pocket you cut and inject a fair bit of filling into each donut. Stand them up on their ends so the filling can set up without running out. An easy way to do this is to stand them upright in loaf pans.
For the Glaze
- Melt the butter and oil together over low heat.
- Whisk in the salt and powdered sugar as well as you can.
- Add 1/3 cup of hot water and whisk until smooth. You are looking for a thin but not watery glaze. If it seems thick to you, add a bit more water, a teaspoon at a time, and whisk again. If the glaze starts to thicken up at any point, microwave it for a few seconds and whisk it well. Or whisk in a bit more water. Either way will work.
To Glaze
- Place a doughnut into the glaze to coat and the flip over. Fish out the doughnut with a fork and tilt the doughnut to let all but a thin coating of glaze run off. The goal is for the glaze to be transparent, It should be almost invisible once it dries. Place on racks to allow the glaze to set up.
- These are best served the day they are made. Refrigerate any leftovers and warm them very gently in the microwave to serve.
Did You Make Any Changes?
Notes
Note on Raspberry Filling
You will not need the entire recipe of filling. Save the leftovers and use it in place of jam.Note on the Nutritionals
Chances are, if you’re making jelly donuts, you aren’t super concerned about the calories, but if you are, know that the calorie count was calculated with all the filling and all the glaze, but you’ll only use a bit over half the filling and about the same of the glaze. If that makes you feel any better.Storing
These are best the day you make them. Store leftovers in the fridge for 2 days, and microwave for 5-7 seconds before serving.Nutrition
Would you like to save this post?

Hi, y’all! I hope you’ve enjoyed this post and hopefully also learned a thing or two.
If you like my style, I invite you to sign up for my occasional newsletter, The Inbox Pastry Chef.
Expect updates on new and tasty recipes as well as a bit of behind-the-scenes action. I hope to see you there!

Thanks for spending some time with me today, friends. Enjoy your doughnuts!


Join in Today!
I just made these last night..never in the world did I think I could make doughnuts! I have a deeper appreciation for Pastry chefs..lol! Will definitely make them again!
You get 20/10 stars for making these donuts, Jennifer, and I’m so happy you enjoyed them. I hope the end result was worth all the production! ❤️
These look fantastic and I’m really excited to try them. You mention that it’s possible to save the excess jam filling – how long will it last in the fridge? Any tips for how best to store it? Thank you!
Hi, Hank! I hope you really love the donuts! Save the jam in a tightly-sealing jar in the fridge. There’s enough sugar in it that it should last you a good month or so. Use it however you’d use jam or as an ice cream topping, cake filling, or make a “fool” by swirling it together with whipped cream. OR use it as a jammy layer in a trifle. Enjoy!
Excellent, I appreciate the suggestions for other uses as well! Thank you very much!
Can you use canola oil in this recipe? Thank you.
Hi Rebecca! Yes, canola will work just fine. Other options would be sunflower, safflower and “generic” vegetable oil. Enjoy, and don’t hesitate to ask if you have other questions!
As a baker and pastry chef myself I am constantly trying new recipes. I weigh all my ingredients also. I tried this recipe myself this morning and followed your directions explicitly. To say it was sticky is an understatement and I had to throw everything in the garbage and complained about what a waist of ingredients.
I’m sorry it didn’t work out for you, Marie. I’d be happy to help troubleshoot, if you’d like. It is indeed a slack dough, but I find it is workable with oiled up or pan-sprayed hands.
I made these a few weeks ago and they were so delicious! My adult children said they were the best they’ve had. I want to make them for a weekend brunch but I don’t want to do all the work the same morning. I’m wondering if I could go through all the steps and after cutting them if I could cover and keep in the fridge overnight. Then take out and let them come to room temperature before frying them the day of the brunch. Can you advise me please?
Thanks!
Hi, Debra! I’m so pleased these were a hit with your family! Yes, you can absolutely refrigerate the cut donuts and fry them up on the day. I’d pull them out maybe 45 minutes before frying. Consider testing 1 straight from the fridge by floating it in a dish of water. When ready to fry, donuts should only sit down in the oil by about 1/3, so check with water to make sure they’re ready to go. Just carefully blot off the water before frying so you don’t get too much sputtering from the hot oil.
I Would Love To Try Some Of Your Recipes!!!!Sincerely Deborah Brown
Wonderful! Thanks for letting me know, and I hope you enjoy them!
I may have over mixed my batter because these didn’t come out as airy and melt away as I’d expected. However my biggest problem was some taste very oily. I’m sure my oil temp was the issue. I used a small deep fryer. If I try again I’ll try the Dutch oven with a thermometer.
I’m sorry they didn’t turn out perfectly for you. Were you able to get them to where they had a pale line around the center? That is what a well-risen donut looks like when fried, and it does take some practice to nail it. In a small fryer, I imagine the oil would cool quickly even when adding just 1 or 2 donuts to the oil, so I bet you are correct there. If you do try again with your Dutch oven, please let me know how they turn out!
Hi Jennifer. I just made these doughnuts for my mom for mother’s day. Followed the recipe as prescribed (except after cutting the doughnuts they rose over night in a cool setting so that I didn’t have to wake up early). They were delicious. Light and fluffy! Thanks for the recipe.
What a lovely gift for your mom, Owen! I’m so glad they turned out well! Take care!
I had a lot of problems with this recipe. I used a kitchen aid stand mixer to mix the ingredients, and I was left with a wet mess after an hour, let alone 15 minutes.
I added extra flour until it was able to be formed into a ball as described. It likely took double the amount stated in the recipe.
The glaze is an INSANE amount for what you need. After brushing over the doughnuts, I was left with a huge pot of leftovers, 10 times more than I’d ever need to use. A pound of sugar completely wasted and it just tastes like butter!
When I finally finished the recipe and went to reap the benefits of my hard work, I found that they in fact taste nothing like krispy kreme donuts, and in fact taste like buttered brioche bread rolls with jam inside. I’m so disappointed in this absolute waste of my time and money under the guise of making delicious donuts.
I hope you read this before attempting the recipe, look elsewhere. These are NOT krispy kreme donuts.
I’m sad and disappointed.
Hi, Sam.
I’m very sorry you did not experience success with this recipe. I would love to help you troubleshoot, and I’m always happy to answer questions should you run into trouble even in the middle of making something.
For my information, did you measure using a kitchen scale? I find using a scale invaluable to getting consistent results most inline with how I wrote the recipe and how it worked for me.
I will refer you to this part of the recipe:
“Mix on low speed using the dough hook. After about a minute, increase the speed to medium and knead for 10-15 minutes, or until the dough completely clears the sides of the bowl. It will still be gooey in the bottom, and you think it will never happen, but it will. Give it time. Oil your hands well and gather the soft dough into a ball as best you can.”
Perhaps I should have been more explicit in saying the dough is very slack. I did describe that it would still be very gooey in the bottom of the bowl and that you would need to oil your hands well so you could gather the soft dough into a ball as best you can. Perhaps I should have been more clear in letting you know this is indeed a very soft dough. Adding all that extra flour would certainly give you an end product that would be much more dense than you’d want, and I can understand how frustrating that is.
As to tasting like brioche, my brioche recipe contains 1 pound, 1 oz of butter and 3/4 pounds of whole eggs. This dough is nowhere near as rich, calling for only 2 yolks and 3 Tablespoons of oil.
As to the amount of glaze, I freely admit it is a lot. I believe that amount of glaze is necessary to be able to dip and flip each doughnut to get it completely coated on all sides without risking smashing the doughnuts in the bottom of the bowl you’re using for glazing. I see you just brushed the glaze on, which is not the method I stated in the recipe. If you change the method, of course you would need less, and I leave those decisions to you. If you are going to deviate from the instructions, it is also quite alright to make less glaze than called for since you’d be using less per doughnut by brushing rather than dunking and flipping.
I do hope this helps some, and again, I am very sorry you had a bad experience making these doughnuts.
I had the same problem. After a while the mixture didn’t form a dough. It was more of a crepe mix than a doughnut one. Buuuut I didn’t use the scale and measured 1 1/2 cups. Terrible mistake!!! 12 weighted oz are different from liquid or dry oz. 12 oz od flour are actually 2 3/4 cups. After I made that adjustment the dough came out perfectly!
I’m so glad you were able to use a scale to get the desired results. I would even call 12 oz flour closer to 3 cups, as I scale my flour at about 4 oz/cup.
Although I always encourage people to get a scale, not many folks have them, especially in the US. Glad you enjoyed the donuts!
These look amazing! I wouldn’t mind giving these a try! I can imagine fresh and hot these taste amazing.
Thanks, Stephanie! All I can say is that I’m really glad they’re gone. Because they’re dangerous! lol