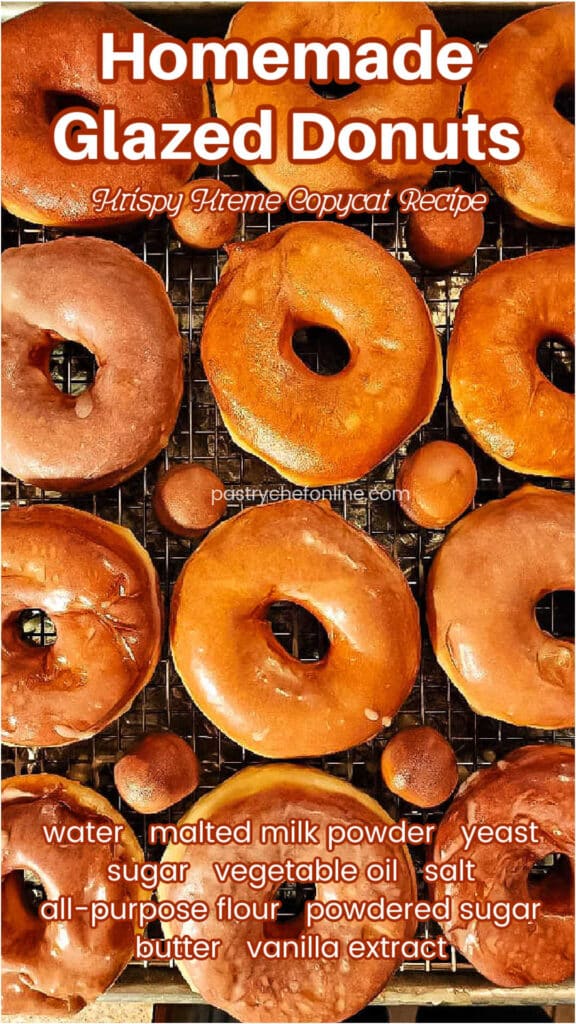
Friends, are you ready to make the best glazed donuts? I hope so, because today we’re making a copycat version of my beloved Krispy Kreme glazed doughnuts!
They have that crackly-thin glaze that shatters satisfyingly when you bite into them, and they are just all-around excellent.
If you’re a filled donut fan, you may enjoy my key lime pie donuts or my raspberry-filled donuts. For ease of browsing, you can find all my sweet yeast bread recipes in one place.
Pastry Chef Online Participates in Affiliate Programs. If you make a purchase through one of my links, I may earn a small commission. For more information click to read my disclosure policy
Glazed Donuts, At a Glance
✔️Skill Level: Intermediate
✔️Skills: Working with Yeast, Patience, Shallow Frying
✔️Type: Shaped Sweet Dough
✔️Number of Ingredients: 7 for the donuts, 5 for the glaze
✔️Prep Time: 20 minutes
✔️Rise Time: 1st rise: 2 hours, 2nd rise, about an hour
✔️Cook Time: 1-2 minutes per donut
✔️Yield: 12 donuts plus scraps and donut holes
Jump Straight to the Recipe
We really enjoyed the doughnuts. Soooo much better than storebought!
Neighbor Diane
Why Make Glazed Donuts (When You Can Buy Them)
Friends, I looked up the ingredients for Krispy Kreme donuts, and wow. There are very few ingredients that I recognize as food, but there are a bunch of stabilizers, acidity regulators, and whatnot.
If you want to take a look at the actual ingredients, you can see them here.
I don’t know about you, but I don’t have a shelf full of industrial food ingredients.
In other words, when you make homemade glazed donuts, you know exactly what you’re putting in them and also what you’re putting in your mouth.
The dough is slightly sweet, very soft, and flavorful. It puffs up beautifully when you fry it, so your donuts will end up light and delightful.
I use a fair amount of malted milk powder in the donuts, because I love that old-fashioned hint of maltiness. If you’re a fan of malt, you will enjoy these.
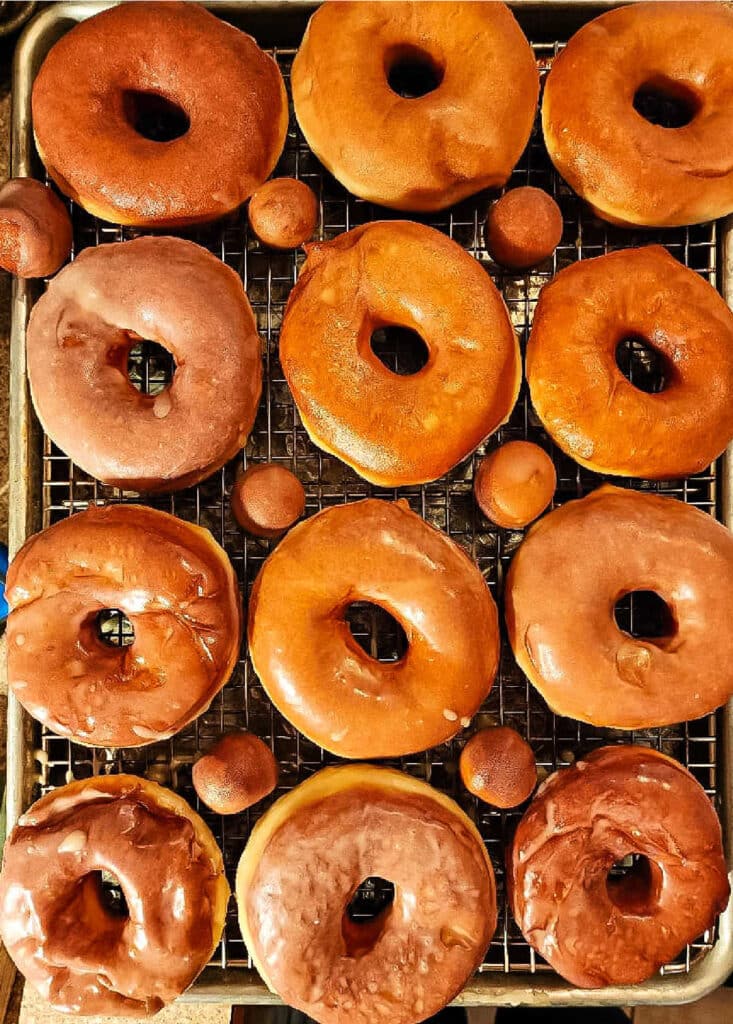
And just look at how they fry up:
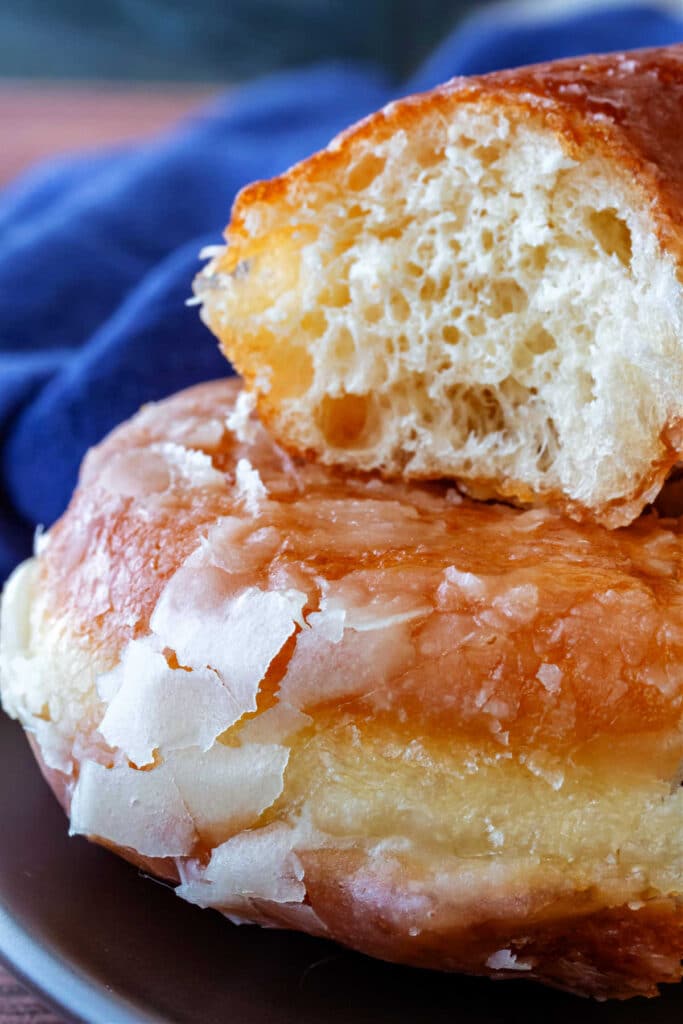
I made these when I literally wanted a Krispy Kreme copycat and I was thrilled to discover this recipe. I was a doughnut newbie and frying made me a little nervous, but all of the exact details in the recipe helped to put me at ease…These doughnuts are soft and tender and the glaze cracks and flakes just like you want it to when you take a bite. Highly recommend, especially eaten when they are still warm!
Reader Maggie
If you’re convinced and you do decide to make some, I have a favor to ask:
When you do make this recipe, it will help me and other readers if you:
✅Rate the recipes using the stars in the recipe card
✅Leave a review when prompted in the recipe card (If it’s a positive review, and I hope it is, I’ll use it in the post as social proof)
✅Leave a comment on the post
Thank you so much!
How to Make Homemade Glazed Donuts
If you’ve made donuts before and you don’t need a step-by-step walk-through, feel free to jump straight to the recipe.
For the rest of you, let’s take a look at the ingredients you’ll need:

- water: The liquid in the dough. If you don’t have malted milk powder, use whole milk instead
- malted milk powder: Provides that little *something* that makes these donuts taste old-fashioned. Your donuts will still be delicious if you don’t have malted milk powder, but it is a nice secret ingredient to have on hand
- yeast: Provides the rise for the donuts. I use instant yeast. If you use active dry, proof it first in a couple of ounces of the liquid called for before adding it to the dough
- sugar: Adds some sweetness and helps to tenderize the crumb. The sugar also assists in browning, ensuring that your donuts will turn out a glorious, golden-brown color
- vegetable oil: Carries flavor in the dough and also helps keep the donuts tender and soft
- kosher salt: Snaps all the flavors into focus and moderates the yeast activity so the crumb isn’t open and flabby
- nutmeg: Adds that old-fashioned glazed donut flavor. If you love crullers and/or eggnog, you’ll want to add nutmeg. It is technically optional, but it adds a lovely fragrance and mild flavor
- all-purpose flour: Provides the bulk and structure as well as the protein necessary for a nice rise. All-purpose is the sweet-spot for donuts, unless you like yours really chewy, in which case, use bread flour. NOTE: The recipe is written for 1 pound of flour. The donuts in the photos were made with 1 pound of flour. The dough is very soft and somewhat sticky as is. For even lighter doughnuts, you may reduce the flour to as little as 14.5 oz, but know you’ll end up with something that’s more thick batter than dough, and you’ll have to flour your surface and the dough itself pretty heavily to work with it. BUT, your doughnuts will be even lighter and more ethereal than mine. If you’re used to working with really slack dough, I’d encourage you to give it a try
- butter: For the glaze. If you want to make yours taste as much like Krispy Kremes as possible, substitute oil for the butter. I like the buttery flavor, but it’s 100% your call
- powdered sugar: For the glaze
- vanilla extract: To flavor the glaze
Procedure
Making doughnuts is pretty much like making any other yeast-raised treat.
The main difference, of course, is that these fry rather than bake.
Here are the broad strokes:
- Make the dough and let it rise.
- Shape the dough and give it a second rise.
- Fry.
- Glaze.
The complete recipe is at the bottom of the post, and you can jump straight to it if you’re good to go.
These next sections go into a bit more detail about how to achieve Donut Nirvana.
Making the Dough
Would you like to save this post?
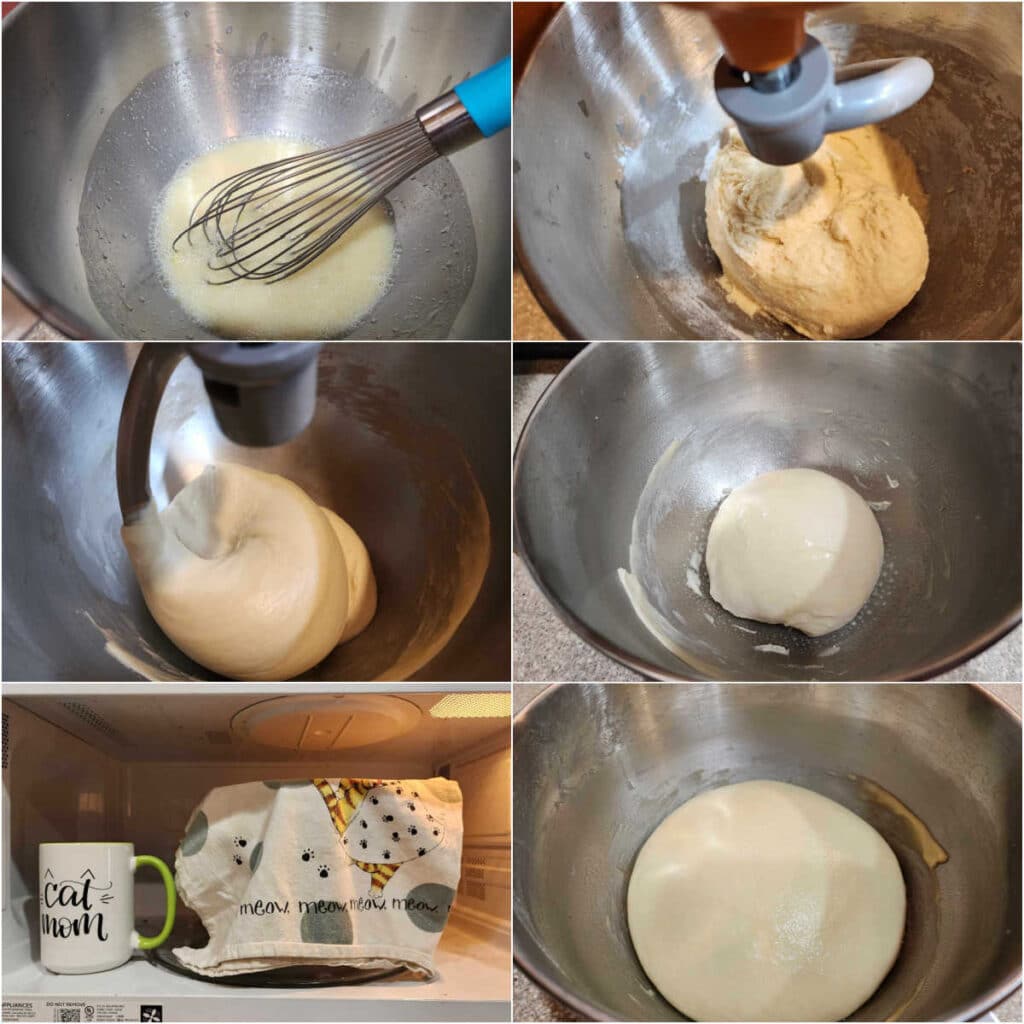
- Whisk the water, malted milk powder, salt, yeast, sugar, and oil together in your mixer bowl, and then add the flour all at once.
- Mix with your dough hook on low until the flour is incorporated, scraping the bowl as necessary, and then knead for about 15 minutes.
- The finished dough will be smooth, shiny, and supple. If you choose to use less flour (as discussed in the Ingredients section), your dough will not climb the dough hook, and it will be much softer and more like a thick batter with a lot of it sticking in the bottom and around the sides of the bowl. That’s fine. That’s what it does. It will, however, be shiny and very stretchy.
- Form the dough into a ball in the bottom of your mixer bowl and spray it with pan spray.
- Cover with a tea towel. In the microwave, heat a mug of water to a boil, and then slide it to one side of the oven. Place the covered dough in the microwave and close the door. Allow the dough to rise until it is doubled in size, about 2 hours. You may have to reheat the water once or twice. Just take the bowl of dough out before you do!
- Voila, the risen dough.
Shaping and Second Rise
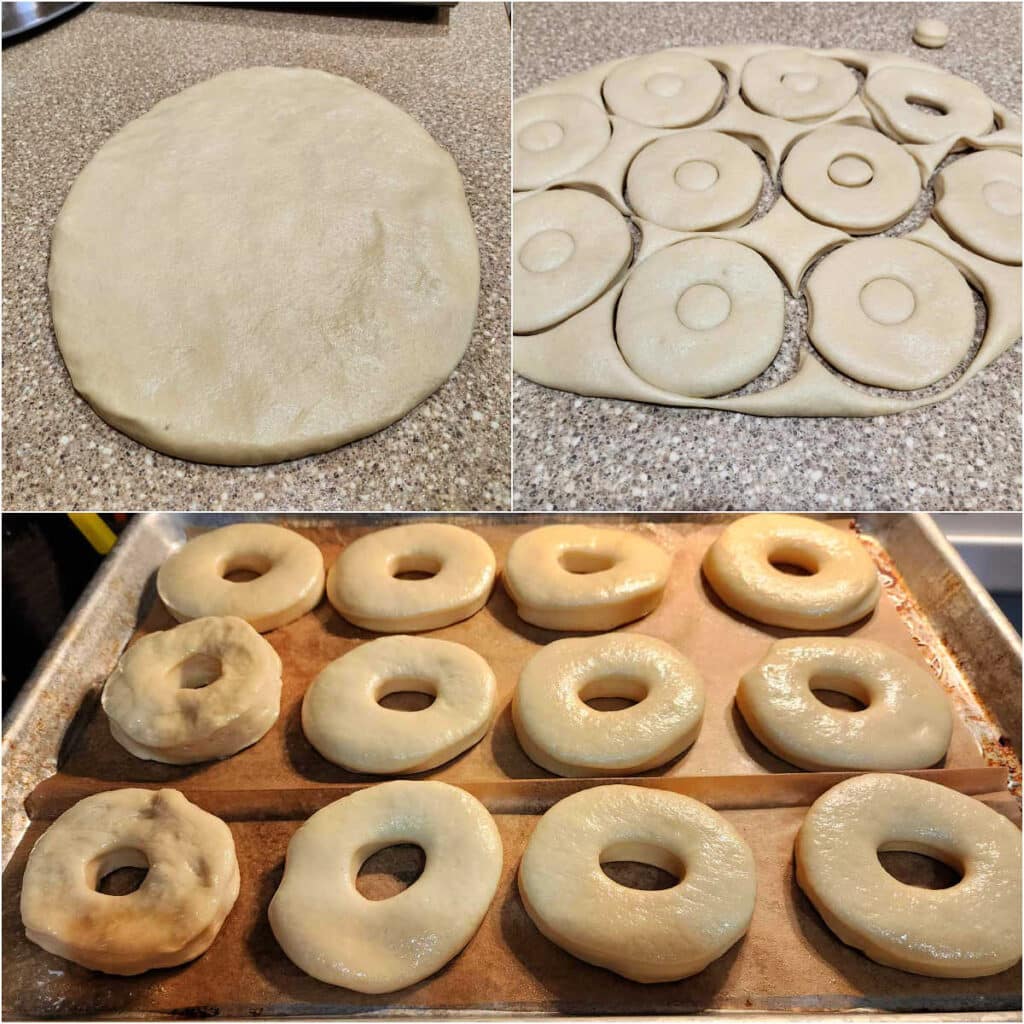
- This dough is soft enough that you shouldn’t have to use a rolling pin to get it to a reasonable thickness for donuts. Just pat it out with oiled or wet hands. If you use less flour, you’ll have to gently roll with a lot of flour dusted on the counter and on top of the dough.
- Using your doughnut cutter or two round cutters, cut your shapes out as close together as you can.
- Place the cut rounds onto their own individual squares of parchment. Note this was the first batch I made, and I ended up cutting the parchment around the donuts using a knife. It’s doable, but pre-cutting makes much more sense.
Lightly spray the doughnuts with pan spray, cover them, and let them rise in a cozy place until nice and puffy, about an hour.
By the way, do you see those two, bumpy sort of guys on the lower left of the pan? Those were second rolls. Which is why I’m telling you not to roll twice but rather just cut all the scraps into bite-sized pieces and fry them up as donut holes.
You’ll thank me for this tip.
Frying
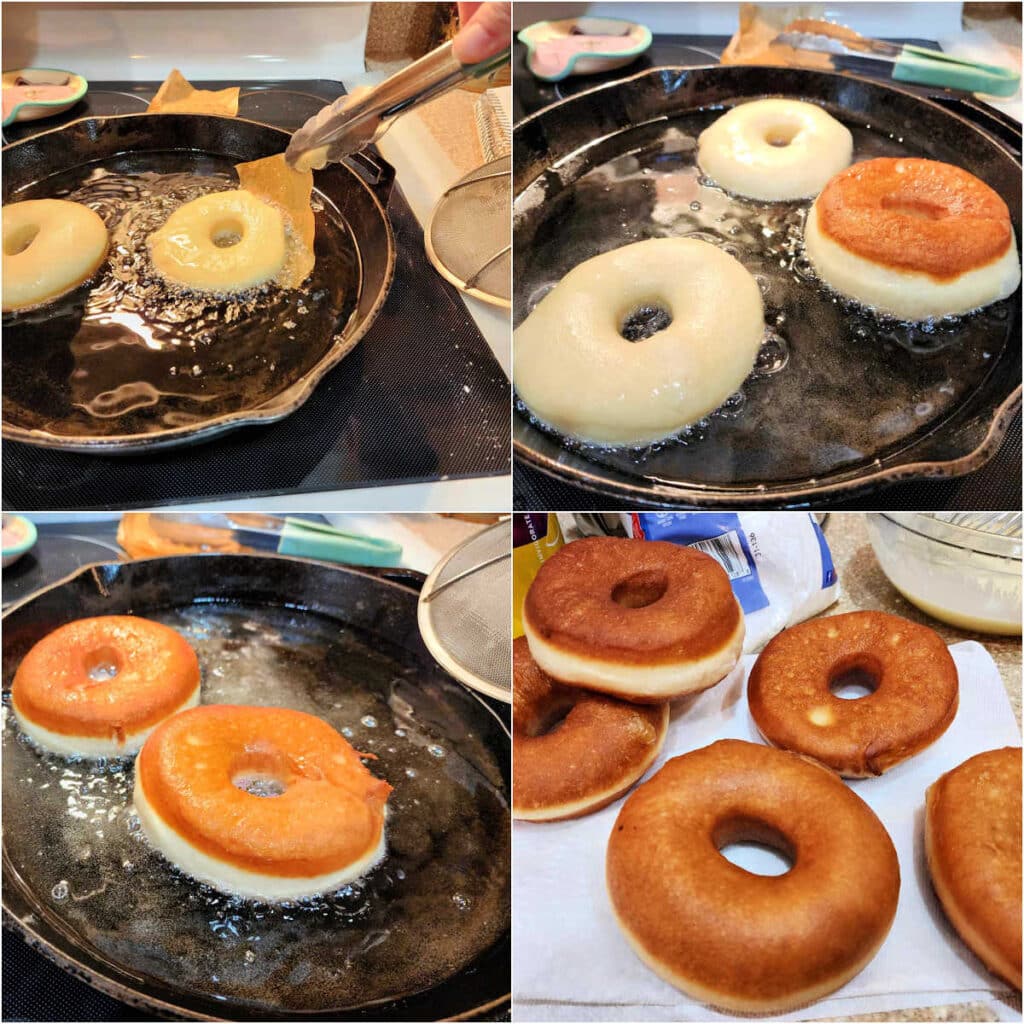
- Carefully place each donut and its little parchment landing pad into the oil, and then use tongs to slide the parchment out from under each one and set it aside.
- Well-risen donuts will float fairly high in the oil, leaving a pale line all the way around the centers. Flip them gently with a spatula or skimmer.
- Notice how high they sit in the oil. They should only be submerged a little under halfway.
- As each donut finishes frying, place them on several layers of paper toweling to drain and cool.
Frying Tips
A. To begin with, fry one donut. That’ll be your test to see if they’ve risen enough. The donut should have a pale stripe around its equator. If it doesn’t, leave the rest to rise for an additional 15 minutes or so, and then try again.
B. To help with turning, you can flip each donut up onto its side against the side of the skillet and then coax it back down into the oil on its other side. If you do this gently, you won’t hurt the donut.
C. Fry only 3 donuts at a time, and frequently check your oil temp so you can make adjustments as needed. Turn the heat up, or down, or slide the pan off the burner entirely for a minute or two if necessary.
Glazing
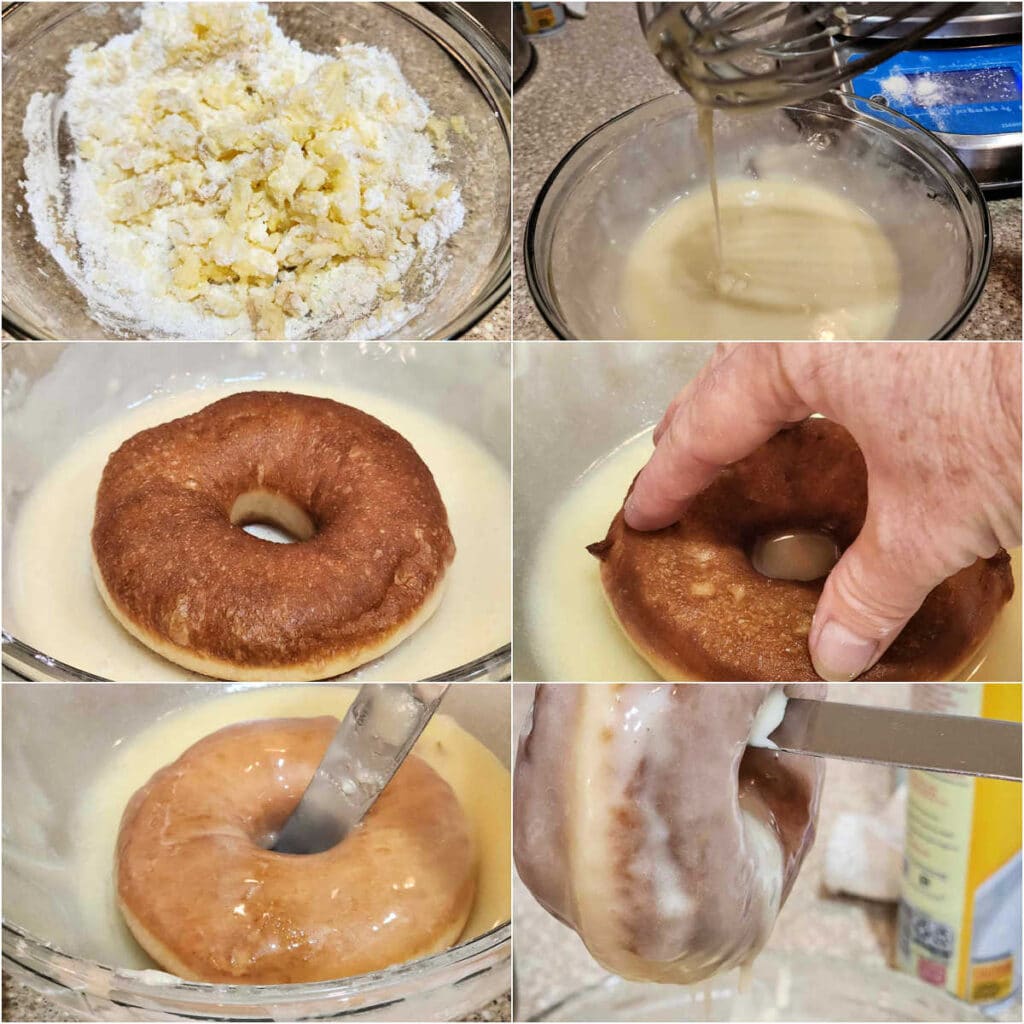
- To make the glaze, melt the butter and whisk the powdered sugar, salt, and vanilla in as well as you can.
- Thin the glaze with boiling water until it is thin and drippy.
- Place a donut in the bowl of glaze and
- press it down so it is half-submerged.
- Flip the donut and then, using a knife or chopstick in the hole, swirl it around to completely coat it.
- Hold the donut up using the blade of the knife through the hole. Pretend you are jousting. Shake the donut to help encourage all excess glaze to run off.
You will have to occasionally reheat the glaze in the microwave or add a bit more boiling water to keep the consistency thin. You really want the glaze to set up almost transparent.
Specialty Equipment
To cut the donuts, you have two choices.
Either use a doughnut cutter, or use two round cutters. It’s up to you.
Glazed Doughnut Q & A
Donuts are best eaten the same day you make them, if not immediately. You can reheat leftovers the next day. If you still have some left, use them to make donut bread pudding.
Yes, just cut them with a round cutter, fry them the same way, and fill them once they’ve cooled.
Questions?
If you have any questions about this post or recipe, I am happy to help.
Simply leave a comment here and I will get back to you soon. I also invite you to ask questions in my Facebook group, Fearless Kitchen Fun.
If your question is more pressing, please feel free to email me. I should be back in touch ASAP, as long as I’m not asleep.
A Note About Measurements
My recipes are almost all written by weight, including liquids, unless otherwise specified.
For accuracy and consistency of results, I encourage you to buy–and use–a kitchen scale.
I promise that baking and cleanup will be so much quicker and easier.
This is the scale that I recommend for home use. I have owned and used one for years.
Please Share And/Or Rate the Recipe
It helps me and other readers so much if you take a moment to rate and review this recipe.
Your star rating and comments help others decide whether the recipe is worth making, and your feedback helps me continue improving recipes here at Pastry Chef Online.
Other lovely ways to share include pinning or posting on your favorite social media platform.
Thank you so much for taking the time!

A. To begin with, fry one donut. That’ll be your test to see if they’ve risen enough. The donut should have a pale stripe around its equator. If it doesn’t, leave the rest to rise for an additional 15 minutes or so, and then try again.
B. To help with turning, you can flip each donut up onto its side against the side of the skillet and then coax it back down into the oil on its other side. If you do this gently, you won’t hurt the donut.
C. Fry only 3 donuts at a time, and frequently check your oil temp so you can make adjustments as needed. Turn the heat up, or down, or slide the pan off the burner entirely for a minute or two if necessary.
Glazed Donut Recipe
Ingredients
For the Donuts
- 8 oz water 226 grams or 1 cup
- 2.25 oz malted milk powder 112 grams or 1/2 cup
- 1 teaspoon instant yeast 4 grams
- 2.75 oz sugar 78 grams or about 1/3 cup
- 1.65 oz neutral vegetable oil 47 grams or 1/4 cup, I use avocado oil
- 1 teaspoon kosher salt 5 grams, I use Morton's
- several gratings whole nutmeg about 1/4 teaspoon (optional but lovely in doughnuts)
- 16 oz all-purpose flour 1 pound, 454 grams, or about 3 1/2 cups
For the Glaze
- 2 oz unsalted butter 1/2 stick, 57 grams, or 1/4 cup
- 8 oz powdered sugar 226 grams or 2 cups
- heavy pinch salt
- ½ teaspoon vanilla extract
- boiling water enough to thin to a "drippy" glaze
Instructions
To Make the Dough
- Place all the ingredients in the bowl of a stand mixer fitted with the dough hook attachment and mix on low until all the flour is incorporated. Scrape the bowl as necessary.
- Once the dough has come together, knead on medium speed until the dough is smooth, shiny, and very stretchy, about 15 minutes. Note the dough is very soft, so it won't clear the bottom of the bowl. Think of it more as a very thick batter rather than a dough.
- Scrape any dough from the sides of the bowl, spray the top of the dough with pan spray, cover, and let rise in a warm spot for about 2 hours, or until doubled in volume.
- While the dough is proofing, cut a sheet of parchment into 12 squares, about 4"x4" and arrange them on half sheet pan so they're touching but not overlapping. Set that aside until the dough has finished rising. Have
To Shape the Donuts
- Heavily flour your work surface, and scrape the proofed dough onto the flour. Flour the top of the dough and press the dough out until it's about 1/4" thick. No need to use a rolling pin–the dough is soft and easy to work with.
- Cut out donuts using a 3 1/2" donut cutter or two round cutters, a larger one to set the diameter and a smaller one for the holes. Place each proto-donut on one of the pieces of parchment, spray them all lightly with pan spray, and set in a warm place to proof in a cozy place until puffy, about an hour.
- Cut the scraps into 1" pieces. These will fry up into larger holes. I don't recommend rerolling the dough. The resulting donuts end up much heavier than the first rolls. Place the scraps on their own piece of parchment, spray and cover them, and let them rise as well.
To Make the Glaze
- In a medium-sized, microwave-safe bowl. melt the butter. Whisk in the powdered sugar, salt, and vanilla as well as you can, and then whisk in boiling water until you have a thin, drippy consistency. This will be a glaze that sets up so thin you can barely see it, so it'll need to be much thinner than a cake glaze. When it cools, it will thicken up, so right before you're ready to glaze, microwave it for about 30 seconds to thin it out again. You will have to do this periodically as you glaze your donuts.
To Fry and Glaze
- Arrange several thicknesses of paper toweling on a half-sheet pan (or a convenient space on the counter near the stove).
- Heat about 1" of vegetable oil in a large skillet to 360F/180C. Make sure you don't fill the skillet more than half full. I use my 12" cast iron skillet. You could also use a saute pan.
- When the oil is hot enough, turn the heat down so it doesn't get too hot, and carefully slide 1 donut and the parchment it's sitting on into the oil. Use tongs to grab the parchment, slide it out from under its donut, let excess oil drip back into the pan, and then discard.
- Fry for about 1 minute per side, using a knife to carefully flip the donut over once the first side is done. Your donut should have a pale line running around its center. If it doesn't, cover the rest of the donuts and let them rise for an additional 15 minutes. If this is the case, take the oil off the heat, then resume frying activities.
- Continue frying, 3 donuts at a time, until they're all golden brown and lovely. When done, remove each one from the oil with a spatula, allow excess oil to drip off for a few seconds, and then place them on the paper towel-lined pan.
- Once all the donuts are cooked, fry up the donut holes and the cut scraps. These will take less time to cook, so keep an eye on them.
- Set a large rack over a sheet pan or cookie sheet. Reheat your glaze and whisk it well. Take each donut, one at a time, and press it down into the glaze until it starts to come up through the hole. Flip it with a knife and, keeping the knife in the center of the donut hole, sort of stir it around so the donut does a bit of a hula hoop in the glaze, ensuring the entire thing is covered in glaze. Hold the donut up using the knife, and let the glaze drip off back into the bowl so the glaze is just about transparent. Place the glazed donut, prettiest side up, on the cooling rack. Repeat with the rest of the donuts. Don't forget to reheat the glaze periodically to keep it nice and thin.
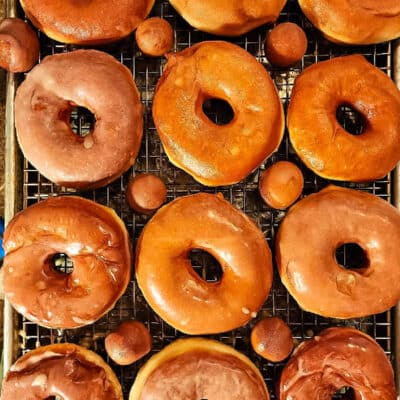
- Repeat with all the donuts, donut holes, and scraps. You should have just enough glaze to give everything a nice, thin coating. Allow the glaze to firm up and set so you can experience the "crackle" of the thin glaze, and then dig in.
- Donuts are best the day they're made, so do your best. If there are leftovers, cover them tightly and serve them the next day, reheated in a toaster oven until warm.
Did You Make Any Changes?
Notes
A Note About the Amount of Flour
If you are used to working with slack dough, cut back on the flour to 14.5 oz/411 grams. The dough will be wet like thick batter, so it’s a bit hard to work with, but the reward is that your donuts will be super light. Just make sure to flour the counter heavily and liberally flour the top of the dough before patting it out. Using 16 ounces sacrifices a bit of the ethereal quality of a Krispy Kreme for the sake of ease. Trust me, your doughnuts will be delicious, either way.Nutrition
Would you like to save this post?
And that’s it, friends. I really hope you enjoy the glazed donuts. They are a bit of work to make, but man, are they good!
Take care, and have a lovely day.

Hi, y’all! I hope you’ve enjoyed this post and hopefully also learned a thing or two.
If you like my style, I invite you to sign up for my occasional newsletter, The Inbox Pastry Chef.
Expect updates on new and tasty recipes as well as a bit of behind-the-scenes action. I hope to see you there!


Join in Today!
I made these when I literally wanted a Krispy Kreme copycat and I was thrilled to discover this recipe. I was a doughnut newbie and frying made me a little nervous, but all of the exact details in the recipe helped to put me at ease. That meticulous attention to detail really matters when you’re trying something new and when you want a specific result so Jenni clearly knows her stuff! These doughnuts are soft and tender and the glaze cracks and flakes just like you want it to when you take a bite. Highly recommend, especially eaten when they are still warm!
I am so thrilled that you enjoyed them and that they satisfied your need for a Krispy Kreme, Maggie! Been there, done that! =)
Hi Jennifer!
Thank you so much for the advice! They are oily when cool so i’ll look into a better way of draining them after frying.
I will also try the recipe that you developed! I cannot wait! 🙂
Thank you so much again!
-Caroline
You’re very welcome! Let me know how it goes! 🙂
Hello Jennifer!
I am attempting to make your donuts today and was wondering when/how much of the diastatic malt do I add?
Thank you!
Caroline
Hi, Caroline! I didn’t write up a recipe for these doughnuts. Rather I linked to the two recipes I tried. If I were making these today, I would probably add only a tablespoon or so of diastatic malt powder along with the flour. Hope that helps. Enjoy!
Hi Jennifer!
Thank you for the reply! Yes I was trying V2 (the one closer to the KK feel). I believe I put about 2 tablespoons in the last batch and the dough was very hard to handle (very wet). I’ll try it with 1 tablespoon on the next round and maybe a bit more flour!
Also, the donuts came out crispy/oily on the outside – Is my oil too hot? I was frying at about 360 degrees (used canola oil even though you said to use the crisco) and about 45 seconds per side. I tried to lower the temperature to 350 and fry it longer, but the inside wasn’t as light and was still a bit crispy on the outside.
Overall the inside was light and soft frying at 360 degrees, so I hope I’m almost there! Any insight is greatly appreciated!
Thank you again!
-Caroline
The dough *is* very wet–that is key. I used a ton of flour on my bench and on the dough, rolled extremely lightly and then cut out the doughnuts. Adding more flour will probably make them tough.
Also, keep in mind it may be very hard to get exact KK results. They are probably using some sort of magical proprietary oil for frying. Your temp sounds right. Do they still seem oily once cool? If so, it could be a matter of finding a way to drain them more thoroughly.
Good luck! Oh, also, I developed this recipe myself–you might like it: https://copykat.com/2017/08/14/krispy-kreme-glazed-donuts/
Why does every food blog these days have essays of nonsense. Recipe, method and a couple of pics, done. This is why people hate food “bloggers”
You need a recipe site like Epicurious or AllRecipes. Obviously blogs aren’t for you. And yet you took the time to comment, and for that I thank you.
How do I get the 2nd kk recipe?
Of the two I tried, I preferred this one: http://www.food.com/recipe/krispy-kreme-doughnuts-copycat-51199. I paid $.79 for the other recipe on the Top Secret Recipes website which you can find here, Pam: https://www.topsecretrecipes.com/Krispy-Kreme-Original-Glazed-Doughnuts-Copycat-Recipe.html You’ll have to fork over your $.79 cents to get more than just the first couple of ingredients. Enjoy!
Jenni, have you ever tried the product that Dunkin’ Donuts calls a ‘French Cruller’? If you haven’t, you really should give it a try… I’d love to hear your analysis of how you think it’s made.
It’s the only donut I ever crave. I think it’s basically a pate-a-choux, as it’s very eggy and so airy/puffy that it has only 2/3 the calories of their regular donut, according to their website. And the glaze on it is super-thin, like KK’s.
I don’t think it would be possible to form them at home the way they do, since they look like a mini version of your swirly bundt pan. But they’re definitely fried. And so very delicious that I only let myself go there once or twice a year, because I want to eat three or four of them at a sitting.
I am familiar with Crullers. KK makes them as well. I’m pretty sure they are made from fried pate a choux. The ones I’m familiar with look kind of like tractor tires! lol I will eat a cruller no matter who makes it. Love them. =)
today’s doughnuts not even close to those made in the 1940s.
Formulas do tend to change over the years, mostly as companies try to use less expensive ingredients as a way to increase profits. It’s sad, but it happens all the time. Yet another good reason to learn to make your own. Thanks for stopping in, Jennings. 🙂
Reading this post was practically a religious experience. It sent me back to the 60’s in Florida where eating a hot Krispy Kreme transported us college students to a fluffy sugary nirvana. Far Out!
I love your writing style and this delightful post in particular.
Thank you for your comment–made me so happy to read it this morning! There is almost nothing better than a soft, pillowy, still-warm Krispy Kreme doughnut. Happy sigh… =)
What kind of flour and yeast should I use when making doughnuts? Where can I buy it if it’s not available at my local grocery store. The only flour available near by is all purpose, bread flour, and self rising. I don’t ever see cake flour at the store. I only have fleishmans instant yeast too. Thanks!
I would go with all purpose flour, honestly George. And you’ll be fine with the instant yeast. Of the two recipes I tested, I preferred the one w/o cake flour anyway. The dough for these doughnuts is very slack (wet), so they will seem light and airy even if you use bread flour. Just make sure to use plenty of flour on both your bench and on top of the dough when rolling them out. And handle them lightly. You should be fine, but do let me know if you have any other questions. 🙂
Just saw this on FG or Tasteologie? Can’t remember where I came from but wow, I looooooove your attention to detail. You write and think like me. Not a detail spared, leaving nothing to the imagination, a very good thing when it comes to yeast b/c ppl seem to really mess it up 🙂 Although we live in San Diego, for 5 yrs we lived in Wrightsville Beach and then in N Myrtle. It was great. I’d go thru the KK drive thru at 3am sometimes and loved every second. Awesome post!
And pinned, of course!
Thank you so much for stopping by, Averie! Yes, I think it’s very important to try and give folks a ton of information so that they have a better chance at being successful. I feel like my job is to help folks be more confident cooks/bakers, and knowledge is power! =)
I must admit … I am not a doughnut person but after reading your vivid description of KK’s, I am now craving one desperately … Great job!!!
Thanks, CJ! I do adore a good KK doughnut, although I rarely get them. Because I know I’ll end up eating ridiculous numbers of them! lol
My word Jenni, I crown you magna cum laude of Doughnuttery! You had to know I’d peruse the detail section of your thesis. From visual accounts, I concur V2 is the victor of this Krispy Klone kwest. Thanks for the sweet smiles.
Tada! Thanks for the award, Brooks! =) I’ve been doing some more reading and research, and it sounds like there are other contenders out there too. And you know what that means, right?! More doughnuts! lol