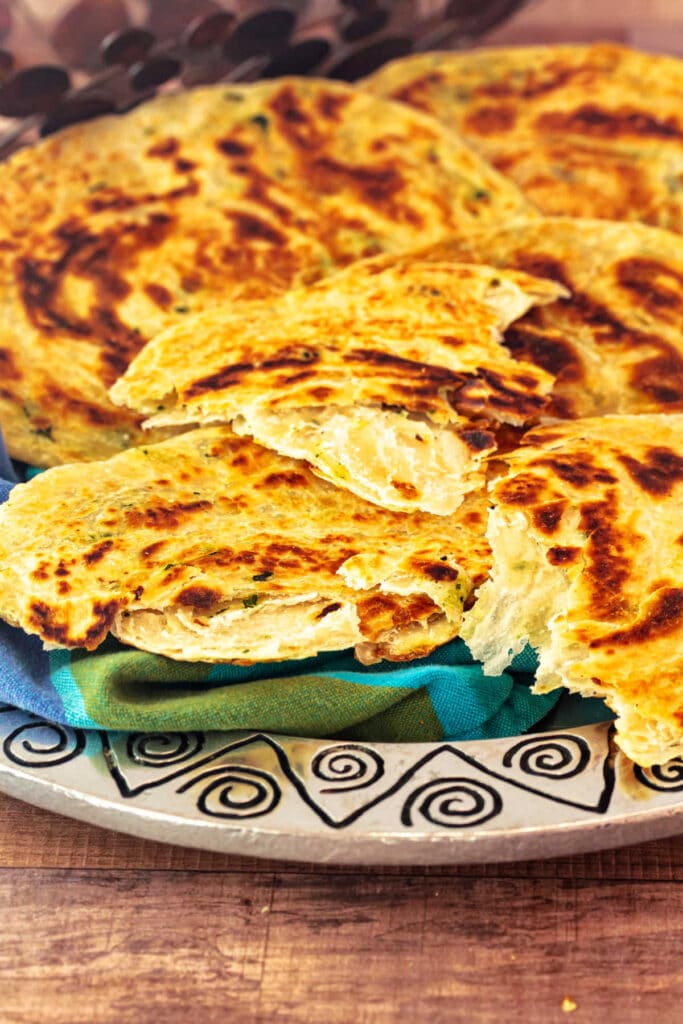
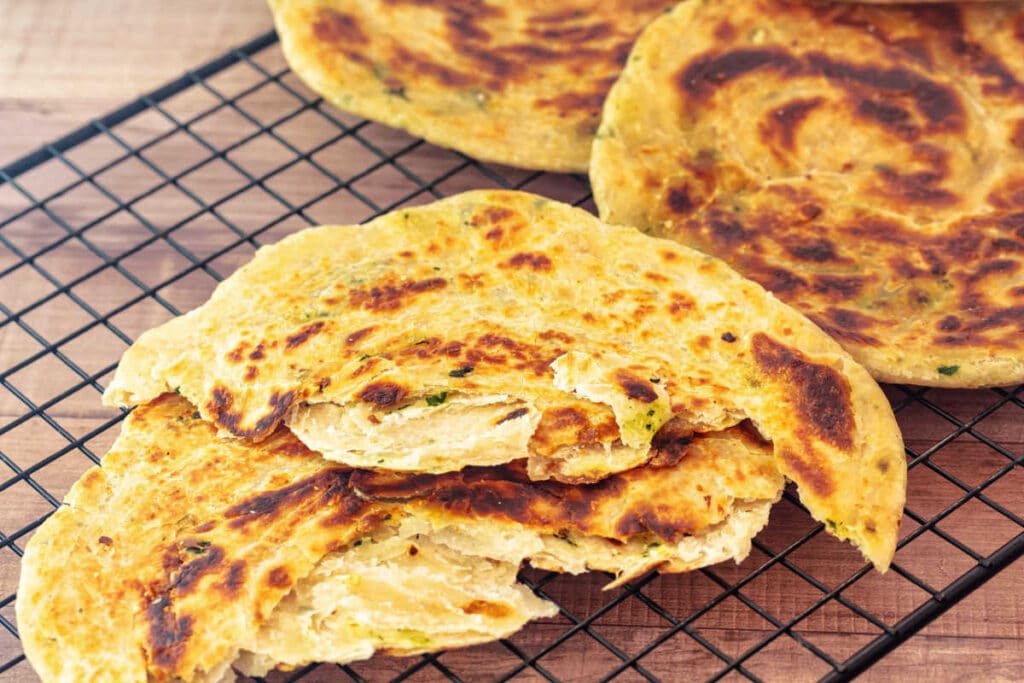
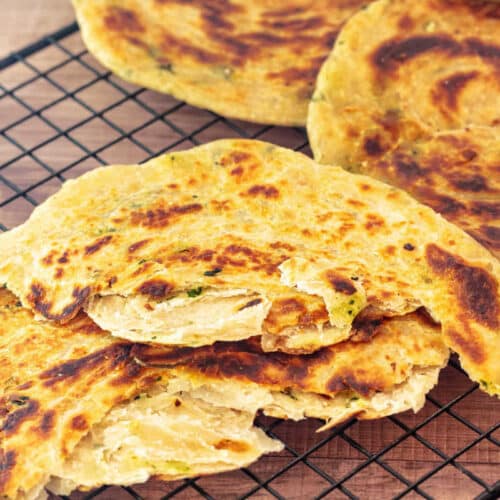
These flaky layered skillet flatbreads are the sort of thing that might not even make it to the table they’re so good. Crisp and golden on the outside, and tender and flaky inside, they’re delicious on their own and even better alongside whatever you’re having for dinner. Or even breakfast.
Inspired by Malabar paratha and other coiled-and-rolled flatbreads from around the world, this recipe borrows techniques from several traditions to create dramatic layers with surprisingly little fuss. Think of these as flatbreads with seasoned layers rather than filled or stuffed skillet breads.
And even better? These flatbreads are almost endlessly customizable. Change the fat, swap the herbs and spices, add citrus zest or a little grated cheese, and make them your own. You can even shape and freeze them before cooking. I’ve tested them straight from the freezer after a week, and they cook up beautifully. Make a batch on a Sunday, season them as your heart desires, and cook them fresh throughout the week.
Pastry Chef Online Participates in Affiliate Programs. If you make a purchase through one of my links, I may earn a small commission. For more information click to read my disclosure policy
I enjoyed last night’s flatbread so much that I made another batch today, seasoned with nigella seed. Together with scrambled eggs and tomato wedges, it was supper tonight. I think I may be forming an addiction. 😂
Reader and recipe requester, Beth
Layered Flatbread, At a Glance
✅Skill Level: Fearless Beginner
✅Skills: Kneading dough, rolling dough thin, shaping layered flatbreads
✅Type: Flatbread
✅Number of Ingredients: 6 plus fat & seasonings
✅Prep Time: 15-20 minutes
✅Rest Time: 1 hour
✅Shaping Time: 30 minutes
✅Make Ahead: Freeze and cook from frozen throughout the week
✅Cook Time: 5-7 minutes per flatbread
✅Yield: 6 6″ flatbreads
Jump Straight to the Recipe
Why You Will Love These Flatbreads
If you love the combination of crispy, chewy, and tender, these flatbreads are for you. And beyond their irresistible texture, you’re completely in charge of how you season them.
The dough itself is simple: just 6 ingredients brought together with a long knead and a generous rest. The fun starts when it’s time to build the layers. Having Mexican food? Add a little cumin and cilantro. Serving Indian food? Try curry powder and pepper flakes. Italian night? A dusting of Parmesan and some minced herbs is hard to beat.
You can even customize the fat. Any pure fat is fair game, including ghee, olive oil, flavored oils, bacon fat, or duck fat. If you’re the sort of person who mentally plans dinner three days in advance, look ahead at what’s on the menu and season your flatbreads accordingly. Future you will thank you!
A Few Notes Before You Get Started
First, I want to give some credit where credit is due. I certainly didn’t dream up the shaping of these breads. That comes from a long line of flatbreads from China and India, and a bit more recently, from the Caribbean. Scallion pancakes, Malabar paratha, and buss up shut all inspired this recipe.
The layering not only buys you that wonderful contrast between crisp and tender, it’s also how we add flavor. So before you begin, think about your seasoning options. They’re kept separate with a mixture of fat and a little flour, so start by choosing your fat.
From there, you can go as simple as salt and pepper, sesame seeds and salt, or a little garlic powder. Or bring in citrus zest, spices, and herbs to complement what you’ll be serving. Making Greek food? Reach for the oregano and lemon zest.
Regardless of your flavor choices, remember that restraint is the order of the day. We’re not filling ravioli or even naan. We’re seasoning layers.
They’re also perfect for cooking from frozen. Make 6 (or a double batch of 12), season them a few different ways, freeze them, and cook them throughout the week. Huzzah!
Making the Flatbread
This section is pretty long because it goes through all the stages of shaping a coiled flatbread. If you are already familiar with the process, please feel free to skip down to the recipe.
For the rest of you guys, let’s go on a flatbread journey together, shall we? We’ll start with the ingredients, move onto making the dough, shaping it, and cooking it. Let’s go.
Ingredients and Substitutions
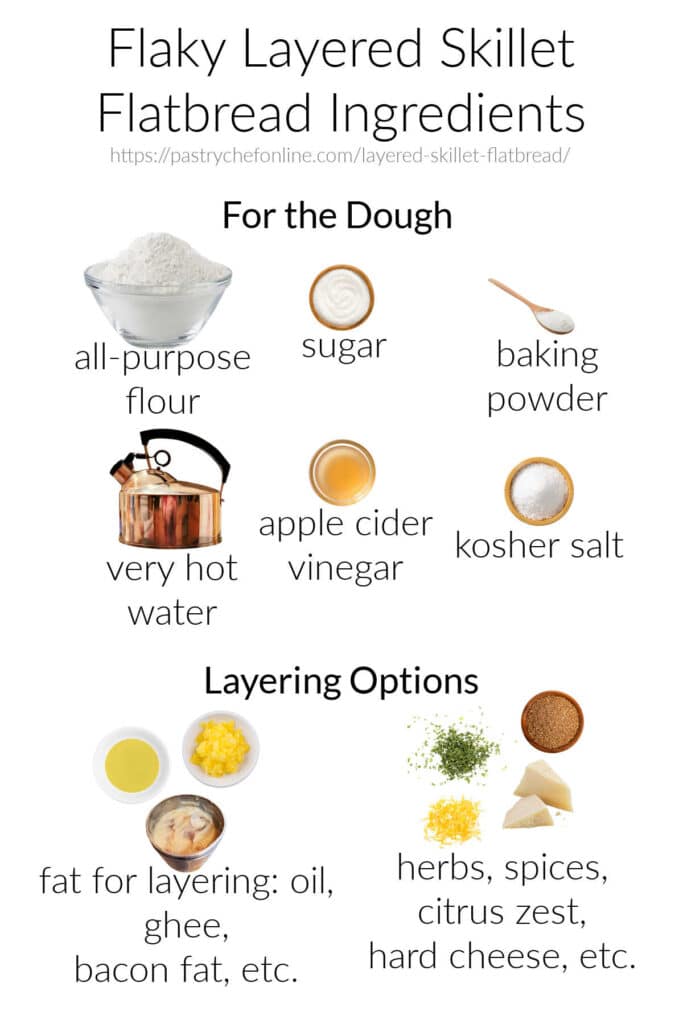
- all-purpose flour: A higher protein all-purpose flour such as King Arthur or Bob’s Red Mill lends plenty of gluten to be able to stretch and form the thin, silky layers we want without becoming tough
- sugar: Just a touch aids in browning in the skillet. You won’t be able to taste it. The sugar is there in a supporting role
- baking powder: Provides just a little bit of “puff,” not so the dough will rise, but so the layers will puff apart in the hot skillet
- hot water: using hot water helps to moderate gluten development so we don’t end up with a super chewy bread. Using hot water gelatinizes some of the starches in the flour, taking that portion of the gluten out of the equation entirely.
- apple cider vinegar: Acts as a tenderizer, helping keep the finished flatbread pleasantly chewy rather than tough.
- kosher salt: The only seasoning in the dough itself, so don’t leave it out. Note that it goes in with the wet ingredients so it dissolves, evenly seasoning the dough
- fat for layering: Use a fat that will support your flavor profile and that’s 100% fat. No whole butter, y’all. The water in butter can interfere with layer formation and leave the finished flatbreads a bit gummy. Any pure fat will work here: olive oil, ghee, clarified butter, lard, bacon fat, etc.
- seasoning options: Remember that restraint is the word of the day. Any flavors you add will end up being concentrated by the shaping process, so use a very light hand.
Making the Dough
This is a hot water dough, and it behaves a bit differently than other doughs. Here’s what to expect if you make it by hand. Note you can also make it in a stand mixer using the dough hook, mixing it on low until it comes together and then on medium for 15 minutes.
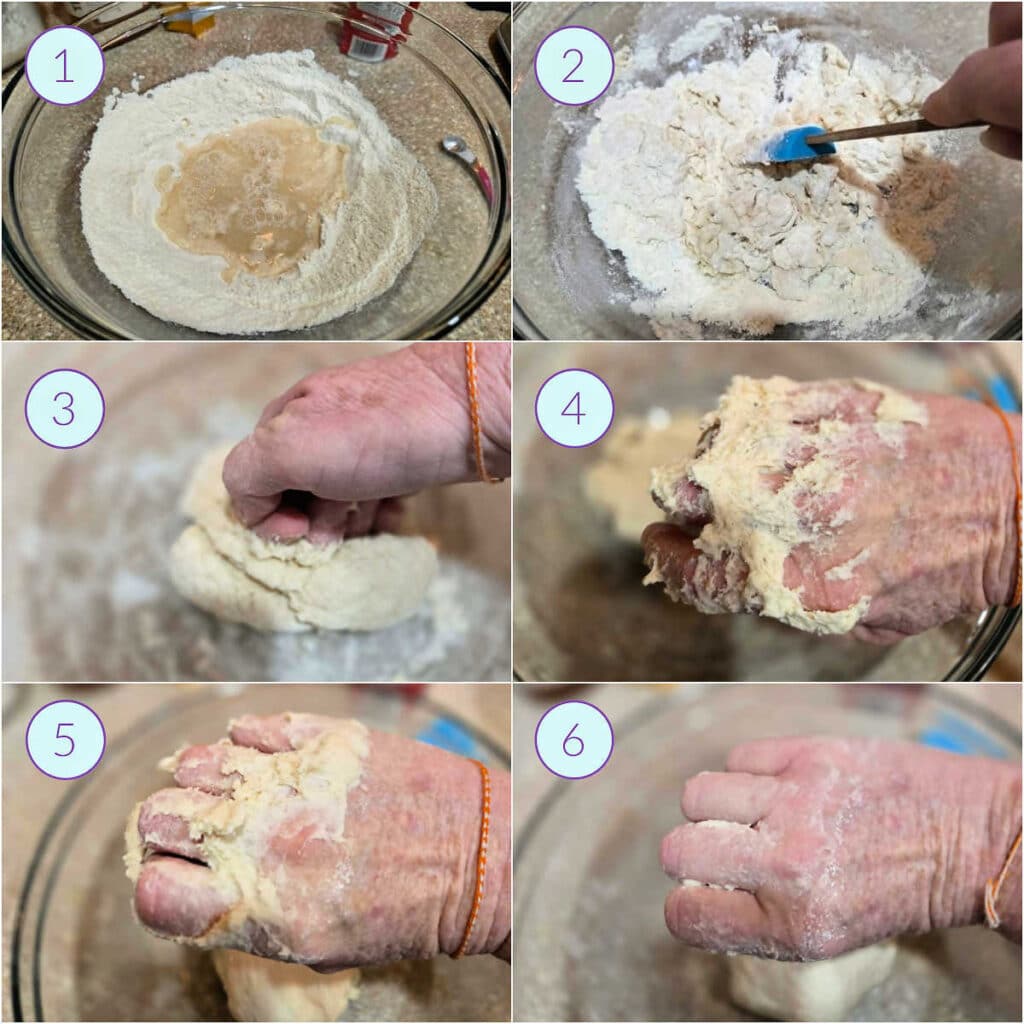
- Pour the wet ingredients into the dry ingredients, much as you would if making biscuits or pancakes.
- Bring everything together into a shaggy dough.
- Knead using your fist, working the dough between the sides of the bowl and your hand for 15 minutes.
- The dough will start out very sticky thanks to the hot water gelatinizing some of the starches.
- Keep kneading, and as the gluten develops, the dough will become more cohesive and stick to your hand less, until…
- …it pretty much pulls away from your hand completely. All done but the resting.
Cover the dough by pressing plastic directly onto and around the dough so it won’t dry out. Rest it for one hour.
Jenni Says: The hot water makes this dough sticky and more than a little rough-looking at first, but please worry not. Between the long knead and the one-hour rest, it transforms beautifully. Trust the process–build the gluten then let it rest–and before you know it, the dough will literally be ready to roll.
Building All Those Flaky Layers

- Look at how stretchy the dough is after its rest!
- Portion into 6 balls for 6″ flatbreads. You can also make smaller ones by portioning into 8 balls or larger ones by portioning into 4 balls.
- Roll each ball into a disc about 4″ in diameter. Smear on a small amount (about 1/2 teaspoon) of ghee or other fat, and then…
- Sprinkle with a tiny bit of all-purpose flour. The flour will absorb some of the fat keeping the dough from getting sloppy. No one wants sloppy dough.
- Stack them as you roll them, then flip the stack over so you’ll start with the first one you rolled.
- Roll the dough very thin, thin enough to see the counter through it. Then maybe roll it a little thinner. It’s okay to roll over the edges too, since they tend to stay thicker than the center. Brush with a thin layer of the fat/flour mixture (see Recipe Card), and you’re ready to season and shape.
Jenni Says: Remember, we’re seasoning layers, not stuffing ravioli. Any herbs, spices, zest, or cheese will become concentrated as the dough is rolled, stretched, and coiled. Start with less than you think you need.
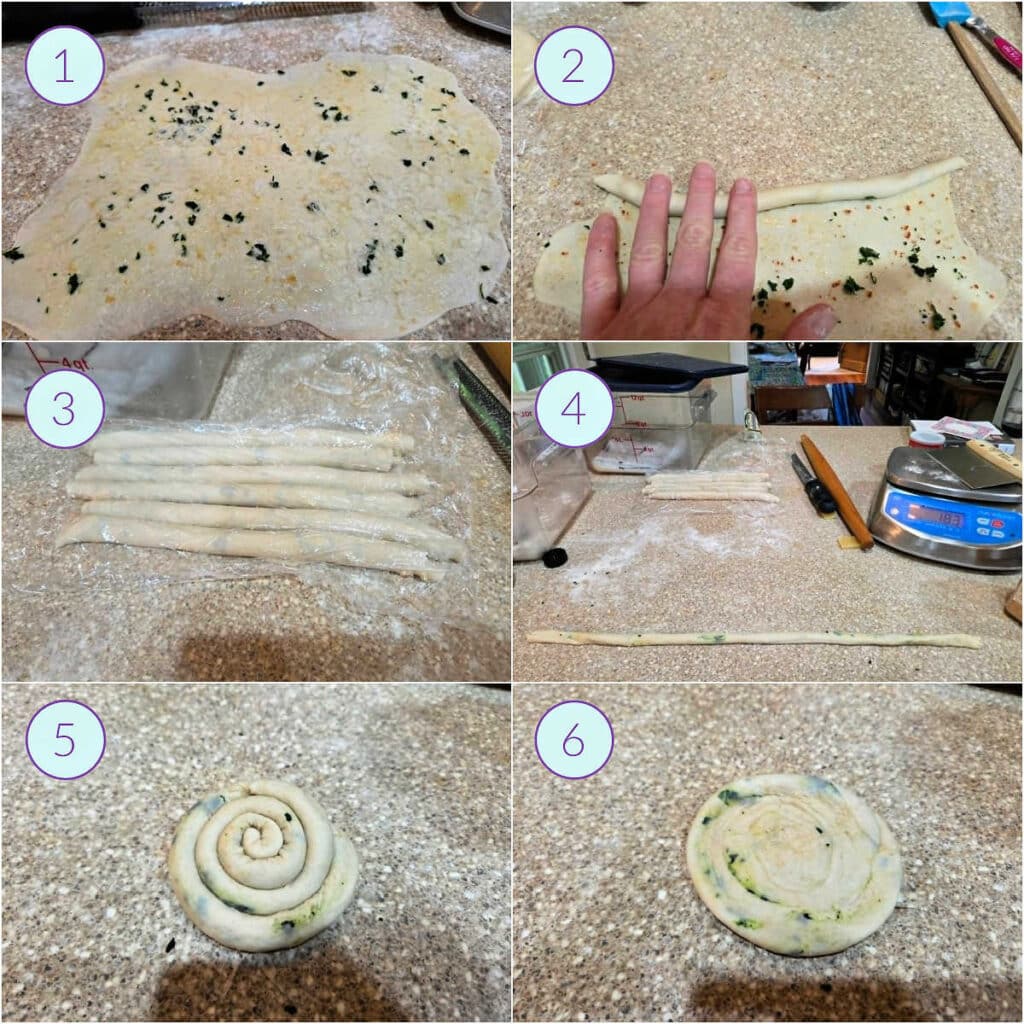
- Sprinkle on your seasonings. Note that in the photo, there’s basil olive oil and flour for the fat component seasoned with garlic powder, minced flatleaf parsley and basil, and Microplaned Parmesan. Yet the first thing you see is the dough and not the seasonings. We’re not layering up a pan pizza, and since we’re rolling up all those ingredients into little cigars, they’ll naturally concentrate. This is definitely a less-is-more situation.
- Roll the dough up into a tight cigar one at a time.
- Keep the cigars covered so they don’t dry out. For the next step, start with the first one you rolled.
- Stretch the cigar out into a long snake. You can do this by gently rolling against the counter as you slowly separate your hands or by holding the cigar at either end and then bouncing it on the counter as you move your hands apart. Or some combination thereof. The word of the day is Gentle. If the dough tears or breaks, though, it is not the end of the world. The coiling yet to come fixes a host of mistakes.
- Coil up the snake of dough, trying not to twist it as you go. Don’t pull the dough as you coil. Just snug each loop against the previous one so everything stays in contact without creating bulges.
- Press it flat-ish with your hand, cover it, and move on to the next one.
Would you like to save this post?
Shaping the Flatbreads
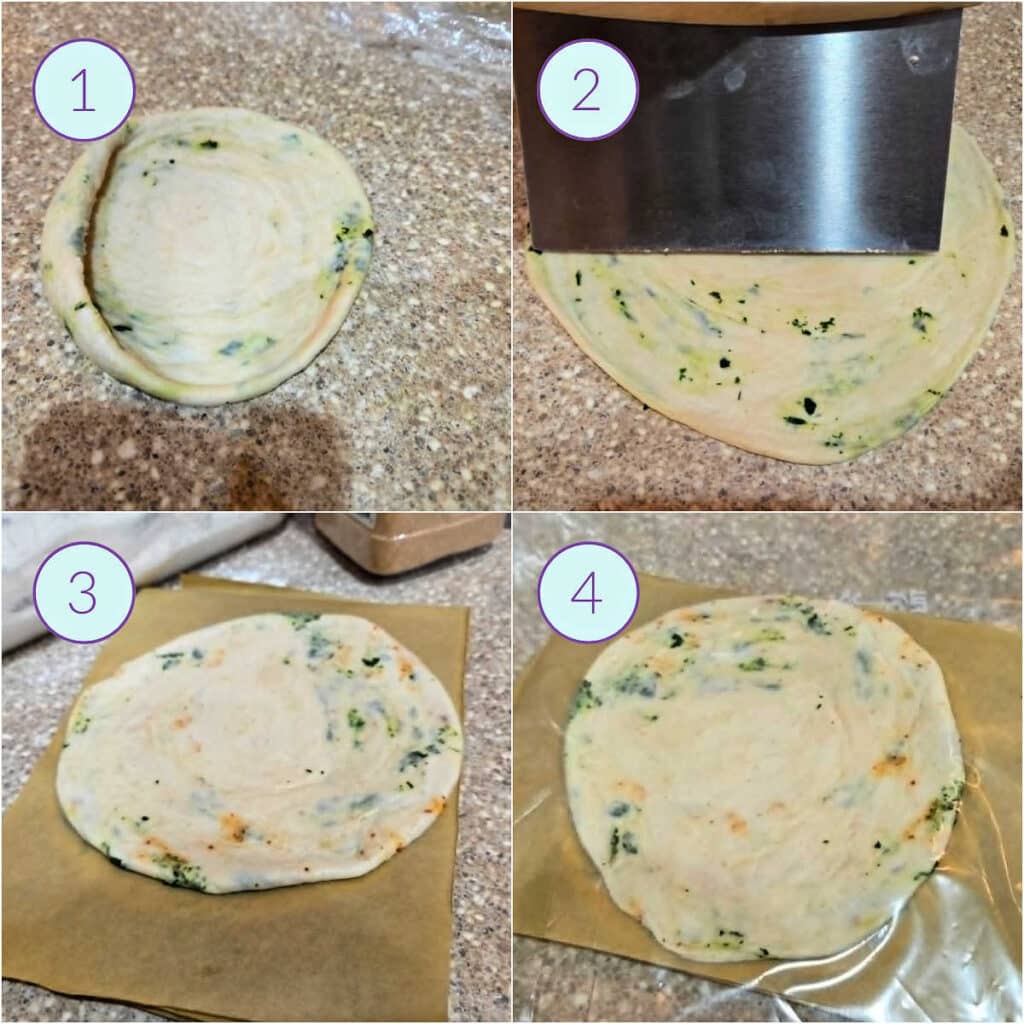
- Roll the dough out into about an 8″ circle. The dough will want to spring back toward its coiled shape, so flip it over several times as you roll. It’ll fight back for the first minute or so, and then it sort of gives up and allows you to roll it out. I like to use my French rolling pin for this because it’s easier to roll from the center outward and end up with a relatively even circle.
- My bench knife is 6″ wide, so I use it as a quick way to measure the diameter.
- If you’d like to freeze them to cook later, stack them with parchment between them, and then….
- …put them in a zip-top freezer bag. Press out as much air as you can before sealing and freezing.
Cooking the Flatbreads
Whether cooking from fresh or frozen, the procedure is the same. See the Recipe Card for some small tweaks when cooking from frozen, but the broad strokes are the same.
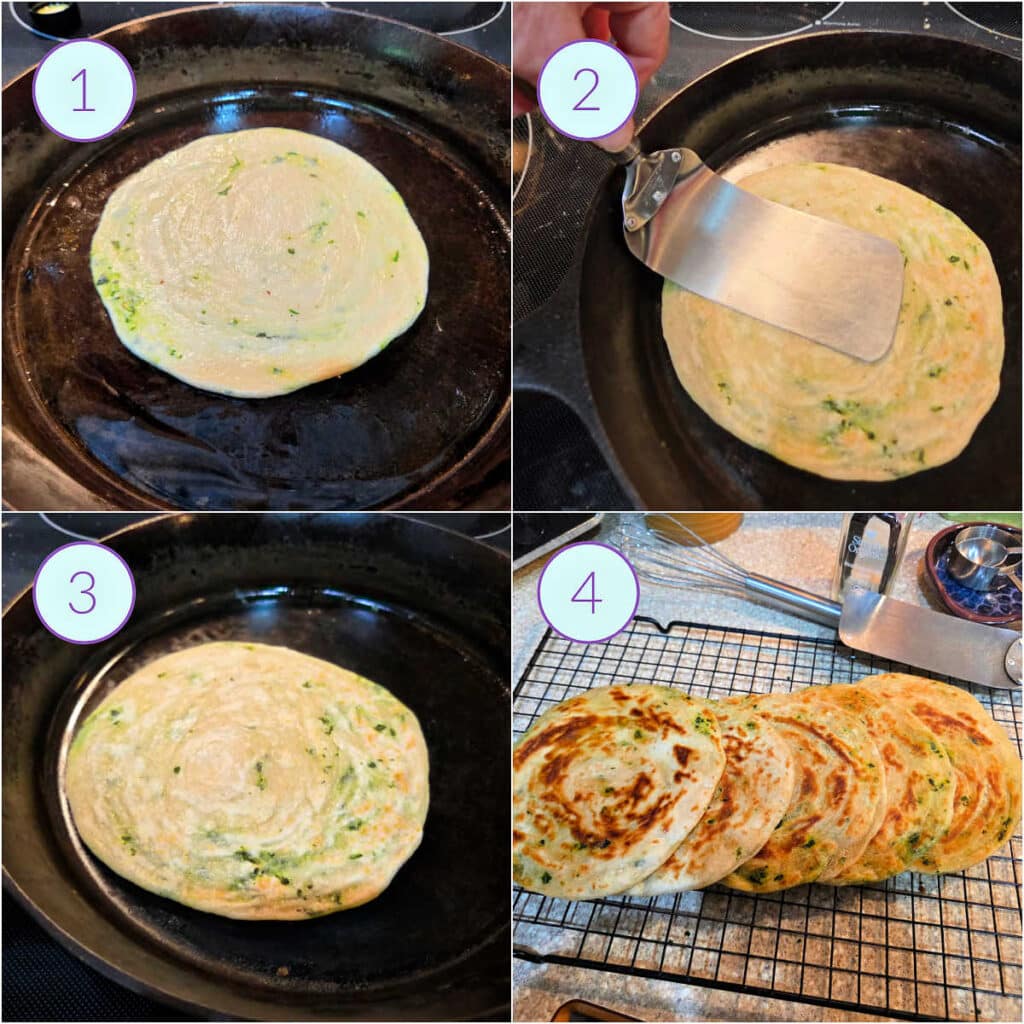
- Put the dough into the preheated pan.
- Flip the dough frequently and press down to make sure it’s in good contact with the hot pan. This promotes even cooking and browning.
- Continue cooking and flipping until evenly speckled with golden brown all over. Add about 1 teaspoon of fat, and lift up the flatbread, allowing the fat to coat the surface of the pan. Cook an additional 15-20 seconds per side without pressing down to get a bit more puff/layer separation and browning.
- Stack up the cooked breads so they keep each other warm.
Before serving, gently but firmly scrunch and bend the flatbreads in your hands a few times. This encourages the layers we worked so hard to build in to separate, making them even flakier and easier to pull apart.
Jenni Says: Don’t skip the scrunching step. A little bending and squeezing encourages the layers to separate from each other, making the flatbreads flakier, more flexible, and easier to tear and scoop.
Serving Suggestions
Once you take the time to “scrunch” your bread, they become bendy, so you can use them to scoop up all sorts of Items, from hummus to chili to marinated beans and vegetables. See?
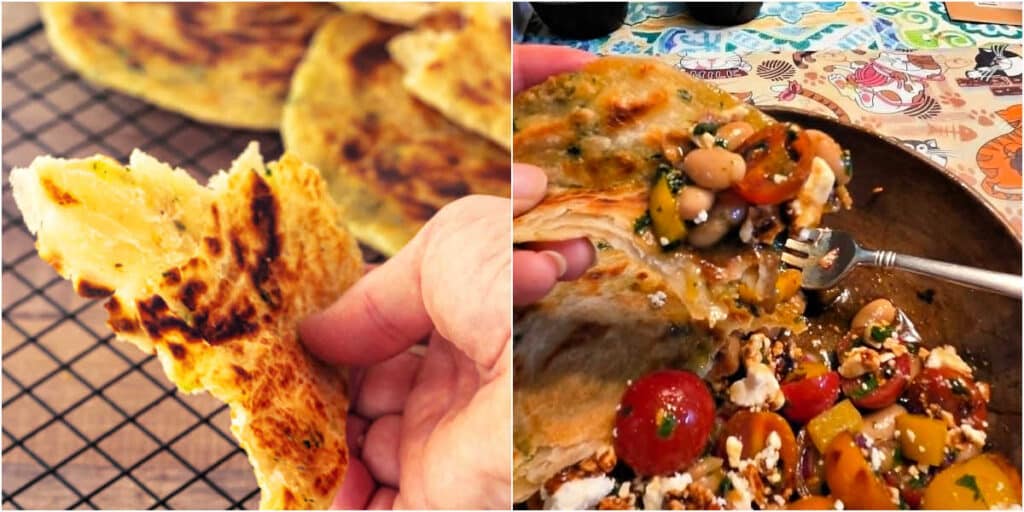
You really are only limited by your imagination. And serving a flatbread with an otherwise sorta boring meal elevates the whole thing. It turns your Wednesday evening breakfast for dinner scrambled eggs into an Event.
These flatbreads are less a side dish and more a supporting actor. Pair them with soups, stews, curries, bean dishes, eggs, roasted vegetables, grilled meats, or simply eat them warm from the skillet while standing in the kitchen.
A few ideas from PCO:
- Season them with pepper flake and Italia herbs to scoop up the sauce from a bowl of penne alla vodka.
- Make them with bacon fat and munch them alongside some bucatini carbonara.
- Use ghee or clarified butter as your fat, season with salt and pepper (or lemon pepper), and scoop up scrambled eggs. No link here. I just love me some scrambled eggs.
- Tear them into pieces as the bread component to a summertime tomato peach panzanella salad.
Flaky Flatbread Q & A
Yes, and before you ask, you can also double the dough. A 1x recipe will yield 4 large flatbreads. For reference, those are the ones I used for the Glamour Shots. You can also choose to make 6 flatbreads that will end up about 6″ in diameter. Or go small and make 8 flatbreads to have for snacks.
Starches start to gelatinize (or swell up) at 155°F / 68°C, so when you pour hot water into the dry ingredients, some of the starches will gelatinize. As the water cools as you mix it, it also activates gluten. This method gives you a nice balance between tender and chewy. I boil my water, pour it into another bowl, and mix it with the apple cider vinegar and salt. Once it cools to 165-170°F / 74-78°C, add it to your bowl. If making the dough by hand, start mixing with a wooden spoon or spatula until the dough cools enough to knead, about 3-4 minutes.
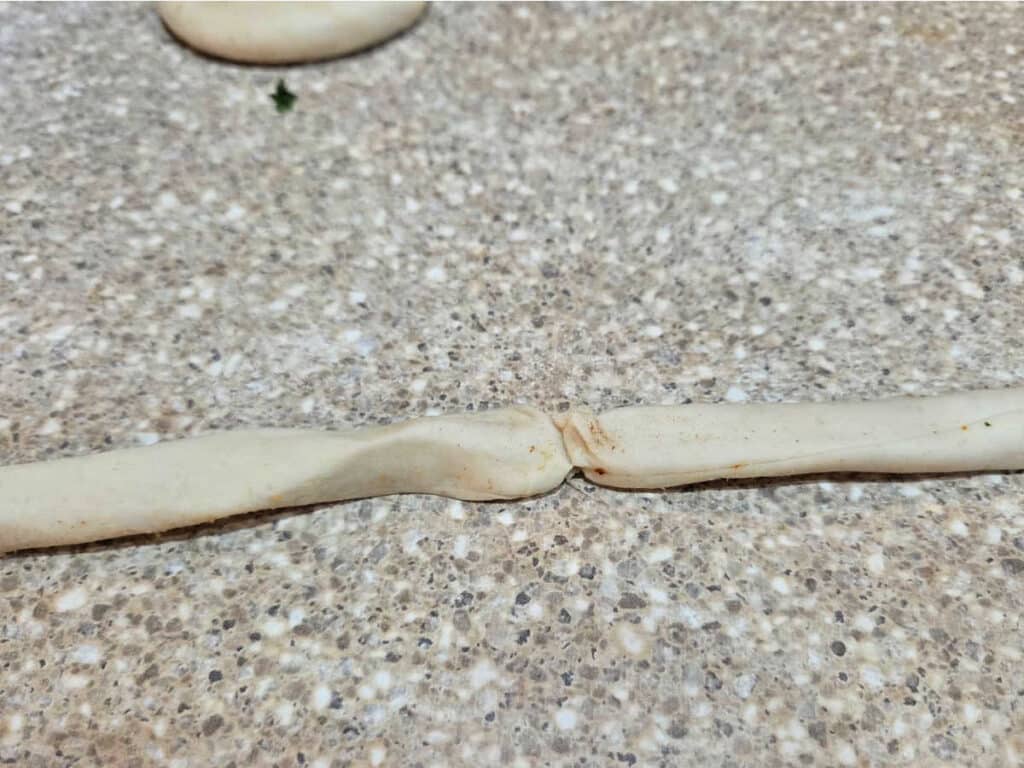
A small tear or three is not going to hurt anything, I promise. The rolling is but one step in building a flaky and layered flatbread, so that little tear will just get rolled up, and you won’t even notice it. Acknowledge the tear, take a deep breath, and keep going. All will be well.
The rule is to use pure fat or 100% fat. Since butter is only about 80% fat, using it will introduce some unneeded water which could result in a gummy bread. Stick with 100% fat. If you want butter flavor, use ghee or clarified butter, both of which are 100% fat. You can even use cooled brown butter to introduce a nuttier flavor.
Yes. I have tested these by cooking after freezing them for up to a week. When cooking fresh, preheat the pan on medium heat. When cooking from frozen, preheat on medium low and then turn up the heat once the dough has thawed completely, about a minute. Total cooking time from frozen is 8-9 minutes.
Left to their own devices, coiled flatbread will puff up, which is great, but not before all the layers are cooked. Pressing rather aggressively during cooking ensures good contact with the surface of the pan. This promotes more even cooking and browning. Flipping frequently also ensures an evenly cooked bread that has similar browning on both sides. Once you add the fat to the pan at the end of cooking, you can stop pressing. This allows for some puffing once we’re sure the layers are all cooked.
Once the bread is cool enough to handle safely, a good scrunch will separate all the layers that might have gotten compressed during the cooking process. Scrunching also loosens the structure, allowing you to bend the bread to use as a scoop.
Questions?
If you have any questions about this post or recipe, I am happy to help.
Simply leave a comment here and I will get back to you soon. I also invite you to ask questions in my Facebook group, Fearless Kitchen Fun.
If your question is more pressing, please feel free to email me. I should be back in touch ASAP, as long as I’m not asleep.
Served warm, they’re an excellent accompaniment to so. many. dishes. I’ve added this recipe to my collection of go-to recipes. I’l be making them often.
Reader and recipe requester Beth
Flaky Layered Skillet Flatbread
Equipment
Ingredients
For the Dough
- 256 grams all-purpose flour 9 oz or about 2 cups, King Arthur preferred
- 1 teaspoon granulated sugar
- ½ teaspoon baking powder
- 170 grams hot water (165-170°F / 74-77°C) 6 oz or 3/4 cup
- 2 teaspoons apple cider vinegar or white vinegar
- 3 grams kosher salt slightly generous 1/2 teaspoon of Morton's or 1 teaspoon Diamond Crystal
For Layering
- 28 grams fat (ghee, oil, bacon fat, etc) 1 oz or 2 Tablespoons, plus a little more for stacking
- 2 teaspoons all-purpose flour plus a little more for sprinkling
Seasoning Options
- minced herbs, citrus zest, spices, Microplaned hard cheese, etc. a total of no more than 1/2 teaspoon of herbs/spices/zest and no more than 8-9 grams of Microplaned cheese per flatbread. Restraint is the order of the day.
Instructions
To Make the Dough
- In the bowl of your stand mixer or in a large mixing bowl, combine the flour, sugar, and baking powder and whisk well to combine.
- In a small bowl, add the apple cider vinegar and salt.
- Bring your water to a boil and then pour 170 grams into the vinegar and salt.
- When it cools to 165-170°F / 74-77°C, pour it into the dry ingredients.
- Mix with the dough hook or with a spatula if making by hand until you have a shaggy dough and most of the dry ingredients are moistened.
- Knead on medium speed or by hand, working the dough between your fist and the inside of the bowl, for 15 minutes. Dough will be fairly smooth, a little sticky, and not very stretchy.
- Cover the dough with plastic wrap by pressing it directly onto the dough and tucking it in so it doesn't dry out. Let the dough rest for 1 hour.
Initial Shaping
- While the dough is resting, mix the 28 grams/1 ounce/2 Tablespoons of fat and 2 teaspoons of all-purpose flour together and set aside. Make sure the mixture is spreadable. If using a fat that tends to solidify at room temperature, put it in the microwave for a few seconds to make sure you can spread it.
- After the rest, weigh the dough and divide it into 4, 6, or 8 equal pieces. I think the sweet spot for a single serving is to divide it into 6 pieces, but it will work regardless.
- Shape each portion of dough into a rough ball and cover with plastic wrap to prevent drying. Make sure it's a fairly large piece or wrap, because it will be doing a lot of work over the next few steps.
- Working with one piece at a time on a very lightly floured surface–scantily floured, even–roll each piece into a flat-ish disc about 3-6" in diameter depending on what size flatbread you are making.
- Rub or brush about 1/2 teaspoon of fat onto each round and then sprinkle on about 1/2 teaspoon all-purpose flour. Stack the discs as you go, and cover them with your trusty piece of plastic wrap.
- Flip the stack of discs upside down to work with the first one you made.
- On a clean, dry surface, and working with one piece at a time, roll out into an Extremely thin, vaguely rectangular shape. It should be so thin you can see the countertop through it. It won't snap back much because the dough is well rested, and the clean counter gives you enough friction to help roll it paper thin.
- Lightly brush the surface of the dough with about 1 teaspoon of the fat/flour mixture.
- Using a light hand, sprinkle on your preferred seasonings. Remember, we're not stuffing, we're building seasoned layers. Go easy.
Building in the Layers
- Roll up the dough into a cigar and place it under the plastic wrap. Repeat with the other discs of dough.
- Once you have rolled all your cigars, work with one at a time and stretch or roll it so it is 2-3 times longer than it was when you started. I like to roll lightly against the counter, moving my hands away from each other as I roll. And for fun, you can use a great technique used to make some Asian noodles: the bounce stretch. Hold the dough at either end and bounce it lightly against the counter as you move your hands farther apart.
- Coil the long snake of dough into a round, making sure the loops touch and being careful not to twist the rope as you coil it.
- Press the coil of dough flat with your palm, and cover while you shape the rest of your dough.
Cooking the Flatbread
- Preheat your cast iron skillet (or other pan–nonstick is fine) over medium heat for 5 minutes. It may take less time with a lighter pan. NOTE: If baking from frozen, heat the pan over medium-low heat for 5 minutes and then increase the heat once the dough has completely thawed.
- Working with one disc of dough at a time, roll it out into a circle, flipping the dough over several times. It will want to cup up at first, but be patient and keep rolling it. You will prevail. If making 6 flatbreads, roll the dough into about an 8" round.
- Place the dough into the dry, heated pan and let cook for about 30 seconds without pressing down.
- Flip the dough every 30-45 seconds, pressing down firmly, especially concentrating on the center of the bread and on the edges to ensure even cooking.
- After about 5 minutes of cooking/flipping/pressing, the dough should be an evenly-spotted golden brown. Add about 1 teaspoon of fat of choice–NOT the fat mixed with flour–and lift the bread and tilt the pan so the fat can coat the surface.
- Let the bread sizzle and puff for about 20-30 seconds per side, and it's done! Total cooking time is between 5-7 minutes or about 8-9 minutes if cooking from frozen. Place on a cooling rack and move onto the next bread.
- I move the skillet off the heat and turn off the burner between breads so the pan doesn't overheat and smoke. You should do the same. Continue cooking/flipping/pressing/sizzling and stacking the bread until it is all done.
- Once the flatbreads are cool enough to handle, scrunch each one a bit to loosen up the layers and make the bread flexible. Serve and enjoy!
Did You Make Any Changes?
Notes
This dough starts out rougher and stickier than many bread doughs because the hot water gelatinizes some of the starches in the flour. Trust the knead. Trust the one-hour rest. The dough transforms dramatically. 2. Resist the urge to over-season.
A little seasoning goes a long way. Because the herbs, spices, zest, and cheese are rolled into thin layers and then concentrated during shaping, less is usually more. 3. Tears and breaks are not a problem.
If the dough tears while rolling or a rope breaks while stretching, simply continue with the recipe. Once coiled, flattened, and cooked, small imperfections disappear into the layers and they will cook up just as perfectly as your untorn, unbroken spirals. Promise. 4. Flip and press aggressively.
Unlike many breads, these flatbreads benefit from frequent flipping and pressing during cooking. This ensures even browning, encourages the layers to separate, and prevents undercooked spots in the center. Once you add the fat during the last minute or so of cooking, stop pressing to allow the oil’s heat to puff the breads up a little bit. 5. Don’t skip the scrunch.
Before serving, gently bend and scrunch each flatbread a few times. This encourages the layers to separate, making the bread flakier, more flexible, and easier to tear and scoop. You can also let everyone scrunch their own. Who doesn’t love audience participation?
Nutrition
Would you like to save this post?
Are You a Flaky Flatbread Convert? Please Rate and Review the Recipe
It helps me and other readers so much if you take a moment to rate and review this recipe.
Your star rating and comments help others decide whether the recipe is worth making, and your feedback helps me continue improving recipes here at Pastry Chef Online.
Other lovely ways to share include pinning or posting on your favorite social media platform.
Thank you so much for taking the time!


Hi, y’all! I hope you’ve enjoyed this post and hopefully also learned a thing or two.
If you like my style, I invite you to sign up for my occasional newsletter, The Inbox Pastry Chef.
Expect updates on new and tasty recipes as well as a bit of behind-the-scenes action. I hope to see you there!


Join in Today!
Served warm, they’re an excellent accompaniment to so. many. dishes. I’ve added this recipe to my collection of go-to recipes. I’l be making them often.
I am so grateful for the request, Beth, and I’m thrilled that you like them! Makes me happy to think of you making them regularly and flavoring them all sorts of ways!