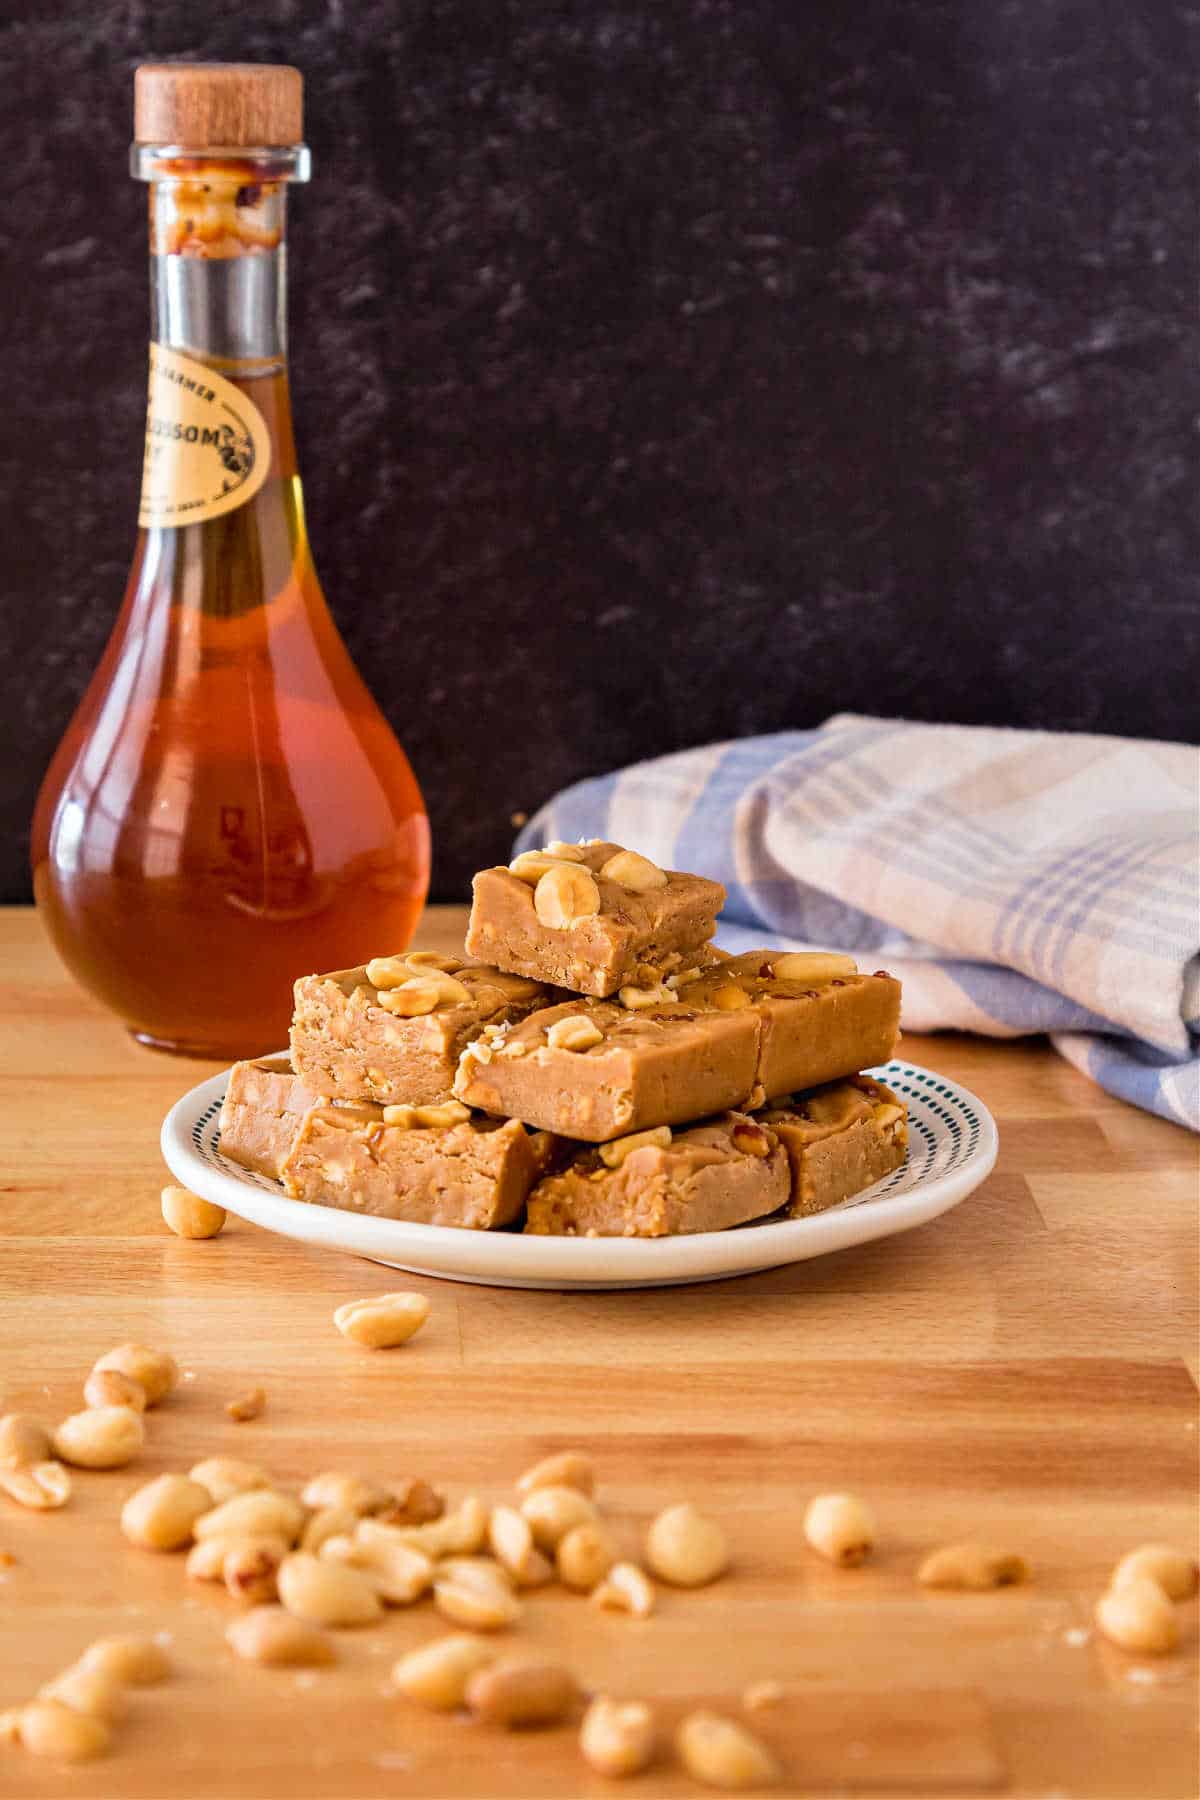
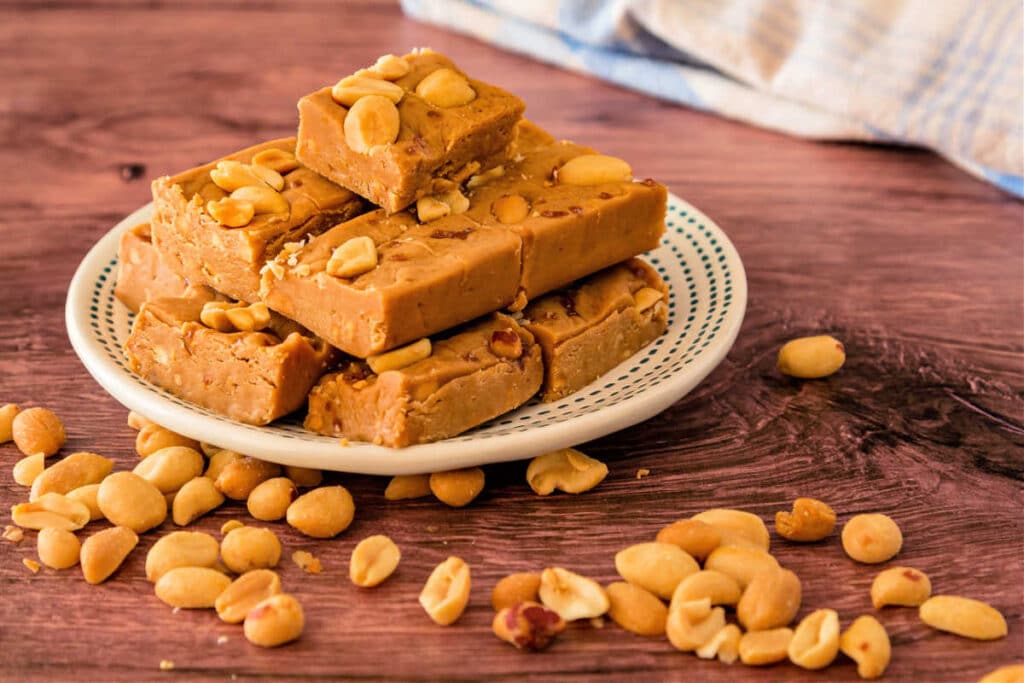
Hello, friends. I have such a delicious old-fashioned candy treat for you today. This peanut butter fudge recipe is the absolute best candy, y’all! Perfect for snacking or for giving as gifts, you can make this particular peanut butter fudge with either creamy or crunchy peanut butter: I tested both to be sure.
What sets this recipe apart is the addition of honey, which for me is a no-brainer, because peanut butter and honey are fantastic together. Stick with me, and I’ll show you how to make it.
If fudge is your thing, you may also really enjoy my penuche recipe. For ease of browsing, you can find all my candy recipes in one place. Thanks so much for being here.
Pastry Chef Online Participates in Affiliate Programs. If you make a purchase through one of my links, I may earn a small commission. For more information click to read my disclosure policy
Watch my best peanut butter fudge web story here if you’d like.
This was the best peanut butter fudge I have had!! I really enjoyed batch 2 [the second round of testing and the recipe for a single batch in this post]. Crunchy, complex, smooth and delicious!
Reader and Friend Carol
Peanut Butter Fudge, At a Glance
✅Skill Level: Intermediate
✅Skills: Cooking Sugar, Using an Instant Read Thermometer
✅Type: Candy
✅Number of Ingredients: 8, 2 additional “mix-ins,” optional
✅Prep Time: 10 minutes
✅Cook Time: 10 minutes
✅Wait Time: about 4 hours
✅Yield: 64 pieces
Jump Straight to the Recipe
Run, Don’t Walk, to Make This Fudge!
Y’all. I read a TON of recipes for peanut butter fudge. I got some ideas from a few, but mainly I thought all the recipes seemed too sweet.
Many recipes, identified as “easy peanut butter fudge” achieved a fudge-like texture by mixing in a full pound of powdered sugar into an already-sweet mixture.
After I shook myself out of the sugar coma, I headed to the kitchen.
This fudge has a higher peanut butter-to-sugar ratio than other recipes, ensuring that it is very peanutty in flavor.
I also use honey in the recipe, because peanuts and honey is a dreamy combination.
If you are not a fan of honey, substitute corn syrup, and you’ll have a very excellent fudge that is more straight-up peanutty without the notes of honey.
This recipe also calls for a fair amount of salt, because what’s more boring than unsalted peanuts? Nuts need salt, and the amount that’s present in the peanut butter is not enough to season the batch since it gets diluted by all the sugar and milk and whatnot.
Why This Recipe is Called “Alice’s” Peanut Butter Fudge

Alice was our first foster cat, and also our first foster fail.
She was all about whatever I was cooking. Talk about food-driven!
We very sadly had to have her put to sleep just as I was starting to test this recipe, so I have named it for her.
I missed her help with recipe testing. She was the best, and we will always miss our Alice-Balliss.
How to Make Peanut Butter Fudge
In this section, I’ll go over all the ingredients as well as possible substitutions, explain in detail how to make it, and give variations as well as equipment recommendations and some helpful tips for success.
If you prefer to head straight to the recipe, click here. Then you can always scroll back up if you need any clarification.
Ingredients and Substitutions
Here’s what you’ll need to make this candy:
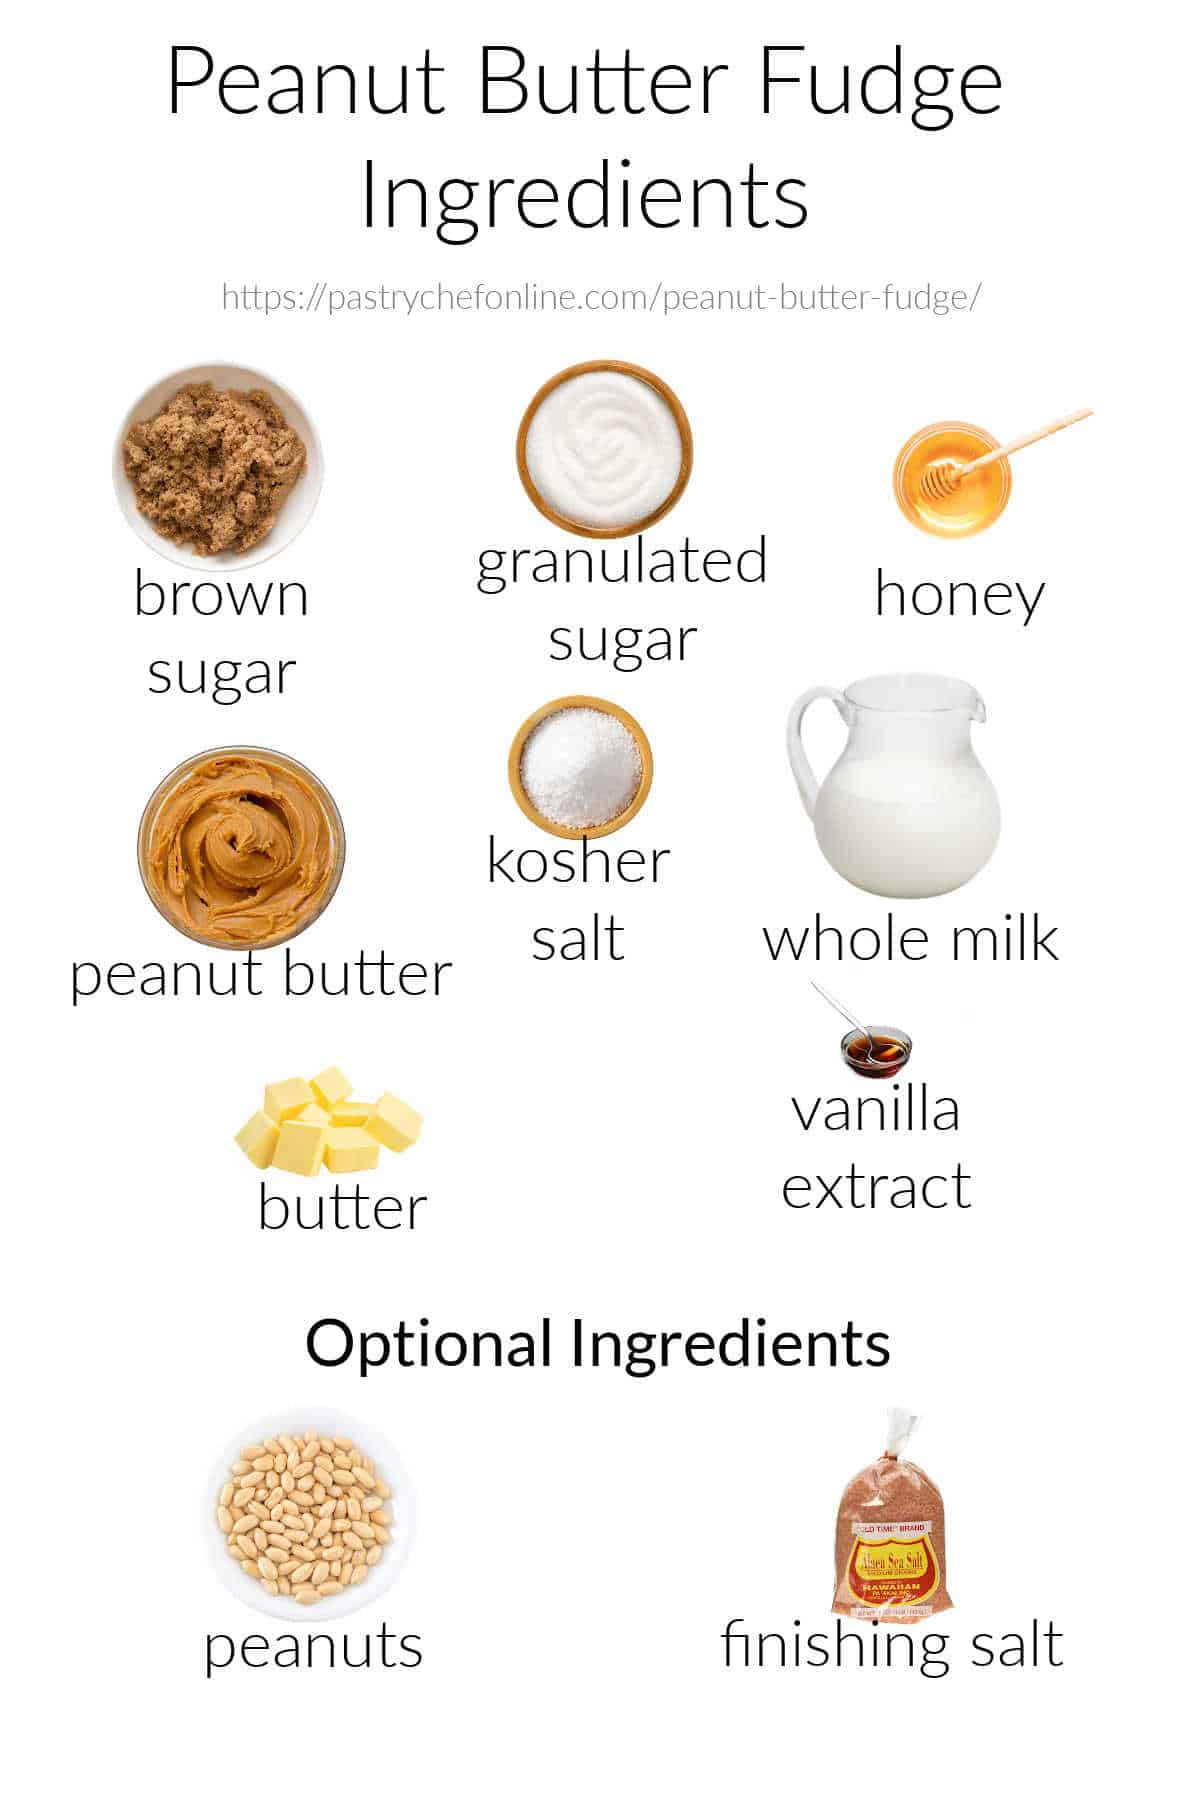
- Brown sugar: Adds sweetness but also a little depth from molasses. You may use light or dark brown sugar
- Granulated sugar: You can use all brown sugar if you like, substituting for the amount of white sugar. But I didn’t want the molasses flavor to overwhelm the honey, so I like using some granulated sugar to get a more neutral sweetness
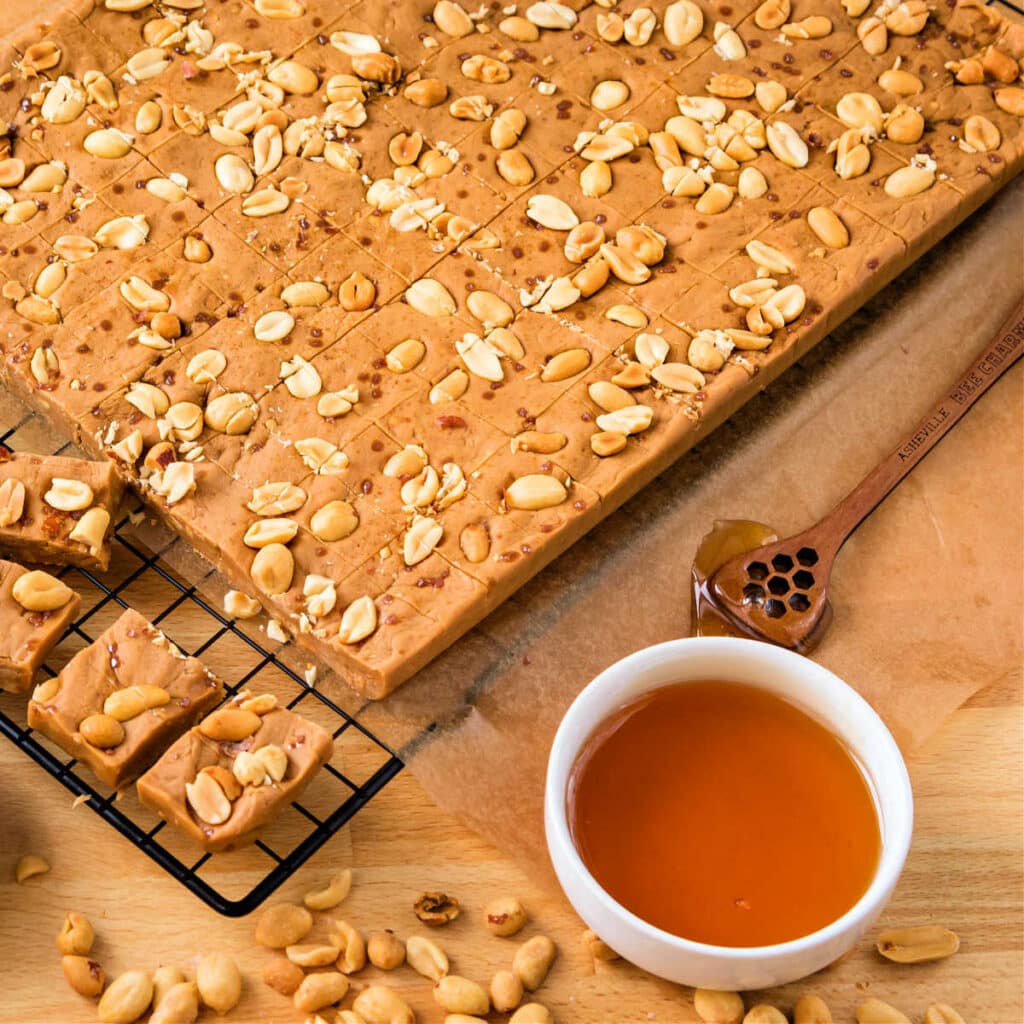
- Honey: Use your favorite honey here. I used gallberry honey, which I purchased at the farmer’s market. Feel free to experiment with different flavors of honey to achieve different results. For the mildest honey flavor, use a lighter-colored honey. If you do not like honey, substitute corn syrup for a straightforward peanut butter fudge. You could also consider using real maple syrup, because peanut-maple fudge sounds like a plan!
- Peanut butter: Do not use natural peanut butter that separates with a layer of oil on top. We typically use natural peanut butter at home for general snacking, but for fudge, stick with “conventional” peanut butter. I used Jif in testing this recipe. You can use either creamy or crunchy peanut butter. I tested with both and preferred the crunchy because I like the texture of little crunchies throughout
- Salt: As I said earlier, the amount of salt in the peanut butter alone isn’t enough. I call for 1 full teaspoon (2 in a double batch). If that seems like a lot to you, use 3/4 teaspoon, but please don’t leave this additional salt out entirely
- Whole milk: You could use half and half if you’d like. I wouldn’t go with 2% or skim here. Whole milk is really just here to help the sugars dissolve and add a tiny bit of extra milk fat.
- Butter: Use unsalted or salted. I use unsalted
- Vanilla: Any vanilla extract will do. I use Watkins baking vanilla
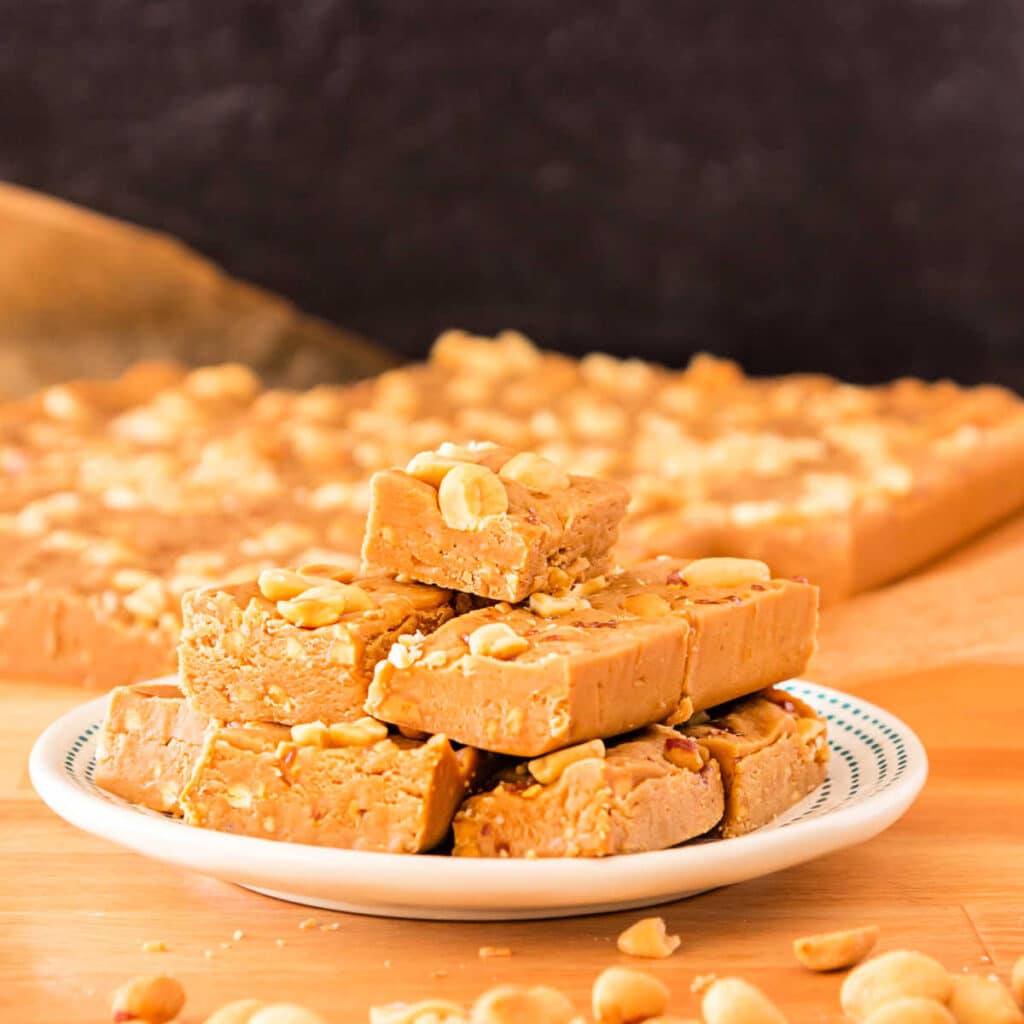
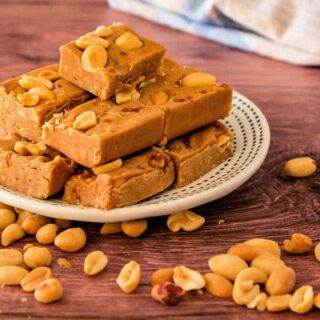
- Roasted peanuts (optional): For a layer of crunchy goodness on top, whether or not you’re using crunchy peanut butter. It also looks pretty
- Finishing salt (optional): For an additional sparkle of salt. It’s entirely optional, but consider using it, especially if you use less salt in the recipe than called for
Procedure
All fudge follows basically the same process:
- Cook ingredients to 234-236F/112-113C.
- Allow to cool to about 120F/49C.
- Stir and stir until matte in texture and very thick.
- Pour into pan and smooth out/press in.
- Let candy cool for about 4 hours before slicing into squares.
This candy follows that same formula.
I recently (like 2 days ago) learned that you can use your
It worked like a charm. Magic.
The instructions reflect using a mixer, but I will provide instructions for stirring with a wooden spoon in the NOTES section of the recipe.
Here are some step-by-step collages to show you what to do.
- In a heavy-bottomed saucepan, add the brown sugar, sugar, honey, peanut butter, salt, and milk.
- Stir together, pressing down on the peanut butter to break it up and help it mix into the milk.
- Over no more than medium heat, continue stirring as the mixture heats.
- Keep stirring, even after it comes to a boil. This is a thick mixture, so a lower heat and stirring both help prevent sticking and/or possible scorching.
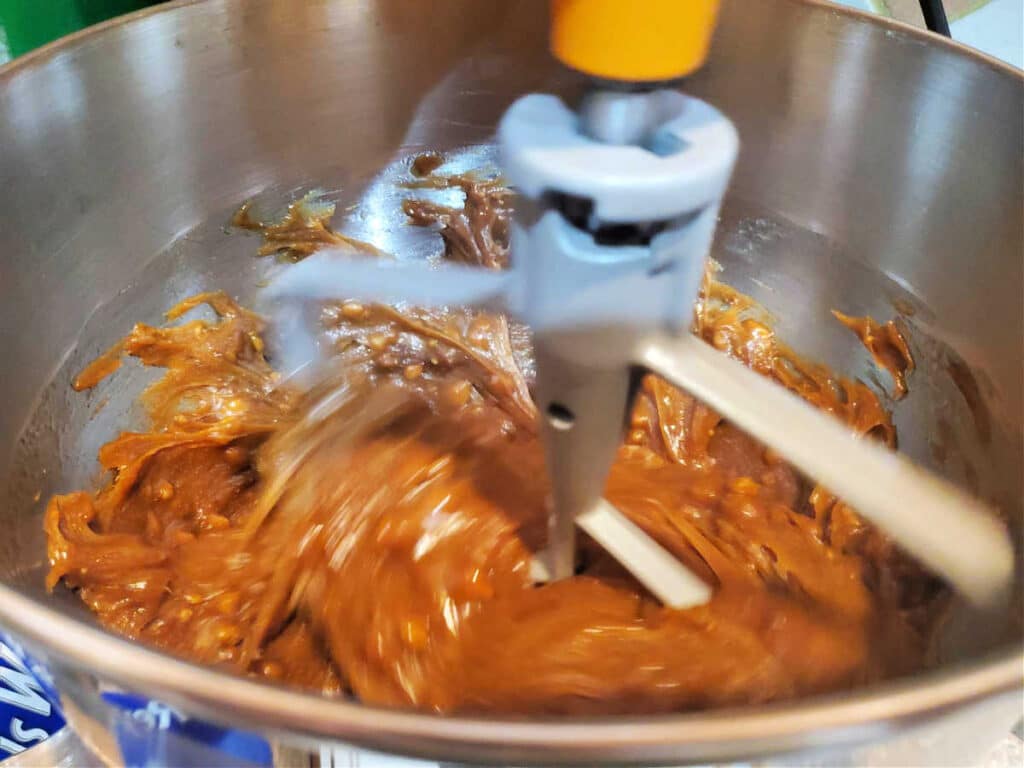
- Put the butter and vanilla in the bowl of your
stand mixer (or into a large bowl). - Once the candy has reached the correct temperature, pour it into the bowl with the vanilla and butter
- Just let it sit there. You can elevate the bowl onto a cooling rack to speed cooling by a little bit
- I insert my instant-read thermometer and check the temperature occasionally by jiggling it to wake it up. (My instant-read’s display goes to sleep to preserve battery life. Jiggling it a little bit wakes it up so I can read the temp)
In this collage, you see a double batch. It took about 1:15 to cool down. If you make a single batch, it will take about 45 minutes or so to cool down to “stirring temperature.”
The Differences Between Making a Double Batch Vs a Single Batch
If you make a single batch, once the candy comes to a boil, it will pretty quickly reach 234F. This is because there’s only 1/2 cup of milk, and the water portion boils off pretty quickly, allowing the temperature to rise quickly.
If you make a double batch, it will take a bit longer to cook to 234F.
This wouldn’t seem like a big deal, but with a candy that you have to stir almost constantly, your final product will have some subtle differences:
- Since the candy takes longer to cook with a double batch, your fudge will have a more roasted flavor than when making a single batch. This is especially true when using crunchy peanut butter, because the nuts themself will get toasty. If you cook on medium to medium-low and keep stirring, you will not have to worry about them getting too dark.
- The honey flavor, while discernable in both batches, is a little more “forward” in a single batch than a double batch. That’s because the longer cooking time in a double batch caramelizes the honey just a little bit, making it a bit less sweet and more complex.
For an example of the roasted look of a double batch, see the above collages and note the difference in color between stirring the fudge in the pan and pouring the finished fudge into the mixer bowl. You should be able to tell that the fully-cooked candy is a deeper beige/brown color than when I first mixed it in the pan.
Would you like to save this post?
If making a single batch, the color change will be much less noticeable.
NOTE I keep tasting both versions, over and over and over, and I can’t decide which I like better!
Both are very, very good. I just want you to know that there are subtle differences.
The recipe is for a single batch, and I will add the double batch amounts in the NOTES section of the recipe.
Equipment You May Need
For a single batch, I cook this candy in my OXO saucier, which is one of my favorite pans.
For a double batch, you can probably still use the same pan, although I opted for a 4-qt saucepan for the double batch.
Since we’re cooking this candy at a lower temperature, it will not boil up crazily, but you still want to have a larger pan and use a long-handled wooden spoon or silicone spatula to stir to avoid any burns from thick, boiling candy.
A single batch will fit perfectly in an 8″ x 8″ square pan. A double batch works really well in a 9″ x 13″ pan.
You’ll also need an instant-read thermometer or a good candy thermometer and an offset spatula for spreading the finished fudge into your pan.
Take a look at my other must-have tools for serious bakers, too.
Variations
I’d love to tell you you can substitute any nut butter for the peanut butter in this recipe, but unless your alternate has a conventional texture and doesn’t separate, I can’t be sure it will work.
What I do know will work is to substitute maple syrup for the honey to have a maple peanut butter fudge. I think that would be delicious.
Mix-ins are always welcome too. Once the fudge is cool enough so they won’t melt, you can mix in chocolate chips.
You like peanut butter and coconut? Go for it with some shredded coconut.
Or go for an “Elvis fudge” by mixing chopped banana chips and crisp, crumbled bacon into the peanut butter base.
In that case, make sure to store the fudge in the fridge and eat it all up within a week or so.
Tips for Success
This is not a candy you should try to rush by cooking at a high temperature. Keep your heat at no higher than medium, and lower it a touch once the candy comes to a boil. Stir the whole time.
To save your arm, once the candy comes to temperature, pour your candy into your mixer bowl to cool and then stir it using the paddle attachment. It works like a charm and is much faster than stirring the fudge by hand.
A single batch will have a lighter flavor and a more prominent honey flavor. A double batch will have a more roasted flavor. If you are not confident with candy making, start with a single batch.
If you do decide to press peanuts into the top of your fudge, you can easily cut through them using a serrated knife with a gentle sawing motion.
Peanut Butter Fudge Q & A
As written, all ingredients are gluten-free. Check your labels for any possible cross-contamination issues.
If it’s pretty cool in your kitchen, you can keep it at room temperature, in a tightly-sealed container for up to 2 weeks.
Yes. Peanut butter fudge (all the fudge) freezes really well. The day after making it, once it is completely set, place in a single layer in a gallon-sized freezer bag. Make sure to press out as much air as possible before sealing. To get as much air out as humanly possible, close the bag almost all the way, insert a straw in the opening left, and suck out as much air as you can before sealing. It will be fine in the freezer for up to 3 months. Thaw at room temperature for several hours before opening the bag to serve.
More Candy Recipes to Enjoy
This fudge is a great gift to give, maybe along with a couple of other kinds of candy.
Consider making some old-fashioned cocoa fudge or some penuche (brown sugar fudge).
And if your giftees are butterscotch fans, my butterscotch hard candy is delicious, plus it gives you a candy option with a crunchier texture.
And never underestimate the power of a rum ball on a candy tray! These maple rum balls from Cheryl at Pook’s Pantry are incredible.
And if you are just here for the peanut butter, may I direct you to my peanut butter mousse pie recipe? Made without cream cheese, it tastes like a peanut butter cloud.
Questions?
If you have any questions about this post or recipe, I am happy to help.
Simply leave a comment here and I will get back to you soon. I also invite you to ask questions in my Facebook group, Fearless Kitchen Fun.
If your question is more pressing, please feel free to email me. I should be back in touch ASAP, as long as I’m not asleep.
A Note About Measurements
My recipes are almost all written by weight, including liquids, unless otherwise specified.
For accuracy and consistency of results, I encourage you to buy–and use–a kitchen scale.
I promise that baking and cleanup will be so much quicker and easier.
This is the scale that I recommend for home use. I have owned and used one for years.
Love This Fudge? Please Rate and Leave a Review. Thank you!
It helps me and other readers so much if you take a moment to rate and review this recipe.
Your star rating and comments help others decide whether the recipe is worth making, and your feedback helps me continue improving recipes here at Pastry Chef Online.
Other lovely ways to share include pinning or posting on your favorite social media platform.
Thank you so much for taking the time!

Alice’s Peanut Butter Fudge Recipe
Ingredients
- 238 grams brown sugar 8.5 oz or 1 cup
- 129 grams granulated sugar 4.6 oz or a little more than 1/2 cup
- 81 grams honey, corn syrup, or a mixture of the two 2.9 oz or 1/4 cup
- 112 grams whole milk 4 oz or 1/2 cup
- 269 grams smooth or crunchy peanut butter 9.6 oz or 1 cup
- 1 – 1 ¼ teaspoon kosher salt I use Morton’s
- 21 grams butter .75 oz or 1 1/2 Tablespoons
- 2 teaspoons vanilla extract
Optional
- ¼ teaspoon finishing salt
- 1/4-1/3 cup salted peanuts eyeballing this is fine
Instructions
- Spray an 8" x 8" pan lightly with pan spray. Line the pan with a parchment strip cut or folded to fit snugly in the bottom of the pan and up 2 opposite sides. Set aside.
- Add sugars, honey or corn syrup, milk, peanut butter, and salt to a heavy-bottomed saucepan.
- Put the butter and vanilla in the bowl of your stand mixer or in another large bowl. Set aside convenient to the stove.
- Over medium heat, stir the peanut butter mixture until smooth.
- Keep stirring as the mixture comes to a boil. If using a candy thermometer, clip it to the side of your pan now.
- Reduce the heat to medium-low and continue to cook and stir until the candy reaches 234F/112C on an instant-read thermometer or on a candy thermometer.
- Once the fudge has reached the correct temperature, which will only take maybe 4-5 minutes once it starts boiling, pour it into the bowl with the butter and vanilla. You can lightly scrape the sides of the pan, but leave anything that's stuck in the bottom of the pot. You can eat that yourself once it cools down!
- Let the candy cool, undisturbed, until the temperature is about 120F/49C. This will take about 45 minutes for a single batch and about 1:15-20 minutes for a double batch. NOTE: Wait time is dependent upon the temp of your kitchen, so always check your temperature with an instant-read or candy thermometer.
- If using a stand mixer, place the bowl on the mixer and mix on medium-low speed until lightened in color, very thick, and no longer shiny. You can also stir with a hand mixer in your large bowl.
- Scrape the finished fudge into the prepared pan. Use clean hands or an offset spatula sprayed lightly with pan spray to press out and smooth the candy evenly in the pan.
- Optional: Sprinkle on the salt and scatter on some peanuts. Use your clean hand or the back of the offset spatula to press them down into the fudge so they stick.
- Cover loosely with plastic wrap and freeze for about an hour if you're impatient to cut it. If you have patience, leave it to cool at room temperature for at least 4 hours. I still like to at least refrigerate it for a little while to hedge my bets since I like to cut it on a cutting board and not in the pan.
- You can cut yours either way, using the 2 ends of the parchment to help you pull the slab of candy out of the pan. Slice with a serrated knife. Or just slice in the pan, being careful not to scratch up your pan.
- See the NOTES section below for ingredient amounts for a double batch and for stirring the candy with a wooden spoon.
Did You Make Any Changes?
Notes
Double Batch Amounts
476 grams (17 oz or 2 cups) brown sugar258 grams (9.2oz or a little more than 1 cup) granulated sugar
162 grams (5.8 oz or 1/2 cup) honey, corn syrup, or a mixture of the two
224 grams (8 oz or 1 cup) whole milk
538 grams (19.2 oz or 2cups) smooth or crunchy peanut butter
2 – 2 1/2 teaspoon kosher salt (I use Morton’s)
42 grams (1.5 oz or 3 Tablespoons) butter
4 teaspoons vanilla extract
! Optional
1/2 teaspoon finishing salt
1/2-2/3 cup salted peanuts (eyeballing this is fine) It took about 5 minutes on speed 3 of my KitchenAid to get the double batch of fudge to a beautiful, thick, matte texture.
To Make Without a Mixer
The traditional way to make fudge, without a mixer, has you add the butter and vanilla to the pot of fudge once it has reached the correct temperature and you have taken it off the heat. Once the candy cools to about 120F/49C, begging stirring with a sturdy wooden spoon or a silicone spatula. Stir pretty vigorously, switching arms when one gets tired. You can also draw up big spoonfuls of fudge and let it fall back into the pan. The helps get some air in the candy as well as helps to cool it down some. Keep stirring until the fudge is very thick and matte in texture and holds its shape on your spoon. Depending on what temperature you start stirring at, this could take 10 to 15 minutes or so. Maybe invite some friends to help you stir! Scrape the candy out into the pan and continue with the recipe.Storing
If it’s pretty cool in your kitchen, you can keep it at room temperature, in a tightly-sealed container for up to 2 weeks. Peanut butter fudge (all the fudge) freezes really well. The day after making it, once it is completely set, place in a single layer in a gallon-sized freezer bag. Make sure to press out as much air as possible before sealing. To get as much air out as humanly possible, close the bag almost all the way, insert a straw in the opening left, and suck out as much air as you can before sealing. It will be fine in the freezer for up to 3 months. Thaw at room temperature for several hours before opening the bag to serve.Nutrition
Would you like to save this post?
Thanks for taking the time to read today! I hope you love this peanut butter fudge recipe as much as we do.
Take care, and have a lovely day.

Hi, y’all! I hope you’ve enjoyed this post and hopefully also learned a thing or two.
If you like my style, I invite you to sign up for my occasional newsletter, The Inbox Pastry Chef.
Expect updates on new and tasty recipes as well as a bit of behind-the-scenes action. I hope to see you there!


Join in Today!
This recipe sucks. Despite my gut telling me not to add the peanut butter to the pot. I followed the directions and it came out like stringy bbq sauce and you can barely taste the peanut butter. I froze it but once it thawed it was a paste. It didn’t even become totally solid in the freezer.
Sounds like this is a temperature issue. I know you won’t believe me that I’ve made this frequently and have never had an issue, but it’s true. Sorry this didn’t work out for you. I could help you troubleshoot, but since you’ve already decided this recipe sucks, I doubt you want the help. If you do happen to want help, you can email me directly at [email protected] and I am more than happy to help pinpoint where things went wrong for you.
Muss ich unbedingt nachmachen, Danke und danke auch für die Gramm Angaben!
Ich habe heute deinen Blog abonniert.
Viele Grüße sendet,
Gabriel
This is some seriously good fudge, Gabriel–enjoy, and thanks for subscribing!
Thank you for the samples!! I really loved batch 3 – very flavorful and not too sticky!
Hi, Alexandra! So glad you enjoyed them, and I’m glad you’re feeling better! Batch 3 is my favorite, too! 🙂
This was the best peanut butter fudge I have had!! I really enjoyed batch 2. Crunchy, complex, smooth and delicious! Alice would be thrilled to know such a wonderful recipe is named in her honor! She was such a sweet kitty.
I am so very happy you love it, and I am glad I get to share stuff with you In Person! And yes, Alice was such a sweet and earnest girl. We will always miss her. xo
So sorry for your loss. Alice was very lucky to have such a loving home. I lost 2 of my Tortis a year and a half ago. A few months apart. They were 15 and 16 years old. I still miss them. The fudge looks so good, I’m going to add it to my baking list this year. Wishing you and yours a Merry Christmas, and Happy New Year.
Thank you, Annette. I’m so sorry for your losses. That’s a lot, and it’s always so hard. The fudge is really good, and I hope you enjoy it.