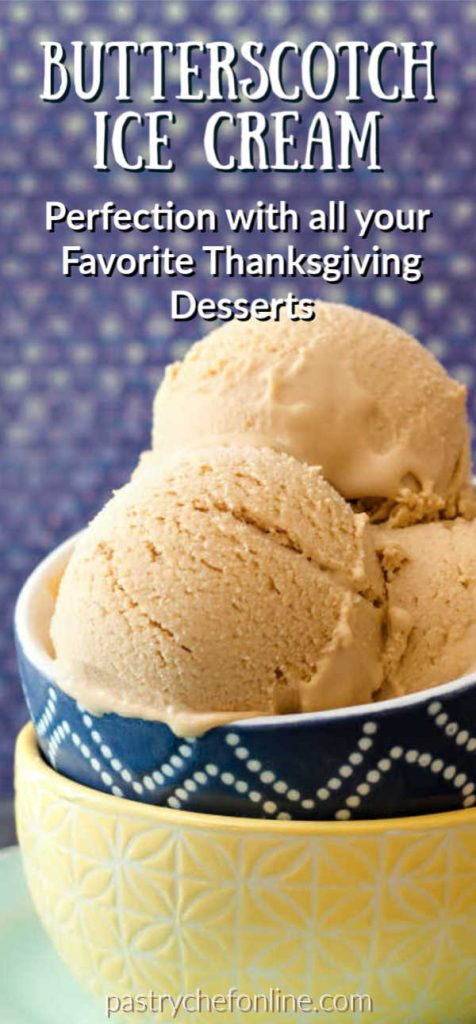
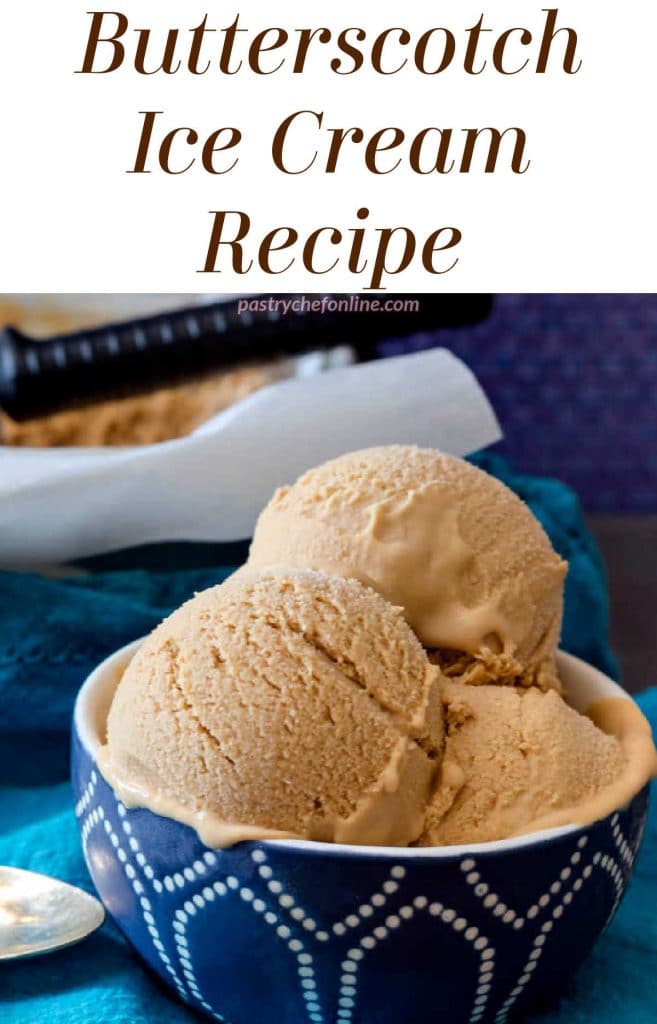
I am really excited to bring you not only this easy recipe for decadent Butterscotch Ice Cream because butterscotch is my favorite and so is ice cream!
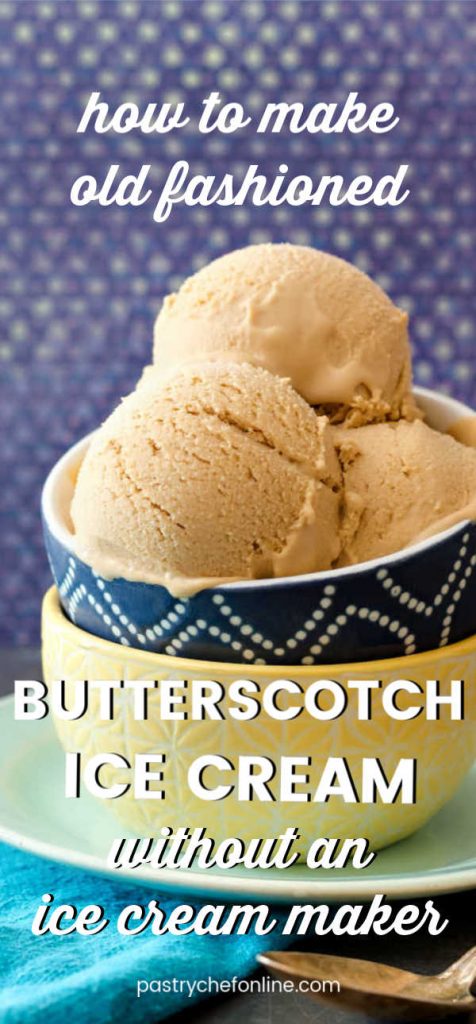
The butterscotch ice cream starts with a base that I would normally tell you to churn in your ice cream maker, but since I know not everyone has an ice cream maker, I froze this one in the freezer, whisking every hour. I’ll show you how to do it, because not having an ice cream churn shouldn’t keep you from enjoying churn-style ice cream!
And for folks who like their butterscotch in ribbons, you may enjoy my butterscotch ripple ice cream recipe.
Pastry Chef Online Participates in Affiliate Programs. If you make a purchase through one of my links, I may earn a small commission. For more information click to read my disclosure policy

For ease of browsing, here are all of my ice cream recipes in one place. Thanks for stopping by!
Last year for my birthday, my husband gifted me an old-fashioned hand-crank ice cream maker (like Grampie had).
Reader Michelle
I “christened” it using this recipe, and it is my absolute favorite. I’ve made the recipe a few times since then (along with some other favorites), and we just can’t get enough of it.
Butterscotch Ice Cream, At a Glance
✔️Skill Level: Beginner
✔️Skills: Making Butterscotch (Cooking Sugar), Controlling Crystallization Through Agitation (ie: Churning)
✔️Type: Sicilian Gelato
✔️Number of Ingredients: 7
✔️Prep Time: 20 minutes
✔️Cook Time: 20 minutes
✔️Freezer Time: 3 hours
✔️Yield: about 5 cups
✔️Related Reading: The difference between caramel and butterscotch
Jump Straight to the Recipe
Why This Recipe Works
Sicilian gelato is basically a sweetened, whole milk ice cream base that is thickened with starch rather than egg.
Since it’s a whole-milk base, there is less butterfat than a base made using cream or even half and half, and that’s important since the butterscotch itself already sports a stick of butter.
Almost more important than the amount of butterfat is the lack of eggs in the recipe. Butterscotch is such a pure flavor I didn’t want to muddy it at all by introducing egg yolks.
You’ll note the recipe calls for a touch of cream cheese as well. This is a trick I learned from Jeni’s Splendid Ice Creams.
Cream cheese not only adds additional body to the base, but it also acts as a stabilizer, helping to keep the ice cream smooth, creamy, and free of ice crystals.
How does this work? Cream cheese already contains stabilizers in the form of xanthan gum or guar gum, so we can “borrow” them to help stabilize our ice cream.
And as your final bonus, while you can churn this in a traditional ice cream maker, you can also churn it by hand–just a few whisks every hour or so while it’s freezing. Excellent!
How To Make It
Ingredients
Like most homemade ice cream, the ingredient list is pretty short and straightforward:
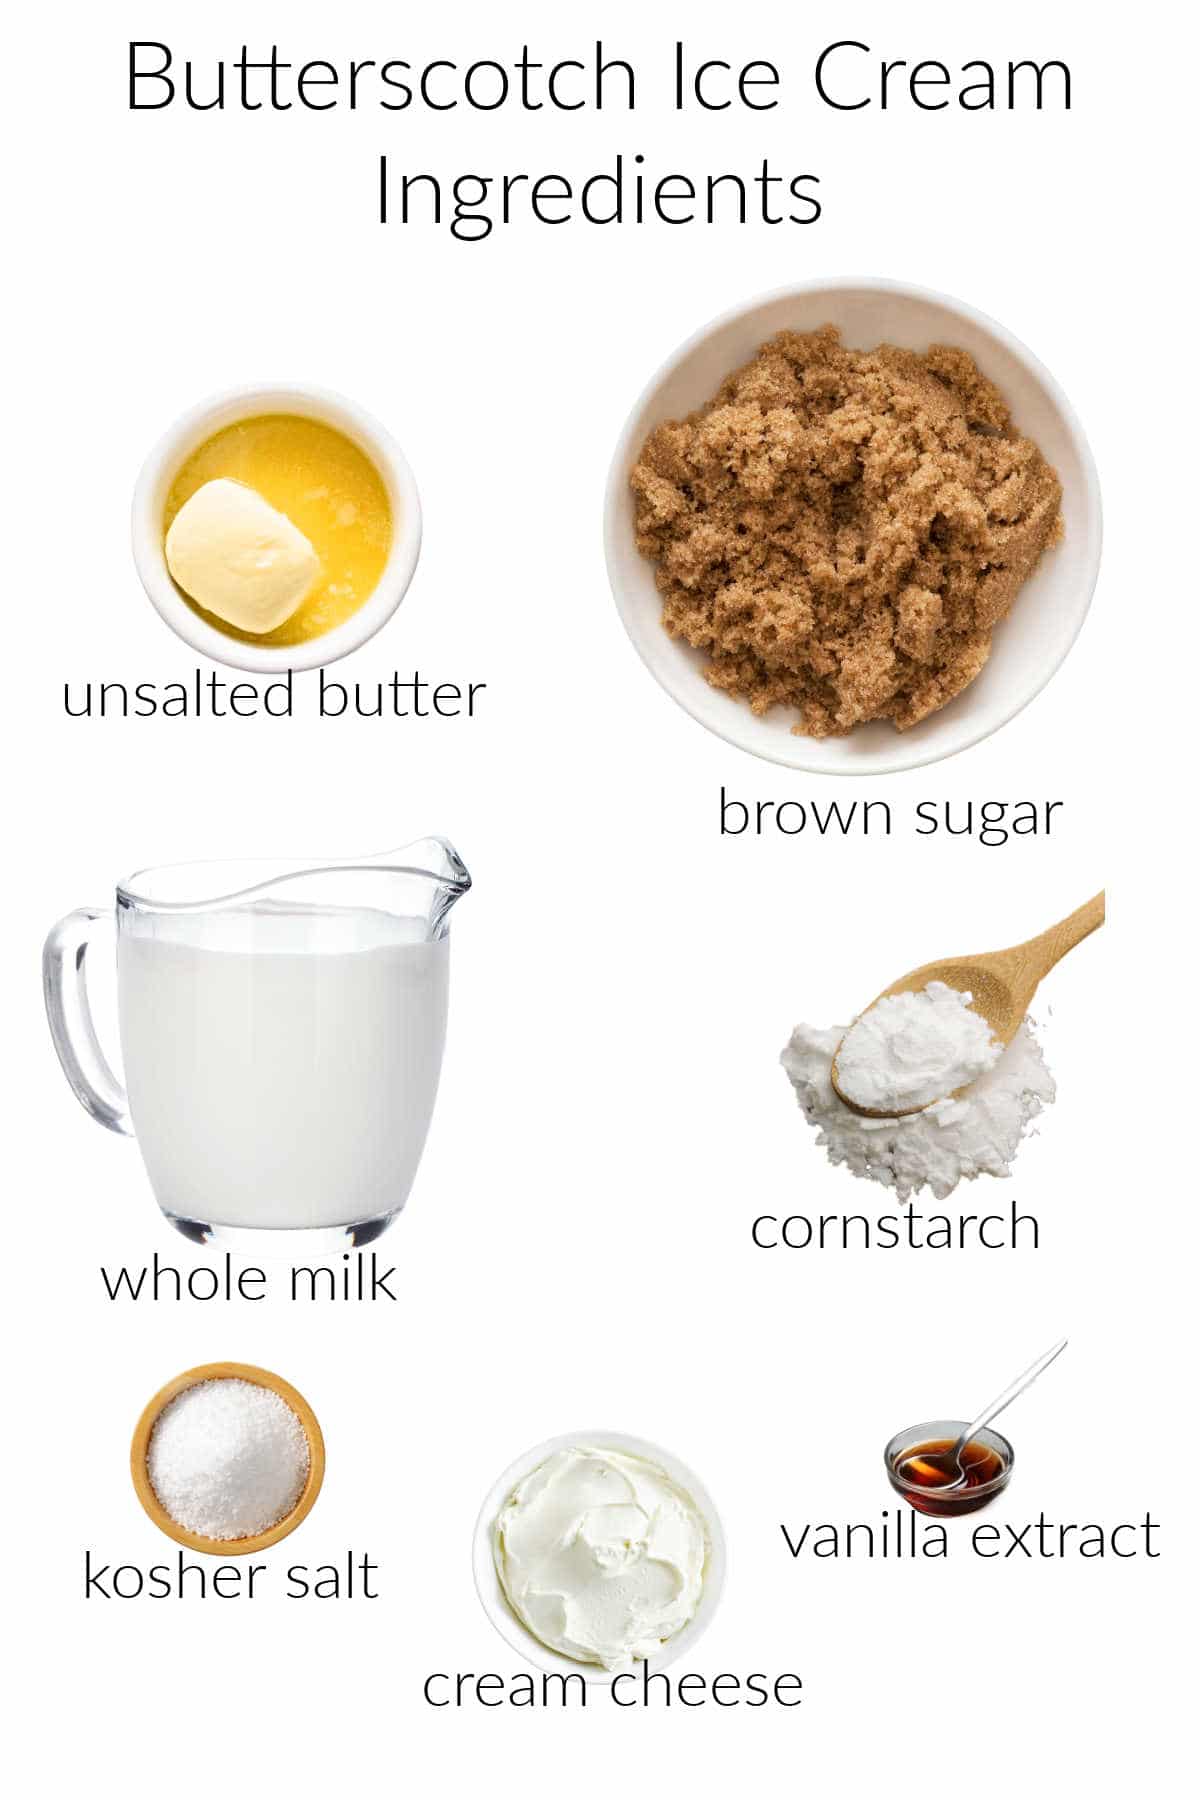
- butter and brown sugar: the backbone of any butterscotch dessert. Cook the two together until the sugar has caramelized and the butter has browned. You can use light or dark brown sugar, but I prefer dark brown. You can also use salted or unsalted butter, but I prefer to use unsalted and then salt to taste. Even if you use salted butter, it is likely you will need to add some extra salt
- whole milk: provides the volume for the ice cream. You can substitute 2% milk here, but up the cornstarch by an additional teaspoon or you risk having icy ice cream.
- cornstarch: thickens the mixture to provide body to trap air and to keep ice crystals small
- kosher salt: for flavor. Salt is an integral flavor component of butterscotch, so don’t leave it out
- cream cheese: provides a touch of extra fat and richness while not overwhelming the ice cream. It also helps keep it scoopable straight from the freezer
- vanilla extract: rounds out the flavor
Making the ice cream base is a pretty straightforward process. There are actually a number of ways to do it, but this is how I made my butterscotch base:
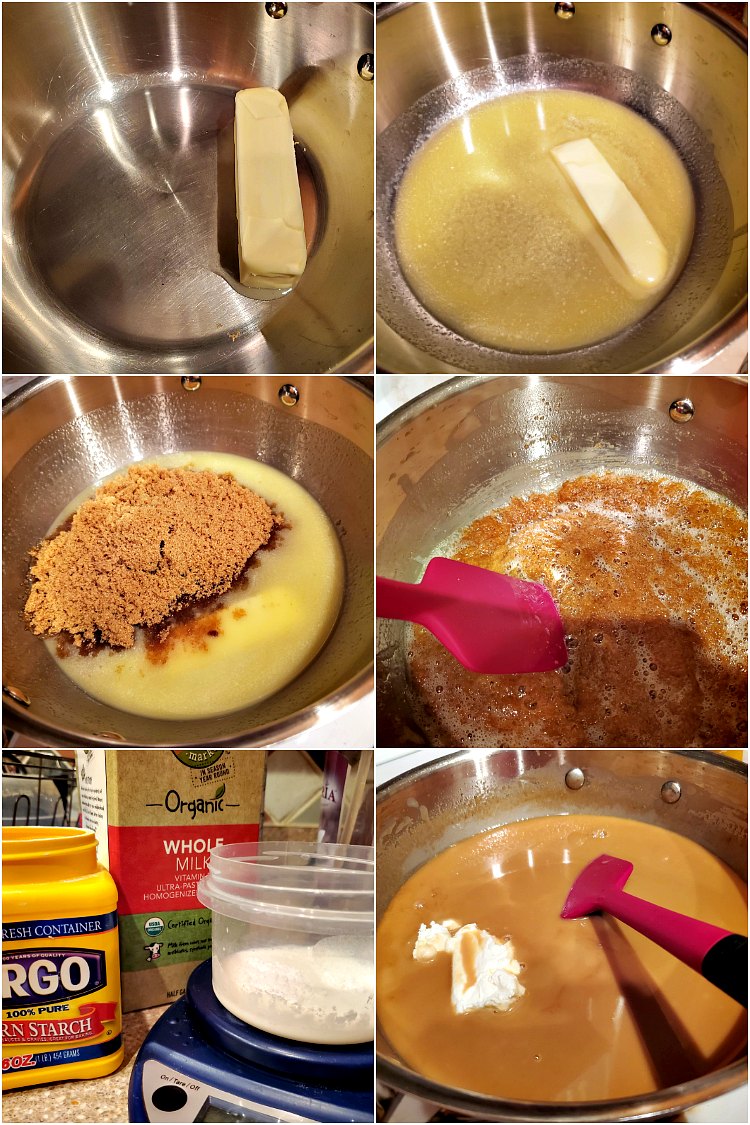
- Make butterscotch by cooking together brown sugar and butter until the butter has browned and the sugar has caramelized.
- Add half of the milk and stir over low heat until all the butterscotch has melted into the milk.
- Whisk the cornstarch into the rest of the milk and add to the pot. Bring to a boil and let boil for one minute.
- Whisk in the softened cream cheese until smooth.
- Add vanilla.
Jenni Says: To make sure that the sugar dissolves completely with the butter, I have begun adding some water to the mixture. It will boil off and will ensure a completely smooth butterscotch.
Can I Make Ice Cream Without an Ice Cream Maker?
Yes you can. I did!
I do have this ice cream maker, and I love using it, but I realize not everyone has an ice cream maker.
And not everyone has a mixer for making no churn ice cream. So for today’s ice cream treat, I decided to make a conventional base (Sicilian gelato) and then freeze it without an ice cream maker.
How To Make A Churned Ice Cream without a Churn
I heard about this method years ago from my friend Anna, who is a pastry chef in New York. Honestly, I was skeptical. Don’t be like me. This really works!
All you need is time at home. And a whisk and a bowl. And space in your freezer.
Here’s how you do it.
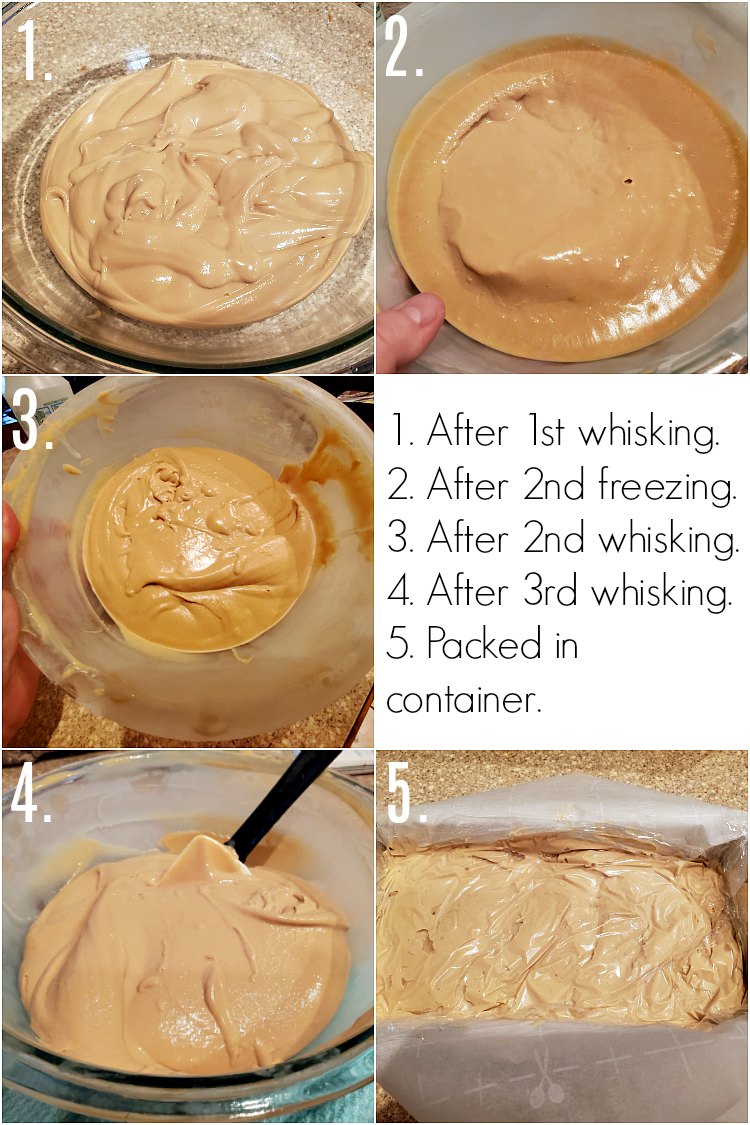
- Make and chill your base until completely cold.
- Put the base in a large bowl and put it in the freezer. Set a timer for one hour.
- After the hour is up, take the bowl out of the freezer and whisk it very thoroughly, making sure to scrape all the frozen bits around the edges into the rest. Whisk until it is completely smooth with no lumps.
- Repeat Steps 2 and 3 at least two more times. It might take three more times depending on your base.
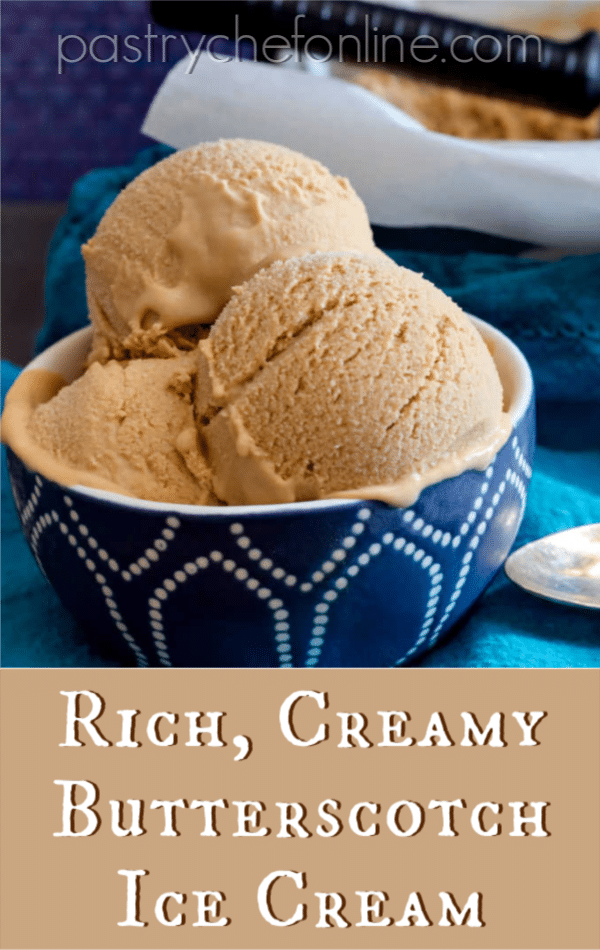
Here’s a collage with photos of what my base looked like as I was in the process of freezing it. Mine took 3 rounds of whisking and freezing.
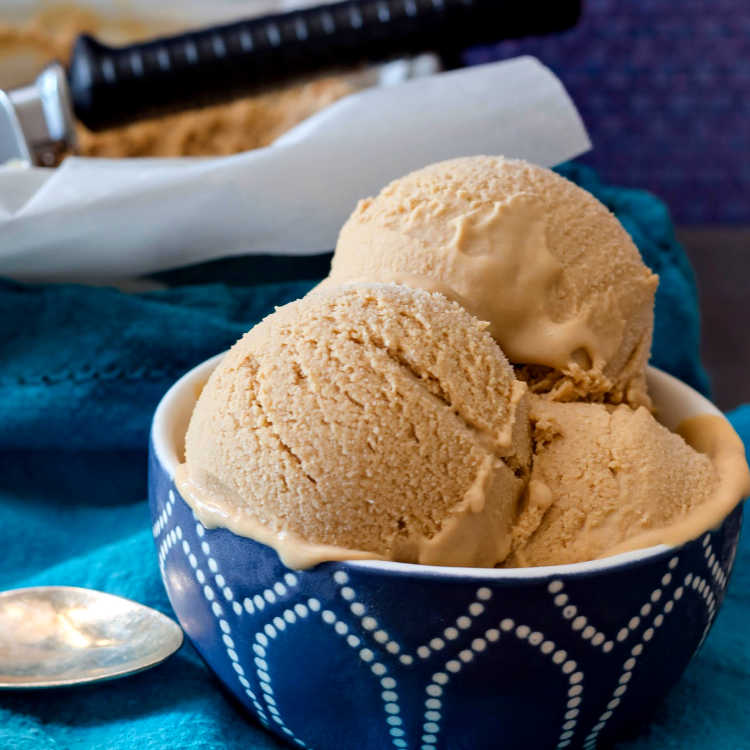
How Do I Know When My Ice Cream Is Done?
If you’ve ever had soft-serve ice cream or frozen yogurt, that is the texture you’re looking for.
After 3 or possibly 4 rounds of freezing and thorough whisking, your base will hold its shape fairly well and will look like soft serve.
And then you’re done.
Once you get to soft-serve consistency:
- pack the ice cream in whatever container you’d like
- press plastic wrap on the surface of the ice cream (if not using a container with a tight-fitting lid)
- freeze at least four more hours or overnight.
Thanks to whisking in some air, the cornstarch, and the cream cheese, your ice cream won’t be rock hard straight from the freezer, but it will be a bit easier to scoop if you let the container sit on the counter for five minutes or so before serving.
PRO TIP: If you forget about your base and it freezes solid before you’ve whisked enough air into it, cut it into chunks and blend it up in your blender or food processor. Then pack into your container and freeze.
Butterscotch Ice Cream Q & A
My conditional answer is yes. Since butter is an integral part of the flavor profile, make sure that whatever butter substitute you use tastes a good bit like real butter. Try Melt, Country Crock Plant Butter, or Earth Balance sticks. Make sure your sugar is vegan as well, and swap out the dairy for plant-based milk. Since we’re thickening the base with cornstarch, make sure that whatever plant-based milk you use will withstand boiling without separating.
As written, this ice cream is gluten free. To be safe, check your labels and make sure that none of the ingredients are processed on shared equipment.
For best flavor and texture, eat your real butterscotch ice cream within a week.
Questions?
If you have any questions about this post or recipe, I am happy to help.
Simply leave a comment here and I will get back to you soon. I also invite you to ask question in my Facebook group, Fearless Kitchen Fun.
If your question is more pressing, please feel free to email me. I should be back in touch ASAP, as long as I’m not asleep.
A Note About Measurements
My recipes are almost all written by weight, including liquids, unless otherwise specified.
For accuracy and consistency of results, I encourage you to buy–and use–a kitchen scale.
I promise that baking and cleanup will be so much quicker and easier.
This is the scale that I recommend for home use. I have owned and used one for years.

Don't let its small price and small size fool you. The Escali Primo is an accurate and easy-to-use food scale that I have used for years. It's easy to store, easy to use, has a tare function, and easily switches between grams and ounces/pounds for accurate measurements.
Love This? Please Rate and Review. Thanks!
It will help me and other readers so much if you take a moment to rate and leave a review for this recipe.
You can use the stars to rate 1-5 (5 is best), and leave a review in the comments. It helps me make adjustments if any are needed, and comments help others decide whether the recipe is worth making.
Other ways to share include pinning, and/or sharing on your favorite social media platform.
Thank you so much for taking the time!


Butterscotch Ice Cream Recipe
Equipment
Ingredients
- 1 cup well packed brown sugar 8 oz, by weight
- 1 stick unsalted butter
- 1 quart whole milk divided
- 1 Tablespoon cornstarch
- ¾ teaspoon kosher salt
- 2 oz cream cheese softened
- 2 teaspoons vanilla extract
Instructions
- Melt butter in a heavy bottomed saucepan.
- Add the brown sugar, and cook over medium-high heat until the sugar caramelizes and the butter browns, stirring constantly. First it will be hard to mix the butter and sugar, then it will smooth out. After a few minutes of stirring, it will break again, and the butter and sugar will be separate. Keep cooking and stirring until the mixture comes back together for a second time and darkens in color. You may see a few wisps of smoke.
- Once the butterscotch has finished cooking, carefully add 2 cups of the whole milk. The butterscotch will harden into a clump. Worry not. Cook and stir over medium-low heat until the butterscotch melts.
- Whisk the cornstarch and salt into the other 2 cups of milk and then whisk into the butterscotch.
- Bring to a boil, stirring frequently, and allow the mixture to boil for about 1 minute.
- Turn the heat off and whisk in the softened cream cheese until completely incorporated and smooth. Stir in the vanilla.
To Churn with an Ice Cream Maker
- Let the base cool for an hour on the counter, whisking occasionally, and then chill the ice cream base at least 6 hours or overnight.
- Freeze according to manufacturer’s instructions and pack into a container to freeze throroughly.
To Churn without an Ice Cream Maker
- Pour the finished base into a large bowl.
- Cool the base for an hour on the counter, whisking occasionally, and then chill the ice cream base at least 6 hours or overnight.
- Whisk the base thoroughly to incorporate a bit of air and freeze for an hour.
- Remove the base from the freezer and whisk very well, being sure to scrape the frozen parts around the edges into the whole.
- Return to the freezer and repeat steps 3 and 4 at least 2 more times and possibly 3, until the base is the consistency of soft serve ice cream.
- Pack into an airtight container to freeze thoroughly, at least 4 hours or overnight.
Did You Make Any Changes?
Video
Notes
- Make and chill your base until completely cold.
- Put the base in a large bowl and whisk it really well to aerate it as much as possible.
- Put it in the freezer. Set a timer for one hour.
- After the hour is up, take the bowl out of the freezer and whisk it very thoroughly, making sure to scrape all the frozen bits around the edges into the rest. Whisk until it is completely smooth with no lumps.
- Repeat Steps 2 and 3 at least two more times. It might take three more times depending on your base.
 HOW DO I KNOW WHEN MY ICE CREAM IS DONE?
If you’ve ever had soft-serve ice cream or frozen yogurt, that is the texture you’re looking for.
After 3 or possibly 4 rounds of freezing and thorough whisking, your base will hold its shape fairly well and will look like soft serve. (See Video)
And then you’re done.
Once you get to soft-serve consistency:
HOW DO I KNOW WHEN MY ICE CREAM IS DONE?
If you’ve ever had soft-serve ice cream or frozen yogurt, that is the texture you’re looking for.
After 3 or possibly 4 rounds of freezing and thorough whisking, your base will hold its shape fairly well and will look like soft serve. (See Video)
And then you’re done.
Once you get to soft-serve consistency:
- pack the ice cream in whatever container you’d like
- press plastic wrap on the surface of the ice cream (if not using a container with a tight-fitting lid)
- freeze at least four more hours or overnight.
Nutrition

Hi, y’all! I hope you’ve enjoyed this post and hopefully also learned a thing or two.
If you like my style, I invite you to sign up for my occasional newsletter, The Inbox Pastry Chef.
Expect updates on new and tasty recipes as well as a bit of behind-the-scenes action. I hope to see you there!
Thanks for spending some time with me, friends. Enjoy the ice cream, and thanks for being here!


Join in Today!
Jenni, like all of your recipes that I I have tried, this is a keeper! The instructions are exact, step by step, all went as it was supposed to and the ice cream was superb! In fact, the butterscotch was so lovely that I didn’t want to add the milk but I’d promised my hubby some ice cream, so I had to. But wow that butterscotch was yummy just as is! I paired the ice cream with a pear crisp but it can stand on its own. My hubby can’t get enough of it! I have never made ice cream like this before – I’m really curious now as to what else would work with this base!
I am so thrilled you guys enjoyed the ice cream, and I know that it went beautifully with the pear crisp! Thanks for reviewing!
Hi Jenni
This recipe looks great. How much butter is used? I live in Australia and butter doesn’t come in a ‘stick’ as the recipe asks for….
Thanks
Guy
Hey, Guy. Sorry I didn’t address this in the recipe. A stick of butter in the US is 4 oz, so 113-114 grams will do it. Enjoy!
Can you give the temperature for the sugar/butter combination when it has reached the proper stage.
Hey, Johnette! I have never taken the temp before bexaise I generally go by my nose. When it smells like caramel, it’s ready. So by that definition, I’d say you’re looking at 320F or so. I hope that helps!
Hi there, thanks for sharing. Can the cream cheese be omitted?
Yes, you can omit the cream cheese with no problem. It does help it be a bit more “scoop able” but it’s not strictly necessary, Taz. Enjoy!
I love this recipe. It has become my favorite, and it never lasts long in my house.
The directions are amazing, and I really appreciate the photos and videos showing exactly what it should look like at each stage. (Especially helpful when making the butterscotch.) Love it!
Last year for my birthday, my husband gifted me an old-fashioned hand-crank ice cream maker (like Grampie had).
I “christened” it using this recipe, and it is my absolute favorite. I’ve made the recipe a few times since then (along with some other favorites), and we just can’t get enough of it.
Michelle, hi! I’m honored you chose this ice cream to Christen your churn! Thank you so much for letting me know. I wish you many many more delicious batches!
I’m a big fan of butterscotch, I love this as n ice cream!
Butterscotch is my hands down favorite flavor, so I try to make everything into a butterscotch at least once. The ice cream is especially good, and it makes a great milkshake!
My favorite summer dessert is strawberry (or peach) shortcake
Nothing like showing off perfectly ripe fruit! Good luck in the giveaway, Karen!
Now wait just a darn minute here. Did you say that the very same ice cream base that I make up for an ice Cream maker, no special adjustments like the no-churn/whipped cream + sweetened condensed milk recipes which are designed for no-churn, can work doing what you said and showed so clearly? REALLY??? That is incredible and wonderful. I have an ice cream freezer but that 24 hour chill thing catches me, a lot. (I have two, but distraction…and freezer space….) Eager to make this and what a glorious fact and fun filled post.
I know, right?! I read about it a very very long time ago, but I sort of didn’t *really* believe it. But I’m here to tell you, it is the truth! I truly cannot tell the difference, and there’s less to wash too!