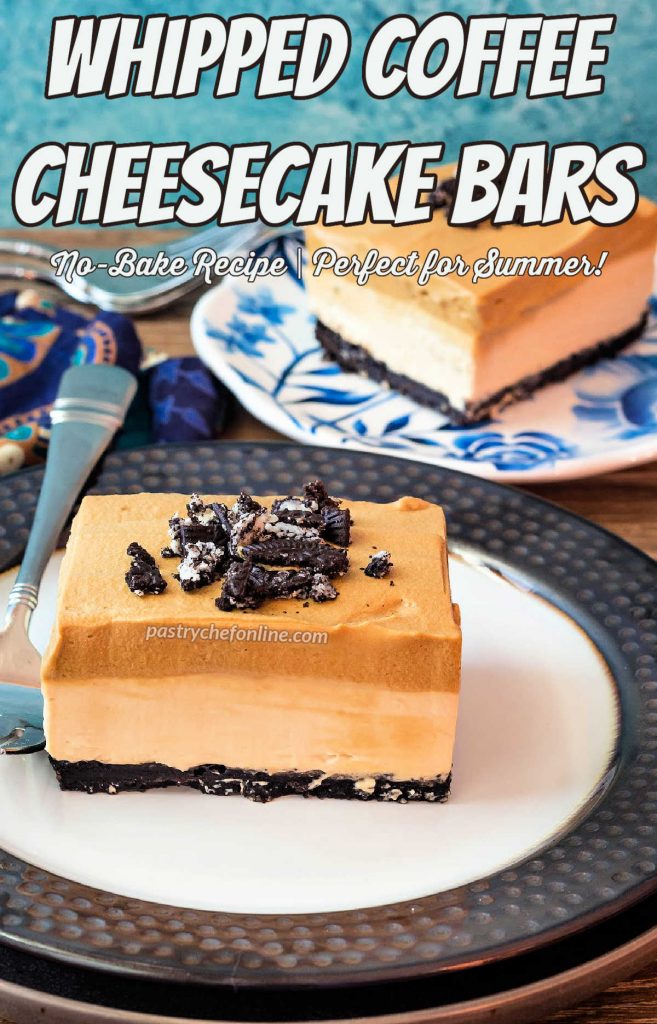
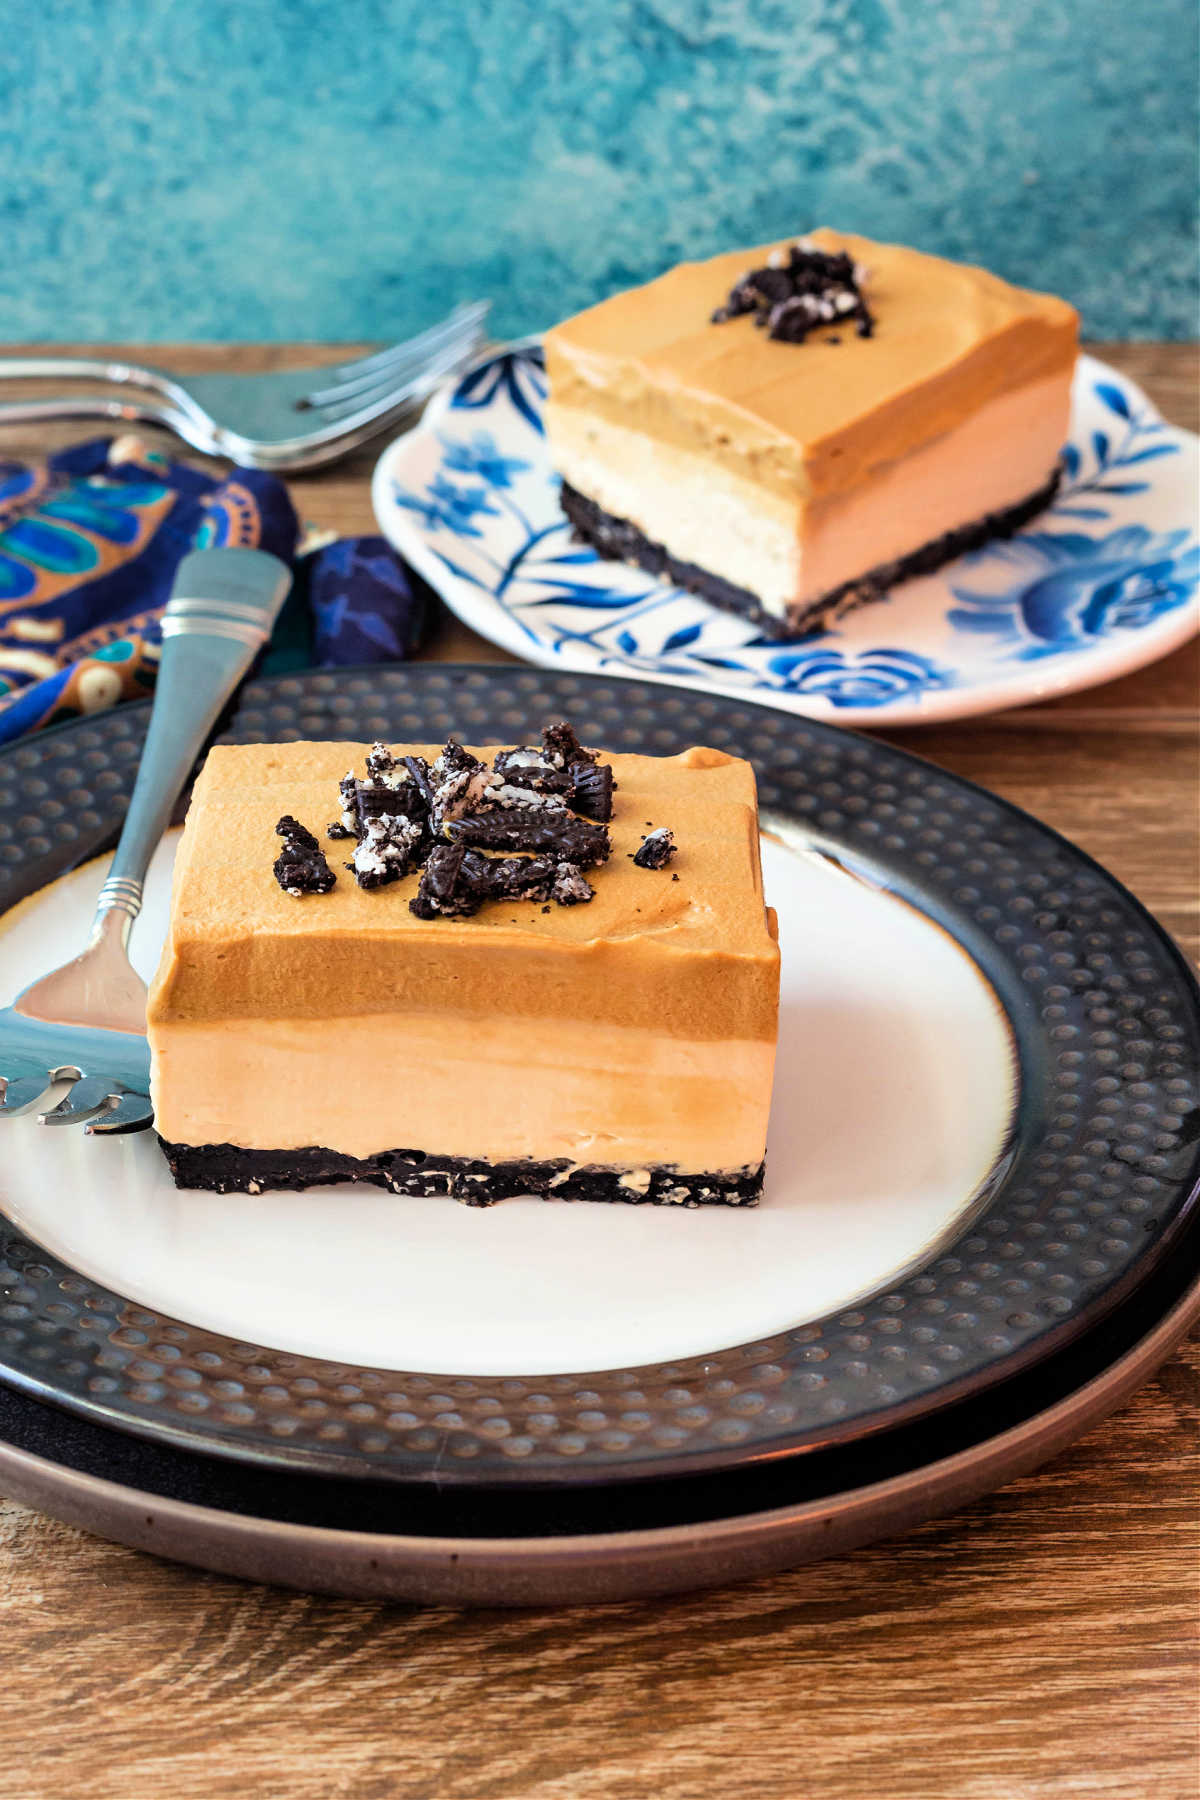
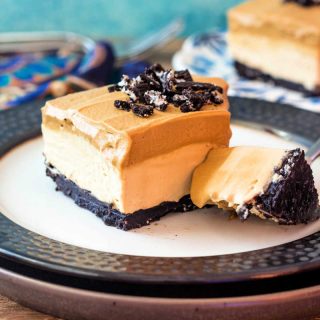
Today, I have the perfect summery treat for you. No-bake whipped coffee cheesecake bars, my friends. I do bake the crumb crust for a few minutes, but the filling and topping are both no-bake. And as a bonus, you can serve this coffee dessert refrigerated or frozen.
Whipped coffee, beaten coffee, or Dalgona coffee brings an intense coffee flavor to the whipped cream topping while the coffee cheesecake layer has a milder coffee flavor. When taken all together, this no-bake cheesecake packs in a ton of coffee flavor.
You may also want to give my coffee mousse recipe a try.
For ease of browsing, you can find all my cheesecake recipes in one place. Thanks so much for visiting!
This post and recipe was created for #SummerDessertWeek! I was sent samples by some of the sponsor companies but as always opinions are 100% mine.
See my whipped coffee cheesecake bars recipe web story here.
Why You Should Make These Layered Coffee Cheesecake Bars
Friends, coffee lovers, cheesecake lovers, lend me your ears. These are the magical things about this dessert:
Pastry Chef Online Participates in Affiliate Programs. If you make a purchase through one of my links, I may earn a small commission. For more information click to read my disclosure policy
- No-bake (well, minimal bake, since I do ask you to bake the crust) makes it an easy summer choice for dessert
- Made with no hard-to-find ingredients–no fancy coffee extracts here, just good old instant coffee.
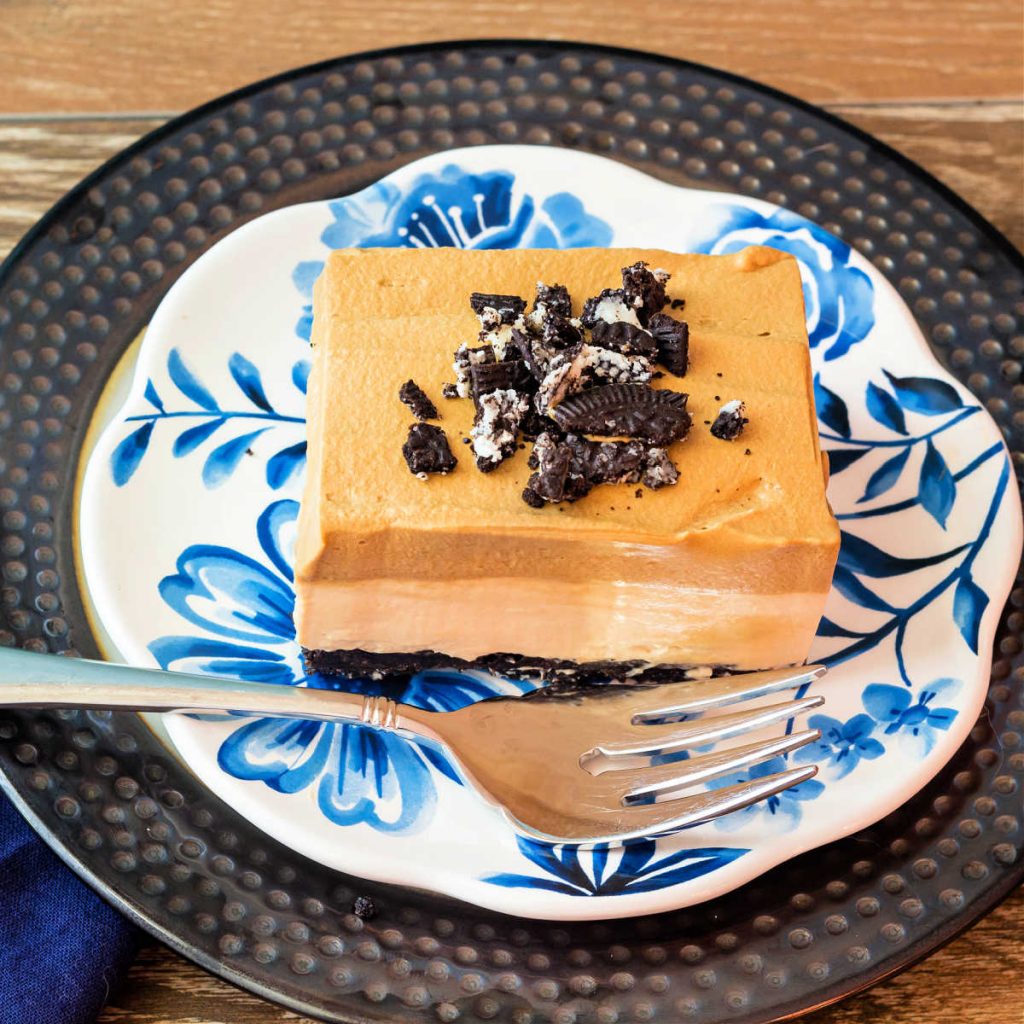
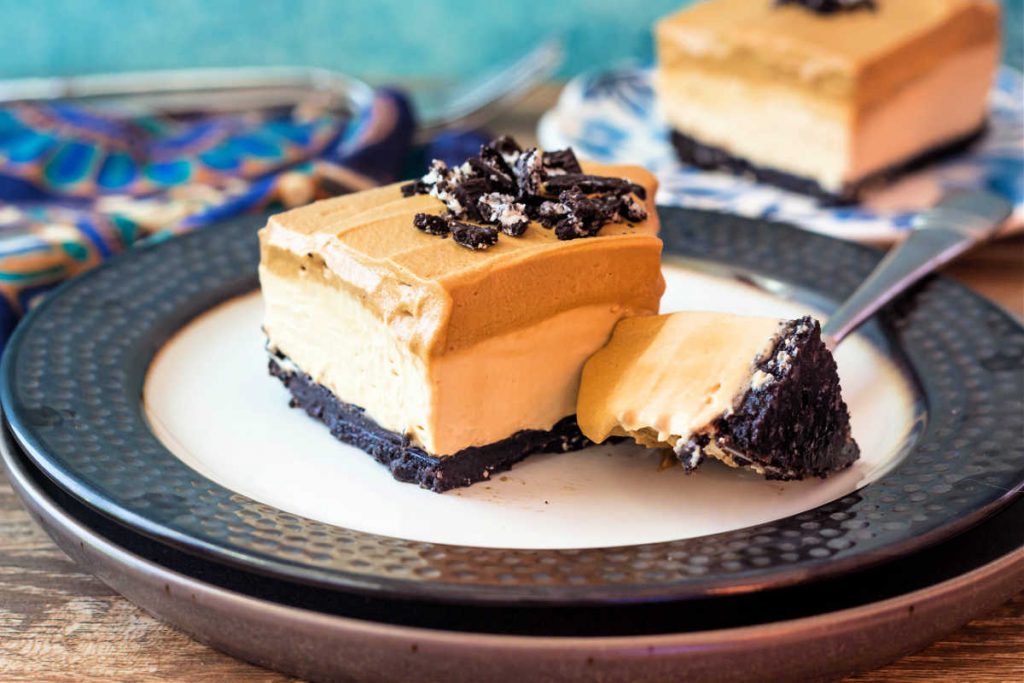
- Chocolate crumb crust–who doesn’t love that? If you don’t want to use sandwich cookies (I used the “Thins”), you can opt for chocolate sable.
- A mild, cream cheese coffee layer
- An intensely coffee-y whipped coffee layer
- Light and airy when served at refrigerator temperatures–almost like a mousse
- Firmer and as delicious out of the freezer (if you let it sit for about 20-25 minutes).
- You can vary the intensity of the coffee flavor by using more or less instant coffee in either layer. Or both.
- While a
stand mixer makes the mixing go a bit faster, you can absolutely make this coffee cheesecake using a hand mixer.
How To Make Whipped Coffee Cheesecake Bars
There are three components in these whipped coffee cheesecake bars. None are difficult to make.
Here’s what you’ll need.
Ingredients
To make the crust:
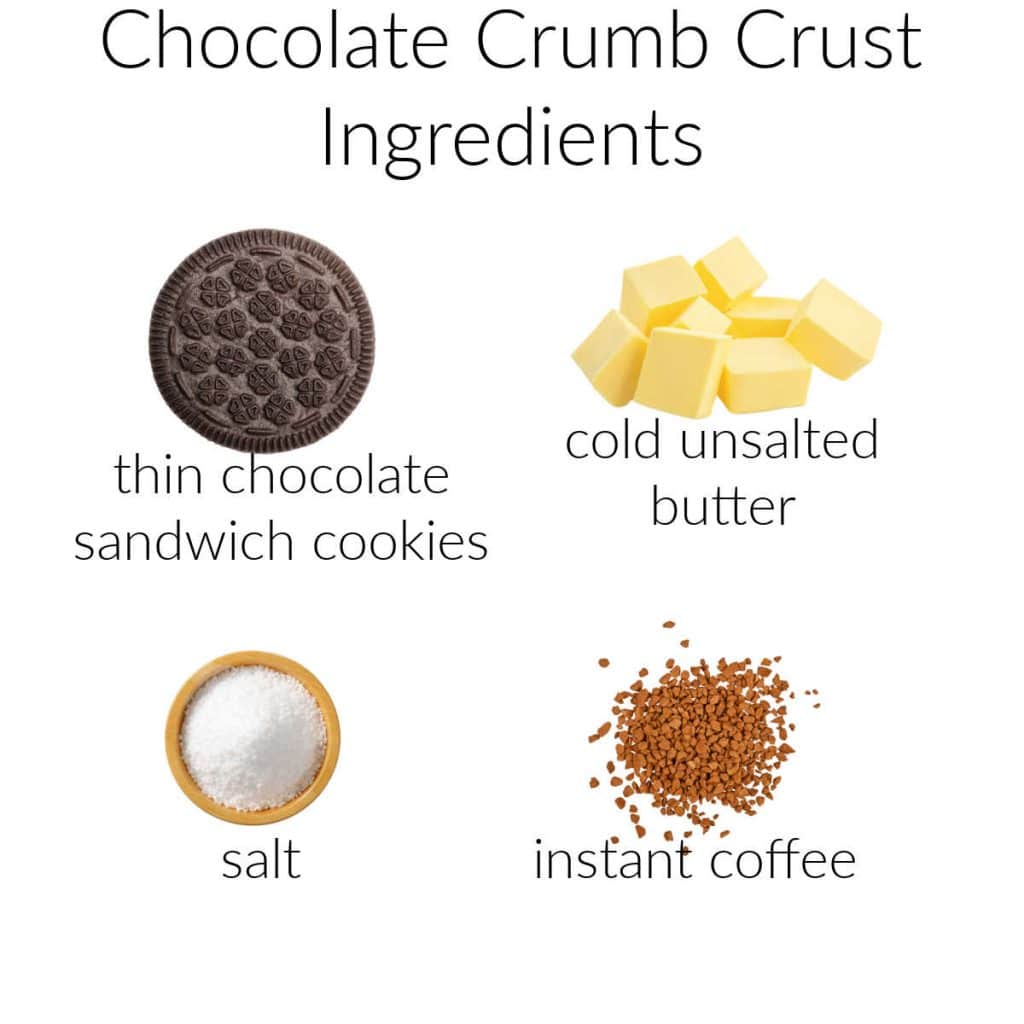
- chocolate sandwich cookies: I used the “thins” version of most folks’ favorite chocolate cream sandwich cookie. If you do, too, you’ll need 35, or about 3/4 family-sized package
- butter: No need to melt it since it’ll melt in the oven. I use unsalted here and add the salt separately. If you use salted butter, you guessed it: leave out the salt
- salt: brings out the flavors in the crust and balances any bitterness from the instant coffee. I use kosher. If all you have is fine-grained salt, cut back by about half
- instant coffee: I use just a little bit in the crust to tie all the coffee flavors together. It’s technically optional in the crust, but why not go all in?
For the no bake coffee cheesecake layer:

- cream cheese: 2 packages, softened to room temperature. Go with a premium brand because sometimes store brands are a bit softer, and the cream cheese is really what gives this layer a slice-able texture
- powdered sugar: I used sponsor Dixie Crystals. Vary the sweetness according to your taste. I used 1 cup, but you could also cut back to 3/4 of a cup if you like your desserts a little less sweet
- Greek yogurt: NOT PICTURED–sorry! You can also substitute sour cream. Either will provide a little lift and tang, which goes so beautifully with the coffee flavor
- vanilla extract: rounds out the flavor
- kosher salt: brings out flavor and counteracts bitterness from the instant coffee
- instant coffee: the main flavoring agent in the cheesecake layer. Use a good brand here. Instant coffee labeled Classico or Robusto will lend great flavor
- heavy cream: Heavy cream is the other ingredient that lends body and mouthfeel to the cheesecake. You’ll be using a full cup plus 1 Tablespoon that you’ll heat up to dissolve the instant coffee in
- granulated sugar: You could use powdered sugar here too, if you’d like, but since Dixie Crystals makes both powdered and granulated sugar, I went with granulated for sweetening the cream
Want an even easier recipe for the cheesecake layer? Try this 3-ingredient no-bake cheesecake with some instant coffee or coffee extract added!
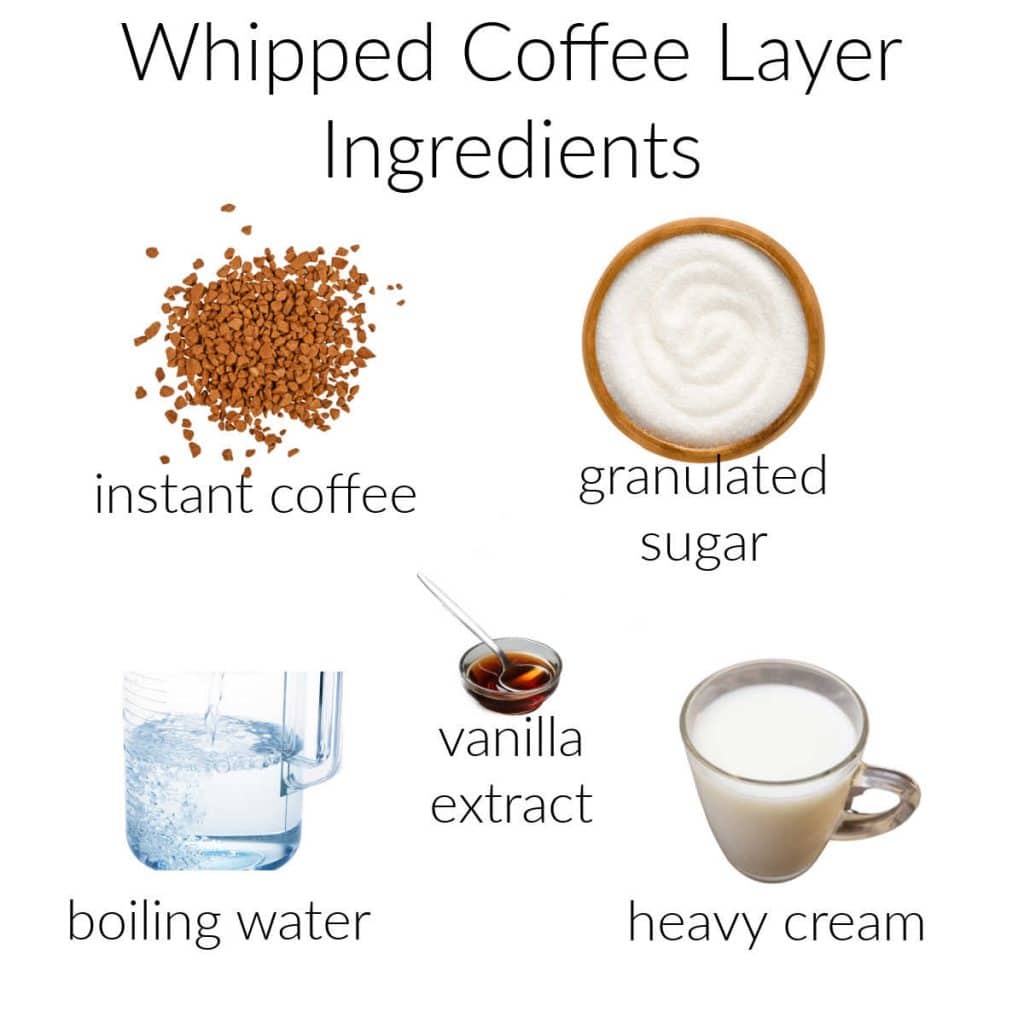
- instant coffee, hot water, and granulated sugar: These 3 ingredients are all you need to make beaten coffee (whipped coffee, Dalgona coffee–it goes by many names), either to drink or now to put in your cheesecake recipe. Equal amounts of all three is the magic proportion.
- heavy cream, vanilla, granulated sugar: whipped together to make a “chantilly cream” to then be whisked together with your Dalgona mixture
Procedure
To make the crust:
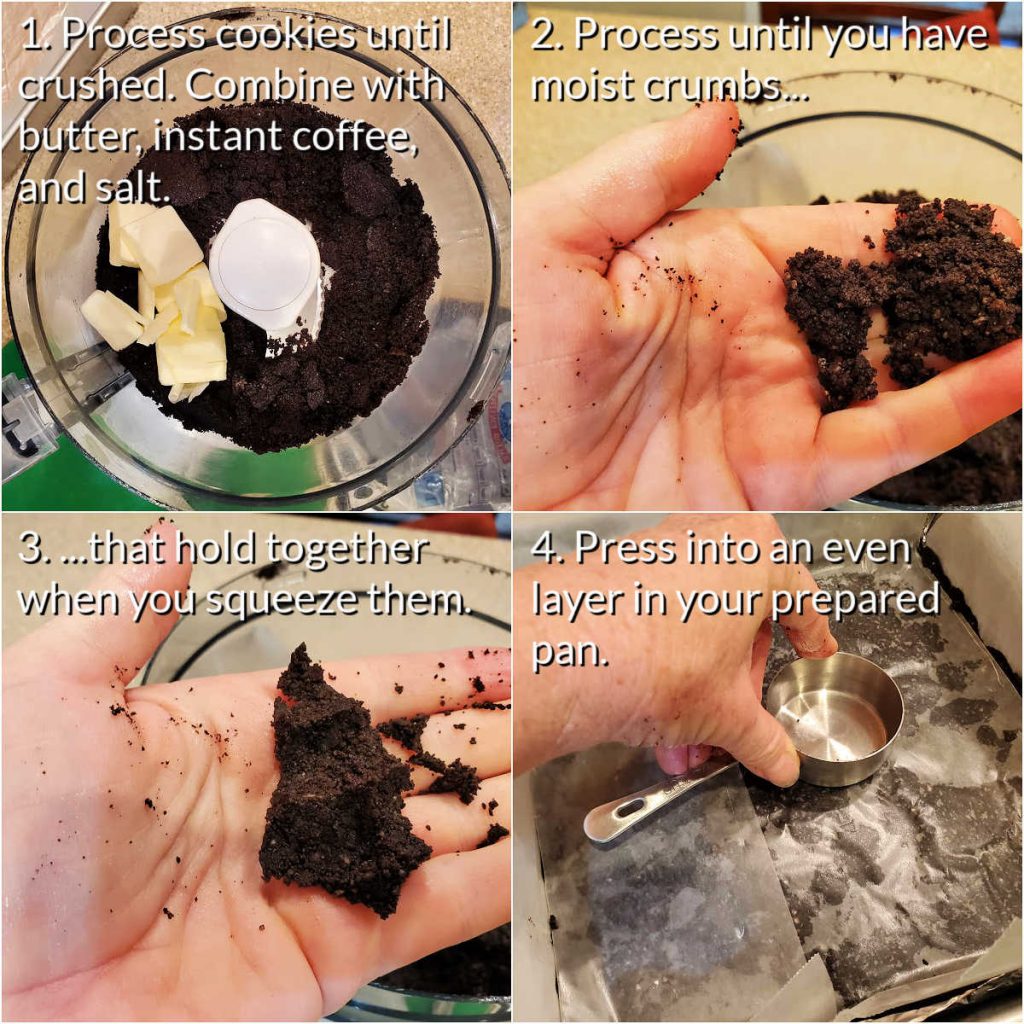
The crust is very easy to make. Using a food processor makes it a snap, but you can also crush up the cookies with a rolling pin and then mix everything together with a wooden spoon.
To make the cream cheese layer:
This layer is made in two stages.
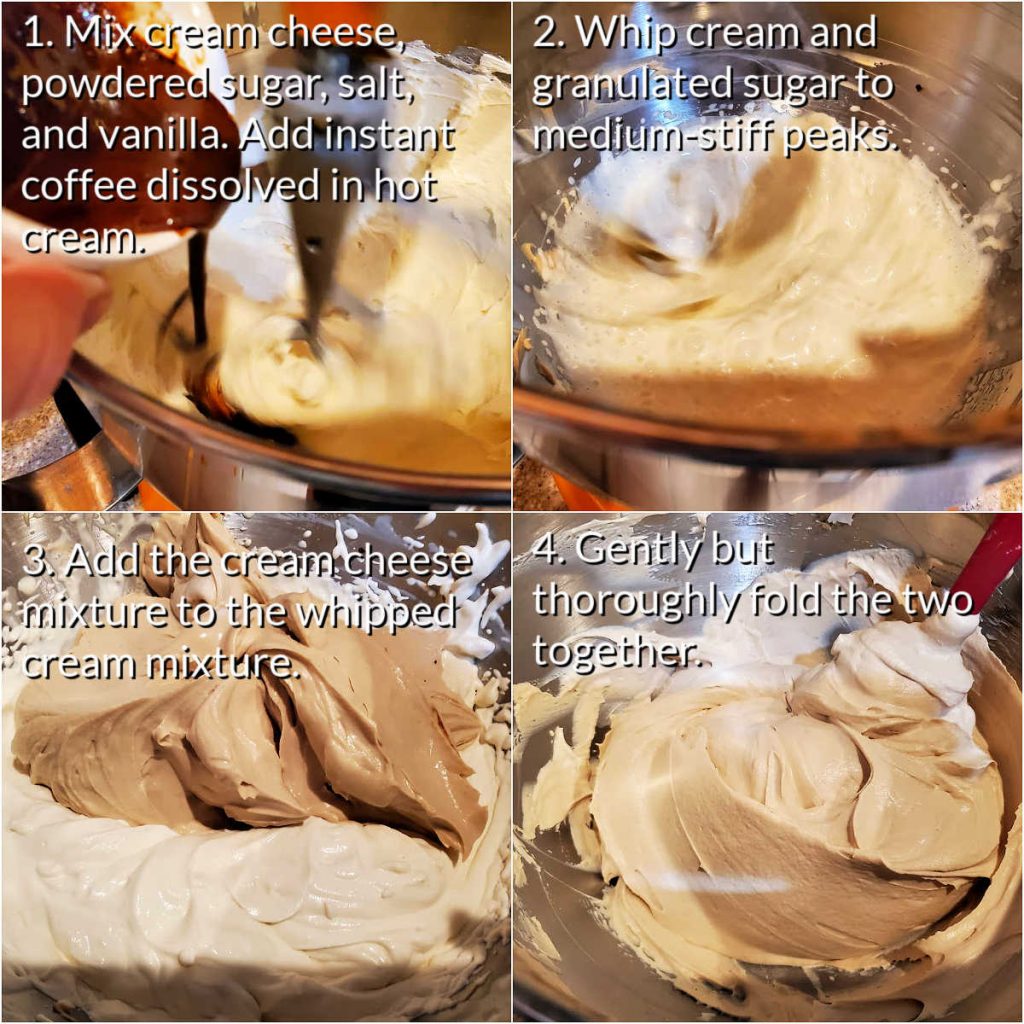
First, you’ll make the cream cheese layer by blending together the softened cream cheese, powdered sugar, Greek yogurt, salt, and vanilla.
Dissolve the instant coffee in a little hot cream and add that to the mix.
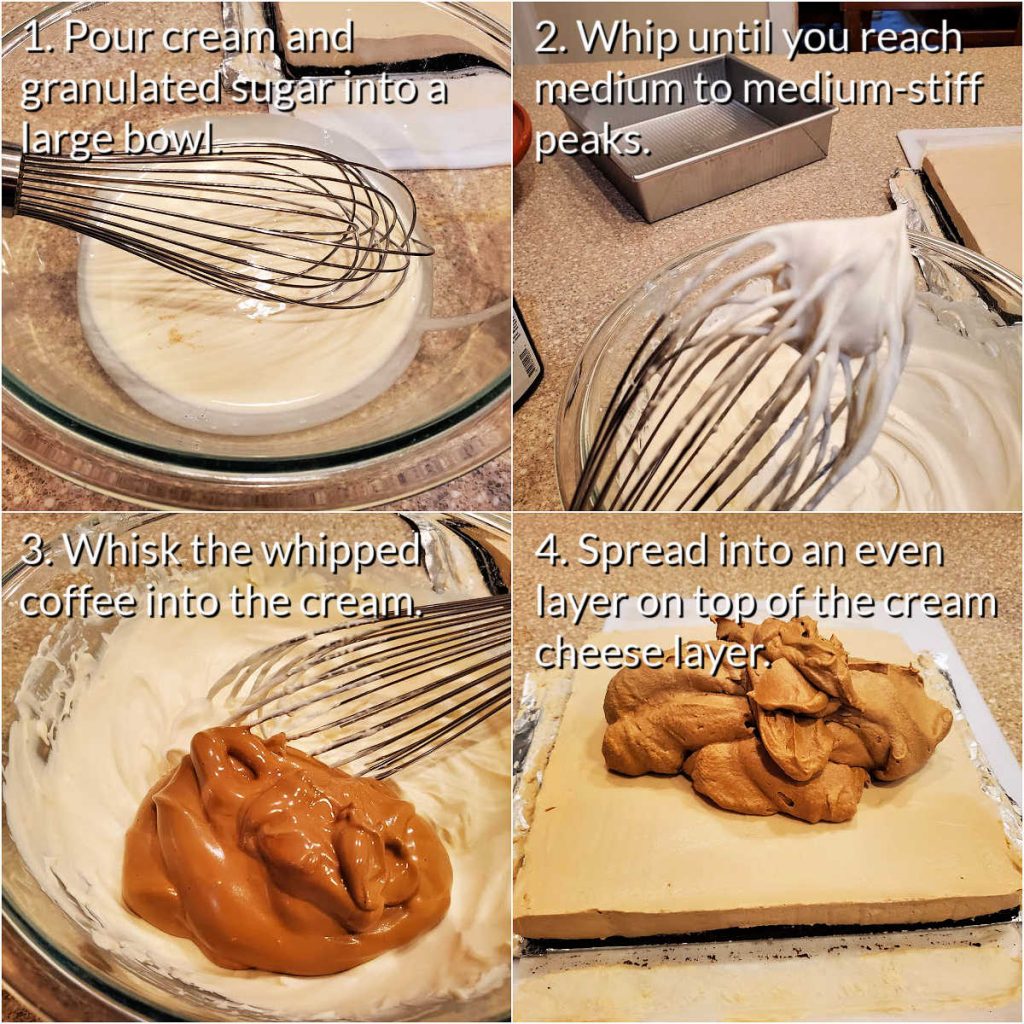
Next, you’ll whip the cream to medium to medium-stiff peaks and then fold the two mixtures together to make what is basically a coffee-flavored, cream cheese mousse.
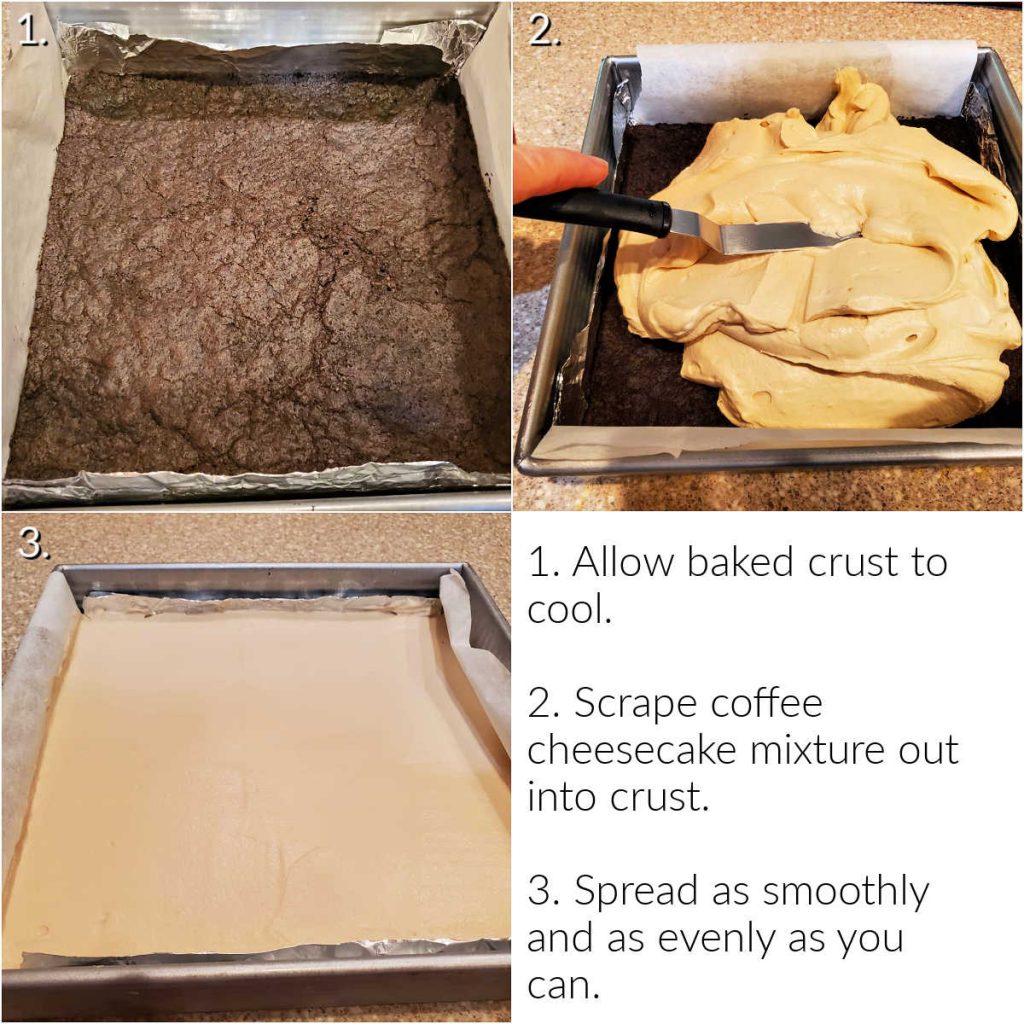
Once you have that done, spread it into your prepared crust as smoothly as you can.
Would you like to save this post?
To make the whipped coffee topping:
First, you’ll whip the instant coffee, granulated sugar, and boiling water together until it’s thick like shaving cream and expanded in volume by about four times.
See? It really does increase in volume by a Very Very Lot!
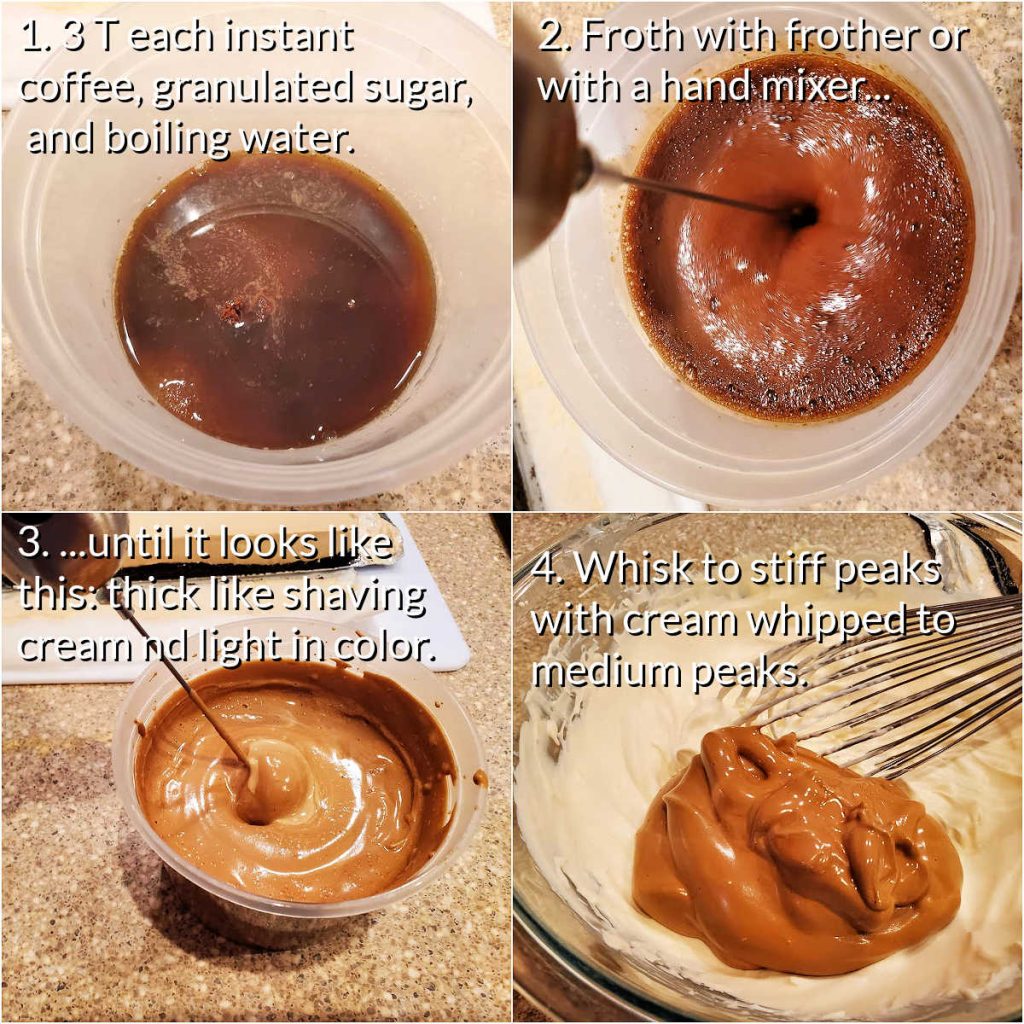
Then, whip the cream with a bit more sugar and a touch of vanilla until you get to medium peaks.
Whisk the two mixtures and spread on top of your cream cheese layer.
Equipment You May Need
I like the height of this no bake cheesecake when I make it in a 9″ square pan like this one made by sponsor Circulon. If you want your bars a bit taller, you can use an 8″ square pan, or even make this as a more traditional cheesecake in a round pan.
I also like to use my coffee frother for making the whipped coffee mixture. I find that my
Another option is to use a hand mixer.
When spreading out the filling, the best tool for the job is an offset spatula. It will keep your knuckles out of the filling so you can make a lovely, smooth layer. For a pan this size, I used my 6″ offset.
Offset spatulas are inexpensive and are useful for so much more than just one or two tasks, that I encourage you to get a set of 3 and then choose the size that’s right for your job.
Pastry Chef Tips for Success
While this is a fairly easy recipe to make, there are a lot of “parts” to it, so here are some tips to keep your time in the kitchen to a minimum while maximizing your Dessert Success.
- If you want to break up your time in the kitchen, you can make the crust on one day, the filling the next, and the whipped coffee layer an hour or two before serving.
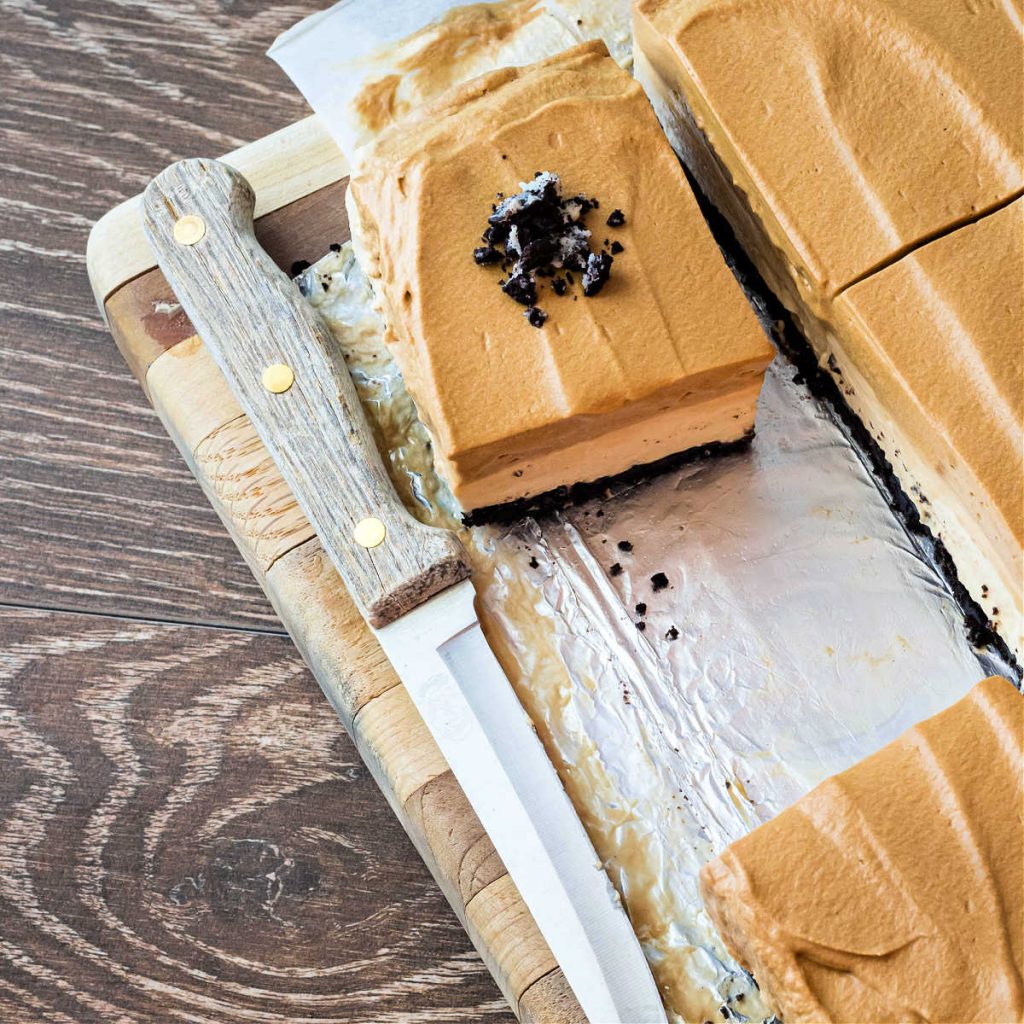
- Do line your pan with two strips of either parchment or nonstick foil cut to fit into the bottom of the pan and up the sides. Not only will this minimize cleanup, but it will also allow you to remove the cheesecake bars from the pan for easier slicing and serving.
- I usually tell you to add a pinch of salt to everything you make. Do NOT add salt to the whipped coffee layer, because the salt will keep the coffee from foaming up nice and thick.
- Make sure to leave the whipped cream for the whipped coffee layer at medium to no more than medium-stiff peaks. You’ll still be whisking to combine the whipped coffee, and you will run the risk of over-whipping and ending up with grainy topping if you take the cream all the way to stiff peaks.
- For best results and the cleanest cuts, refrigerate your guy overnight. Wipe knife blade in between each cut to keep your portions looking sharp and clean.
No-Bake Cheesecake Bars Q & A
Technically, no. The crust will hold together just fine if you press it into the pan and then freeze it. I much prefer the texture of the baked crust, so I put it in the oven for 12 minutes at 350F.
The texture of no-bake cheesecake is its own thing. It’s light and airy and mousselike whereas most traditional baked cheesecakes are rather dense (in a good way). A no-bake cheesecake is definitely the one you want to make during the summer, both because you don’t have to heat up your kitchen and because the lighter texture is appropriate for warmer weather.
No, it’s not. But the only gluten-containing ingredient is the cookies for the crust. Substitute with your favorite gf chocolate cookie and you’re good to go. Caveat: check all your other ingredients for possible cross-contamination.
Store this guy for up to 5 days in the fridge, well covered. For longer storage, you can pop the whole pan in the freezer.
Other Cheesecake Recipes You May Enjoy
If you’re feeling festive for the holidays, try my no-bake orange cranberry cheesecake parfait recipe. With seasonal flavors and a light texture, it’s a lovely ending to a heavy holiday meal. This cheesecake mousse is also a light and welcome end to a meal when you want cheesecake flavor but you don’t want to turn on the oven.
If you’re into baked cheesecakes, this cinnamon cheesecake is excellent. I often make it as a King Cake for Mardi Gras.
Another option for summer are these spectacular blueberry cheesecake bars.
Or if chocolate is more your thing, this no-bake chocolate cheesecake should fit the bill nicely!
A Note About Measurements
It helps me and other readers so much if you take a moment to rate and review this recipe.
Your star rating and comments help others decide whether the recipe is worth making, and your feedback helps me continue improving recipes here at Pastry Chef Online.
Other lovely ways to share include pinning or posting on your favorite social media platform.
Thank you so much for taking the time!

Whipped Coffee Cheesecake (No-Bake)
Ingredients
For the Crust
- 35 Oreo Thins cookies cream and all
- 2 ½ oz 5 Tablespoons unsalted butter
- 1 teaspoon instant coffee crystals
- heavy pinch of salt
For the Cheesecake Layer
- 2 blocks cream cheese softened
- 1 cup powdered sugar
- ¼ cup Greek yogurt
- 2 teaspoons vanilla extract
- ¼ teaspoon salt
- 1 Tablespoon instant coffee crystals
- 1 cup plus 1 Tablespoon heavy cream divided use
- 2 Tablespoons granulated sugar
For the Whipped Coffee Layer
- 3 Tablespoons instant coffee crystals
- 3 Tablespoons granulated sugar
- 3 Tablespoons hot water
- ¾ cup heavy cream
- ¼ cup granulated sugar
- ½ teaspoon vanilla extract
- NOTE: Do not add salt to the whipped coffee layer–it will make your coffee foam break down
Instructions
- For the Crust
- Line a 9" square baking pan with 2 criss-crossing strips of parchment or non-stick foil cut to just fit in the bottom of the pan. Make sure the ends extend up and over the sides of the pan. This will help you remove the bars from the pan for easy cutting and serving.
- In your food processor, pulse cookies to a fine crumb. Alternatively, you can place the cookies in a heavy-duty zip-top bag and crush them with a rolling pin into a fine crumb.
- Pulse in the butter–no need to melt it– the instant coffee, and the salt until evenly combined.
- Press into a uniform, tightly compacted layer in the bottom of your prepared pan.
- Bake at 350F for 12 minutes. Set aside to cool.
- NOTE: You don't necessarily have to bake your crumb crust. You can also set the pan in the freezer to set up while you make the filling. I prefer the texture of a baked crust, so I just went with it.
- For the Cream Cheese Layer
- In the bowl of your stand mixer or in a large bowl with a hand mixer, cream together the softened cream cheese, powdered sugar, Greek yogurt or sour cream, vanilla, and salt until completely smooth and creamy.
- Dissolve the instant coffee in 1 Tablespoon of heavy cream. Heat for a few seconds in the microwave and stir, making sure the coffee has dissolved completely before adding to the cream cheese mixture.
- Scrape the bowl well, and continue beating until very smooth and uniform in color.
- Scrape this mixture into another large bowl.
- Whip the remaining 1 cup of cream and the 2 Tablespoons of granulated sugar together until you reach medium-stiff peaks. (Peaks will just bend over a bit when you raise up the beater and turn it sideways.) No need to wash the mixing bowl before doing this.
- Scrape the sweetened whipped cream into the bowl with the coffee mixture.
- Gently but thoroughly fold the two together until the mixture is uniform in color.
- Scrape the filling on top of your crumb crust in your prepared pan. Spread out into all four corners, making sure the layer is as even as you can make it.
- Cover with foil or plastic wrap, and refrigerate overnight.
- For the Whipped Coffee Layer
- Use a coffee frother or a hand mixer to whip the instant coffee, sugar, and hot water together until very thick and light, and at least quadrupled in volume. Set aside.
- Whip the cream and sugar together until you reach medium peaks. NOTE: Do NOT add salt to the whipped coffee layer. Salt will break down the rich coffee foam.
- Scrape the whipped coffee into the cream and whisk until you reach stiff peaks.
- Use an offset spatula to spread the whipped coffee layer onto the cream cheese layer.
- Refrigerate for at least an hour before serving.
Did You Make Any Changes?
Nutrition
Would you like to save this post?

Hi, y’all! I hope you’ve enjoyed this post and hopefully also learned a thing or two.
If you like my style, I invite you to sign up for my occasional newsletter, The Inbox Pastry Chef.
Expect updates on new and tasty recipes as well as a bit of behind-the-scenes action. I hope to see you there!

Disclaimer: These posts and recipes are part of the week-long event, #SummerDessertWeek but all opinions are 100% mine! We would like to thank our amazing sponsors: Dixie Crystals and Circulon. These wonderful sponsors provided the prize packs for our giveaways and also sent samples and products to the #SummerDessertWeek bloggers to use in their recipes.


Join in Today!
Hi Jenni.
It looks like you used pieces of crushed oreos for the top garnish.
I plan to use the oreo baking crumbs (that come in a box, sans icing layer) for the base & don’t have any actual cookies on hand.
What do you think about using cocoa nibs as a garnish?
I think that is a fantastic idea, Rebecca! Honestly, if I’d had nibs, I’d have used them. Another idea would be chocolate-covered espresso beans. I really hope you enjoy the bars!
Hello. I do not ever have Oreos on hand. How many total grams of them do you use? If I know the gram measurement, I will know how much of another cookie to use. Also, how many grams is “one block” of cream cheese? Different packages have different weights… Thank you!
Hi, Monika! Good questions both. You’ll need roughly 300 grams of cookies. You may need a bit extra butter than I call for if you aren’t using sandwich cookies. Standard blocks of cream cheese in the US weigh 8 oz each, so you’ll need about 450 grams total of cream cheese. I hope you enjoy the bars!
Thanks so much for replying. I appreciate that you did that 🙂 Cannot wait to make it!!!
You’re more than welcome. I try to make myself as available as possible for questions. And you are always welcome to shoot me an email if you need a response asap. Enjoy the bars!