You are definitely going to want to make this peanut butter marshmallow cake, especially if you still dream about the fluffernutter sandwiches of your childhood!
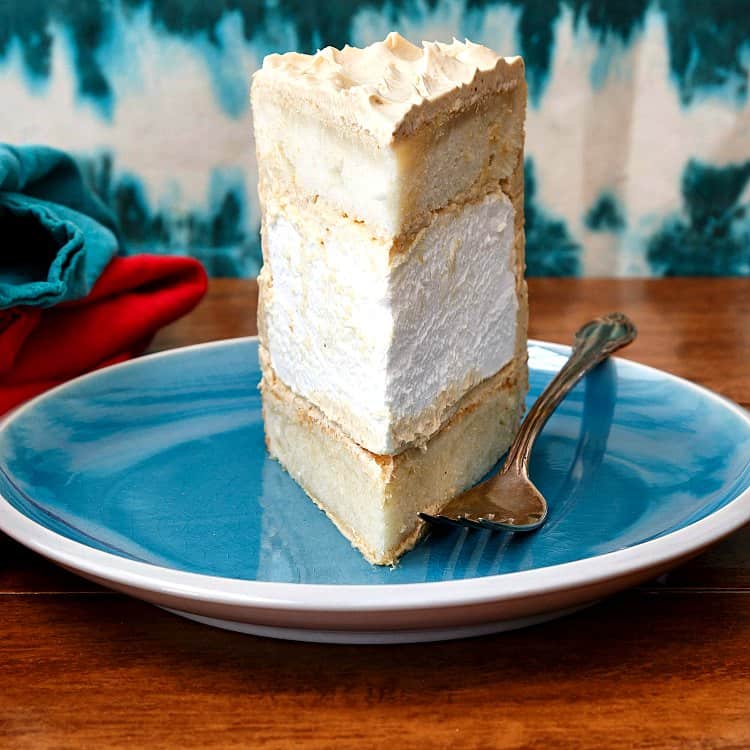
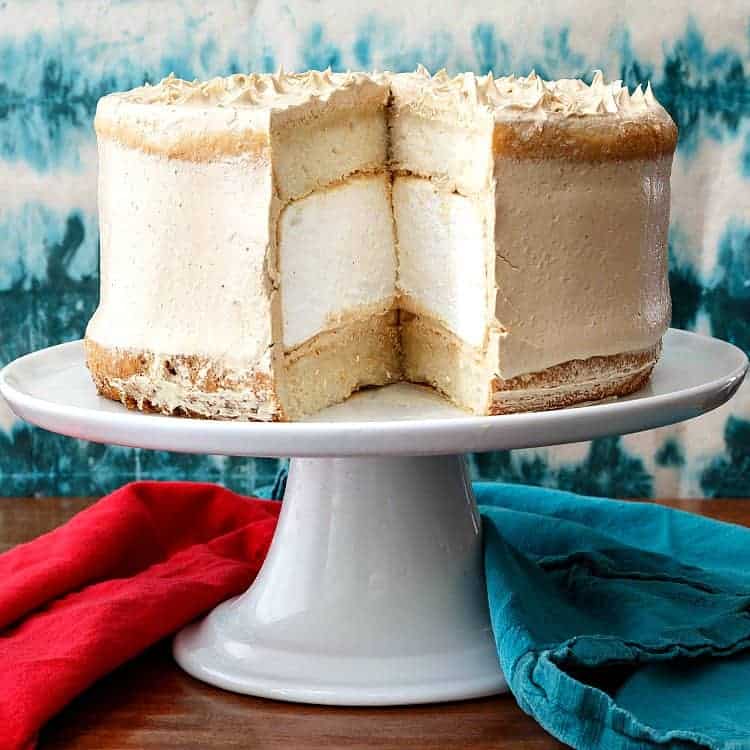
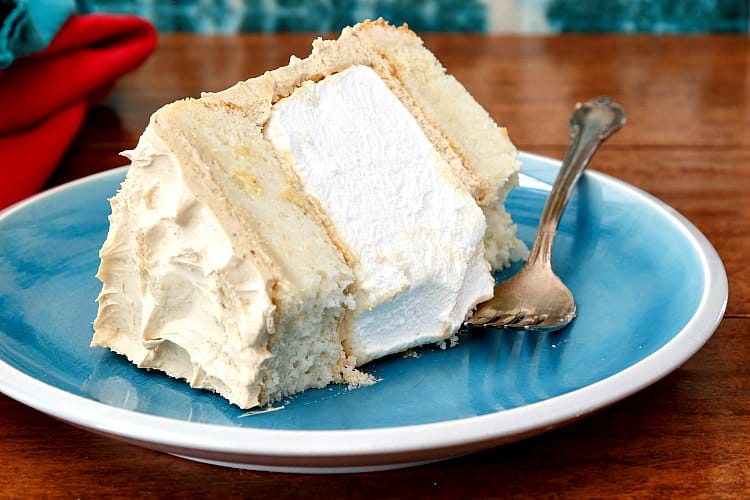
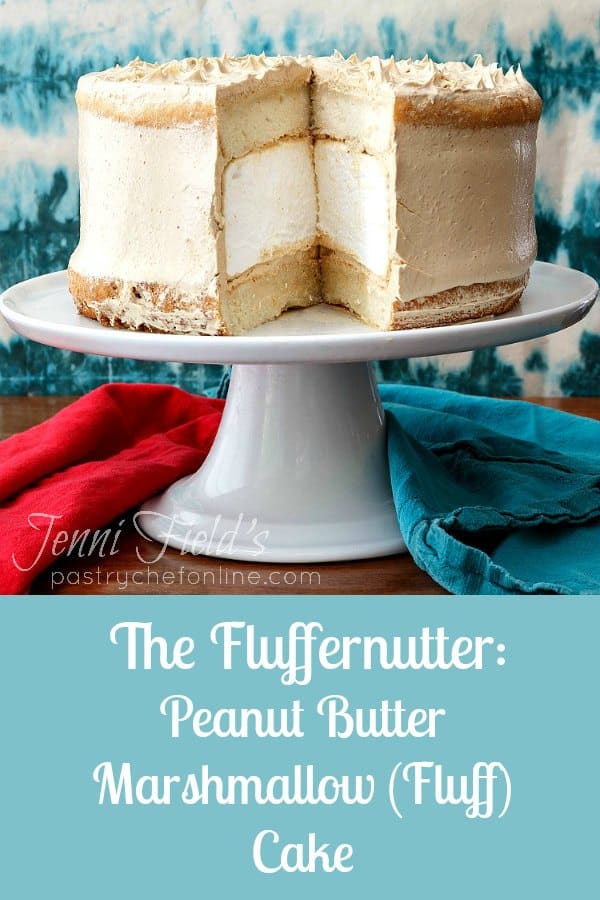
Two tender layers of white cake separated by one huge layer of soft marshmallow, all frosted with brown sugar peanut butter Swiss meringue buttercream equals one magical cake!
For ease of browsing, you can find all my cake recipes here.
Another great one to try is my easy rocky road cake.

What Makes This Cake So Great
My friend, super talented pastry chef and cookbook author Jill O’Connor is magical.
And one of the most magical things about her (aside from her excellent taste in binge-worthy television), is her use of a Big Fat Marshmallow as a layer in a cake.
Yes, you read that right. You make a marshmallow in an oiled and cornstarched cake pan, let it cure for 12 hours or so, and then pop it out, brush it off, and use it as a cake layer.
Pastry Chef Online Participates in Affiliate Programs. If you make a purchase through one of my links, I may earn a small commission. For more information click to read my disclosure policy
Well now.
Her daughter requested this for her birthday cake one year, and now it is her birthday cake every year.
You can find the recipe for the cake, The Scotchmallow, as well as all manner of other wonderful cakes in Jill’s latest book, (affiliate) Cake, I Love You.
I decided you can’t get any more fun than making a kid favorite, the fluffernutter, into a cake with Wow Factor.
I dreamed up a Brown Sugar Peanut Butter Swiss Meringue Buttercream to pair with the mallow. And all that was needed was the “bread.” Enter white cake. And not just any white cake.
I went with another friend’s–pastry chef, Serious Eats editor, and blogger at (the former) BraveTart Stella Parks’s–recipe from her James Beard Award-winning cookbook, (affiliate) Brave Tart.
Like all of Stella’s recipes, this cake is pretty much the best white cake I’ve ever tried. And way moister than many, probably all.
White cakes tend towards dryness since there are no yolks to keep things tender, but Stella solves that problem by subbing in some coconut oil for part of the butter and introducing buttermilk as the liquid. Lovely.
Armed with my components, I set off to make the peanut butter marshmallow cake of my dreams. And maybe of your dreams, too.
Ingredients
As with most cakes, the ingredients are straightforward. You may even own everything you need with the possible exception of the gelatin:
For the cake: Use your favorite white cake recipe, or use Stella Park’s white cake recipe. That’s what I used, and it was fantastic.
For the mallow:
- cornstarch
- water: Divided use. Par for blooming the gelatin and part to help dissolve the sugar when heating the sugar and corn syrup together
- unflavored gelatin
- granulated sugar: you can sub brown sugar for a bit deeper flavor if you’d like
- corn syrup: You can substitute agave if you’d like. Or use maple syrup, although that will change the flavor to maple vanilla. Which might not be a bad thing!
- salt
- vanilla
- confectioners sugar
For the buttercream:
- egg whites
- sugar
- brown sugar
- salt
- vanilla
- butter: at cool room temperature
- peanut butter
Making the Buttercream
So, here’s the formula for the most stable Swiss (or any) meringue buttercream.
1 part egg whites, 2 parts sugar. Butter equal to the weight of the whites plus the sugar.
Would you like to save this post?
My three whites weighed 3.65 oz. So here’s my math:
sugar = 3.65 x 2 = 7.3 oz (3.65 ounces each of granulated sugar and brown sugar in this particular case)
butter = 3.65 + 7.3 = ~11 oz (okay, I added an extra ounce and rounded things off at 12 oz)
The 6 oz of peanut butter won’t change since there really shouldn’t be too much variation in your egg whites as long as you’re using US large eggs.
Q & A
I have anticipated some questions you might ask about this cake. If I have left out a question you’d like the answer to, please don’t hesitate to leave a comment or email me.
Technically, yes. But there is no way to make a 2″ layer of marshmallow fluff. You need the gelatin in a homemade marshmallow to give the structure it needs to hold its shape and be easily sliced.
I use a serrated knife to slice off any domed part once they’re out of the oven and completely cool. Then I snacked on the domes while I assembled the cake.
There’s a bit more to it than slicing a “regular” cake.
I poured boiling water into a metal cocktail shaker, dipped a sharp knife into it, and then wiped it dry on a clean towel. Then, I cut–without sawing–until the knife started to get bogged down in the mallow. I repeated the dipping-drying-cutting until I could cut through the whole slice. Alternatively, you could use a very sharp serrated blade and use a gentle sawing motion to cut the cake.
The easiest way to eat this cake is to lay the slices down on their sides and cut through the mallow with the side of your fork.
You have to be precise with the temperature of the sugar syrup for making the marshmallow. Jill says to shoot for 240F or no more than 244F. This will give you a nice soft mallow. Any higher temperature, and the mallow may be too firm/sticky to slice nicely let alone to cut and eat. Make sure you’re using a precise instant-read thermometer.
Of course not. If you have a favorite white cake recipe, by all means use that one. You can even use a box mix if you’d like. And if you prefer a different peanut butter buttercream recipe, go for it. You can even make the mallow with a different recipe and/or switch up the flavors if you want. Make a peanut butter and jelly cake by adding some raspberry or strawberry puree or freeze dried fruit whizzed to dust in a blender to your mallow, for example.
Make extra buttercream. I figured this guy was going to be sweet enough with the big fat mallow and the white cake, so I wanted to use just enough frosting to hold everything together. By all means use 4 or even 5 whites instead of the three I used, and change your other measurements accordingly.
More Desserts You Might Enjoy
If the nostalgia of a fluffernutter grabbed you and brought you here, you may love another “kid sandwich:” bread, butter and sugar sandwich. Such a perfect childhood memory for me.
For folks who are all about the marshmallow part of this cake, you may want to give my coffee marshmallows a try. Homemade marshmallows are delicious, easy to make, and it is so easy (and fun) to vary the flavors as well.
And last but not least, for peanut butter fans, you have to check out my peanut butter mousse pie. Deeply decadent and peanutty, the texture is like a peanut butter cloud.
Love a good, old fashioned peanut butter cookie? You have found it in my peanut butter cookie recipe. Made with double the peanut butter of most recipes, it uses browned butter to up the flavor ante.
A Note About Measurements
My recipes are almost all written by weight, including liquids, unless otherwise specified.
For accuracy and consistency of results, I encourage you to buy–and use–a kitchen scale.
I promise that baking and cleanup will be so much quicker and easier.
This is the scale that I recommend for home use. I have owned and used one for years.

Peanut Butter Marshmallow Cake (Fluffernutter Cake)
Equipment
Ingredients
For the Mallow Layer*
- cornstarch for dusting
- 1 cup cold water
- 3 Tablespoons unflavored granulated gelatin
- 2 cups granulated sugar
- ¾ cup light corn syrup
- ¼ teaspoon fine sea salt
- 1 ½ teaspoons vanilla extract
- confectioner’s sugar for dusting
For the Peanut Butter Buttercream
- 3 large egg whites
- granulated sugar equal to the weight of the egg whites
- brown sugar equal to the weight of the egg whites
- ½ teaspoon kosher salt**
- ½ teaspoon vanilla extract
- butter at cool room temperature, equal to the weight of the whites plus the sugar
- 6 oz creamy peanut butter I used natural peanut butter, but you can also use one that is super smooth
To Assemble and Finish
- 2 9 ” layers white cake***
Instructions
For the Mallow Layer
- Coat a 9" (I used an 8" pan for mine and it was just fine–worked well with the 9" cake layers which can shrink in the oven some) round cake pan with nonstick cooking spray and dust liberally with cornstarch. Set aside.
- Pour 1/2 cup of the cold water into the bowl of a stand mixer and sprinkle with the gelatin. Allow the gelatin to absorb the water, 15-20 minutes.
- In a large saucepan over medium heat, combine the remaining 1/2 cup water, the granulated sugar, corn syrup, and salt. Heat, swirling the pan occasionally, until the sugar dissolves. Increase the heat to high and let the syrup come to a boil. Cook, without stirring, until it reaches 240F on an instant read candy thermometer. Do not allow the syrup to go past 244F or the marshmallow will be tough and rubbery.
- With the mixer on low, beat the syrup into the gelatin, using the whisk attachment of the mixer. Increase the mixer speed to high and continue beating until the marshmallow is thick, fluffy, and very white but still warm, 10 to 13 minutes. Beat in the vanilla.
- Scrape the marshmallow into the prepared pan, smooth the surface with a spatula, and dust with confectioners’ sugar. Let the marshmallow stand, uncovered, for 8-12 hours to firm up. Turn the marshmallow onto a piece of parchment paper lightly dusted with confectioners’ sugar. Brush away any excess cornstarch. (Store the marshmallow layer in a covered container or large, self-sealing plastic bag for up to 1 week.)
For the Peanut Butter Buttercream
- Place the egg whites, granulated sugar, brown sugar, and salt in the bowl of your stand mixer.
- Find a pan that the mixer bowl will fit into without touching the bottom. Put about an inch of water in the pan and place over medium-high heat.
- Fit the mixer bowl into the pan and whisk the egg white mixture constantly while the water heats underneath. Once the water reaches a boil, turn the heat down to medium-low and continue whisking the whites until all the sugar has dissolved and the whites are very hot. Shoot for 165F on an instant read thermometer.
- Remove the bowl from the pan and place on your mixer fitted with the whisk attachment.
- Add the vanilla extract, and whisk on medium speed for a minute or two. Increase speed to high and continue whisking until the the meringue is light and billowy and cooled to room temperature.
- Once the meringue is cool, begin adding the cool butter, about 1 Tablespoon at a time. Whisk well after each addition. The buttercream will first break down and get soupy, but it will come back together with the last couple of additions. Scrape the bowl as necessary.
- Whisk in the peanut butter, making sure to scrape the mixer bowl to get it completely incorporated.
- Taste and add a tiny bit more salt if you think it needs it.
To Assemble and Finish
- Slice the dome off of each of your cake layers. Set aside as the baker’s treat.
- Make sure you brush off all the extra cornstarch and confectioners’ sugar from the marshmallow layer.
- Smear a tablespoon or two of buttercream in the center of your cake platter.
- Center one cake layer, bottom side up, on the platter and press down gently.
- Scoop on about 3/4 cup of the buttercream and spread out to the edges with an offset spatula.
- Place the mallow layer on top of the buttercream and press down gently.
- Add another 3/4 cup of buttercream and spread out. Follow this with the second cake layer, bottom side up.
- Use an offset spatula to frost the sides of the cake. Since the marshmallow is a bit smaller in diameter than the cake layers, the coating will be a bit thicker around the mallow than it will be around the cake layers. I like the naked look, so I kept it at that. Feel free to make extra buttercream to get the look you prefer.
- Spread the rest of the buttercream evenly over the top of the cake so it "hangs over the edge" of the cake a little bit.
- Go around the sides of the cake again with your offset spatula. This will smooth out the sides and leave a little "wall" of buttercream around the edges. Using the flat of your offset spatula, sweep in towards the center of the cake, knocking down the wall so it is even with the top of the cake. Wipe the spatula clean between swipes and continue around the cake until the top is smooth and you have clean edges. Decorate the top as you wish. I just made little peaks by pulling up with my spatula all over the top. You can put mini marshmallows on top if you want, or chopped up peanuts or peanut brittle. Have fun!
- Store in the fridge. Allow cake to come to sit at room temperature for about 45 minutes before eating. To slice, dip your knife in very hot water, wipe it dry, and cut straight down until the marshmallow sort of binds up the knife. Carefully pull the knife out, dip again, wipe dry again, and continue your cut. To serve, place slices on their sides. You can easily cut the marshmallow with the side of your fork. Enjoy!
Did You Make Any Changes?
Notes
Nutrition
Would you like to save this post?
Love This Fluffernutter Cake? Please Rate & Review!
It helps me and other readers so much if you take a moment to rate and review this recipe.
Your star rating and comments help others decide whether the recipe is worth making, and your feedback helps me continue improving recipes here at Pastry Chef Online.
Other lovely ways to share include pinning or posting on your favorite social media platform.
Thank you so much for taking the time!


Hi, y’all! I hope you’ve enjoyed this post and hopefully also learned a thing or two.
If you like my style, I invite you to sign up for my occasional newsletter, The Inbox Pastry Chef.
Expect updates on new and tasty recipes as well as a bit of behind-the-scenes action. I hope to see you there!

And there you have it, friends. A fun, festive, kid-friendly retro cake to enjoy with friends or by yourself. In a bubble bath or something.
If you were a fan of a fluffernutter sandwich as a kid, I really think you’ll love this fancy cake version.
Take care, and have a lovely day!


Join in Today!
My daughter made this for my birthday last year. It was delicious, and the peanut butter frosting was melt-in-your-mouth heaven.
Wow, this is quite the sleeper recipe on the site, so I’m so happy to hear your daughter made this for you–a labor of love! The frosting really is excellent, right? 🙂
Would love to get all your recipes
They’re all here for you in one place, Lisa! Enjoy browsing–a good place to start is with the recipe index here: https://pastrychefonline.com/recipe-index/ 🙂