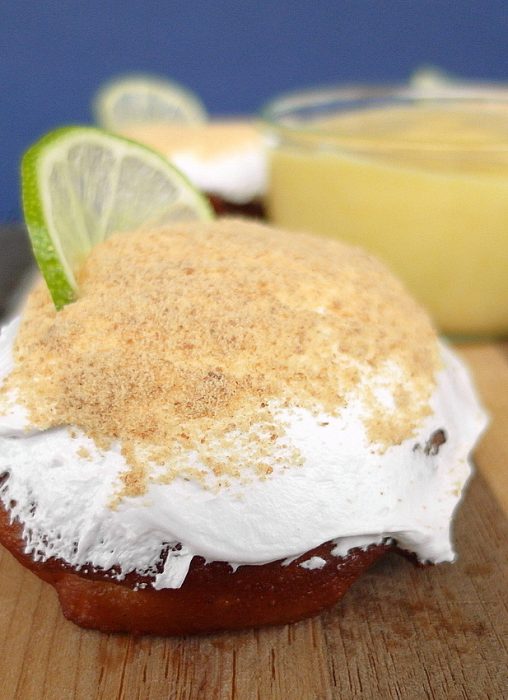
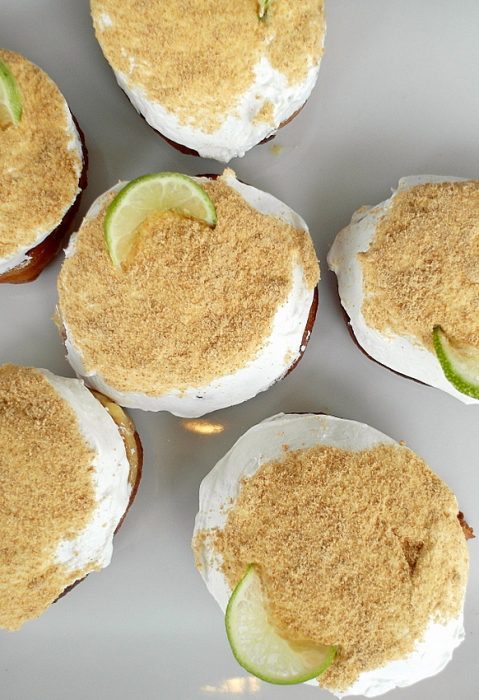
Key lime pie doughnuts are as amazing as they sound. They’re a bit of work to make, but they are for sure a showstopper!
If you’d love a plainer donut, give my glazed donut recipe a try.
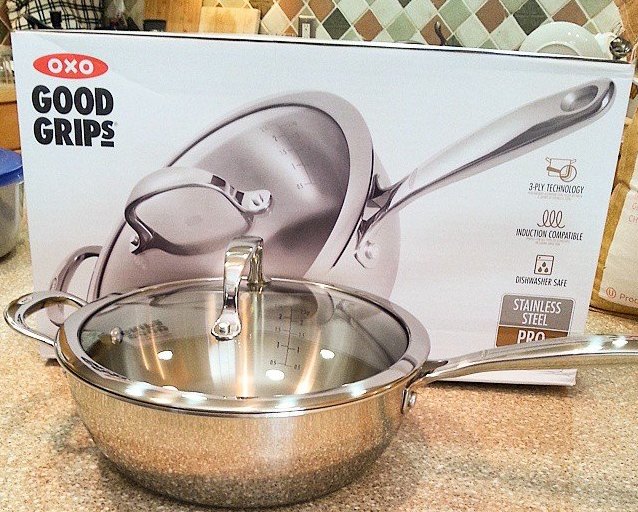
Thank you, OXO friends, for sending me the OXO Good Grips Stainless Steel Pro 3.5qt Covered Saucepan![]() and allowing me the chance to review it. All product links are affiliate links.
and allowing me the chance to review it. All product links are affiliate links.
For ease of browsing here are all my sweet yeast breads recipes.
Sometimes my head is only barely attached to my body. The lovely blogger liaison lady from OXO reached out to ask if bloggers would like a chance to review the new #OXOCookware. We were to fill out a short survey saying which piece of cookware we’d like to take for a spin and also what we’d make with it. I gave it some thought, dashed off my answer, and promptly forgot what I had said.
When I got the email saying that I’d been accepted for this promotion (yay!) I then realized I’d completely forgotten what I said I was going to make. Nice. So, I emailed Veronica and told her the dog ate my homework and I couldn’t remember what I had responded on the survey.
She emailed back and said not to worry and that I could make anything I wanted. But she also said I had answered “I would make a fruity pastry cream that would then be used as a filling for doughnuts.” I quite liked that answer as it was like the first time I’d ever heard it. Rather than make a “fruity pastry cream” though, I decided to go with a curd. Key lime curd, to be exact. The schmancy kind we used to make at the restaurant with white chocolate and some creme fraiche in it. Except I used sour cream and you can too.
Pastry Chef Online Participates in Affiliate Programs. If you make a purchase through one of my links, I may earn a small commission. For more information click to read my disclosure policy
Before I tell you about the curd and the subsequent doughnuts, let me tell you about this pan.
#OXOCookware 3.5qt Stainless Steel Sauce Pan
How does the OXO stainless steel saucepan perform?
In three words, I love it. Honestly. It is quite heavy, and the shape of the handle feels good in my hand. The bottom is nice and flat which ensures good contact with flat cooking surfaces. The assist handle is a really nice feature. I wouldn’t generally expect to see one on a pan this size, and I probably wouldn’t really need to use it myself unless I filled the pan really full. It is certainly nice to have though, especially if I use it in the oven which I can do because the pan is all-metal and even the lid with its silicone gasket is oven-safe to 430F.
I own an induction burner![]() that I got at the restaurant supply store several months ago. Until I got this pan, I could use my pressure cooker, my enameled cast iron and my regular cast iron on it. My other pans just make the burner beep at me because it doesn’t recognize that a pan is even there. Only pans with enough ferrous material (iron) work with induction, and now I can add the OXO Stainless Steel Pro 3.5QT Covered Saucepan
that I got at the restaurant supply store several months ago. Until I got this pan, I could use my pressure cooker, my enameled cast iron and my regular cast iron on it. My other pans just make the burner beep at me because it doesn’t recognize that a pan is even there. Only pans with enough ferrous material (iron) work with induction, and now I can add the OXO Stainless Steel Pro 3.5QT Covered Saucepan![]() to the list. I’m so happy, because it’s the only “normal-sized” pan I own that is induction compatible, and induction is super fast and efficient. Huzzah!
to the list. I’m so happy, because it’s the only “normal-sized” pan I own that is induction compatible, and induction is super fast and efficient. Huzzah!
As much as I like all the features I’ve already mentioned, I think my favorite thing about the pan is the shape of it. It has sloped sides and very rounded corners where the pan sides meet the bottom–almost like a slightly-less-steep wok with a broad, flat bottom. Not only does this mean that the surface area is pretty wide but that my spoon and especially my whisk can reach into those corners without leaving any custard or whatever stuck there. The radius of the corners is almost the same as the curve of my whisk, allowing for almost total contact. I love this; it makes stirring and whisking completely hassle-free since I’m not worrying about sticking.
I’ve used the pan only two or three times now, but each time has been a real joy. I will be using this pan frequently for years and years, and I feel very good about recommending it to you.
I generally love the OXO brand and consider it of high quality. Some of their gadgets are a bit too specific for my liking (lots of unitaskers, as Alton Brown would say), so I was really hoping that this pan wouldn’t have any sort of gimmicky features. It does not. Each feature is well thought out and useful. It’s an elegant pan that means business.
White Chocolate Key Lime Curd
Quite simply, you need this in your repetoire. This key lime curd is plenty tangy as a curd should be, but there is also a creaminess and certain “milkiness” in the background that make it almost completely irresistible. It is not hard to make. In fact, the white chocolate key lime curd has only a couple more ingredients than a regular curd.
Observe:
Now that you know all about the Pan and the Curd, it’s time to get on with the doughnuts themselves. It’s not my recipe. While I did adapt it ever so slightly, the dough is from Gesine Bullock-Prado’s blog, G Bakes, and it is perfect. I happened across her doughnut post just a few days ago as I was trying to decide how to make my dough. Kismet, I thought. And so I went with it. Go see Gesine’s gorgeous heart-shaped Strawberries and Cream Doughnuts. They are lovely.
I will stop talking now and just put it all together for you, okay?
It will help me and other readers so much if you take a moment to rate and leave a review for this recipe.
You can use the stars to rate 1-5 (5 is best), and leave a review in the comments. It helps me make adjustments if any are needed, and comments help others decide whether the recipe is worth making.
Other ways to share include pinning, and/or sharing on your favorite social media platform.
Thank you so much for taking the time!

Key Lime Pie Doughnuts
Key Lime Pie Doughnuts with White Chocolate Key Lime Curd
Ingredients
For the Dough (adapted from Gesine Bullock Prado’s recipe here)
- 22 oz all purpose flour (I use King Arthur)
- ½ cup granulated sugar
- ½ cup unflavored dried potatoes (if yours are powdery, fine. If they’re in flakes, pulverize them in a blender until they’re powdery)
- ¼ cup malted milk powder (Gesine uses nonfat dry milk powder. You can use either)
- 2 ½ teaspoons active dry yeast
- 1 ¼ teaspoon kosher salt
- zest of 1 lime
- 12 oz room temperature water
- 2 large eggs
- 1 Tablespoon vanilla
- ⅓ cup vegetable shortening (you could probably use butter, but you may have to adjust the amount of flour since there’s water in butter)
For the White Chocolate Key Lime Curd
- 8 oz key lime juice (I use Nellie & Joe’s)
- 14 oz granulated sugar
- heavy pinch of salt probably about 1/4 teaspoon
- 2 whole eggs
- 4 egg yolks
- 3 oz creme fraiche or sour cream
- 3 oz butter softened
- 2.67 oz white chocolate cut into small pieces (I use the 4oz Ghirardelli bars)
For the Key Lime Italian Meringue
- 2 egg whites (about 3 oz)
- pinch of salt
- zest of half a lime
- granulated sugar (double the weight of the whites. My whites weighed in at 2.8 oz, so I used 5.6 oz of sugar)
- 2 tablespoons key lime juice (I use Nellie and Joe’s)
- ¼ cup water
To Fry and Finish
- 4 cups -6 cups vegetable oil
- large Dutch oven
- 6-8 Graham cracker “sheets” blended to dust in the blender (or just made into crumbs if you prefer that look)
Instructions
For the Dough
- In a large bowl, whisk together the flour, sugar, potatoes, milk powder/malted milk powder, yeast and salt. Set aside.
- In the bowl of your stand mixer, mix together the lime zest, water, eggs and vanilla.
- Pour in all the dry ingredients and mix on low speed using the dough hook. After about a minute, add the shortening.
- Mix until all the flour and fat is incorporated into the dough and then knead on medium-low to medium speed for a good 12 minutes. The dough should be very smooth. It will stick in the bottom of the mixer bowl and there might be some dough stuck to the sides of the bowl as well. The dough will be sticky when you touch it, but it shouldn’t be messy-sticky.
- Oil your hands well and gather the soft dough into a ball as best you can.
- Oil a bowl and place the dough ball in it. Spray or brush the dough with some oil. Cover and let rise in a warm place (I boil water in the microwave and then move the mug to the back, making room for the covered bowl) until doubled, about 2 hours.
- Once the dough has risen, gently press out the gases and then roll it to a 1/2″ thickness on a lightly floured or greased surface. Make sure to flour or oil the top of the dough before rolling.
- Using a 3″ cutter, cut circles out of the dough and place them on parchment-lined pans. From the first roll, I got 17 doughnuts. I gathered the scraps together, let them rest covered so the gluten could relax and then rerolled to get 5 more rounds for a total of 22. You may get one or two more or less depending on how thick/thin you rolled.
- Spray the doughnuts with some oil or pan spray and cover with plastic wrap. Refrigerate 6 hours to overnight.
For the White Chocolate Key Lime Curd
- Put the key lime juice, sugar, salt, eggs and yolks in a sauce pan (I used my OXO pan and was very happy with the results).
- Whisk the ingredients together really well and set aside for a moment.
- Place the creme fraiche or sour cream, butter and white chocolate in a large bowl. Set a fine mesh strainer close by.
- Heat the juice mixture over medium to medium-high heat, stirring or whisking constantly, until the mixture is steaming and thickens up nicely. Try not to let it come to a boil, but if it does, the fine mesh strainer will take care of any cooked egg bits.]
- Strain the thickened juice mixture over the bowl with the white chocolate (et al) in it. Let sit a couple of minutes and then whisk until smooth.
- Press plastic wrap onto the surface of the curd and chill until cold, at least 3-4 hours.
For the Italian Meringue
- Place the whites, salt and zest in the bowl of your stand mixer. Fit it with the whip attachment.
- In a small, heavy bottomed sauce pan, stir the sugar, juice and water together until the sugar is evenly moistened.
- Put a lid on the pot and bring it to a boil.
- Start the mixer on medium speed until the whites are foamy. Increase the speed just a smidge. You are going for medium peaks at the same time that the sugar syrup gets up to temperature.
- Leave the mixer on and check your syrup. Once it reaches a boil, leave the lid on and let boil for a minute, then remove the lid. The syrup will boil up pretty high with huge bubbles. This is because of the lime juice, so make sure your pan is bigger than you think it needs to be so you don’t have any Incidents.
- When the sugar reaches 244F, (I use my Thermapen to frequently check the temperature) pour it in a steady stream down the inside of the mixer bowl. Turn the speed up slowly to high and let whip until completely cool and very, very thick. Clean off the beater, cover the bowl and put in the fridge until you need it.
To Fry and Finish
- Pour the cracker dust/crumbs into a wide, shallow plate or Pyrex baker. Set aside.
- Remove the doughnuts from the fridge and let rise in a warm place in your kitchen for 30-45 minutes. They should look puffy but not bloated.
- In your heavy Dutch oven, bring the oil up to 350F.
- Fry 2-3 doughnuts at a time. Fry on one side for about a minute, until the side that is down is doughnut colored. Flip with chopsticks or whatever is handy and fry another minute until the second side matches the first.
- Remove to a rack with paper towels under it to drain and cool. Let them cool completely before filling and topping. This will take about 20-30 minutes.
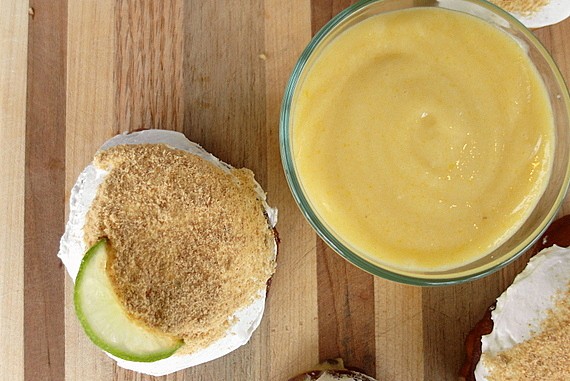
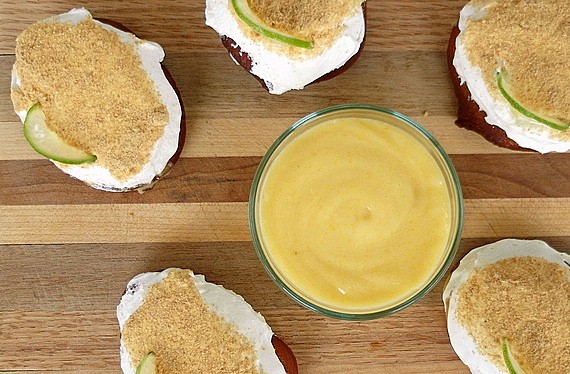
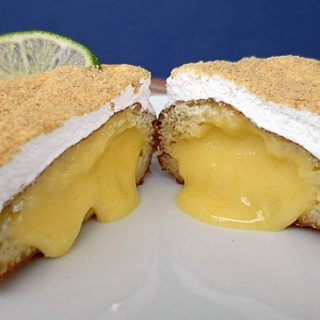
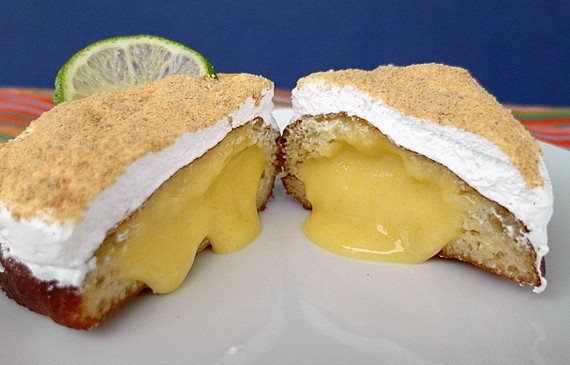
- Once cool, fill a pastry bag fitted with a Bismarck tip with the curd. Insert the tip all the way into one side of the doughnut. Slowly squeeze the bag and fill the doughnut while slowly pulling the tip out of the doughnut. Shoot for about 2-3 Tablespoons of filling per doughnut.
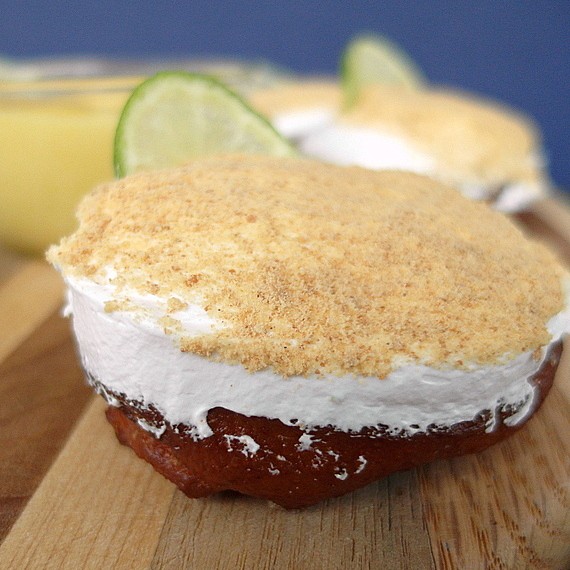
- Once the doughnuts are filled, spread about 3-4 Tablespoons meringue on evenly on each one. You can pipe this with a star tip if you want, but I didn’t want to.
- Dip the tops of the meringued doughnuts into the cracker crumbs to get an even coat.
- Eat as soon as possible. Store leftovers in the fridge and bring to room temperature for 20-30 minutes before eating.
- Enjoy these. You have earned it!
Did You Make Any Changes?
Notes
If making the whole shebang seems a bit much, feel free to make the dough and cut it out into rings and just make glazed doughnuts. The dough really is fantastic. And the curd, well. That stuff is addictive, so whip up a batch to have with biscuits or scones or to fill wee tart shells. If you love key lime pie and doughnuts though, it is my duty to tell you that you owe it to yourself to spend an evening and morning making these babies.
Whip up the curd the evening before, while the cut doughnuts are in the fridge. The next day, all you’ll have to do is fry ’em up and make the meringue while they cool. Fill ’em up, spread on some meringue and dip them in crumbs. Done and done.
If you are in the market for a new sauce pan, I can highly recommend the OXO Good Grips Stainless Steel Pro 3.5QT Covered Saucepan![]() . Now I want a couple more pieces to give them a run for their money too. Well done, OXO. I love this pan!
. Now I want a couple more pieces to give them a run for their money too. Well done, OXO. I love this pan!

Hi, y’all! I hope you’ve enjoyed this post and hopefully also learned a thing or two.
If you like my style, I invite you to sign up for my occasional newsletter, The Inbox Pastry Chef.
Expect updates on new and tasty recipes as well as a bit of behind-the-scenes action. I hope to see you there!
Thank you for spending some time with me today. I hope I made you hungry, and I hope you give the doughnuts a try.
Have a lovely day.


Join in Today!
These are heavenly. I love key lime pie although we can’t get key lime juice here, I still try with ordinary limes from the fruit shop. I can’t wait to give your donuts a test drive. 🙂
I think you will be so-so-SO happy Maureen! They are indeed pretty heavenly! =)
I do like a Key Lime Pie, and your doughnut version looks scrumptious. Nice test drive too. Stumbled and tweeted!
Thank you, Brooks! And I really truly highly recommend the pan. =)
Thanks for sharing the video. Looks great. Love that pot.
Thanks! I am very impressed with this OXO line, Joan!