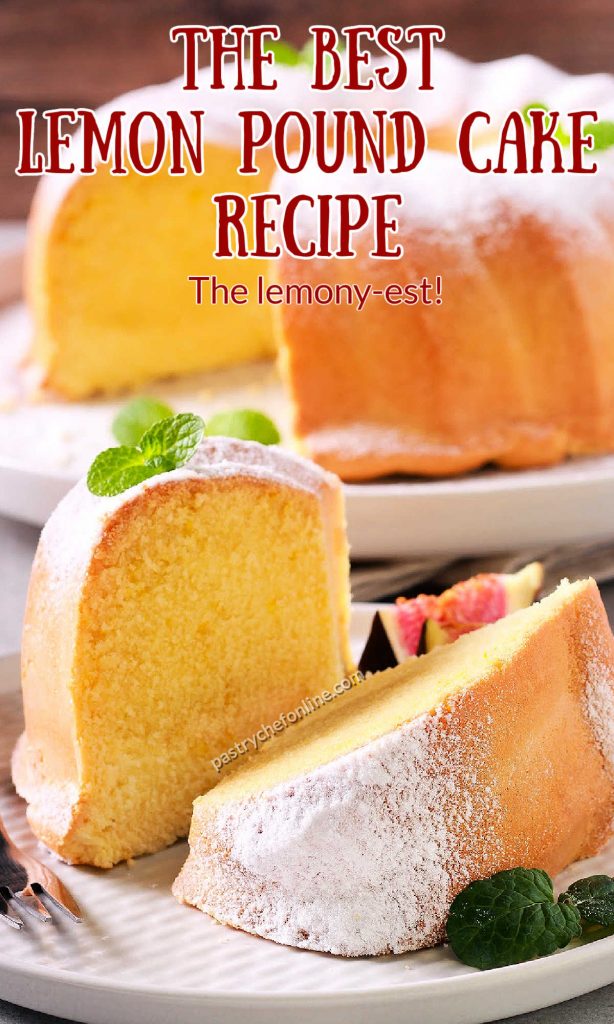
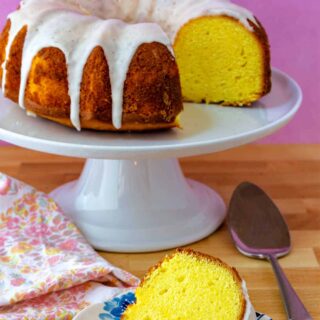
Here is yet another version of my “Van Halen” Pound Cake. I consider this to be the best lemon pound cake ever. Flavored with lemon in the form of zest, juice, and just a few drops of lemon oil, it is the triple threat of lemon pound cake recipes.
I also include a video of how to use the creaming method to make this pound cake. If you love lemony cakes, you may also enjoy my lemon corn buttermilk pound cake.
And you can find all my pound cake recipes here.
Watch my best lemon pound cake web story here.
Hi Jenni, I love this recipe so much. Thanks to you I got the highest grade for my external exam using this recipe.
Reader and Culinary Student Donna
What Makes This Recipe So Great
The key to making the best any-kind-of-pound-cake is to layer in the main flavor/s in as many ways as possible. In the case of lemon pound cake, you could absolutely just use some lemon extract and call it a day.
But, if you want to achieve the most lemony, best lemon pound cake in all the land, you’ll have to do a bit more than just that.
Pastry Chef Online Participates in Affiliate Programs. If you make a purchase through one of my links, I may earn a small commission. For more information click to read my disclosure policy
This cake has lemon in all its forms:
- lemon zest, and lots of it. This is where all the essential oils live, in the yellow outside skin
- lemon juice, because just using the zest gives you the perfume of lemon but not the sourness. Using juice brings the tartness you expect from a lemon dessert
- lemon extract or lemon oil, but only a touch. I find that using too much of either one can taste artificial, so I use just enough to give the lemon flavor a bit of punch
And last, because we love the tartness of lemon so much, I add an additional tart ingredient. In the video, I used Greek yogurt.
You can also achieve that lovely tang by using buttermilk and, to a lesser extent, sour cream.
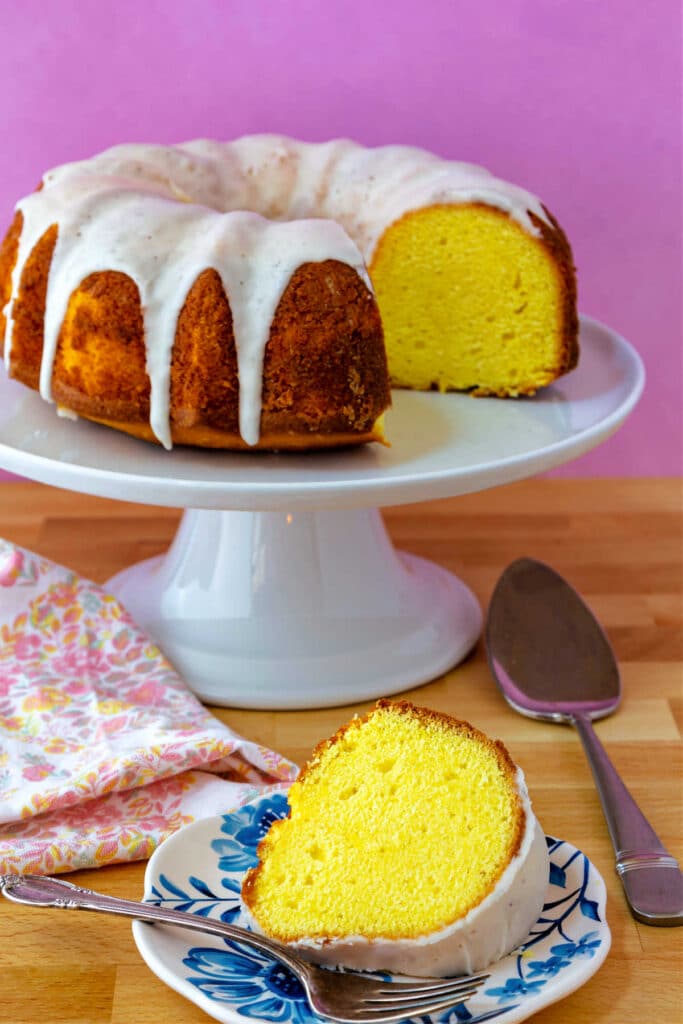
Of course, the glaze is a great place to reinforce the flavor of the cake, so the holy trinity of zest, juice, and extract or oil come to play in the glaze, too.
How Did You Make It Yellow?
Worry not. No artificial dyes were sacrificed to make this lemon pound cake a sunny, lemon yellow.
I added a mere 1/4 teaspoon of turmeric to the sugar and butter mixture. The cake, which would already be a pale yellow because of the zest and egg yolks only need a little bit of urging to look like sunshine.
And no, you cannot taste the turmeric at all.
Procedure
Ingredients
Here’s what you’ll need to make the best and most lemony lemon pound cake you’ll ever taste.
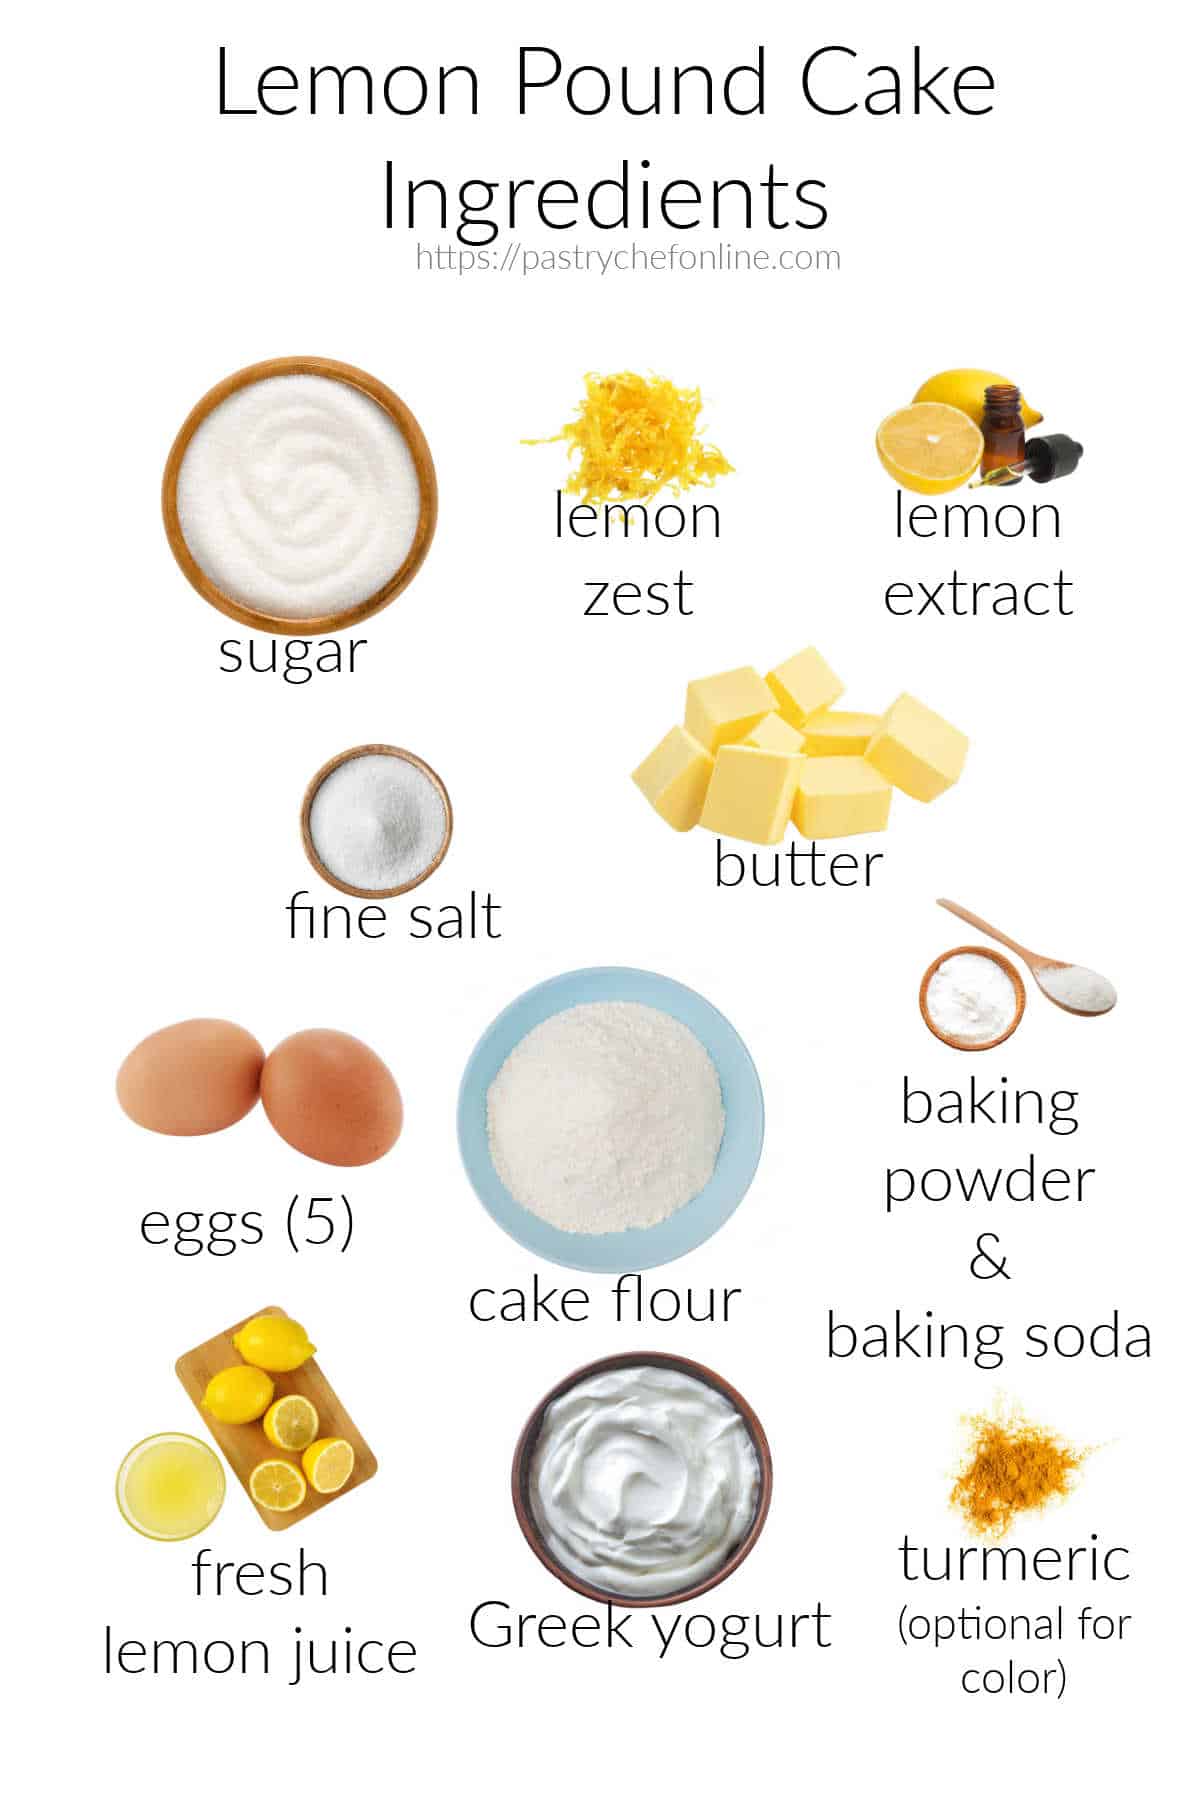
- unsalted butter: make sure it’s cool butter. You don’t want it soft, just pliable. Keep the temp between 65-68F.
- sugar: regular granulated. It’s the action of creaming the butter together with the crystalline sugar that tears holes in the butter, which in turn allows for an even rise and crumb once the rest of the ingredients are added
- fine sea salt: you can also use table salt. If you sub with kosher salt, you’ll have to use a touch more since kosher salt crystals are larger and don’t pack together as tightly
- lemon zest: use a Microplane to get small, feathery pieces of zest.
- lemon extract: substitute lemon oil if you like. But only use about 3 drops since it’s more concentrated than lemon extract
- eggs: I use large eggs. Take them out of the fridge a good 45 minutes to an hour before baking
- cake flour: you can also use all-purpose flour. Your cake won’t have quite as fine a texture, but the difference is very slight
- baking powder: leavener
- baking soda: the baking soda is here primarily to counteract the acidity from all the lemon components. Make sure your baking soda doesn’t have any lumps in it
- Greek yogurt: full fat or low fat. Don’t sub fat-free. You can also use buttermilk if you have it, or a mixture of the two
- lemon juice: Provides the rest of the liquid as well as tart, lemon flavor
- turmeric: 1/2 teaspoon provides a sunny lemon color without any flavor that I can detect, and my palate is pretty sensitive. You could also use a few drops of yellow food coloring or just leave coloring out altogether. Your call.
Procedure
Like most butter cakes, this one is made using the creaming method.
In short, here are the steps:
- cream together butter, sugar, salt, lemon zest, optional turmeric, and extract. Fat carries flavor, so it makes sense to add the salt, zest, and extract at the same time you add the butter
- Whip eggs well then drizzle them into the batter, a little at a time.
- Whisk together dry ingredients: flour, baking powder, and baking soda.
- Whisk together the Greek yogurt and lemon juice. Note, you can make this cake with buttermilk in place of the Greek yogurt as well.
- Alternate adding the dry and wet ingredients in 5 additions, beginning and ending with dry. (dry-wet-dry-wet-dry)
- Scrape batter evenly into your prepared pan.
Visual How-To
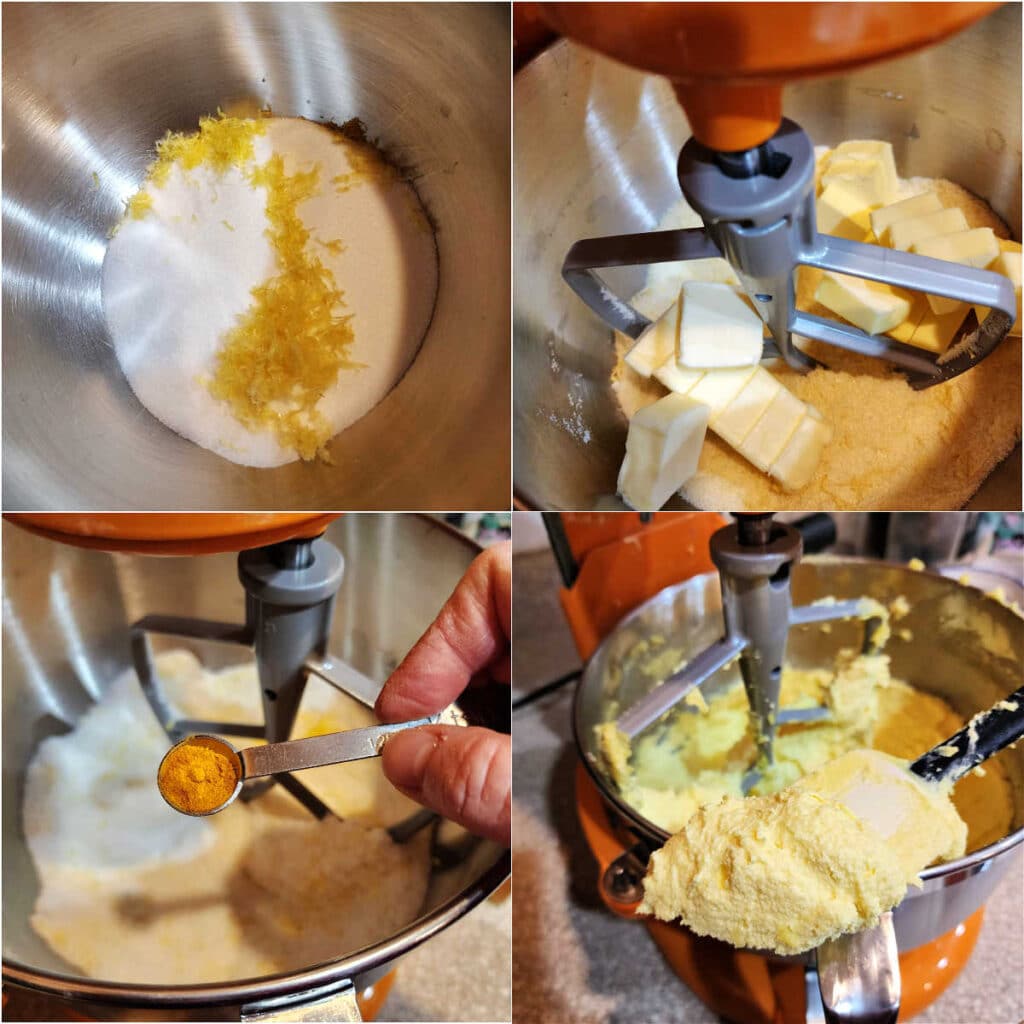
- Put the sugar, lemon zest, salt, and lemon extract in your mixer bowl. Mix well so the zest perfumes the sugar and it turns a very pale yellow.
- Add the butter and turmeric, if using.
- Beat on medium speed until light and fluffy.
NOTE: The sugar will not completely dissolve during this stage because there is not enough water in the butter to dissolve it all the way.

- Beat the eggs together.
- Add them in small additions, beating well between each. Scrape the bowl every once in a while. Adding the eggs should take about five minutes.
- Notice how much creamier the batter looks at this point. Nice and thick and billowy.
- Add the flour and leavening and Greek yogurt/buttermilk and lemon juice mixture alternately, beginning and ending with the flour mixture.
NOTE: Only allow a few seconds between one addition before adding the next. The mixture won’t be completely combined, but that’s okay.
Once everything is in, scrape the bowl really well, making sure to get down to the bottom.
Then turn the mixer on high for about 3 seconds. That will be enough to bring everything together beautifully.
Would you like to save this post?
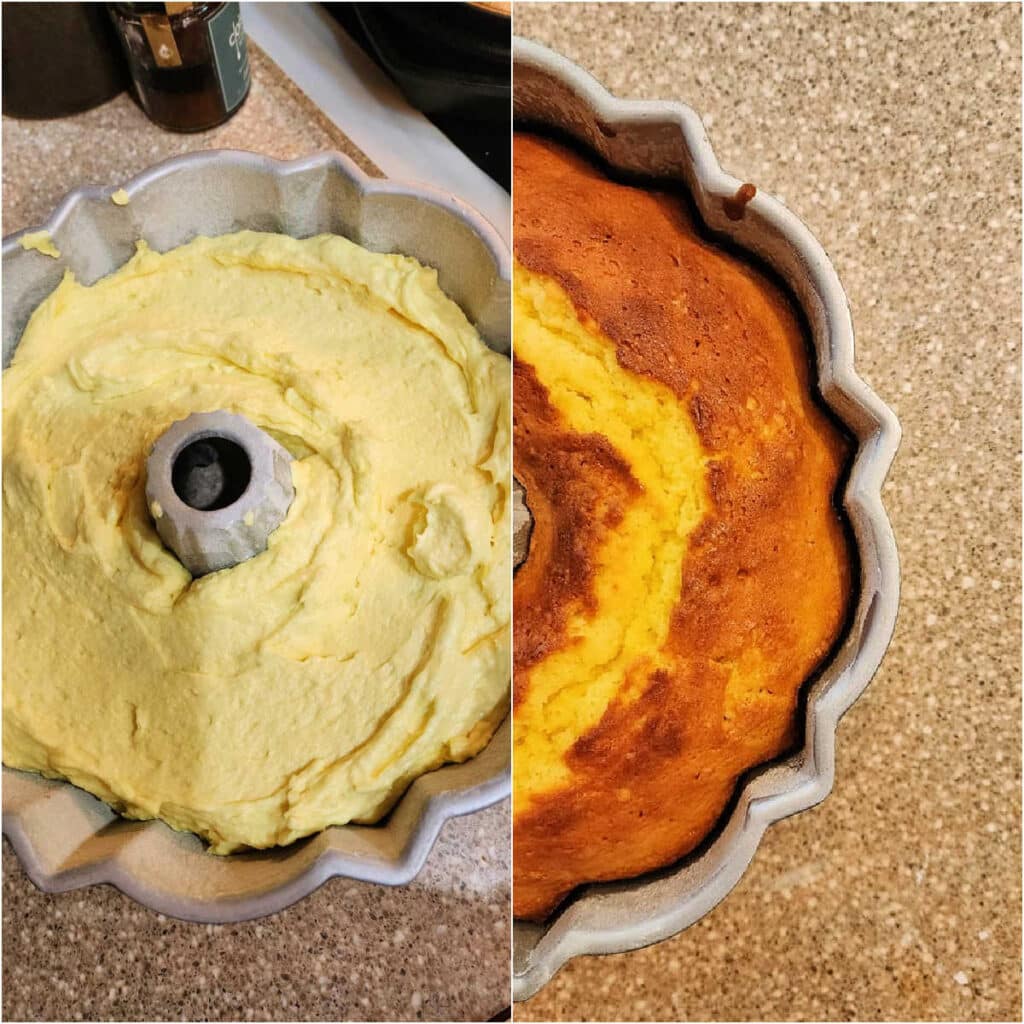
- The batter will be thick and billowy. Scrape it evenly into your pan-sprayed-and-well-floured 12-cup Bundt pan and then spread it out evenly.
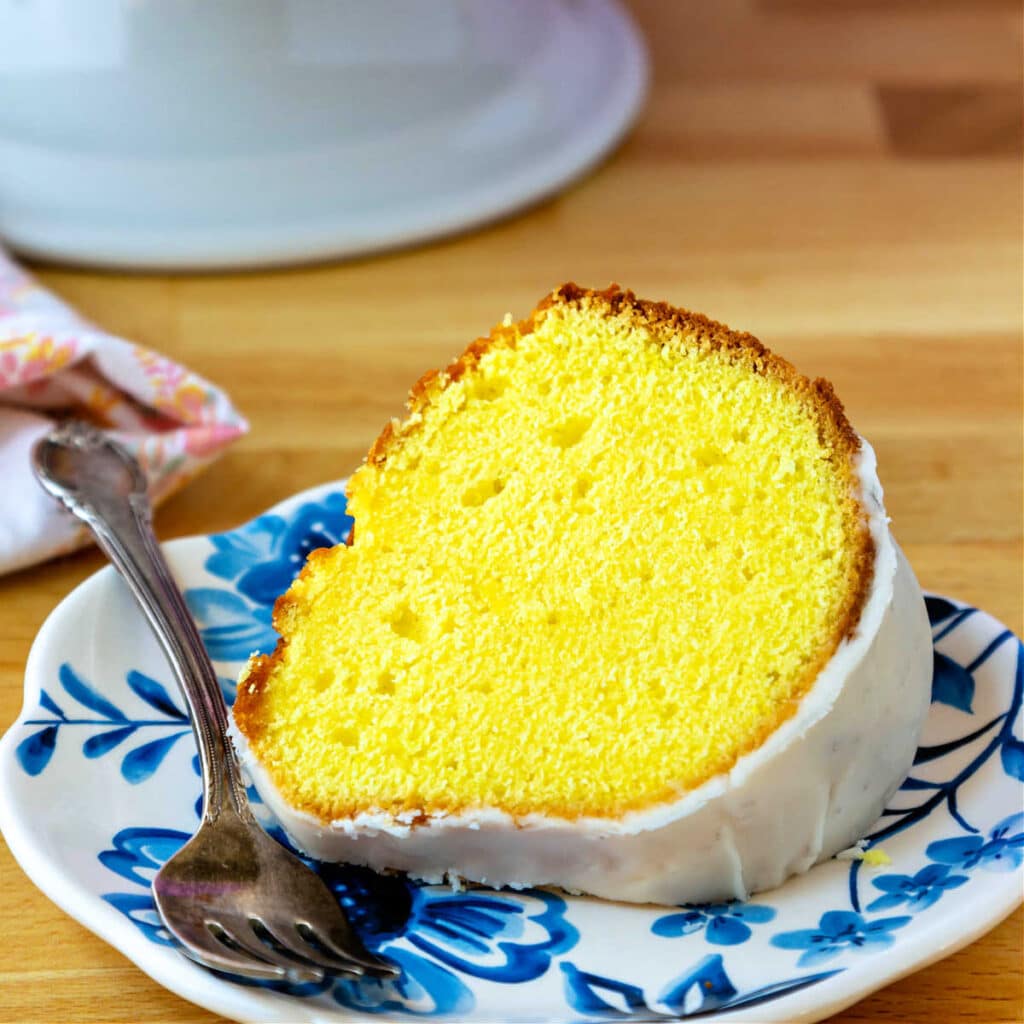
- Bake until deep golden brown and well-risen with a sunshiny crack all around the center of the cake.
Let the cake cool in the pan for about 20 minutes before turning it out onto a rack to cool.
NOTE: For a very moist cake, wrap the still-hot cake with plastic wrap, The wrap will prevent evaporation as the cake cools, leaving all the moisture in the cake where it belongs.
Equipment You May Need
You can certainly make this cake–most cakes, really–with a hand mixer, but nothing does as good a job at creaming butter and sugar together than a
This is the one I recommend:
This pound cake, like almost all my pound cake recipes, is scaled to fit in a 12-cup Bundt pan. Most of the specialty Bundts only hold 10 cups, so make sure you have a “classic” Bundt pan or be prepared to have leftover batter to make into a few cupcakes.
Variations
You can use this same recipe to make a lime, orange, or even grapefruit pound cake. Just swap out the zest, juice, and extract.
As written, it will work with any citrus, so you can make your favorite.
Tips for Success
Make sure your butter, eggs, lemon juice, and yogurt or buttermilk are all at cool room temperature before you start. That way, you won’t be adding cold stuff on top of butter than you worked so hard to cream. It’ll just seize back up again, and your batter will get all curdled looking.
Bake the cake on the rack that is one below dead center of the oven. That way, the center of the pan will be in the center of the oven, and you’ll get the most even bake possible.
Lemon Pound Cake Q & A
I am not a gluten free baker, but I believe you can substitute any “cup for cup” type gluten-free flour blend and have good results. Let the batter sit for 30 minutes before baking to give all the flours a chance to fully hydrate.
Yes. Substitute a vegan “stick butter” (not in the tub) and use soy or coconut yogurt.
Absolutely. It will keep just fine on the counter for 4-5 days, and for longer storage, you can freeze individual slices or the whole cake by wrapping in plastic wrap and then placing wrapped slices in a freezer bag (or wrapping the whole cake in foil after wrapping in plastic wrap). Freeze for up to 3 months, and let the cake thaw at room temperature, still wrapped.
Serving Suggestions
This cake doesn’t need much accompaniment, honestly.
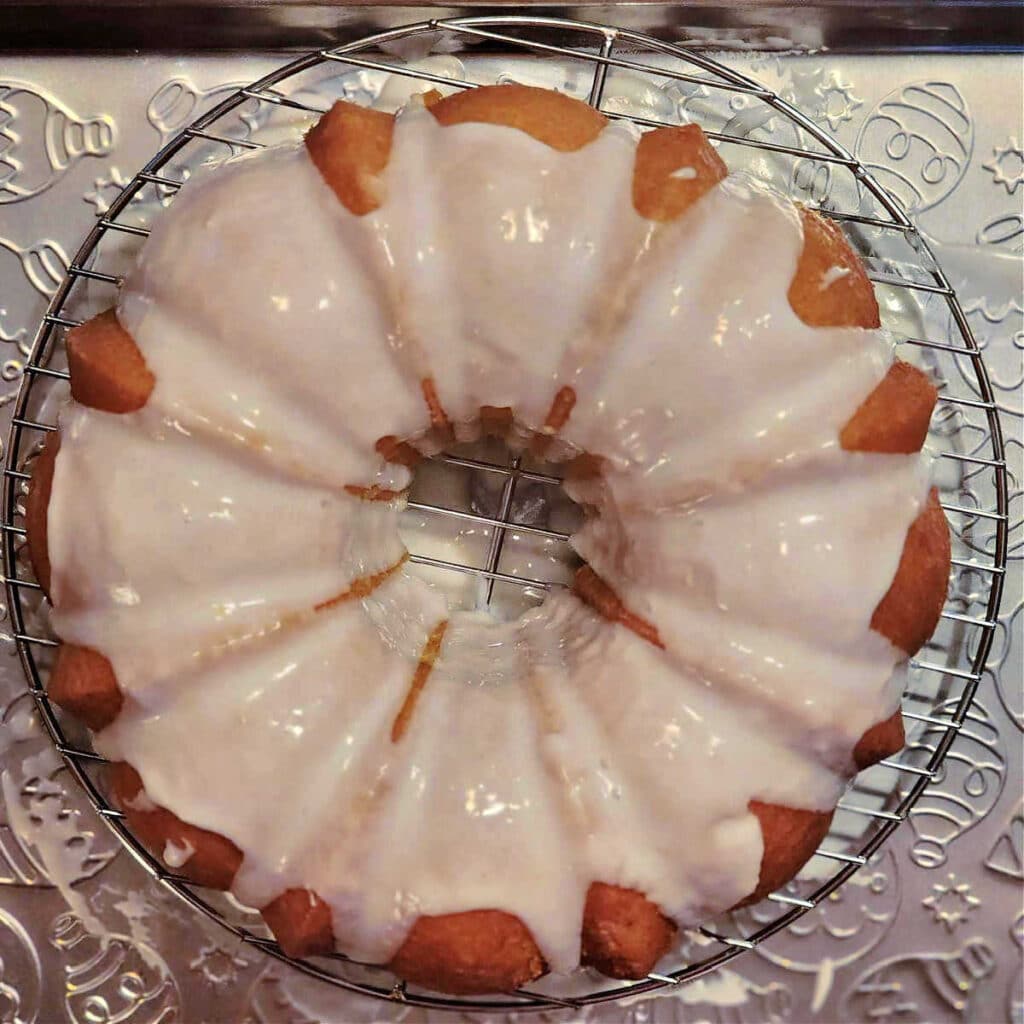
I like a tart lemon glaze made with just powdered sugar, lemon zest, a tiny pinch of salt, and freshly squeezed lemon juice.
You could also frost the cake if you’d like. I think a heavy frosting would overpower the velvety texture of the cake, so maybe frost it with some stabilized whipped cream or serve slices with some whipped cream.
Questions?
A Note About Measurements
It helps me and other readers so much if you take a moment to rate and review this recipe.
Your star rating and comments help others decide whether the recipe is worth making, and your feedback helps me continue improving recipes here at Pastry Chef Online.
Other lovely ways to share include pinning or posting on your favorite social media platform.
Thank you so much for taking the time!

Lemon Pound Cake
Ingredients
- 19 oz granulated sugar
- 12 oz unsalted butter at cool room temperature
- 1 gently rounded teaspoon fine sea salt
- Zest of 4 small-ish lemons or 2 large (use a Microplane for best results)
- ½ teaspoon lemon extract or 3 drops of lemon oil
- Optional, for color 1/4 teaspoon ground turmeric
- 5 large eggs lightly beaten
- 13 oz cake flour
- ¾ teaspoon baking powder
- ¼ teaspoon baking soda
- 8 oz thick Greek yogurt (without gums or other additives) or sour cream or buttermilk
- 2 oz freshly squeezed lemon juice strained
Instructions
- Set your oven rack to one below the center and preheat the oven to 350F.
- Spray a 12-cup Bundt-type pan thoroughly with pan spray, then flour your pan very well. Knock out the excess flour. If you only have a 10-cup Bundt-type pan, you'll have about 1 1/2 cups of batter left over. You can use this to make a 6" cake or maybe 4-5 cupcakes. Go ahead and prepare those pans if necessary. *Set aside.
- Cream together butter, sugar, salt, zest, extract/oil and optional turmeric until very light and fluffy. Take your time here; it could take 8 minutes or more. You want your creamed mixture to be very pale in color (this lets you know that you've incorporated a lot of air into the mix) and very thick and fluffy. Scrape down your mixing bowl as necessary.
- While the butter mixture is creaming, whisk together your flour, baking powder, and baking soda. If after whisking, the flour seems a bit lumpy, go ahead and sift the dry ingredients. Set aside.
- Whisk together the yogurt/sour cream/buttermilk and lemon juice. Set aside.
- Once the butter/sugar mixture is beautifully light, drizzle in the beaten eggs, a bit at a time, over a period of about 5 minutes. Scrape the bowl as necessary.
Alternately add the dry and wet ingredients, beginning and ending with dry, in this manner:
- Add half the dry
- Add half the wet
- Add half of the remaining dry ingredients
- Add the rest of the wet ingredients
- Add the rest of the dry ingredients.
- Mix on low for only about 5 seconds between additions. Scrape the bowl as necessary, making sure to get down to the bottom, but don't worry too much about completely mixing.
- Once all your ingredients are combined, scrape the bowl and fold by hand for a few seconds.
- Put the bowl back on the mixer and mix on high speed for no more than three seconds.
- Scrape the batter into your prepared pan(s).
- Bake for about an hour until the cake is well-risen, deeply golden brown, and has a crack running around the center of the top of the cake (pound cakes do this. It's okay). A thin knife or a skewer inserted into Said Crack should come out clean. This will take about an hour, give or take, depending on your oven.
- Let the cake cool in the pan for 20 minutes (10 minutes if you've made a small extra cake) then turn the cake out.
- Wrap tightly in plastic wrap and refrigerate until cool. I promise this will not give you a soggy cake, just a very moist and wonderful cake.
Optional
- When just barely warm, you can glaze the cake with a mixture of powdered sugar, lemon juice, lemon zest, just a pinch of salt.
Did You Make Any Changes?
Notes
Helpful Hints
- Spend as much time as you need to on the creaming of the butter and sugar. This is what ensures a tight yet melting crumb. Make sure the mixture stays cool–under 70F. If it starts to warm up past that, refrigerate everything for 15 minutes and then cream until the mixture is almost white, very light, and fluffy.
- Grease and flour your pan very well, first brushing in a liberal amount of melted Crisco and then adding flour. Tap the pan and angle it all around to be sure to get as full coverage as possible. Bang the excess out into the trashcan. You can also use "pan lube."
- Allow your cake to cool for 20-30 minutes in the pan before turning it out onto a rack.
- For the moistest cake, wrap the cake completely in plastic wrap while still warm. This will keep excess moisture from evaporating out of the cake.
- Glaze is not necessary although it’s often appreciated! A simple dusting with powdered sugar could be enough, especially if you’re enjoying your lemon pound cake with a cup of tea or coffee.
- The cake will keep, covered at room temperature, for a good 5 days. For longer keeping, freeze the whole cake, or freeze individual slices. Wrap in plastic wrap and then put in freezer bags for up to 3 months. Thaw at room temperature. Do not refrigerate the cake as refrigeration encourages staling, and we don’t want that.
Nutrition
Would you like to save this post?

Hi, y’all! I hope you’ve enjoyed this post and hopefully also learned a thing or two.
If you like my style, I invite you to sign up for my occasional newsletter, The Inbox Pastry Chef.
Expect updates on new and tasty recipes as well as a bit of behind-the-scenes action. I hope to see you there!

So, there you have it. I hope you love this sunshiny lemon pound cake as much as we do!
Thanks so much for watching and reading. I hope you have a lovely day.
See my best lemon Bundt cake recipe web story here.


Join in Today!
Wow!! Just Wow!!! This is, without a doubt, the absolute best pound cake I’ve ever tasted!! Super moist and super lemony, and I still managed to keep the crunchy, crusty edges thanks to you answering my question from my email and giving me a tip that allowed me to have the best of both worlds! There’s no need to look for another lemon pound cake recipe. You won’t find a better one! Oh and I also have a very happy lemon-loving husband tonight. Thanks Jenni!!
Jan, yay! So glad you got your crunchy bits AND a moist cake! Everybody wins!
Thanks for this info it’s so very helpful.
My pleasure, Sharon! Enjoy the cake!
Hi Jenni, I love this recipe so much. Thanks to you I got the highest grade for my external exam using this recipe. I baked it in a loaf tin and it came out wonderful, however, I’d like to know can I bake it in a round pan for a birthday cake (10″) and get the same result, can I layer it?
Oh, wow, that’s great, Donna! I’m so glad it worked out so well and congratulations on your exam grade! I have baked a different version of my standard pound cake in 2 9″ pans and it turned out great. I think you should be just fine. And since pound cake is pretty “sturdy,” layering it should not be an issue. Enjoy!
lemon pound cake
do they have a glaze for the recipe for lemon pound cake
Hi, Merkeba. I don’t give an exact recipe for the glaze because everyone has their favorite way of making it. I do suggest in the Notes section to mix powdered sugar, lemon zest, lemon juice, and a pinch of salt together to the consistency you prefer and then glaze the cake while it is still a little warm so the glaze has a chance to soak in. Enjoy!
I LOVE your dueling banjo pound cakes! Awesomeness! (2 thumbs up!) 😀
Thank you so much! I love this video–so much fun to make, plus I think it’s helpful:) So glad you enjoyed it, Leslie!
I’m totally loving this, Miss Jenni!! Fabulous!! Like you, I beat the #*%(#& livin’ day lights outta of it to get it thick and whipped!! xo
Hee! Thanks, Ally! I think lots of folks don’t take the time. It really does make a difference. 🙂
Jenni, WOW! I know I’ve watched you ice your Bundts on one of your videos…and I still need to try to make one like this. SO pretty. And I’ll up my creaming time…patience is not my strong suit! OK, for the creme brulee…I heated the cream, used some of the cream to temper the eggs, then returned them to the pot. Poured into ramekins and baked in a bain marie. I’m thinking I didn’t bake long enough. Any other thoughts? THANKS!
Yes, I just love the swirlie pan! 🙂
Did the egg mixture thicken up before you filled your rammies? If you return the whole shebang to the pot and then heat “so it coats the back of a spoon,” then that’s as thick as it will ever get. Eggs only get one chance to thicken, and if you thicken them while stirring over heat, you’ll end up w/creme anglaise. That happened to us at the restaurant before, so I’m wondering if that happened to you too?
Love your explanation chef ….once again grateful for the knowledge you share …Lovina 🙂
Thank you so much, Lovina. I am happy to share, and I hope this video explains the process at least fairly well. 🙂
Love it Jennifer. Thanks for sharing.
I’m so glad you liked it; I hope you find it useful! Thanks for stopping in, Joan!