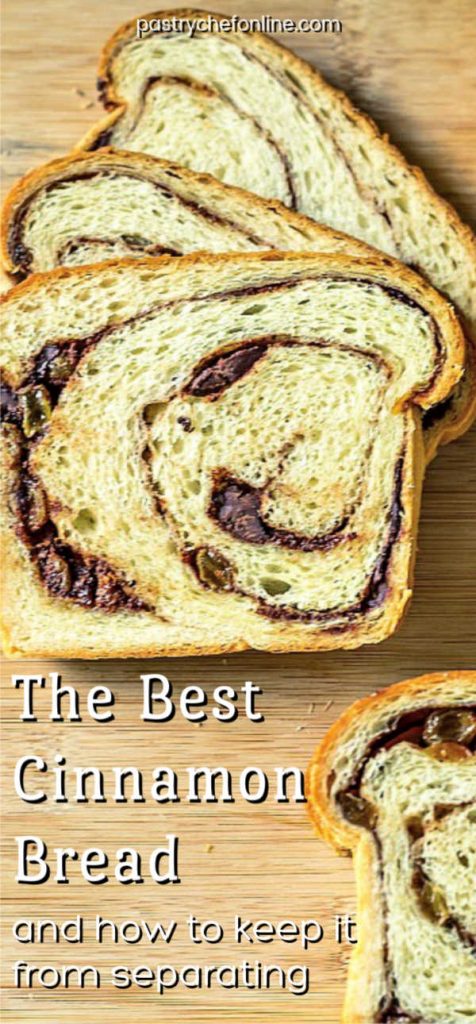
Today, we’re talking about how to keep cinnamon swirl bread from separating and gapping when baked.
Unlike cinnamon rolls that are gooey and fun to unroll to eat, a slice of bread that unravels when you try to slice it for toast is no good for anyone.
If your cinnamon swirl bread pulls apart, leaves gaps, or slides out in slices, you didn’t fail. A few common issues cause separation, and they’re all fixable. Here’s what went wrong and how to keep your swirl intact next time.
Pastry Chef Online Participates in Affiliate Programs. If you make a purchase through one of my links, I may earn a small commission. For more information click to read my disclosure policy
Read on to learn why swirl bread separates. If you’re ready for a recipe that solves the problem, try my Cinnamon Raisin Bread recipe.
Reader Question
Phyllis recently sent in this question:
I love to make cinnamon raisin bread. I normally roll out the dough and spread it with butter, cinnamon, sugar and raisins. Then I would roll it up and bake it. After it is baked, the dough inside has separated with lots of space between where it was rolled. How can I achieve a pretty slice of cinnamon raisin bread?
I did a bit of reading up on this problem.
In my reading about cinnamon swirl bread, I came across several blog posts in which the bread had clearly not stuck together. There were gaps between all the layers, or some of the layers, and a few of them looked like if you held a slice up by the end of the spiral, it would unravel or spring open like a sproinged slinky.
Of course the bread will still be delicious, but sometimes it’s nice to have a slice of bread stay a slice of bread, you know?
Why Does Cinnamon Bread Separate?
Before we get into all the ins and outs, we need to understand why this gapping/separating/delamination happens.
There are two main reasons that swirls in cinnamon bread (and other swirled “stand alone breads” as opposed to cinnamon rolls) tends to gap open.
- The first is that the steam from the dough and filling coupled with the gases emitted by the yeast pushes out and up, smooshing your layers and leaving a noticeable gap often under the top layer of your swirled bread.
- The other issue is that there is no sticking power in the swirl. Most folks slather on butter and then their sugar and cinnamon and the fat makes everything slippery so the layers can’t bind. Fixing the binding problem also fixes the gas issue and you’ll also end up with a lighter bread that has great oven spring and rise.
It sounds so simple, right? Honestly, when it has happened to me in the past, I chalked it up to overproofing, figuring it rose too high and then collapsed.
And that could be one of the issues. Obviously, it wasn’t something that I felt the need to look into, but once I started snooping around for Phyllis, I really wanted to smack myself in the head (thanks, Phyllis) and exclaim, “Why didn’t I think of that?!”
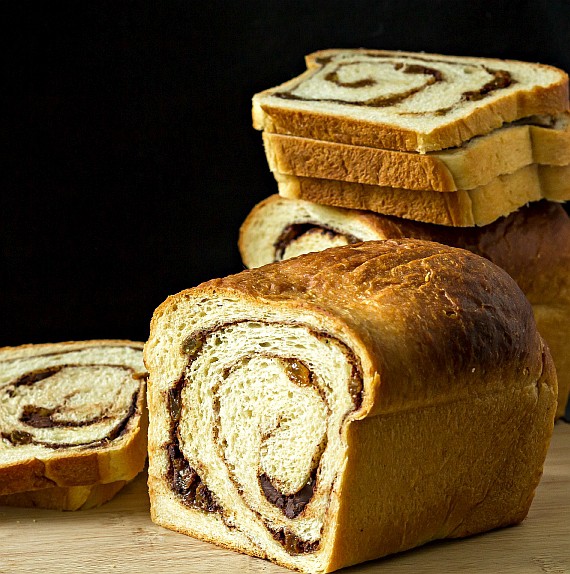
How To Keep Cinnamon Bread from Separating
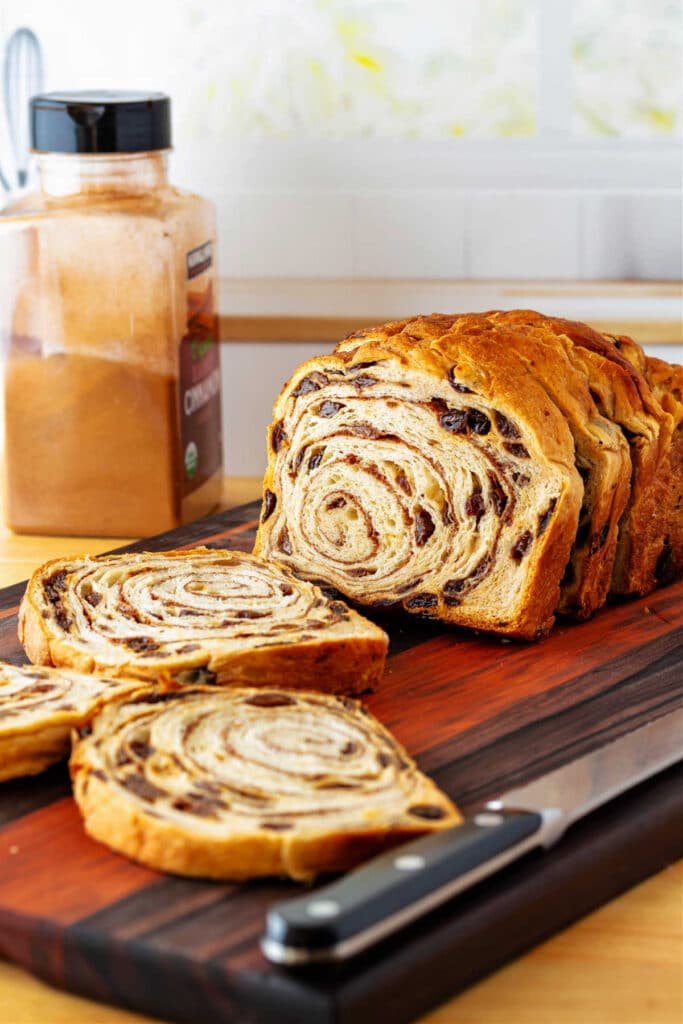
What follows is an update after I made gorgeous cinnamon raisin bread that was perfectly laminated.
There are two main methods to keep your swirls from delaminating, or to put a positive spin on it, that ensure your slices of swirl bread are perfect.
- Using starch as a binder
- Using egg as a binder
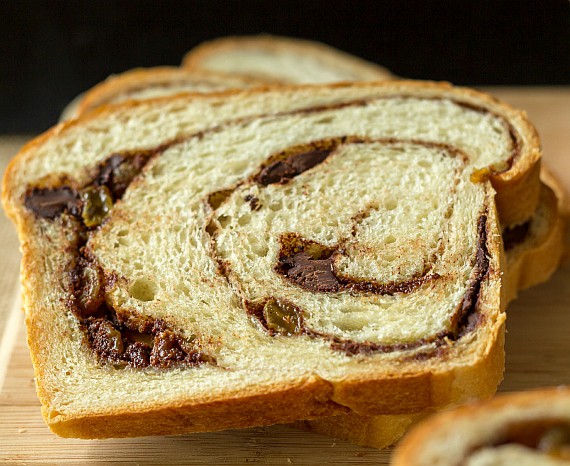
The Starch Method
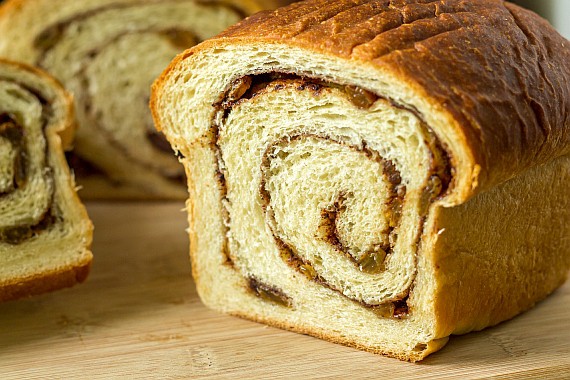
This is now my go-to and much preferred method of keeping the swirls in cinnamon bread from separating.
My “new” swirl recipe is equal parts flour and sugar plus cinnamon and a pinch of salt.
For one loaf, that generally translates to 2 Tablespoons each of flour and granulated sugar, 4 1/2 teaspoons cinnamon, and a pinch of salt.
How The Starch Method Works
Butter is delicious, but it is the opposite of glue. So using butter in the swirl is right out.
What does stick to dough, though, is more dough.
Would you like to save this post?
When you mix flour, sugar, and cinnamon together, you have the dry ingredients of a dough.
Add to that a liberal brushing of your dough with milk, you have the liquid you need to make a thin cinnamon “dough” that will yield beautiful swirls that hold together, even when thinly sliced.
Here’s how to do it:
- Roll dough out into a long, thin rectangle, and liberally brush the entire surface with milk.
- Whisk together your swirl ingredients and then spread them evenly onto the wet dough, pressing down to moisten the flour and sugar as much as possible.
- Roll up the dough under light tension–pulling back on the roll every couple of rolls to ensure a tight roll.
- Pan, rise, and bake.
- Cool, slice (thinly, if you want), and enjoy.
The Egg Method: My Runner-Up
The egg method is where you mix a beaten egg together with the swirl ingredients (sugar, cinnamon, salt) and spread that thinly on your rectangle of dough.
The egg acts as glue, binding the swirl to the dough, resulting in minimal if any delamination.
Why It’s My Runner-Up
The method works well, if you’re not allergic to eggs.
Especially if you’re making an egg-free loaf, why introduce egg when you don’t have to?
Add Your Mix-ins To the Dough and Not the Swirl
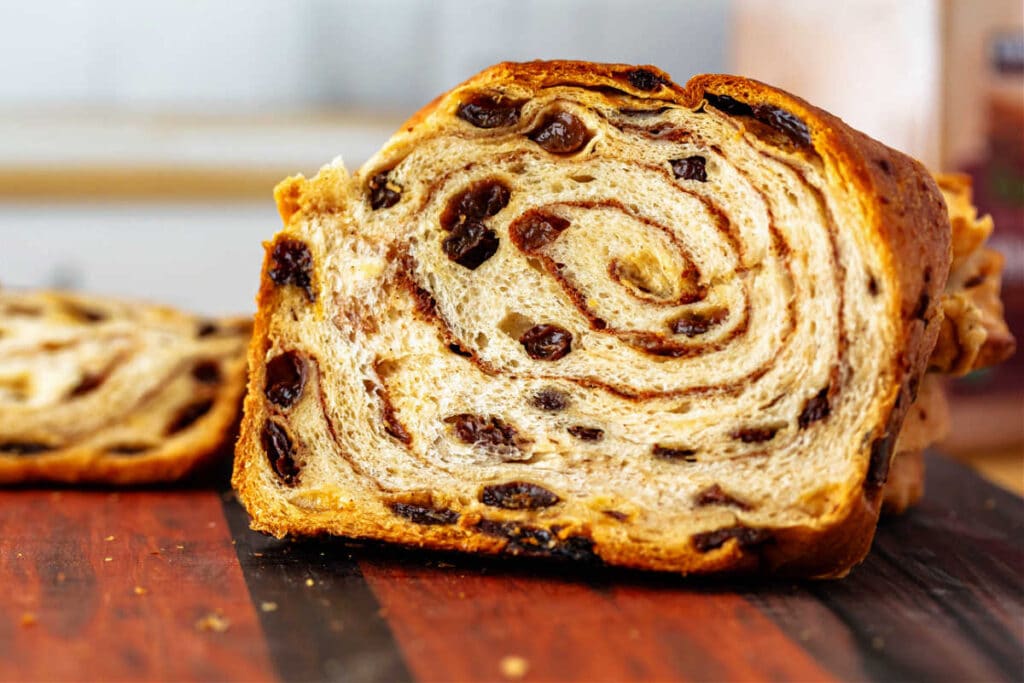
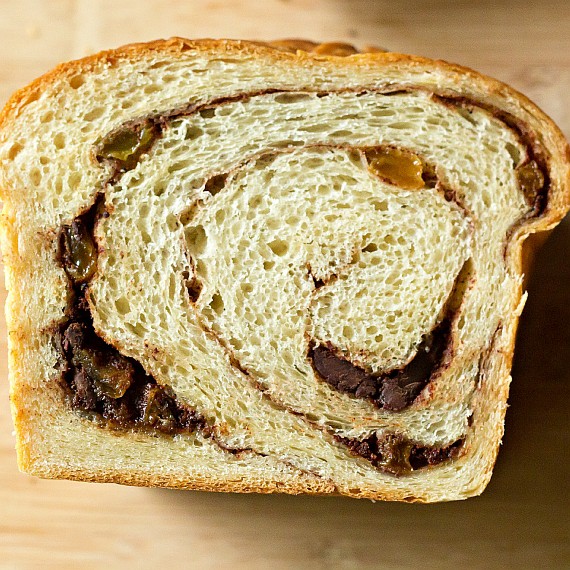
Another excellent tip for keeping your swirl together is to not add the “chunky bits” such as raisins, nuts, or chocolate chips, to get in the way of the binding.
Knead any mix-ins into the dough itself and leave the swirl smooth. Just cinnamon, flour (or egg, if that’s your preferred method), sugar, and salt.
Even with the best “glue,” you will end up with some delamination around the mix-ins. See the photo above where I used raisins and chocolate chips and added them directly to the swirl.
Delicious, but a bit of a clumpy mess. Knead those into the dough. I learned my lesson so you don’t have to make the same mistake as me!
Reader Review
Reader Helen reached out with this wonderful review of this bread and the method for keeping it from separating. Here’s what she said:
Found this recipe for Cinnamon Bread claiming it wouldn’t separate layers if the directions were followed. Tried it yesterday, and it worked exactly as the claim stated. I love you Pastry Chef Online for solving my dilemma of the separating layers in my Cinnamon Bread . . . I even went all out and used this recipe instead of the one I’ve been using for years . . . Two words describe it: YUMMY and BEAUTIFUL. Thank you so very much Chef Jenni. I’m not a FB user otherwise I’d post out there.
Reader Helen Chapman
I know you too will find success using either one of the methods I outline in this post! Thank you for commenting, Helen. It means the world to know I’m helping!
More Answers to Baking Questions
If you’re the kind of person who likes to understand why things happen and why methods work rather than just knowing the steps for doing things, you may enjoy the answers to these baking questions:
- Do I Really Have to Sift Flour?
- What Do Eggs Do In Baking?
- What Is The Creaming Method and Why We Use It
Reader Rave
Perfect! Made this bread last night, following your recipe to a T, and it could not have turned out any better. The dough was a joy to work with and the taste is so yummy. Thank you for sharing your recipe. I love it and now have a favorite, go to recipe source.
Reader Patti
If you have any questions about this post or recipe, I am happy to help.
Simply leave a comment here and I will get back to you soon. I also invite you to ask questions in my Facebook group, Fearless Kitchen Fun.
If your question is more pressing, please feel free to email me. I should be back in touch ASAP, as long as I’m not asleep.
Since I wrote this post, I have improved upon the original recipe. You can find my cinnamon raisin bread by clicking the button below. If you loved the recipe as I originally wrote it, just email me and I’m happy to send you the original.
References
- Cinnamon Swirl Bread from King Arthur
- Discussion of the Issue on StackExchange
- Gap in Cinnamon Loaf Discussion at The Fresh Loaf
- Cinnamon Swirl Bread from The Galley Gourmet (method of brushing milk/vanilla on both sides of the dough)
- Discussion of why cinnamon bread separates on Cooking Light Forum

Hi, y’all! I hope you’ve enjoyed this post and hopefully also learned a thing or two.
If you like my style, I invite you to sign up for my occasional newsletter, The Inbox Pastry Chef.
Expect updates on new and tasty recipes as well as a bit of behind-the-scenes action. I hope to see you there!


Join in Today!
It seems like a awful lot of flour, to the cinnamon sugar mixture, is that much really necessary?
If you want the layers to laminate, yes you need that much flour. What you’re basically doing is creating a sort of dough that activates when the milk and flour mix during baking. Dough sticks to dough. If you don’t want to use that much flour, try cutting it back by half and then mixing in an egg white to make a paste. Then you can spread that mixture over the dough and roll it up.
Hi!
So glad I ran into this article to help me with my purse cinnamon bread! We don’t eat eggs so thank you, thank you, thank you, for including the starch method! Question…any starch works? Potato, tapioca or cornstarch? Also, I mix the raisins with the flour when making the dough before the first rise. The filling I use is just cinnamon and brown sugar. The recommendation of 2tsp of starch per 1/4 cup of sugar…the filling calls for 3tbsp of brown sugar(so just under 1/4cup) and 1tbsp of ground cinnamon, do I add 2tsp of starch AND 2tsp of powdered sugar? So 4tsp total to the filling?
Hey, Yuri! I’m glad you found it helpful. 🙂 Any starch should work although I’ve only used flour. Still, all starches swell at around the same temp and function in similar ways, so any should work. I think between the powdered sugar and starch, I’d just go with starch. Add maybe 1 Tablespoon flour. You can even consider adding just enough milk or water to turn the filling into a thick, spreadable paste.
Thank you for your prompt response! I added 1tbsp of cornstarch to my filling and it worked like a charm!!!
I am so pleased! Yay!
Found this recipe for Cinnamon Bread claiming it wouldn’t separate layers if the directions were followed. Tried it yesterday, and it worked exactly as the claim stated. I love you Pastry Chef Online for solving my dilemma of the separating layers in my Cinnamon Bread . . . I even went all out and used this recipe instead of the one I’ve been using for years . . . Two words describe it: YUMMY and BEAUTIFUL. Thank you so very much Chef Jenni. I’m not a FB user otherwise I’d post out there.
Oh, Helen, your comment made me well up! I am so pleased the bread turned out well and that you no longer have to worry about separating layers! Have a wonderful holiday, and thank you, sincerely, for your comment. Made my day!
What works well for me is to brush on the egg mixture (I use 1 egg white – no yolk, because the white is the glue- ), fork-whipped with 1.5 tsp water) on the dough then add the dry filling, and as you roll up, brush more egg mixture on the bottom side of the dough as you go. Holds the bread together very well!
That is a great tip, thank you! It’s always good to have a “deep bench” when trying to troubleshoot, Mary! Also, I bet the flavor is more true than when using yolk as well. Nice!
Hey Jenni! This is a great recipe! The dough was more beautiful and easier to mix up than any I’ve made in the past. I do have one question though: is there any good way to go about increasing the amount of filling? I’m a sucker for a lot of filling but not to the point where it turns the loaf into a total mess. Any help would be much appreciated!
Hey, Ellie! Honestly, with a cinnamon bread, less is more. Too much filling, and it will “unravel” the bread. You could certainly try doubling all the filling ingredients and adding some beaten whole egg and a couple of tablespoons of flour to making a paste. That should have enough binding power, but I couldn’t say for certain. I’m more likely to go all-in with filling when it’s cinnamon rolls, where the goo factor is part of the charm. If you do try to increase the filling, please let me know what binder or combo of binders you use and how it turned out. I’m glad you enjoyed working with the dough. I like that dough a lot too! Oh, and if you’re going to add extra filling, I’d definitely skip on raisins, nuts, chocolate chips, etc, unless you incorporate those into the dough and not the filling. Hope this helps–I look forward to hearing about your experimentation!
Hey Jenni, I actually made your recipe again (mostly as is with just a bit more cinnamon in the filling), and it was perfect! When I made the recipe the first time, I must not have divided the filling evenly. I only kept one loaf for myself, so I never figured that out! Thanks again for your great recipe and your helpfulness!
I am so glad it turned out well for you, Ellie! And the more cinnamon, the merrier, I say! 🙂
Awesome….where have you!
Is there a rolling technique to prevent the filling from oozing out during the final proof? I rolled both loaves up, pinching the sides as I went, but as they go in the oven, both are sitting in a small pool of filling which I know will turn in to a gooey burnt caramel mess as they bake.
Did you spread the filling right up to the edge of the dough? I generally leave about an inch or 1 1/2″ bare to allow for some “slide” as you roll it up. Hopefully it will turn out for you. Let me know!
Perfect! Made this bread last night, following your recipe to a T, and it could not have turned out any better. The dough was a joy to work with and the taste is so yummy. Thank you for sharing your recipe. I love it and now have a favorite, go to recipe source. : )
Hi, Patti! I’m so glad you enjoyed the bread and that you took the time to let me know! Take care, and know you can always search here on the blog or email me if you have any questions!
I have an issue with the filling in this recipe being too runny. It oozes off the dough as I roll. I tried adding more sugar or less egg, but it still turns our runny. I’ve thought about adding flour since my daughter can’t have corn starch. Any tips or other suggestions to help? Thanks!
Adding more sugar probably makes it even more runny, right? Bleh. You are absolutely right that adding some flour will help. It will thicken up the filling into a paste and will help the layers adhere once baked. Please let me know how it goes!
Thanks for the info. Will try the egg solution next time as well as using your recipe. My question is
Do you think I could also add diced cooked apples and pecans to the dough at end of kneading.
Or even just replacing the raisins with apples and pecans.
Thanks for your help.
Hey, Jan! I’d be a bit concerned about the extra liquid that apples would leach into the dough. It wouldn’t hurt the bread, flavor-wise or texture-wise, but it could impede the roll adhesion. Absolutely use the pecans, for sure. Toast them first for more flavor. Also, you could consider using dried apples that you rehydrate for a few minutes in hot water or hot apple juice and then dry off. They won’t be as wet as fresh apple. Another option is to maybe grate some apple into the dough and then cut back a bit on the amount of liquid. Either way, I liked where you’re going with the flavors. If you give it a shot, do let me know! Oh, here’s another idea: maybe use apple butter mixed with cornstarch as part of your swirl. Another way to add some apple flavor, and the corn starch should help bind the layers. =)
Do use a whole cup of potato flakes, or do I use the potatoes flakes to make 1 c prepared mashed potatoes?
It’s a whole cup of potato flakes–just dump ’em in dry, Katie!
This is a great article, thank you! I made the most delicious cinnamon raisin swirl bread last night. The dough was perfect consistency, the raisins folded into it easily, the swirl part(cinnamon and brown sugar) was fabulous, it was beautiful and brown when I took it out of the oven….and today I sliced into it and it looks like a purse(my 6 year old said that). The whole top part separated from the lower and it truly looks like a purse. LOL.
My 2 year old has an egg allergy AND milk allergy, so it’s exciting to see I can use cornstarch mixed into the filling to make it stick. I’ll give that whirl next time.
Glad you found the post helpful, Jen! We have all been there–sad, separated, purse bread! lol The good news is that a)it still tastes good and b)now we know how to fix it! Hope the cornstarch works for you! =)
Dumb question….for the starch, are you referring to flour or confectioners’ sugar? You mention that the CI people recommend using powdered sugar in the filling, but I have seen tips where it’s recommended that you add flour to the filling.
Not a dumb question at all, Sadie. I’m referring to flour or cornstarch. I think the amount of cornstarch in powdered sugar is pretty small and wouldn’t be much help. My understanding is that the powdered sugar dissolves faster so there are no grains just sitting there getting in the way of adhesion. I’ve lately been using cornstarch mixed into my filling along with just a bit of well-beaten egg white, and that seems to be doing the trick. I’m still brushing down both sides of the dough with water as I roll as well.
A great read, Jenni! You’re thorough research is appreciated. You’ve got that “stick-to-it-iveness”. 🙂
And now, so does the swirl! Ba-DUM-bum. =) Thanks, Brooks!!
Another excellent, informative post, Jenni. I gave up making swirl breads a couple years ago because I couldn’t stand the delaminated look. Now I’m gonna confidently give them another go. Thank you!
That egg trick is magic, Maggie! =)
Gorgeous loaves. Wish I had a slice or two for breakfast tomorrow.
Thanks Barbara! The things I must sacrifice for my readers! lol 😉
LOVE how you are able to explain all of this! I know this is going to be the silliest question but do you mix all of the swirl ingredients together or brush the egg on the dough and then sprinkle the other ingredients over the egg?
Not a silly question at all. I mixed everything together, but you could do it the other way too. =)
Thanks, Jenni! <3
I was just wondering about this earlier this month because I wanted to make a swirl bread, but then I didn’t want to experience the gaps in the swirl! This might be the best, most helpful (and perfectly timed!) thing I’ve read on the internet all year 🙂
Wow, high praise indeed! I do love the synchronicity of the Internet. So glad this came at the right time for you, Janice!