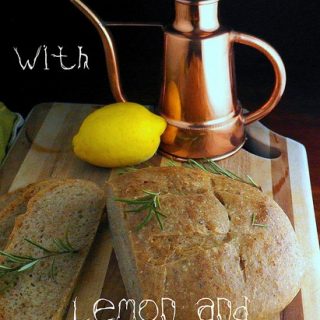
 This bread.
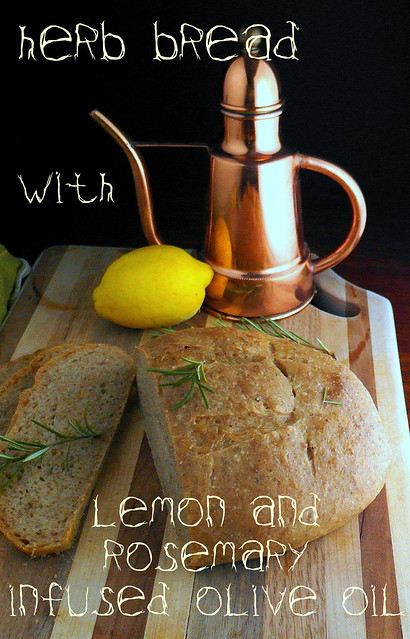
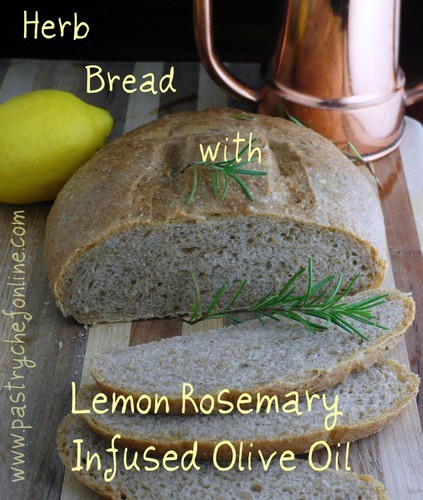
This is the second batch of communion bread I’ve made for St. Andrew’s Presbyterian in Charlotte. The first was the Milk and Honey bread. And now, this bread. This herb bread with lemon and rosemary infused olive oil. Wow.
This bread.
This is the second batch of communion bread I’ve made for St. Andrew’s Presbyterian in Charlotte. The first was the Milk and Honey bread. And now, this bread. This herb bread with lemon and rosemary infused olive oil. Wow.
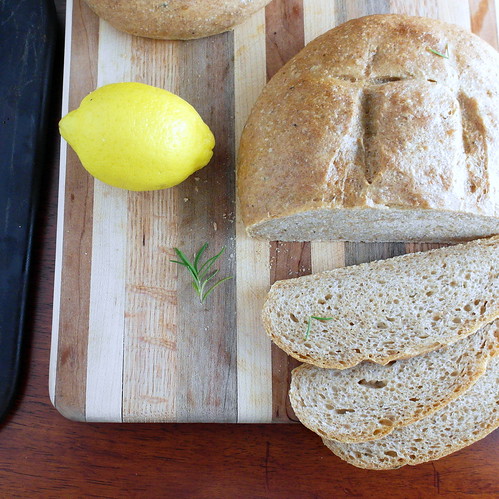
A total keeper awesome flavor Reader CarolNadine and I talked about the tie-ins for her service, and she wanted it to contain herbs and specifically rosemary, for remembrance. As I gathered my ingredients on Friday morning, a lemon spoke up and wanted to join the party. I was delighted that he could join us, because when the oil in the lemon zest mixed with the oils from the rosemary in the peppery extra virgin olive oil, the combination smelled of summer.
 Oh, this bread.
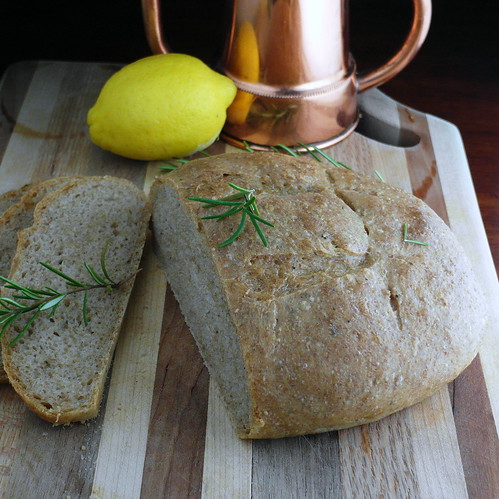
So good, I’ve made it twice in three days. The first, for communion, I gave one long, slow rise and then a shape and final proof before baking. I dusted the tops with some stone ground flour and baked them for about thirty minutes or so. I started the second batch yesterday, giving the dough a long, slow rise on the counter followed by about twelve hours in the fridge. This morning, I pulled it out, shaped it and gave it another long rise before baking. No flour this time, because I knew that the longer rising time would yield a loaf with a thin, slightly blistered crust, and I didn’t want to cover that up.
Oh, this bread.
So good, I’ve made it twice in three days. The first, for communion, I gave one long, slow rise and then a shape and final proof before baking. I dusted the tops with some stone ground flour and baked them for about thirty minutes or so. I started the second batch yesterday, giving the dough a long, slow rise on the counter followed by about twelve hours in the fridge. This morning, I pulled it out, shaped it and gave it another long rise before baking. No flour this time, because I knew that the longer rising time would yield a loaf with a thin, slightly blistered crust, and I didn’t want to cover that up.
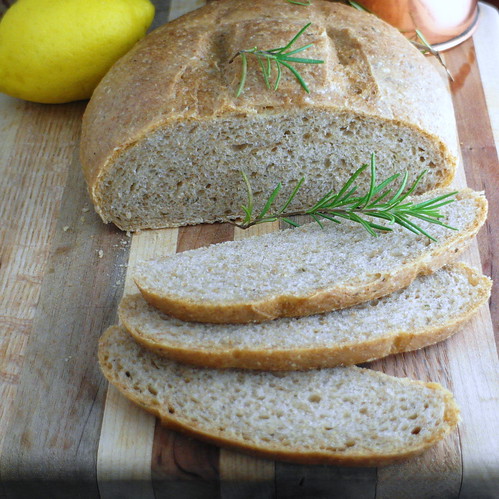 Both batches are simply wonderful, although the flavor is a bit more complex in the loaf that took longer to make. That’s the bread baker’s dilemma. The longer it takes to make, the tastier it is. It is both a reward to enjoy after a two or even three day baking session and a punishment to have to wait that long.
 Those of you who appreciate instant gratification (relatively speaking. This is bread we’re talking about), just go with the one long rise. Those of you who already have something tasty to nosh upon while waiting, try the overnight version.
Y’all, this bread!
Those of you who appreciate instant gratification (relatively speaking. This is bread we’re talking about), just go with the one long rise. Those of you who already have something tasty to nosh upon while waiting, try the overnight version.
Y’all, this bread!
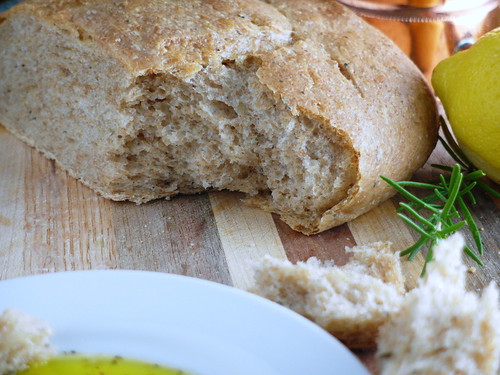
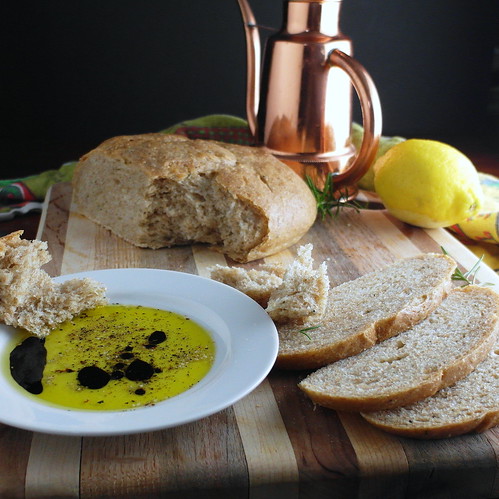 And once you have made either version, it truly wants to be dredged in excellent olive oil and then smeared with goat cheese.
And with a bread this flavorful, make sure to use every last morsel of it. If by some chance you have some bread leftover that is starting to feel a bit dry—and this will only take a day or two—chunk it up, toast it a bit and then let it shine in a magnificent panzanella.
This bread.
And once you have made either version, it truly wants to be dredged in excellent olive oil and then smeared with goat cheese.
And with a bread this flavorful, make sure to use every last morsel of it. If by some chance you have some bread leftover that is starting to feel a bit dry—and this will only take a day or two—chunk it up, toast it a bit and then let it shine in a magnificent panzanella.
This bread.
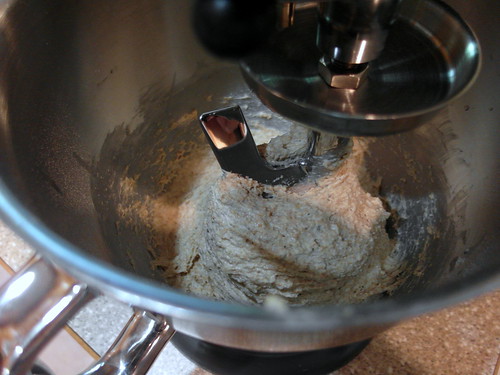 At 70% hydration, the dough is very slack. You will be sorely tempted to add some more flour to your mixer or to your counter when you try to knead, but I implore you not to give in. Trust me. Trust that this bread will be delicious. And oil up your hands to work with the dough, okay?
Herb Bread with Lemon and Rosemary Infused Olive Oil
You might be amazed by how flavorful this bread is, especially since the ingredient list is not very long. Please do yourself a favor and make some of this for yourself.
Ingredients
- 3 ounces extra virgin olive oil
- leaves from a 6" sprig of rosemary
- zest of one large lemon
- 20 oz bread flour*
- 14 oz tepid water**
- 1 tablespoon your choice of fresh herbs (thyme and oregano would be lovely), chopped or 1 teaspoon of your favorite herb blend (such as Italian herbs or Herbes de Provence)
- 2 teaspoons active dry yeast (I don't like instant or rapid rise, but if you like it, go for it)
- 2 teaspoons kosher salt
Instructions
- Put the oil, rosemary and zest in a small sauce pan. Gently heat this on low heat for about 30 minutes.
- Remove from the heat and set aside to cool down to room temperature.
- Strain the oil through a fine mesh strainer to catch the zest and rosemary leaves, making sure to press down on the solids.
- In your stand mixer fitted with the dough hook, mix together 2 ounces of the infused oil, flour, water, yeast and salt on low speed. The dough will be very wet, so make sure to scrape down to the very bottom of the bowl a few times to be sure all the flour is incorporated.
- Knead on medium-low speed for 6-8 minutes, or until the dough all climbs up the dough hook.
- Oil your hands (with plain olive oil) and then pull out the very sticky dough, shape it into as much of a round as you can manage and then put it right back into the mixer bowl. Drizzle 2 teaspoons of the remaining infused oil over the dough and spread it to keep the dough from drying out.
- Cover the bowl and let rise until tripled in size. This will take about 3-4 hours at room temp.
- Press out the gases and fold the dough over on itself a couple of times to redistribute the yeast. Spread 2 more teaspoons of the infused oil on top to keep it from drying out, cover with plastic wrap and refrigerate overnight, or for eight to twelve hours.
- With oiled hands, press the gases out again (the dough will be much easier to handle by now), divide the dough into two equal pieces (about 18 oz apiece) and shape into rounds or ovals, pulling the surface of the dough taught on the top of the loaves. Place the loaves on a baking stone or cookie sheet.
- Spread the last of the infused oil onto the loaves, cover with plastic wrap, and let rise for a couple of hours, or until the dough is at room temperature and has about doubled in size.
- Preheat the oven to 400F and set a rack to one-above-the-center.
- Slash the loaves decoratively with a very sharp knife or a lame
- Bake for 20 minutes and then reduce the heat to 375F and continue to bake for an additional 8-10 minutes, or until the internal temperature of the bread is around 200F-205F.
- Remove to racks and cool until room temperature before slicing (or pulling apart) and enjoying.
Did You Make Any Changes?
Notes
*or a mixture of whole wheat and bread flour to equal 20 oz. I used a local stone ground flour from The Grain Mill in Wake Forest and purchased through Carolina Grown
**I use filtered water from the fridge and then heat it on the stove until it's right around body temperature. This only take a couple of minutes.
While I didn't add anything extra in this bread, some toasted pine nuts or walnuts would be welcome. You might also consider adding some coarsely chopped roasted garlic, too.
Would you like to save this post?
Did you make this recipe?Please tell us how it went!
 Thank you so much for spending some time here today. I do hope you give this a try; I promise you won’t be sorry!
Have a lovely day.
Thank you so much for spending some time here today. I do hope you give this a try; I promise you won’t be sorry!
Have a lovely day.


Join in Today!
A total keeper awesome flavor
Do you happen to have a ballpark average on what 20 oz of flour might be? I grind my own wheat with a Whisper Mill, but don’t have access to a food scale. Thanks for any help! Excited to make this for our church.
I would encourage you to get a scale, especially baking at high volume. It’s really hard for me to give you a cup measure for the ounces, especially if you are grinding your own. But having said that, a cup of flour generally weighs between say 4oz and 5oz. You may have to play with the measurements a bit, but you’re probably looking at between 4-5 cups for 20oz. Hope that helps!
What a wonderful bread!
Love the herbs in this bread – lemon and rosemary, and I’d loooooooove to try this recipe
Thanks so much, Winnie! I hope you do give it a try–it is really good! Thanks for stopping by, and please do let me know if you make it. Would love to hear what you think!
Complex flavors developed over time makes for a memorable loaf and the flavor profiles herein are a triple-threat of deliciousness. Gorgeous work my friend!
Thank you so much, Brooks! Round one was wonderful, and round two was beyond wonderful. Next time I make it, I’ll cut back on the yeast and let it rise forever. This is a good one–if you put your own Brooks spin, please let me know. Would love to hear your thoughts!
And … we’re good! Scrolled right down this time. What a beautiful loaf, Jenni! I have several bread recipes that make two loaves but I’ve never thought to let one set longer for more flavor. What a great idea! You are so smart.
I am just a crazy experimenter, but thanks! And I’m glad the site is behaving itself now. Thanks for the email earlier!
Most welcome!
Experimenting is how the best recipes come about. #fearlessin2013. P.S. Working my way up to real puff pastry. I made rough puff today. 🙂 I figured it was too damn hot for the real thing. 117° here.
Yikes! Good call on the “no real puff in the 117F heat!” Ugh–can’t even imagine. :/
Gorgeous! I love the story of this bread and it being a connection between you and your friend. And it is stunning! Perfect! I want to try this. And the flavors must be brilliant! xo
I am having the best time making the communion bread. Because, I sometimes miss having a restaurant of folks to make smile, and the congregation at The Andy is standing in. 🙂
I do hope you give this one a go, Jamie–it is just lovely. It smells unbelievably good while it’s baking and I was very happy with the flavor and texture too!
Love!! Saved the recipe for later ~ the fam will love it. Thank you!
Oh, I’m so pleased, Karie! If you’re like me, you’ll want to make it…frequently! =)