
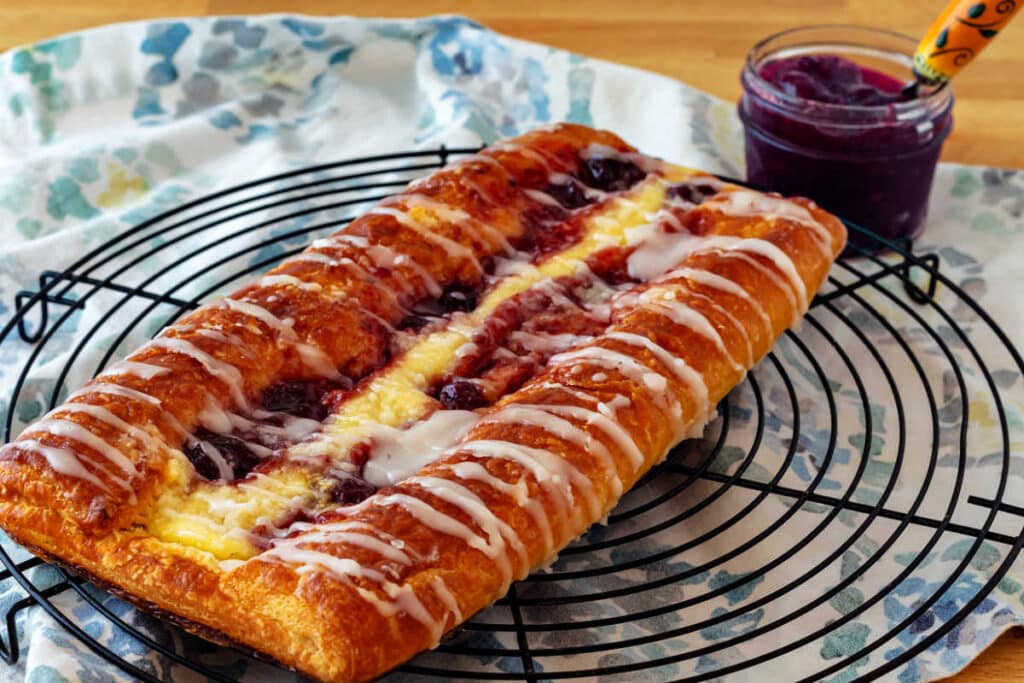
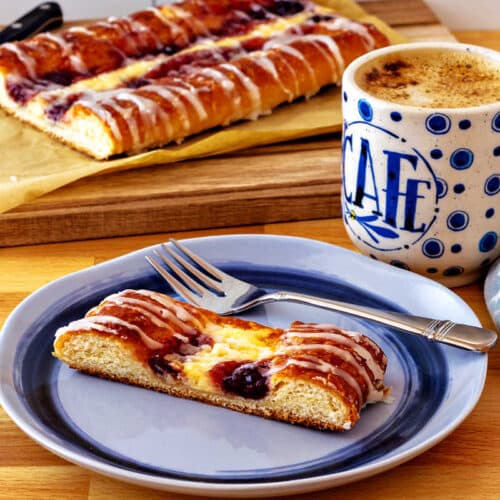
This bakery-style cheese and fruit Danish, also called a cheese and fruit strip or simply a “fruit strip,” is my homemade take on the big, sliceable pastries I remember from Entenmann’s—only with buttery homemade laminated Danish dough, a rich cream cheese filling, and plenty of fruity preserves. Three stripes of filling make every slice feel decadent, while tall, flaky pastry edges keep everything tucked neatly inside.
A light scattering of streusel melts into the fruit and cheese as the Danish proofs, helping to keep the fillings thick and luscious. Add a little more before baking if you want visible crumbs, then finish the deeply golden pastry with a shiny coat of simple syrup and a drizzle of powdered sugar glaze.
It looks like a serious bakery project, but once you’ve made your Danish dough, assembly is surprisingly straightforward. And since one large Danish is meant to be sliced and shared, you get all the glory of individual fruit-and-cheese pastries without the fussiness of shaping them. Shall we get started?
Pastry Chef Online Participates in Affiliate Programs. If you make a purchase through one of my links, I may earn a small commission. For more information click to read my disclosure policy
Cheese and Fruit Danish, at a Glance
✅Skill Level: Confident Beginner to Intermediate
✅Skills: Laminating Dough, Rolling Pastry
✅Type: Danish Pastry
✅Number of Ingredients: 13
✅Prep Time: 40 minutes
✅Rise Time: 45 minutes-1 hour
✅Cook Time: 20-25 minutes
✅Yield: 2 large Danish, 6 slices per Danish
Jump Straight to the Recipe
Why You’ll Love This Bakery-Style Danish
There’s something kind of special about having an individual Danish, like a morning bun or a bear claw. No sharing and it’s all for you.
And then, there is this cheese and fruit Danish. It recalls the nostalgia of opening up that white and blue Entenmann’s box and cutting a slice to have with tea or coffee or morning cartoons.
This Danish is like that Danish: large enough to share, a bit of powdery streusel, bountiful stripes of cheesecake filling and your favorite fruit jam or preserves, plus a drizzle of white icing for homey razzle dazzle.
My recipe is based upon my master Danish dough recipe, and it makes two generously filled Danishes big enough to share, although you might not want to. And while they look fancy, they are an edible craft project that you can absolutely make at home. I will walk you through it.
Ingredients and Substitutions
If you are well-versed in the ways of Danish pastry, you can go ahead and jump down to the recipe. And if you’re not, stick with me while we go over how to shape, fill, bake, and finish off what is basically a big old Danish-style coffee cake.
Here’s what you’ll need to make it:
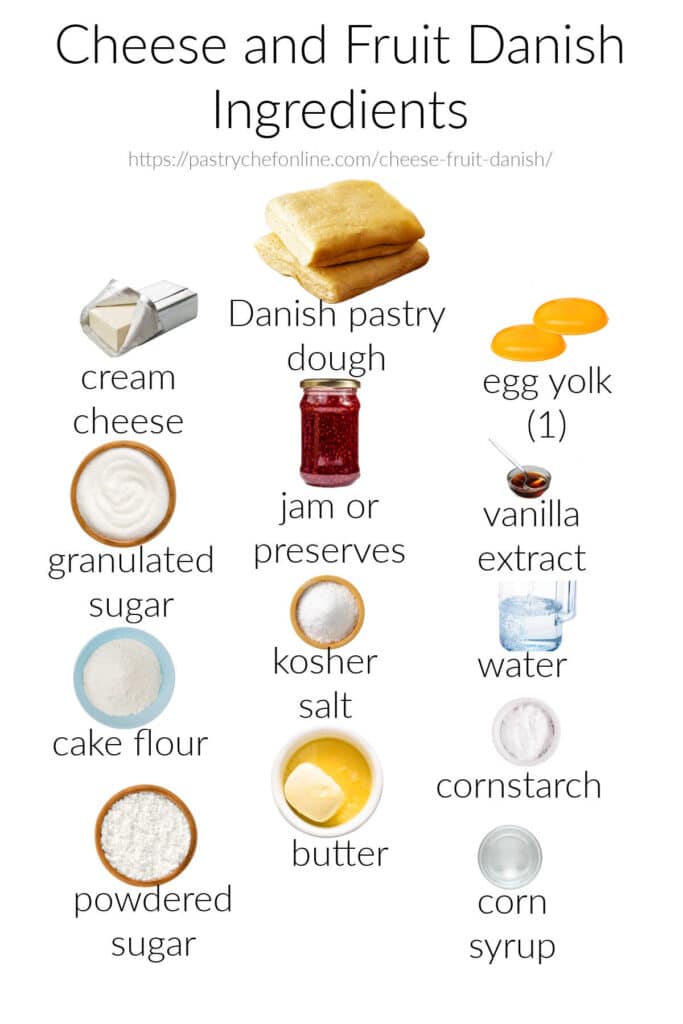
- Danish dough: You’ll need a 1x recipe of the master Danish pastry recipe, and you’ll end up with two big old Danishes.
- cream cheese: forms the base of the cheese filling, which is really a simplified cheesecake batter. What’s not to love?
- Granulated sugar: Used in the cheese filling, the streusel, heavy syrup, and white icing, sugar does some heavy lifting in this recipe! It adds sweetness and tenderness while assisting in browning.
- Egg yolk: Helps to set the cheese filling, while the fat carries flavor and the emulsifiers keep the filling smooth.
- Vanilla Extract: Rounds out the “cheesecake flavor profile” of the cheese filling and also brings a creamy finish to the white icing.
- Jam or Preserves: This is dealer’s choice. You can use homemade jam or preserves or store-bought. Either will work. You might try my mixed berry jam or the spiced cherry pie preserves. I used Bonne Maman 4 Fruit Jam from Costco.
- Cornstarch: The secret behind making the jam stay put, cornstarch gelatinizes as it heats in the oven, absorbing liquid from the jam and keeping it more-or-less in place. Without it, some of the jam would likely run out and onto the baking sheet.
- Cake flour: Used in the streusel, cake flour keeps the streusel tender while absorbing liquid from the cheese and fruit fillings as they bake.
- Kosher salt: A little pinch in the cheese filling and white icing helps to balance the flavors and bring them into focus. Without salt, the pastry will taste a bit flat.
- Water: Goes into solution with sugar in the heavy syrup to make sure the Danish has a beautiful, shiny finish. Water is also used in the white icing to give it the perfect texture for drizzling.
- Powdered Sugar: Used in the white icing, powdered sugar dissolves easily and provides sweetness, body, and color to the icing.
- Butter: Used in the streusel, butter assists in browning and carries flavor while giving the streusel its characteristic crumbly texture.
- Corn syrup: Just a little bit in the white icing allows it to set into a glossy finish without shattering when you bite into it. If you have Lyle’s Golden Syrup, you may substitute that.
- Lemon Zest (not pictured): Brings a little “lift” and classic cheesecake flavor to the cheese filling.
- Egg Wash (not pictured): I always make my egg wash with 1 whole egg, about a teaspoon of water, and a tiny pinch of salt. Whisked well and then brushed onto the surface of the pastry right before baking, egg wash does a beautiful job of allowing the pastry to brown to a beautiful, deep golden brown.
How to Make a Cheese and Fruit Danish
This Danish might look fancy and a little intimidating to shape, but don’t let appearances fool you. Once you see the process photos, you’ll realize just how straightforward it is to put together.
Let’s walk through it, shall we?
Would you like to save this post?
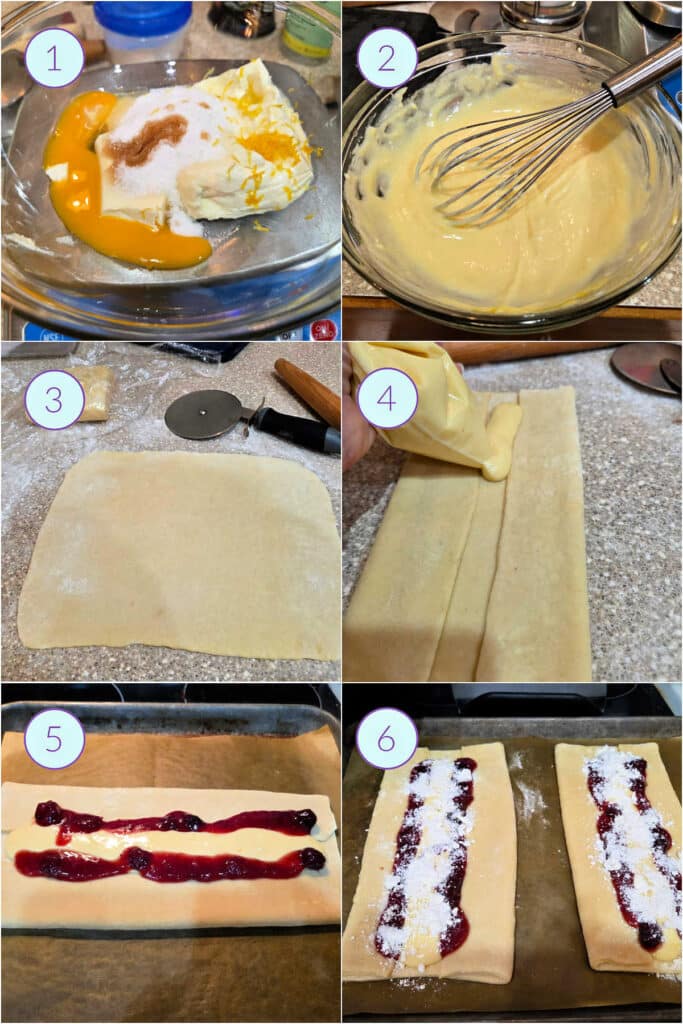
- Make sure your cream cheese is very soft, and then whisk all the ingredients together….
- …until smooth.
- Roll out and trim the Danish dough and then divide into two large rectangles about 12″ / 30cm wide and 10″ / 25cm tall.
- Fold each side of each rectangle in towards the center, leaving a channel about 3/4″ / 2cm wide. Press the edges of your folds to seal them, using a little bit of water or egg wash as glue. Pipe or spoon a line of cheese filling into the channel.
- Pipe a line of fruit filling to either side of the cheese filling.
- Scatter a small handful of the streusel on top of the fillings, cover, and let rest until relaxed and a little puffy, about 45 minutes.
See? That’s very easy, right? Once the pastry is ready to bake, brush the exposed dough with egg wash, and (optionally) scatter on a bit more streusel, then bake until deeply golden brown.
Once the Danishes have baked, brush them with heavy syrup while still hot, and then drizzle on some white icing once cool.
And that’s it. Mysterious large Danish pastry, decoded.
Tips for Making a Bakery Case-Worthy Danish
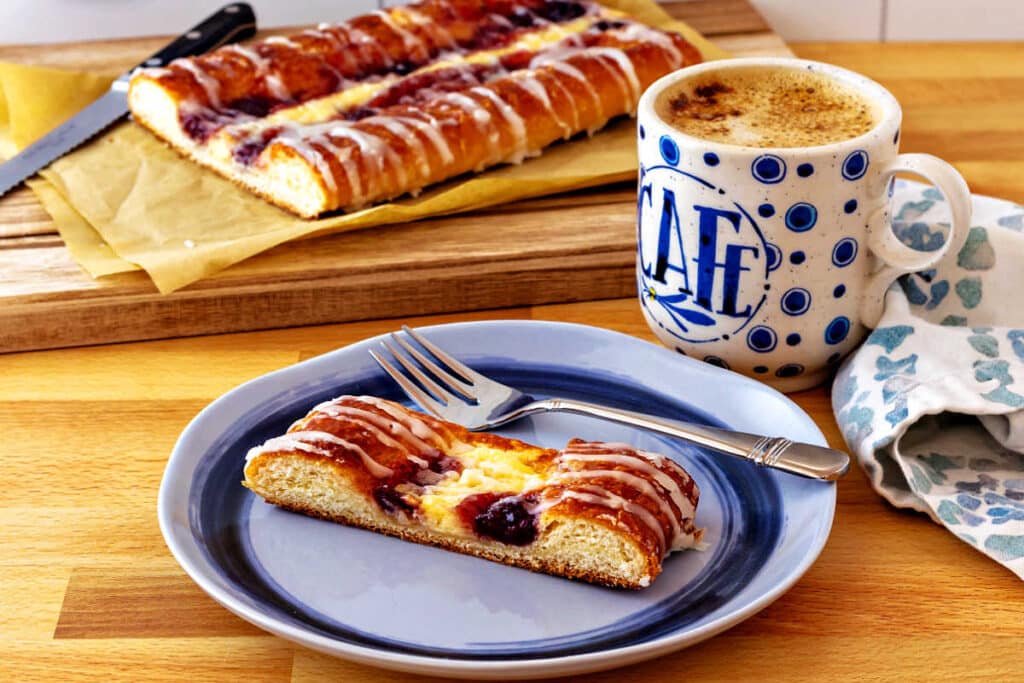
Danish pastries come in a wide variety of flavor combinations and shapes. One thing they share is that they are Craveable. And a lot of that craveability comes from the finishes: the little extra steps we take that don’t take very long but that really help to showcase a pastry as something You Must Have.
As with bear claws, this fruit and cheese Danish gets a few “treatments” before it is camera-ready.
First, if you choose to add extra streusel right before baking, you’ll get some lovely little crunchy bits of textural contrast. Then, the egg wash makes sure the color is deeply golden brown. But wait. There’s more! Right out of the oven, it gets a brush with heavy syrup, making it shiny, and then the crowning touch? The old white icing razzle dazzle!
Since so much is going on, it pays to be restrained with each little flourish you add. The glaze should be light enough that you can still see lots of bits of streusel as well as the burnished, shiny surface. A feast for the eyes before it becomes a feast for the rest of your senses!
Storing and Reheating
Since this big old Danish contains dairy in the topping, I’d let it cool to barely warm, drizzle on the icing, and then serve it that day. Any leftovers get stored in the fridge and then warmed up in the toaster oven at 350°F / 177°C.
If you’d like to eat one and freeze one, which is entirely reasonable, let the second one cool completely. Leave off the final drizzle of white icing, and wrap it well in plastic wrap and foil, or put it in a zip top freezer bag with as much air pressed out as you can manage.
It will keep just fine in the freezer for a couple of months. If you’re planning on eating it that day, thaw it at room temperature. If you prefer a more leisurely thaw, transfer it to the fridge overnight. Then let it come to room temp. Either way, once it is at room temperature, give it a little glaze with white icing before warming it up as described above. Be sure to allow the glaze to set up for a few minutes before reheating.
Questions?
If you have any questions about this post or recipe, I am happy to help.
Simply leave a comment here and I will get back to you soon. I also invite you to ask questions in my Facebook group, Fearless Kitchen Fun.
If your question is more pressing, please feel free to email me. I should be back in touch ASAP, as long as I’m not asleep.
A Note About Measurements
My recipes are almost all written by weight, including liquids, unless otherwise specified.
For accuracy and consistency of results, I encourage you to buy–and use–a kitchen scale.
I promise that baking and cleanup will be so much quicker and easier.
This is the scale that I recommend for home use. I have owned and used one for years.
Bakery-Style Cheese and Fruit Danish
Ingredients
For the Cheese Filling
- 150 grams cream cheese 5.3 oz or about 2/3 cup, well-softened
- 45 grams granulated sugar 3 Tbsp + 2 teaspoons
- 1 egg yolk
- ½ tsp vanilla extract
- pinch salt Kosher salt or fine salt will work here. Just a little pinch, because we're not making a ton of filling
- lemon zest from 1/2 medium lemon
For the Jam Filling
- 150 grams jam or preserves 5.3 oz or a slightly generous 1/2 cup, your choice of flavor, homemade or store-bought
- 2 grams cornstarch about 3/4 teaspoon
For the Streusel
- 56 grams butter 2 oz or 4 Tablespoons, at cool room temperature
- 56 grams granulated sugar 2 oz or a slightly generous 1/4 cup
- 112 grams cake flour 4 oz or a scant 1 cup
- pinch salt just a wee pinch
For Shaping and Baking
- 1 master Danish dough recipe For reference, I gave this batch 3 simple folds and 1 book fold. Use the laminating schedule that works for you.
- cheese filling above
- jam filling above
- 4 tbsp egg wash 1 egg whisked with 1 teaspoon water, and a tiny pinch of salt
For the Heavy Syrup
- 100 grams sugar 3.5 oz or about 1/2 cup
- 50 grams water 1.75 oz or a scant 1/4 cup
For the White Icing
- 100 grams confectioners sugar 3.5 oz or 1 cup minus 2 Tbsp
- 18 grams water a generous 1 Tbsp
- 6 grams corn syrup about 1 teaspoon
- pinch salt tiny pinch–this is a small amount of icing
- 4 grams vanilla extract about 1 teaspoon
Instructions
To Make the Cheese Filling
- In a medium bowl, whisk the softened cream cheese together with the sugar, egg yolk, vanilla, lemon zest, and salt until smooth.
- Transfer to a piping bag or a zip-top bag, and set aside in the fridge until needed.
To Make the Fruit Filling
- In a small bowl, whisk the jam together with the cornstarch. The mixture will look a little hazy but it will clear up in the oven as the cornstarch gelatinizes.
- Transfer to a piping bag or zip-top bag, and set aside until needed.
To Make the Streusel
- In a small bowl, combine the softened butter, sugar, cake flour, and pinch of salt, and rub between your fingers until no large lumps of butter remain and the streusel has a sandy texture. Set aside.
To Shape and Bake
- Cover a half sheet pan with a piece of parchment. Set aside.
- On a lightly floured surface, roll the chilled Danish dough into a rectangle approximately 12" wide by 20" long. Trim the edges with a pizza cutter or sharp knife to straighten them and expose the laminated layers.
- Cut the rectangle in half crosswise to make two rectangles, each approximately 12" / 30cm wide by 10" / 25 cm tall. Transfer them to your parchment-lined baking sheet, leaving a little room between them for expansion.
- Working with one rectangle at a time, fold the two long sides inward toward the center, creating a narrow channel about ¾" wide down the middle. Press the folded edges gently to help them stay in place. Lightly moisten with water or egg wash if needed to help the dough stick.
- Pipe or spoon a generous stripe of cheesecake filling down the center channel of each Danish, dividing the filling evenly between the two pastries. You may have a bit leftover. I trust you to find a use for it.
- Pipe or spoon the thickened preserves along either side of the cheese filling, creating three distinct stripes: fruit, cheese, fruit. Divide the preserves evenly between the two pastries.
- Scatter a small handful of streusel over the fillings, reserving some to add just before baking if desired.
- Cover loosely and let rise in a warm, draft-free spot for about 45–60 minutes, or until noticeably puffy and relaxed. The dough should look lighter and slightly expanded rather than dramatically doubled.
- While the pastries proof, set a rack in the center of the oven, and preheat to 425°F (218°C).
- Once proofed, gently brush the exposed pastry with egg wash, taking care not to flood the cut edges or the fillings. Optionally, add any reserved streusel. Most of it will have "melted" into the filling. That's fine–it's there, in part, to keep the filling in place. If you want bountiful streusel, add some or all of what remains.
- Place the baking sheet in the oven and immediately reduce the temperature to 375°F (190°C). Bake for 20–25 minutes, or until the pastry is deeply golden brown and the center registers 195-200°F / 91-93°C. My Danish took about 23 minutes, so keep an eye on yours.
- As soon as the Danishes are done, remove them to a cooling rack and give them a good brushing with the heavy syrup. (procedure below)
- Allow the pastries to cool to room temperature, and then drizzle some white icing over them as a razzle dazzle finish. (procedure below)
To Make the Heavy Syrup
- While the Danishes are baking, heat the water and sugar together in a small pan until it reaches a boil. Allow it to boil for about 20 seconds, and then remove from the heat. Keep warm.
To Make the White Icing
- While the Danishes are cooling, add all ingredients to a small saucepan.
- Whisk over medium heat until smooth and the glaze is warm, about 100°F / 38°C.
Did You Make Any Changes?
Nutrition
Would you like to save this post?


Join in Today!