
Laminated Danish dough has a reputation for being fussy, exacting, and best left to professional bakers. But while there are certainly ideal ways to laminate dough, there’s a ton of wiggle room between textbook-perfect layers and abject failure.
In this tutorial, I’ll show you how to make a rich, buttery Danish dough using very soft butter that you spread directly onto the dough—no carefully shaped butter block required. I’ll also show you what to look for as you roll and fold, how to tell when your dough needs to chill or warm up, and what to do when your butter misbehaves. You gotta watch butter like a hawk.
Even if you don’t laminate with textbook precision, you can still make Really Good Danish. Your layers may not all be perfectly even, but your pastry will still be buttery, tender, flaky, and absolutely worth making. Relax. It’s not that deep. You’ll be fine. Now let’s go.
Pastry Chef Online Participates in Affiliate Programs. If you make a purchase through one of my links, I may earn a small commission. For more information click to read my disclosure policy
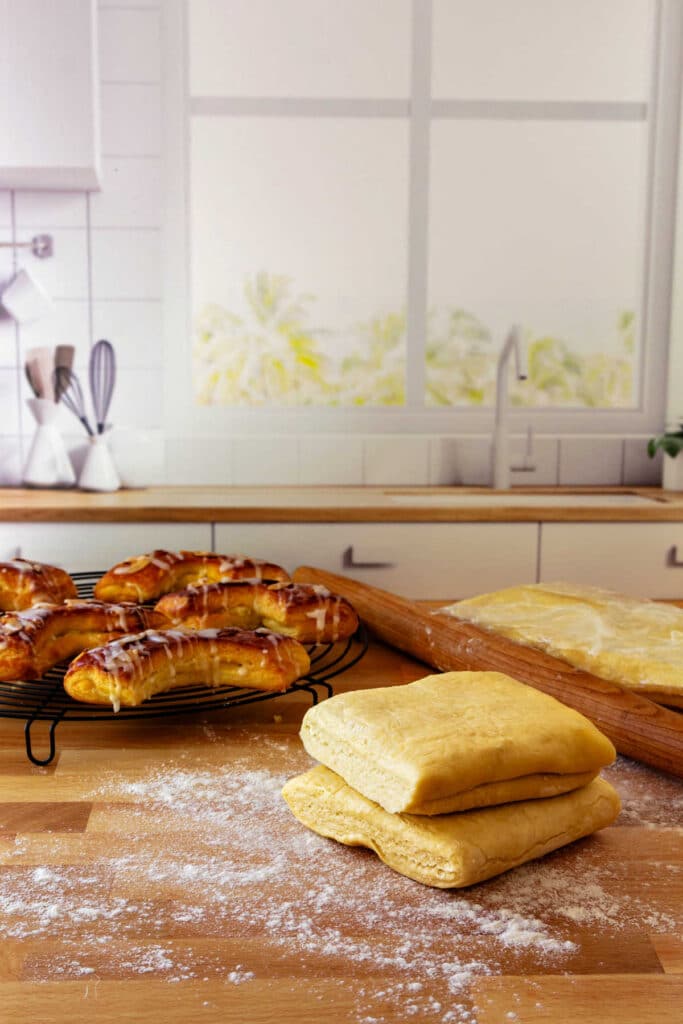
Danish Pastry, At a Glance
✅Skill Level: Confident Beginner or Intermediate
✅Skills: Making Yeast Dough, Lamination
✅Type: Laminated Pastry Dough
✅Number of Ingredients: 11
✅Prep Time: Danish shape-dependent
✅Chill Time: overnight
✅Cook Time: 20-40 minutes, depending on shape
✅Yield: about 1 pound, 6 oz of Danish dough
Jump Straight to the Recipe
Why You’ll Love This Danish Dough Recipe
The bones of this recipe come from my culinary school textbook, so it definitely starts with street cred thanks to Wayne Gisslen’s expertise. Then, it gets the PCO treatment, which means that I tell you what the ideal is while also telling you what will work. Those two Things are not the same, because successful pastry lamination exists on a continuum. If you want to shoot for perfection, you can. If you want to shoot for good enough for Sunday brunch, I can help with that too.
The dough is enriched with eggs, egg yolk, sugar, butter, and powdered milk. Using powdered milk gives you the benefits of milk solids without adding additional liquid to the dough.
The dough by itself is slightly sweet and almost brioche-like. Rolling in layers of additional butter allows the pastry to puff up in the heat of the oven, delivering that difficult-to-achieve flaky AND tender thing that sets laminated dough apart from its unlaminated, slightly less glamorous cousins.
Ingredients and Ingredient Function
The dough portion of laminated Danish pastry (détrempe) is pretty straightforward, but every ingredient is there for a reason. For those of you who love knowing why each ingredient is there, let’s go over all the ingredients and how they work in this dough.
If you’re ready to jump right in, you can skip down to the recipe.
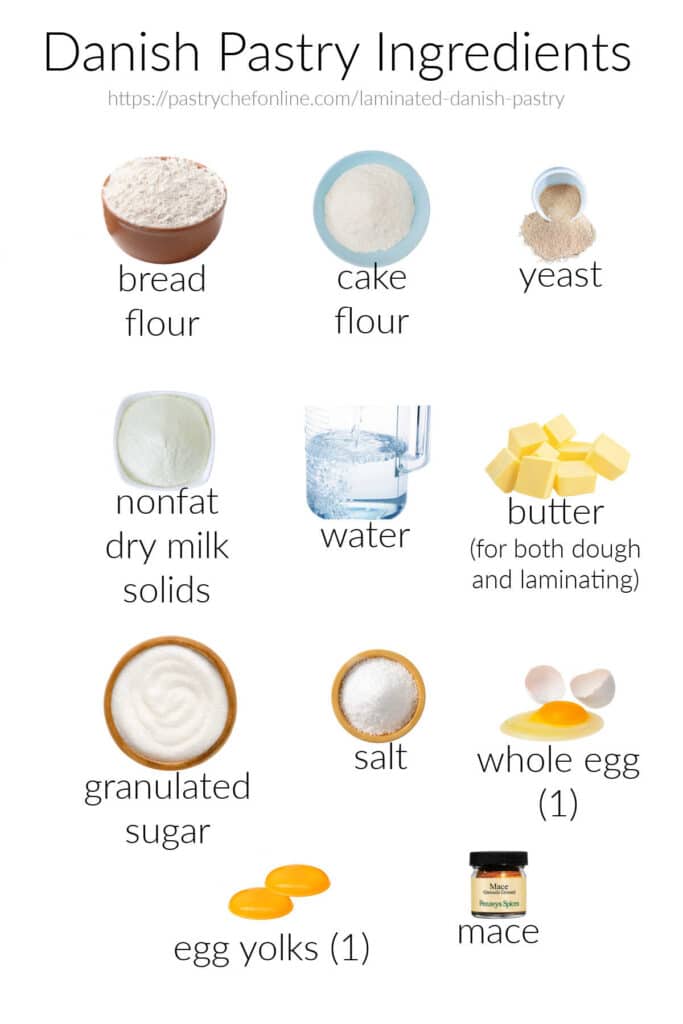
- bread flour: The majority of the flour in the recipe, the high protein in bread flour allows for significant gluten development. It’s needed for structure when laminating.
- cake flour: Cake flour is bleached and is lower in protein. In this recipe, it helps to bring the overall gluten amount down and allow for a tender bite to your pastries. If you don’t have cake flour or bread flour, substitute all-purpose flour for the total amount of flour.
- salt: Helps to round out the flavor of the dough as well as regulating yeast activity and strengthening the gluten network.
- sugar: Provides sweetness and tenderness while assisting with browning.
- nonfat dried milk solids: provides milky sweetness and some protein. It also assists in browning.
- water: provides the liquid for the recipe, allowing gluten formation and workability. Along with the milk solids, it helps to “play the part of milk” without having to scald whole milk.
- yeast: Allows the dough to rise as it digests carbohydrates in the dough and expels carbon dioxide. I use instant yeast and add it to the dry ingredients. You may also use active dry yeast. If using active dry, heat the water to a comfortably warm temperature and stir in the yeast as well as 1 teaspoon of the sugar from the recipe. Wait for it to get foamy before proceeding.
- whole egg: Provides water, fat, and protein for additional structure and emulsification.
- egg yolk: Provides a touch more richness and adds a little additional color to the dough. The yolk also assists in browning. The extra emulsifiers keep the dough smooth and silky.
- butter: Appears twice in the recipe: For richness and to carry flavor in the dough itself. A second amount is also what gets laminated during the folding process. Lamination is what allows the dough to puff beautifully in the oven.
- mace: Just a little bit brings that “why is this so delicious?” factor to Danish dough. You may substitute nutmeg.
How to Make Laminated Danish Dough
Laminated pastry has two parts: the dough itself (called the détrempe, but that doesn’t really matter), and the butter that gets laminated between layers of the dough. That part is called beurrage, which also doesn’t matter unless you play trivia.
How you get the butter part into the dough part to start the rolls and folds can be argued until the cows come home, but the truth is you just have to get it in there, and there are many ways to do it.
In my puff pastry tutorial, I use the fairly classic “make a block of butter and wrap it up in the dough like a letter in an envelope” technique. That absolutely works.
In this recipe, I show you an easier way that yields very similar results.
Once you get the butter In There, you need to repeatedly roll the dough out and then fold it to create the layers, and there is no one right number of layers or even types of folds. Yes, there are the classic numbers and types, and you can end up getting carried away and make too many layers, but I’ll give you some rules to keep you in check.
So relax and understand that laminating dough is not as difficult or even as exacting as many would have you believe.
In a nutshell, here’s what you do:
- Make the dough and knead it a little while.
- Enclose the butter in the dough.
- Roll, fold and chill as needed.
- Chill overnight.
- Make Danish, pretty much any kind.
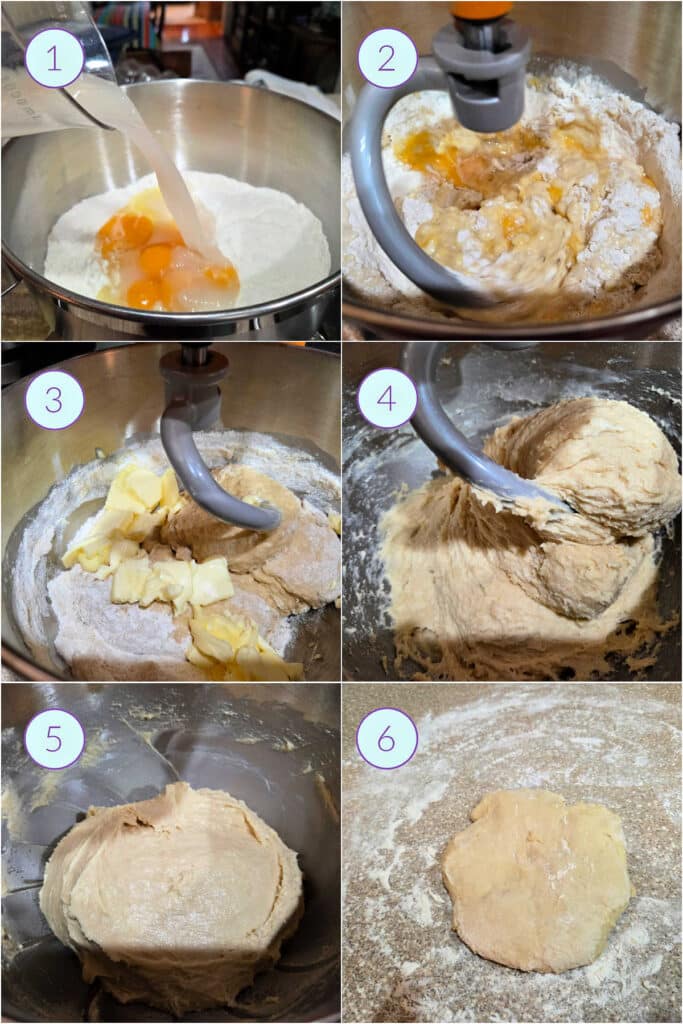
- All the ingredients except the butter go into the bowl of your stand mixer.
- Mix with the dough hook just for a minute or two to get things going.
- Add the softened butter, cut up into little pieces so it’s easier to incorporate.
- Knead for 4-5 minutes. You don’t need to fully develop the gluten since you’ll be doing a bunch of rolling and folding, which effectively finishes the kneading process.
- You should have a shiny, slightly sticky dough that is mostly smooth.
- Flour the counter fairly well and then sprinkle a bit more flour on top of the dough. That will make rolling it out much easier.
Jenni Says: Have some extra flour as well as your bench scraper handy to assist you in making some of the folds, especially the first couple. As you continue to laminate, the dough will firm up and smooth out, becoming much easier to work with.
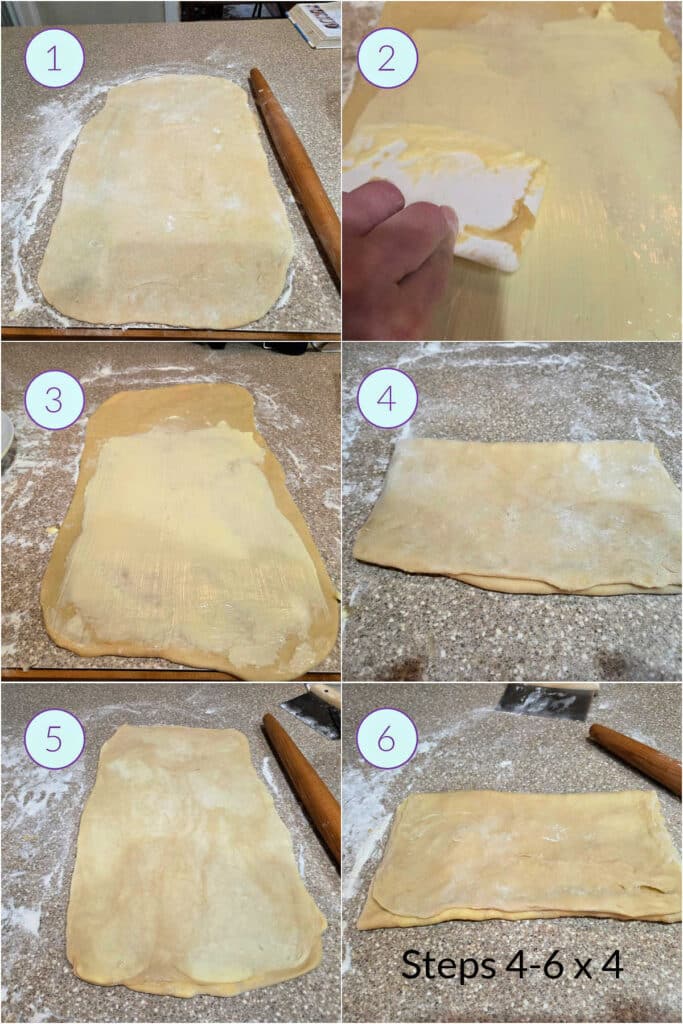
- Roll the dough into a long, thin rectangle. I shoot for about 18-20″ / 47-50 cm long and about 12″ / 30 cm. My rolling pin is 18″ long, so rather than busting out a slide rule, I use that known measurement to eyeball the dimensions of the dough.
- Use an offset spatula or plastic dough scraper to spread a thin, even layer of butter over the bottom 2/3 of the dough.
- Make sure to leave about an inch / 2.5 cm of clearance on the sides. You can spread it all the way down to the bottom with no margin.
- Fold the bottom third of the dough up, like you’re folding a letter. This effectively doubles the thickness of your butter. Fold the top third down to enclose the butter. Try to line up all the edges as closely as you can while still admitting you’re human and are allowed to make mistakes.
- Take that packet of butter, turn it 90°, and roll it out to 18-20″ x 12″ / 47-50 cm x 30 cm.
- Fold in thirds like a letter. Congratulations, you have just completed one “turn” of your Danish pastry. Repeat the rotating by 90°, rolling into a large rectangle, and folding in thirds three more times for a total of four turns for the traditional four-turn method.
Jenni Says: As I mentioned earlier, you can sprinkle a little additional flour under and over the dough as you make the first couple of turns. But since we want the layers to adhere to each other, be sure to brush off the additional flour before making your folds.
How Many Turns Does Danish Dough Need?
Traditionally, you need four letter turns to make properly laminated Danish dough.
But, guess what? You can make more or fewer, and you can even introduce book folds.
I tested three lamination “schedules,” and all gave me great results and allowed me to choose different doughs for different applications.
Here are the lamination schedules I tested:
- Three simple folds plus one book fold (more layers than traditional)
- Four simple folds (traditional)
- Two simple folds and one book fold (fewer layers than traditional)
I don’t want you to get too hung up on the number of folds, because as long as you make at least 2 book folds or 3 simple folds, you’ll have a workable dough that will puff nicely in the oven.
What’s a Book fold?
A book fold is when you roll out the dough into a long, thin rectangle and fold the top halfway down and the bottom halfway up until they almost meet in the center. Then fold the top over onto the bottom, lining up the corners as evenly as possible.
Danish Pastry Dough Troubleshooting
There are a few ways that your dough can misbehave, and I have suffered them all and lived to tell the tale.
Would you like to save this post?
I am here to tell you that Danish pastry isn’t quite as precious and exacting as some might have you believe. Yes, there is the ideal, and then there’s a busy home kitchen, so here are some of the Things that can happen and how to either a)prevent them from happening or b)mitigate them before they become Very Big Problems.
What To Do If the Butter Is Too Soft
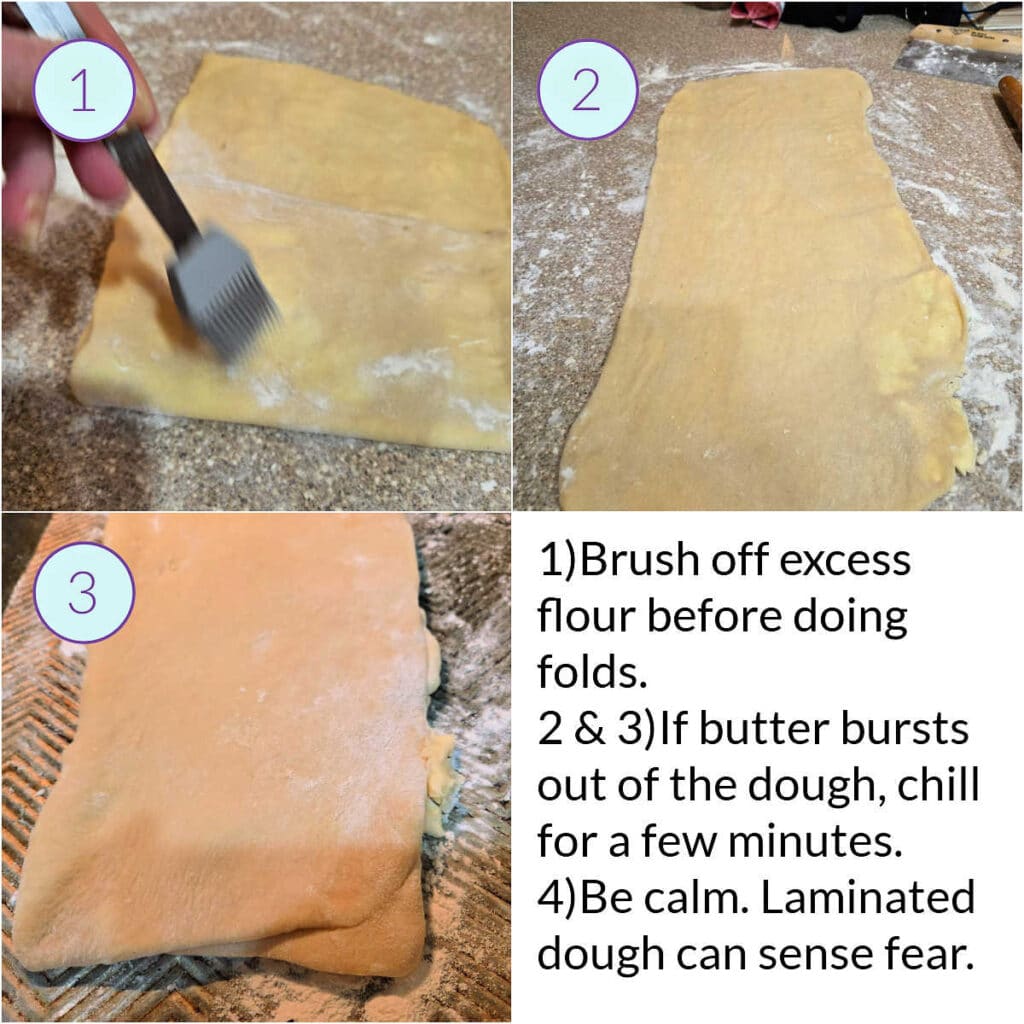
- Don’t forget to brush your excess flour off between folds. Look at me up there, making a storied book fold and brushing off the excess flour before rolling. So far, so good, right?
- And then when I rolled into my long rectangle, just look at all the soft butter that “guished” out the side?
- Take a deep breath, fold the dough, cover it with some plastic wrap and refrigerate it for about 15 minutes or so or until the butter is still soft but not wet or slippery.
- Read that again: Brush off excess flour before doing folds. If butter bursts out of the dough, chill it for a few minutes. Be calm. Laminated dough can sense fear.
Jenni Says: The best way to patch a spot where butter breaks through your dough is to dust it with a little plain flour. Pat the flour onto the exposed butter and gently smooth it over the area with your fingers. This helps absorb surface moisture and makes the dough easier to handle so you can continue laminating without making a big production out of the mishap.
What to Do if the Butter is Too Hard
There are a couple of issues that can come up if your butter is too hard.
If the butter you spread on initially is too hard, you can tear the dough and create a mess.
And if the butter gets too cold during any resting time in the fridge, you can end up with the butter sheet separating into flakes when you roll it.
Here are some images that will hopefully help you prevent these issues.
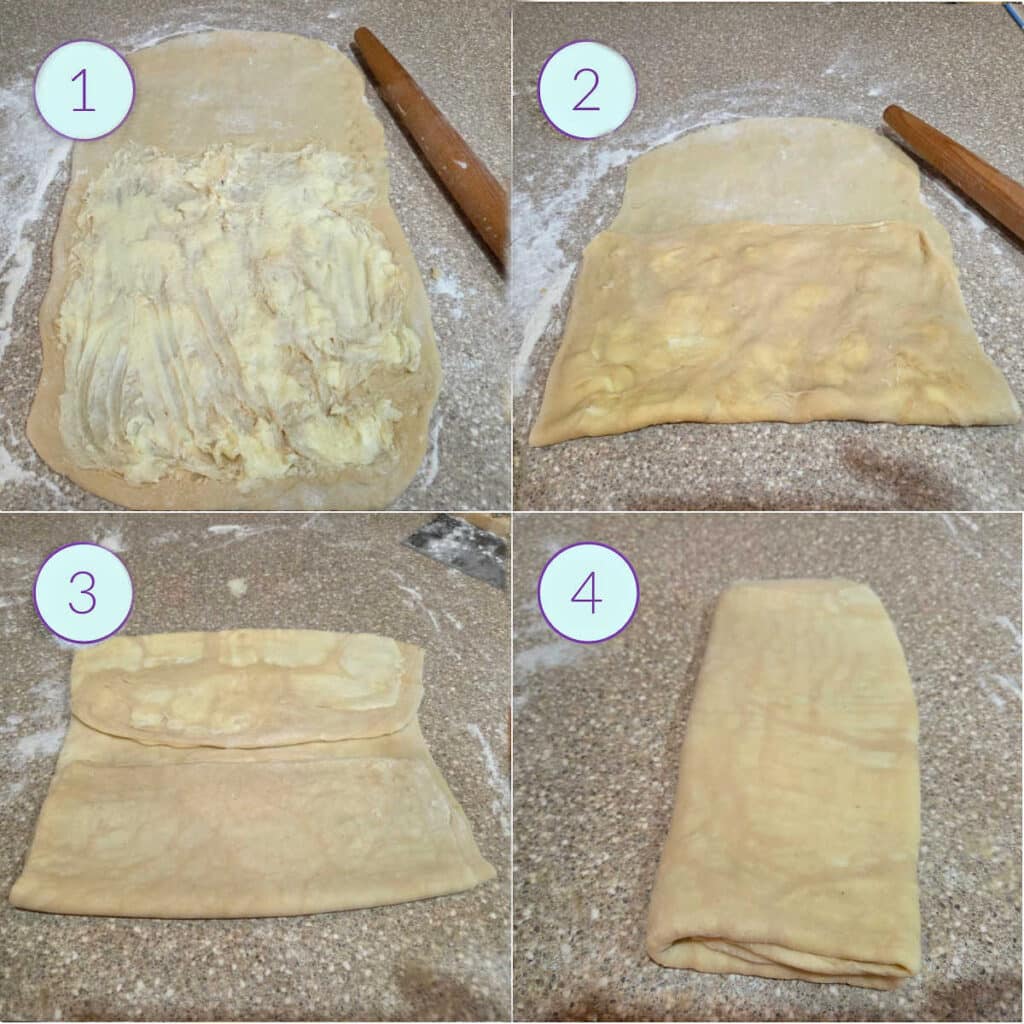
- Look at that butter! It is obviously too hard, and trying to smear it does no one any good, least of all that poor dough. If your butter is too firm to spread smoothly, let it soften until you can spread it easily without tearing the dough.
- This is what happens when you throw caution to the wind and decide to carry on, even if the butter is too firm. The audacity of just crossing your fingers and going for it doesn’t necessarily mean abject failure. It’s just more likely to lead to uneven lamination and uneven puffing. The moral of the story: butter texture is important. If it’s too cold, let it warm up.
- In this photo of a book fold, you can see that there is more butter (or at least thicker butter) in the top half than in the bottom, and it’s “chunky” rather than one large sheet of butter. Again, this is because the butter was not soft enough before rolling. And using butter that is too hard is arguably a bigger deal than using butter that is too soft, because once the butter breaks into flakes, you probably won’t get perfectly even layers again. But subsequent rolling and folding will flatten and distribute those pieces, and you’ll still get plenty of lift.
- This piece of dough has had two simple folds and one book fold. And you can see the butter is still uneven. If this happens to you, and you didn’t catch it before you started rolling/folding, know that it’s best used in a layered pastry like a morning bun. Even if the dough doesn’t puff evenly, rolling it into a coil gives you lots of overlapping layers in the finished pastry. So while you might not get picture-perfect Danish pastries with this sort of “mottled” Danish dough, you will still have homemade Danish, which is more than most folks can say!
How to Know the Dough is Ready to Roll
The last step of making Danish dough is to refrigerate it overnight, allowing for the butter to really firm up while the yeast slowly does its fermentation in the dark of the fridge.
So when you pull it out to start rolling it to make your favorite Danish shape/s, you want to make sure that the firmness and malleability of the dough and the butter are about the same so that they will smoothly roll out at the same rate. This preserves the lamination and gets us about as close to perfect as you can get in the home kitchen.
The best way I know to test this is to gently poke the dough. If you feel “hard bits,” the butter is still too firm. When the butter has had a few minutes to temper, when you poke the dough, it will feel like one cohesive mass. It may feel slightly tacky, but it won’t be sticky. It should also roll out easily with minimal pull-back.
For me in my fairly cool kitchen, about 30 minutes is plenty of time to make sure the dough is workable. The poke test hasn’t failed me yet!
What to Make with Danish Pastry Dough
NOTE: Individual posts coming very soon. I promise not to leave you hanging!
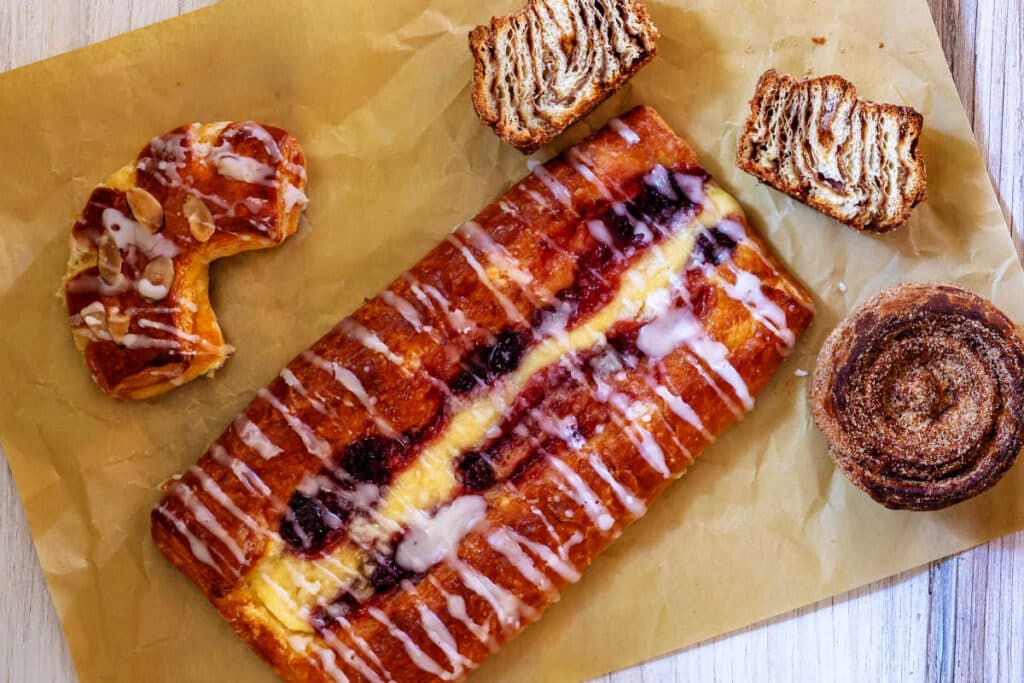
Once you have mastered Danish pastry, you can make all sorts of Danish pastries from pinwheels to simple rounds filled with a dollop of jam or custard to Danish kringle.
In this particular PCO Danish Pastry Unit, I used 1 batch each to make 8 bear claws, 2 Entenmann’s-style cheese and fruit Danish pastries, and 6 ginormous, sugar-encrusted morning buns.
For reference, here’s which lamination schedule I used for which pastry, and why.
- bear claws: I used the dough made with four simple folds, which is the traditional lamination schedule. I chose this dough for this shape because it gives a nice, even rise with a fine, tender crumb. The layers are fairly fine so there is a nice bit of “crackle” when you bite into one while having a soft, buttery interior.
- Danish cheese and fruit strip: This one, I used the one with the most layers (and therefore the thinnest layers), because I wanted something that would puff evenly and brown beautifully without a lot of “crackle.” The three simple folds and a book fold schedule gave me a dough in which the layers were so thin that it acted like a brioche dough.
- Morning Buns: I used the two simple folds and one book fold schedule partly because I wanted fewer, more substantial layers that would create a dramatic coil. And also, since this was the dough I “ruined” by not letting my butter soften enough, I knew coiling the dough would mitigate and spread out the uneven pockets. The results were pretty spectacular, so know you’ll always have a use for not-perfect Danish dough!
Make Ahead, Refrigeration, and Freezing
Danish dough can be refrigerated for up to two days total, including any refrigeration before and after lamination. Plan to make it at least the day before you want to shape and bake it.
If your schedule is busy, you can certainly make the dough and refrigerate it overnight before adding the butter and laminating it. Then, after laminating, it can be refrigerated for up to a full day before shaping and baking.
If you want to make and laminate the dough and then freeze for later use, know that it might take a bit longer to proof once it has thawed.
If you do need to freeze your dough, wrap it well in plastic wrap and foil, and store it in a zip-top freezer bag or other freezer-safe container for up to 2 months. To thaw, transfer the dough to the fridge the day before you need to roll it. Give the dough the poke test once you unwrap it to see if it’s ready to roll. If not, cover it and let it rest on the counter until it has reached a workable consistency. And remember, after a long rest in the freezer, it may take the yeast a while to wake up.
Danish Dough Q & A
No, it’s not. If you can make dough, use a rolling pin, and fold things, you will be fine. Yes, you can be exacting and precise, and that will yield a potentially ideal Danish pastry. In a home environment, my advice is to relax, enjoy and learn from the process, and make some lovely Danish dough so you can have homemade Danishes. A worthy and achievable goal.
Feel free to use all-purpose flour for the total amount of flour. The texture may be slightly different, but it will still laminate beautifully and taste great.
Butter can break through if it’s too hard or leak through if it’s too soft. If it’s for the former reason, pat a little flour over the exposed butter (brush off excess!), and then let the dough rest on the counter for a few minutes until the butter softens up and can be rolled at the same rate as the dough. If it’s for the latter reason, apply flour as before, and then refrigerate for a few minutes until the butter reaches a workable consistency.
The traditional folding schedule is four simple folds, but a little deviation does not necessarily hurt anything. You might choose to do a book fold and two simple folds, two book folds and a simple fold, three simple folds and a book fold, or be traditional and go with four simple folds. There is optimal, and then there is what you have time and patience for. And then there’s a little bit of judicious rule breaking.
Questions?
If you have any questions about this post or recipe, I am happy to help.
Simply leave a comment here and I will get back to you soon. I also invite you to ask questions in my Facebook group, Fearless Kitchen Fun.
If your question is more pressing, please feel free to email me. I should be back in touch ASAP, as long as I’m not asleep.
A Note About Measurements
My recipes are almost all written by weight, including liquids, unless otherwise specified.
For accuracy and consistency of results, I encourage you to buy–and use–a kitchen scale.
I promise that baking and cleanup will be so much quicker and easier.
This is the scale that I recommend for home use. I have owned and used one for years.
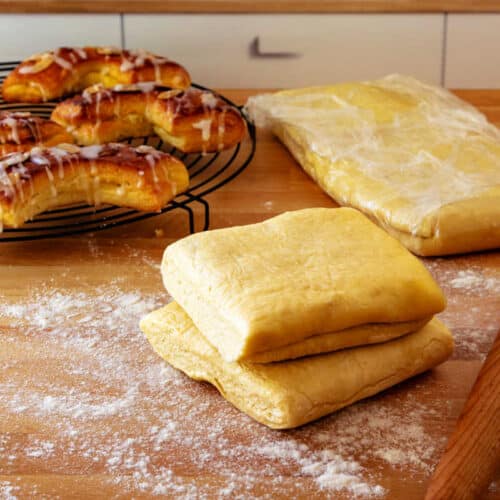
Danish Pastry Dough
Ingredients
For the Dough
- 100 grams water 3.5 oz or 1/3 cup plus 4 teaspoons
- 5 grams instant yeast 1 1/2 teaspoons
- 30 grams unsalted butter 1.1 oz or 2 Tablespoons plus 1 teaspoon, very soft
- 38 grams granulated sugar 1.3 oz or 3 Tablespoons
- 13 grams dried milk powder 0.5 oz or about 2 Tablespoons
- 3 grams kosher salt If using Morton's, use a slightly generous 1/2 teaspoon. If using Diamond kosher, use 1 teaspoon. If using fine salt, use a generous 1/4 teaspoon.
- ⅛ teaspoon ground mace sub nutmeg if you don't have mace
- 1 egg large
- 1 egg yolk large
- 200 grams bread flour 7 oz or about 1 2/3 cups
- 50 grams cake flour 1.8 oz or a slightly scant 1/2 cup
For Laminating
- 125 grams unsalted butter 4.4 oz or 1 stick and 1 Tablespoon, very soft
Instructions
Mise en Place
- Make sure all ingredients are at room temperature. The butter should be very soft and of an easily spreadable consistency.
- If using active dry yeast instead of instant yeast, warm the water to a cozy-warm-not-hot temperature of about 100-110° F / 38-43° C, and stir in the yeast as well as a teaspoon of the sugar from the recipe. Allow it to get foamy before proceeding.
To Make the Dough
- Add all the dough ingredients except the butter to the bowl of your stand mixer fitted with the dough hook.
- Mix on speed 1-2 for about 2 minutes until the flour has mostly been incorporated.
- Add the softened butter and knead on speed 4-5 for about 5 minutes. The dough will be much smoother than when you start, but it won't be completely smooth or cohesive. Worry not. All the laminating will take care of that.
- Cover the mixing bowl and let it rest in the fridge for about 1 hour.
To Get the Butter Ready for Laminating
- Cut the 125 grams of butter into small pieces and spread them out in a small-ish bowl so they soften quickly. I put mine in the cozy microwave with the oven surface light on so it will get very soft.
- Whisk the butter until it is uniform with no lumps and easy to spread.
To Add the Butter to the Dough and Complete the First Fold
- Remove the dough from the fridge, and pat it out on a well-floured surface. Sprinkle a bit of flour on top as well.
- Roll the dough into a long rectangle, about 18-20" x 12" / 47-50 cm x 30 cm. Use a bench scraper to make sure the dough isn't sticking, sprinkling on a bit more flour as necessary.
- Once the dough is the correct size, brush off any excess flour from the surface.
- Use a plastic dough scraper or an offset spatula to evenly spread the softened butter across the bottom 2/3 of the dough, leaving roughly a 1" border along the sides but spreading it right to the bottom edge.
- Fold the bottom third up over the butter so you can't see any peeking out above the fold. Then, fold the top third down over the first fold to make an envelope about 12" / 30 cm long and 6" / 15 cm tall. Pull the corners a little and try to line up the edges as evenly as possible.
- Voila, you have gotten the butter into the dough and completed your first fold.
To Laminate
- Take your dough envelope and rotate it 90° so it's 12" / 30 cm tall and 6" / 15 cm wide. Roll it out as evenly as possible to the target 18-20" / 47-50 cm x 12" / 30 cm size, paying attention to the consistency of the butter. If it seems a little soft, let it firm up in the fridge for a few minutes. If it seems too firm, let it sit at room temperature for a few minutes before continuing. If any butter starts to leak out, rub a little extra flour on the butter and keep going. Brush off any excess flour.
- Fold the bottom third up and the top third down like you're folding a letter, and square up the edges as much as you can. Admire your work.
- Rotate the dough packet by 90°, and complete the previous two steps two more times for a total of 4 "simple folds," including the fold you did when you initially incorporated the butter. Please see the main post for other types of folds and lamination schedules.
- Wrap the laminated dough in plastic wrap and refrigerate it overnight. You'll find that it will puff up somewhat overnight. That's a signal that your yeast is healthy and working.
- The next day, let the dough temper until the butter and dough are equally workable, using the poke test described in the post. Roll, trim, and shape according to your chosen Danish pastry recipe.
Did You Make Any Changes?
Nutrition
Would you like to save this post?
Have I Helped You Find Danish Dough Confidence? Please Rate and Review!
It helps me and other readers so much if you take a moment to rate and review this recipe.
Your star rating and comments help others decide whether the recipe is worth making, and your feedback helps me continue improving recipes here at Pastry Chef Online.
Other lovely ways to share include pinning or posting on your favorite social media platform.
Thank you so much for taking the time!


Hi, y’all! I hope you’ve enjoyed this post and hopefully also learned a thing or two.
If you like my style, I invite you to sign up for my occasional newsletter, The Inbox Pastry Chef.
Expect updates on new and tasty recipes as well as a bit of behind-the-scenes action. I hope to see you there!



Join in Today!