Today, I’m sharing a recipe requested by a reader: houska, a Czech bread served at Easter or Christmas, depending on family tradition.
While there is some debate about houska versus vánočka—houska being an everyday savory bread and vánočka a sweeter celebration bread—my reader grew up calling this sweet version houska, so that’s what I’m going with.
I’ll show you how to braid the dough and bake it into soft, lightly sweet, yeasted goodness. If you’re in an Easter bread mood, you might also enjoy my Cornish saffron bread or Armenian Easter bread. And now, on with my homage to Adrienne’s mom’s houska.
Pastry Chef Online Participates in Affiliate Programs. If you make a purchase through one of my links, I may earn a small commission. For more information click to read my disclosure policy
Houska, At a Glance
✅Skill Level: Intermediate
✅Skills: Working with yeast dough, plumping fruit, braiding dough
✅Type: Braided Czech Celebration Bread
✅Number of Ingredients: 10
✅Prep Time: 45 minutes
✅Rise Time: First rise: overnight, second rise: about 2 hours
✅Cook Time: 45-50 minutes
✅Yield: 1 large braided loaf serving around 12
Jump Straight to the Recipe
What Is Houska?
I know you’re here to learn to make houska (pronounced HOW-ske) and not sit through a full history lesson, so we’ll keep short and sweet:
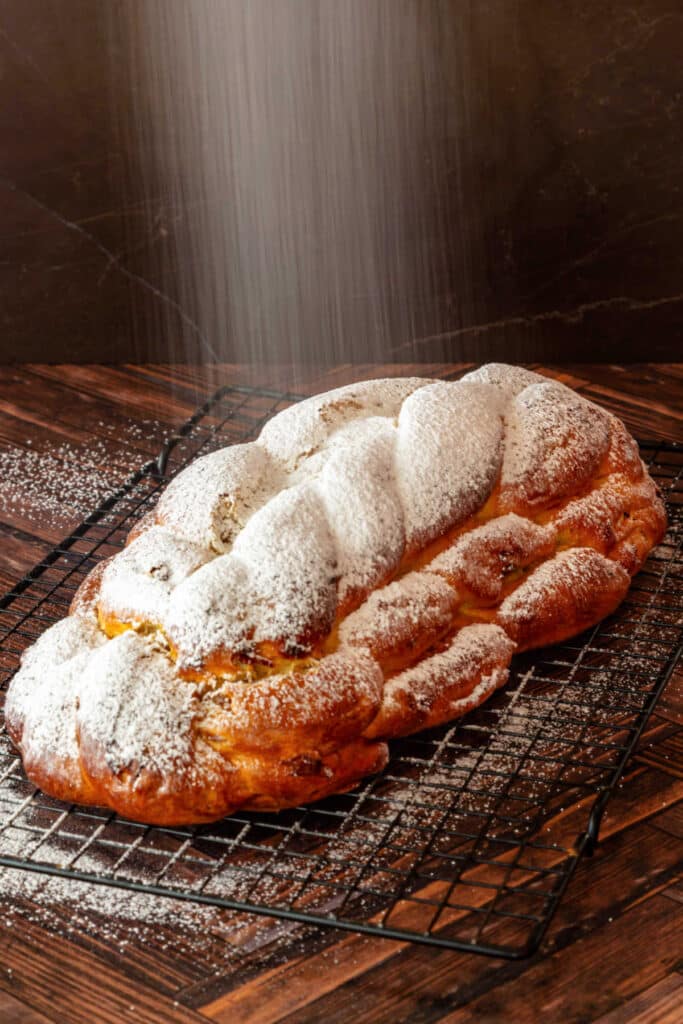
Houska is a Czech celebration bread, often served at Easter or Christmas, depending on family tradition. There are many variations, but most are based on an enriched yeast dough flavored with mace and lemon zest and studded with golden raisins and almonds.
The dough is typically braided, sometimes in two or even three stacked layers, and finished in different ways: drizzled with a sweet glaze, dusted with powdered sugar, or, if you’re reader Adrienne’s mom and prefer it toasted, left unadorned. The braid speaks for itself.
How to Make Houska
In this section, I’ll tell you the ingredients you need (along with any substitutions that will work for you), how to make the dough, shape and stack the braids, and how to finish the loaf after baking.
If you’re the type who likes to know the “why” behind the steps, this is for you. Since this bread was new to me, I did a fair amount of research, and I’ll share those sources in a resources section at the end in case you’d like to leap down a houska rabbit hole.
If an ingredient is linked, it’s to a deep dive about that ingredient and its function, should you need yet another rabbit hole!
Ingredients and Substitutions
Here are all the ingredients you’ll need to make houska. When possible, I will make note of substitutions.
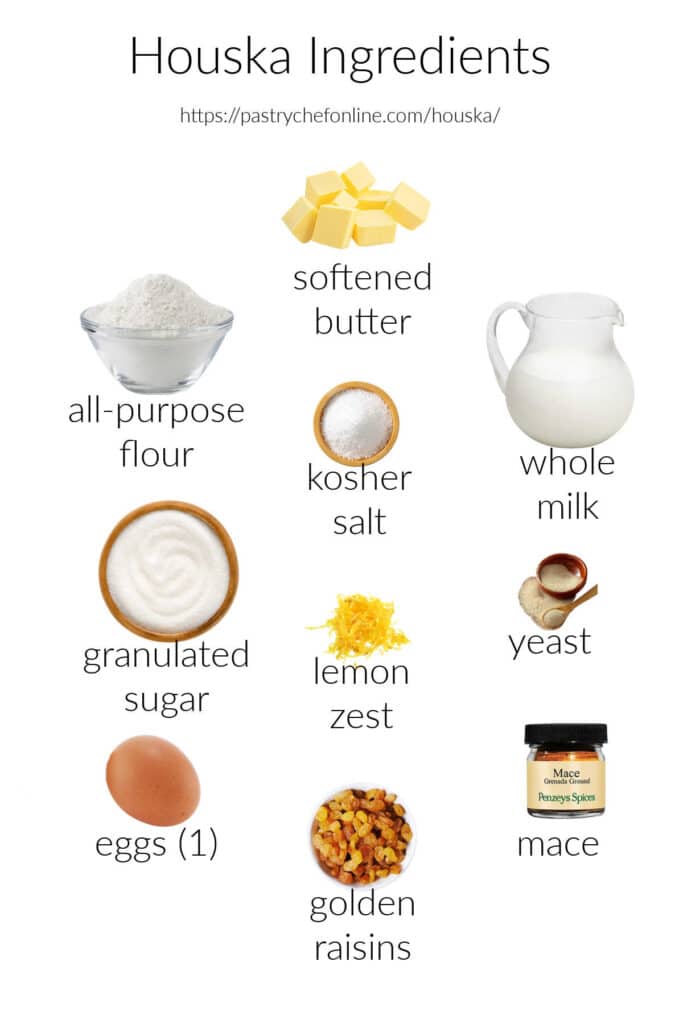
- all-purpose flour: provides the bulk and structure for the bread. I use and recommend King Arthur all-purpose, because it has a relatively high protein content at 11.7%. If using a different brand with a lower protein content, you may need to cut back slightly on the liquid.
- softened butter: butter adds richness, shortens the gluten, carries (and adds) flavor, and assists in browning. Unsalted butter is the way to go here as it’s the best way to assure correct seasoning when adding salt.
- whole milk: Scalded and cooled. Heating the milk to 185°F / 85°C deactivates the protein glutathione that can inhibit rise. Provides the bulk of the water in the recipe. Milk solids add flavor and assist in browning, and the lactose in the milk provides a subtle extra sweetness
- kosher salt: Salt regulates yeast growth to prevent a flabby dough. It also adds flavor and wakes up the flavors of lemon and mace
- granulated sugar: Provides a subtle sweetness, assists in maintaining moisture in the loaf, assists in browning and, along with the fat in the recipe, tenderizes the dough.
- lemon zest: Adds bright lemon flavor
- yeast: Leavens the dough by producing gas as it feeds on sugars. Use active dry or instant yeast. I keep instant yeast in the fridge and add it straight in with the other ingredients.
- eggs: Only one here. While some houska recipes call for multiple eggs and/or yolks, 1 does the trick just fine. The egg provides extra water (eggs are 75% water), some fats and emulsifiers for a supple dough, and assists in browning.
- golden raisins: Plumped in boiling water, drained, and patted dry. Raisins add pops of sweet, fruity goodness. They also inhibit mold growth and can extend the shelf life of the bread. Substitute any combination of dried fruits you like. I have even seen recipes using candied cherries, so do what feels right to you.
- mace: The brilliant golden-red filaments that encase nutmeg, mace has a more delicate flavor than nutmeg. It is traditionally called the cherry pie spice because it pairs so well with fruit. You may substitute nutmeg here, but since it has a more assertive flavor, cut back just a bit.
- almonds (not pictured): Sliced almonds are traditionally included in the recipe, and feel free to add them if you are a fan. Adrienne’s mom didn’t use almonds in hers because her kids didn’t like them, so I left them out too.
Making the Dough (Part I)
This section is huge and tells you exactly what to do and how to do it. I also give you visual and tactile cues so you won’t have any questions about whether you’re doing it right.
If you are comfortable with working with enriched doughs, you may not need all these instructions. You may skip ahead to the recipe if you’d like.
There are many different ways to make houska dough, and just about every recipe I studied used a slightly different method.
I found this particular approach in a houska recipe from the Home Baking Association (see Resources section). It works beautifully and yields a shiny, extensible, supple dough.
In a nutshell, here’s what you’ll do:
- Mix a portion of the flour with scalded and cooled milk, sugar, yeast, and salt. The mixture will look like pancake batter–a few lumps and all.
- Whisk the egg, mace, and lemon zest into the batter.
- Cut the butter into the remaining flour. I used my stand mixer with the paddle attachment, which was much easier than doing it by hand—especially if your hands complain like mine sometimes do.
- Pour the batter into the flour/butter mixture.
- Mix and knead until the dough comes together, then add the raisins and knead a bit more.
Here I’ll get more in depth information including visual and tactile cues so you can make this braid with confidence.
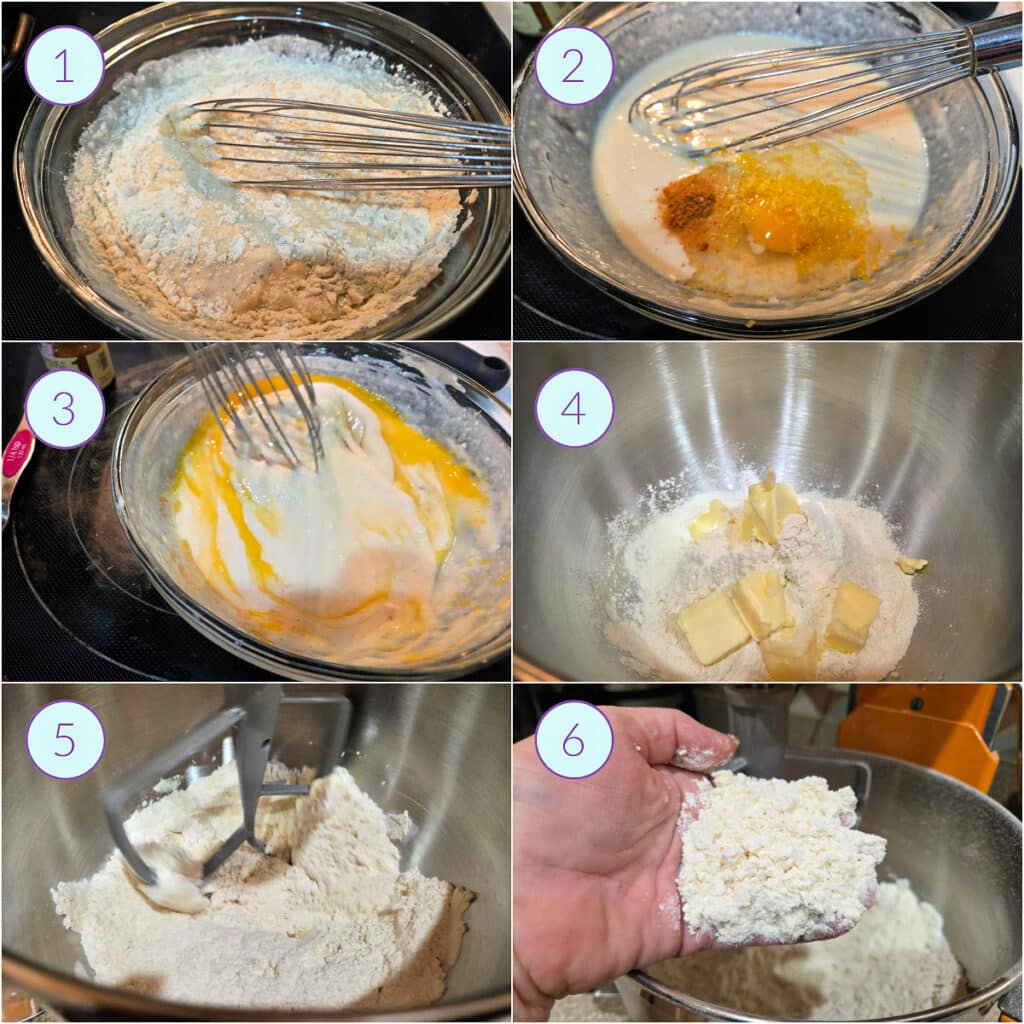
- Whisk about 1/3 of the flour together with the scalded and cooled-but-still-warm milk, sugar, salt, and yeast.
- Add the egg, mace, and lemon zest and…
- …whisk until you have a pancake-like batter. A few lumps are normal and nothing to worry about.
- In your stand mixer, combine the rest of the flour and the softened butter, cut into pieces.
- Mix on medium to medium-low speed for about 3 minutes, or until the flour looks like…
- …this. It should resemble pie crust or biscuit dough before adding liquid.
TIPS
Pour scalded milk into a bowl and cover it as it cools to minimize evaporation. If a little of the liquid does evaporate, add in a little of the raisin soaking water so the total amount is 8.5 oz.
Why cut the butter in like this when you could add it at the end or melt it and pour it right in? Cutting the butter into a portion of the flour coats some of the flour with fat. That coated flour can’t contribute to gluten development, which helps yield a softer, more tender, slightly cake-like bread. Fancy!
Making the Dough (Part II)
Would you like to save this post?
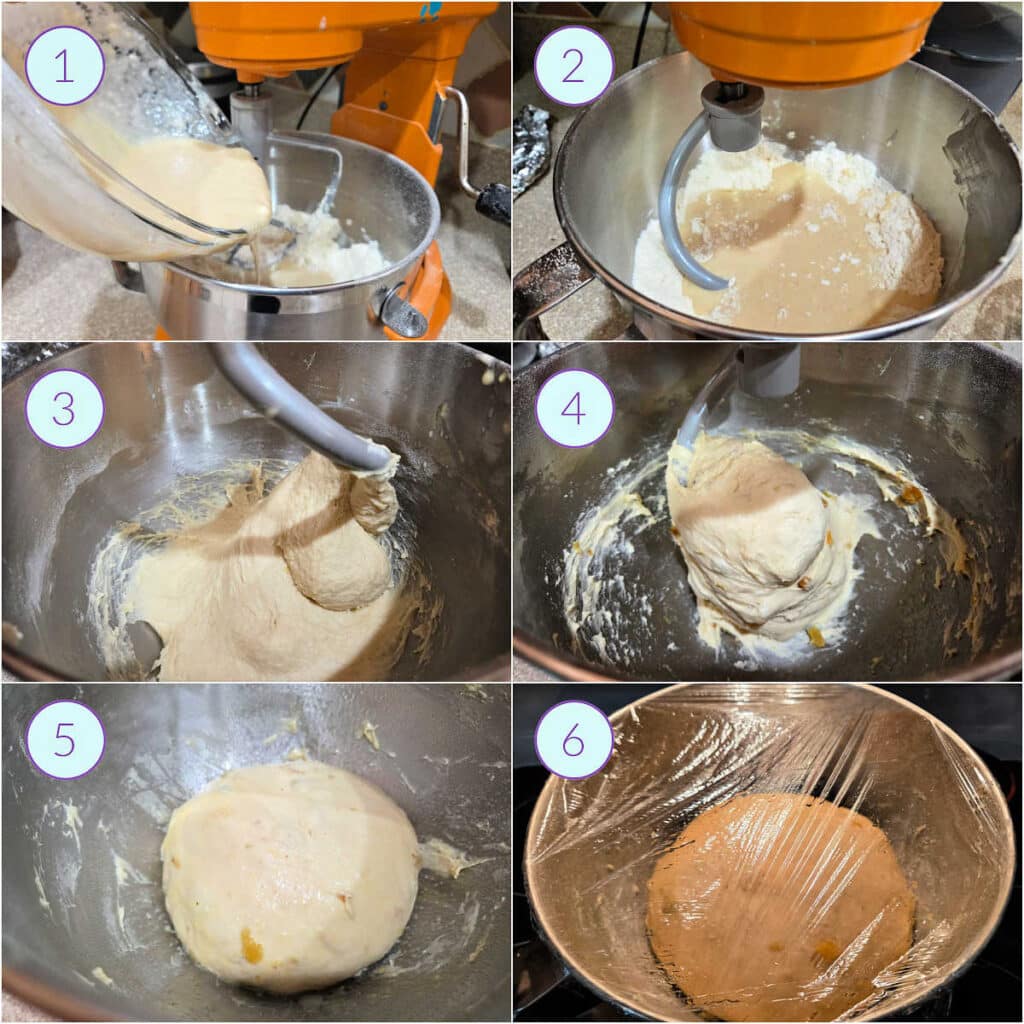
- Pour the batter into the flour mixture.
- Switch the paddle for the dough hook, and mix on low speed until all the flour is incorporated and you have a slack, messy dough. If you think it looks too messy, you’re doing it right.
- Then knead on medium speed for 9 minutes. Note most of the dough is sticking in the bottom and along the sides of the bowl. Worry not.
- Add the plumped raisins and knead for an additional 5 minutes. Note how much more cohesive the dough is now, with most of it clearing the sides of the bowl and only sticking a little in the bottom.
- Oil or spray your hands with pan spray, and gather the dough into a smooth ball. Oil it or spray it with pan spray, and…
- …cover it with plastic wrap to hang out in the fridge overnight.
TIPS
Total kneading time is 14 minutes. Start timing when you turn the mixer up to medium speed. Add the raisins during the last five minutes of kneading so they don’t lose their integrity and get smeared too completely into the dough. This would be the time to add nuts as well.
How does the dough magically tighten up while kneading? Did you add more flour? No, no extra flour. During kneading, gluten strands elongate and strengthen through agitation. Eventually, those elastic structures become strong enough to pull the dough away from the sides of the bowl. This usually starts to happen around the 11–12 minute mark, so be patient and resist the urge to add more flour.
The finished dough will feel very smooth, soft, and slightly tacky, but it won’t be sticky.
When baked, the crumb can almost be described as “feathery” as the long sheets of gluten you took the time to develop do their thing.
Shaping the Dough
Once you take the dough out of the fridge, it will be pretty firm and easy to work with. As you work the dough into ropes for braiding, it will soften up.
Resist the urge to flour your work surface. You want a clean, dry work surface so you can easily roll out the dough using friction from your hands and the surface.
Here’s what you’ll do:
- You have 2 choices here, and either is correct.
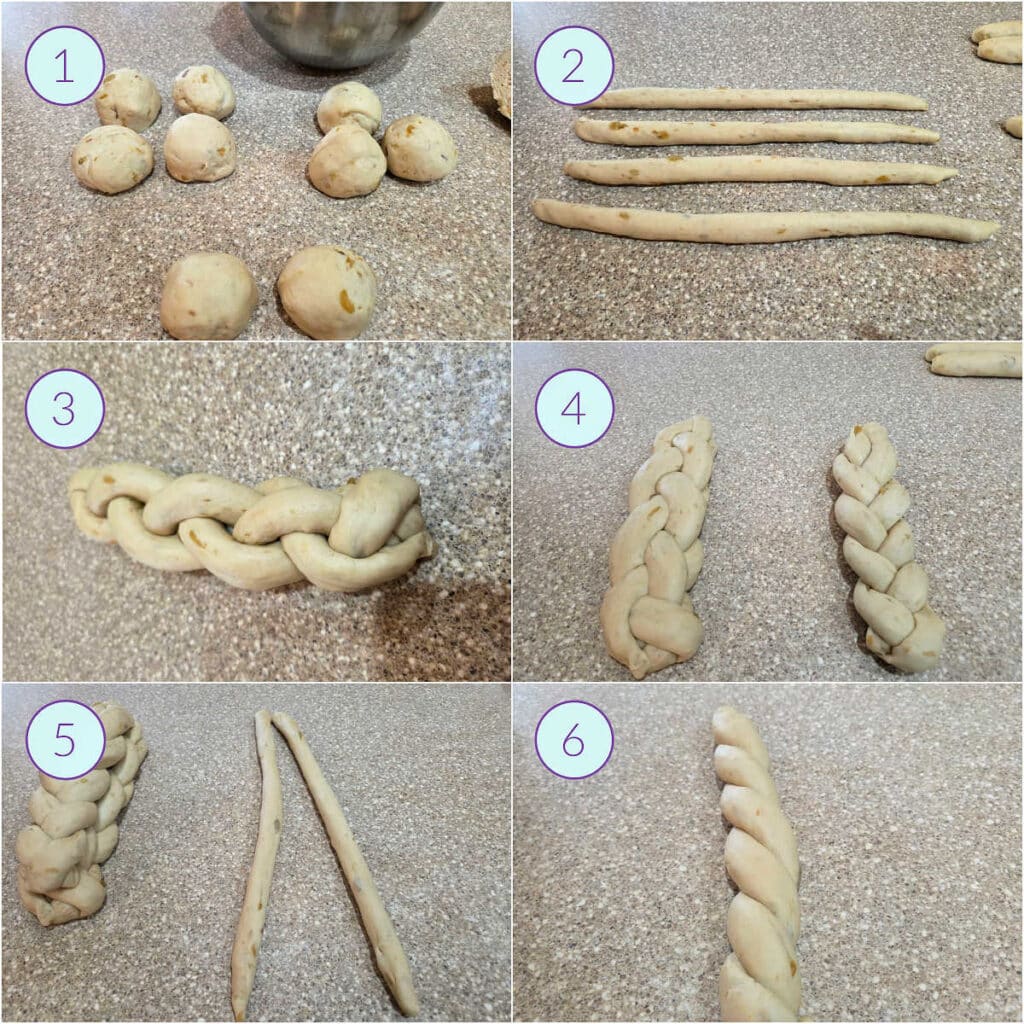
- divide your dough into 4 large, 3 medium, and 2 small pieces OR
- divide into 3 large, 3 medium, and 2 small pieces.
Keep pieces of the same size grouped together so you don’t get confused. Roll each piece into a smooth ball.
- Roll each ball into a rope about 16″ (40 cm) long. Do this in two stages: first roll each into a rope about 8″ (20 cm) long, then go back and roll them to the full length.
- Using either 3 or 4 ropes, braid them into the bottom layer. (See Resources section for excellent braiding tutorials).
- Press that braid down firmly to widen it a bit. Then braid the three medium ropes into a standard 3-strand braid and center it on top.
- With cupped hands, press the middle braid down fairly firmly so it stays in place.
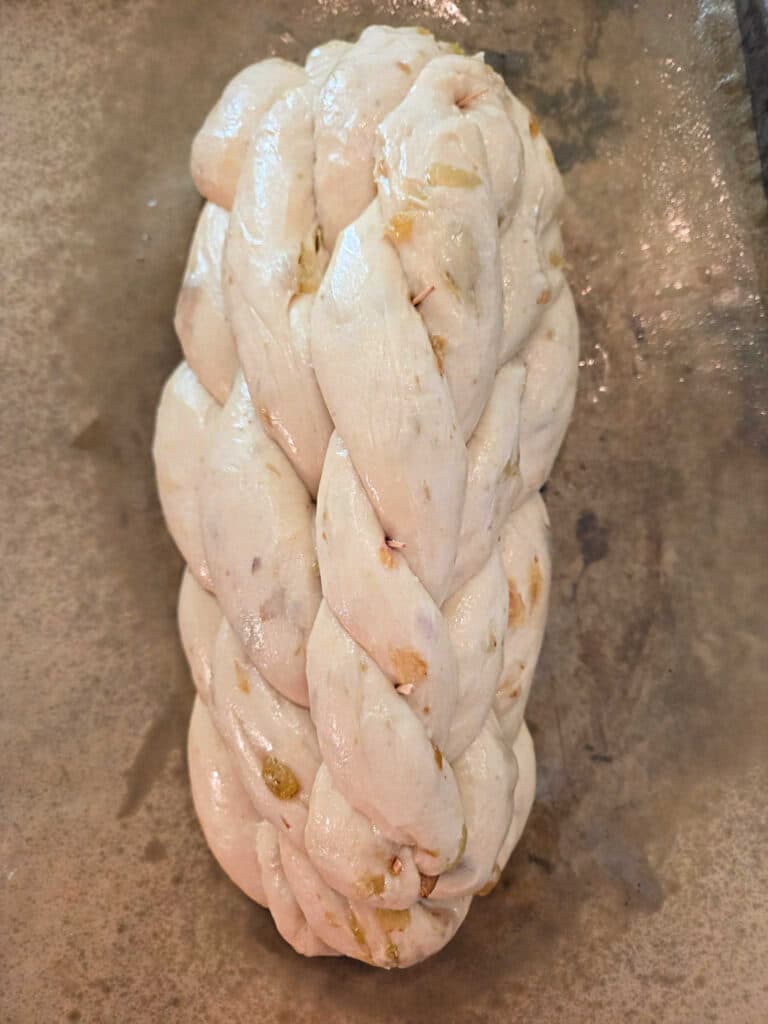
- Twist the two remaining small ropes together and center the twist on top of the middle braid. Cup your hands and gently press all three braids together.
TIPS
I didn’t measure my ropes, and you don’t have to either. As long as they’re all more or less the same length, you’re good to go.
Why are you making me roll the ropes in two stages? When you roll out gluten-full dough, it wants to snap back. Over and over again. This gets frustrating. Rolling in two stages allows the gluten to relax between rolls so it’s easier to roll to the final length.
Second Rise and Baking
Once you’ve assembled your braid, it is not a bad idea to use skewers or long toothpicks to help the loaf keep its shape while rising.
Try to put the toothpicks in spots where the braided ropes intersect, and make sure they stick out so you can remove them after baking. No one wants to eat a skewer.
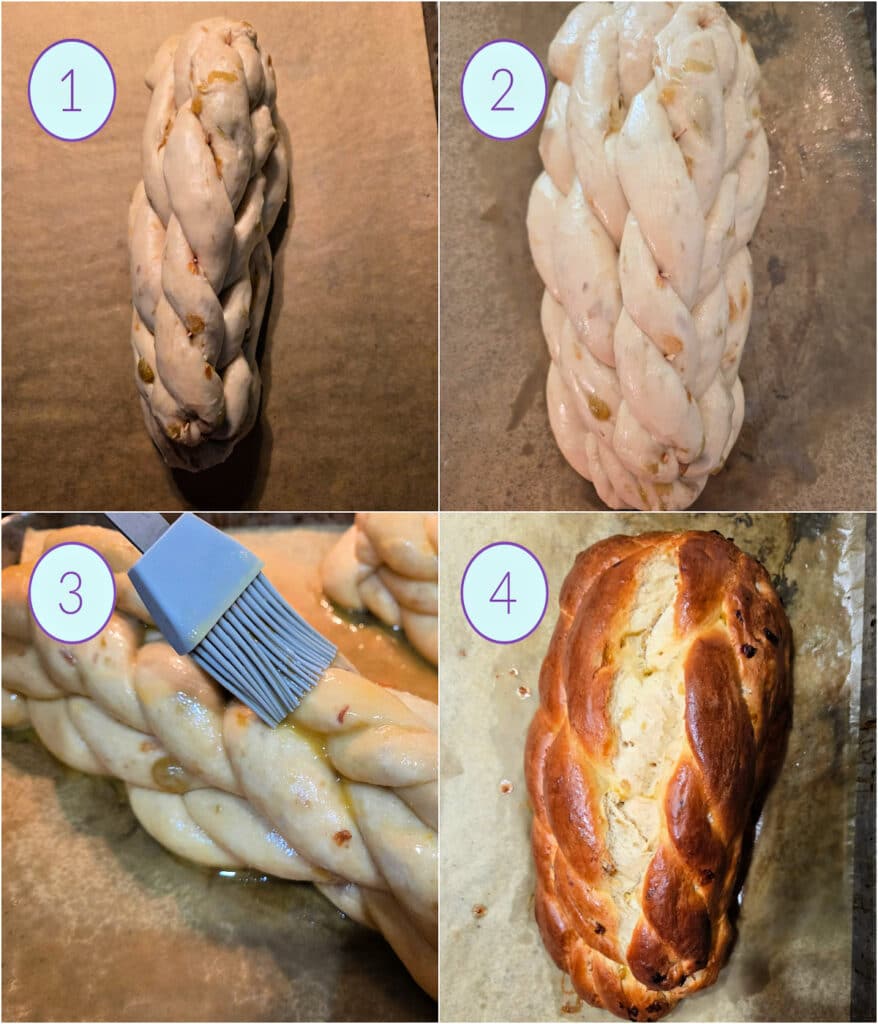
- Place the shaped (and optionally skewered) braid on a parchment-lined baking sheet. Spray lightly with pan spray, cover with plastic wrap, and let rise in a cozy spot for about 2 hours…
- …or until nice and puffy. The braid should wobble like set Jell-o when you gently shake the pan. It’s ready to bake!
- Gently but thoroughly brush with egg wash, a mixture of whole egg, a tiny bit of water, and a wee pinch of salt.
- Bake until deeply golden brown with an internal temperature of 195°F / 91°C. This loaf takes about 50 minutes to bake, so tent loosely with foil after about 30-35 minutes to keep it from overbrowning.
TIPS
You’ll see in the image above that, even with skewers, my top twist took a turn to the right. Sneaky. Very rarely will you get a perfectly stacked braid to rise and then bake up perfectly stacked. The skewers help, but they aren’t a magical fix.
Don’t skip the egg wash, especially if you’re not going to glaze or dust your loaf with powdered sugar. The egg wash gives the baked loaf a beautiful color and sheen. If you leave it off, or aren’t thorough, your bread will be much paler and duller, either in spots or all over.
Why does my bread look done when it’s not? Even when your braid appears beautifully golden brown on top, check its temp. Chances are it will need more time to reach 195°F / 91°C. It’s okay. Enriched, egg-washed breads brown quickly. To give the interior of the bread time to catch up, tenting the braid with foil deflects most of the radiant heat away from the top of your loaf so it stays perfectly golden brown.
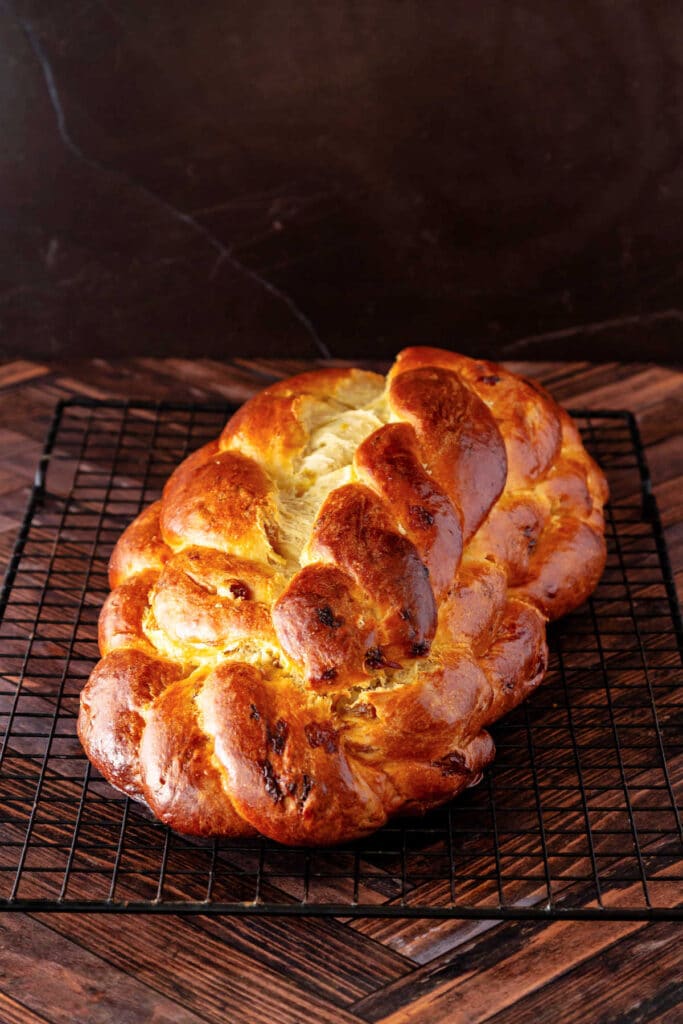
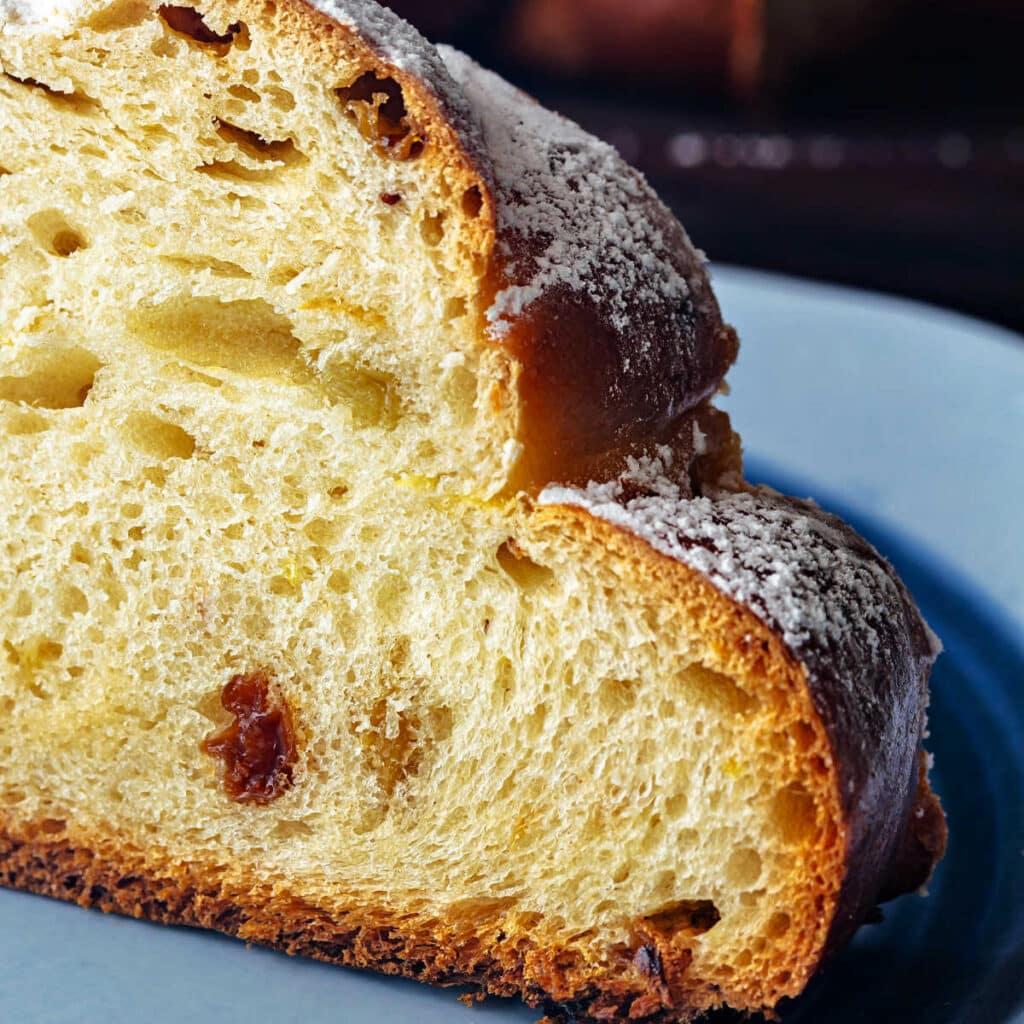
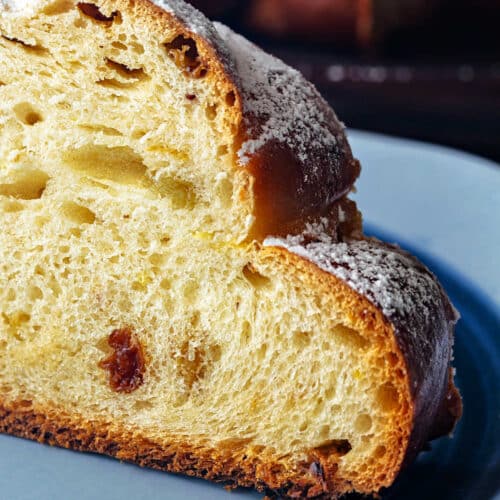
Slicing
I know you want to see this bread sliced. It’s beautiful! Use a sharp, serrated knife to cut even, thick slices.
Wait until the bread has cooled completely before slicing. Right out of the oven, the structure isn’t completely set until it cools down. Evaporation is technically part of the baking process, and as the braid cools, excess liquid will continue to evaporate. If you cut it too soon, you’ll end up with gummy slices, and we don’t want that.
Houska FAQ
Softer butter is easier to rub into the flour. We’re going for a fairly homogeneous dough, and the butter will eventually be evenly dispersed throughout. Using cold butter is better for biscuits or pie dough because you want discrete pieces.
Yes. Osmosis is a real thing, and if you don’t soak your raisins, they will pull moisture from the surrounding bread, leaving your beautifully hydrated loaf drier than it should be. And remember, you can substitute your favorite dried fruit/fruits here. It’s your houska!
While not strictly necessary, allowing a long, overnight proof improves flavor and texture. If you want to make the bread all in one day, rather that refrigerating the ball of dough, allow it to rise in a cozy place until doubled in size. Then proceed with the recipe. Note that the dough may be a bit harder to work with since it’ll be warm. Consider refrigerating your portioned dough (for braiding) for an hour or so to make it easier to handle.
It should be fine for two days at room temperature. Only slice what you need–a sliced loaf dries out more quickly. For longer storage, cool completely, cut into slices of your desired thickness, and freeze in a zip top freezer bag for up to 6 weeks. Let slices thaw at room temp or put them in the toaster oven so you can eat them with butter and jam.
Questions?
If you have any questions about this post or recipe, I am happy to help.
Simply leave a comment here and I will get back to you soon. I also invite you to ask questions in my Facebook group, Fearless Kitchen Fun.
If your question is more pressing, please feel free to email me. I should be back in touch ASAP, as long as I’m not asleep.
A Note About Measurements
My recipes are almost all written by weight, including liquids, unless otherwise specified.
For accuracy and consistency of results, I encourage you to buy–and use–a kitchen scale.
I promise that baking and cleanup will be so much quicker and easier.
This is the scale that I recommend for home use. I have owned and used one for years.
Houska
Ingredients
For the Houska Dough
- 15.6 oz all-purpose flour, divided use 443 grams or about 3 1/2 cups measured by whisking, spooning, and sweeping
- 8.5 oz whole milk, scalded to 185F and cooled to 125F 241 grams or 1 cup and 1 Tablespoon
- 2.8 oz granulated sugar 79 grams or a slightly generous quarter cup
- 2 tsp kosher salt 10 grams. I use Morton's. If using measuring spoons, use 2 teaspoons Morton's or 3 teaspoons of Diamond Crystal.
- 1 ½ tsp active dry or instant yeast 5 grams. I use instant yeast
- 1 egg at room temperature
- zest of 1 small-to-medium lemon
- ¼ tsp mace a generous 1/8 teaspoon if substituting nutmeg
- 4 oz golden raisins, plumped in boiling water for 10 minutes, drained, and patted dry. *Reserve some raisin soaking liquid. You might need it 112 grams or 3/4 cup
- 1.5 oz sliced almonds, optional 43 grams or 1/2 cup
- 4 oz softened, unsalted butter 1 stick or 112 grams
For the Egg Wash
- 1 whole egg
- pinch kosher salt
- 1 tsp water
Instructions
- Check your scalded milk to make sure it is no more than 125°F / 52°C. Weigh it to see if you lost any volume. If so, add some *reserved raisin soaking liquid until you have 8.5 oz. I needed an extra tablespoon of liquid.
- In a large mixing bowl, combine the scalded milk, 10 oz / 284 grams all-purpose flour, sugar, salt, and yeast and whisk until you have a pancake batter-like consistency.
- Whisk in the egg, lemon zest, and mace.
- Cut the soft butter into pieces and add to the bowl of your stand mixer with the remainder of the flour.
- Attach the paddle attachment and mix on speed 1 or 2 until the butter is evenly distributed throughout and no large pieces remain, about 3 minutes.
- Tip in the batter, scraping the bowl well, then swap the paddle for the dough hook.
- Mix on low speed until there is very little loose flour remaining, about 2 minutes. The dough will be quite shaggy and messy at this point.
- Turn the speed up to medium (4-5), and knead for 9 minutes. Don't worry if the dough seems too soft. Trust the process.
- Stop the mixer and add the raisins and optional almonds. If using almonds, reserve a small handful to put on top of the loaf after shaping.
- Knead on medium speed (4-5) for an additional 5 minutes. At this point, the dough should be mostly clearing the sides of the bowl, even if a little still sticks to the bottom. Thanks, gluten!
- Oil or spray your hands with pan spray. Gather up the soft, shiny dough, and form it into a smooth ball, and plop it back into the mixing bowl. Spray or oil thoroughly, cover with plastic wrap, and refrigerate overnight, or for at least 8 hours. It can easily go as long as 36 hours in the fridge, so it's pretty forgiving. I let mine cold ferment for 12 hours.
Shaping and Baking
- Remove the dough from the fridge. It will be pretty stiff. That's okay. It'll be easier to work with, and it will soften up/warm up as you work with it.
- Divide the dough into 3 or 4 large pieces, 3 medium pieces, and 2 small pieces. Don’t stress about perfect sizing—just aim for small orange-sized pieces for the large ones, medium lemons for the middle, and small limes for the smallest.
- Roll each piece of dough into a log about 8" long, keeping the same-sized pieces together. Then roll each 8" log into an approximately 16" rope. No need to be super exact. I used my bench knife, which is 6" long, to check, approximating 16".
- Braid the 3 (or 4) larger ropes, pinching the ends together so they don't separate. Press it down so it flattens and widens just a bit.
- Braid the 3 medium ropes into a 3-strand braid, pinching the ends well. Center it on the largest braid and press them together with cupped hands.
- Twist the two smallest ropes together, pinching the ends, and center it on top of the 3-strand braid. Use your cupped hands to press them together.
- Insert several skewers or long toothpicks through the braided layers to help keep everything in place during the rise and bake. To avoid noticeable holes, insert them where the ropes intersect.
- Spray with pan spray or brush with neutral oil, cover with plastic wrap, and let rise in a cozy place until noticeably puffy, larger, and a little jiggly when you gently shake the baking sheet. This will take anywhere from 1 1/2-2 1/2 hours. depending on conditions in your kitchen.
- During the last 30-45 minutes of the rise, heat the oven to 350F with a rack in the center. Whisk the egg wash ingredients together.
- When the houska is nicely light and risen, brush gently but thoroughly with the egg wash. You can even use two coats to make sure you have a nice, even layer of egg wash on the bread. If using sliced almonds, sprinkle the ones you reserved down the center of the bread.
- Bake for 30-35 minutes, rotating the baking pan after 20 minutes to ensure even browning. At this point, the loaf should be beautifully golden brown.
- Tent the bread with foil and continue baking until an instant read thermometer reads 195°F / 91°C, an additional 10-20 minutes.
- When the braid reaches the target temperature, remove from the oven. Slide the houska onto a cooling rack and allow it to cool completely. This could take 2-3 hours.
- Once completely cool, you may leave it as is, drizzle it with a powdered sugar and milk glaze, or dust it with powdered sugar. I chose option C, but there is no one right way.
- Serve as is or toast it to serve with butter and jam. Keep the remainder of the loaf at room temperature for 2 days. Slice and freeze in a zip top freezer bag for longer storage. Enjoy!
Did You Make Any Changes?
Notes
Helpful Reminders
- The dough will be soft and a bit sticky at first. Don’t add extra flour—trust the process. It will smooth out and strengthen with kneading. Adding more flour will just result in a denser loaf that won’t rise as well.
- The dough will begin to clear the sides of the bowl after extended kneading (around the 11–12 minute mark). Be patient—this is where the structure develops. For this bread, that happens after adding the raisins and optional almonds.
- If the dough shrinks back while rolling the ropes, let it rest for 5–10 minutes to let the gluten relax, then continue.
- The shaped loaf should be noticeably puffy and a little jiggly before baking.
- This bread browns quickly. Tent loosely with foil as needed and bake to an internal temperature of 195°F/91°C.
Nutrition
Would you like to save this post?
Love This Recipe? Please Consider Leaving a Rating and Review
It helps me and other readers so much if you take a moment to rate and review this recipe.
Your star rating and comments help others decide whether the recipe is worth making, and your feedback helps me continue improving recipes here at Pastry Chef Online.
Other lovely ways to share include pinning or posting on your favorite social media platform.
Thank you so much for taking the time!

Resources
Sources
Here are the four recipes I used to develop my own version of houska. All are worth exploring, and if you want more of the history of the bread, check out the houska recipe from Cook Like Czechs:
✅Houska from The Home Baking Association. This recipe includes the butter incorporation step I used in mine.
✅A recipe from The Kitchn calling for heavy cream, eggs, and yolks. I opted for a bit less richness in my version.
✅The vanocka/houska recipe from Cook Like Czechs. She is the real deal. If you are interested in digging deep into this bread in particular and Czech cuisine in general, she’s your expert.
✅A houska recipe from the Nebraska Bohemians Facebook page from a bakery in Crete, Nebraska. It is especially interesting to read all the comments and variations that people make.
Braiding Tutorials
I watched a few videos to get a feel for the four strand braid. You might choose to use 2 3-strand braids topped with a twist, but if you are into braiding, these videos will help you!
✅A YouTube Short from Come and Bake showing how to braid 4 strands.
✅An excellent tutorial from The Bread Kitchen showing a different, flatter 4-strand bread as well as how to braid 3-9 strands.
For more sweet yeasty goodies, check out my Sweet Yeast Breads category.

Hi, y’all! I hope you’ve enjoyed this post and hopefully also learned a thing or two.
If you like my style, I invite you to sign up for my occasional newsletter, The Inbox Pastry Chef.
Expect updates on new and tasty recipes as well as a bit of behind-the-scenes action. I hope to see you there!


Join in Today!