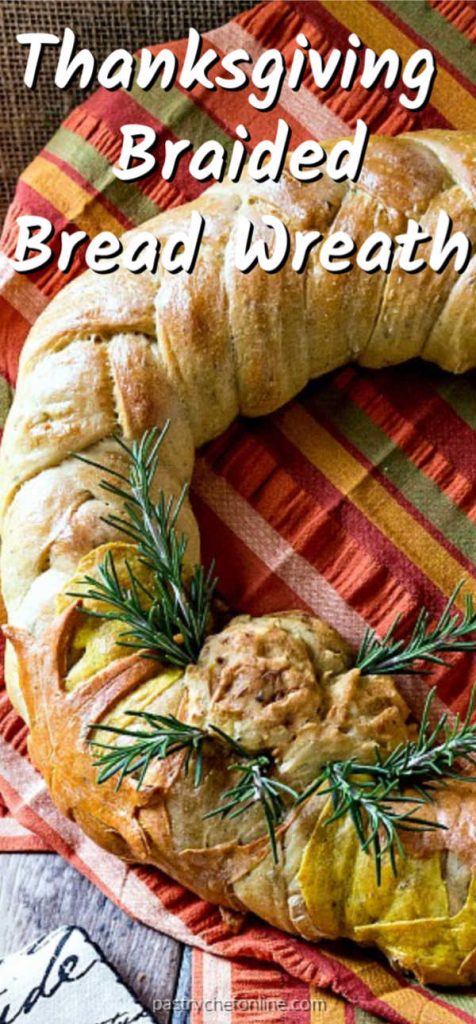
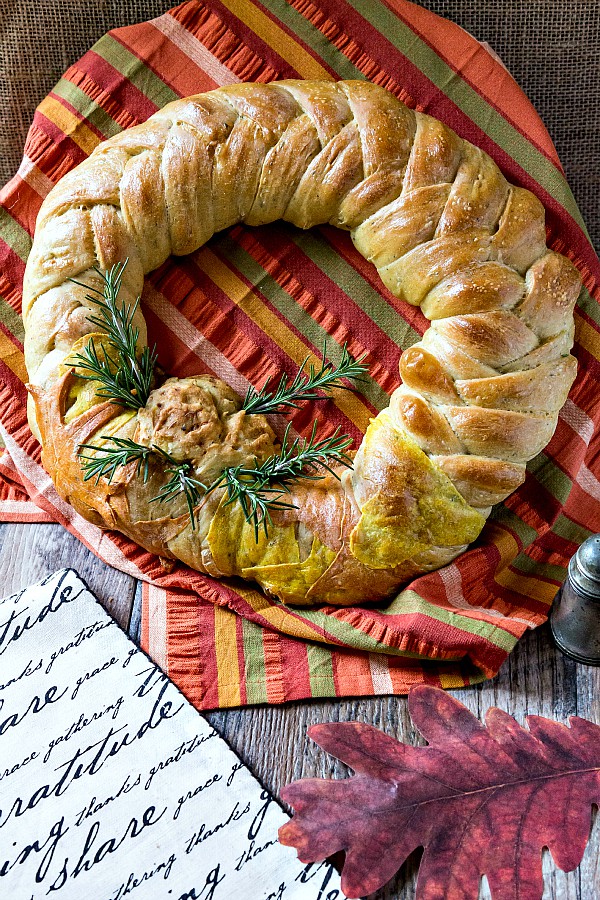
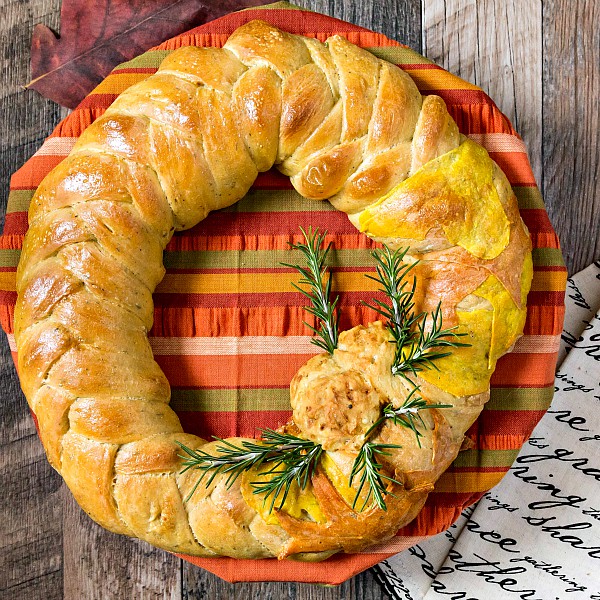
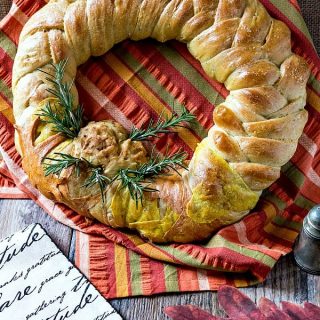
Not only is this braided bread wreath beautiful to look at, it’s also not too hard to make and it tastes wonderful!
I’ll tell you step by step how to make it and what sort of dough is best suited to keeping its shape when baking.
You’ll be proud to serve this braided wreath bread for Thanksgiving, maybe along with some soft dinner rolls or pumpkin dinner rolls, because you can’t have too much bread!
Find all my Thanksgiving breads in one place and all my bread and roll recipes are here.
Thanksgiving Wreath Bread
If you already love making bread, there is no time like Thanksgiving for pulling out all the stops and making a showstopper of a braided loaf that can serve both as a centerpiece and as a delicious part of your meal.
That was my thought process behind this braided bread wreath.
Making Sure the Bread Holds Its Shape During Rising and Baking
The difficult part of making any sort of bread that is shaped is making sure it doesn’t rise so much that all the detail goes away.
Pastry Chef Online Participates in Affiliate Programs. If you make a purchase through one of my links, I may earn a small commission. For more information click to read my disclosure policy
I was especially keen on making sure my leaves held their shape, but also I wanted the pinecone to more or less look like a pinecone and not just a blob.
My friend Donna from Cookistry is known for making wonderful shaped breads and braids, including loaves of bread that look like bunnies and birds.
Her advice is long, slow rising in the fridge and not to use a slack dough.
If you use too much liquid, the bread will rise too much and/or too rapidly, and your carefully braided wreath may turn out to look like monkey bread or something!
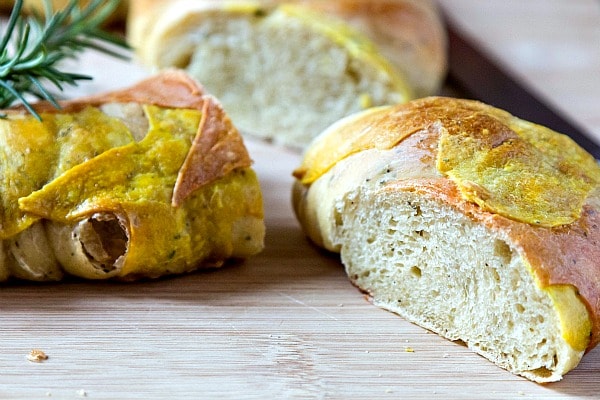
I decided on a dough with a hydration of 65%, which is about the hydration of a typical sandwich loaf.
I must admit that was a rather arbitrary decision, but I stuck with it, and I was rewarded with a dough that completely cleared the sides and bottom of my mixer bowl during kneading. Perfect!
What Does Hydration Mean in Bread Making?
What I mean when I talk about hydration is just the percentage of the weight of the flour that the water weighs.
For example, if I made a dough with 50% hydration, for each ounce of flour, I’d use half an ounce of water (by weight).
Bakers’ Percentages
In bread baking, we use something called bakers’ percentages in which the flour is always designated at 100%, no matter the weight.
In hypothetical recipe A, if the weight of the flour is 18 oz, then 18 oz equals 100%. In recipe B, if the flour weighs in at 24 oz, then 24 oz equals 100%.
The rest of the ingredients are scaled with percentages of that 100%.
So, for hypothetical Recipe A with 18 oz of flour, a 50% hydration dough would contain 9 oz of water, or half as much as the flour.
In hypothetical Recipe B with 24 oz of flour, a 50% hydration dough would contain 12 oz of water. Make sense?
In real life, a dough with 50% hydration would be pretty stiff–almost like a cracker dough rather than a bread, but for ease of explanation, 50% works.
Any fatty liquids (namely oil) don’t count towards the percentage of liquid since fats don’t interact with flour in the same way water-type liquids do.
That is, fat, even liquid fat, doesn’t contribute to gluten formation.
In my 65% hydration dough, I decided on using 15 oz of flour, so I used 9.75 oz of water.
The math looks like this: 15 x .65 (or 65%)= 9.75 oz.
Serious bakers will assign percentages to the rest of the ingredients as well (maybe 1-2% salt and yeast, etc), but I’m a bit more loosey goosey than that, so I just added “reasonable amounts” of each.
As written, this recipe works beautifully, so yay for that.
I also added a bit of olive oil for richness and a liberal sprinkle of poultry seasoning for that Thanksgiving Flavor. Here’s how I made my bread.
Ingredients You’ll Need to Make a Braided Bread Wreath
There are no weird or unusual ingredients in this braided wreath friends. Here’s what you need:
- bread flour
- water
- sugar
- olive oil
- salt
- yeast
- poultry seasoning
If you bake even occasionally, you probably own all of these ingredients in your pantry or fridge right now.
Do I Need a Stand Mixer to Make This Bread?
Strictly speaking, it is not necessary to own a stand mixer for baking bread.
However, I strongly urge you to consider purchasing a
- You bake a lot of bread on a regular basis
- You are more interested in eating the bread than you are in the process of building the dough.
In other words, if you are in love with the process of making bread, feeling the ingredients come together and then transforming from a shaggy mass to a smooth and stretchy, shiny ball of dough, then you may want to continue making bread by hand.
If you’re like me and enjoys the process of seeing the dough come together in a bowl without any real desire to get my hands sticky, then yes, owning a
Using Spices to Color Your Dough

You could certainly paint the cut out leaves for the wreath with egg white mixed with food coloring, but since many spices lend themselves to the fall color scheme, I added additional spices to my dough to make the different colors:
- I used ground turmeric to make the yellow leaves
- ground paprika or smoked paprika colored my orange leaves
I didn’t make any brown leaves, but you absolutely could by adding a touch of cocoa powder to your dough.
How to Make the Dough for a Braided Thanksgiving Bread Wreath
While I enjoy making more involved doughs that require several steps like these buttery mini brioche buns, most of the breads I make are the straight dough method.
This means you just plop everything in the mixing bowl at the same time and mix then knead.
For this bread, I did add one additional step, so you add the ingredients in two groups.
Here’s how it goes:
- Mix together the flour, water, and sugar until it comes together in a loose dough. Cover and let rest for 20 minutes. This gives the flour a chance to hydrate.
The fancy name for this is autolyse, but it just means giving the dough a rest before adding salt, fat, and yeast. - Add the olive oil, yeast, salt, and poultry seasoning. Mix in evenly and then knead for 10 minutes.
Voila, your dough is finished!
Now it just needs about a 3 hour rise on the counter followed by another super long slow rise in the fridge.
Is It Hard to Braid Bread?
Nope!
Seriously, if you ever played with Play-Doh as a kid, you got this.
This bread dough is supple and not sticky, and you will love working with it.
How to Form the Braided Bread
I decided to go with a 5 strand braid. I explain in detail in the recipe card how to do it, but I know some people prefer to watch a How-To video.
This is the video I watched, and I found it very helpful:
Timetable for Making This Bread
Since this wreath bread requires a lot of slow rising time, you’ll want to break up the baking over 2-3 days.
Here’s how I would do it:
Day One, in the Afternoon
- Make the dough
- Give it a 3 hour rise on the counter
- Press out the gases, cover and refrigerate overnight
Day Two, Morning
- Divide, color, and shape the dough
- Form the wreath
- Refrigerate for 6 hours
Day Two, Afternoon
- Let rise on the counter while oven preheats for 1 hour
- Egg wash and bake
- Cool
Can I Freeze This Bread?
Yes! Especially since Thanksgiving is a busy time and requires a lot of planning, you can make this loaf up to 3 weeks in advance.
Allow the bread to cool completely, then wrap it very well with plastic wrap and then heavy duty foil.
Remove from the freezer Thanksgiving morning and allow to come to room temperature, still wrapped.
Before presenting, you can warm the bread in a 350F oven for about 10 minutes.
NOTE: If you’re going to freeze the bread, so so without the rosemary sprigs. Add those after thawing and reheating.
A Note About Measurements

Don't let its small price and small size fool you. The Escali Primo is an accurate and easy-to-use food scale that I have used for years. It's easy to store, easy to use, has a tare function, and easily switches between grams and ounces/pounds for accurate measurements.
I really hope you love this recipe for a braided bread wreath, you guys!
It will help me and other readers so much if you take a moment to rate and leave a review for this recipe.
You can use the stars to rate 1-5 (5 is best), and leave a review in the comments. It helps me make adjustments if any are needed, and comments help others decide whether the recipe is worth making.
Other ways to share include pinning, and/or sharing on your favorite social media platform.
Thank you so much for taking the time!

Thanksgiving Braided Bread Wreath Recipe
Equipment
Ingredients
For the Dough
- 15 oz bread flour
- 9.75 oz cool water
- 1 Tablespoon sugar (I used palm sugar. Brown sugar or white would work as well)
- 1 ½ Tablespoons 4 1/2 teaspoons extra virgin olive oil
- 1 ¼ teaspoon kosher salt
- 2 teaspoons active dry yeast
- 2 teaspoons poultry seasoning (get the coarser kind that looks like tiny flakes–not the ground kind–if you can find it)
For Coloring the Leaves
- ½ teaspoon turmeric (for yellow leaves)
- ½ teaspoon paprika (for orange leaves)
- 1 egg beaten with 1 teaspoon water for egg wash
- optional rosemary sprigs for “pine boughs”
Instructions
- In the bowl of your stand mixer fitted with the dough hook, mix together the flour, water and sugar until it comes together into a soft dough. Cover and let sit for twenty minutes if you have time. If not, keep on going.
- Add the olive oil, salt, yeast, and poultry seasoning to your mixer bowl and continue to mix until all the ingredients are evenly distributed.
- Knead on medium-low speed for about 10 minutes until the dough is smooth and elastic. The dough should completely clear the sides and the bottom of your mixing bowl. If the dough sticks a bit in the bottom, add a small amount of flour (1 tablespoon or so) and continue kneading another couple of minutes.
- Once the dough is smooth and stretchy, oil your hands and gather the dough into a ball.
- Plop the ball back in the mixing bowl, spray lightly with pan spray or brush with some olive oil and allow to rise in a warm place until at least doubled, about 3 hours. Dough should be very light and airy.
- Evenly press all the gases out of the dough and place back in the mixer bowl. Oil or spray the top again, cover the bowl with plastic wrap, and refrigerate for 8 hours or overnight.
To Shape the Dough
- Remove the dough from the fridge and press out any gases that have built up in it.
- Portion out 5 4oz pieces of dough. Cut the remaining dough into 3 equal pieces. These pieces will be smaller and are for the leaves and pinecone.
- Shape the 5 pieces of dough into smooth balls. Take one of the dough balls and roll it out on the counter until you have a very short and fat snake.
- Set aside and do the same with each of the other four balls.
- Keep rolling them a bit longer, one at a time in succession, until all five balls have magically turned into ropes about 3 feet long.
- You can also make them shorter for a smaller wreath or even just braid them as a straight loaf. Totally your call. The reason why you’re working with each piece in succession is that short rest while you’re working with the other ones allows the gluten to relax enough to roll them out a bit longer with each turn. It took me a good five turns of rolling each one before I liked the length.
- Pinch the ends of the five ropes together at one end.
- Position the strands so you have two on one side of the work space and three on the other. (See Video, above and embedded in the recipe card).
- The two sets of strands should be at about a 45 degree angle from each other.
- Take the outside strand on the side with three and move it across his two friends to end up next to the two strands on the other side.
- Now that side has three strands and the other has two.
- Move the outside strand on that side across his two friends to end up next to the two strands on the original side.
- Keep braiding like that, keeping the angle between the two sets of strands as consistent as possible so the braid is uniform, until you get to the end. (Again, see video for a visual of this.)
- PInch the five ends together at the far end, and then form them into a ring.
- Pinch the ends together where they meet. That part won’t be gorgeous, but that’s okay because we’re going to cover them with dough leaves.
- Place the wreath on a parchment-lined pan (I turned a half sheet pan upside down so my wreath wouldn’t get messed up if it started pressing against the sides. If you have a flat cookie sheet, that will work as well.
For the Leaves and Pinecones
- Knead the turmeric into one of the remaining balls of dough as well as you can.
- Do the same with the paprika to another of them.
- Knead a bit of cocoa powder into the third ball if you want your pinecone to be brown. I left mine natural, so it’s your call.
- Roll the yellow and orange dough out very thin. You should not need to flour or oil your work surface. This dough is very easy to work with.
- Use cookie cutters to cut out leaf shapes. If you don’t have leaf cutters, heart and star cutters will work because once you cut them out, you can pull on the shapes to make them more leaf-like. A third option is to just free-hand it all. That’s what I did, and it worked out just fine. I cut out leaf shapes with a sharp paring knife.
- Use a bit of water to "glue" the leaves Artfully onto your wreath. You can go all the way around or stay in one place like I did. You can make your leaves bigger or smaller. Go crazy!
- For the pine
- cone/s, form small egg shapes and stick them where you want them.
- My guys slumped a bit, so I would probably add more flour to the third ball of dough the next time.
- Take scissors and snip into the dough at regular intervals to simulate the…petals? What are those called? If nobody has any issues with nuts, you can also use sliced almonds to simulate the petal things. Just shove them into the dough eggs so they look like pinecones.
- Spray the finished bread lightly with pan spray, cover and refrigerate for 6 hours.
- Remove the dough from the fridge. It won’t look too much different than it did when you put it in there in the first place, but it has been sneakily developing flavor.
- Let rise in a warm place in your kitchen while you preheat the oven for an hour.
- Place a baking stone on the center rack and preheat to 350F.
- At the end of the hour, brush the whole loaf with the egg wash and transfer the bread–still on the parchment–to the baking stone.
- Bake for 15 minutes. Rotate the pan and bake another 10-15 minutes or until the internal temperature of the bread is 200F-205F.
- If your bread isn’t as brown as you’d like (mine wasn’t), put it under the broiler–watching carefully–for a couple of minutes.
- Remove to a rack to cool.
- Wash and some small rosemary sprigs and poke them into the bread (artfully, of course) around the pinecones.
- Use as part of your Thanksgiving table centerpiece and then pass to share.
Did You Make Any Changes?
Video
Notes
Nutrition

Hi, y’all! I hope you’ve enjoyed this post and hopefully also learned a thing or two.
If you like my style, I invite you to sign up for my occasional newsletter, The Inbox Pastry Chef.
Expect updates on new and tasty recipes as well as a bit of behind-the-scenes action. I hope to see you there!


Join in Today!
Hello,
What would happen if for the 6hour rise in the fridge I left it overnight again instead? Will this ruin the bread?
Your leaves look amazing for not having a cookie cutter!
If you plan on doing that, cut back on the amount of yeast in the recipe by just a little bit to hopefully account for a longer cold rise. And thank you very much! I hope you enjoy the bread. Would love to see a photo of yours! Happy Thanksgiving!
lovely wreath braided bread. Looks awesome and I love the fact that you have used natural ingredients to color the leaves.
Thank you, Mayrui! I debated about using food coloring, but then I realized I have natural food coloring in my spice cabinet!
What a pretty bread, it looks wonderful.
Thanks, Laura!
Wow, what a beautiful and flavorful edible bread wreath that is. Looks stunning.
Thank you for the quick bread math tutorial, I’m always stumped by what hydration% means and now I know. So thank you again 🙂
Just having that math in your back pocket makes it so much easier to create your own recipes or to scale to any amount of dough you need. Glad you found it helpful, Pavani, and thanks for choosing this theme. It inspired me to get all crafty with my bread!
This is a masterpiece. Looks beautiful and festive.
Thanks so much! It was a lot of fun to make!