
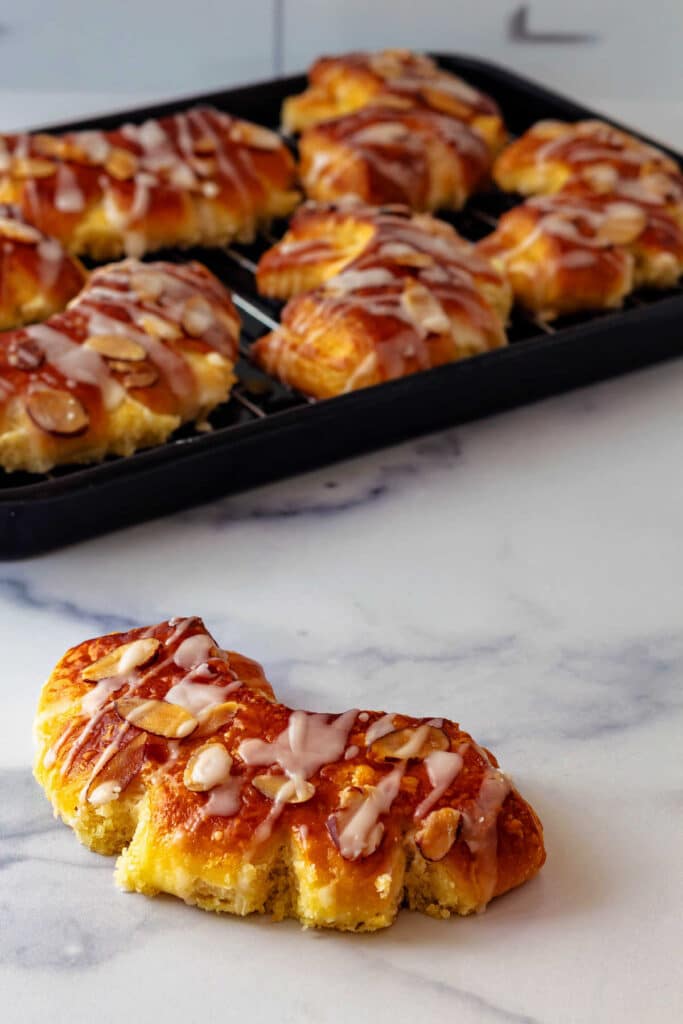
Bear claws are buttery, flaky Danish pastries wrapped around a generous ribbon of almond filling, shaped into their distinctive curved “claws,” and baked until deeply golden. A shiny coat of simple syrup and a drizzle of powdered sugar glaze finish them off with just enough extra sweetness.
The contrast is what makes them so more-ish: crisp, delicate layers of pastry surrounding a soft, rich almond center. The filling is sweet but not cloying, with enough almond flavor to stand up to all that butter, while the glaze adds a little crackly sweetness on top.
They look impressive, but the shaping is surprisingly straightforward—and perfection is absolutely not required. If a little almond filling escapes in the oven, trim it off, glaze your beautiful bear claws, and carry on. They’re light, buttery, almondy, and look super fancy.
Pastry Chef Online Participates in Affiliate Programs. If you make a purchase through one of my links, I may earn a small commission. For more information click to read my disclosure policy
Bear Claws, At a Glance
✅Skill Level: Confident Beginner to Intermediate
✅Skills: Shaping Pastry, Glazing
✅Type: Danish Pastry
✅Number of Ingredients: 11
✅Prep Time: 45 minutes
✅Rise Time: 30-45 minutes
✅Cook Time: 20 minutes
✅Yield: 8 pastries
Jump Straight to the Recipe
Why You’ll Love These Bear Claws
Bear claws are an iconic Danish pastry filled with sweet almond goodness, topped with sliced almonds, a layer of shiny sugar glaze and a drizzle of white icing. The glaze makes them shiny while the bit of icing gives the ole razzle dazzle.
They are playful and tasty, and you’ll love them not only because they taste good, but because you made them.
The recipe uses my master Danish pastry dough, and you’ll turn out 8 curved beauties that look like they came straight from the pastry case at your favorite fancy bakery. Except they’ll have come from your oven!
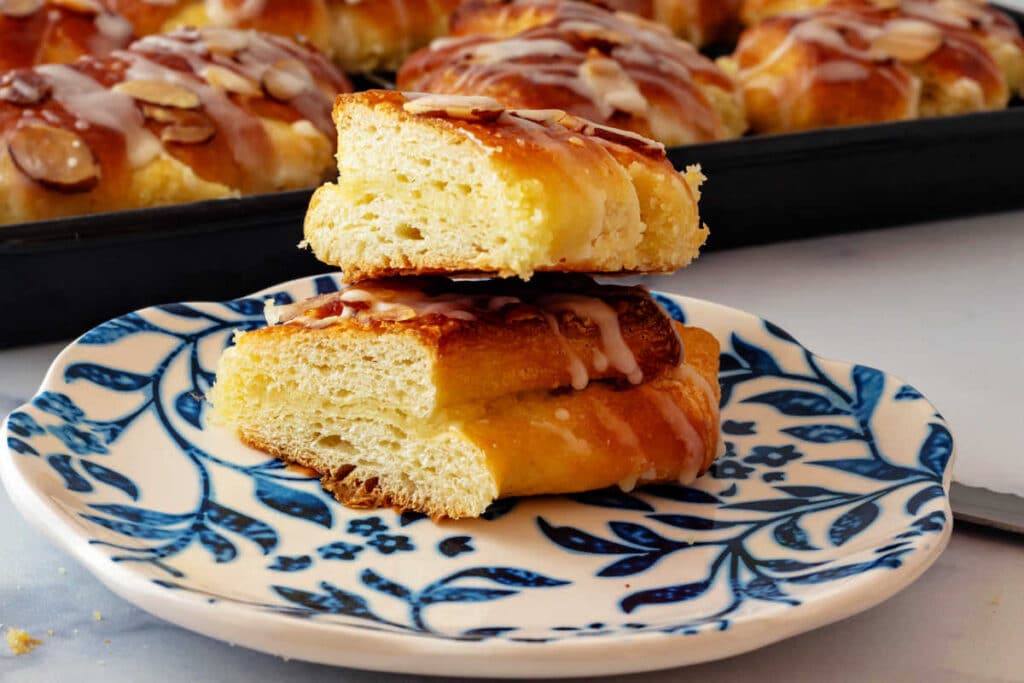
They are Goldilocks-sized, not too large or too small. They embody “restrained indulgence,” so you can still feel moderately virtuous while enjoying the fruits of your labor. They’re made with my “four simple folds” lamination schedule so you get a bit of crackle on the outsides and lots of tender, buttery layers on the insides.
In short, making and eating these will make you feel rather virtuous and very accomplished.
Ingredients and Substitutions/Notes
If you are raring to go make bear claws, you can head straight to the recipe. Otherwise, I’ll go over the ingredients and what they add to the recipe. I’ll also share substitutions where necessary and show you all the steps for how to make the filling, shape, and finish the pastries.
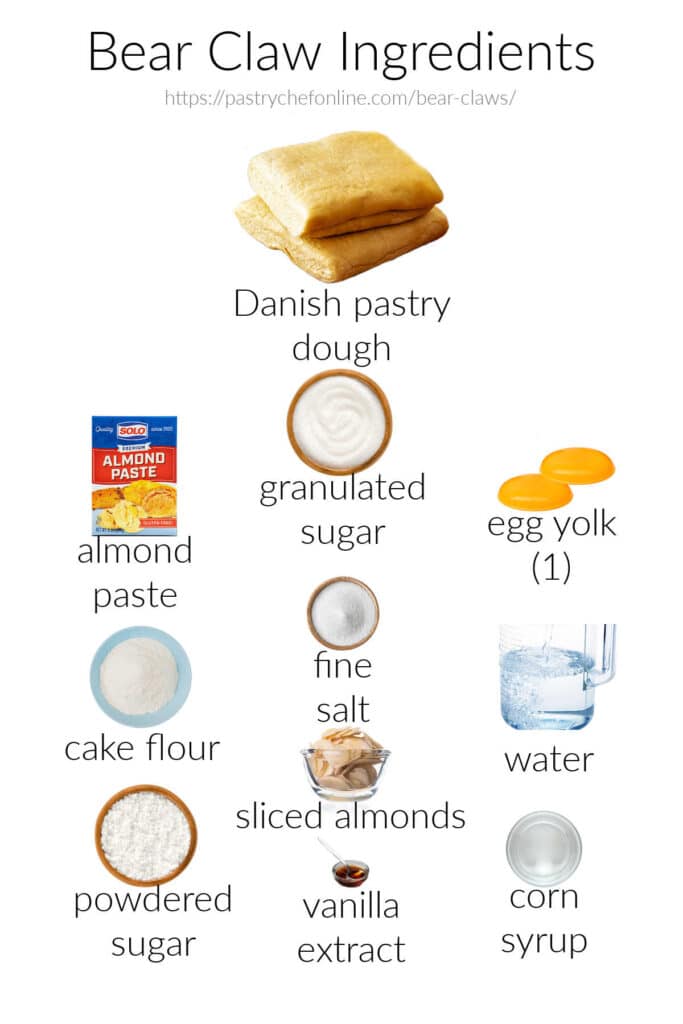
- Danish dough: You’ll need a 1x recipe of my master Danish dough recipe.
- Almond paste: I looked at a few fancy grocery stores until I found it at Walmart with the pie filling. Almond paste is the main flavoring of bear claw filling. You can buy it, or if you’re feeling fancy, you can make it from scratch.
- Granulated Sugar: Found in the filling and the heavy syrup, sugar brings sweetness, a tender texture, and assists in browning.
- Egg yolk: Helps to emulsify the almond filling. The fat in the yolk also carries flavor.
- Cake flour: Just a little in the filling allows the almond paste to set into a texture that is quite similar to the surrounding pastry. This makes the bear claw feel cohesive rather than reading as a filled pastry.
- Fine salt: A tiny pinch in both the filling and the white icing helps moderate sweetness while bringing out the flavor of the almonds.
- Water: Used in the sugar syrup and white glaze, water contributes to the consistency of both components.
- Powdered Sugar: Used in the white icing for body, sweetness, and color.
- Sliced Almonds: Used mainly for decoration and a visual cue, sliced almonds contribute a little crunch and flavor but mostly let you know that you’re about to eat an almond-flavored pastry.
- Corn Syrup: Used in the white icing, just a little corn syrup makes the glaze super shiny while preventing it from shattering when you bite into it. Substitute a little Lyle’s Golden Syrup if you have some.
- Egg Wash (not pictured): 1 egg mixed with a teaspoon of water and a wee pinch of salt and brushed on right before baking, the egg wash acts as glue for the sliced almonds and allows for a beautiful, deeply golden brown finish that promises wonderful flavor. No pale, insipid pastries here, friends!
How to Make Bear Claws to be Proud Of
In a nutshell, here is how we shall proceed:
- Roll out and trim Danish dough
- Cut into 8 rectangles
- Pipe on filling
- Fold and press to seal
- Cut “toes” with a bench knife
- Proof for 30-45 minutes until a little puffy
- Egg wash and apply almonds
- Bake, brush with heavy syrup after baking
- Drizzle on the old razzle dazzle
It sounds like a Lot, but like everything in the pastry world, it’s just a process to be followed, and none of what you’ll be doing is difficult. It’s an edible craft, and I’ll walk you through all the steps.
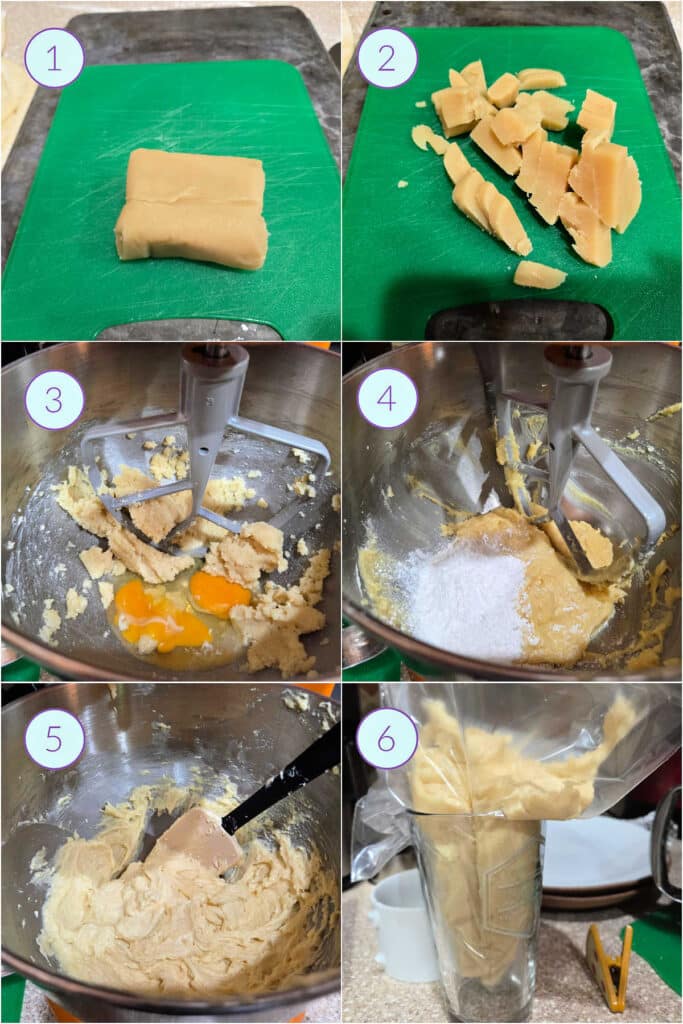
- Weigh out the appropriate amount of almond paste, and….
- …chop it into little pieces.
- Put it in the bowl of your stand mixer and beat it well. Add the sugar and beat well again, then add the butter, salt and egg yolk and mix again, scraping the bowl as necessary. NOTE: The photos show a larger batch than what you’ll need to fill your bear claws, so follow the amounts in the written recipe.
- Mix in the flour until completely incorporated.
- Your almond filling will be smooth and ready to use.
- Place it in a piping bag fitted with a #10 piping tip or in a zip top bag. Cut the corner of the bag off leaving a 1/3″ / 8 mm opening when ready to pipe.
The filling can sit at room temperature until you have your pastry ready to fill. You can make it the day before, but it will definitely firm up in the fridge. Make sure you take it out at least an hour before piping so you don’t have to force it through the piping tip.
Would you like to save this post?
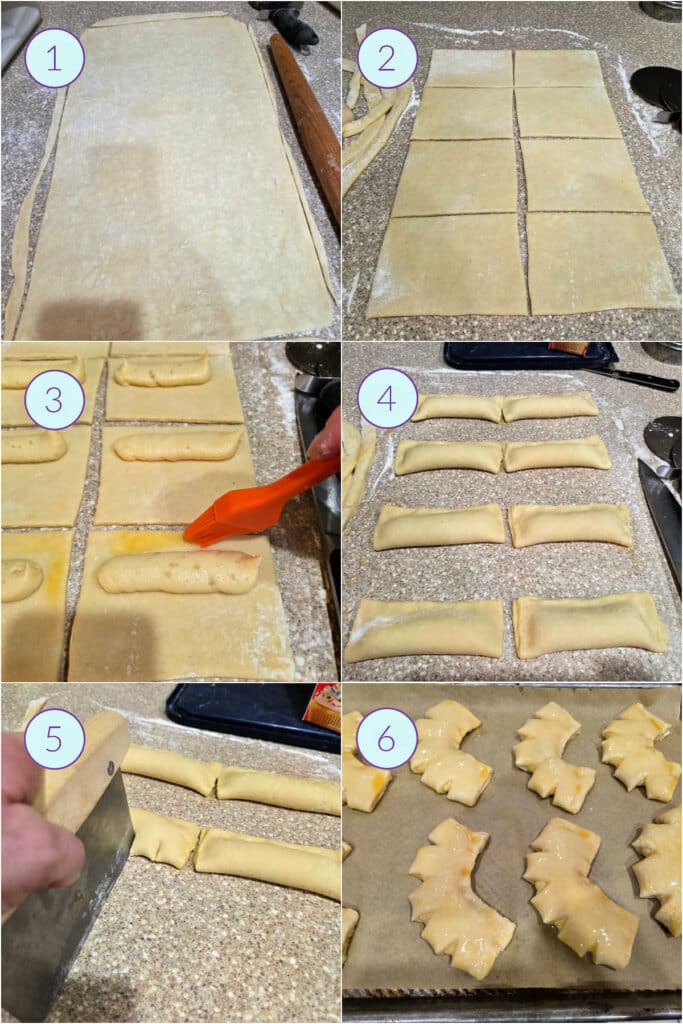
- Roll out the Danish dough and trim into an even rectangle approximately 16″ x 12″ / 40 cm x 30 cm.
- Cut the pastry into 8 rectangles about 6″ / 15cm wide and 4″ / 10 cm tall.
- Pipe a line of almond filling to one side of the midline, leaving room to egg wash around the filling. Brush on a little egg wash for glue, and….
- …seal the pastries well by pressing with your fingers.
- Use your bench knife to make four equidistant cuts in the folded side of each pastry. These are the bear’s “toes.” You can cut more toes if you want, but they won’t be anatomically correct. Hee.
- Curve the bear claws to separate the toes and place them on a parchment-lined baking sheet. Cover and let proof for 30-45 minutes, or until they look a little puffy and relaxed.
NOTE: Make sure you follow my instructions for the size of the piping tip/hole you cut into a zip-top bag. The hole I cut was a little too large, and I ended up with a bit too much filling which leaked out onto the baking sheet. It was not the end of the world since I own a paring knife, but save yourself a bit of a headache and be a bit more restrained than I was.
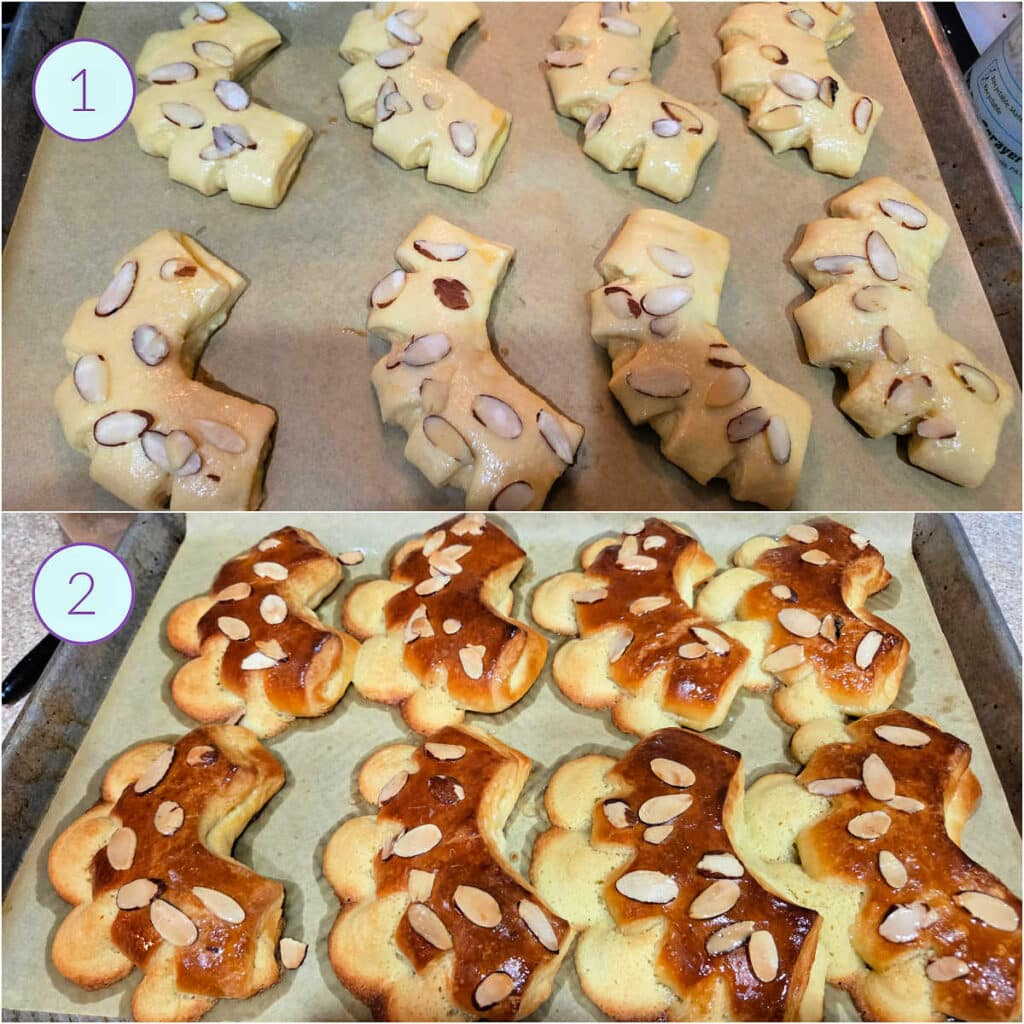
- After your bear claws have rested, relaxed, and are a little puffy, brush them with egg wash and then sprinkle on a few sliced almonds.
- This photo tells you two things: the pastries browned beautifully, and the filling got unruly! It’s fine, but I don’t want it to happen to you, or at least not so spectacularly, so be restrained when you fill these beauties.
How to Finish Your Bear Claws Like a Master Baker
Behold, the bear claw. For a fairly humble pastry, it has a lot going on, but everything is there for a reason. Let’s go through them so you know why I am asking you to go to absurd lengths to gild a lily.
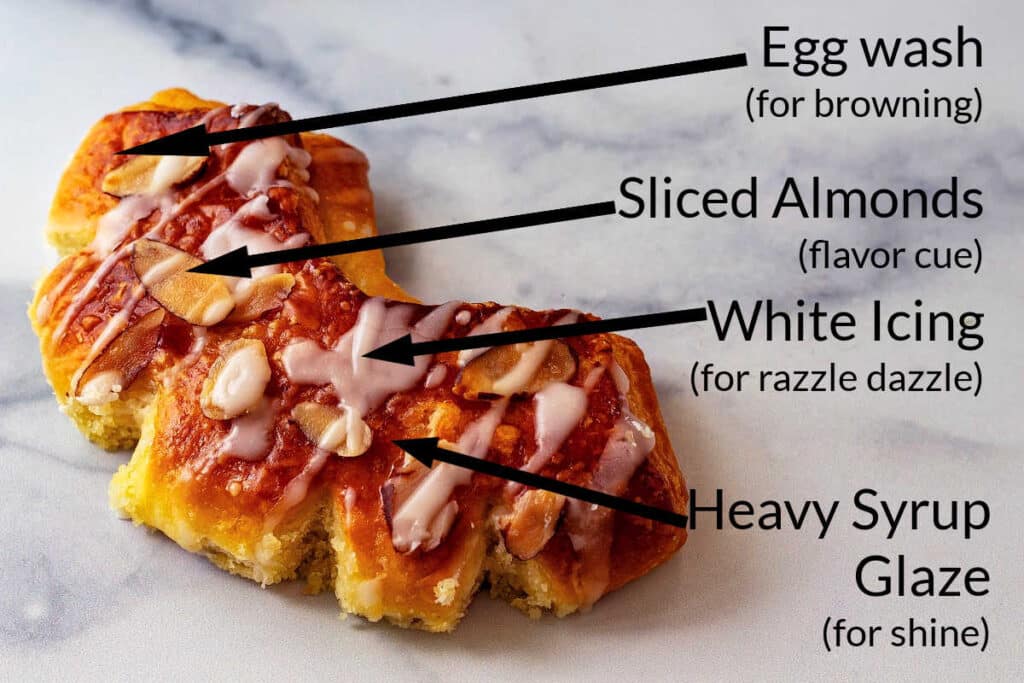
We brush on egg wash (an egg, a pinch of salt, and a teaspoon of water whisked together very well) to promote browning. You can see that the egg wash has absolutely done its job. Yes, your pastries will get some color without the egg wash, but they won’t have this beautiful, European-style pastry finish.
The sliced almonds are there to say, “Hey, you’re about to enjoy an almond pastry!” The majority of the almond flavor comes from the almond paste in the filling. The sliced almonds are there for a little crunch and visual interest.
As soon as they come out of the oven, brush the pastries with a heavy syrup (2 parts sugar to 1 part water, brought to a boil and then kept warm). Its main job is to make your pastries shine, and it does its job very well. So pretty!
The ultimate finishing touch is the white icing. It’s not to be poured on top to cover a bear claw like you would a cinnamon roll or honey bun. No, we don’t want to cover up all our gilding. The white icing is there to add a little razzle dazzle, and less is generally more.
Now your bear claws are camera-ready!
Storing and Reheating
Store any leftover pastries in a well-sealed container at room temperature for two days. Warm them for 2-3 minutes in the toaster oven set to 350°F / 177°C or for about 10 seconds in the microwave.
For longer storage, freeze them on a baking tray until hard, and then put them in a heavy duty, zip-top freezer bag for up to 2 months. Freezing them first helps make sure they don’t stick together in the freezer.
Let frozen bear claws thaw in the zip top bag until they reach room temperature, then warm them in the toaster oven (preferred) or the microwave.
Questions?
If you have any questions about this post or recipe, I am happy to help.
Simply leave a comment here and I will get back to you soon. I also invite you to ask questions in my Facebook group, Fearless Kitchen Fun.
If your question is more pressing, please feel free to email me. I should be back in touch ASAP, as long as I’m not asleep.
A Note About Measurements
My recipes are almost all written by weight, including liquids, unless otherwise specified.
For accuracy and consistency of results, I encourage you to buy–and use–a kitchen scale.
I promise that baking and cleanup will be so much quicker and easier.
This is the scale that I recommend for home use. I have owned and used one for years.
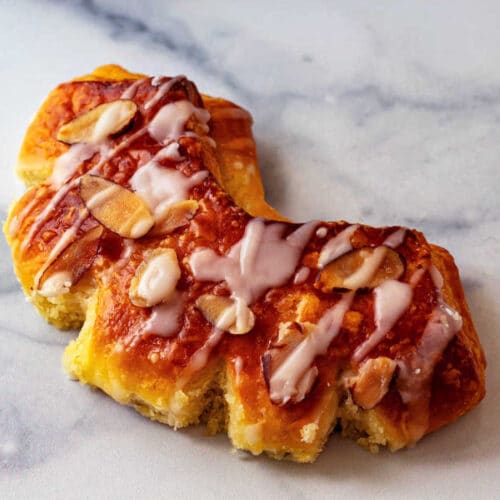
Classic Bear Claws
Equipment
Ingredients
For the Almond Filling
- 75 grams almond paste 2.6 oz or about 1/3 cup, packed
- 30 grams granulated sugar 1 oz or 2 Tbsp + 1 teaspoon
- 30 grams unsalted butter 1 oz or 2 Tbsp + 1/2 teaspoon
- pinch salt just a tiny pinch since this is a small amount of almond filling
- 1 egg yolk
- 20 grams cake flour about 2 1/2 Tbsp
For Shaping and Filling
- 1 master Danish dough recipe
- the almond filling recipe above
For Finishing and Baking
- 4 Tbsp egg wash 1 egg whisked together with 1 teaspoon water and a tiny pinch of salt. You'll use the egg wash both as glue to close the pastries and as a proper egg wash to help them brown beautifully.
- ¼ cup sliced almonds you won't need a lot, and I didn't measure. I just added a few to each pastry
For the Heavy Syrup
- 100 grams granulated sugar 3.5 oz or about 1/2 cup
- 50 grams water 1.8 oz or about 1/4 cup
For the White Icing
- 100 grams confectioners sugar 3.5 oz or 1 cup minus 2 Tbsp
- 18 grams water a generous 1 Tbsp
- 6 grams corn syrup about 1 teaspoon
- pinch salt tiny pinch–this is a small amount of icing
- 4 grams vanilla extract about 1 teaspoon
Instructions
To Make the Almond Filling
- Break the almond paste into small pieces and place them in the bowl of your stand mixer fitted with the paddle attachment. Beat until the paste is broken up into small bits.
- Add the granulated sugar. Beat until smooth and creamy, scraping the bowl as necessary.
- Add the softened butter and cream again, scraping the bowl as necessary. We’re trying to make sure there are no (or minimal) little lumps of almond paste in the filling. That’s what’s up with all the beating.
- Add the salt and egg yolk and mix until thoroughly incorporated.
- Add the cake flour and mix just until completely combined. Scrape the bowl to make sure no flour or unmixed filling remains.
- Transfer the almond filling to a piping bag fitted with a #10 piping tip, or use a zip-top bag and cut a ⅓-inch (8 mm) opening in one corner when you’re ready to pipe. Set aside if continuing immediately. Otherwise, you can make this the day before and refrigerate it. Let it sit out at room temperature at least an hour so it loosens up and is easily piped.
- Set a rack in the center of the oven and preheat to 375°F / 190°C.
To Shape and Fill
- On a lightly floured work surface, roll the Danish pastry dough into a rectangle approximately 16" x 12" (40 x 30 cm). Trim the edges to make a neat rectangle.
- Cut the dough into 8 rectangles, each approximately 6" x 4" (15 x 10 cm).
- Pipe a line of almond filling along one side of the center of each rectangle, leaving enough room around the filling to seal the dough. Be restrained with the filling so it doesn't escape during baking. You may have a little filling left over.
- Lightly brush the edges of the dough with egg wash, then fold the dough over the filling. Press firmly along the edges to seal.
- Using a bench knife, make 4 evenly spaced cuts along the folded edge of each pastry to form the bear's toes.
- Gently curve each pastry into a slight arc to separate the toes and give the bear claws their distinctive shape.
- Transfer the pastries to a parchment-lined baking sheet, leaving room between them. Cover and let proof for 30–45 minutes, or until slightly puffy and relaxed.
To Finish and Bake
- Once the bear claws look relaxed and a little puffy, brush each one with a thin coat of egg wash.
- Sprinkle each pastry with a few sliced almonds. Don't be too precious with placement, but distribute them reasonably evenly.
- Bake in the heated oven for about 20 minutes, or until the pastries are deeply golden brown and puffed. If your oven heats unevenly, rotate the pan 180° after 10 minutes. Remove to a cooling rack.
To Make the Heavy Syrup
- While the bear claws are baking, heat the water and sugar together in a small pan until it reaches a boil. Allow it to boil for about 20 seconds, and then remove from the heat. Keep warm.
To Make the White Icing
- While the bear claws are cooling, add all ingredients to a small saucepan.
- Whisk over medium heat until smooth and the glaze is warm, about 100°F / 38°C.
To Gild the Lily
- Immediately brush the baked bear claws with the heavy syrup. (procedure above)
- Once the pastries have cooled to barely warm, drizzle a little white icing (procedure above) over the bear claws. Admire your work. Devour.
Did You Make Any Changes?
Nutrition
Would you like to save this post?
Did I Help You Master Bear Claws? Please Rate and Review!
It helps me and other readers so much if you take a moment to rate and review this recipe.
Your star rating and comments help others decide whether the recipe is worth making, and your feedback helps me continue improving recipes here at Pastry Chef Online.
Other lovely ways to share include pinning or posting on your favorite social media platform.
Thank you so much for taking the time!


Hi, y’all! I hope you’ve enjoyed this post and hopefully also learned a thing or two.
If you like my style, I invite you to sign up for my occasional newsletter, The Inbox Pastry Chef.
Expect updates on new and tasty recipes as well as a bit of behind-the-scenes action. I hope to see you there!


Join in Today!