
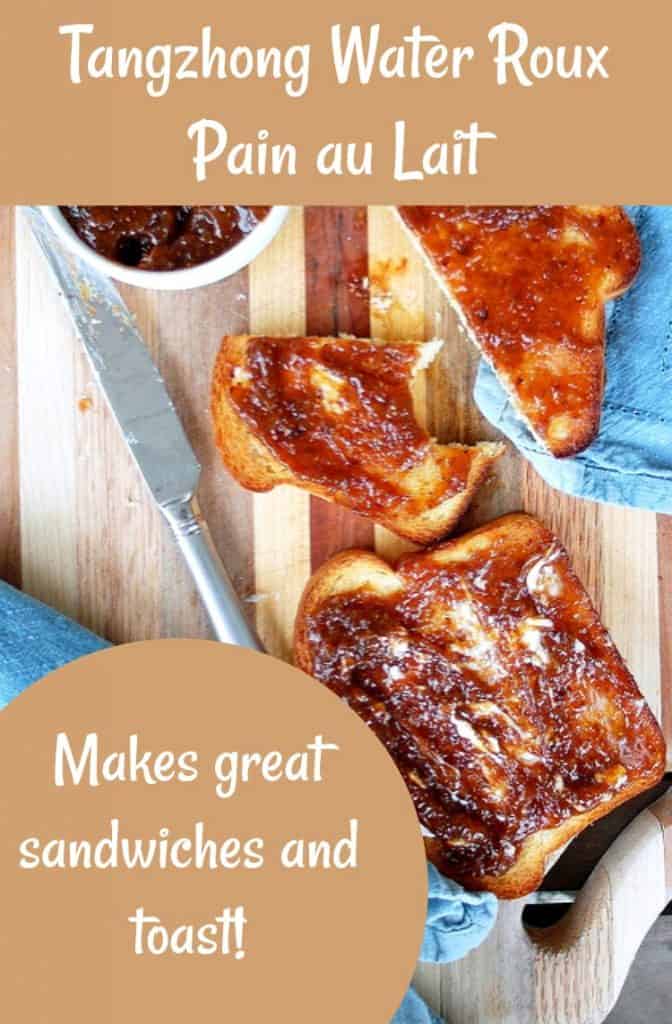
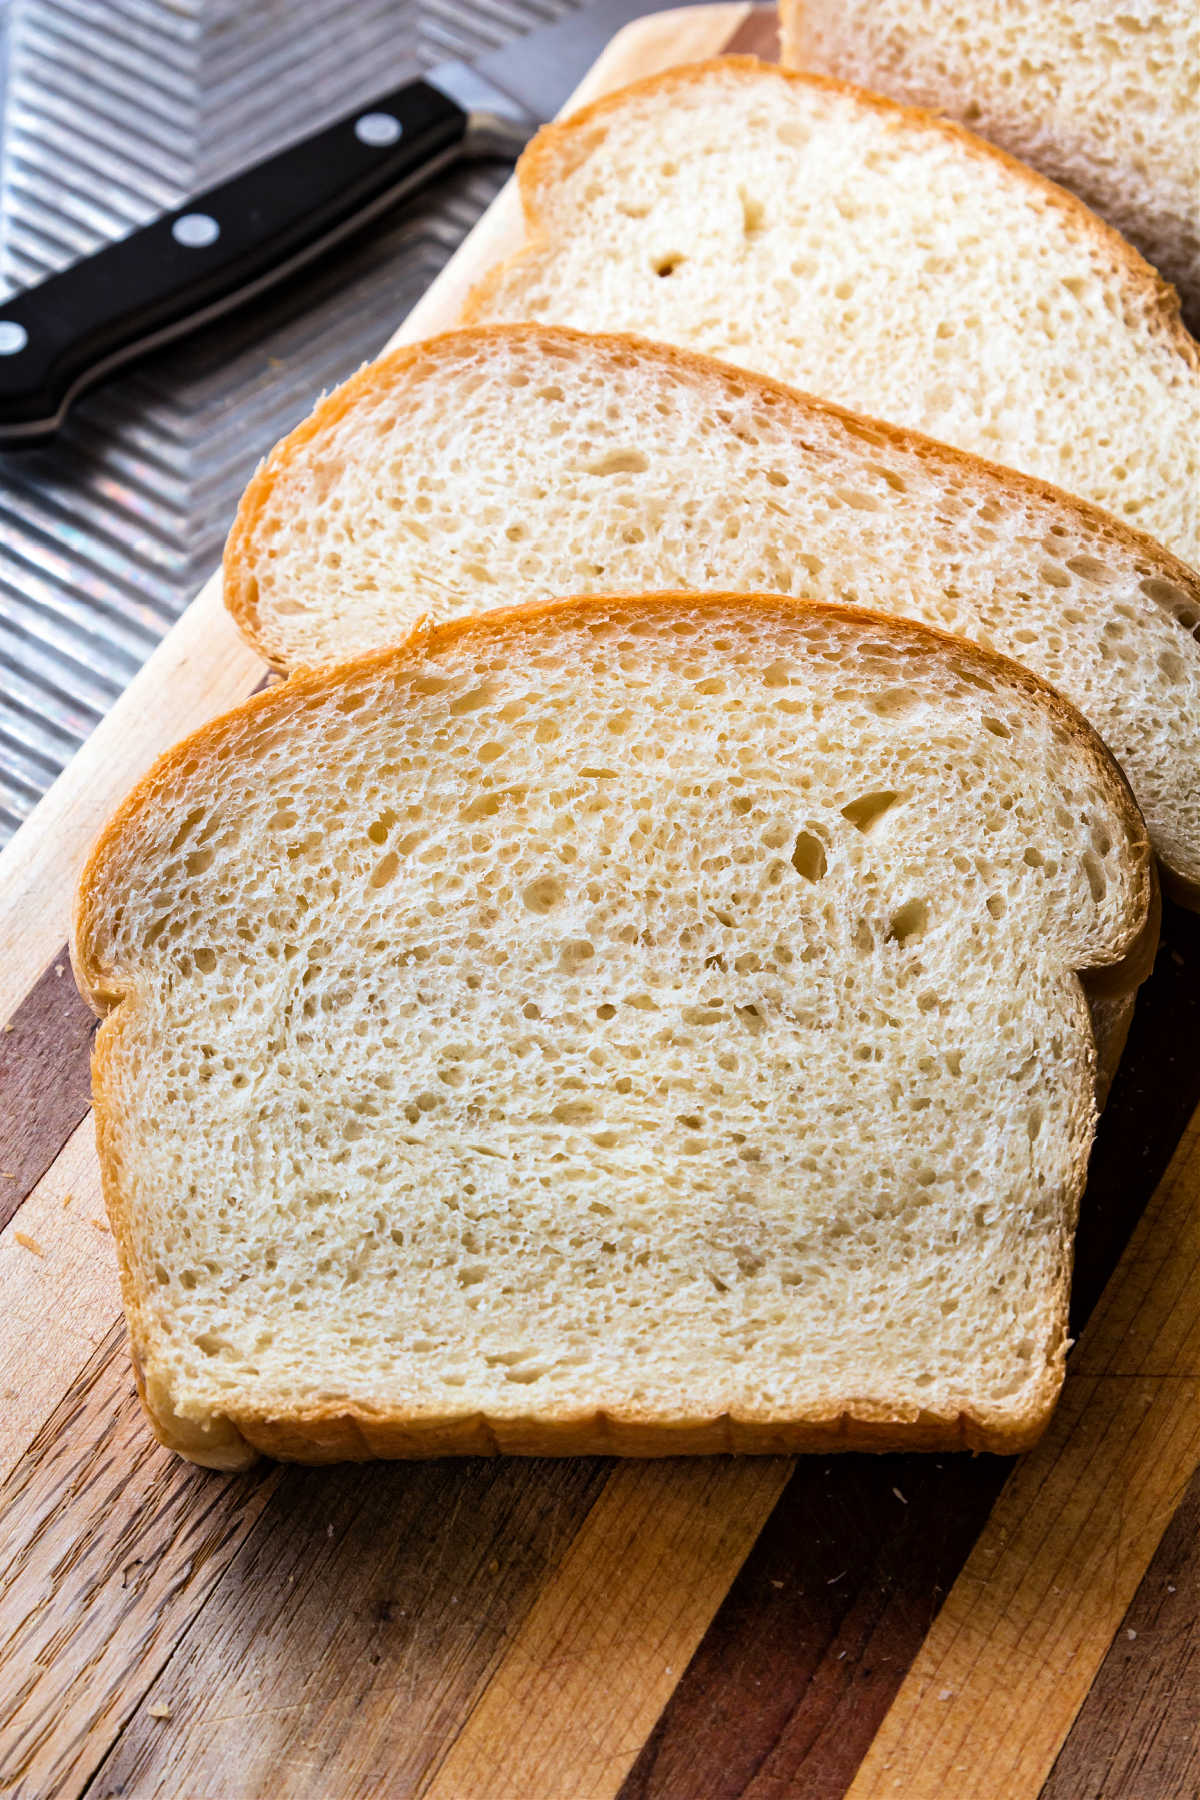
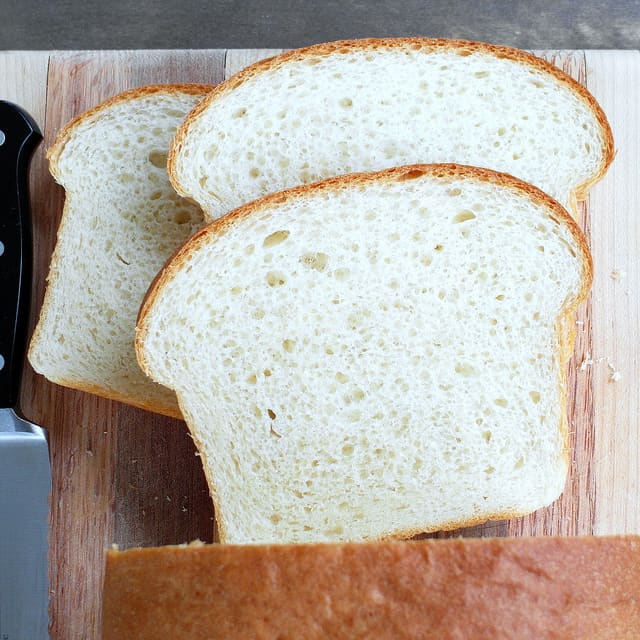
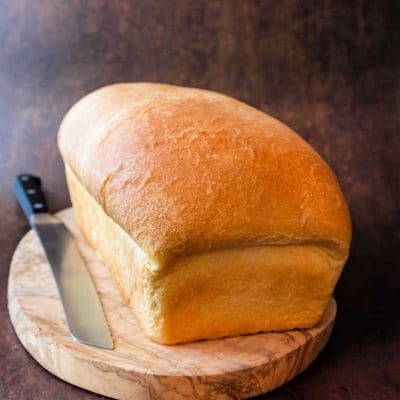
Let me show you how to use the tangzhong method to make pain au lait or milk bread. Tangzhong breads are soft and springy and stay that way for days. This milk bread made using the tangzhong method may be the best sandwich bread ever.
Another way to make bread that has great keeping properties is to make potato bread, so you might want to check that out as well.
For ease of browsing, here are all of my bread and roll recipes in one place. Thanks for visiting!
This is my favorite white bread recipe. Such a good flavor and texture. Worth all of the wait time during the kneading process!
Pinner Laura
Why Make Tangzhong Bread
If you are a fan of soft, springy sandwich bread, I’m pretty sure you can’t beat the Tangzhong method.
If you’re looking for hearty, chewy bread, this ain’t it, but seriously, you may never encounter a softer or sweeter white bread.
When I need a bread, butter, and sugar sandwich, this is the bread I use.
The Tangzhong gives this bread great keeping qualities, too.
This bread is for you if you like:
- Soft white bread
- Have a kiddo who will only eat white bread
- Can’t eat an entire loaf of bread in a day and don’t want to freeze it
- Bread with great keeping qualities without any artificial conditioners or additives
- Perfect toast, because this loaf toasts like a dream
What Is The Tangzhong Method
Tangzhong, or water roux, is a Japanese technique that was popularized in Asian countries by a Chinese cookbook author Yvonne Chen in a book called the 65°C Bread Doctor.
The method involves cooking a portion of the flour with a portion of the liquid in the recipe until the flour gelatinizes (thickens).
Then, this “roux” is added back to the rest of the ingredients.
Once I read about the method, I knew I wanted to try it. I put it forth on twitter that I was going to give it a go.
The supremely talented Stella, of BraveTart (more recently with Serious Eats), told me that she had used the method, which she learned in a Japanese bakery in Kentucky believe it or not, to develop a very special “kid bread” for her upcoming cookbook.
Incidentally, you can now grab a copy of the fantastic BraveTart: Iconic American Desserts at your favorite book store or through Amazon where you’ll find her recipe for “Wonder Bread” along with the best chocolate chip cookies anywhere.
What is Tangzhong?
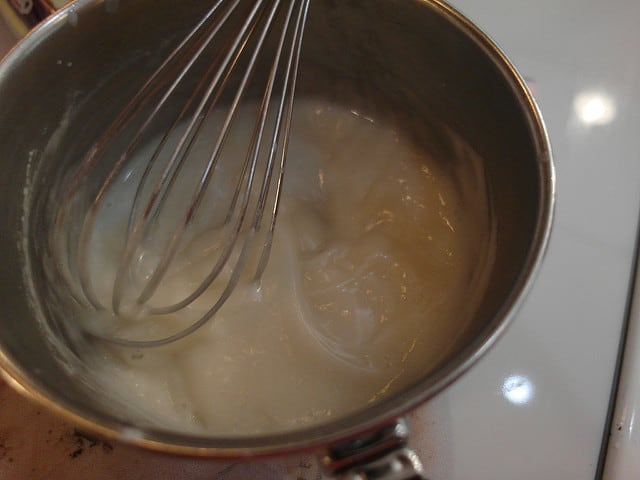
Tangzhong, or water roux, is a mixture of 1 part flour to 5 parts water, by weight, that you stir and cook until the starches in the flour gelatinize and the mixture thickens. This magically happens at 150°F, or 65°C.
After covering and cooling to warm, you simply add this tangzhong into your recipe.
Because the Tangzhong is made up of both flour and water, the two most abundant ingredients in bread making, it is added in place of a portion of the flour and water in your formula, not in addition to.
The amount of flour you use in the Tangzhong can vary from 5%-12% of the total amount of flour.
Once you’ve settled on the amount of flour, simply multiply the weight of the flour by five, and that’s the amount of water you’ll need. Easy.
How To Do The Math
Let’s say your original recipe calls for 10 oz of flour (for easy math purposes) and 7 oz of water and you want to substitute tangzhong for 10% (again, for easy math purposes) of the total weight of the flour:
- 10 oz x 10% = 1 oz
- 1 oz x 5 = 5 oz
This leaves you 9 ounces of “loose flour” (10 oz – 1 oz) and 2 ounces of “loose water” (7 oz – 5 oz).
Whisk together the 1 oz of flour and 5 oz of water and cook to 150°F (65ºC), cover and let cool to just warm.
Add the cooled tangzhong to your remaining flour and liquid, yeast and salt and continue with your bread recipe.
How Tangzhong Helps to Keep Bread Soft
When proteins–in this case, gluten–denature (unravel) in the oven and then cool off, they squeeze moisture out and form a sturdy, dry matrix.
In bread, this is called the crumb.
Crumb is affected by moisture, sugar and fat content as well, but when the moisture wanders off during staling, what is left is the hard protein matrix.
Once starches gelatinize and suck up moisture, which is one of the steps of the baking process: “Gelatinization of starches: 150°F”, they don’t let go of it. Water checks in, but it doesn’t check out.
So when the starch matrix sets up upon cooling, part of its very fabric is water. Unlike proteins which set up into a hard web–think loofah–starches set up more like a damp sponge.
With Tangzhong bread, you’re decreasing the amount of dry protein structure and increasing the amount of moist gelatinized starch structure.
How Does Tangzhong Work?
When it comes to making soft breads with good keeping properties, what good is water with gelatinized starch in it?
Bread is moist largely because of water content. The more water, the moister the bread. The longer the water stays in the bread, the longer the bread stays moist.
When you cook water and flour together until the starch granules swell up, what you’re basically doing is forming a gel in which the starches bind or hold onto the water.
And since the starches are all swelled up and dealing with the water, the proteins in the flour, glutenin and gliadin which normally bond to create gluten, are sidelined. So, what you are doing when you add tangzhong to a bread is two things
- you’re introducing a gel into the dough that will hold onto water far longer than in a standard dough and, even though you’re using the same total amount of flour,
- you’re inhibiting some of the gluten from forming, creating a more tender product.
Now, this is not to say that your bread will have less structure. It will just have a protein structure (thank you, gluten) as well as an extra-large portion of starch structure (thanks, Tangzhong).
Pain au Lait with the Tangzhong Method
Once I figured out the basics of the method, I decided to apply them to pain au lait, or milk bread. I thought the sweetness of the bread would work beautifully with the softness the tangzhong would bring.
I modestly declare that I was right.
I’ll talk you through how to make this bread, give you some tips that I hope will be helpful to your success, and share some serving suggestions as well.
As always, if you have questions, you can click the “Email Jenni” button down below a ways and hit me up. I am happy to help!
Ingredients and Substitutions
There are no weird or special ingredients in a Tangzhong loaf of bread.
The tangzhong mixture is made by cooking together a portion of the liquid (water and/or milk) with a portion of the flour until the flour gelatinizes. Let that cool and then add that into your dough.
The Math
For those of you who are interested in such things, I used 7% of the total weight of the flour in the Tangzhong.
Rather than using water, I used milk. So know that you can do that and all will be well.
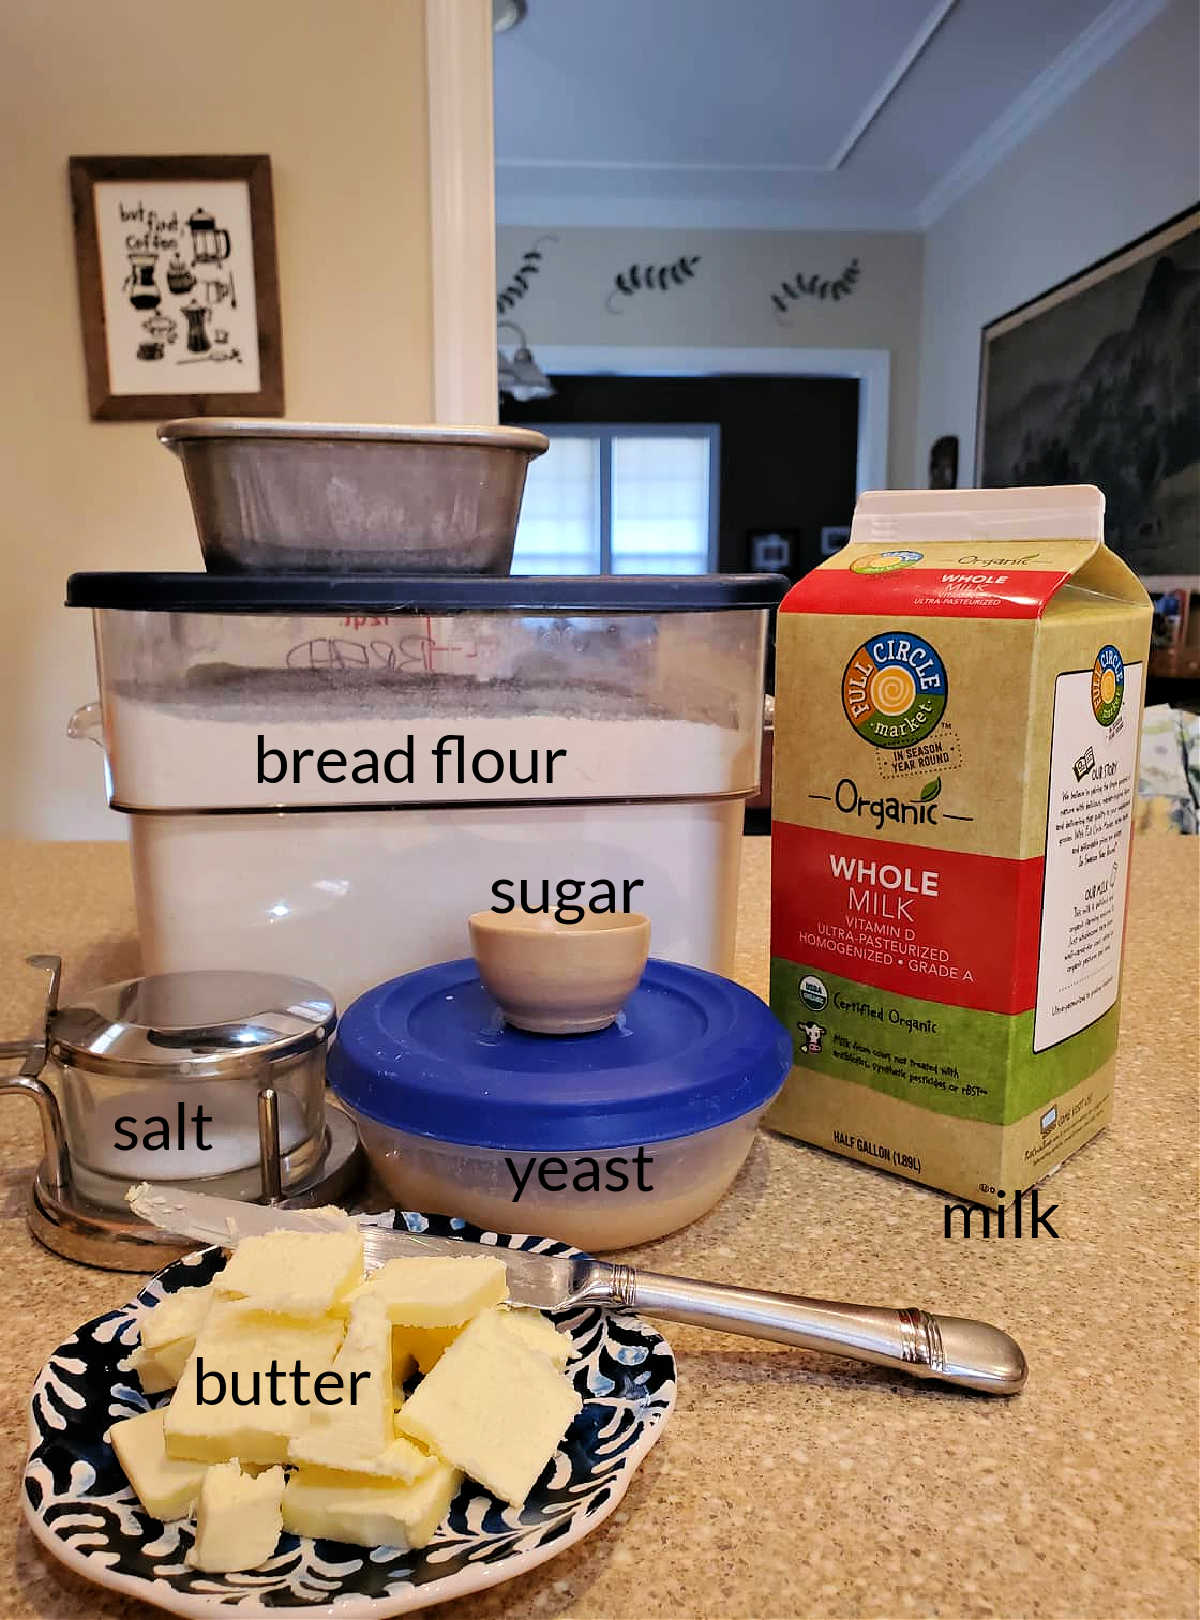
- bread flour: Even though bread flour is used, this loaf isn’t dense and chewy because some of the gluten from the flour is bound up in the roux. Because of this, I recommend sticking with bread flour or at least a higher-gluten all-purpose flour like King Arthur
- milk: I used whole milk. Substitute with 2% or even plant-based milk that doesn’t contain extra thickeners. Note that the bread may not be as sweet since cow milk contains milk sugars
- yeast: I use instant yeast. You may also use active dry yeast. If you do, proof the yeast in a portion of the milk with a teaspoon of the sugar called for. Once it gets foamy, add it to the rest of your ingredients
- salt: Salt adds flavor to the bread as well as helping to control yeast growth so it doesn’t rise too quickly and become “flabby.” Don’t leave it out. I use Morton’s kosher salt.
- sugar: Aside from adding sweetness, sugar also helps tenderize the dough, adds to moistness, and assists in browning. You don’t need much. Between the milk sugars and the table sugar, this bread has a lovely, milky sweetness that works for both sweet and savory sandwiches.
- butter: Fat adds flavor as well as carries other flavors. It also tenderizes the crumb and assists in browning. I use unsalted butter. You can substitute a plant-based butter if you want to make a vegan Tangzhong bread. Note that most plant-based butters are salted, so you will have to cut down on additional salt a bit.
Procedure
- First, you’ll make the tangzhong by whisking together the flour and milk until smooth and then heating until thickened, whisking constantly.
- Add the rest of the milk to cool it down.
- Put it in your mixer bowl and add the rest of the ingredients excep the butter.
- Mix into a shaggy dough, cover the bowl, and let it rest for about 20-30 minutes.
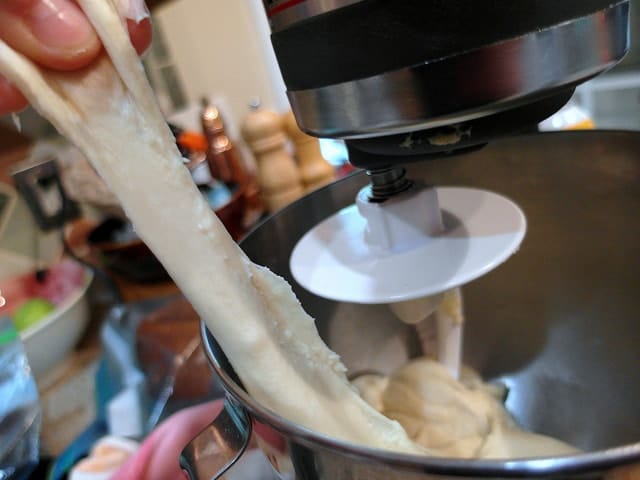
- Knead on medium speed for 10-15 minutes, or until the dough passes the windowpane test.
- Let it rise until doubled.
- Punch down, shape, place it in the pan, and give it another rise.
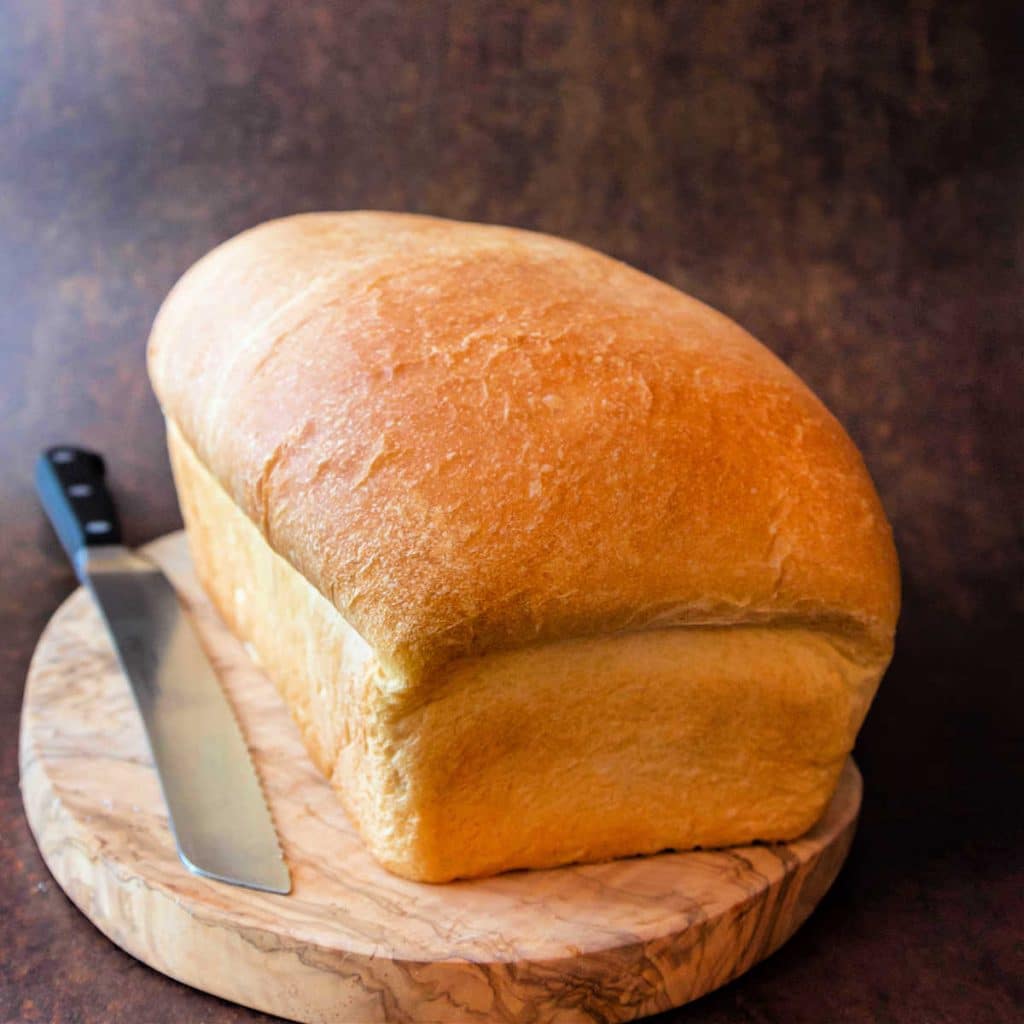
- Bake until golden brown. The internal temperature should be right around 200F.
- Let cool completely before slicing.
Equipment Recommendation
Since some of the proteins that create the gluten structure are tied up in the tangzhong, it takes awhile for the structure to develop.
In other words, this bread takes a lot of kneading.
For that reason, I recommend making this bread in a
I have a 6-quart KitchenAid that I got from Everything Kitchens, and I love it.
I would not recommend you try to knead this dough using a hand mixer with dough hooks.
Other than the mixer, which granted is a big purchase if you don’t already have one, a bench knife is cheap and useful for all kinds of kitchen tasks.
I use one to help shape this dough, to portion dough for my grits bread burger buns, soft pretzels, and pumpkin dinner rolls, and to scrape dough bits and other scraps off the counter.
Lastly, this recipe fits perfectly into a 9″x5″ loaf pan.
Visual How-To
Here is how to fold your letter-folded dough in half and pinch it together into a long log.
And here’s how to get that log of dough into your pan.
Tips for Success
Be patient and make sure your dough is fully developed to get the best results. You’re making bread with less protein in it, so be sure to knead it until it passes the windowpane test.
For a softer top crust, brush the top of the loaf with about a tablespoon of butter as soon as it comes out of the oven.
How Does Tangzhong Affect the Dough?
Since you’re inhibiting some of the gluten from forming, in essence, you’re working with a dough with an overall lower protein content. And the lower the protein content, the wetter the dough.
High protein flour absorbs more water than low protein flour. This stands to reason since more protein means it needs more water to activate the gluten. And remember, we’ve already made an end run around 5-10% of the gluten by gelatinizing that flour instead.
In short, expect your tangzhong dough to be a bit stickier than standard bread dough.
This type of dough requires a lot more kneading to develop the proteins remaining so your dough stretches the way it needs to. It needs to be kneaded. A lot.
Q & A for the Method and the Bread
Yes. I found reference to rice flour tang zhong and corn flour (corn starch) tangzhong here on Samayalarai: Cooking is Divine. I have not tried either method, but since, in the case of the wheat flour, the gluten is taken out of the equation leaving only gelatinized starches, it is my guess that there would be very little difference in the texture of the end products.
Yes. Jeanine asked this question of me the other day. I was able to find a delightful looking Gluten Free Japanese Milk Bread by Nicole on Gluten Free on a Shoestring through a thread on The Fresh Loaf.
I would say a qualified yes to this if a)the properties that Tangzhong brings (longer keeping, soft and springy texture, overall lower gluten) are what you’re looking for and b)you realize that you might need to do some tweaking of your formulas to get them to turn out the way you want. For instance, when using other flours that naturally contain less (or no) gluten—rye and oat come to mind—further reducing the gluten by binding up some of your wheat flour in a gel might not give you enough lift. Also, as some mixed flour dough tends to be sticky to begin with, you may end up with soup. So again, I give a qualified yes to this one.
Here’s a link to Swathi’s (Zesty South Indian Kitchen) Rye Bread made with Tangzhong post.
Most of what I have read about Tangzhong is pretty specific. 1:5 is it. But, Stella’s formula calls for a cooked flour starter at a 1:2 ratio: 3oz flour and 6oz water. The resulting water roux has the consistency of mashed potatoes whereas Tangzhong is more akin to pancake batter in texture.
There is always more than one way to skin a cat, and I found reference to several water roux type starters at Shoon Yin’s Recipes, all made a bit differently and all with different ratios of flour to water.
The short answer is yes. Make the starter, spread it out on a plate or put it in a bowl, cover it with plastic wrap and refrigerate up to one day ahead. I would not try to keep it any longer than that as you might start getting some wild yeast fermentation, ending up with more of a sourdough than a true tangzhong bread. Bring the starter back to room temperature before proceeding with your recipe.
If you leave the loaf whole and cut only what you need, the bread should stay soft for up to 4 days out at room temperature. Compare that to standard bread recipes that are really best the day you make them.
Even though it has a longer shelf-life than a standard loaf, if you can’t eat all the bread within 4 days, slice it and freeze it in a zip-top freezer bag (or bags). Press out as much air as you can before sealing. Your bread will stay nice and fresh for as long as 6 months. Thaw at room temperature, or take out frozen slices as needed and thaw in the microwave for a few seconds before using.
Other Tangzhong Bread Recipes
Here are a few other recipes from my site and around the web. The Saffron Bread is lovely, and do check out the other recipes too. You’ll see how versatile this method is. Enjoy!
- Cornish Saffron Bread is a sweetly perfumed Easter bread you might enjoy making
- Tangzhong Whole Wheat and Rye Bread A heartier and more complex loaf than my Tangzhong bread
- Cinnamon Currant Tangzhong Bread Perfect for toasting for breakfast or brunch!
- Hokkaido Milk Bread A classic Japanese bread that gets its tenderness and gossamer crumb from the shaping method as well as the Tangzhong
Questions
Serving Suggestions
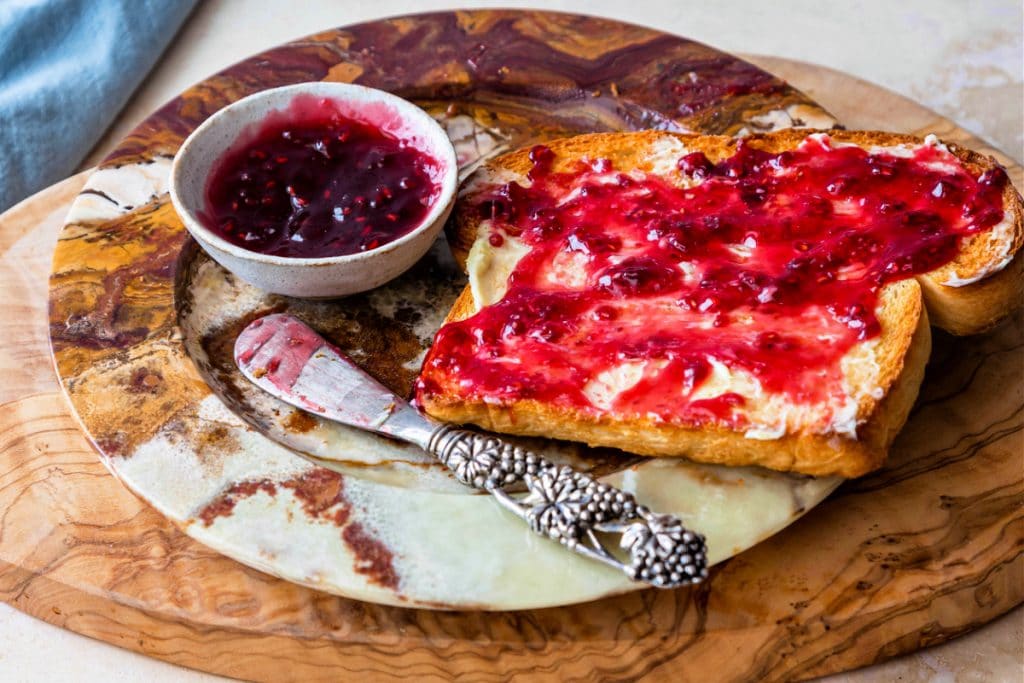
Obviously, you have to make toast with butter and jam! Might I suggest my mixed berry jam or fig jam?
Make a great BLT sandwich. Or pile on some coronation chicken salad.
You can also use it for bread crumbs to top gratins or bread chicken. It would also be a great addition to a meatloaf like this chorizo meatloaf or an old-fashioned beef meatloaf.
A Note About Measurements
NOTE: Most of my recipes are written by weight and not volume, even the liquids.
Even though I try to provide you with volume measurements as well, I encourage you to buy a kitchen scale for ease of measuring, accuracy, and consistency. Especially for bread since volume measurements of flour can vary widely
This is the scale I use, love, and recommend:

Don't let its small price and small size fool you. The Escali Primo is an accurate and easy-to-use food scale that I have used for years. It's easy to store, easy to use, has a tare function, and easily switches between grams and ounces/pounds for accurate measurements.
It will help me and other readers so much if you take a moment to rate and leave a review for this recipe.
You can use the stars to rate 1-5 (5 is best), and leave a review in the comments. It helps me make adjustments if any are needed, and comments help others decide whether the recipe is worth making.
Other ways to share include pinning, and/or sharing on your favorite social media platform.
Thank you so much for taking the time!

Pain au Lait using Tangzhong method
Ingredients
For the Tangzhong
- 6 oz whole milk
- 1.2 oz bread flour
For the Dough
- All the Tangzhong
- 6 oz . whole milk
- 15.8 oz bread flour
- 4 teaspoons granulated sugar
- 1 ¼ teaspoons active dry yeast (from a batch of yeast you know is alive and kicking)
- 1 ⅛ teaspoon 7 grams kosher salt (picky, but there you have it), (I used Morton’s)
- 3.25 oz butter cut into small pieces and allowed to get very soft
Instructions
For the Tangzhong
- Whisk together the flour and milk.
- Once there are no lumps remaining, cook over medium heat, whisking constantly, until the mixture has evenly thickened and is nice and smooth.
- Remove from the heat and…
For the Bread
- pour the 6 oz of milk into the Tangzhong, whisking until smooth. This will lower the temperature so you don't have to wait before continuing.
- To your mixing bowl, add all the tangzhong/milk mixture and all the rest of the ingredients except for the butter.
- With the dough hook, mix on low speed for one minute, or until the dough just comes together. There might be some loose flour in the bowl, but don't worry about it. It will get incorporated in the next step when you add the butter.
- Cover the mixer bowl with a lint-free towel (you can leave the bowl on the mixer) and let rest for 30 minutes. This rest (autolyse) allows some gluten to form before you even start kneading.
- After the rest, turn the mixer on medium-low speed and add the butter in several additions over the course of about three minutes. By the time the butter is incorporated, you should have a nice, slightly sticky dough.
- Turn the mixer on medium speed and knead for 10 minutes.
- Test the dough to see if it is smooth and stretchy and passes the windowpane test.
- If not, knead an additional 5 minutes and check again.
- Once the dough passes the windowpane test, gather it into a smooth ball, plop it back into the mixer bowl and spray with pan spray. Cover the bowl with a lint-free towel.
- Boil a mug of water in the microwave, move it to one side, and let the dough hang out in the moist, warm microwave until doubled, about an hour or so.
- Once the dough has doubled, turn it out onto a clean work surface–no flour. Lightly press the dough into a rough 9" square.
Shaping
- Fold the dough into thirds like a letter. Then, fold it in half–it will seem an impossible task, but just start at one side and sort of push the dough down in the center of your letter fold and pinch the top and bottom edges together. Keep doing this all the way down the length of your dough. Now you will have a fat cylinder of dough about a foot long.
- Roll the dough over (smooth side up) and hold it like a bowed up slinky.
- Fit the dough into a pan-sprayed 9"x5" loaf pan so the slinky's ends are down in the bottom of the pan. Then press the dough down a bit to even it out and allow it to sit snugly in the pan.
- Heat the mug of water for another minute or so, and spray the top of the loaf with pan spray.
- Cover with plastic wrap and place back in the cozy microwave with its little mug friend.
- Go ahead and set a rack in the center of the oven and preheat to 350F.
- Let the loaf rise until it has not quite doubled in size–it will probably rise about an inch or so above the lip of the loaf pan. This will take about 30-45 minutes.
- Once the dough has risen nicely, place in the preheated oven and bake until the loaf is a deep golden brown. It doesn't need any egg wash or anything. The loaf should sound hollow when tapped and the internal temperature will be between 205F and 210F.
- Tip the bread out of the pan and onto a wire rack to cool. Let cool at least an hour if you can. If you can't, I'll understand. Your bread will have a better texture if you let it cool first, though. Hot bread sort of turns to mush in your mouth since the starches need to cool down to about 140F to solidify. Cutting too soon can result in smooshed and smooshy bread.
- Store at room temperature in an airtight container for 3-4 days. For longer storage, pre-slice, wrap well and freeze. Pull out slices as needed and leave the rest frozen.
Did You Make Any Changes?
Notes
Nutrition

Hi, y’all! I hope you’ve enjoyed this post and hopefully also learned a thing or two.
If you like my style, I invite you to sign up for my occasional newsletter, The Inbox Pastry Chef.
Expect updates on new and tasty recipes as well as a bit of behind-the-scenes action. I hope to see you there!
Thanks for spending a (large) part of your day with me, and have a lovely day.


Dee says
I have trouble getting the flour and water/milk lump free. Would it work just as well if I combined melted butter and flour, mix them together and then added the water/milk? Much like making a white sauce.
Jennifer Field says
I’ve not tried it that way, but it sounds promising. Still, I’ve never had the lumps issue before. Make sure to whisk the milk and flour together while cold and then heat them together to avoid lumps.
Kimmy says
Hi! Have you read the tangzhong blog on King Arthur website? The author stated that when you use tangzhong you should up the hydration of dough recipe to 75%. Have you tried this or have you found that not necessary? A lot of sweet dough recipe I see has very low hydration of 55-60%. I’m thinking of using tangzhong for it.
Jennifer Field says
Hey, Kimmy. This is a really good question. Yes, I have read that post, but in my experience, I didn’t find it necessary to add extra liquid. I just did the math to use what I needed in the tangzhong and added the rest directly to the dough. I don’t think it’s a bad idea to up the hydration, regardless. Many breads benefit from additional liquid, often because people just tend to err on the side of too dry a dough because of the stickiness factor. Tangzhong doughs are, by nature, more sticky than traditional dough, so upping the liquid by a bit more will just make it stickier. On the plus side, your mixer is your friend here, as are oiled hands. I tend to make breads with hydration of at least 65% or so (usually), so I can’t see that upping that to 75% would be a problem as long as you know what to expect, stickiness-wise. Hope that helps!
Nena lim says
Hi Jennie
I have done this tangzhong technique and encounter small holes on the surface of the dough, does it mean the dough is not kneaded enough , it is very sticky and hard to shape
Thanks
Nena
Jennifer Field says
Tangzhong dough, because less gluten can form, is by nature very sticky. It also benefits from a long knead or a combination of kneading (by machine) for a few minutes and resting the dough for 20-30 minutes in between. Once it is smooth it will still be somewhat sticky, so oil your hands in order to shape it with minimal sticking. I hope that helps!
J Rose says
Just got into baking bread during this pandemic! I am absolutely possessed! What a great explanation and directions of tangzhong method! Thank you so much for sharing. You have me feeling, “This cornbread and tortilla girl in South Texas can do this!”
Jennifer Field says
Yes you can, J Rose!! It’s a great method! I have more recently begun exploring adding other gelatinized starches to bread as a “short cut tangzhong method,” because I believe adding cooked potato to bread dough is pretty much the same and cooking some of the flour and water together. They both serve the same purpose. And if you’re a cornbread and tortilla girl, keep an eye out. I’m going to have a loaf up on the blog soon that starts with cooked grits! Super good! Take care and stay safe, and thank you for commenting. Let me know how your adventures in tangzhong go! 🙂
Suzette says
Hi there, I just found you and your site while looking up good soft sandwich bread and love your energy and style. Thank you for the awesome recipe, also, I heard of this method for baking bread but thought it was just for milk bread. I was wondering if you heard of the Yudane method which uses much more of the flour and boiling water added to the flour, letting it cool then refrigerate four 4 hours before making the bread. I found out about this method here https://www.thebreadshebakes.com/2019/03/homemade-japanese-milk-bread-loaf-recipe-shokupan/ she has a very good explanation of the two methods.
Jennifer Field says
I haven’t, but I will be reading this post. Thank you! I’m so glad you stopped in to say howdy and to teach me something!
Bianca says
Hi there, I have a general question about tangzhong. Is there any benefit of letting it sit overnight in the fridge? I found recipes that ask for that whereas others just tell you to let it cool down completely and then use it (after maybe a couple hours max).
Does a long resting period change the flavor or does it in any way change the outcome? I can not find an answer to that anywhere but maybe you know?
Thanks!
Jennifer Field says
Hey Bianca. I would say that there is minimal benefit. I do not know the answer to your question For Sure, but the tangzhong is fully gelatinized on the stove, so no need to let it sit in the fridge overnight for hydration purposes. And the gelatinization keeps the proteins from forming gluten, so no need for it to hang out for gluten to develop either. I usually just wait until the mixture is at room temp. Hope this helps!
Anonymous says
John Dickey says
I have come to the Tangzhong technique even later, just last fall actually. Fascinating!
Your article on this is very helpful and explains the science (the why) behind the process. I also found some very good information on the King Arthur Flour website (https://blog.kingarthurflour.com/2018/03/26/introduction-to-tangzhong/ and related/linked articles). They did a study that brings up an important point to consider, hydration level. Their study shows needing a certain hydration level to get the best benefit of the Tangzhong technique.
Your example using a Pain au Lait recipe gave you a head start since it already had a 70% hydration. That reduced the math and fiddling with the recipe. Other breads will need adjustments.
I would agree that your initial blandness of the first loaf was just the substitution of water for some of the milk. I have had exactly that result in experiments. Some breads need that milk. Water doesn’t do it for certain loaves.
Tangzhong has certainly improved several of my breads. It softens rye blends. It seems to help increase the overall and useful life of the finished bread, staying moist and soft much longer rather than turning stale and hard in a very short period of time. This gives storage options and increases the applause from tasters.
I’m not sure yet how it is affecting the size of the holes in the crumb. I’ll need to do some loaves without rye in them to check that. Rye tends to stay low and small.
Using sourdough starter in a dough with a Tangzhong approach does work deliciously too.
While it is usually best to give a dough plenty of time (but not too much!) to rise slowly and develop more flavor, sometimes one does not have that luxury. Your separate mug boil and then snuggle it with the dough approach is one way to speed things up. I have been using another one lately called No-Time Bread: https://www.thekitchn.com/easier-no-knead-bread-in-a-hurry-40653 (one example). This does involve microwaving the actual dough in a microwave-safe bowl with a damp cloth on top. But it does speed up the process when necessary. So many paths.
Thank you for a very informative and helpful article. Sharing discoveries helps us all improve.
Jennifer Field says
Hi, John, and thank you so much for this comment and the links to further resources! So much to know, we all should be learning all the time! Here’s another nugget I’ve picked up along the way: a friend of mine uses Tangzhong with gluten-free breads, believe it or not, and she has had excellent results. It’s a great technique to have in your back pocket.
I have read the KA article about adding additional liquid for some of the formulas, and I believe Stella Parks has also addressed this in a Serious Eats column (I think). I have never had the issue, but you could be right. It could be that I’m already starting with a bread with a pretty high hydration. And I guess it stands to reason that with a “firmer” dough/lower hydration, having a certain percentage bound up with the starch would necessitate additional liquid to actually activate the gluten in the remainder of the flour and allow us to end up with a workable dough that has enough “give” to actually rise.
Thanks again, for taking the time to comment. Will have to give sourdough a go at some point, too!
Jan Mowbray says
Hi. I made this bread today and I have to say your directions are excellent, though I did have a bit of a problem with that last fold. However, I made it work. The last rise probably took about an hour. After the dough ingredients are all incorporated it’s very similar to making artisanal bread – the way the dough stretches, the windowpane check, forming the loaf, etc. I’ve been making bread for about 50 years and am always looking for different methods, types of bread. I usually make sourdough so I may incorporate the tangzhong method in that. Thanks for introducing this bread and making this recipe/method easy.
Jennifer Field says
Thanks so much for commenting, Jan! Glad you made it work–that’s what it’s all about! Glad I could help expand your bread making repertoire! It’s such a cool technique and makes such a difference in softness and keepability. I hope you end up enjoying many, many more loaves. I have a gluten free baking friend who even uses the method with gluten free breads, so the technique is applicable across almost any bread you can imagine. Have fun!
Beth Lee says
Holy moly. that was a lot of work to write this post! I’m thinking the actual bread making is way easier. And now I want a pb&j sandwich!
Jennifer Field says
LOL, yes, I promise it’s way easier to make the bread than it is to read the post! And this is a great choice for a PB&J! 🙂
Ron says
Are you aware that your photos all disappeared?
Jennifer Field says
No, but I do now! Thanks for letting me know–I will see if I can find them and re-appear them. In the meantime, I hope you try the bread. 🙂
Seriously, I appreciate the heads up!
Wendy says
I know this comment comes late but I made this last night and it is very bland. Not enough salt. In bread baking, salt plays two roles, taste and strengthening the gluten. Also, if you are using an autolyze it should be ~before~ the salt is added.
Jennifer Field says
Thanks for your comment. I agree that there is relatively little salt in this dough. That is because I was more interested in making an excellent sandwich bread that would take a back seat to all the ingredients you’d put on a sandwich. For just “straight up” eating, perhaps more salt would be in order. As to the rest, you do as you see fit and as your training/education has taught you. Personally, I love the final outcome, but to each his own. Sorry you didn’t love the loaf. Next time, feel free to apply bakers’ percentages and add your preferred amount of salt. Again, thank you for stopping in.
Eberhard says
Why don’t you people use grams – it would make everything so much easier ,,,,,,,,,,,,,,,,,,,,,,,,,,,,,,,,,,,,,,
Jennifer Field says
You people? Nice. Thanks for visiting, and you can change all my ounce weights to grams on your scale.
Joel says
What lovely, pillowy bread you’ve created! I can’t wait to try it! My passion this year (okay, my obsession) is my new bread maker, and your recipe looks like it could be easily adapted for one. Make the tangzhon on the stove, through every thing into the bread maker and let it do all the work on the dough cycle, do the final proof and bake it in the oven (I just bought a Pullman bread pan for the only purpose of making those lovely, perfectly square Japanese loaves that they use for “butter jam toast” that is ubiquitous in Japanese kissaten.
The dough.cycle on my bread machine runs 1 1/2 hours, and the schedule breaks down thus:
Knead 1: 12 minutes
Rest: 5 minutes
Knead 2: 8 minutes
Rise 2: 25 minutes
(My manual says there’s no stir down, but I’ve noticed about a 1 minute stir down after rise 2)
Rise 3: 40 minutes
Do you think this schedule is compatible with your recipe? Or, alternately, I could just use the mix cycle and turn the machine off for the rises.
Thank you for including the baker’s percentages! I’m just starting to tackle ratios, and it’s so helpful to see them in recipes (or formulas, if you prefer).
Jennifer Field says
I have never used a bread machine before, so I honestly don’t know how well the formula translates to the machine. But the rising times sound reasonable. If I remember correctly, the rise time is relatively brief, so my vote is to go for it. And enjoy your new bread machine! Also, do let me know how it goes, Joel. =)
Joel says
I’m not sure if the bread machine worked or not, but the resulting bread soft, moist and delicious. It was not quite the crumb that I remember Japanese shokupan had (the shokupan was denser).
I first converted your recipe to metric (it’s easier for us math-challenged bakers), then developed the formula and scaled it for 1 1/2 lb bread machine. There actually wasn’t much scaling to do. If you like, I could email you a link to the final result (I hesitate to post it here, as I’ve been reprimanded before for self-promotion. I’d be happy to, though, with your permission.
I thought the amount of butter to be obscene! It made the dough so oily and wet that it was difficult to work. I wondered adding just a tad more flour might make it more pliable? Maybe flour the board? I only ask because I’d love to use to make rolls, but at this consistency, I don’t think my feeble shaping abilities would be up to the task.
The rise was a bit scary too! But it all worked out. Oh, I did get a “bubble” on the top of the loaf. Didn’t affect the taste, though. And the coffee cup in the microwave is genius!
Jennifer Field says
You are welcome to post your results here. I don’t consider it self promotion at all if it furthers the conversation. You’re welcome to cut back some on the butter. I wouldn’t necessarily add more flour since that can impede rise and dry things out, but if you’re looking for a tighter crumb anyway, that might be the ticket. On the other hand, less butter would allow for a stronger gluten structure so maybe that would solve all your problems in one fell swoop! Keep me posted, and Happy New Year! Thanks Joel!
Joel says
Happy New Year to you and yours too! May the New Year find you happy, healthy, and prosperous, and may your kitchen be filled with enticing, alluring aromas all year long!
Here’s the link to the recipe I adapted for the bread machine from yours. I’d be eternally grateful if you’d take a quick look when you have a moment, and offer any suggestions or tweaks. https://tinyurl.com/yb3wqqv6
Carol says
This is a great explanation of tangzhong. Thank you. Now I have more questions. I started using this method a few years ago when trying (and failing) to get those soft, pillowy cinnamon rolls from my kitchen. The success of this technique made my day! However, I wanted more. Of course . I tried a butter and flour roux and other fats as well, And I now like the fat better than water and milk. So now I don’t know how that goes with the explaination. The amount of water in butter isn’t enough and there isn’t any water in oil. Do you know? Thanks
Jennifer Field says
Very interesting about the fat+flour! I’d love to see the formula you’re using! An off the cuff thought: the fat would coat that amount of flour and tke all of that gluten out of the equation, leaving nothing but “tenderness” in the roux.
cristina says
Hi Jennifer,
Thank you for the message you sent me, I will definitely try this method. I think i will be hanging around here in your website. Reading and trying some of your technique in making breads and baking cakes. I love how you explain things and site example. Keep up the good work. My God bless you always.
Regards,
Cristina from Maldives
Jennifer Field says
Thanks so much, Cristina! I’m glad you’re here, and I’ll always try to help if I can!
Farha says
Hi,
Awesome post! Will this work the same when baked in a 9 inch by 5 inch pullman pan. Your recipe says in step 11 ‘Let the rise until it has not quite doubled in size–it will probably rise about an inch or so above the lip of the loaf pan. This will take about 30-45 minutes.’ In the pullman pan will it not overflow?
Hoping you will guide here! Thanks!
Jennifer Field says
Hey, Farha. I don’t bake in closed pans, but if you are used to baking in a Pullman pan, use the amount of dough that you would for your regular Pullman loaves. What I would do is adapt your tried and true Pullman recipe to the Tangzhong method–the post shows you how–and that way you’ll be working with a known quantity of dough. If you want to use my recipe as written, you will have to go through a bit of trial and error. Hope that helps!
Caleb says
Excellent recipe. I’ve been making sandwich bread but wanted a reliable tangzhong recipe.
I don’t have an electric mixer so I will attempt to do this by hand. Any adjustments to the kneading times? Anything I should be aware of when making this by hand? Thanks in advance!
Jennifer Field says
Oil up your hands frequently since this dough is really, really sticky. Oil your kneading surface too. I’d give the dough a good 30 min rest before kneading, go for 5 minutes, let it rest again and go 5 more. By hand, I wouldn’t be surprised if actual hands on kneading takes about 20 minutes. You could probably cut down on this some by kneading for a total of 10 or so and then resting it in the fridge overnight. Shape from cold but then let come up to room temp and then double before baking. I hope that helps. I’ve never tried to do Tangzhong by hand because of the stickiness factor, but a good autolyse and an overnight in the fridge should help you out. Let me know how it goes!
Caleb says
Thanks for your reply Jennifer!
I actually made this twice before you replied. The dough really wasn’t that sticky and I didn’t need to oil my hands or anything… Sticky dough would be like some of the super-hydrated no-knead doughs. Am I doing anything wrong? I didn’t do the overnight fridge rest, but I can try that the next time I do it.
The last two times the bread turned out really good… but I dunno, it wasn’t anything like those fluffy things sold in bakeries here in Hong Kong. Just wondering, will the recipe work if I replace the milk with water and butter with olive oil?
Thanks!!
Jennifer Field says
I’ve never had the “real deal” in Hong Kong, Caleb, so I honestly don’t know how these loaves stack up against them. Yes, you can absolutely sub water and oil for the milk and butter. It’s certainly worth a try! Wish I could be more helpful, but since I’ve not had the type of bread you’re trying to replicate, I’m really not sure. You may want to check on the forums at thefreshloaf.com. Those folks are extremely helpful. Good luck!
Cat says
Thank you for sharing the method of mixing the bread ingredients. Tried a couple of recipes but none was as thorough as yours thus leading to sticky dough and failed bakes. haha. Thank you for that and now I get to eat delicious bread fresh from my oven.
Jennifer Field says
I am so glad, Cat! I wanted to make sure to add enough detail so that folks could use the Tangzhong method with any of their favorite bread recipes. I must say, this white bread recipe is hard to beat for good, old-fashioned white sandwich bread!
Rosalind says
Can I substitute table salt for kosher salt for tangzhong bread. Thanks
Jennifer Field says
Good question, Rosalind. Yes you can, but reduce the amount by about 25%. If you have unionized salt, that would be even better, or use a fine sea salt. There are a couple of brands available at the “refular” grocery stores here right by the table salt that you can get.
Kelli says
I wanted to thank you so much for posting this recipe! It’s our favorite! My husbands request when I started making bread is that he would like it to be like store bought. At first I was insulted, but what he meant is that he wanted a light fluffy bread. This has met all expectations! I have changed it up a bit. I use this method for everything, from honey wheat to foccia, we love it! It comes out perfect everytime. I get requests for bringing bread all the time. Thanks again for posting
Jennifer Field says
I am so thrilled you like it, Kelli! I use the method for other types of breads myself. I’m so glad you’re adapt it to your needs! Continue to enjoy soft, springy bread, and have a very Happy New Year!
Kelli says
I wated to give the recipe 5 stars but it wouldn’t let me. I just wanted everyone to know I find this recipe worthy of 5 stars
Jennifer Field says
Sorry it wouldn’t let you rate it, Kelli, but I’m thrilled you want to give it 5 stars. It’s totally the thought that counts! =)
dave says
great article.
a few questions:
i love italian boules and french baguette bread.
is it possible to do with this method?
suppose the recipe for the artisan/italian bread asks for a temp of 450
or higher than the tangzhong bakes at 350 as in this recipe which one to pick?
is the temp lower due to the gelitanization and therefore cooks faster?
also i notice that the bread dosent seem scored which is done with italian breads and boules and rolls.
is that not recommended for breads with this method?
and lastly, for the sake of experimentation with texture, flavor and color would it be ok to use both water and milk or should it allways be water or milk
i appreciate all your help.
dave.
Jennifer Field says
Great questions all, Dave.
Yes, you can use this method with almost any sort of bread, even gluten free. Just subtract the amounts you’re using in the tangzhong from the total amounts of flour and liquid. Starches gelatinize at relatively low temperatures (about 155F) so any baking temperature from 325 on up will give you the benefits of tangzhong. I baked this at a lower temp just because I wanted a soft sandwich bread with a relatively soft crust. Baking hot should not be an issue, I wouldn’t think. As to the scoring, you can shape and score your dough however you want. The reason I didn’t score mine was because I wanted a sandwich loaf. I would absolutely encourage you to use a mixture of both water and milk in any proportions to play with color. I would think the more milk you use, the darker the crust. I don’t think there is any chemical reason not to mix water and milk in the tangzhong. I hope this helps. And if you want to get super deep into Tangzhong, check out the tangzhong/water roux threads in the forums over on The Fresh Loaf. I am sure most of those folks have more experience than I do w/this method. =) http://www.thefreshloaf.com/search/node/tangzhong
Tabatha says
I just made this recipe today. AMAZING! I’m a beginner at baking bread, but the instructions were easy enough for me to understand that I did it.
Lovely lovely bread! Thank you so much for this recipe!
Jennifer Field says
I am thrilled that you love it, Tabatha! You *must* make a grilled cheese and a pb&j, stat! =)
krystal says
I just tried this recipe but I think I did something wrong, the dough was very soupy and I couldn’t get it to hold any shape when forming to put it into the bread pan? Once I got it into the bread pan it rose and was dripping down the sides.
Jennifer Field says
Sounds like there was either way too much water or you used a low-protein flour rather than bread flour. Did you weigh all your ingredients? If you can tell me exactly what you did, I can better help you troubleshoot, Krystal. Thanks!
Maggie says
Jenni, I had to let you know that after your post here and then browsing that Fresh Loaf forum you referenced, I decided to use this water roux method for a spelt bread with other whole grains. We all know how diffcult it can be to get boinginess into those types, right?
I used your exact milk roux method to start with (doubling it for two loaves), and then threw every kind of change-up at it imaginable. I used about 3C white bread flour, 3C spelt flour, a cup of whole wheat flour, and 2 or 3 C soaked wheat berries, plus about a cup of whole flax seeds, and a total of about 5 tsp SAF yeast — and the results were fantastic! Great oven spring, high rise, soft sliceable texture, amazing grainy flavor. Can’t wait to try it again with 100% whole grains.
This is a fabulous technique to add to my bread repertoire… thanks so much for bringing it to my attention!
Jennifer Field says
Fantastic!! It really is the most magical method–I’m so glad you love it. And hooray for The Fresh Loaf folks–they make me feel like I know nothing at all. Such a great resource, Maggie!
aisha says
Hi I have a question,can we make this bread using starter,because I have so much starter ,and want to use it.I don’t want to use commercial yeast.Is that possible and if yes how much?
.
Jennifer Field says
You should be able to make it using a starter. As a matter of fact, I think I may have answered a similar question just the other day. Okay I found it. I’m just going to paste my response here: Hi, Donna! Yes, this method is really intriguing, isn’t it?! I’ve really just begun to scratch the surface, but it’s my understanding that you can use tangzhong in conjunction with starters since you’re only looking at dealing with 5%-10% or so of the weight of the flour. The only issue might be in getting that 1:5 ratio, so you’d have to do the math and see if there’s enough “free” water in the formula or if you might have to steal some from the starter, in which case you might want to scale down the flour in the starter as well to keep the ratio the same. I am not sure about the vital wheat gluten, so I will direct you to The Fresh Loaf. There are a ton of discussions in the forum over there about this method and they get deep into the arcane science of it. Try here: http://www.thefreshloaf.com/search/node/tangzhong I think you’ll be able to find your answer there. Thanks so much for stopping in. I appreciate the visit and the comment. =)
Hope that helps, Aisha!
DonnaP says
Aisha, this may help: I finally had a weekend free, and tried it out with the starter and with the vital wheat gluten, plus a couple other things to generate a low-carb fluffy bread (my younger son has T1D, so we carb count everything):
my starter is 100% hydration, and I used http://www.thekitchn.com/recipe-beginner-sourdough-sandwich-loaf-recipes-from-the-kitchn-48192 as a basis for my proportions.
I used 5 oz water and 1 oz mixture of half semolina, half white whole wheat flour for the tangzhong. While that was going, I then weighed out 7 oz water (since I’m using semolina in this I go up on the water a little bit) with 1.5 tsp yeast and mixed. Then I added all the tangzhong, 5 oz bread flour, 2 oz semolina, 4 oz vital wheat gluten 8 oz white whole wheat flour and 1 tbsp sea salt. I mixed it on low in the mixer, then kneaded in the mixer for about 7-8 minutes on 3, then kneaded on the counter until I had a good stretch on the windowpane test (since it’s whole wheat, it doesn’t get as stretchy as white flour). I then put it into a lightly oiled glass bowl and let rise for about 2 hours. Then I cut the dough into 4 pieces and lightly shaped into balls, covered and rested about 10-15 minutes. I then shaped each piece into an oblong, folded in thirds, then folded across the long way. After that, I put them into a large (13″ length) Pullman pan, also lightly oiled, seam side down. I covered the pan with a cloth and let the dough rise about 45-60 minutes, then put the lid on the pan. Oven to 350, and baked about 40 minutes until hollow and internal temp ~200-205.
Totally fluffy, nice crumb, and the best part is this is 10 g carbohydrates per ounce! And my sons like the bread, even better!!!
Jennifer Field says
Wow–win-win all around! Fantastic, and thank you for sharing your procedure, Donna!
Zachary says
Delicious bread! One note, usually when you autolyse you leave the salt out because it inhibits that initial yeast growth!
Jennifer Field says
Good point, Zachary. I generally find that it has minimal impact here, especially when trying to promote a soft, fluffy bread. Either way, this is one fine sammich loaf. Thanks for stopping in and for reading!
DonnaP says
Jenni, two questions: can you make this bread using a starter (levain)? And what about using vital wheat gluten (which I use a lot to decrease carb content in my breads)?
thanks, I have been intrigued by Tangzhong breads.
Jennifer Field says
Hi, Donna! Yes, this method is really intriguing, isn’t it?! I’ve really just begun to scratch the surface, but it’s my understanding that you can use tangzhong in conjunction with starters since you’re only looking at dealing with 5%-10% or so of the weight of the flour. The only issue might be in getting that 1:5 ratio, so you’d have to do the math and see if there’s enough “free” water in the formula or if you might have to steal some from the starter, in which case you might want to scale down the flour in the starter as well to keep the ratio the same. I am not sure about the vital wheat gluten, so I will direct you to The Fresh Loaf. There are a ton of discussions in the forum over there about this method and they get deep into the arcane science of it. Try here: http://www.thefreshloaf.com/search/node/tangzhong I think you’ll be able to find your answer there. Thanks so much for stopping in. I appreciate the visit and the comment. =)
megan says
Hi Jenni! Thanks for this great explanation of tangzhong, and the guidelines on using tangzhong in a recipe. Thanks to your tips about % tangzhong and example for converting a recipe to include tangzhong, I made some nice and soft whole wheat bread!
I am writing a post about it, and linked readers to your site as what I found to be the best explanation of the science being tangzhong (without learning all the Chinese used in Yvonne Chen’s cookbook). Check it out in a few days if you wish!!
BTW Bravetart/Stella is so cool! I am also one of her fans. Please keep writing!
Jennifer Field says
Thank you so much, Megan! Yes, Stella is amazing! =)
So glad you found the post useful, and I really appreciate the link as well! 🙂
Monica Rampo says
Hi Jennifer,
I am Monica from Indonesia.
You know how happy I am that I found your post about tangzhong. Before read your post I just knew that there is a method called tangzhong. And I have tried make bread using this method. But I didn’t know why the recipe call out such amount of tangzhong. Thanks to your explanation. It really helps me understand about this method.
Now I can make my own tangzhong calculation. And I have applied to recipe without tangzhong. And really I feel satisfied about it. The bread came out wonderful, soft and delicious. And the important thing it still soft until next days.
I have shared this method on my blog and mention the source from pastrychefonline and link back to your website.
It is now become popular post on my blog. Good thing. Thanks again Jenni.
Monica
Jennifer Field says
Hooray! I am so glad you found the article helpful! It did its job, too–allowing you to make calculations to use the tangzhong method with any formula you want. I’m so happy! =)
Tracee says
ever tried baking this in a Pullman loaf pan? I have a 2# and a 4#…I assume this one would be a 2#? Just wondering…
Jennifer Field says
I haven’t, but I see no reason you couldn’t to end up with beautiful, square slices and a nice, even crumb!
jessica yee says
The best and most informative…..thank you so much Jennifer! You certainly made baking interestng and easier for a starter in baking like me, and gaining confidence. Thank you for the hardwork!
Jennifer Field says
Thank you so much, Jessica! I’m glad you found the post helpful! Enjoy your bread. =)
Dionne Baldwin says
Thank you for posting a very ton about this! I tried this method awhile back and I just fell in love with it. It was our go-to recipe for a long time and is one of my top 5 faves for sure.
Time to try it again! I will have to try your recipe so I can sink my brain deeper into the method and play with it a little .
Jennifer Field says
It really is a magical method! I won’t always want a really soft loaf, but when I do, I will absolutely default to Tangzhong. Amazing!
Dionne Baldwin says
Thank you for posting a very ton about this! I tried this method awhile back and I just fell in love with it. It was our go-to recipe for a long time and is one of my top 5 faves for sure.
Time to try it again! I will have to try your recipe so I can sink my brain deeper into the method and play with it a little .
Liz says
I know I’ve seen some of my Asian baker friends posting about this method of bread baking…but thanks for the extended explanation. It sounds perfect for my family…who doesn’t love a moist, homemade sandwich loaf?! Instead of doing the calculating involved in altering a favorite recipe, I think yours will be the first I try!
PS…thanks for the kind words on my blog. They mean a ton coming from such a marvelous baker like you!
Jennifer Field says
I read so many blog posts in doing research for this post, but none really adequately explained to me why the method works. I figured that I would write as if I were my audience, answering all the questions that I would ask. And did ask. Now I have confused myself! lol
I’m glad you appreciate the explanation. I like to know *how,* but I’m always more interested in *why!* =)
Chitrangada says
Thanks a lot for such an informative post. It answered many doubts I had about tangzhong. Will definitely try this method of bread making, thanks to you.
Jennifer Field says
This method certainly has *my* wholehearted approval, Chitrangada! I do hope you give it a try and that you enjoy the results as much as I have!
Kate Richards Bruski says
This was a great post and interesting recipe. Will try it.
Jennifer Field says
Hey thanks, Kate! Glad you enjoyed it–do give this method a try. It makes such soft, springy bread=)
suzyQ says
Your bread looks like Arnold or Pepperidge Farm white, allowing of course that you used quality ingredients, not the dreck found in commerical products. I think you’ve cracked the “secret code” for mass produced bread.
Jennifer Field says
I am really so amazed by the tangzhong method–what fantastic results! I don’t necessarily always want my bread to be soft and pillowy, but for sandwiches, it’s just about perfect. Great way to extend the shelf life a bit without having to resort to, as you put it, dreck. Thanks for stopping in and for your comment, SuzyQ!
Swathi says
Amazing post Jenni, you nailed every nuke and corner of Tangzong method. I love this method because it makes even rye bread soft. The loaf is perfect and toast is delicious. I am going to pin it
Jennifer Field says
Thank you so much, Swathi! I agree with you–what an amazing (and really easy to do) technique. I can see using it in all sorts of baked goods that I don’t want to have to freeze right away. And the rye bread in your post looked spectacular. I was glad to be able to link to it!
Karen @ Karen's Kitchen Stories says
Such an informative read! I’ve enjoyed making bread using this method and love how it stays fresh for so long. Now I have a better understanding =) Your bread looks great. Now I know I don’t have to do the fancy folding and shaping (although I love how it looks). Thanks Jenni!
Jennifer Field says
I like the fancy folding and shaping, too. It is really pretty, but I wanted to make sure that all my slices would work for sandwiches! Having those smaller “balls” all in the pan together might do something to the crumb, though. I’m thinking it might elongate it as the dough won’t only rise but each ball will press up against the others, forcing themselves higher and higher. I will give the traditional shaping a whirl soon, especially because I have sandwich bread coming out of my ears now, Karen! lol
MrsJennyK says
oooooh nyum nyum nyum…. I can’t wait to try it Jenni! Thanks for taking on the terrible, terrible task of testing and eating all of that bread for us, your beloved fans. I know it was tough on you 😉
Jennifer Field says
Thank you for recognizing my sacrifice, Jenny! lol =)
Brooks says
Jenni, when you first started talking/tweeting/posting/teasing about this method I knew I had to try it. But I’m going to hold off on this project until I’m in the new kitchen. Like you, Stella is a powerhouse of skill and the two of you leave me absolutely inspired. This is a well-written and researched post with photographs to back it up. Brava!
Jennifer Field says
Brooks, I think you’ll love this method! And it takes fairly little time, at least for Stella’s and my bread. Forcing the rise in a warm, moist microwave allows primary to happen in about an hour w/a second rise only taking 30-45 minutes. I will have to try it with a slower rise, maybe even refrigerated for awhile, just to see how the flavors develop, but I really like the mild, milkiness of this for sandwiches. =)